AEG Electrolux ESL68071R Benutzerhandbuch
- Kategorie
- Geschirrspüler
- Typ
- Benutzerhandbuch

user manual
benutzerinformation
Dishwasher
Geschirrspüler
ESL 68071

Electrolux. Thinking of you.
Share more of our thinking at www.electrolux.com
CONTENTS
Safety information 2
Product description 5
Control panel 5
Use of the appliance 7
Setting the water softener 8
Use of dishwasher salt 8
Use of detergent and rinse aid 9
Multitab function 10
Loading cutlery and dishes 10
Select and start a washing programme
11
Washing programmes 12
Care and cleaning 13
What to do if… 13
Technical data 15
Environment concerns 16
Subject to change without notice
SAFETY INFORMATION
Before the installation and use, read this
manual carefully:
• For your safety and the safety of your prop-
erty.
• To help the environment.
• For the correct operation of the appliance.
Always keep these instructions with the ap-
pliance also if you move or give it to a differ-
ent person.
The manufacturer is not responsible if an in-
correct installation and use causes damage.
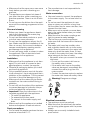
Children and vulnerable persons safety
• Do not let persons, children included,
with reduced physical sensory, reduced
mental functions or lack of experience
and knowledge to use the appliance.
They must have supervision or instruction
for the operation of the appliance by a per-
son who is responsible for their safety.
• Keep all packaging away from children.
There is the risk of suffocation or injury.
• Keep all detergents in a safe area. Do not
let the children touch the detergents.
• Keep children and pets away from the ap-
pliance when the door is open.
General safety
• Do not change the specifications of this
appliance. There is the risk of injury and
damage to the appliance.
• Obey the safety instructions from the de-
tergent manufacturer to prevent burns to
eyes, mouth and throat.
• Do not drink the water from the appli-
ance. Particles of detergent can stay in
your appliance.
• Do not keep the appliance door open with-
out supervision. This to prevent injury and
to fall on an open door.
• Do not sit or stand on the open door.
Use
• The appliance is only for domestic use.
Do not use the appliance for other uses
to prevent injury to persons and damage
to property.
• Only use the appliance to clean accesso-
ries that are applicable for dishwashers.
• Do not put flammable products or items
that are wet with flammable products in,
near or on the appliance. Risk of explo-
sion or fire.
• Put the knives and all items with sharp
points in the cutlery basket with their
points down. If not, put in a horizontal po-
sition in the upper basket or in the knife
basket. (Not all models have the knife bas-
ket).
• Use only specified products for dishwash-
ers (detergent, salt, rinse aid).
• Types of salt that are not specified for dish-
washers can cause damage to the water
softener.
• Fill the appliance with salt before you
start a washing programme. Remaining
salt in the appliance can cause corrosion
or make a hole in the bottom of the appli-
ance.
• Do not fill the rinse aid dispenser with oth-
er products than the rinse aid, (dishwash-
er cleaning agent, liquid detergent). This
can cause damage to the appliance.
2 electrolux

• Make sure that the spray arms can move
freely before you start a washing pro-
gramme.
• The appliance can release hot steam if
you open the door while a washing pro-
gramme operates. There is a risk of skin
burns.
• Do not remove the dishes from the appli-
ance until the washing programme is com-
pleted.
Care and cleaning
• Before you clean the appliance, deacti-
vate it and disconnect the mains plug
from the mains socket.
• Do not use flammable products or prod-
ucts that can cause corrosion.
• Do not use the appliance without the fil-
ters. Make sure that the installation of the
filters is correct. An incorrect installation
causes unsatisfactory washing results
and damage to the appliance.
• Do not use spray water or steam to clean
the appliance. Risk of electrical shock
and damage to the appliance.
Installation
• Make sure that the appliance is not dam-
aged. Do not install or connect a dam-
aged appliance, contact the supplier.
• Remove all packaging before you install
and use the appliance.
• Only a qualified person must do the elec-
trical connection, the plumbing and the in-
stallation of the appliance. This to prevent
the risks of structural damage or injury.
• Make sure that the mains plug is discon-
nected from the mains socket during in-
stallation.
• Do not drill into the sides of the appliance
to prevent damage to hydraulic compo-
nents and electrical components.
• Important! Obey the instructions in the
template supplied with the appliance:
– To install the appliance.
– To assemble the door panel.
– To connect to the water supply and
drain.
• Make sure that the appliance is installed
below and adjacent to safe structures.
Frost precautions
• Do not install the appliance where the tem-
perature is less than 0 °C.
• The manufacturer is not responsible for
frost damage.
Water connection
• Use new hoses to connect the appliance
to the water supply. Do not use used ho-
ses.
• Do not connect the appliance to new
pipes or pipes not used for a long time.
Let the water flow for some minutes, then
connect the inlet hose.
• Make sure not to squash or cause dam-
age to the water hoses when you install
the appliance.
• Make sure that the water couplings are
tight to prevent a water leakage.
• The first time you use the appliance,
make sure that the hoses do not have wa-
ter leaks.
• The water inlet hose has a safety valve
and a double sheath with an inner mains
cable. There is pressure in the water inlet
hose only when the water flows. If there
is a leak in the water inlet hose, the safety
valve interrupts the flow of water.
– Be careful when you connect the water
inlet hose:
– Do not put the water inlet hose or
the safety valve in water.
– If the water inlet hose or the safety
valve are damaged, immediately dis-
connect the mains plug from the
mains socket.
– Contact the service centre to replace
the water inlet hose with safety valve.
Warning! Dangerous voltage.
Electrical connection
• The appliance must be earthed.
• Make sure that the electrical information
on the rating plate agrees with the power
supply.
• Always use a correctly installed shock-
proof socket.
electrolux 3

• Do not use multiple plugs and extension
cables. There is a risk of fire.
• Do not replace or change the mains ca-
ble. Contact the service centre.
• Make sure not to squash or cause dam-
age to the mains plug and cable behind
the appliance.
• Make sure that there is access to the
mains plug after the installation.
• Do not pull the mains cable to disconnect
the appliance. Always pull the mains plug.
Internal lamp
This appliance has an internal lamp that
comes on when you open the door and
goes off when the door is closed.
Warning! Visible led radiation, do not
look directly into the beam.
The LED of the lamp is CLASS 2 and
agrees with IEC 60825-1: 1993 + A1:1997
+ A2:2001.
Emission wave length: 450 nm
Maximum emitted power: 548 μW
To replace the internal lamp, contact
the service centre.
Disconnect the mains plug from the
mains socket before the replacement
of the internal lamp.
Service centre
• Only a qualified person can repair or work
on the appliance. Contact the service cen-
tre.
• Use only original spare parts.
To discard the appliance
• To prevent the risk of injury or damage:
– Disconnect the mains plug from the
mains socket.
– Cut off the mains cable and discard it.
– Remove the door catch. This prevents
children or pets to be closed in the ap-
pliance. There is a risk of suffocation.
– Discard the appliance at the local
waste disposal centre.
Warning! The dishwasher
detergents are dangerous and can
cause corrosion !
• If an accident occurs with these de-
tergents, contact immediately a physi-
cian.
• If the detergent gets into the mouth,
contact immediately a physician.
• If the detergent gets into the eyes,
contact immediately a physician and
clean the eyes with water.
• Keep dishwasher detergents in a
safe area and out of children touch.
• Do not keep the appliance door
open when there is detergent in the
detergent dispenser.
• Fill the detergent dispenser only be-
fore you start a washing programme.
4 electrolux

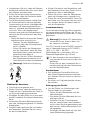
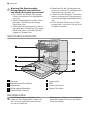
PRODUCT DESCRIPTION
1
2
3
4
5
6
7
8
9
1 Upper basket
2 Water hardness dial
3 Salt container
4 Detergent dispenser
5 Rinse aid dispenser
6 Rating plate
7 Filters
8 Lower spray arm
9 Upper spray arm
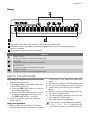
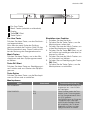
CONTROL PANEL
The controls are on the top on the con-
trol panel. To operate with the controls,
keep the appliance door ajar.
Messages in the display and acoustic
signals help you to operate with the ap-
pliance.
1
2
3
4
5
1 On/off button
2 Menu buttons (up and down)
3 Display
4 OK /Start button
5 Option button
On/off button
Press this button to activate or deactivate
the appliance.
After ten minutes from the end of the wash-
ing programme, the Auto Off function auto-
matically deactivates the appliance. This
helps to decrease energy consumption.
electrolux 5

Menu buttons
Press these buttons to go through the
menu option and the menu washing pro-
grammes.
OK /Start button
Press this button to confirm a function and
to start a washing programme.
Option button
Press this button to open and close the
menu option.
Setting a function
1. Activate the appliance.
2. Press the Option button to open the
menu option.
3. Press one of the menu buttons to go
through the menu option.
4.
Press the OK /Start button to confirm a
function or open the submenu.
5. Press one of the menu buttons to go
through the submenu.
6. Press the OK /Start button to confirm.
7. Press the Option button to close the
menu option.
Menu option
Menu Submenu Description of the function
DELAY START You can delay the start of the
washing programme from 1 to
24 hours.
SAVE ENERGY ON
OFF
This function decreases the
temperature in the drying
phase. The power consump-
tion decreases by 25%.
The dishes can be wet at the
end of the programme when
you open the appliance door.
We recommend that you keep
the door ajar and let the dishes
dry.
MULTITAB ON
OFF
If you use the combi detergent
tablets ('3 in 1', '4 in 1', '5 in
1'), use the multitab function.
Refer to 'Multitab function'.
SETTINGS LANGUAGE ENGLISH
(Different languages are availa-
ble).
You can set the language of
the messages in the display.
WATER HARDNESS
(10 levels are available).
You can adjust the level of the
water softener. Refer to 'Set-
ting the water softener'.
Factory setting: 5.
RINSE AID You can activate the rinse aid
dispenser. This function is avail-
able only when the multitab
function is on.
SOUND VOLUME You can adjust the volume of
all the audible signals.
5 levels are available.
Level 0 = volume off.
BRIGHTNESS
(10 levels are available).
You can change the intensity of
the display.
10 levels are available.
Factory setting: 10.
6 electrolux

Display
1 The status bars show the status of the washing programme.
2 This area shows messages, washing programmes, functions and washing pro-
gramme phases.
3 This area shows the function symbols.
Symbols
DELAY START
It comes on when you activate the delay start.
MULTITAB
It comes on when you activate the function.
SAVE ENERGY
It comes on when you activate the function.
SOUND VOLUME
It comes on when the acoustic signals are off.
USE OF THE APPLIANCE
Activating the appliance for the first time
1. Activate the appliance.
2. The display shows the default language:
LANGUAGE ENGLISH.
• Press the OK /Start button to confirm
the default language
• Press one of the menu buttons to set
a different language and then press
the OK /Start button to confirm.
3. Press the Option button to close the
menu option.
Using the appliance
1. Be sure that the set level of the water
softener agrees with the water hardness
in your area. If not, adjust the water soft-
ener.
2. Fill the salt container with dishwasher salt.
3. Fill the rinse aid dispenser with rinse aid.
4. Load cutlery and dishes into the appli-
ance.
5. Set the correct washing programme for
the type of load and soil.
6. Fill the detergent dispenser with the cor-
rect quantity of detergent.
7. Start the washing programme.
If you use the combi detergent tablets
('3 in 1', '4 in 1', '5 in 1'), use the multi-
tab function. Refer to 'Multitab function'.
electrolux 7

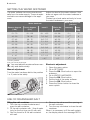
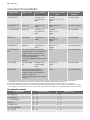
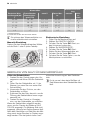
SETTING THE WATER SOFTENER
The water softener removes minerals and
salts from the water supply. These minerals
and salts can cause damage to the appli-
ance.
Adjust the level of the water softener if this
does not agree with the water hardness in
your area.
Contact your local water authority to know
the water hardness in your area.
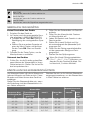
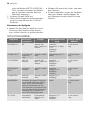
Water hardness
Water hardness ad-
justment
German degrees
(°dH)
French degrees
(TH°)
mmol/l Clarke de-
grees
manually elec-
troni-
cally
51 - 70 91 - 125 9,1 - 12,5 64 - 88
2
1)
10
43 - 50 76 - 90 7,6 - 9,0 53 - 63
2
1)
9
37 - 42 65 - 75 6,5 - 7,5 46 - 52
2
1)
8
29 - 36 51 - 64 5,1 - 6,4 36 - 45
2
1)
7
23 - 28 40 - 50 4,0 - 5,0 28 - 35
2
1)
6
19 - 22 33 - 39 3,3 - 3,9 23 - 27
2
1)
5
1)
15 - 18 26 - 32 2,6 - 3,2 18 - 22 1 4
11 - 14 19 - 25 1,9 - 2,5 13 - 17 1 3
4 - 10 7 - 18 0,7 - 1,8 5 - 12 1 2
< 4 < 7 < 0,7 < 5
1
2)
1
2)
1) Factory position.
2) Do not use salt at this level.
You must adjust the water softener man-
ually and electronically.
Manual adjustment
Turn the water hardness dial to the position
1 or 2 (refer to the table).
Electronic adjustment
1. Open the menu option.
2. Go to SETTINGS .
3.
Press the OK /Start button to open the
submenu.
4. Go to WATER HARDNESS .
5. Press the OK /Start button.
6. Set the level of the water softener.
7.
Press the OK /Start button.
8. Press the Option button to close the
menu option.
USE OF DISHWASHER SALT
Filling the salt container
1. Turn the cap counterclockwise and
open the salt container.
2. Fill the salt container with 1 litre of water
(only for the first time you fill with salt).
3. Use the funnel to fill the salt container
with salt.
4. Remove the salt around the opening of
the salt container.
5. Turn the cap clockwise to close the salt
container.
When it is necessary to fill the salt contain-
er, the display shows the message REFILL
8 electrolux

SALT . The message does not show while a
washing programme operates.
After you fill the salt container, the display
can continue to show the message for
some hours. This does not have an unwan-
ted effect on the operation of the appliance
It is correct that water comes out from
the salt container when you fill it with salt.
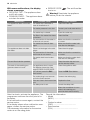
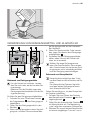
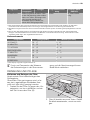
USE OF DETERGENT AND RINSE AID
20
30
M
A
X
1
2
3
4
+
-
1
2
3
4
5
6
7
Use of detergent
To help the environment, do not use
more than the correct quantity of deter-
gent.
Obey the instructions on the detergent
packaging.
How to fill the detergent dispenser:
1.
Press the release button
2
to open the
lid
7
of the detergent dispenser.
2.
Put the detergent in the dispenser
1
.
3. If the washing programme has a pre-
wash phase, put a small quantity of de-
tergent on the inner part of the appli-
ance door.
4. If you use the detergent tablets, put the
tablet in the detergent dispenser
1
.
5. Close the detergent dispenser. Press
the lid until it locks into position.
Use long washing programmes when
you use the detergent tablets. These
cannot fully dissolve with short washing
programmes and can decrease the
washing results.
Use of rinse aid
Rinse aid makes it possible to dry the
dishes without streaks and stains.
The rinse aid dispenser automatically
adds rinse aid during the last rinsing
phase.
Do these steps to fill the rinse aid dispenser:
1.
Press the release button
6
to open the
lid
5
of the rinse aid dispenser.
2.
Fill the rinse aid dispenser
3
with rinse
aid. The mark 'max' shows the maxi-
mum level.
3. Remove the spilled rinse aid with an ab-
sorbent cloth to prevent too much foam
during the washing programme.
4. Close the rinse aid dispenser. Press the
lid until it locks into position.
When it is necessary to fill the rinse aid dis-
penser, the display shows the message RE-
FILL RINSE AID . The message does not
show while a washing programme operates.
electrolux 9

Adjust the rinse aid dosage
Factory set: position 3.
You can set the rinse aid dosage between
position 1 (lowest dosage) and position 4
(highest dosage).
Turn the rinse aid selector
4
to increase or
decrease the dosage.
MULTITAB FUNCTION
The multitab function is for combi detergent
tablets.
These tablets contain agents as detergent,
rinse aid and dishwasher salt. Some types
of tablets can contain other agents.
Be sure that these tablets are applicable for
the water hardness in your area (refer to the
instructions on the packaging of the prod-
ucts).
The multitab function deactivates the flow
of rinse aid and salt.
The multitab function deactivates the salt
and the rinse aid messages.
The programme duration can increase if
you use the multitab function.
Activate or deactivate the multitab func-
tion before the start of a washing pro-
gramme. You cannot activate or deacti-
vate the function when a washing pro-
gramme operates.
To activate the multitab function
1. Open the menu option.
2. Go to MULTITAB and activate the multi-
tab function.
• When you activate the multitab func-
tion, it stays on until you deactivate it.
3. Press the OK /Start button.
4. Press the Option button to close the
menu option.
To deactivate the multitab function and
use separately detergent, salt and rinse
aid
1. Open the menu option.
2. Go to MULTITAB and deactivate the mul-
titab function.
3. Press the OK /Start button.
4. Press the Option button to close the
menu option.
5. Fill the salt container and the rinse aid
dispenser.
6. Adjust the water hardness to the highest
level.
7. Start a washing programme without
dishes.
8. When the washing programme is com-
pleted, adjust the water softener to the
water hardness in your area.
9. Adjust the quantity of rinse aid.
LOADING CUTLERY AND DISHES
Refer to the leaflet 'Examples of Real-
Life loads'.
Hints and tips
• Do not put in the appliance items that
can absorb water (sponges, household
cloths).
• Remove the remaining food from the
items.
• Make soft the remaining burned food on
the items.
• Put hollow items (cups, glasses and
pans) with the opening down.
• Make sure that water does not collect in
containers or in bowls.
• Make sure that cutlery and dishes do not
bond together.
• Make sure that the glasses do not touch
other glasses.
• Put small items in the cutlery basket.
• Mix the spoons with other cutlery to pre-
vent them to bond together.
• When you put the items in the baskets,
make sure that the water can touch all sur-
faces.
• Put light items in the upper basket. Make
sure that the items do not move.
• Water droplets can collect on plastic
items and non-stick pans.
10 electrolux

SELECT AND START A WASHING PROGRAMME
Starting the washing programme
without delay start
1. Activate the appliance.
2. Set the washing programme and func-
tions.
3. Press the OK /Start button.
4. Close the appliance door. The washing
programme starts automatically.
Starting the washing programme with
delay start
Set the delay start before you set a
washing programme.
1. Activate the appliance.
2. Open the menu option and go to DE-
LAY START .
3. Set the number of hours for the delay
start.
4.
Press the OK /Start button.
5. Press the Option button to close the
menu option.
6. Set the washing programme.
7. Close the appliance door. The count-
down of the delay start starts automati-
cally.
• When the countdown of the delay
start is completed, the washing pro-
gramme starts automatically.
The opening of the appliance door inter-
rupts the countdown of the delay start.
When you close the door, the count-
down continues from the point of inter-
ruption.
Cancelling the delay start
If the delay start has not started, you can
change the selection.
To change the selection while the delay
start operates, it is necessary to cancel the
delay start. When you cancel a delay start,
this automatically cancels the washing pro-
gramme.
1. Press and hold the Option button and
the OK /Start button at the same time.
2. Release the buttons when the display
shows the message CONFIRM CAN-
CEL ? .
3. Press the OK /Start button to confirm.
• Delay start and washing programme
are cancelled. The display shows the
message CHOOSE PROGRAMME .
Interruption of a washing programme
• Open the appliance door.
– The washing programme stops.
• Close the appliance door.
– The washing programme continues
from the point of interruption.
Cancelling the washing programme
If the washing programme has not started,
you can change the selection.
To change the selection while the washing
programme operates, it is necessary to can-
cel the programme.
1. Press and hold the Option button and
the OK /Start button at the same time.
2. Release the buttons when the display
shows the message CONFIRM CAN-
CEL ? .
3. Press the OK /Start button to confirm.
Make sure that there is detergent in the de-
tergent dispenser before you start a new
washing programme.
End of the washing programme
When the washing programme is comple-
ted, an intermittent acoustic signal sounds.
1. Open the appliance door.
• The display shows the message PRO-
GRAMME END and the message
PLEASE SWITCH OFF . (If the salt con-
tainer and/or the rinse aid dispenser
are empty, the salt and/or rinse aid
messages replace the message
PLEASE SWITCH OFF ).
2. Deactivate the appliance.
3. For better drying results, keep the appli-
ance door ajar for some minutes.
Remove the items from the baskets
• Let the dishes become cold before you re-
move them from the appliance. Hot
dishes can be easily damaged.
• First remove the items from the lower bas-
ket, then from the upper basket.
• There can be water on the sides and on
the door of the appliance. Stainless steel
becomes cool more quickly than the
dishes.
electrolux 11

WASHING PROGRAMMES
Programme Type of soil Type of load Programme descrip-
tion
SAVE ENERGY
function
AUTOMATIC
1)
All Crockery, cut-
lery, pots and
pans
Prewash
Wash 45 °C or 70 °C
Rinses
Dry
Yes, with effect.
30 MINUTES
2)
Fresh soil Crockery and
cutlery
Main wash 60 °C
Rinse
Yes, without effect.
70° INTENSIVE Heavy soil Crockery, cut-
lery, pots and
pans
Prewash
Wash 70 °C
Rinses
Dry
Yes, with effect.
ENERGY
3)
Normal soil Crockery and
cutlery
Prewash
Wash 50 °C
Rinses
Dry
Yes, with effect.
50 MINUTES Light soil Crockery and
cutlery
Wash 55 °C
Rinses
Yes, without effect.
PLATE WARM-
ER
Use this programme to quickly
rinse the dishes. This prevents the
remaining food to bond on the
dishes and bad odours to come
out from the appliance.
Do not use detergent with this pro-
gramme.
Rinse Yes, without effect.
45° GLASS Normal or light
soil
Delicate crock-
ery and glass-
ware
Wash 45 °C
Rinses
Dry
Yes, with effect.
PREWASH This programme makes the
dishes warm before use or re-
moves the dust from dishes not
used for a long time.
Do not use detergent with this pro-
gramme.
Rinse Yes, without effect.
1) The appliance senses the type of soil and the quantity of items in the baskets. It automatically adjusts the
temperature and quantity of the water, the energy consumption and the programme time.
2) With this programme you can wash a load with fresh soil. It gives good washing results in a short time.
3) This is the standard programme for test institutes. With this programme you have the most efficient use of water
and energy consumption for crockery and cutlery with normal soil. Refer to the supplied leaflet for test information.
Consumption values
Programme
1)
Energy (kWh) Water (litre)
AUTOMATIC 0,9 - 1,7 8 - 15
30 MINUTES 1,0 - 1,2 10 - 11
70° INTENSIVE 1,4 - 1,5 13 - 14
ENERGY 0,9 - 1,0 9 - 11
50 MINUTES 1,0 - 1,2 10 - 11
PLATE WARMER 0,8 4
45° GLASS 0,8 - 0,9 11 - 12
12 electrolux

Programme
1)
Energy (kWh) Water (litre)
PREWASH 0,1 4
1) The display shows the programme time.
The water pressure and temperature,
the variations of the mains supply and
the quantity of dishes can change the
consumption values.
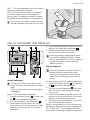
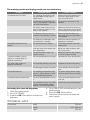
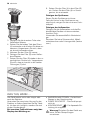
CARE AND CLEANING
To remove and clean the filters
Dirty filters decrease the washing results.
Although the maintenance is very low with
these filters, make a check at intervals and
if necessary, clean them.
1. Turn the filter (A) counterclockwise and
remove it out from filter (B).
A
B
2. Filter (A) has two parts. To disassemble
the filter, pull them apart.
3. Fully clean the parts with water.
4. Put the two parts of the filter (A) togeth-
er and push. Make sure that they assem-
ble correctly in each other.
5. Remove the filter (B).
6. Fully clean the filter (B) with water.
7. Put the filter (B) to its initial position.
Make sure that it assembles correctly in
the two guides (C).
C
8. Put the filter (A) into position in filter (B).
Turn the filter (A) clockwise until it locks.
To clean the spray arms
Do not remove the spray arms.
If the holes in the spray arms become clog-
ged, remove remaining parts of soil with a
thin pointed object.
To clean the external surfaces
Clean the external surfaces of the appliance
and control panel with a moist soft cloth.
Only use neutral detergents.
Do not use abrasive products, abrasive
cleaning pads or solvents (acetone).
WHAT TO DO IF…
The start of the appliance does not occur or
it stops during operation.
First try to find a solution to the problem (re-
fer to the table). If not, contact the service
centre.
electrolux 13

With some malfunctions, the display
shows a message:
• OPEN THE TAP - The appliance does
not fill with water
• DRAIN BLOCKED - The appliance does
not drain the water
•
SERVICE CODE
- The anti-flood de-
vice is on.
Warning! Deactivate the appliance
before you do the checks.
Malfunction Possible cause Possible solution
The appliance does not fill with
water.
The water tap is blocked or
there is limescale on it.
Clean the water tap.
The water pressure is too low. Contact your local water author-
ity.
The water tap is closed. Open the water tap.
The filter in the water inlet hose
is blocked.
Clean the filter.
The connection of the water in-
let hose is not correct.
Make sure that the connection
is correct.
The water inlet hose is dam-
aged.
Make sure that the water inlet
hose has no damages.
The appliance does not drain
the water.
There is a blockage in the sink
spigot.
Clean the sink spigot.
The connection of the water
drain hose is not correct.
Make sure that the connection
is correct.
The water drain hose is dam-
aged.
Make sure that the water drain
hose has no damages.
The anti-flood device operates. Close the water tap and con-
tact the service centre.
The start of the washing pro-
gramme does not occur.
The appliance door is open.
The display shows the mes-
sage PLEASE CLOSE DOOR .
Close the appliance door.
You did not press the OK /
Start button.
Press the OK /Start button.
The mains plug is not connec-
ted in the mains socket.
Connect the mains plug.
Blow out fuse in the house fuse
box.
Replace the fuse.
The delay start is set. Cancel the delay start.
When the countdown is com-
pleted, the washing pro-
gramme starts automatically.
After the check, activate the appliance. The
programme continues from the point of in-
terruption.
If the malfunction occurs again, contact the
service centre.
If the display shows other malfunction mes-
sages, contact the service centre.
The necessary information for the service
centre is on the rating plate.
Record this information.
–Model
(MOD.) ....................................................
....
– Product number
(PNC) ..........................................
– Serial number
(S.N.) ..............................................
14 electrolux

The washing results and drying results are not satisfactory
Problem Possible cause Possible solution
The dishes are not clean. The washing programme was
not applicable for the type of
load and soil.
Make sure that the washing pro-
gramme is applicable for the
type of load and soil.
You did not put the items cor-
rectly in the baskets, water did
not touch all surfaces.
Put the items correctly in the
baskets.
The spray arms could not turn
freely. Incorrect position of the
items in the baskets.
Make sure that an incorrect po-
sition of the items do not cause
the blockage of the spray arms.
The filters are dirty or not as-
sembled and installed correctly.
Make sure that the filters are
clean and correctly assembled
and installed.
The quantity of detergent was
not sufficient or missing.
Make sure that the quantity of
detergent is sufficient.
Limescale particles on the
dishes.
The salt container is empty. Fill the salt container with dish-
washer salt.
Incorrect level of the water soft-
ener adjustment.
Adjust the water softener with
the correct level.
The salt container cap is not
closed correctly.
Make sure that the salt contain-
er cap is closed correctly.
There are streaks, whitish
stains, or a bluish layer on
glasses and dishes.
The rinse aid quantity is too high. Decrease the rinse aid quantity.
Dry water drop stains on
glasses and dishes.
The rinse aid quantity is too low. Increase the rinse aid quantity.
The detergent can be the cause. Use a different brand of deter-
gent.
The dishes are wet. The washing programme was
without a drying phase or with
a decreased drying phase.
For better drying results, keep
the door ajar for some minutes.
The dishes are wet and matt. The rinse aid dispenser is emp-
ty.
Fill the rinse aid dispenser with
rinse aid.
The multitab function is on (this
function automatically deacti-
vates the rinse aid dispenser).
Activate the rinse aid dispenser.
Activating the rinse aid dispenser
1. Open the menu option.
2. Go to SETTINGS .
3.
Press the OK /Start button to open the
submenu.
4. Go to RINSE AID and activate the rinse
aid dispenser.
5. Press the OK /Start button.
6. Press the Option button to close the
menu option.
TECHNICAL DATA
Dimensions Width 596 mm
Height 818 - 898 mm
Depth 550 mm
electrolux 15

Water supply pressure Minimum 0,5 bar (0,05 MPa)
Maximum 8 bar (0,8 MPa)
Water supply
1)
Cold water or hot water maximum 60 °C
Capacity Place settings 12
1) Connect the water inlet hose to a water tap with a 3/4'' thread.
The rating plate on the inner edge of
the appliance door shows the electrical
connection data.
If the hot water comes from alternative
sources of energy, (e.g. solar panels,
photovoltaic panels and aeolian), use a
hot water supply to decrease energy
consumption.
ENVIRONMENT CONCERNS
The symbol on the product or on its
packaging indicates that this product may
not be treated as household waste. Instead
it should be taken to the appropriate
collection point for the recycling of electrical
and electronic equipment. By ensuring this
product is disposed of correctly, you will
help prevent potential negative
consequences for the environment and
human health, which could otherwise be
caused by inappropriate waste handling of
this product. For more detailed information
about recycling of this product, please
contact your local council, your household
waste disposal service or the shop where
you purchased the product.
Recycle the materials with the symbol
.
Put the packaging in applicable containers
to recycle it.
16 electrolux

Electrolux. Thinking of you.
Mehr zu unserem Denken finden Sie unter www.electrolux.com
INHALT
Sicherheitshinweise 17
Gerätebeschreibung 20
Bedienblende 20
Gebrauch des Gerätes 23
Einstellen des Wasserenthärters 23
Gebrauch von Salz für Geschirrspüler 24
Verwendung von Reinigungsmittel und
Klarspüler 25
Funktion "Multitab" 26
Laden von Besteck und Geschirr 26
Auswählen und Starten eines
Spülprogramms 27
Spülprogramme 28
Reinigung und Pflege 29
Was tun, wenn … 30
Technische Daten 33
Umwelttipps 33
Änderungen vorbehalten
SICHERHEITSHINWEISE
Lesen Sie vor der Montage und Anwen-
dung sorgfältig dieses Handbuch:
• Für Ihre Sicherheit und die Sicherheit Ih-
res Eigentums.
•Zum Schutz der Umwelt.
• Zur korrekten Bedienung des Geräts.
Bewahren Sie diese Bedienungsanleitung in
der Nähe des Geräts auf, auch wenn Sie die-
ses an einem anderen Ort aufstellen oder
es an eine andere Person weitergeben.
Der Hersteller ist nicht dafür verantwortlich,
wenn eine inkorrekte Montage und Verwen-
dung Schäden verursacht.
Sicherheit von Kindern und
schutzbedürftigen Personen
• Lassen Sie keine Personen (einschließlich
Kinder) mit eingeschränkten physischen,
sensorischen oder geistigen Fähigkeiten
oder fehlenden Erfahrungen und Kennt-
nissen dieses Gerät benutzen. Solche Per-
sonen müssen von einer Person beauf-
sichtigt oder bei der Bedienung des Ge-
räts angeleitet werden, die für ihre Sicher-
heit verantwortlich ist.
• Halten Sie das Verpackungsmaterial von
Kindern fern. Andernfalls besteht Ersti-
ckungs- oder Verletzungsgefahr.
• Bewahren Sie alle Reinigungsmittel an ei-
nem sicheren Ort auf. Reinigungsmittel
dürfen nicht in die Hände von Kindern ge-
langen.
• Halten Sie Kinder und Haustiere vom ge-
öffneten Gerät fern.
Allgemeine Sicherheitshinweise
• Nehmen Sie keine technischen Änderun-
gen am Gerät vor. Hierdurch besteht Ver-
letzungsgefahr und das Gerät kann be-
schädigt werden.
• Beachten Sie die Sicherheitsanweisun-
gen des Reinigungsmittelherstellers, um
Verätzungen an Augen, Mund oder im
Hals zu vermeiden.
• Trinken Sie kein Wasser aus dem Gerät.
Es können Reinigungsmittelrückstände
im Gerät zurückbleiben.
• Lassen Sie die Gerätetür nicht ohne Be-
aufsichtigung offen stehen. Damit werden
Verletzungen und die von der geöffneten
Tür ausgehende Stolpergefahr vermieden.
• Setzen oder stellen Sie sich nie auf die of-
fene Tür.
Verwendung
• Dieses Gerät ist nur zur Verwendung im
Haushalt bestimmt. Verwenden Sie die-
ses Gerät nicht zu anderen Zwecken, um
Verletzungen und Sachschäden zu ver-
meiden.
• Spülen Sie in diesem Gerät ausschließlich
spülmaschinengeeignete Gegenstände.
• Laden Sie keine entflammbaren Produkte
oder Gegenstände, die mit entflammba-
ren Produkten benetzt sind, in das Gerät
und stellen Sie solche nicht in die Nähe
oder auf das Gerät. Es besteht Explosi-
ons- und Brandgefahr.
electrolux 17

• Ordnen Sie Messer und andere spitze Ge-
genstände mit der Spitze nach unten in
den Besteckkorb ein. Wenn dies nicht
möglich ist, legen Sie sie horizontal in den
Oberkorb oder in den Messerkorb. (Nicht
alle Modelle sind mit einem Messerkorb
ausgestattet.)
• Verwenden Sie für Geschirrspüler aus-
schließlich dafür vorgesehene Produkte
(Reinigungsmittel, Salz, Klarspülmittel).
• Die Verwendung von Salzarten, die nicht
für Geschirrspüler vorgesehen sind, kann
zur Beschädigung des Wasserenthärters
führen.
• Füllen Sie das Gerät mit Salz, bevor Sie
ein Spülprogramm starten. Salzrückstän-
de im Gerät können Korrosion oder ein
Loch im Boden des Geräts verursachen.
• Füllen Sie nie andere Produkte als Klar-
spülmittel (Reinigungsmittel für Geschirr-
spüler, Flüssigreiniger) in den Klarspülmit-
tel-Dosierer. Dadurch kann das Gerät be-
schädigt werden.
• Vergewissern Sie sich, dass die Sprühar-
me sich ungehindert bewegen können,
bevor Sie ein Spülprogramm starten.
• Es kann heißer Dampf aus dem Gerät aus-
treten, wenn Sie die Tür während des Ab-
laufs eines Spülprogramms öffnen. Dabei
besteht die Gefahr von Hautverbrennun-
gen.
• Nehmen Sie kein Geschirr aus dem Ge-
rät, bevor das Spülprogramm beendet ist.
Reinigung und Pflege
• Schalten Sie das Gerät vor Reinigungsar-
beiten immer ab, und ziehen Sie den Netz-
stecker aus der Steckdose.
• Verwenden Sie keine entflammbaren Pro-
dukte oder Produkte, die Korrosion verur-
sachen.
• Benutzen Sie den Geschirrspüler nie oh-
ne Filter. Vergewissern Sie sich, dass die
Filter ordnungsgemäß eingesetzt sind.
Falsch eingesetzte Filter führen zu nicht
zufriedenstellenden Spülergebnissen und
einer Beschädigung des Geräts.
• Reinigen Sie das Gerät nicht mit einem
Wasser- oder Dampfstrahl. Andernfalls
besteht Stromschlaggefahr und das Ge-
rät könnte beschädigt werden.
Montage
• Achten Sie darauf, dass das Gerät nicht
beschädigt ist. Ein beschädigtes Gerät
darf nicht montiert oder an das Strom-
netz angeschlossen werden. Wenden Sie
sich in diesem Fall an Ihren Händler.
• Entfernen Sie das gesamte Verpackungs-
material, bevor Sie das Gerät montieren
und verwenden.
• Der elektrische Anschluss, die Klempner-
arbeiten und die Montage des Geräts dür-
fen nur von einer qualifizierten Fachkraft
ausgeführt werden. Auf diese Weise wer-
den Gebäudeschäden oder Verletzungen
vermieden.
• Achten Sie darauf, dass der Netzstecker
während der Installation nicht an einer
Netzsteckdose angeschlossen ist.
• Bohren Sie keine Löcher ins Gehäuse
des Geräts. Dabei könnten hydraulische
oder elektrische Bauteile beschädigt wer-
den.
• Wichtig! Befolgen Sie die Anweisungen
der mit dem Gerät mitgelieferten Monta-
geanleitung bei:
–Montage des Geräts.
– Montage der Türverkleidung.
– Anschluss des Wasserzulaufs und -ab-
laufs.
• Stellen Sie sicher, dass das Gerät unter
und an angrenzenden sicheren Konstruk-
tionen montiert ist.
Frostschutzmaßnahmen
• Stellen Sie das Gerät nicht an einem Ort
auf, an dem die Temperatur unter 0 °C ab-
sinken kann.
• Der Hersteller haftet nicht für Frostschä-
den.
Wasseranschluss
• Verwenden Sie neue Schläuche und kei-
ne gebrauchten Schläuche für den An-
schluss an die Wasserversorgung.
• Schließen Sie das Gerät nicht an neue
oder lange nicht mehr benutzte Schläu-
che an, sondern lassen Sie zunächst das
Wasser ein paar Minuten durch den
Schlauch fließen und schließen Sie erst
dann den Zulaufschlauch an.
• Achten Sie darauf, die Wasserschläuche
bei der Geräteinstallation nicht zu quet-
schen oder zu beschädigen.
18 electrolux

• Vergewissern Sie sich, dass alle Wasser-
anschlüsse vollkommen dicht sind, damit
kein Wasser austreten kann.
• Prüfen Sie bei der ersten Verwendung
des Gerätes, dass die Schläuche keine
Wasserlecks aufweisen.
• Der Wasserzulaufschlauch verfügt über
ein Sicherheitsventil und eine doppelte
Ummantelung mit einem innenliegenden
Netzkabel. Der Wasserzulaufschlauch
steht nur während des Wasserzulaufs un-
ter Druck. Wenn der Wasserzulauf-
schlauch eine undichte Stelle aufweist, un-
terbricht das Sicherheitsventil den Was-
serzulauf.
– Gehen Sie beim Anschluss des Wasser-
zulaufschlauchs vorsichtig vor:
– Tauchen Sie den Wasserzulauf-
schlauch oder das Sicherheitsventil
nicht in Wasser.
– Ziehen Sie sofort den Netzstecker
aus der Steckdose, wenn der Was-
serzulaufschlauch oder das Sicher-
heitsventil beschädigt ist.
– Wenden Sie sich für den Austausch
des Wasserzulaufschlauchs mit Si-
cherheitsventil an den Kundendienst.
Warnung! Gefährliche Spannung.
Elektrischer Anschluss
• Das Gerät muss geerdet sein.
• Stellen Sie sicher, dass die elektrischen
Daten auf dem Typenschild den Daten Ih-
rer Stromversorgung entsprechen.
• Schließen Sie das Gerät nur an eine sach-
gemäß installierte Schutzkontaktsteckdo-
se an.
• Verwenden Sie keine Mehrfachsteckdo-
sen oder Verlängerungskabel. Es besteht
Brandgefahr.
• Ersetzen oder wechseln Sie nicht selbst
das Netzkabel. Wenden Sie sich hierzu
an den Kundendienst.
• Achten Sie darauf, den Netzstecker und
das Netzkabel hinter dem Gerät nicht zu
quetschen oder zu beschädigen.
• Stellen Sie sicher, dass der Netzstecker
nach der Montage noch zugänglich ist.
• Ziehen Sie nicht am Netzkabel, wenn Sie
das Gerät vom Stromnetz trennen möch-
ten, sondern ziehen Sie dazu immer di-
rekt am Netzstecker.
Innenbeleuchtung
Die Innenbeleuchtung des Geschirrspülers
wird automatisch beim Öffnen der Tür ein-
geschaltet und beim Schließen der Tür aus-
geschaltet.
Warnung! Sichtbare LED-Abstrahlung;
vermeiden Sie es, direkt in das Licht
der Lampe zu schauen.
Die LED-Leuchte ist der KLASSE 2 zuzuord-
nen in Übereinstimmung mit IEC 60825-1:
1993 + A1:1997 + A2:2001.
Wellenlänge der Lichtstrahlen: 450 nm
Maximale Abgabeleistung: 548 μW
Für den Austausch der Innenbeleuch-
tung wenden Sie sich bitte an den Kun-
dendienst.
Ziehen Sie vor dem Austausch der In-
nenbeleuchtung bitte den Netzstecker
aus der Netzsteckdose.
Kundendienst
• Nur qualifizierte Fachkräfte dürfen an
dem Gerät Reparaturarbeiten durchfüh-
ren. Wenden Sie sich hierzu an den Kun-
dendienst.
• Es dürfen nur Originalersatzteile verwen-
det werden.
Entsorgung des Geräts
• Um das Risiko von Verletzungen oder
Sachschäden zu vermeiden:
– Ziehen Sie den Netzstecker aus der
Netzsteckdose.
– Schneiden Sie das Netzkabel ab und
entsorgen Sie es.
– Entfernen Sie den Türschnappver-
schluss, damit Kinder oder Haustiere
nicht in dem Gerät eingeschlossen wer-
den können. Andernfalls besteht Ersti-
ckungsgefahr.
– Entsorgen Sie das Gerät bei Ihrer örtli-
chen Abfallentsorgungsstelle.
electrolux 19

Warnung! Die Geschirrspüler-
Reinigungsmittel sind gefährlich
und können Korrosion verursachen!
• Bei Unfällen mit diesen Reinigungs-
mitteln konsultieren Sie umgehend ei-
nen Arzt.
• Sollte Reinigungsmittel in den Mund
gelangen, konsultieren Sie umge-
hend einen Arzt.
• Sollte das Reinigungsmittel in die Au-
gen gelangen, konsultieren Sie umge-
hend einen Arzt und spülen Sie die
Augen mit Wasser aus.
• Bewahren Sie die Reinigungsmittel
an einem sicheren Ort außerhalb der
Reichweite von Kindern auf.
• Lassen Sie die Gerätetür nicht offen
stehen, solange sich Reinigungsmit-
tel im Reinigungsmittelbehälter befin-
det.
• Füllen Sie das Gerät erst mit Reini-
gungsmittel, kurz bevor Sie ein Spül-
programm starten.
GERÄTEBESCHREIBUNG
1
2
3
4
5
6
7
8
9
1 Oberkorb
2 Wasserhärtestufen-Wähler
3 Salzbehälter
4 Reinigungsmittelbehälter
5 Klarspülmittel-Dosierer
6 Typenschild
7 Filter
8 Unterer Sprüharm
9 Oberer Sprüharm
BEDIENBLENDE
Die Bedienelemente befinden sich
oben auf dem Bedienfeld. Lassen Sie
die Tür einen Spaltbreit offen stehen,
um sie zu erreichen.
Meldungen im Display und akustische
Signaltöne helfen Ihnen bei der Bedie-
nung des Geräts.
20 electrolux
Seite wird geladen ...
Seite wird geladen ...
Seite wird geladen ...
Seite wird geladen ...
Seite wird geladen ...
Seite wird geladen ...
Seite wird geladen ...
Seite wird geladen ...
Seite wird geladen ...
Seite wird geladen ...
Seite wird geladen ...
Seite wird geladen ...
Seite wird geladen ...
Seite wird geladen ...
Seite wird geladen ...
Seite wird geladen ...
-
 1
1
-
 2
2
-
 3
3
-
 4
4
-
 5
5
-
 6
6
-
 7
7
-
 8
8
-
 9
9
-
 10
10
-
 11
11
-
 12
12
-
 13
13
-
 14
14
-
 15
15
-
 16
16
-
 17
17
-
 18
18
-
 19
19
-
 20
20
-
 21
21
-
 22
22
-
 23
23
-
 24
24
-
 25
25
-
 26
26
-
 27
27
-
 28
28
-
 29
29
-
 30
30
-
 31
31
-
 32
32
-
 33
33
-
 34
34
-
 35
35
-
 36
36


AEG Electrolux ESL68071R Benutzerhandbuch
- Kategorie
- Geschirrspüler
- Typ
- Benutzerhandbuch
in anderen Sprachen
- English: AEG Electrolux ESL68071R User manual
Andere Dokumente
-
Electrolux ESF 2200 DW Benutzerhandbuch
-
Electrolux GA60SLV220 Benutzerhandbuch
-
-
Aeg-Electrolux F99001VIP Benutzerhandbuch
-
Aeg-Electrolux F99009M0P Benutzerhandbuch
-
-
-
-
-