
REEF CARE PROGRAM
Foundation™™
Test Kits
Benutzerhandbuch
DE
Handleiding
NL
User Manual
GB
Manuel utilisateur
FR
Manual del usuario
SP


Red Sea’s Reef Care Program - Recipes
The complete Reef Care program is the result of years of research into the physiological
demands of SPS, LPS & Soft Corals in the reef aquarium. Reef Care RecipesTM translates the
many years of practical experience with Red Sea’s Reef Care Program on tens of thousands
of diverse reef tanks worldwide into a simple to implement regimen of water management
activities specically for the most common types of hobby reef aquariums.
Water management refers to all of the water related activities such as water changes, testing
and supplementing that needs to be done on a regular basis to ensure the success of your
reef aquarium. This is not just limited to maintaining the ideal balance of the seawater but
also deals with controlling nuisance algae and coral nutrition for their long term health and
vitality.
In addition to the Foundation™ program, which is fully described below, the complete Reef
Care program also includes the following:
Algae Management Program – Controlled nitrate & phosphate reduction that prevents
nuisance algae and provides the ne control of Zooxanthellae populations that signicantly
affect coral growth rates and coloration.
Trace-Colors™ – Provide the essential minor and trace elements that are part of the coral
skeleton and soft tissue and are specically important for SPS corals to display their natural
pigments.
Reef Energy® – Provides the carbohydrates, vitamins ,amino and fatty acids that fuel all
metabolic processes of corals.
For optimal results you should implement the complete program.
GB

2 | Red Sea | Reef Care Program
The Foundation™ Elements (Ca, KH & Mg)
A successful coral reef aquarium is dependent upon maintaining the appropriate water
parameters that in turn provide the stable environment required by the corals. Although
all the elements found in natural seawater have an important role in providing the
optimal water parameters, a few of them have a more signicant role in the overall
stability. These elements are the foundation of the reef environment and they include the
three major elements: Calcium (Ca), Magnesium (Mg) and Bi-Carbonates (HCO3). These 3
elements have a major effect on the water chemistry (pH stability, Alkalinity, sea water
ionic strength) and on many of the coral’s biological processes (skeleton formation, ions
exchange, photosynthesis).
Coral Growth
Coral Growth (Skeletogenesis) is the process by which special cells within the corals soft
tissue, combine the foundation elements together with Strontium and Barium from the
surrounding water to form the building blocks of coral skeletons.
Corals build approximately 90% of their skeleton by combining Ca and CO3 ions from the
water to form Aragonite (CaCO3). The rest of the skeleton is made up from Magnesite
(MgCO3), Strontianite (SrCO3), Calcite (a more brittle crystal structure of CaCO3), Fluorite
(CaF2) and other minor and trace minerals.
In unbalanced conditions such as low levels of Mg and/or Sr the skeleton will develop
with a higher proportion of Calcite making it more brittle and more susceptible to
damage.
The foundation elements complement each other in the formation of coral skeleton and
if not available in the correct ratios one of them will quickly become the limiting factor of
healthy coral growth.
Elevated levels of the foundation elements create a more positive ionic pressure enabling
passive diffusion of the elements through the soft tissue making this process much more
efcient (less energy required per gram of skeleton). Therefore balanced elevated levels
of the foundation elements will result in accelerated coral growth rates.

Foundation™ | 3
when aiming to enhance coral coloration by reducing the levels of algae nutrients, lower
balanced levels of the foundation elements should be maintained.
Optimal levels of the Foundation Elements
Unlike the natural reef environment, where there is an immense reservoir of the
foundation elements, the reef aquarium is an articial environment that is constantly
affected by chemical changes and therefore the foundation elements must be monitored
and replenished constantly. Furthermore, research has shown that the optimal levels of
these elements should be maintained according to the variety and maturity of the specic
coral population.
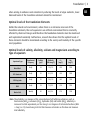
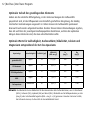
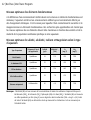
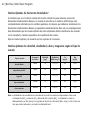
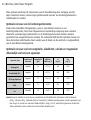
Optimal levels of salinity, alkalinity, calcium and magnesium according to
type of aquarium
Aquarium Type Supplement
frequency
Salinity
(ppt)
Alkalinity
(dKH meq/l)
Ca
(mg/l)
Mg
(mg/l)
Mixed Reef Daily 34 11.5/4.1 450 1350
SPS Dominant Daily 35 8.0/2.9 430 1280
SPS Frag tank Daily 35 12.6/4.5 465 1390
ULNS Daily 33 7.0/2.5 410 1220
Marine Fish Weekly 30 6.8/2.4 370 1100
Note: The alkalinity is a measure of the concentration of all buffering substances such as
bicarbonate (HCO3), carbonate (CO3), hydroxide (OH) and borate (BO3). Alkalinity is
measured in mille equivalents per liter meq/L or in degrees of Carbonate hardness (dKH
= meq/L x 2.8). Avoid using test kits that measure carbonates as this does not measure
total alkalinity.
GB

4 | Red Sea | Reef Care Program
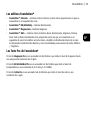
The Foundation™ Supplements
• Foundation™ Calcium+ Contains Calcium, Strontium & Barium in the ratios as found in
coral skeleton.
• Foundation™ KH/Alkalinity Contains Bicarbonates.
• Foundation™ Magnesium Contains Magnesium
• Foundation™ ABC+ Contains Calcium, Strontium, Barium, Bicarbonates, Magnesium,
Potassium, Boron, Iodine & Bromine formulated in the exact ratio as found in the coral
skeleton. This unique powder supplement simplies the daily dosing of more than just
the foundation elements and is recommended for aquariums up to about 300 liters / 75
gallons.
The Foundation™ Test Kits
Calcium Pro test kit is an advanced titration test, measuring the level of calcium to a
resolution of 5 ppm.
KH Alkalinity Pro test kit is an advanced titration test, measuring the level of buffers to a
resolution of 0.05 meq/L (0.14dKH).
Magnesium Pro test kit is an advanced titration test, measuring the level of Magnesium to
a resolution of 20 ppm.

Foundation™ | 5
Testing and Supplementing
Causes and effects of unbalanced levels of foundation elements
• New aragonite substrate - new aragonite surfaces can increase the non-biological
precipitation of calcium and carbonates which will lead to their depletion from the water,
causing a drop in calcium and alkalinity.
• Unbalanced salt mixture - low magnesium or high calcium can lead to alkalinity drops.
• Excessive dosing of calcium or buffer (without dosing magnesium) - Adding too much
calcium (to saturation levels) can lead to a sudden drop in alkalinity. Adding too much
buffer to an aquarium with calcium at saturation levels will cause precipitation, leading to
low calcium levels.
The phenomena listed above are typical to many chemically unbalanced marine and reef
tanks causing stress to the inhabitants as well as to the aquarist. Balanced supplementation
should therefore be implemented to maintain calcium, magnesium and alkalinity at the
recommended levels.
GB

6 | Red Sea | Reef Care Program
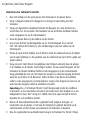
Important notes for using the Foundation™ Pro Titration test kits
• Before carrying out any water testing always check the salinity and make adjustments
as necessary. If you have made adjustments to the water wait 10 minutes for the water
parameters to stabilize. (e.g. 1 ppt increase in salinity due to evaporation of fresh water
will result in approximate increases of 13ppm Ca and 40ppm Mg)
• Before testing clean the glass vial and the large syringe by rinsing with the water to
be tested.
• After testing rinse all syringes and vials with RO or distilled water before storing. If vials
are left unwashed a residue can form that will affect the results of future tests. Use a
slightly acidic solution such as citric acid to remove the residue.
• In order to ensure an accurate drop size always hold reagent bottle vertically above
the test vial, and gently squeeze out each drop.
• Close all reagents tightly immediately after use.
• The test reagents are stable up to the date stated on the pack when stored closed
between 15 – 25 °C.
• Store the reagents and color card in the plastic box to prevent damage from prolonged
exposure to light.
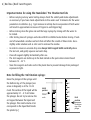
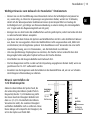
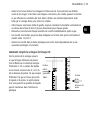
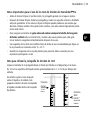
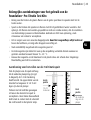
Note for lling the 1ml titration syringe:
Raise the plunger of the syringe until
the bottom ring of the plunger (see
arrow in diagram) is at the 1.0 ml
mark. The surface of the liquid will be
approximately 0.1 – 0.15 ml below
the plunger. Do not try to remove the
air trapped between the liquid and
the plunger. This small volume of air
corresponds to the liquid held inside
the plastic tip.]
Initial
position
1.0 ml
mark Final
position
the bottom
ring of the
plunger
1.0
0.9
0.8
0.7
0.6
0
.
9
0.8
0.7
0.6
0.5
0.4
0.3
0.2

Foundation™ | 7
Directions for Magnesium Pro Test Kit
1. Using the large syringe provided, place exactly 2 ml of the water to be tested into the
glass vial.
2. Add 5 drops of Mg Pro Reagent A, shaking the vial for 15 seconds after each drop.
3. Add 5 drops of Mg Pro Reagent B and mix the reagent gently with the water sample.
4. Screw the glass vial onto the bottom of the Titrator and wait for approx 60 seconds for
the test sample to obtain the titration start color as shown on the instruction card. A
precipitate will form on the bottom of the vial.
5. Ensure that the dispensing tip is on the 1 ml titration syringe and ll with 1ml of
Magnesium Pro Titrant (C). [see note for lling titration syringe.]
6. Insert the syringe into the center of the Titrator so that the volumetric scale on the side
of the syringe is visible. The graduations of the volumetric scale are 0.01 ml, equivalent
to 20 ppm of magnesium.
7. Add the rst 0.4 ml of titrant (equivalent to 800ppm of magnesium) by pressing the
plunger of the syringe while gently swirling the Titrator. Continue adding the titrant
gradually, swirling the Titrator after each addition and paying attention to the color in
the vial. As the color in the vial approaches the end color as shown on the instruction
card, add one drop at a time, swirling after each drop, until the blue end color is rst
achieved.
Note: Shortly after the blue end color is achieved the liquid in the vial will turn from
blue to violet. Do not continue adding titrant. If you have used more than 0.8ml of
titrant you may have missed the end point and should redo the test.
8. Note the amount of titrant used (according to the initial and nal position of the
plunger not the liquid surface) and use the table on the instruction card to calculate the
level of magnesium in the water sample.
9. Return any unused quantity of titrant to the Magnesium Pro Titrant C bottle.
GB

8 | Red Sea | Reef Care Program
Directions for KH Alkalinity Pro Test Kit
1. Using the large syringe provided, place exactly 10 ml of the water to be tested into
the glass vial.
2. Screw the glass vial onto the bottom of the Titrator.
3. Ensure that the dispensing tip is on the 1 ml titration syringe and ll with 1ml of
Alkalinity Pro Titrant. [see note for lling titration syringe.]
4. Insert the syringe into the center of the Titrator so that the volumetric scale on the
side of the syringe is visible. The graduations of the volumetric scale are 0.01 ml,
equivalent to an alkalinity of 0 .05 meq/L (0.14 dKH).
5. Add the rst 0.4 ml of titrant (equivalent to an alkalinity of 2.0 meq/L – 5.6 dKH) by
pressing the plunger of the syringe while gently swirling the Titrator. The test sample
will obtain the titration start color as shown on the instruction card after the rst few
drops of titrant are added. Continue adding the titrant gradually, swirling the Titrator
after each addition and paying attention to the color in the vial. As the color in the
vial approaches the end color as shown on the instruction card, add one drop at a
time, swirling after each drop, until the end color is achieved.
Note: If you have added 1 ml of alkalinity titrant, without reaching the end color, the
alkalinity of your water sample is more than 5 meq/L (14 dKH). Rell the syringe and
continue to add titrant until you reach the end color.
6. Note the amount of titrant used (according to the initial and nal position of the
plunger not the liquid surface) and use the table on the instruction card to calculate
the level of calcium in the water sample.
7. Dispose of any unused quantity of titrant.

Foundation™ | 9
Directions for Calcium Pro Test Kit
1. Using the large syringe provided, place exactly 5 ml of the water to be tested into
the glass vial.
2. Add 5 drops of Calcium Pro Reagent A and mix gently with the water sample.
3. Add a leveled measuring spoon of Calcium Pro Reagent B, close the vial with the cap
and shake for 20 seconds. The test sample will now have the titration start color as
shown on the instruction card.
4. Screw the glass vial onto the bottom of the Titrator.
5. Ensure that the dispensing tip is on the 1 ml titration syringe and ll with 1ml of
Calcium Pro Titrant (C). [see note for lling titration syringe.]
6. Insert the syringe into the center of the Titrator so that the volumetric scale on the
side of the syringe is visible. The graduations of the volumetric scale are 0.01 ml,
equivalent to 5 ppm of calcium.
7. Add the rst 0.6 ml of titrant (equivalent to 300ppm of calcium) by pressing the
plunger of the syringe while gently swirling the Titrator. Continue adding the titrant
gradually, swirling the Titrator after each addition and paying attention to the color in
the vial. As the color in the vial approaches the end color as shown on the instruction
card, add one drop at a time, swirling after each drop, until the end color is achieved.
Note: If you have added 1 ml of Calcium Titrant C, without reaching the end color, the
calcium concentration of your water sample is more than 500 ppm. Rell the syringe
and continue to add titrant until you reach the end color.
8. Note the amount of titrant used (according to the initial and nal position of the
plunger not the liquid surface) and use the table to calculate the level of calcium in
the water sample.
9. Return any unused quantity of titrant to the Calcium Pro Titrant C bottle.
GB

10 | Red Sea | Reef Care Program
Das Reef Care Programm von Red Sea - Rezepte
Das vollumfängliche Reef Care Programm ist das Ergebnis jahrelanger Erforschung die
physiologischen Bedürfnisse von SPS-, LPS- und Weichkorallen im Riffaquarium. Die Reef
Care Rezepte setzen die praktische Erfahrung des „Reef Care“ Programms aus vielen Jahren
und bei mehr als 10000 verschiedenen Riffaquarien weltweit für die wichtigsten Arten von
Meerwasseraquarien in einfach zu realisierende Wassermanagement Aktivitäten um.
Wassermanagement meint alle auf das Wasser bezogene Aktivitäten, wie z.B. Wasserwechsel,
Wassertests und Supplementierung, die auf regelmäßiger Basis erfolgen müssen, um den Erfolg
Ihres Riffaquariums sicherzustellen. Dies beschränkt sich nicht nur auf die ideale Balance des
Meerwassers, sondern befasst sich auch mit der Kontrolle von nicht erwünschten Algen und der
Nährstoffversorgung, um langfristig Gesundheit und Vitalität der Korallen sicherzustellen.
Zusätzlich zum Foundation™ Programm (Riffbegründung), dessen Produkte weiter unten genau
beschrieben werden, beinhaltet das Reef Care Riffpege-Komplettprogramm folgende Sortimente:
Algae Management-Programm – Kontrollierte Nitrat- und Phosphatreduktion, die unerwünschte
Algen verhindert und die Feinsteuerung der Zooxanthellen-Populationen ermöglicht, die einen
bedeutenden Einuss auf Wachstumsrate und Farbentfaltung der Korallen haben.
Trace-Colors™ – Liefert die essentiellen Neben- und Spurenelemente, die Teil des Korallenskeletts
und ihres Weichgewebes sind. Sie sind besonders wichtig für SPS-Korallen, die ihre natürlichen
Pigmente zeigen sollen.
Reef Energy® – Liefert die Kohlenhydrate, Vitamine, Amino und Fettsäuren, die die Energie für alle
Stoffwechselprozesse in Korallen liefern.
Optimale Ergebnisse erzielen Sie, wenn Sie das vollständige Programm verwenden.
Die Foundation™ Grundelemente (Ca, KH & Mg)
Der Erfolg eines Korallenriff-Aquariums hängt von der Aufrechterhaltung der geeigneten
Wasserparameter ab, die ihrerseits für die von den Korallen benötigte stabile Umgebung sorgen.
Obwohl alle Elemente, die in natürlichem Meerwasser enthalten sind, eine wichtige Rolle für

Foundation™ | 11
die optimalen Wasserparameter spielen, haben einige von ihnen eine bedeutendere Rolle
für die Gesamtstabilität. Diese bilden die Grundlage der Riffumgebung und umfassen die drei
Hauptelemente Calcium (Ca), Magnesium (Mg) and Bi-Carbonate (HCO3). Diese 3 Elemente
haben einen großen Einuss auf die Wasserchemie (pH-Stabilität, Karbonathärte/Alkalinität,
Ionenstärke des Meerwassers) und auf viele biologische Prozesse der Korallen (Skelettbildung,
Ionenaustausch, Photosynthese).
Korallenwachstum
Korallenwachstum (Skeletogenese) ist ein Prozess, in dem spezielle Zellen innerhalb
des korralinen Weichgewebes die Aufbaustoffe mit Strontium und Barium aus dem
Umgebungswasser kombinieren um die Bausteine des Korallenskeletts zu bilden.
Korallen bauen ca. 90% ihres Skeletts durch die Kombination von Ca und CO3 Ionen aus dem
Wasser, um Aragonit (CaCO3) zu bilden. Der Rest des Skeletts wird aus Magnesit (MgCO3),
Strontianit (SrCO3), Calcit (eine etwas sprödere Kristallstruktur von CaCO3), Fluorit (CaF2) und
anderen Neben- und Spurenelementen gebildet.
Unter unausgewogenen Bedingungen, z.B. bei niedrigen Mengen an Mg und/oder Sr entwickelt
sich das Korallenskelett mit einem höheren Anteil an Calcit und wird dadurch spröder und
anfälliger für Bruchschäden.
Die Aufbaustoffe ergänzen sich gegenseitig bei der Bildung des Korallenskeletts, und wenn
sie nicht im passenden Mengenverhältnis verfügbar sind, wirkt sich einer von ihnen schnell
hinderlich auf ein gesundes Korallenwachstum aus.
Erhöhte Mengen der Aufbaustoffe schaffen einen positiveren (zunehmenden) osmotischen
Druck, der den passiven Transport der Elemente durch das Weichgewebe ermöglicht, was diesen
Prozess energieefzienter macht (es wird weniger Energie pro Gramm Skelett benötigt). Daher
führen ausgewogene, erhöhte Mengen der Aufbaustoffe bei den Korallen zu beschleunigten
Wachstumsraten.
Wenn eine verstärkte Farbentfaltung durch die Reduktion von Algennährstoffen angestrebt wird,
sollte ein niedrigerer, ausgewogener Gehalt der Aufbaustoffe aufrechterhalten werden.
DE

12 | Red Sea | Reef Care Program
Optimaler Gehalt der grundlegenden Elemente
Anders als die natürliche Riffumgebung, in der immense Mengen der Aufbaustoffe
gespeichert sind, ist das Riffaquarium eine künstlich geschaffene Umgebung, die ständig
chemischen Veränderungen ausgesetzt ist. Daher müssen die Aufbaustoffe permanent
überwacht und wieder aufgestockt werden. Darüber hinaus haben Untersuchungen ergeben,
dass Art und Alter der jeweiligen Korallenpopulation bestimmen, welches die optimalen
Mengen dieser Elemente sind, die man aufrechterhalten sollte.
Optimale Werte für Salzhaltigkeit, Karbonathärte/Alkalinität, Calcium und
Magnesium entsprechend der Art des Aquariums
Aquarientyp
Dosierhäugkeit
Salinität (ppt)
Alkalinität
(dKH meq/l)
Ca
(mg/l)
Mg
(mg/l)
gemischtes Riff täglich 34 11,5/4,1 450 1350
SPS dominant täglich 35 8,0/2,9 430 1280
SPS Ablegerbecken täglich 35 12,6/4,5 465 1390
ULNS täglich 33 7,0/2,5 410 1220
Fischaquarium wöchentlich 30 6,8/2,4 370 1100
Hinweis: Die Alkalinität ist eine Maßeinheit für die Konzentration aller Puffersubstanzen, wie z.B. Bicarbonat
(HCO3), Carbonat (CO3), Hydroxid (OH) und Borat (BO3). Alkalinität wird in Milliäquivalenten pro Liter
(meq/L) oder in Karbonathärtegraden (dKH = meq/L x 2,8) gemessen. Benutzen Sie keine Testkits,
die Carbonate messen, da dies nicht die Gesamtalkalinität misst.

Foundation™ | 13
Testen und Ergänzen
Ursachen und Folgen unausgewogener Mengen der Aufbaustoffe
• Neues Aragonit-Substrat: Neue Aragonit-Oberächen können die nicht-biologische
Fällung (Ausscheidung eines gelösten Stoffes als Niederschlag) von Calcium und
Carbonaten steigern, was zu deren Schwund aus dem Wasser und einem Abfallen der
Calcium- und Alkalinitätswerte führt.
• Unausgewogene Salzmischung: Niedrige Magnesium- oder hohe Calciumwerte können
zu einem Abfallen der Karbonathärte/Alkalinität führen.
• Übermäßige Dosierung von Calcium oder Pufferzusatz (ohne die Ergänzung von
Magnesium): Der Zusatz von zuviel Calcium (bis zum Sättigungsgrad) kann zu einem
plötzlichen Sinken der Karbonathärte/Alkalinität führen. Die Gabe von zuviel Pufferzusatz
verursacht in einem Aquarium, in dem der Sättigungsgrad für Calcium erreicht ist, eine
Ausfällung (Niederschlag) und führt zu niedrigen Calciumwerten.
Die oben aufgeführten Phänomene sind typisch für viele chemisch unausgewogene
Meeres- und Riffquariuen und bedeuten Stress für die Aquarienbewohner wie auch für
den Aquarianer. Deshalb sollte eine ausgewogene Ergänzung stattnden, damit Calcium,
Magnesium und Karbonathärte/Alkalinität immer in den empfohlenen Mengen vorliegen.
Die Foundation™-Zusätze
Foundation™ Calcium+ enthält Calcium, Strontium & Barium in den Mengenverhältnissen,
wie sie im Korallenskelett vorliegen
Foundation™ KH/Alkalinity enthält Bicarbonate
Foundation™ Magnesium enthält Magnesium
Foundation™ ABC+ enthält Calcium, Strontium, Barium, Bicarbonate, Magnesium, Kalium,
Bor, Jod & Bromin im Verhältnis, das exakt dem Verhältnis dieser Elemente im Korallenskelett
entspricht. Dieser einzigartige Pulverzusatz vereinfacht die tägliche Dosierung von mehr als
nur den Aufbaustoffen und wird für Aquarien bis zu 300 Liter empfohlen.
DE

14 | Red Sea | Reef Care Program
Die Foundation™-Testkits
Das Testkit Magnesium Pro ist ein fortschrittlicher Titrationstest, der den Magnesiumgehalt
in Ihrem Riffaquarium mit der außergewöhnlichen Genauigkeit von 20 ppm misst.
Das Testkit Calcium Pro ist ein fortschrittlicher Titrationstest, der den Calcium-Gehalt in
Ihrem Riffaquarium mit der ungewöhnlichen Genauigkeit von 5 ppm misst.
Das Testkit KH Alkalinity Pro ist ein fortschrittlicher Titrationstest, der den Puffergehalt in
Ihrem Riffaquarium mit der außergewöhnlichen Genauigkeit von 0,14° dKH (0,05 meq/l)
misst.

Foundation™ | 15
Wichtige Hinweise zum Gebrauch der Foundation™-Titrationstests
• Messen Sie vor der Durchführung eines Wassertests immer die Salzhaltigkeit und passen Sie
sie, wenn nötig, an. Wenn Sie Anpassungen vorgenommen haben, warten Sie 10 Minuten,
damit sich die Wasserparameter stabilisieren können (zum Beispiel führt ein Anstieg der
Salzhaltigkeit um 1 ppt infolge von Wasserverdunstung zu einem Anstieg des Calciumgehalts
um 13 ppm und des Magnesiumgehalts um 40 ppm).
• Reinigen Sie vor dem Testen die Glasäschchen und die große Spritze, indem Sie beide mit dem
zu untersuchenden Wasser ausspülen.
• Spülen Sie nach dem Testen alle Spritzen und Glasäschchen mit UO- oder destilliertem Wasser
aus, bevor Sie sie wegpacken. Wenn das Glasäschchen nicht ausgewaschen wird, bildet sich
ein Rückstand, der die Ergebnisse späterer Tests beeinussen wird. Verwenden Sie eine leicht
säurehaltige Lösung, wie z.B. Zitronensäure , um die Rückstände zu entfernen.
• Um eine gleichmässige Tropfengrösse zu erreichen, die Flasche immer senkrecht über dem
Reagenzglas halten und jeden Tropfen leicht aus der Flasche drücken.
• Verschließen Sie alle Reagens-Behälter nach Gebrauch fest.
• Die Test-Reagenzien sind bis zu dem auf der Verpackung angegebenen Datum stabil, wenn sie
geschlossen bei 15–25°C aufbewahrt werden.
• Bewahren Sie die Reagenzien und die Farbskala in der Kunststoff-Box auf, um sie vor Schaden
durch längere Lichteinwirkung zu schützen.
Hinweis zum Befüllen der
1 ml-Titrationsspritze
Ziehen Sie den Kolben der Spritze hoch, bis
der untere Ring des Kolbens (siehe Pfeil im
Diagramm) bei der 1,0 ml-Markierung steht.
Der obere Rand der Flüssigkeit bendet sich
dann ca. 0,1-0,15 ml unterhalb des Kolbens.
Versuchen Sie nicht, die zwischen Flüssigkeit
und Kolben bendliche Luft zu entfernen. Diese
kleine Menge Luft entspricht der Flüssigkeit, die
sich in der Spitze aus Plastik hält.
DE
Ausgangs-
position
1,0 ml-
Markierung End-
position
Bodenring
des Kolbens
1.0
0.9
0.8
0.7
0.6
0
.
9
0.8
0.7
0.6
0.5
0.4
0.3
0.2

16 | Red Sea | Reef Care Program
Gebrauchsanleitung Testkit Magnesium Pro:
1. Geben Sie mit der zum Testkit gehörenden großen Spritze genau 2 ml des zu
untersuchenden Wassers in das Glasäschchen.
2. Geben Sie 5 Tropfen des Reagens Magnesium Pro Reagent A dazu, schütteln Sie dabei
das Glasäschchen nach jedem zugefügten Tropfen 15 Sekunden lang.
3. Geben Sie 5 Tropfen des Reagens Magnesium Pro Reagent B dazu und mischen Sie das
Reagens sanft mit der Wasserprobe.
4. Schrauben Sie das Glasäschchen unten an den Titrierapparat und warten Sie etwa 60
Sekunden lang, bis die Probe die auf der Farbkarte gezeigte Titrations-Anfangsfarbe
zeigt. Am Boden des Glasäschchens A setzt sich gelöster Stoff als Niederschlag ab
(Präzipitation).
5. Sorgen Sie dafür, dass die Dosierspitze auf der 1 ml-Titrierspritze sitzt und füllen Sie sie
mit 1 ml der Maßlösung Magnesium Pro Titrant C.
6. Führen Sie die Spritze so in die Mitte des Titrierapparates ein, dass die Volumenskala an
der Seite der Spritze zu sehen ist. Die Volumenskala ist in 0,01 ml-Schritte eingeteilt,
die jeweils 20 ppm Magnesium entsprechen.
7. Geben Sie die ersten 0,4 ml der Maßlösung (entspricht 800 ppm Magnesium) dazu,
indem Sie den Kolben der Titrierspritze drücken, während Sie den Titrierapparat sanft
schwenken. Fügen Sie allmählich mehr der Maßlösung dazu und schwenken Sie den
Titrierapparat nach jeder Zugabe, achten Sie dabei auf die Farbe in dem Glasäschchen.
Wenn die Farbe in dem Fläschchen der auf der Farbskala gezeigten Endfarbe ähnlich
wird, geben Sie immer nur noch jeweils einen Tropfen der Maßlösung dazu und
schwenken Sie den Titrierapparat nach jedem Tropfen, bis die blaue Endfarbe erstmals
erreicht ist.
Hinweis: Kurz bevor die blaue Endfarbe erreicht ist, ändert die Flüssigkeit
im Gläschen ihre Farbe von blau in violett. Geben Sie nicht mehr von der
Maßlösung dazu. Wenn Sie mehr als 0,8 ml der Maßlösung gebraucht haben, haben
Sie wahrscheinlich das Erreichen des Endpunktes verpasst und sollten den Test
wiederholen.

Foundation™ | 17
8. Notieren Sie die Menge der gebrauchten Maßlösung (entsprechend der Anfangs- und
Endposition des Kolbens, nicht der Flüssigkeit) und berechnen Sie anhand der Tabelle
den Magnesiumgehalt Ihrer Wasserprobe.
9. Geben Sie eventuell nicht benötigte Mengen der Maßlösung in die Flasche für
Magnesium Pro Titrant C zurück.
DE

18 | Red Sea | Reef Care Program
Gebrauchsanleitung Testkit Calcium Pro:
1. Geben Sie mit der zum Testkit gehörenden großen Spritze genau 5 ml des zu
untersuchenden Wassers in das Glasäschchen.
2. Geben Sie 5 Tropfen des Reagens Calcium Pro Reagent A dazu und mischen Sie es sanft
mit der Wasserprobe.
3. Geben Sie einen gestrichenen Messlöffel des Reagens Calcium Pro Reagent B dazu,
schließen Sie das Glasäschchen mit dem Deckel und schütteln Sie es 20 Sekunden
lang. Die Probe hat nun die auf der Farbskala gezeigte Titrations-Anfangsfarbe.
4. Schrauben Sie das Glasäschchen unten an den Titrierapparat.
5. Sorgen Sie dafür, dass die Dosierspitze auf der 1 ml-Titrierspritze sitzt und füllen Sie sie
mit 1 ml der Maßlösung Calcium Pro Titrant C.
6. Führen Sie die Spritze so in die Mitte des Titrierapparates ein, dass die Volumenskala an
der Seite der Spritze zu sehen ist. Die Volumenskala ist in 0,01 ml-Schritte eingeteilt,
die jeweils 5 ppm Calcium entsprechen.
7. Geben Sie die ersten 0,6 ml der Maßlösung (entspricht 300 ppm Calcium) dazu,
indem Sie den Kolben der Titrierspritze drücken, während Sie den Titrierapparat sanft
schwenken. Fügen Sie allmählich mehr der Maßlösung dazu und schwenken Sie den
Titrierapparat nach jeder Zugabe, achten Sie dabei auf die Farbe in dem Glasäschchen.
Wenn die Farbe in dem Fläschchen der auf der Farbskala gezeigten Endfarbe ähnlich
wird, geben Sie immer nur noch jeweils einen Tropfen der Maßlösung dazu und
schwenken Sie den Titrierapparat nach jedem Tropfen, bis die Endfarbe erreicht ist.
Hinweis: Wenn Sie nach der Zugabe von 1 ml der Maßlösung Calcium Titrant C die
Endfarbe noch nicht erreicht haben, liegt die Calciumkonzentration Ihrer Wasserprobe
bei über 500 ppm. Füllen Sie die Titrierspritze nach und fahren Sie mit der Zugabe der
Maßlösung fort, bis Sie die Endfarbe erreicht haben.
8. Notieren Sie die Menge der gebrauchten Maßlösung (entsprechend der Anfangs- und
Endposition des Kolbens, nicht der Flüssigkeit) und berechnen Sie anhand der Tabelle
den Calciumgehalt Ihrer Wasserprobe.
9. Geben Sie eventuell nicht benötigte Mengen der Maßlösung in die Flasche für Calcium
Pro Titrant C zurück.
Seite wird geladen ...
Seite wird geladen ...
Seite wird geladen ...
Seite wird geladen ...
Seite wird geladen ...
Seite wird geladen ...
Seite wird geladen ...
Seite wird geladen ...
Seite wird geladen ...
Seite wird geladen ...
Seite wird geladen ...
Seite wird geladen ...
Seite wird geladen ...
Seite wird geladen ...
Seite wird geladen ...
Seite wird geladen ...
Seite wird geladen ...
Seite wird geladen ...
Seite wird geladen ...
Seite wird geladen ...
Seite wird geladen ...
Seite wird geladen ...
Seite wird geladen ...
Seite wird geladen ...
Seite wird geladen ...
Seite wird geladen ...
Seite wird geladen ...
Seite wird geladen ...
Seite wird geladen ...
Seite wird geladen ...
Seite wird geladen ...
Seite wird geladen ...
-
 1
1
-
 2
2
-
 3
3
-
 4
4
-
 5
5
-
 6
6
-
 7
7
-
 8
8
-
 9
9
-
 10
10
-
 11
11
-
 12
12
-
 13
13
-
 14
14
-
 15
15
-
 16
16
-
 17
17
-
 18
18
-
 19
19
-
 20
20
-
 21
21
-
 22
22
-
 23
23
-
 24
24
-
 25
25
-
 26
26
-
 27
27
-
 28
28
-
 29
29
-
 30
30
-
 31
31
-
 32
32
-
 33
33
-
 34
34
-
 35
35
-
 36
36
-
 37
37
-
 38
38
-
 39
39
-
 40
40
-
 41
41
-
 42
42
-
 43
43
-
 44
44
-
 45
45
-
 46
46
-
 47
47
-
 48
48
-
 49
49
-
 50
50
-
 51
51
-
 52
52


Red Sea Magnesium Pro Bedienungsanleitung
- Typ
- Bedienungsanleitung
- Dieses Handbuch eignet sich auch für
in anderen Sprachen
- English: Red Sea Magnesium Pro Owner's manual
- français: Red Sea Magnesium Pro Le manuel du propriétaire
- español: Red Sea Magnesium Pro El manual del propietario
- Nederlands: Red Sea Magnesium Pro de handleiding
Verwandte Artikel
-
 Red Sea Magnesium Bedienungsanleitung
-
 Red Sea Phosphate Pro Benutzerhandbuch
-
Red Sea Trace Colors Bedienungsanleitung
-
 Red Sea Marine Care Bedienungsanleitung
-
 Red Sea NO3:PO4-X Bedienungsanleitung
-
Red Sea Reef Energy Plus Bedienungsanleitung
-
 Red Sea Reef Base White Bedienungsanleitung
-
 Red Sea Phosphate Benutzerhandbuch
-
 Red Sea MAX NANO Cube Bedienungsanleitung


