RUTEC VARDAflex COB Plus LED-Strip Bedienungsanleitung
- Kategorie
- Lichterketten
- Typ
- Bedienungsanleitung

D D
Carl-Zeiss-Str. 15
28857 Syke
COB_PlusProfiSelect_BA_74369_08/2022
COB Plus Profi Select
Der LED-Strip ist nur für die Installation in tro ckenen
Innenräumen geeignet.
Stromschlaggefahr!
Beauftragen Sie mit der Installation eine Elektrofach kraft.
Für Leuchten, die nicht gemäß den euro päischen
Sicherheitsrichtlinien installiert wurden, entfällt jeder
Haftungsanspruch.
Achtung!
LED-Strip nur an ein geeignetes Netzgerät
(24 V DC) anschließen.
Nur komplett abgerollt betreiben.
LED-Strips in Parallelschaltung verbinden.
LIEFERUMFANG:
1 x 5 Meter LED-Strip
TECHNISCHE DATEN:
Spannungsversorgung 24 V Netzgerät mit konstanter
Ausgangsspannung
Leistung 75 W
Stromstärke 3,125 A
Ausstrahlwinkel 120°
Anzahl LED 2560
Länge Maximal 5 Meter pro Anschluss
Abmessungen 5000 x 10 x 2,9 mm
Biegedurchmesser 64 mm
CE-konform mit den zutreffenden
europäischen Richtlinien
Schutzklasse 3 - Schutzkleinspannung
Profil notwendig
LED-Strip nicht ohne
weiteren Kühlkörper sowie ausreichende
Belüftung betreiben
Nur für den Innenbereich geeignet
Die vollständigen technischen Daten entnehmen Sie bitte dem
jeweiligen Artikel auf www.rutec.de!
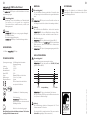
Beispielabbildung
✂
+ 24 V + 24 V + 24 V + 24 V
WWWW
CCC
C
✂
MONTAGE:
Stromschlaggefahr!
Vor der Installation Spannung abschalten. Sicherstellen, dass
die Spannung nicht versehentlich wieder eingeschaltet werden
kann.
LED-Strip erst an einen Controller und dann an
das Netzgerät anschließen (nicht im Lieferumfang enthalten).
Achtung!
Bei stromführenden Oberflächen Isolierschicht zwischen
LED-Strip und Oberfläche anbringen. Ober -
flächen müssen eben, staub- und fettfrei sowie trocken sein.
1. Oberfläche vorbereiten.
2. LED-Strip, falls erforderlich, kürzen (Bild 1).
3. Schutzfolie abziehen und LED-Strip mit leichtem
Druck anpressen, dabei nicht direkt auf die elektronischen
Bauteile drücken.
4.
LED-Strip an Spannungsversorgung anschließen.
LED-PLATINE KÜRZEN:
Stromschlaggefahr!
Vor dem Kürzen immer spannungsfrei schalten.
LED-Strip kann jeweils nach 32 LEDs (62,5 mm)
getrennt werden (Bild 1).
LED-Strip an der markierten Stelle trennen.
Bei eng bestückten LED-Strips wird ein Mikroseitenschneider
oder optional ein Cutter benötigt
!
Achtung!
Bei Lötverbindungen beachten: Löttemperatur 260° C und
Lötdauer maximal 10 Sekunden.
Es ist ausschließlich neutral vernetztes Silikon zu verwenden
(keinesfalls essighaltiges Silikon verwenden!).
ENTSORGUNG:
Entsorgen Sie elektrische und elektronische Geräte
umweltgerecht. Nähere Informationen erhalten Sie bei
Ihrer zuständigen Behörde.
Bild 1

G
Carl-Zeiss-Str. 15
28857 Syke
COB_PlusProfiSelect_BA_74369_08/2022
COB Plus Profi Select
The LED strip
is only suitable for installation in dry
indoor rooms.
Risk of electric shock!
Be sure to have a professional electrician complete
in stallation. There is no warranty coverage for any lights
installed without observing european safety directives.
Caution!
Only connect the LED strip to a suitable
power supply (24 V DC).
Only operate when completely unrolled.
Connect LED strips in parallel.
SCOPE OF DELIVERY:
1 x 5 metre LED strip
TECHNICAL DATA:
Power supply 24 V power supply with constant
output voltage
Power 75 W
Current strength 3.125 A
Beam angle 120°
Quantity LED 2560
Length maximum 5 metres per connection
Dimensions 5000 x 10 x 2.9 mm
Bending diameter 64 mm
Compliant with the applicable
european CE directives
Safety class 3 - low voltage protection
Profile necessary
The LED strip needs an
additional cooling element and
sufficing air ventilation.
Suitable for indoor use only
Please refer to the respective article on www.rutec.de for
complete technical data!
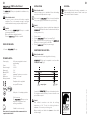
G
example figure
✂
+ 24 V + 24 V + 24 V + 24 V
WWWW
CCC
C
✂
INSTALLATION:
Risk of electric shock!
Switch off voltage prior to installation. Ensure that voltage
cannot be accidentally switched on again.
First connect the LED strip to a controller and then
to the power supply (not included in the scope of delivery).
Caution!
On conducting surfaces, place an insulation layer between the
LED strip and surface. Surfaces must be flat, free
of dust, grease and dry.
1. Prepare surface.
2. Shorten LED strip if necessary (Fig. 1).
3. Peel off adhesive film and gently press on
LED strip, do not press directly on the LEDs.
4. Connect
LED strip
to power supply.
SHORTENING THE LED STRIP:
Risk of electric shock!
Always disconnect the mains plug before shortening.
LED strip can be separated in each case after
32 LEDs (62.5 mm) (Fig. 1).
Separate the LED strip
at the marked position.
For a tightly assembled LED strip is a micro side cutter or an
optional cutter required.
Caution!
With soldered connections note that the soldering
tem perature is 260° C and the soldering duration a
maximum of 10 seconds per soldering point.
Only use neutral cross-linked silicon (never use silicon which
includes vinegar!).
DISPOSAL:
Dispose of electrical and electronic equipment in an
environmentally friendly manner. Please contact your
local council for further information.
Fig. 1
-
 1
1
-
 2
2


RUTEC VARDAflex COB Plus LED-Strip Bedienungsanleitung
- Kategorie
- Lichterketten
- Typ
- Bedienungsanleitung
in anderen Sprachen
Verwandte Papiere

Sonstige Unterlagen
-
 VARDAFLEX RU-86548 Benutzerhandbuch
-
VARDAFLEX 86478 Bedienungsanleitung
-
JB Systems Light FLEXI LED Bedienungsanleitung
-
EuroLite LED IP STRIP SET 45 RGB Benutzerhandbuch
-
Renkforce 1493868 Bedienungsanleitung
-
Kibri 39493 Bedienungsanleitung
-
-
-
