
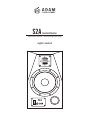
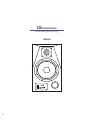
S2A Nearfield Monitor
Operation manual / Bedienungsanleitung
english / deutsch
S2A
https://manual-hub.com/

2
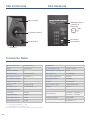
Table of contents
Safety Instructions 3
Quick Start 4
Setting up your speakers 5-6
Controls 7-8
A.R.T. Accelerated Ribbon Technology 9
Limited warranty 10
Technical Data 11
Introduction
First of all, we would like to thank you for choosing ADAM Audio. ADAM Studio Monitors
are built to a maximum in reproduction quality and perfection. You have selected a
precise high resolution active speaker system that allows you to professionally judge
audio recordings. We are condent that these monitors can meet your expectations to
a faithful sound reproduction.
To enjoy the capabilities of your new speakers, please read the following safety and
warranty considerations before connecting these. Get informed about the speaker
placement and the available control elements. The positioning and the acoustical
properties of the control room often play a bigger role than you might think.
The S2A is a professional and compact near eld monitor. A suitable tool for home
studios, small control rooms, recording vehicles and post productions suites.
The S2A is a two-way ported active system that uses a single A.R.T. tweeter and a
HexaCone® bass/midrange driver below the crossover frequency at 1.8 kHz. Each
section uses an individual amp with continuous output of up to 150 Watts (RMS).
The use of our exceptional A.R.T. tweeter ensures full compatibility to the latest
media formats such as DVD Audio and SACD with their expanded high frequency
resolution. At the same time the S2A allows to monitor the low frequency range down to
35 Hz with a at response. Because of the extraordinary stiffness and lightness of
the HexaCone’s® Nomex/Kevlar sandwich membrane, this results in an exceptional
accurate frequency response of the speaker.
If you have chosen the correspondent option, the speakers are magnetically shielded
and can therefore be used in close combination with sensitive equipment like computer
screens.
We very much hope that you enjoy your new monitors and their unique transducer
design. If you have any questions about this or any of our products, don’t hesitate to
contact us - we will be happy to advise you. The Team from ADAM Audio
https://manual-hub.com/

English
3
Safety Instructions
In case of a problem, please either contact your ADAM dealer or us. We are happy to try
and help. Always refer servicing to qualied personnel and never attempt to repair this
product by yourself. Please read through the following safety instructions completely
before setting your system up.
• Do not open the monitor. There are no user-serviceable parts inside.
• Do not expose this product to rain or moisture, never wet the inside with
any liquid and never pour or spill liquids directly onto this unit.
• Never use ammable or combustible chemicals for cleaning audio
components
• Avoid touching the speaker membranes and do not block the woofer’s
ventilation port.
• Assure free airow behind the speakers to maintain sufcient cooling.
• Always use fully checked cables. Defective cables can harm your speakers.
They are a common source for any kind of noise, hum, crackling etc.
• Always switch off your entire system before connecting or disconnecting
any cables, or when cleaning any components.
• This product, as well as all attached extension cords, must be terminated
with an earth ground three-conductor AC mains power cord. To prevent
shock hazard, all three components must always be used.
• Never replace any fuse with a value or type other than those specied.
Never bypass any fuse.
• Never expose this product to extremely high or low temperatures
• Never operate this product in an explosive atmosphere.
• Always keep electrical equipment out of the reach of children.
• Always unplug sensitive electronic equipment during lightning storms.
• If you have not ordered the magnetically shielded version of these monitors,
do not place the speakers to electronically equipment like computer screens.
https://manual-hub.com/

4
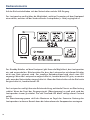
Quick Start
• After having unpacked your monitor, please allow the system to acclimate to the
temperature of the room. Please do not connect the speaker for approximately an
hour.
• Make sure the power switch at the back of the unit is turned off as well as the switch
on the front of the monitor.
• Connect the XLR-Input (1) of the speaker to the output of your audio system.
Decrease the volume of your audio system to protect your speaker and ears from
damage when switching the system on.
• Now, check the voltage setting (2). It has to conform with the voltage standard of the
country you stay. Please, contact ADAM Audio, should this not be the case.
• Connect the provided power cord to the speaker.
• Switch on the rear power switch rst, then the front switch. By increasing the volume
of your audio system, you should now hear sound.
• To achieve the best possible sound reproduction, please see the following consid-
erations for speaker placement.
(1) (2)
https://manual-hub.com/

English
5
Setting up your speakers
The S2A is designed for vertical operation. The speakers should be positioned on rm
ground or a stand. Vibrating parts of nearby objects can mask the sound.
In case, you plan to modify the speaker cabinet (e.g. drilling holes), please contact us
before doing so. We will guide you and handle your warranty obliging.
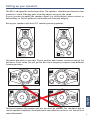
Set up your speakers with the A.R.T. tweeters pointing upwards.
Horizontal placement is possible. Please position both tweeter sections either to the
outside or to the inside. You will get the best linear frequency response from different
listening positions.
Obstacles between the speaker and your ear must be avoided. You should be able to
see the speaker completely. Avoid placement near reective surfaces, too. You will lose
room information!
S2A
S2A
S2A
S2A
S2A
S2A
https://manual-hub.com/

6
Setting up your speakers
The Tweeter should be positioned approximately at the height of your ears. In case you
need to position the speaker in a signi cant lower or higher position, the monitor needs
to be angled.
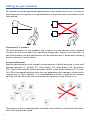
Placement of 2 speakers
The ideal placement of two speakers and a listener in a two-channel stereo listening
situation are the corner points of a equilateral triangle (60° angles). Since the S2A is a
near eld monitor, the best performance will be achieved with a stereo base/listening
distance between 1 and 3 meters.
Surround placement
Speaker positioning for multi-channel stereo purposes is ideally based on a circle with
speakers placed at 0° (Center), 30° (Front Right), 110° (Rear Right), 250° (Rear Left),
330° (Front Left), with the listener being the circle’s center (Radius between 0.7-2.0 m).
This ITU recommended con guration may vary depending on the purpose of the control
room (music or lm). However, it is recommended to create a symmetrical listening
position with the front side and surround speaker pointing to the listener’s ear.
The distance to the surrounding walls should be at least 40 cm to avoid early re ections,
which will degrade the sound.
https://manual-hub.com/

English
7
Controls
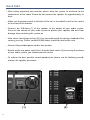
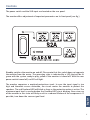
The power switch and the XLR-input are located on the rear panel.
The monitor offers adjustment of important parameters on its front panel (see g.)
Standby switches the monitor on and off. Please note that this switch does not separate
the monitor from the mains. The operating state is indicated by a LED that will be lit
green with the system ready to play, yellow if the monitor is turned off. With the rear
power switch turned off, no LED will light.
The monitor comprises a overload protection circuit. In case the input signal is too
high and therefore causes distortion, the circuit mutes the monitor to protect the
speakers. The red Overload-LED will blink as long as the protective action is active. The
maximum input level is reached when the Overload-LED starts blinking. Excessive use
of the monitor in this state will likely result in a reduced lifetime of the components. If
possible, turn down the source signal level.
https://manual-hub.com/

8
Controls
INPUT GAIN
To match the monitor’s input to the source signal level, the input sensitivity can be
varied by -10 dB to +10 dB.
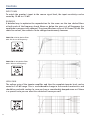
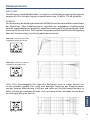
ROOM EQ
A detailed way to optimize the reproduction for the room are the two shelve lters
at both ends of the frequency band. Above or below the given cut off frequency the
amplitude is progressively changed. The given dB values occur at 30 Hz and 15 kHz. We
show ve curves, the controls can be changed continuously however.
HIGH GAIN
The voltage gain of the tweeter amplier and thus the complete tweeter level can be
varied in a ±4 dB range. This is a considerable change in the sound characteristic and
should be used with caution. In case you have a considerably damped room or if there
is a special taste you are after this control will serve you well.
ROOM EQ >6 kHz Shelve Filter
with 6 kHz cut off frequency
ROOM EQ <150 Hz Shelve Filter
with 150 Hz cut off frequency
https://manual-hub.com/

English
9
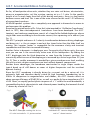
A.R.T. Accelerated Ribbon Technology
So far, all loudspeaker drive units, whether they are voice coil driven, electrostatics,
piezos or magnetostatics, act like a piston, moving air in a 1:1 ratio. As the speci c
weight of air is much lower than that of the driving mechanics, there is a bad match
between source and load. This is one of the main reasons for the small 1-2% ef ciency
of conventional speakers.
All ADAM speaker systems take a completely new approach in kinematics to move air
and overcome this problem.
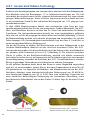
Based on the original works of Dr. Oskar Heil, who invented his “Air Motion Transformer”
back in 1972, new electrodynamical transducers have been developed. The A.R.T.
tweeter’s and midrange membrane consist of a lamella-like folded diaphragm whose
single folds move according to the alternate current, thus squeezing air in and out (see
Fig. 1).
The A.R.T. principle achieves a 4:1 velocity transformation between driving diaphragm
and driven air, i. e. the air moves in and out four times faster than the folds itself are
moving. This superior “motor” is responsible for the enormous clarity and transient
reproduction and thus their increased ef ciency.
Another factor in dynamics is diaphragm area. For practically all drive units, the cone
area you can see is the acoustically active area of the loudspeaker. By folding the
A.R.T. diaphragm into the third dimension as seen from the listener’s position, the
acoustically effective area of the diaphragm is increased by a factor larger than 2.5 (see
Fig. 2). Thus, a smaller movement is needed for a given sound pressure level, enabling
the unit to reach a higher sound pressure level without dynamic compression.
Besides these advantages, the membrane construction in single stripes avoids the
typical break up of stiff domes or cones at higher frequencies and the resultant
dynamic limiting.
Since the A.R.T. membrane is directly driven by a current, not by a voice coil, it is
extremely light and therefore ideally suited for high frequency reproduction up to
35kHz. In comparison to magnetostatics and ribbons, the A.R.T. tweeter offers an
above average ef ciency of 93dB/W/m, as well as a perfectly linear impedance of 3.2
±0.05 Ohms, an equally perfect phase response of ± 1° within the used bandwidth, a
reasonable directivity characteristic and a thermal power handling that exceeds that of
1” domes by a factor of 2 to 3.
Area comparison between the
unfolded A.R.T. tweeter diaphragm
and a 1” dome tweeter
The A.R.T. Principle: moving the air in a
4:1 ratio instead of a 1:1 piston motion
Fig.1 Fig.2
https://manual-hub.com/

10
Limited Warranty
ADAM Audio GmbH grants a two years limited warranty for this product. If anything
goes wrong with this product, ADAM Audio and its national distributors will provide
repair free of charge (exclusions may apply) and replacement parts.
Terms and Conditions
This guarantee complements any national/regional law obligations of dealers or
national distributors and does not affect your statutory rights as a customer.
This warranty is limited to the repair of the equipment. Neither transportation, nor
any other costs, nor any risk for removal, transportation and installation of products
is covered by this warranty. Products whose serial number has been altered, deleted,
removed or made illegible are excluded from this warranty.
The warranty is only valid for the original owner. It is not transferable.
The warranty will not be applicable in cases other than defects in materials and/or
workmanship at the time of purchase and will not be applicable:
a. for damages caused by incorrect installation, connection or packing,
b. for damages caused by any use other than correct use described in the user manual
c. for damages caused by faulty or unsuitable ancillary equipment,
d. if repairs or modications have been executed by an unauthorized person.
e. for damages caused by accidents, lightning, water, re heat, war, public disturbances
or any other cause beyond the reasonable control of ADAM Audio.
How to claim repairs under warranty
Should service be required, please follow the following procedure:
If the equipment is being used in the country of purchase, you should contact your
ADAM Audio dealer.
If the equipment is being used outside the country of purchase, you should contact
your ADAM Audio national distributor in the country of residence. You will be advised
where the equipment can be serviced. Please visit our website to get the contact
details of your local distributor.
To validate your warranty, you will need a copy of your original sales invoice with the
date of purchase.
Transport
In case you have to send your speakers to any other location, it is of vital importance to
use the original packaging materials. Experience shows that it is very difcult to avoid
damage if you have to send them without these. We will not be responsible for damages
due to improper packaging.
https://manual-hub.com/

English
11
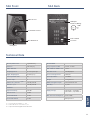
*1 = long term IEC 265-8-Wrms / 10 min
*2 = nominal IEC 265-8 = Peak Power 5 µsec
*3 = entsprechend den Angaben auf der Rückseite
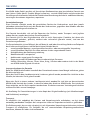
Woofer/Subwoofer 1 (HexaCone)
Basket ø 186 mm (7”)
A.R.T. Tweeter 1
Diaphragm area 71 cm2 (11 in.2)v
Equiv. diaphragm ø 95 mm (3.7”)
Velocity transf. ratio 4:1
Built in amps 2
Subwoofer / Woofer *1/2 150 W/200 W
Tweeter *1/2 150 W/200 W
Controls
Input Sensitivity ±10 dB
Tweeter level ±4 dB
Room EQ >6kHz ±6 dB
Room EQ <150Hz ±6 dB
XLR Input
balanced, Wiring:
Power Switch
A.C. Inlet
12
3
1 GND
2 +
3 –
A.R.T. tweeter
7“ HexaCone woofer
Bass Re ex Port
Frontpanel
S2A Front S2A Back
General Data
Freq. response ±3dB 35 Hz - 35 kHz
THD >80Hz at 90dB in 1m <0.8 %
SPL max at 1m 108 dB/W/m
Crossover frequencies 1800 Hz
Input impedance 10 kOhm
Weight 13 kg 28.6 lb.
Width x Height x Depth 220x370x320 mm
Warranty 2 years
Supply Voltage 100-120V~, 50/60Hz *3
200-240V~, 50/60Hz *3
Max. Power Consumption max. 500W
Safety Class1
Technical Data
https://manual-hub.com/

12
S2A Nearfield Monitor
Bedienungsanleitung
deutsch
S2A
https://manual-hub.com/

Deutsch
13
Inhalt
Sicherheitshinweise 14
Quick Start zur Inbetriebnahme 15
Empfehlungen zur Aufstellung 16-17
Bedienelemente 18-19
A.R.T. Accelerated Ribbon Technology 20
Garantie 21
Technische Daten 22
Einleitung
Danke, dass Sie sich für einen Studiomonitor von ADAM Audio entschieden haben!
Sie erwerben ein professionelles und hoch auösendes Aktivsystem zur zuverlässigen
Beurteilung von Tonaufnahmen, gefertigt und gebaut mit dem Ziel größtmöglicher
Perfektion und bestmöglicher Wiedergabequalität.
Bitte lesen Sie diese Bedienungsanleitung vor der Inbetriebnahme und beachten Sie
die folgenden Sicherheitshinweise und Garantiebestimmungen. Die nachfolgenden
Tipps und Überlegungen sollen Ihnen dabei helfen, die Fähigkeiten ihrer Lautsprecher
möglichst gut zu nutzen. Die Positionierung im Raum sowie die Eigenschaften des
Hörraums selbst sind von größerer Bedeutung für das Gesamtergebnis als bisweilen
vermutet.
Das Modell S2A ist ein kompakter Nahfeldmonitor für den Einsatz in kleinen Regieräumen:
im Tonstudio, im Übertragungswagen, bei der Postproduktion oder einfach dort, wo
klangliche Kompromisse auch bei geringen Abmessungen nicht eingegangen werden
sollten. Das aktive Zweiwege-Bassreexsystem arbeitet mit einem A.R.T. Hochtöner,
sowie einem HexaCone® Konuslautsprecher für den Tief-/Mitteltonbereich unterhalb
1,8 kHz. Für beide Wege steht ein eigener Verstärker mit 150 W (RMS) zur Verfügung.
Die herausragenden Eigenschaften des A.R.T. Hochtöners gewährleisten volle
Kompatibilität zu aktuellen Medien mit ihrer erweiterten Auösung im Hochtonbereich,
wie etwa die DVD Audio oder die SACD. Gleichzeitig erlaubt der S2A, trotz kompakter
Abmessungen, eine neutrale Beurteilung des Bassbereichs hinunter bis 35 Hz. Die
besondere Steif- und Leichtigkeit der, aus Nomex und Kevlar bestehenden, HexaCone
Wabenmembran sorgt zudem eine außergewöhnliche Wiedergabepräzision.
Sofern Sie die entsprechende Option (Magnetische Abschirmung) für die S2A mit
bestellt haben, kann dieser auch in der Nähe entsprechend empndlicher Peripherie,
wie etwa Computermonitoren, betrieben werden.
Wir wünschen Ihnen viele schöne Stunden mit Ihrem neu erworbenen ADAM
Lautsprecher.
Sollten Sie Fragen zu weiteren Einzelheiten haben oder es ein Problem gibt, zögern Sie
bitte nicht, uns zu kontaktieren. Ihr ADAM Audio Team.
https://manual-hub.com/

14
Sicherheitshinweise
Bei einem Problemfall wenden Sie sich bitte an Ihren ADAM Vertragshändler oder direkt an uns.
Wir helfen gerne! Bitte versuchen Sie auf keinen Fall dieses Produkt selbst zu reparieren und
beachten Sie die folgenden Sicherheitshinweise bevor Sie Ihre neuen Lautsprecher in Betrieb
nehmen.
• Öffnen Sie die Monitore nicht. Es benden sich keine wartungsbedürftigen Teile im
Gehäuseinnern.
• Vermeiden Sie, dass Flüssigkeiten jeglicher Art ins Gehäuseinnere gelangen. Sprühen Sie
weder Flüssigkeiten direkt auf das Gerät, noch nutzen Sie nasse Reinigungstücher.
• Bitte verwenden Sie keine brennbaren und ätzenden Chemikalien zur Reinigung dieses
Produkts.
• Vermeiden Sie jede Berührung mit den Membranen der Lautsprecher und blockieren Sie nicht
die Bassreexöffnung.
• Gewährleisten Sie eine rückwärtige Zirkulation für eine notwendige Kühlung der Elektronik.
• Schalten Sie stets alle Geräte aus, bevor Sie eine Kabelverbindung entfernen oder neu
hinzufügen.
• Verwenden Sie stets geprüfte Kabel. Defekte Kabel sind häug die Ursache für Störgeräusche
jeglicher Art.
• Dieser Lautsprecher kann einen Schalldruck von über 85 dB SPL erzielen. Zu hohe Lautstärken
können ihr Gehör schädigen.
• Diese Monitore müssen mit einer dreipoligen, geerdeten Stromversorgung betrieben werden.
Alle drei Pole müssen stets verwendet werden. Dies gilt auch für davor geschaltete
Verlängerungen oder Verteiler.
• Verwenden Sie ausschließlich die spezizierten Sicherungstypen. Überbrücken Sie niemals,
auch nicht im Notfall, die Sicherung.
• Bitte entfernen Sie den Netzstecker bei Gewitter.
• Setzen Sie dieses Produkt nicht bei extremen Temperaturen ein, ebenso wenig in feuer- oder
explosionsgefährdeten Umgebungen.
• Stellen Sie sicher, dass dieses Gerät mitsamt Verkabelung nicht versehentlich durch Kinder
manipuliert wird.
• Sollten Sie nicht über die magnetisch abgeschirmte Version dieser Lautsprecher verfügen,
so platzieren Sie diese nicht in unmittelbarer Nähe empindlicher elektronischer Geräte wie
Bildschirmen.
https://manual-hub.com/

Deutsch
15
Inbetriebnahme des aktiven Lautsprechers
• Nach dem Auspacken sollte sich der Lautsprecher ca. 1 Stunde unangeschlossen an
die Umgebungstemperatur anpassen.
• Schalten Sie den Netzschalter auf der Rückseite und den Schalter auf der Vorderseite
aus.
• Verbinden Sie den XLR-Eingang (1) des Lautsprecher über einen “männlichen” XLR-
Stecker mit dem Ausgang Ihrer Audio-Anlage. Regeln Sie den Ausgangspegel
herunter, so dass beim Einschalten der Lautsprecher zu hohe Schallpegel zu keinen
Schäden führen können.
• Überprüfen Sie, ob die gekennzeichnete Nennspannung (2) mit der Nennspannung
in Ihrer Umgebung übereinstimmt. Falls dies nicht der Fall sein sollte, kontaktieren
Sie unbedingt ADAM Audio.
• Verbinden Sie nun den Lautsprecher über das mitgelieferte Netzkabel mit der
Netzversorgung.
• Schalten Sie den hinteren und danach den vorderen Schalter ein. Wenn Sie nun den
Pegel Ihrer Anlage erhöhen, sollte das Signal über die aktiven Lautsprecher zu hören
sein.
• Um ein optimales Wiedergabeergebnis zu erhalten, beachten Sie bitte die Hinweise
zur Aufstellung auf den nachfolgenden Seiten.
(1) (2)
https://manual-hub.com/

16
Empfehlungen zur Aufstellung
Der S2A wurde für eine vertikale Aufstellung konstruiert. Stellen Sie den Lautsprecher
auf festen Untergrund oder befestigen Sie ihn auf einem Ständer. Mitschwingende Teile
können den Klang maskieren, selbst wenn es nicht offensichtlich “scheppert“.
Sollte ein mechanischer Eingriff zur Aufstellung notwendig erscheinen (Dübel oder
ähnliches), so setzen Sie sich bitte vorher mit uns in Verbindung. In der Regel gibt es
hier keine Probleme, die Garantiebestimmungen werden kulant gehandhabt.
Stellen Sie die S2A Monitore aufrecht mit den Hochtönern nach oben zeigend auf.
Eine horizontale Aufstellung ist möglich. Für eine bestmögliche lineare Reproduktion
des Frequenzgangs aus unterschiedlichen Abhörpositionen ist es hierbei unerlässlich,
dass die Hochtönersektionen jeweils beide nach außen oder nach innen platziert sind.
Vermeiden Sie Hindernisse im Wege des Schalls zu Ihren Ohren. Sie sollten die
Lautsprecher komplett sehen können! Vermeiden Sie gleichzeitig eine Aufstellung
neben schallreektierenden Objekten. Sie verlieren an Wiedergabequalität.
S2A
S2A
S2A
S2A
S2A
S2A
https://manual-hub.com/

Deutsch
17
Empfehlungen zur Aufstellung
Positionieren Sie die Hochtöner möglichst in Ohrenhöhe. Für den Fall, dass Sie die
Monitore deutlich über- oder unterhalb Ohrhöhe platzieren müssen, sollten diese
entsprechend angewinkelt werden.
Zweikanal Stereo
Die allgemein günstigste Lautsprecheraufstellung im Zweikanal-Stereobetrieb ist das
so genannte Stereodreieck. Lautsprecher und Zuhörer sitzen an den Eckpunkten eines
gleichseitigen Dreiecks (60° Winkel). Als Nahfeldmonitor erreichen Sie die besten
Ergebnisse mit einer Stereobasis und Abhörentfernung zwischen ein und drei Metern.
Mehrkanal Stereo (Surround)
Die Aufstellung der Lautsprecher in einem Mehrkanal-Stereo-Setup sollte sich
idealerweise an einem Kreis orientieren. Die Lautsprecher werden an den
Winkelpositionen 0° (Center), 30° (Front Rechts), 110° (Rear Rechts), 250° (Rear
Links) und 330° (Front Links) platziert. Der Zuhörer sitzt in der Kreismitte, die in diesem
Fall einen Radius zwischen 0,7 und 2,0 Meter aufweisen sollte. Diese Richtlinie der ITU
kann je nach Anwendung variiert werden (Film- oder Musikbearbeitung/wiedergabe).
Dennoch ist es stets zu empfehlen, dass eine symmetrische Verteilung der Lautsprecher
angestrebt wird. Zudem sollten die linken und rechten Frontlautsprecher sowie die
Surrounds auf den Hörer ausgerichtet werden.
https://manual-hub.com/

18
Bedienelemente
Auf der Rückseite benden sich der Netzschalter und der XLR-Eingang.
Der Lautsprecher verfügt über die Möglichkeit, wichtige Parameter auf dem Frontpanel
einzustellen, welches auf der Vorderseite des Lautsprecher (s. Abb.) zugänglich ist.
Der Standby-Schalter auf dem Frontpanel gibt Ihnen die Möglichkeit, den Lautsprecher
ein- und auszuschalten. Bitte beachten Sie, dass der Lautsprecher mit diesem Schalter
nicht vom Netz getrennt wird. Der jeweilige Betriebszustand wird durch eine LED
angezeigt. Wenn der Lautsprecher angeschaltet ist, leuchtet diese LED grün, ansonsten
gelb, wenn der Netzschalter eingeschaltet ist. Wenn der Netzschalter auf der Rückseite
ausgeschaltet ist, leuchtet keine LED.
Der Lautsprecher verfügt über eine Schutzschaltung, welche die Chassis vor Überlastung
schützt. Wenn der Pegel des Eingangssignals (Übersteuerung) zu groß wird, wird der
Lautsprecher stumm geschaltet. Die rote Overload-LED blinkt solange dieser Zustand
anhält.
Die Übersteuerungsgrenze stellt das Maximum an Pegel dar. Exzessive Nutzung des
Lautsprechers in diesem Bereich kann die Lebensdauer der Komponenten verringern.
https://manual-hub.com/

Deutsch
19
Bedienelemente
INPUT GAIN
Um die Eingangsempndlichkeit des Lautsprechers an die Bedingungen der Signalquelle
anzupassen lässt sich der Eingang in einem Bereich von -10 dB bis +10 dB einstellen.
ROOM EQ
Zur Optimierung der Wiedergabe bietet der ROOM EQ zwei Kuhschwanzlter an den Enden
des Spektrums. Ober- beziehungsweise unterhalb der angegebenen Eckfrequenzen
wird der Amplitudenverlauf progressiv angehoben und erreicht die angegebenen ±6 dB
Werte bei 30 Hz und15 kHz. Die Graphiken zeigen beispielhaft fünf Kurven, die Regelung
über den Trimmer erfolgt tatsächlich jedoch kontinuierlich:
HIGH GAIN (Hochtonpegel) Der Pegel des Hochtöners kann in einem Bereich von
±4 dB verändert werden. Dies stellt eine deutliche Änderung des Klangcharakters
von der linearen Mittelstellung (0 dB) dar und sollte mit Vorsicht benutzt werden. In
Fällen schwieriger Raumakustik oder auch geschmacklicher Vorlieben leisten diese
Einstellungen aber gute Dienste.
ROOM EQ >6 kHz für die hohen
Frequenzen oberhalb 6 kHz
ROOM EQ <150 Hz für die tiefen
Frequenzen unterhalb 150 Hz
https://manual-hub.com/

20
A.R.T. Accelerated Ribbon Technology
Praktisch alle Antriebsprinzipien von Lautsprechern arbeiten nach dem Kolbenprinzip:
Eine Membran setzt ihre Bewegungen 1:1 in Luftdruckschwankungen um. Die Luft
setzt dabei der vergleichsweise relativ schweren Antriebsmechanik nur einen extrem
geringen Widerstand entgegen. Diese schlechte Anpassung zwischen Quelle und Last
ist ein wesentlicher Grund für den schlechten Wirkungsgrad von 1-2% gängiger Laut-
sprecherkonstruktion.
In allen ADAM Monitorsystemen kommt eine revolutionäre neue Form der Laut-
sprecherantriebstechnik zum Einsatz, die genau dieses Problem überwindet. Die A.R.T.
Hoch- und Mitteltöner basieren auf dem von Dr. Oskar Heil entwickelten Air Motion
Transformer. Die Lautsprechermembran besteht aus einer lamellenförmig gefalteten
Folie, die sich im Takt der eingespeisten Musik öffnet und schließt (Abbildung 1). Durch
die Membranfaltung wird die Luft schneller eingesogen und ausgestoßen, als sich die
Falten bewegen. Die Geschwindigkeitstransformation liegt bei etwa 4:1 und führt zu
einem entsprechend höheren Wirkungsgrad.
Um bei der Dynamik zu bleiben: Bei Konstruktionen nach dem Kolbenprinzip ist die
sichtbare Membran äche identisch mit der akustisch wirksamen Fläche. Bei A.R.T.
Lautsprechern vergrößert sich dieses Verhältnis durch die Faltung in die, vom Beobachter
aus gesehen, dritte Dimension auf circa 2,5:1 (Abbildung 2). Die akustisch wirksame
Fläche ist größer als die Schallaustrittsöffnung, weshalb sich höhere unverzerrte
Lautstärken erreichen lassen. Im Gegensatz zu der, für Kalotten typischen, einsetzenden
Dynamikbegrenzung vermeidet die Aufteilung der A.R.T. Gesamtmembran in einzelne,
ächig angetriebene Teilmembrane ein Aufbrechen zu höheren Frequenzen.
Da die gefaltete Membran direkt durch den Strom in einem Magnetfeld angetrieben
wird, hat sie eine besonders geringe Masse, die einen Frequenzbereich hinauf bis 35
kHz gewährleistet. Im Gegensatz zu Bändchen- und Mangetostaten besitzt der A.R.T.
Hochtöner allerdings einen überdurchschnittlichen Wirkungsgrad von 93 dB/W/m,
eine linealgerade Impedanz von 3,2 (± 0,05) Ohm, eine vernünftige Dispersion mit
einer konstruktiv beabsichtigten Bevorzugung der horizontalen Abstrahlung sowie
eine thermische Belastbarkeit, die um den Faktor 2-3 höher liegt als die einer 25 mm
Kalotte.
Größenvergleich der A.R.T. Hochton
Membran mit einer 25 mm Kalotte
Das A.R.T. Prinzip:
Beschleunigung der Luft im Verhältnis 4:1
Abb.1 Abb.2
https://manual-hub.com/
Seite laden ...
Seite laden ...
Seite laden ...
Seite laden ...
-
 1
1
-
 2
2
-
 3
3
-
 4
4
-
 5
5
-
 6
6
-
 7
7
-
 8
8
-
 9
9
-
 10
10
-
 11
11
-
 12
12
-
 13
13
-
 14
14
-
 15
15
-
 16
16
-
 17
17
-
 18
18
-
 19
19
-
 20
20
-
 21
21
-
 22
22
-
 23
23
-
 24
24


