Adam Audio Sub7 Benutzerhandbuch
- Kategorie
- Subwoofer
- Typ
- Benutzerhandbuch

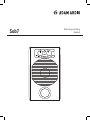
Sub7 Operation Manual / Bedienungsanleitung
English / Deutsch
https://manual-hub.com/

3
Sub7 Manual / English
Protect the cord from being walked on or pinched.
Always use fully checked cables. Defective cables can harm your speakers. They
are a common source for any kind of noise, hum, crackling etc.
Always keep electrical equipment out of the reach of children.
Always unplug sensitive electronic equipment during lightning storms.
The Subwoofer should be installed near the socket outlet and disconnection of
the device should be easily accessible.
To completely disconnect from AC mains, disconnect the power supply from
the AC receptacle. Never use flammable or combustible chemicals for cleaning
audio components.
Avoid touching the speaker membranes and do not block the woofer’s
ventilation ports.
Never expose this product to extremely high or low temperatures. Never
operate this product in an explosive atmosphere.
High SPL’s may damage your hearing! Please do not get close to the
loudspeakers when using them at high volumes.
Please note that the diaphragms build up a magnetic field. Do not ply with
magnetic items at close range to the diaphragms.
Assure free airflow behind the speakers to maintain sufficient cooling.
Safety Instructions
2
Please read the following safety instructions before setting up your system.
Keep the instructions for subsequent reference. Please heed the warnings and
follow the instructions.
Caution: To reduce the risk of electric shock, do not open the subwoofer.
There are no user-serviceable parts inside. Refer servicing to qualified
service personnel.
This product, as well as all attached extension cords, must be terminated with
an earth ground three-conductor AC mains power cord like the one supplied
with the product. To prevent shock hazard, all three components must always
be used.
Never replace any fuse with a value or type other than those specified. Never
bypass any fuse.
Always switch off your entire system before connecting or disconnecting any
cables, or when cleaning any components.
Do not place this unit on an unstable cart, stand or tripod, bracket or table. The
unit may fall, causing serious injury and/or serious damage. When cart is used,
use caution when moving the cart/apparatus combination.
Do not expose this product to rain or moisture, never wet the inside with any
liquid and never pour or spill liquids directly onto this unit. Please do not put
any objects filled with liquids (e.g. vases, etc.) onto the speaker.
Check if the specified voltage matches the voltage of the power supply you
use. If this is not the case do not connect the loudspeakers to a power source!
Please contact your local dealer or national distributor.
Caution
Risk of electrical shock
Do not open
Risque de shock electrique
Ne pas ouvrier
CAUTION: TO REDUCE THE RISK OF FIRE OR ELECTRIC SHOCK,
DO NOT REMOVE BACK COVER OR ANY OTHER PART.
NO USER-SERVICABLE PARTS INSIDE.
DO NOT EXPOSE THIS EQUIPMENT TO RAIN OR MOISTURE.
REFER SERVICING TO QUALIFIED PERSONNEL.
Safety Instructions
https://manual-hub.com/

5
Sub7 Manual / English
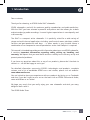
1. Introduction
Dear customer,
Thank you for choosing an ADAM Audio Sub7 subwoofer.
ADAM subwoofers are built for maximum quality reproduction and audio perfection.
With the Sub7 you have selected a powerful and precise tool that allows you to both
evaluate and enjoy audio recordings. It meets highest expectations in sound quality and
craftsmanship.
The Sub7 is a compact active subwoofer. It is perfectly suited for a wide variety of
stereo and multi-channel applications including small control rooms, desktops, mobile
facilities and post-production edit bays … in other words, in any situation where a
combination of no-compromise sound reproduction and a small footprint is required.
This manual is intended to provide you with information about your new ADAM subwoofer.
It contains important information regarding safety, setting up, handling, and
warranty. We request that you read these sections carefully to ensure easy set up and
prevent potential problems.
If you have any questions about this or any of our products, please don’t hesitate to
contact us – we will be happy to assist you.
For detailed information concerning ADAM’s technologies and products, complete
reviews, and a list of worldwide ADAM users and studios, please visit our website:
www.adam-audio.com
You are invited to share your experience with our products by joining us on Facebook
and also, if you don’t want to miss out on the latest info on ADAM Professional Audio,
come and follow us on Twitter!
We hope very much that you really enjoy your new subwoofer and wish you many
delightful hours with it.
The ADAM Audio Team
4
Table of contents
Safety Instructions .............................................2-3
1. Introduction .......................................................5
2. Quick Start ........................................................6
2.1 Important Information .......................................6
2.2 Quick Start ........................................................6
3. Connecting the Subwoofer ................................7
3.1 Connections ......................................................7
3.2 Input ..................................................................7
3.3 Satellite Out .......................................................7
3.4 LEDs ..................................................................7
4. Subwoofer Placement ........................................8
4.1 Distance to satellites .........................................8
4.2 Walls/Distance to walls .....................................8
4.3 Finding the optimum position ............................8
5. Controls .............................................................9-10
5.1 Controls on front panel and Remote Control .....9
5.2 Controls on rear panel .......................................10
6. Trouble Shooting ................................................11
6.1 No or distorted signal ........................................11
6.2 Parasitic noises .................................................11
7. Maintenance ......................................................12
8. Shipping / Packaging ........................................12
9. Environmental Information ................................12
10. EU Declaration of Conformity ............................13
11 . Limited Warranty ...............................................14
11 . 1 Terms and Conditions ........................................14
11 . 2 How to claim ......................................................14
12. Technical Data ...................................................15
https://manual-hub.com/

5
Sub7 Manual / English
1. Introduction
Dear customer,
Thank you for choosing an ADAM Audio Sub7 subwoofer.
ADAM subwoofers are built for maximum quality reproduction and audio perfection.
With the Sub7 you have selected a powerful and precise tool that allows you to both
evaluate and enjoy audio recordings. It meets highest expectations in sound quality and
craftsmanship.
The Sub7 is a compact active subwoofer. It is perfectly suited for a wide variety of
stereo and multi-channel applications including small control rooms, desktops, mobile
facilities and post-production edit bays … in other words, in any situation where a
combination of no-compromise sound reproduction and a small footprint is required.
This manual is intended to provide you with information about your new ADAM subwoofer.
It contains important information regarding safety, setting up, handling, and
warranty. We request that you read these sections carefully to ensure easy set up and
prevent potential problems.
If you have any questions about this or any of our products, please don’t hesitate to
contact us – we will be happy to assist you.
For detailed information concerning ADAM’s technologies and products, complete
reviews, and a list of worldwide ADAM users and studios, please visit our website:
www.adam-audio.com
You are invited to share your experience with our products by joining us on Facebook
and also, if you don’t want to miss out on the latest info on ADAM Professional Audio,
come and follow us on Twitter!
We hope very much that you really enjoy your new subwoofer and wish you many
delightful hours with it.
The ADAM Audio Team
4
Table of contents
Safety Instructions .............................................2-3
1. Introduction .......................................................5
2. Quick Start ........................................................6
2.1 Important Information .......................................6
2.2 Quick Start ........................................................6
3. Connecting the Subwoofer ................................7
3.1 Connections ......................................................7
3.2 Input ..................................................................7
3.3 Satellite Out .......................................................7
3.4 LEDs ..................................................................7
4. Subwoofer Placement ........................................8
4.1 Distance to satellites .........................................8
4.2 Walls/Distance to walls .....................................8
4.3 Finding the optimum position ............................8
5. Controls .............................................................9-10
5.1 Controls on front panel and Remote Control .....9
5.2 Controls on rear panel .......................................10
6. Trouble Shooting ................................................11
6.1 No or distorted signal ........................................11
6.2 Parasitic noises .................................................11
7. Maintenance ......................................................12
8. Shipping / Packaging ........................................12
9. Environmental Information ................................12
10. EU Declaration of Conformity ............................13
11 . Limited Warranty ...............................................14
11 . 1 Terms and Conditions ........................................14
11 . 2 How to claim ......................................................14
12. Technical Data ...................................................15
https://manual-hub.com/

7
Sub7 Manual / English
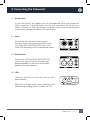
3.1 Connections
On the rear side of the speaker you can find balanced (XLR) and unbalanced
(RCA) connectors. For professional use the XLR connectors will be the first
choice. However, as RCA connections are widely used in home entertainment
environments we have included an RCA jack as well.
3.2 Input
Connect the left and right line-level signal
from your signal source (audio interface, mixer,
etc.) to the LEFT and RIGHT INPUT jacks. Use
either XLR (balanced) or RCA (unbalanced) cables.
3.3 Satellite Out
Connect the LEFT and RIGHT SATELLITE OUT
jacks to the inputs of the left and right main
powered speakers or the inputs of the amps
powering the main speakers.
3.4 LEDs
There are two LEDs on the front, one on each
potentiometer.
Both LEDs will glow green during operation and
yellow during stand-by (Auto On mode, see 5.2).
3. Connecting the Subwoofer
6
2.1 Important Information for set up
After having unpacked your subwoofer, please allow the system to acclimate to
the temperature of the room for approximately an hour.
The subwoofer should be positioned on a firm ground.
We recommend that you retain the original packaging, as it is the best way to
guarantee safe transportation should the need to do so arise.
Please note that the subwoofer will take some break-in time to achieve optimum
sonic performance.
2.2 Quick Start
a) Before connecting the subwoofer to your audio components and the power
source make sure that the subwoofer, the loudspeakers and your audio source
are switched off and set the level controls fully counterclockwise.
b) Choose your preferred connection as described under 3.
c) Check if the specified voltage matches the voltage of the power supply you use.
If this is not the case do not connect the loudspeakers to a power source! Please
contact your local dealer or national distributor.
If the voltages match, use the included power cables to connect the loudspeaker
to the AC sockets.
d) Switch on the main on/off switches on the rear panel of the subwoofer.
e) Make sure that the line out level (volume) of your stereo is either at a low level or
all the way off. Then, switch on your audio system.
f) Turn on your source of music and adjust the volume carefully.
2. Quick Start
https://manual-hub.com/

7
Sub7 Manual / English
3.1 Connections
On the rear side of the speaker you can find balanced (XLR) and unbalanced
(RCA) connectors. For professional use the XLR connectors will be the first
choice. However, as RCA connections are widely used in home entertainment
environments we have included an RCA jack as well.
3.2 Input
Connect the left and right line-level signal
from your signal source (audio interface, mixer,
etc.) to the LEFT and RIGHT INPUT jacks. Use
either XLR (balanced) or RCA (unbalanced) cables.
3.3 Satellite Out
Connect the LEFT and RIGHT SATELLITE OUT
jacks to the inputs of the left and right main
powered speakers or the inputs of the amps
powering the main speakers.
3.4 LEDs
There are two LEDs on the front, one on each
potentiometer.
Both LEDs will glow green during operation and
yellow during stand-by (Auto On mode, see 5.2).
3. Connecting the Subwoofer
6
2.1 Important Information for set up
After having unpacked your subwoofer, please allow the system to acclimate to
the temperature of the room for approximately an hour.
The subwoofer should be positioned on a firm ground.
We recommend that you retain the original packaging, as it is the best way to
guarantee safe transportation should the need to do so arise.
Please note that the subwoofer will take some break-in time to achieve optimum
sonic performance.
2.2 Quick Start
a) Before connecting the subwoofer to your audio components and the power
source make sure that the subwoofer, the loudspeakers and your audio source
are switched off and set the level controls fully counterclockwise.
b) Choose your preferred connection as described under 3.
c) Check if the specified voltage matches the voltage of the power supply you use.
If this is not the case do not connect the loudspeakers to a power source! Please
contact your local dealer or national distributor.
If the voltages match, use the included power cables to connect the loudspeaker
to the AC sockets.
d) Switch on the main on/off switches on the rear panel of the subwoofer.
e) Make sure that the line out level (volume) of your stereo is either at a low level or
all the way off. Then, switch on your audio system.
f) Turn on your source of music and adjust the volume carefully.
2. Quick Start
https://manual-hub.com/

9
Sub7 Manual / English
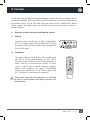
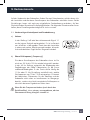
On the front side you will find two potentiometers, one for the volume and one for the
crossover frequency. Both the volume and the frequency can also be controlled by
the remote control. On the rear side, there are more controls (satellite filter, phase
switch, mode). The following tips are intended to assist you at using the controls in
the best manner.
5.1 Controls on the front panel and Remote control
a) Volume
Input Sensitivity control from -60 dB to +6 dB relative
to 775 mV when used via the symmetrical XLR input
or relative to 250 mV when used via the asymmetrical
Cinch (RCA) input.
b) Frequency
The upper frequency limit of the unit is variable and
can be set to any value between 50 and 150Hz.
The 85Hz marker indicates the recommendation of
Dolby® labs for surround sound settings. In many
cases, a slightly lower crossover frequency delivers
tighter bass response, for typical near-midfield
monitors we recommend 70 to 75Hz as upper limit
(i.e. -3 dB point in the frequency response).
Please note: If you alter the frequency it is advisable
to check if an alteration of the phase improves the
sound quality.
5. Controls
FREQ
VOLUME
+
+
8
It is common knowledge that low frequencies (below about 100Hz) are non-directional,
meaning they can hardly be located by the listener. It is, however, a common misunder-
standing that therefore the placement of a subwoofer does not matter. It does matter.
Due to the fact that every room (geometry, furniture, etc.) is unique, the following de-
scriptions intend to be a first introduction to the subject. The aim is to assist you tack-
ling the most common problems with subwoofers and room acoustics, notably interfer-
ence and standing waves.
4.1 Distance to satellites
In most set ups it is advisable to place the subwoofer not too far from the satellites
to minimize the chance of Interferences. Interference means the superposition of
two or more waves resulting in an attenuation/cancellation or enhancement of the
specific frequency/frequencies.
Furthermore, big refelexion faces in close range of the subwoofer should be avoid-
ed if possible.
4.2 Walls/Distance to walls
Generally, every wall in relative close distance to the subwoofer enhances its
sound pressure by about 6 dB. For instance, placing the subwoofer in a corner of
a room will make it about 18 dB louder. It is likely that this will result in an impair-
ment of the precision of the musical reproduction.
Another problem related to the geometrics of the room concerns the so called
‘standing waves’. These are sound waves being reciprocated between reflecting
objects, so they ‘stand’ (don’t seem to move) in between these objects. The speak-
er continues to produce new waves that combines its force with the first wave(s): a
vicious circle that results in local imbalances of the particular frequencies.
4.3 Finding the optimum position
Give it a try! The most important tool for finding the best position for your sub-
woofer are your ears. There are two rather easy ways:
You can determine your listening spot first and then compare the sound of the
subwoofer at different positions.
Another option is to place the subwoofer at the listening position and then move
around. Whereever the sound is the best the subwoofer should be positioned.
4. Subwoofer Placement
https://manual-hub.com/

9
Sub7 Manual / English
On the front side you will find two potentiometers, one for the volume and one for the
crossover frequency. Both the volume and the frequency can also be controlled by
the remote control. On the rear side, there are more controls (satellite filter, phase
switch, mode). The following tips are intended to assist you at using the controls in
the best manner.
5.1 Controls on the front panel and Remote control
a) Volume
Input Sensitivity control from -60 dB to +6 dB relative
to 775 mV when used via the symmetrical XLR input
or relative to 250 mV when used via the asymmetrical
Cinch (RCA) input.
b) Frequency
The upper frequency limit of the unit is variable and
can be set to any value between 50 and 150Hz.
The 85Hz marker indicates the recommendation of
Dolby® labs for surround sound settings. In many
cases, a slightly lower crossover frequency delivers
tighter bass response, for typical near-midfield
monitors we recommend 70 to 75Hz as upper limit
(i.e. -3 dB point in the frequency response).
Please note: If you alter the frequency it is advisable
to check if an alteration of the phase improves the
sound quality.
5. Controls
FREQ
VOLUME
+
+
8
It is common knowledge that low frequencies (below about 100Hz) are non-directional,
meaning they can hardly be located by the listener. It is, however, a common misunder-
standing that therefore the placement of a subwoofer does not matter. It does matter.
Due to the fact that every room (geometry, furniture, etc.) is unique, the following de-
scriptions intend to be a first introduction to the subject. The aim is to assist you tack-
ling the most common problems with subwoofers and room acoustics, notably interfer-
ence and standing waves.
4.1 Distance to satellites
In most set ups it is advisable to place the subwoofer not too far from the satellites
to minimize the chance of Interferences. Interference means the superposition of
two or more waves resulting in an attenuation/cancellation or enhancement of the
specific frequency/frequencies.
Furthermore, big refelexion faces in close range of the subwoofer should be avoid-
ed if possible.
4.2 Walls/Distance to walls
Generally, every wall in relative close distance to the subwoofer enhances its
sound pressure by about 6 dB. For instance, placing the subwoofer in a corner of
a room will make it about 18 dB louder. It is likely that this will result in an impair-
ment of the precision of the musical reproduction.
Another problem related to the geometrics of the room concerns the so called
‘standing waves’. These are sound waves being reciprocated between reflecting
objects, so they ‘stand’ (don’t seem to move) in between these objects. The speak-
er continues to produce new waves that combines its force with the first wave(s): a
vicious circle that results in local imbalances of the particular frequencies.
4.3 Finding the optimum position
Give it a try! The most important tool for finding the best position for your sub-
woofer are your ears. There are two rather easy ways:
You can determine your listening spot first and then compare the sound of the
subwoofer at different positions.
Another option is to place the subwoofer at the listening position and then move
around. Whereever the sound is the best the subwoofer should be positioned.
4. Subwoofer Placement
https://manual-hub.com/

11
Sub7 Manual / English
All ADAM products are designed and manufactured to the highest quality standards.
However, if any problems with your subwoofer occur, we recommend to proceed as
follows:
6.1 Problem: The LED shows normal operation (green) but there is either no or only
a distorted audio signal.
Check the volumes of both the subwoofer and your signal source.
Check the wiring. Is the cable defective? Are all cables connected correctly? If pos-
sible, check with new cables.
Connect the subwoofer as directly to the signal source as possible (please mind
the volume!). Is another part of the signal path (e.g. mixer, audio source) defective?
6.2 Problem: You hear parasitic noises (like humming, buzzing, soughing,
cracking).
Please disconnect the signal cables. If the noises disappear, check the signal path.
Make sure that all cables are properly connected, especially the signal cable be-
tween the preamp/mixing console/etc. and the sub.
If the noises can still be heard, check for other electrical devices close to the
speakers (mobile phones, switching power supplies, etc.). If there is no interfering
device the subwoofer will probably cause the problem.
6. Troubleshooting
10
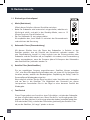
5.2 Controls on the rear panel
a) Mode
This push button allows you to choose between
• Auto: The subwoofer starts operation as soon as a
musical signal arrives, and stops after 15 minutes
without a signal.
• On: The unit is permanently working.
We recommend the ”Auto” position. It minimises power
consumption and makes handling very easy.
b) Subwoofer Phase
With the Phase Switch you can alter the phase of the subwoofer relative
to the satellites. That means to change the polarity of the bass unit.
Depending on the distance between woofer and satellites, either 0° or
180° may be the better position.
We recommend to try out what position sounds better within your
system.
c) Satellite Filter
The satellites in a system can be driven full range or with a 85 Hz high
pass as recommended by Dolby® laboratories for use in surround set-
ups.
Recommendation: If possible the main signal should go into the
Subwoofer. Connect your satellites to the Subwoofer output, either
via XLR symmetrical or RCA asymmetrical. In many cases, clarity and
dynamic range of the speakers can be improved if they do not reproduce
very low frequencies since they do not have to deliver big amplitudes.
d) Foot Switch
This input jack allows for switching the subwoofer on or off by
footswitch. When you have connected the Input and Output of the
subwoofer with the same type of connectors (either both XLR or both
RCA) the footswitch will also switch off the Satellite Filter, enabling the
satellite speakers to play full range.
5. Controls
https://manual-hub.com/

11
Sub7 Manual / English
All ADAM products are designed and manufactured to the highest quality standards.
However, if any problems with your subwoofer occur, we recommend to proceed as
follows:
6.1 Problem: The LED shows normal operation (green) but there is either no or only
a distorted audio signal.
Check the volumes of both the subwoofer and your signal source.
Check the wiring. Is the cable defective? Are all cables connected correctly? If pos-
sible, check with new cables.
Connect the subwoofer as directly to the signal source as possible (please mind
the volume!). Is another part of the signal path (e.g. mixer, audio source) defective?
6.2 Problem: You hear parasitic noises (like humming, buzzing, soughing,
cracking).
Please disconnect the signal cables. If the noises disappear, check the signal path.
Make sure that all cables are properly connected, especially the signal cable be-
tween the preamp/mixing console/etc. and the sub.
If the noises can still be heard, check for other electrical devices close to the
speakers (mobile phones, switching power supplies, etc.). If there is no interfering
device the subwoofer will probably cause the problem.
6. Troubleshooting
10
5.2 Controls on the rear panel
a) Mode
This push button allows you to choose between
• Auto: The subwoofer starts operation as soon as a
musical signal arrives, and stops after 15 minutes
without a signal.
• On: The unit is permanently working.
We recommend the ”Auto” position. It minimises power
consumption and makes handling very easy.
b) Subwoofer Phase
With the Phase Switch you can alter the phase of the subwoofer relative
to the satellites. That means to change the polarity of the bass unit.
Depending on the distance between woofer and satellites, either 0° or
180° may be the better position.
We recommend to try out what position sounds better within your
system.
c) Satellite Filter
The satellites in a system can be driven full range or with a 85 Hz high
pass as recommended by Dolby® laboratories for use in surround set-
ups.
Recommendation: If possible the main signal should go into the
Subwoofer. Connect your satellites to the Subwoofer output, either
via XLR symmetrical or RCA asymmetrical. In many cases, clarity and
dynamic range of the speakers can be improved if they do not reproduce
very low frequencies since they do not have to deliver big amplitudes.
d) Foot Switch
This input jack allows for switching the subwoofer on or off by
footswitch. When you have connected the Input and Output of the
subwoofer with the same type of connectors (either both XLR or both
RCA) the footswitch will also switch off the Satellite Filter, enabling the
satellite speakers to play full range.
5. Controls
https://manual-hub.com/

13
Sub7 Manual / English
We,
ADAM Audio GmbH
whose registered office is situated at
Ederstr. 16, 12059 Berlin, Germany
declare under our sole responsibility that the product:
Sub7
complies with the EU Electro-Magnetic Compatibility (EMC) Directive 89/336/EEC, in
pursuance of which the following standards have been applied:
EN 61000-6-1 : 2001
EN 61000-6-3 : 2001
EN 55020 : 2002
EN 55013 : 2001
and complies with the EU General Product Safety 2001/95/EC, in pursuance of which
the following standard has been applied:
EN 60065 : 2002.
This declaration attests that the manufacturing process quality control and product
documentation accord with the need to assure continued compliance.
The attention of the user is drawn to any special measures regarding the use of this
equipment that may be detailed in the owner’s manual.
Sven Schmöle
Managing Director ADAM Audio GmbH
10. EU Declaration of Conformity
12
Please switch the subwoofer off before cleaning!
Please note that the diaphragms build up a magnetic field. Do not ply with mag-
netic items at close range to the diaphragms.
Please make sure that no liquids get inside the cabinet. Do not spray any fluids
on the speaker. Do not use a wet cloth for cleaning.
Do not use flammable or acidic chemicals for cleaning.
Do not touch the membrane of the subwoofer.
We recommend using a lint-free, damp cloth for cleaning.
The woofer membrane may be dusted using a very soft brush.
8. Shipping / Packaging
In case you have to send your speakers to any other location, it is of vital importance
that you use the original packaging materials. Experience has shown that it is very dif-
ficult to avoid damage if you have to send them without these. ADAM Audio can not be
held responsible for damages due to improper packaging.
If a transport is necessary and the original shipping carton is not available, a new one
can be purchased from ADAM Audio.
9. Environmental Information
All ADAM products comply with international directives on the Restriction of Hazard-
ous Substances (RoHS) in electrical / electronical equipment and the disposal of
Waste Electrical / Electronic Equipment (WEEE).
For disposal, please consult your local authorities for further information.
7. Maintenance
Rudower Chaussee 50, 12489 Berlin, Germany
Christian Hellinger
Managing Director ADAM Audio GmbH
https://manual-hub.com/

15
Sub7 Manual / English
12 . Technical Data
1 = long term IEC 265-8-Wrms / 10 min
2 = nominal IEC 265-8 = Peak Power 5 µsec
Sub7
Subwoofer 178 mm / 7“
Voice coil ø 38 mm / 1.5“
Woofer material coated paper
Built-in amplifiers 1
Subwoofer channel 1/2 140 W / 210 W
EQ 80 Hz -60 to +6 dB
Frequency response 32 Hz - 150 Hz
THD >60 Hz ≤ 1%
Max. peak ≥ 107 dB
Crossover frequency 50 - 150 Hz
Inputs XLR / RCA
Input impedance 10 kΩ
Weight 8 kg / 17.6 lb.
Height x Width x Depth 370 x 200 x 280 mm / 14.5“ x 8“ x 11“
Warranty 5 years
Operating temperature 0° C to 40° C (32° F to 104° F)
Storage temperature -30° C to 70° C (-22° F to 167° F)
Humidity Max. 90 % not condensing
14
ADAM Audio GmbH provides a five year limited warranty for this product.
11 . 1 Terms and Conditions
This warranty is limited to the repair of the equipment or, if necessary, the re-
placement of parts or the product and return shipping within the country of
purchase.
This warranty complements any national/regional law obligations of dealers or
national distributors and does not affect your statutory rights as a customer.
Neither other transportation, nor any other costs, nor any risk for removal, trans-
portation and installation of products is covered by this warranty.
Products whose serial number have been altered, deleted, removed or made illeg-
ible are excluded from this warranty.
The warranty will not be applicable in cases other than defects in materials and/or
workmanship at the time of purchase and will not be applicable:
a) for damages caused by incorrect installation, connection or packing,
b) for damages caused by any use other than correct use described in the user man-
ual,
c) for damages caused by faulty or unsuitable ancillary equipment,
d) if repairs or modifications have been executed by an unauthorized person,
e) for damages caused by accidents, lightning, water, fire heat, public disturbances or
any other cause beyond the reasonable control of ADAM Audio.
11 . 2 How to claim repairs under warranty
Should service be required, please contact the ADAM Audio dealer where the
product has been purchased.
If the equipment is being used outside the country of purchase, the international
shipping costs have to be paid for by the owner of the product.
Service may be supplied by your ADAM Audio national distributor in the country of
residence. In this case, the service costs have to be paid for by the owner of the
product whereas the costs for parts to be repaired or replaced are free of charge.
Please visit our website to get the contact details of your local distributor.
To validate your warranty, you will need a copy of your original sales invoice with
the date of purchase.
11 . Warranty
ADAM Audio GmbH provides a two year limited warranty for this product.
https://manual-hub.com/

15
Sub7 Manual / English
12 . Technical Data
1 = long term IEC 265-8-Wrms / 10 min
2 = nominal IEC 265-8 = Peak Power 5 µsec
Sub7
Subwoofer 178 mm / 7“
Voice coil ø 38 mm / 1.5“
Woofer material coated paper
Built-in amplifiers 1
Subwoofer channel 1/2 140 W / 210 W
EQ 80 Hz -60 to +6 dB
Frequency response 32 Hz - 150 Hz
THD >60 Hz ≤ 1%
Max. peak ≥ 107 dB
Crossover frequency 50 - 150 Hz
Inputs XLR / RCA
Input impedance 10 kΩ
Weight 8 kg / 17.6 lb.
Height x Width x Depth 370 x 200 x 280 mm / 14.5“ x 8“ x 11“
Warranty 5 years
Operating temperature 0° C to 40° C (32° F to 104° F)
Storage temperature -30° C to 70° C (-22° F to 167° F)
Humidity Max. 90 % not condensing
14
ADAM Audio GmbH provides a five year limited warranty for this product.
11 . 1 Terms and Conditions
This warranty is limited to the repair of the equipment or, if necessary, the re-
placement of parts or the product and return shipping within the country of
purchase.
This warranty complements any national/regional law obligations of dealers or
national distributors and does not affect your statutory rights as a customer.
Neither other transportation, nor any other costs, nor any risk for removal, trans-
portation and installation of products is covered by this warranty.
Products whose serial number have been altered, deleted, removed or made illeg-
ible are excluded from this warranty.
The warranty will not be applicable in cases other than defects in materials and/or
workmanship at the time of purchase and will not be applicable:
a) for damages caused by incorrect installation, connection or packing,
b) for damages caused by any use other than correct use described in the user man-
ual,
c) for damages caused by faulty or unsuitable ancillary equipment,
d) if repairs or modifications have been executed by an unauthorized person,
e) for damages caused by accidents, lightning, water, fire heat, public disturbances or
any other cause beyond the reasonable control of ADAM Audio.
11 . 2 How to claim repairs under warranty
Should service be required, please contact the ADAM Audio dealer where the
product has been purchased.
If the equipment is being used outside the country of purchase, the international
shipping costs have to be paid for by the owner of the product.
Service may be supplied by your ADAM Audio national distributor in the country of
residence. In this case, the service costs have to be paid for by the owner of the
product whereas the costs for parts to be repaired or replaced are free of charge.
Please visit our website to get the contact details of your local distributor.
To validate your warranty, you will need a copy of your original sales invoice with
the date of purchase.
11 . Warranty
2 years
https://manual-hub.com/

Sub7 Bedienungsanleitung
Deutsch
Notes/Notizen
............................................................................................................
............................................................................................................
............................................................................................................
............................................................................................................
............................................................................................................
............................................................................................................
............................................................................................................
............................................................................................................
............................................................................................................
............................................................................................................
............................................................................................................
............................................................................................................
............................................................................................................
............................................................................................................
............................................................................................................
............................................................................................................
............................................................................................................
............................................................................................................
............................................................................................................
............................................................................................................
............................................................................................................
............................................................................................................
............................................................................................................
...........................................................................................................
...........................................................................................................
............................................................................................................
............................................................................................................
............................................................................................................
............................................................................................................
............................................................................................................
............................................................................................................
https://manual-hub.com/

19
Sub7 Bedienungsanleitung / Deutsch
Vermeiden Sie, dass Flüssigkeiten jeglicher Art ins Gehäuseinnere gelangen.
Sprühen Sie weder Flüssigkeiten direkt auf das Gerät, noch nutzen Sie nasse
Reinigungslappen.
Bitte verwenden Sie keine brennbaren und ätzenden Chemikalien zur Reinigung
dieses Produkts.
Vermeiden Sie jede Berührung mit den Membranen des Subwoofers und
blockieren Sie nicht die Bassreflexöffnung.
Gewährleisten Sie eine rückwärtige Luftabfuhr für eine notwendige Kühlung der
Elektronik.
Zum Trennen des Gerätes vom Stromnetz schalten Sie den Netzschalter aus.
Anschließend ziehen Sie den Netzstecker aus der Steckdose. Der Netzschalter
und -stecker müssen leicht erreichbar sein.
Verwenden Sie stets geprüfte Kabel. Defekte Kabel sind häufig die Ursache für
Störgeräusche verschiedener Art.
Setzen Sie dieses Produkt nicht bei extremen Temperaturen ein, ebenso wenig in
feuer- oder explosionsgefährdeten Umgebungen.
Bitte beachten Sie, dass im Gehäuseinneren sich Magnete befinden, die ein
Magnetfeld aufbauen. Vermeiden Sie, mit magnetischen bzw. paramagnetischen
Gegenständen in unmittelbare Nähe der Lautsprecher zu hantieren.
Zu hohe Lautstärken können ihr Gehör schädigen! Vermeiden Sie direkte Nähe zu
Lautsprechern, die mit hohen Pegeln betrieben werden.
Sicherheitshinweise
18
Bitte beachten Sie die folgenden Sicherheitshinweise, bevor Sie Ihre neuen
Subwoofer in Betrieb nehmen. Bitte heben Sie diese Anleitung auf. Bitte
beachten Sie alle Warnungen und folgen Sie allen Anweisungen.
Achtung: Um die Gefahr eines Stromschlages zu vermeiden, öffnen Sie
den Subwoofer nicht. Es befinden sich keine wartungsbedürftigen Teile im
Gehäuseinnern. Bitte versuchen Sie auf keinen Fall, dieses Produkt selbst
zu reparieren und wenden Sie sich bei einem Problemfall an qualfiziertes
Servicepersonal.
Der Subwoofer muss mit einer dreipoligen, geerdeten Stromversorgung betrieben
werden. Alle drei Pole müssen stets verwendet werden. Dies gilt auch für davor
geschaltete Verlängerungen oder Verteiler.
Verwenden Sie ausschließlich die spezifizierten Sicherungstypen. Überbrücken
Sie niemals, auch nicht im Notfall, die Sicherung.
Überprüfen Sie, ob die gekennzeichnete Nennspannung mit der Nennspannung
in Ihrer Umgebung übereinstimmt. Sollte dies nicht der Fall sein, schließen Sie
den Subwoofer in keinem Falle an eine Stromquelle an und kontaktieren Sie Ihren
Fachhändler.
Schalten Sie stets alle Geräte aus, bevor Sie eine Kabelverbindung entfernen
oder neu hinzufügen.
Verwenden Sie nur Wagen, Ständer, Stative, Einbauhilfen oder Tische, die vom
Hersteller empfohlen oder die mit dem Gerät geliefert werden. Bewegen Sie
einen Wagen, auf dem das Gerät steht, vorsichtig, um ein Herabstürzen zu
verhindern.
Erklärung der graphischen Symbole
Das Blitzsymbol warnt vor der Gefahr eines
elektrischen Schlages.
Das Ausrufezeichen weist auf wichtige
Bedienungs- oder Pflegehinweise hin.
Achtung
Gefahr durch Stromschlag
Nicht öffnen
UM DIE GEFAHR EINES STROMSCHLAGES ZU VERRINGERN,
ENTFERNEN SIE WEDER DIE RÜCKWAND NOCH SONSTIGE TEILE.
DIE INNEREN BAUTEILE DÜRFEN NICHT VOM ANWENDER, SONDERN
NUR VON QUALIFIZIERTEM FACHPERSONAL GEWARTET WERDEN.
SETZEN SIE DAS GERÄT WEDER REGEN NOCH FEUCHTIGKEIT AUS.
Sicherheitshinweise
https://manual-hub.com/

21
Sub7 Bedienungsanleitung / Deutsch
1. Einleitung
Sehr verehrte Kundin, sehr verehrter Kunde,
wir gratulieren Ihnen zu Ihrer Entscheidung für ein Produkt aus dem Hause ADAM
Professional Audio! Sie haben ein professionelles und hoch auflösendes Aktivsystem
erworben, das sowohl zur zuverlässigen Beurteilung von Tonaufnahmen als auch für
bestmögliche Wiedergabequalität entworfen und gefertigt worden ist.
ADAM-Subwoofer verfolgen das erklärte Ziel aller ADAM-Lautsprecher, größtmögliche
Authentizität bei der Wiedergabe von Musik zu erreichen. Bei den Subwoofern be-
deutet dies, imposanten Basseindruck mit einzigartiger Klarheit und Durchzeichnung
zu verbinden. Der aktive Subwoofer Sub7 bietet bei geringen Abmessungen eine
Erweiterung der Wiedergabe bis hinunter zu 32 Hertz.
Bitte lesen Sie diese Bedienungsanleitung vor der Inbetriebnahme und beachten
Sie die Sicherheitshinweise und Garantiebestimmungen. Die nachfolgenden Tipps und
Überlegungen sollen Ihnen dabei helfen, die Fähigkeiten ihres Subwoofers möglichst
gut zu nutzen. Die Positionierung im Raum sowie die Eigenschaften des Hörraums
selbst sind von größerer Bedeutung für das Gesamtergebnis als bisweilen vermutet.
Sollten Sie Fragen zu weiteren Einzelheiten haben oder Probleme auftauchen, zögern
Sie bitte nicht, uns zu kontaktieren. Wir helfen gerne!
Detaillierte Informationen zu den ADAM-Technologien und Produkten, ausführliche
Testberichte und Hintergrundberichte finden Sie auf unserer Website:
www.adam-audio.com
Wenn Sie Ihre Erfahrungen mit unseren Produkten mit anderen ADAM-Usern teilen
wollen oder die aktuellsten Informationen suchen, besuchen Sie uns auf Facebook
und Twitter!
Wir wünschen Ihnen viele schöne Stunden mit Ihrem neu erworbenen ADAM Sub-
woofer!
Ihr ADAM Audio Team aus Berlin
20
Inhalt
Sicherheitshinweise ................................18-19
1. Einleitung ................................................21
2. Quick Start zur Inbetriebnahme ..............22
2.1 Allgemeine Hinweise ...............................22
2.2 Quick Start / Inbetriebnahme .................22
3. Anschluss des Subwoofers ......................23
3.1 Hinweis zum Anschluss ...........................23
3.2 Input (Eingänge) ......................................23
3.3 Satellite Out (Ausgänge) ..........................23
3.4 LEDs (Leuchtdioden) ...............................23
4. Empfehlungen zur Aufstellung .................24
4.1 Entfernung zu den Satelliten ...................24
4.2 Wände/Wandabstand .............................24
4.3 Das Finden der optimalen Position ..........24
5. Bedienelemente ......................................25-26
5.1 Kontrollpanel (vorn) + Fernbedienung .....25
5.2 Rückseitiges Kontrollpanel ......................26
6. Fehlerbehebung ......................................27
6.1 Kein oder gestörtes Signal ......................27
6.2 Nebengeräusche .....................................27
7. Wartung und Pflege .................................28
8. Transport / Verpackung ..........................28
9. Umweltinformation ..................................28
10. Konformitätsbescheinigung .....................29
11 . Garantie ..................................................30
11 . 1 Garantiebedingungen ..............................30
11 . 2 Inanspruchnahme ...................................30
12. Technischen Daten ..................................31
https://manual-hub.com/
Seite wird geladen ...
Seite wird geladen ...
Seite wird geladen ...
Seite wird geladen ...
Seite wird geladen ...
Seite wird geladen ...
Seite wird geladen ...
Seite wird geladen ...
Seite wird geladen ...
Seite wird geladen ...
Seite wird geladen ...
Seite wird geladen ...
-
 1
1
-
 2
2
-
 3
3
-
 4
4
-
 5
5
-
 6
6
-
 7
7
-
 8
8
-
 9
9
-
 10
10
-
 11
11
-
 12
12
-
 13
13
-
 14
14
-
 15
15
-
 16
16
-
 17
17
-
 18
18
-
 19
19
-
 20
20
-
 21
21
-
 22
22
-
 23
23
-
 24
24
-
 25
25
-
 26
26
-
 27
27
-
 28
28
-
 29
29
-
 30
30
-
 31
31
-
 32
32


Adam Audio Sub7 Benutzerhandbuch
- Kategorie
- Subwoofer
- Typ
- Benutzerhandbuch
in anderen Sprachen
- English: Adam Audio Sub7 User manual