
SonicWall NSsp/High-End NSa Series
Power Supply Replacement and Installation
This document provides instructions for:
•Removing a defective power supply module and installing a replacement –
see Removing the Power Supply from the Appliance and Installing a Power
Supply into the Appliance.
•Installing a redundant power supply module in your SonicWall NSa or NSsp
appliance – see Removing the Cover Plate from the Redundant Power
Supply Slot and Installing a Power Supply into the Appliance.
Review the safety and regulatory information in the Quick Start Guide provided
with the appliance.
Removing the Power Supply from the Appliance
To remove a defective power supply from the SonicWall appliance:
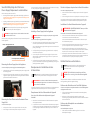
1 Unplug the power cord from the SonicWall appliance power supply module
that is being replaced.
2 Taking note of the power supply orientation as it relates to the appliance,
suppress the power supply release tab while using the module’s handle to
pull the module outwards and remove it.
Removing the Cover Plate from the Redundant Power
Supply Slot
To remove the cover plate:
1 Pull open the soft outer cover to expose the hole in the cover plate.
2 Insert a finger into the hole and pull the cover plate to remove it.
You are now ready to insert the redundant power supply module into the empty
slot. The primary power supply module stays in place.
Installing a Power Supply into the Appliance
To install a new power supply module into the appliance:
1 Insert the new power supply module into the empty slot using the same
orientation you noted when you removed the defective module.
Insert a redundant power supply module using the same orientation as the
primary power supply.
2 Carefully and firmly push the power supply module until it is completely
seated and snaps into place.
3 Connect the power cord to both the power supply and a power source.
When installing a redundant power supply, connect it to a power source
using a separate cord.
4 Confirm that the new power supply is operating correctly. On the front
panel, the LED indicator for the power supply should display a blue light. A
yellow light indicates a problem.
Remplacement et installation du bloc
d'alimentation
Consultez les consignes de sécurité et les informations sur la réglementation en
vigueur décrites dans le Guide de prise en main fourni avec l'appareil.
Remplacement du bloc d'alimentation de l'appareil
Pour retirer le bloc d'alimentation défectueux de l'appareil
SonicWall :
1 Débranchez le cordon d'alimentation du bloc d'alimentation à remplacer
dans l'appareil SonicWall.
2 En prenant soin de noter l'orientation du bloc d'alimentation par rapport à
l'appareil, appuyer la languette de dégagement du bloc d'alimentation tout
en tirant la poignée du module vers l'extérieur pour sortir ce dernier de
l'appareil.
Retrait de la plaque de protection du bloc d'alimentation
Pour retirer la plaque de protection :
1 Ouvrez le couvercle extérieur souple pour exposer le trou de la plaque de
couverture.
2 Insérez un doigt dans le trou et tirez la plaque de couverture pour l'enlever.
Vous pouvez maintenant insérer le module d'alimentation redondant dans
l'emplacement vide. Le module d'alimentation principal demeure en place.
Installation d'un bloc d'alimentation dans l'appareil
Pour installer un nouveau bloc d'alimentation dans l'appareil :
1 Insérez le nouveau bloc d'alimentation dans l'emplacement vide dans le
sens noté lors du retrait du module défectueux.
Insérez un module d'alimentation redondant dans le même sens que le
bloc d'alimentation principal.
2 Poussez le module d'alimentation soigneusement et fermement jusqu'à ce
qu'il soit complètement inséré et qu'il s'enclenche en place.
3 Branchez le cordon d'alimentation sur le bloc d'alimentation et sur la
source électrique. Lors de l'installation d'un bloc d'alimentation redondant,
branchez-le à une source électrique à l'aide d'un cordon séparé.
4 Vérifiez que le nouveau bloc d'alimentation fonctionne correctement. Le
voyant DEL de l'alimentation électrique situé sur le panneau avant devrait
être allumé en bleu. Un voyant jaune indique un problème.
Netzteil Ersetzen und Installieren
Überprüfen Sie die Sicherheits- und Konformitäts-Richtlinien der Schnell-
Einstiegs-Anleitung welche der Appliance beiliegt.
Entfernen des Netzteils aus der SonicWall Appliance
Führen Sie zum Entfernen eines defekten Netzteils aus der SonicWall Appliance
die folgenden Schritte durch:
1 Entfernen Sie das Netzkabel aus dem Netzteil der SonicWall Appliance,
welches ersetzt wird.
2 Merken Sie sich die Ausrichtung des Netzteils. Drücken Sie den
Stromversorgungs-Lösehebel, während Sie am Griff das Modul nach außen
ziehen und entfernen.
Entfernen der Abdeckplatte vom redundanten
Netzteilsteckplatz
Um die Abdeckplatte zu entfernen:
1 Ziehen Sie die weiche äußere Abdeckung auf, um das Loch in der
Abdeckplatte freizulegen.
NOTE: Disconnect the power from the power supply being replaced.
There is no need to power down the appliance.
WARNING: Power supply surfaces can be hot. Handle and store with
care until the surfaces are cool.
Power Supplies (Primary & Redundant)
Example - NSa Appliance Rear View
WARNING: Do NOT insert anything except the power supply module
into the appliance.
NOTE : Débranchez le cordon d'alimentation du bloc d'alimentation à
remplacer. Il n'est pas nécessaire de mettre l'appareil hors tension.
AVERTISSEMENT : Les surfaces du bloc d'alimentation peuvent être
chaudes. Manipulez l'appareil avec soin et mettez-le de côté jusqu'à ce
que les surfaces se refroidissent.
AVERTISSEMENT : N'INSÉREZ AUCUN OBJET autre que le bloc
d'alimentation dans l'appareil.
HINWEIS: Trennen Sie den Stecker von dem Netzteil welches Sie
ersetzen möchten. Das Gerät muss nicht zwingend komplett
ausgeschaltet werden.
WARNUNG: Die Oberfläche der Netzteile kann heiß sein.
Handhaben Sie es vorsichtig, bis die Oberflächen abgekühlt
sind.

2 Führen Sie einen Finger in das Loch und ziehen Sie an der Abdeckplatte, um
sie zu entfernen.
Sie können nun das redundante Netzteilmodul in den leeren Steckplatz
einstecken. Das primäre Netzteilmodul bleibt an Ort und Stelle.
Einsetzen des Netzteils in die SonicWall Appliance
Führen Sie zum Einsetzen des neuen Netzteils in die SonicWall Appliance die
folgenden Schritte durch:
1 Führen Sie das neue Netzteil in die Appliance ein, mit der Ausrichtung, die
Sie sich beim Ausbau gemerkt haben.
Fügen Sie ein redundantes Netzteilmodul in der gleichen Ausrichtung wie
das primäre Netzteil ein.
2 Schieben Sie das Netzteil in Position, bis es fest sitzt und einrastet.
3 Schließen Sie das Netzteil mit dem Netzanschlusskabel an die Stromquelle
an. Wenn Sie ein redundantes Netzteil installieren, schließen Sie es mit
einem separaten Kabel an eine Stromquelle an.
4 Überprüfen Sie, ob die Betriebs-LED jetzt blau leuchtet. Dies zeigt an, dass
das neue Netzteilmodul erfolgreich eingesetzt und angeschlossen wurde.
Ein gelbes Licht deutet auf ein Problem hin.
電源供應器的更換與安裝
檢閱隨設備提供的 Quick Start Guide 及 Safety and Regulatory
Information。
從裝置移除交流電源供應器
若要從
SonicWall
裝置取出有瑕疵的電源供應器,請執行下列步
驟:
1從將被替換的 SonicWall 裝置的電源模組上拔除電源線。
2記下電源供應器與裝置的相關方向,壓下電源供應器的釋放擋
片,同時使用模組的拉把將電源供應器往外拉出移除。
移除備源電源 (Redundant Power Supply) 插槽的蓋板
移除蓋板:
1拉開蓋板上的橡皮蓋,可看見蓋板上的圓孔。
2將手指伸入圓孔,向外拉動蓋板,即可將蓋板取下。
您現在已經可以將備源電源模模組插入空插槽。主電源模組保持
原來的位置不變。
安裝交流電源供應器到裝置中
要安裝新的電源進入
SonicWall
設備,請按照下列步驟
:
1按照移除要替換的電源供應器時所記下的方向插入新的電源供
應器模組到 SonicWall 裝置的空的孔插槽中。
根據與主電源模組相同的方向,插入備源電源模組。
2小心的並穩固的將電源供應模組推入直到它完全的定位及卡
住。
3將電源線連接到電源供應器和電源。當安裝備用電源時,請用
獨立的電源線連接到電源。
4確認新的電源供應器是正確的運轉。在前面板,電源的 LED 指
示燈應該亮藍色,亮黃色表示有問題。
This power supply module is for use only with SonicWall appliances indicated below. Use of
this module with a SonicWall appliance that is not approved will void the warranty for that
appliance. This module is provided as a replacement or redundant power supply, and is
provided on an “as is” basis without warranty of any kind.
This power supply, 01-SSC-0019 SONICWALL HIGH-END NSA NSSP SERIES POWER SUPPLY
FRU, is approved for use with:
SonicWall NSsp 13700 and lower-numbered NSsp models
SonicWall NSa 4700 and higher NSa x700 models
SonicWall NSa 4650 and higher NSa xx50 models
For information and related documents, see the following web site:
https://www.sonicwall.com/support
Copyright © 2021 SonicWall Inc. All rights reserved.
SonicWall is a trademark or registered trademark of SonicWall Inc. and/or its affiliates in the
U.S.A. and/or other countries. All other trademarks are property of their respective owners.
The information in this document is provided in connection with SonicWall Inc. and/or its
affiliates' products. No license, express or implied, by estoppel or otherwise, to any
intellectual property right is granted by this document. SonicWall Inc. and/or its affiliates do
not make any commitment to update the information contained in this document. For more
information, visit http://www.sonicwall.com/legal.
SonicWall NSsp/High-End NSa Series Power Supply Installation Guide
Updated - August 2021
232-004336-52 Rev A
WARNUNG: Stecken Sie nichts anderes außer das Netzteil in
den Gerät-Steckplatz.
注意 : 從欲更換的電源供應器移除電源。設備無須關機。
警告 : 電源供應器表面會很熱。 直到表面冷卻前,需小心的
搬動及儲存。
警告 : 禁止插入 SonicWall 交流電源供應器以外的任何物品。
Legend
WARNING: A WARNING icon indicates a potential for property damage,
personal injury, or death.
CAUTION: A CAUTION icon indicates potential damage to hardware or loss of
data if instructions are not followed.
IMPORTANT, NOTE, TIP, MOBILE, or VIDEO: An information icon indicates
supporting information.
SonicWall NSa/NSsp
Power Supply Module
Installation Guide
-
 1
1
-
 2
2


SonicWALL NSsp/High-End NSa Series Power Supply Installationsanleitung
- Typ
- Installationsanleitung
- Dieses Handbuch eignet sich auch für
in anderen Sprachen
Verwandte Artikel
-
SonicWALL NSa 6650 Installationsanleitung
-
SonicWALL NSsp 12400 Installationsanleitung
-
-
-
-
SonicWALL NSA 2700 Installationsanleitung
-
-
-
-