SonicWall
®
NS
a
4650-9650 Power Supply
Replacement and Installation
This document provides instructions for:
• Removing a defective power supply module and installing a replacement –
see Removing the Power Supply from the Appliance and Installing a Power
Supply into the Appliance.
• Installing a redundant power supply module in your SonicWall NSa
4650/5650/6650/9250/9450/9650 appliance – see R e m o v i n g t h e C o v e r P l a t e
from the Redundant Power Supply Slot and Installing a Power Supply into
the Appliance.
Review the safety and regulatory information in the Quick Start Guide provided
with the 4650-9650 appliance.
Removing the Power Supply from the Appliance
To remove a defective power supply from the SonicWall appliance:
1 Unplug the power cord from the SonicWall appliance power supply module
that is being replaced.
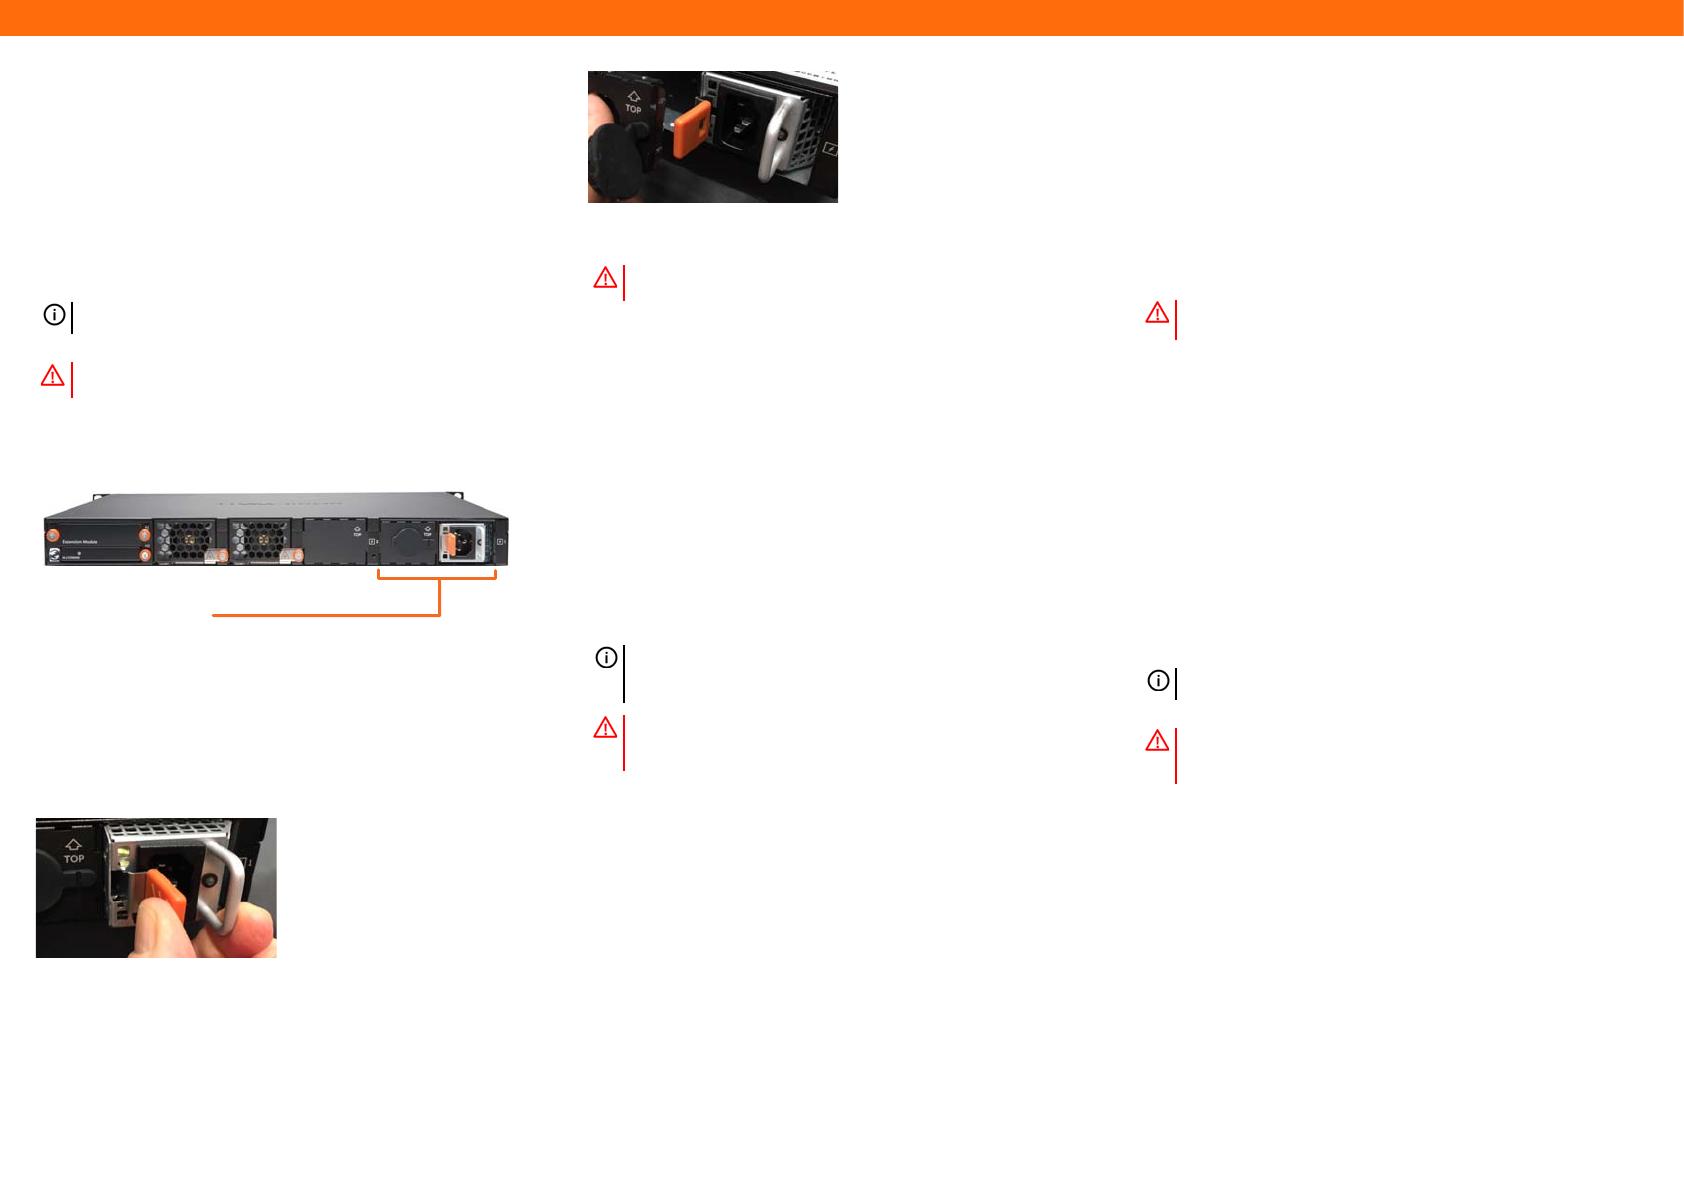
2 Taking note of the power supply orientation as it relates to the appliance,
suppress the power supply release tab while using the module’s handle to
pull the module outwards and remove it.
Removing the Cover Plate from the Redundant Power
Supply Slot
To remove the cover plate:
1 Pull open the soft outer cover to expose the hole in the cover plate.
2 Insert a finger into the hole and pull the cover plate to remove it.
You are now ready to insert the redundant power supply module into the empty
slot. The primary power supply module stays in place.
Installing a Power Supply into the Appliance
To install a new power supply module into the appliance:
1 Insert the new power supply module into the empty slot using the same
orientation you noted when you removed the defective module.
Insert a redundant power supply module using the same orientation as the
primary power supply.
2 Carefully and firmly push the power supply module until it is completely
seated and snaps into place.
3 Connect the power cord to both the power supply and a power source.
When installing a redundant power supply, connect it to a power source
using a separate cord.
4 Confirm that the new power supply is operating correctly. On the front
panel, the LED indicator for the power supply should display a blue light. A
yellow light indicates a problem.
Remplacement et installation du bloc
d'alimentation
Consultez les consignes de sécurité et les informations sur la réglementation en
vigueur décrites dans le Guide de prise en main fourni avec l'appareil 4650-
9650.
Retrait du bloc d'alimentation de l'appareil
Pour retirer un bloc d'alimentation défectueux de l'appareil
SonicWall :
1 Débranchez le cordon d'alimentation du module d'alimentation à
remplacer dans l'appareil SonicWall.
2 En prenant soin de noter l'orientation du bloc d'alimentation par
rapport à l'appareil, enfoncez la languette de dégagement du bloc
d'alimentation tout en tirant la poignée du module vers l'extérieur
pour sortir ce dernier de l'appareil.
Retrait de la plaque de couverture du logement du bloc
d'alimentation redondant
Pour retirer la plaque de couverture :
1 Ouvrez le couvercle extérieur souple pour exposer le trou de la plaque de
couverture.
2 Insérez un doigt dans le trou et tirez la plaque de couverture pour l'enlever.
Vous pouvez maintenant insérer le module d'alimentation redondant dans le
logement vide. Le module d'alimentation principal demeure en place.
Installation d'un bloc d'alimentation dans l'appareil
Pour installer un nouveau module d'alimentation dans l'appareil :
1 Insérez le nouveau module d'alimentation dans le logement vide dans le
sens noté lors du retrait du module défectueux.
Insérez un module d'alimentation redondant dans le même sens que le
bloc d'alimentation principal.
2 Poussez le module d'alimentation soigneusement et fermement jusqu'à ce
qu'il soit complètement inséré et qu'il s'enclenche en place.
3 Branchez le cordon d'alimentation sur le bloc d'alimentation et sur la
source électrique. Lors de l'installation d'un bloc d'alimentation redondant,
branchez-le à une source électrique à l'aide d'un cordon séparé.
4 Vérifiez que le nouveau bloc d'alimentation fonctionne correctement. Le
voyant DEL de l'alimentation électrique situé sur le panneau avant devrait
être allumé en bleu. Un voyant jaune indique un problème.
Netzteil Ersetzen und Installieren
Entfernen des Netzteils aus der SonicWall Appliance
Führen Sie zum Entfernen eines defekten Netzteils aus der SonicWall Appliance
die folgenden Schritte aus:
1 Ziehen Sie das Netzkabel aus der SonicWall Appliance
Stromversorgungsmodul, das ersetzt wird.
2 Beachten Sie die Stromversorgung Ausrichtung in das Gerät. Drücken Sie
die Stromversorgung Lösehebel, während mit Griff des Moduls, das Modul
nach außen ziehen und abnehmen.
Entfernen der Abdeckplatte vom redundanten
Netzteilsteckplatz
Um die Abdeckplatte zu entfernen:
1 Ziehen Sie die weiche äußere Abdeckung auf, um das Loch in der
Abdeckplatte freizulegen.
2 Führen Sie einen Finger in das Loch und ziehen Sie die Abdeckplatte, um sie
zu entfernen.
NOTE: Disconnect the power from the power supply being replaced.
There is no need to power down the appliance.
WARNING: Power supply surfaces can be hot. Handle and store with
care until the surfaces are cool.
Power Supplies (Primary & Redundant )
NSa Appliance Rear View
WARNING: Do NOT insert anything except the power supply module
into the appliance.
NOTE : Débranchez le cordon d'alimentation du bloc
d'alimentation à remplacer. Il n’est pas nécessaire de débrancher
l’appareil.
AVERTISSEMENT : Les surfaces du bloc d'alimentation peuvent être
chaudes. Manipulez et entreposez l'appareil avec soin jusqu'à ce que
les surfaces soient froides.
AVERTISSEMENT : N'INSÉREZ AUCUN OBJET autre qu'un
module d'alimentation dans l'appareil.
HINWEIS: Trennen Sie elektrische Energie von der Stromversorgung
ersetzt. Das Gerät muss nicht ausgeschaltet werden
WARNUNG: Stromversorgung Oberflächen können heiß sein.
Handhaben und speichern Sie vorsichtig, bis die Oberflächen
kühl sind.


