Videotec Was 5 or 23 Liter Tank Benutzerhandbuch
- Typ
- Benutzerhandbuch

ENGLISH ITALIANO FRANÇAIS DEUTSCH
РУССКИЙ
EN
English - Instructions manual
IT
Italiano - Manuale di istruzioni
FR
Français - Manuel d’instructions
DE
Deutsch - Bedienungslanleitung
RU
Русский - Руководство по эксплуатации
WAS
5 or 23 liter tank with pump


EN
English - Instruction manual
ENGLISH
WAS
5 or 23 liter tank with pump


Contents
ENGLISH 1
1 About this manual ......................................................................................................... 5
1.1 Typographical conventions .................................................................................................................................. 5
2 Notes on copyright and information on trademarks .................................................. 5
3 Safety rules..................................................................................................................... 5
4 Identication .................................................................................................................. 6
4.1 Product description and type designation..................................................................................................... 6
4.2 Product marking ...................................................................................................................................................... 6
5 Preparing the product for use ...................................................................................... 6
5.1 Unpacking .................................................................................................................................................................. 6
5.2 Contents ...................................................................................................................................................................... 6
5.3 Safely disposing of packaging material ........................................................................................................... 6
6 Installation ..................................................................................................................... 7
6.1 Fastening of the metal cage ................................................................................................................................ 7
6.2 Choosing the power supply ................................................................................................................................. 8
6.3 Open the box............................................................................................................................................................. 8
6.4 Board description .................................................................................................................................................... 8
6.5 Connection of the board ....................................................................................................................................... 9
6.5.1 Installing the fuse .................................................................................................................................................................... 9
6.5.2 Connection of the power supply line ............................................................................................................................... 9
6.6 Connection of the pump motor ......................................................................................................................... 9
6.7 Pump installation ................................................................................................................................................... 10
6.7.1 Pump with 5m (16ft) or 11m (36ft) delivery ................................................................................................................10
6.7.2 Pump with 30m (98ft) delivery ......................................................................................................................................... 10
7 Maintenance ................................................................................................................11
7.1 Fuses replacement ................................................................................................................................................11
7.1.1 Replacing the fuse of the pump board .......................................................................................................................... 11
7.1.2 Replacing the fuse on the pump inlet ...........................................................................................................................11
8 Information on disposal and recycling ...................................................................... 11
9 Technical data .............................................................................................................. 12
9.1 Washer kit, tank of 5l (1.3gal), pump with 5m (16ft) delivery head .....................................................12
9.1.1 Mechanical ............................................................................................................................................................................... 12
9.1.2 Electrical ....................................................................................................................................................................................12
9.1.3 Environment ............................................................................................................................................................................12
9.1.4 Certications ...........................................................................................................................................................................12
9.2 Washer kit, tank of 23l (6gal), pump with 5m (16ft) delivery head ......................................................12
9.2.1 Mechanical ............................................................................................................................................................................... 12
9.2.2 Electrical ....................................................................................................................................................................................12
9.2.3 Environment ............................................................................................................................................................................12
9.2.4 Certications ...........................................................................................................................................................................12
9.3 Washer kit, tank of 23l (6gal), pump with 11m (36ft) delivery head ...................................................13
9.3.1 Mechanical ............................................................................................................................................................................... 13

EN - English - Instruction manual
4MNVCWAS_2104_EN
9.3.2 Electrical ....................................................................................................................................................................................13
9.3.3 Environment ............................................................................................................................................................................13
9.3.4 Certications ...........................................................................................................................................................................13
9.4 Washer kit, tank of 23l (6gal), pump with 30m (98ft) delivery head ...................................................13
9.4.1 Mechanical ............................................................................................................................................................................... 13
9.4.2 Electrical ....................................................................................................................................................................................13
9.4.3 Environment ............................................................................................................................................................................13
9.4.4 Certications ...........................................................................................................................................................................13
10 Technical drawings .................................................................................................... 14

Instruction manual - English - EN
5
MNVCWAS_2104_EN
1 About this manual
Read all the documentation supplied carefully before
installing and using this unit. Keep the manual in a
convenient place for future reference.
1.1 Typographical conventions
DANGER!
High level hazard.
Risk of electric shock. Disconnect the
power supply before proceeding with any
operation, unless indicated otherwise.
DANGER!
Hot surface.
Avoid contact. Surfaces are hot and may
cause personal injury if touched.
CAUTION!
Medium level hazard.
This operation is very important for the
system to function properly. Please read
the procedure described very carefully and
carry it out as instructed.
INFO
Description of system specications.
We recommend reading this part carefully
in order to understand the subsequent
stages.
2 Notes on copyright and
information on trademarks
The mentioned names of products or companies are
trademarks or registered trademarks.
3 Safety rules
CAUTION! The electrical system to which
the unit is connected must be equipped
with a 20A max automatic bipolar circuit
breaker. The minimum distance between
the circuit breaker contacts must be
3mm (0.1in). The circuit breaker must be
provided with protection against the fault
current towards the ground (dierential)
and the overcurrent (magnetothermal).
CAUTION! Device installation and
maintaining must be performed by
specialist technical sta only.
• The manufacturer declines all responsibility
for any damage caused by an improper use
of the appliances mentioned in this manual.
Furthermore, the manufacturer reserves the right
to modify its contents without any prior notice.
The documentation contained in this manual has
been collected and veried with great care. The
manufacturer, however, cannot take any liability
for its use. The same thing can be said for any
person or company involved in the creation and
production of this manual.
• Before starting any operation, make sure the
power supply is disconnected.
• Be careful not to use cables that seem worn or old.
• Never, under any circumstances, make any
changes or connections that are not shown in
this handbook. Improper use of the appliance
can cause serious hazards, risking the safety of
personnel and of the installation.

EN - English - Instruction manual
6MNVCWAS_2104_EN
• Use only original spare parts. Non-original spare
parts could cause re, electrical discharge or other
hazards.
• Before proceeding with installation, check the
supplied material to make sure it corresponds
to the order specication by examining the
identication labels (4.2 Product marking, page 6).
• A power disconnect device must be included
in the electrical installation, and it must be very
quickly recognizable and operated if needed.
4 Identication
4.1 Product description and type
designation
WAS is a Videotec wash kit for housings equipped
with wipers and consists of a tank with a built-in
pump.
This wide range of wash kits comes in capacities from
5 to 23 litres and delivery heads of up to 30 metres.
In the 30m (98ft) delivery versions the lack of liquid
in the tank is signalled following the automatic stop
of the pump
The 30m (98ft) delivery head versions are only
available in 230Vac or 120Vac.
Using the anti-freeze liquid, the minimum operating
temperature (versions with 5m or 11m delivery
heads) can reach as low as -25°C (-13°F).
4.2 Product marking
See the label attached to the product.
5 Preparing the product for
use
Any change that is not expressly approved
by the manufacturer will invalidate the
guarantee.
5.1 Unpacking
When the product is delivered, make sure that the
package is intact and that there are no signs that it
has been dropped or scratched.
If there are obvious signs of damage, contact the
supplier immediately.
When returning a faulty product we recommend
using the original packaging for shipping.
Keep the packaging in case you need to send the
product for repairs.
5.2 Contents
Check the contents to make sure they correspond
with the list of materials as below:
• Windows washing kit
• Cable tie¹
• Silicone sheath¹
• Terminal¹
• Delivery pipe
• Instruction manual
¹ Only for models with 5m (16ft) or 11m (36ft) delivery heads.
5.3 Safely disposing of packaging
material
The packaging material can all be recycled. The
installer technician will be responsible for separating
the material for disposal, and in any case for
compliance with the legislation in force where the
device is to be used.

Instruction manual - English - EN
7
MNVCWAS_2104_EN
6 Installation
Install the pump with 30m (98ft) pressure
head in places protected from heavy rain.
The product must be fastened with suitable
equipment. The fastening means must
guarantee the mechanical seal when a force
equal to at least 3 times the weight of the
device is applied.
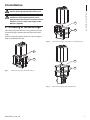
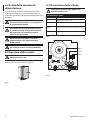
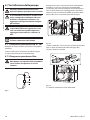
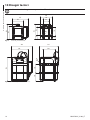
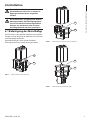
6.1 Fastening of the metal cage
Take the plug out of the tank, along with any pumps
and level gauges. Remove the tank from the metal
cage.
Attach the metal cage (01) rmly to a wall using the
holes provided for this (02).
01
02
Fig. 1 Water tank 5l (1.3gal), 5m (16ft) delivery.
01
02
Fig. 2 Water tank 23l (6gal), 5m (16ft) or 11m (36ft) delivery.
01
02
Fig. 3 Water tank 23l (6gal), 30m (98ft) delivery.

EN - English - Instruction manual
8MNVCWAS_2104_EN
6.2 Choosing the power supply
Depending on the version, the device can be
provided with dierent power supply voltages. Their
value is shown on the product identication label.
Electrical connections must be performed
with the power supply disconnected and
the circuit-breaker open.
When commencing installation make sure
that the specications for the power supply
for the installation correspond with those
required by the device.
Check that the power supply socket and
cable are adequately dimensioned.
Use a power cable that is suitable for
outdoor use (example: H05RH-F).
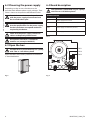
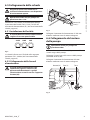
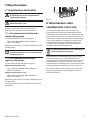
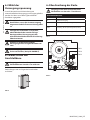
6.3 Open the box
The operation is performed only for a pump
with a 5m or 11m delivery head.
Open the cover of the water-proof box and connect
as described below.
Fig. 4
6.4 Board description
The operation is performed only for a pump
with a 5m or 11m delivery head.
BOARD DESCRIPTION
Connector Function
J5 Power supply for the board
FUS1 Power supply selection fuse (230Vac)
FUS2 Power supply selection fuse (120Vac)
FUS3 Power supply selection fuse (24Vac)
Tab. 1
J5
FUS3
FUS2
FUS1
Fig. 5

Instruction manual - English - EN
9
MNVCWAS_2104_EN
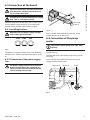
6.5 Connection of the board
Electrical connections must be performed
with the power supply disconnected and
the circuit-breaker open.
The operation is performed only for a pump
with a 5m or 11m delivery head.
Identify the position of the fuses (FUS1, FUS2, FUS3)
and the power supply terminal (J5) on the pump
control board. (6.4 Board description, page8).
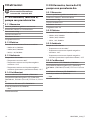
6.5.1 Installing the fuse
Depending on the power supply voltage
choose the right fuse holder.
230V
FUS1
120V
FUS2
24V
FUS3
Fig. 6
The board is supplied with the fuse in the following
position: FUS1, 230Vac (6.4 Board description, page
8).
6.5.2 Connection of the power supply
line
The power supply cable must be covered
by the silicone sheath (01) supplied. The
silicone sheath must be fastened with the
corresponding cable tie (02).
01
J5
02
Neutral (N)
Phase (L)
Fig. 7
Use a suitably sized cable to connect the power
supply terminal J5 to the mains.
6.6 Connection of the pump
motor
Operation valid for pump with 30m (98ft)
delivery.
Use the auxiliary terminal (01) located in the pump
airtight casing.
Connect the earth cable to the pump casing (earth
hole) (02).
Use a suitably sized cable to connect the power
supply terminal to the mains.
02
01
Phase (L) Earth
Neutral (N)
Fig. 8

EN - English - Instruction manual
10 MNVCWAS_2104_EN
6.7 Pump installation
Be very careful not to start the pump when
the tank is empty.
We recommend lling the tank with water
at ambient temperature. If using the pump
at temperatures below 3°C (37.4°F) add
some glass cleaner antifreeze liquid to the
water.
The antifreeze liquid will cause irreparable
damage to the germanium windows. In this
case, do not use anti-freeze liquid, but add
ethanol in a 20% solution.
If present, the level switch enables
automatic stoppage of the pump.
6.7.1 Pump with 5m (16ft) or 11m (36ft)
delivery
Fill the tank with water and insert it in the metal cage.
Insert the pump in the tank and close the cap.
The system is ready to be powered.
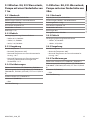
6.7.2 Pump with 30m (98ft) delivery
Avoid contact with the pump motor. Hot
surfaces may cause personal injury if
touched.
Adjust the position of the level switch and the ballast.
220mm
120mm
Fig. 9
Fill the tank with water and insert it in the metal cage.
Ensure that the male/female hydraulic joint (01) is
inserted correctly. Insert the oat in the tank and
close the cap. Check the delivery hose coupling for
the pump (02) to make sure a small quantity of water
comes out.
02
01
Fig. 10
Unscrew the nut (01). Slide it along the delivery pipe
(02). Insert the end of the pipe into the ogive (03).
Lock the nut to the coupling.
02
01
03
04
Fig. 11
The system is ready to be powered.

Instruction manual - English - EN
11
MNVCWAS_2104_EN
7 Maintenance
7.1 Fuses replacement
Maintenance must be performed with the
power supply disconnected and the circuit-
breaker open.
The operation is performed only for a pump
with a 5m or 11m delivery head.
Check the causes that caused the fuse breakage.
In the event the problem occurs again, contact the
technical assistance service.
7.1.1 Replacing the fuse of the pump
board
The used fuse is described below.
• T 4A H 250V: BUSSMANN S505-4-R or
OMEGA GT520240
As an alternative, use an approved fuse featuring the
same characteristics.
For further information refer to the relative
chapter (6.5.1 Installing the fuse, page9).
7.1.2 Replacing the fuse on the pump
inlet
The used fuses are described below.
Pump with 5m (16ft) delivery:
• T 2A L 250V: BUSSMANN S506-2-R or
OMEGA ST522220
Pump with 11m (36ft) delivery:
• T 4A L 250V: BUSSMANN S506-4-R or
OMEGA ST522240
As an alternative, use an approved fuse featuring the
same characteristics.
Once the box is open identify the fuse position.
Fig. 12
8 Information on disposal
and recycling
The European Directive 2012/19/EU on Waste
Electrical and Electronic Equipment (WEEE) mandates
that these devices should not be disposed of in the
normal ow of municipal solid waste, but they should
be collected separately in order to optimize the
recovery stream and recycling of the materials that
they contain and to reduce the impact on human
health and the environment due to the presence of
potentially hazardous substances.
The symbol of the crossed out bin is marked
on all products to remember this.
The waste may be delivered to appropriate collection
centers, or may be delivered free of charge to the
distributor where you purchased the equipment at
the time of purchase of a new equivalent or without
obligation to a new purchase for equipment with size
smaller than 25cm .
For more information on proper disposal of these
devices, you can contact the responsible public
service.

EN - English - Instruction manual
12 MNVCWAS_2104_EN
9 Technical data
The product has been designed to work
intermittently.
1 minute: ON. 15 minutes: OFF.
9.1 Washer kit, tank of 5l (1.3gal),
pump with 5m (16ft) delivery
head
9.1.1 Mechanical
Polyethylene tank, stainless steel cage
Dimensions (WxHxL): 217x272x257mm
(8.5x10.7x10.1in)
Unit weight: 3.5kg (7.7lb)
Water tank capacity: 5l (1.3gal)
Delivery head: 5m (16ft) max
Tube length: 5m (16ft)
9.1.2 Electrical
Supply voltage/Current consumption:
• 230Vac, 0.3A, 50/60Hz
• 120Vac, 0.6A, 50/60Hz
• 24Vac, 1.8A, 50/60Hz
9.1.3 Environment
Operating temperature
• Maximum temperature: 60°C (140°F)
• Minimum temperature with antifreeze liquid in
solution: -10°C (14°F)
• Minimum temperature with antifreeze liquid
in solution (reduced performance and delivery
height): -25°C (-13°F)
9.1.4 Certifications
Electrical safety (CE): EN60950-1, EN62368-1
Electromagnetic compatibility (CE): EN50130-4,
EN61000-6-3, EN55032 (Class B), FCC Part 15 (Class B)
Outdoor installation (CE): EN60950-22
IP protection degree (EN60529):
• IP66
EAC certification
9.2 Washer kit, tank of 23l (6gal),
pump with 5m (16ft) delivery
head
9.2.1 Mechanical
Polyethylene tank, stainless steel cage
Dimensions (WxHxL): 301x410x348mm
(11.8x16.1x13.7in)
Unit weight: 5.4kg (11.9lb)
Water tank capacity: 23l (6gal)
Delivery head: 5m (16ft) max
Tube length: 5m (16ft)
9.2.2 Electrical
Supply voltage/Current consumption:
• 230Vac, 0.3A, 50/60Hz
• 120Vac, 0.6A, 50/60Hz
• 24Vac, 1.8A, 50/60Hz
9.2.3 Environment
Operating temperature
• Maximum temperature: 60°C (140°F)
• Minimum temperature with antifreeze liquid in
solution: -10°C (14°F)
• Minimum temperature with antifreeze liquid
in solution (reduced performance and delivery
height): -25°C (-13°F)
9.2.4 Certifications
Electrical safety (CE): EN60950-1, EN62368-1
Electromagnetic compatibility (CE): EN50130-4,
EN61000-6-3, EN55032 (Class B), FCC Part 15 (Class B)
Outdoor installation (CE): EN60950-22
IP protection degree (EN60529):
• IP66
EAC certification

Instruction manual - English - EN
13MNVCWAS_2104_EN
9.3 Washer kit, tank of 23l (6gal),
pump with 11m (36ft) delivery
head
9.3.1 Mechanical
Polyethylene tank, stainless steel cage
Dimensions (WxHxL): 301x410x348mm
(11.8x16.1x13.7in)
Unit weight: 5.9kg (13lb)
Water tank capacity: 23l (6gal)
Delivery head: 11m (36ft) max
Tube length: 11m (36ft)
9.3.2 Electrical
Supply voltage/Current consumption:
• 230Vac, 0.5A, 50/60Hz
• 120Vac, 1A, 50/60Hz
• 24Vac, 3.8A, 50/60Hz
9.3.3 Environment
Operating temperature
• Maximum temperature: 60°C (140°F)
• Minimum temperature with antifreeze liquid in
solution : -10°C (14°F)
• Minimum temperature with antifreeze liquid
in solution (reduced performance and delivery
height): -25°C (-13°F)
9.3.4 Certifications
Electrical safety (CE): EN60950-1, EN62368-1
Electromagnetic compatibility (CE): EN50130-4,
EN61000-6-3, EN55032, (Class B), FCC Part 15 (Class B)
Outdoor installation (CE): EN60950-22
IP protection degree (EN60529):
• IP66
EAC certification
9.4 Washer kit, tank of 23l (6gal),
pump with 30m (98ft) delivery
head
9.4.1 Mechanical
Polyethylene tank, stainless steel cage
Dimensions (WxHxL): 301x620x348mm
(11.9x24.4x13.7in)
Unit weight: 13.9kg (30.6lb)
Water tank capacity: 23l (6gal)
Delivery head: 30m (98ft) max
Tube length: 30m (98ft)
Switch for liquid level
9.4.2 Electrical
Supply voltage/Current consumption:
• 230Vac, 2A, 50/60Hz
• 120Vac, 4.5A, 60Hz
9.4.3 Environment
Operating temperature
• Maximum temperature: 60°C (140°F)
• Minimum temperature with antifreeze liquid in
solution: -10°C (14°F)
9.4.4 Certifications
Electrical safety (CE): EN60950-1, EN62368-1
Electromagnetic compatibility (CE): EN50130-4,
EN61000-6-3, EN55032, (Class B), FCC Part 15 (Class B)
IP protection degree (EN60529):
• IPX4
EAC certification

EN - English - Instruction manual
14 MNVCWAS_2104_EN
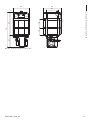
10 Technical drawings
The dimensions of the drawings are in millimetres.
110257
15074
15066
272
Ø 8
177
235
272
217
88
Fig. 13 Water tank 5l (1.3gal), 5m (16ft) delivery.
Ø 8
301348
269 200
152
410
136
Fig. 14 Water tank 23l (6gal), 5m (16ft) or 11m (36ft) delivery.

Instruction manual - English - EN
15
MNVCWAS_2104_EN
620
136 152
410210
269 301
200
Ø 8
Fig. 15 Water tank 23l (6gal), 30m (98ft) delivery.

Headquarters Italy Videotec S.p.A.
Via Friuli, 6 - I-36015 Schio (VI) - Italy
Tel. +39 0445 697411 - Fax +39 0445 697414
Email: [email protected]
France Videotec France SARL
Immeuble Le Montreal, 19bis Avenue du Québec, ZA de Courtaboeuf
91140 Villebon sur Yvette - France
Tel. +33 1 60491816 - Fax +33 1 69284736
Email: info.fr@videotec.com
Asia Pacic Videotec (HK) Ltd
Flat 8, 19/F. On Dak Industrial Building, No. 2-6 Wah Sing Street
Kwai Chung, New Territories - Hong Kong
Tel. +852 2333 0601 - Fax +852 2311 0026
Email: info.hk@videotec.com
Americas Videotec Security, Inc.
Gateway Industrial Park, 35 Gateway Drive, Suite 100
Plattsburgh, NY 12901 - U.S.A.
Tel. +1 518 825 0020 - Fax +1 518 825 0022
Email: info.usa@videotec.com - www.videotec.com
www.videotec.com
MNVCWAS_2104_EN

IT
Italiano - Manuale di istruzioni
ITALIANO
WAS
Tanica da 5 o 23 litri con pompa

Seite wird geladen ...
Seite wird geladen ...
Seite wird geladen ...
Seite wird geladen ...
Seite wird geladen ...
Seite wird geladen ...
Seite wird geladen ...
Seite wird geladen ...
Seite wird geladen ...
Seite wird geladen ...
Seite wird geladen ...
Seite wird geladen ...
Seite wird geladen ...
Seite wird geladen ...
Seite wird geladen ...
Seite wird geladen ...
Seite wird geladen ...
Seite wird geladen ...
Seite wird geladen ...
Seite wird geladen ...
Seite wird geladen ...
Seite wird geladen ...
Seite wird geladen ...
Seite wird geladen ...
Seite wird geladen ...
Seite wird geladen ...
Seite wird geladen ...
Seite wird geladen ...
Seite wird geladen ...
Seite wird geladen ...
Seite wird geladen ...
Seite wird geladen ...
Seite wird geladen ...
Seite wird geladen ...
Seite wird geladen ...
Seite wird geladen ...
Seite wird geladen ...
Seite wird geladen ...
Seite wird geladen ...
Seite wird geladen ...
Seite wird geladen ...
Seite wird geladen ...
Seite wird geladen ...
Seite wird geladen ...
Seite wird geladen ...
Seite wird geladen ...
Seite wird geladen ...
Seite wird geladen ...
Seite wird geladen ...
Seite wird geladen ...
Seite wird geladen ...
Seite wird geladen ...
Seite wird geladen ...
Seite wird geladen ...
Seite wird geladen ...
Seite wird geladen ...
Seite wird geladen ...
Seite wird geladen ...
Seite wird geladen ...
Seite wird geladen ...
Seite wird geladen ...
Seite wird geladen ...
Seite wird geladen ...
Seite wird geladen ...
-
 1
1
-
 2
2
-
 3
3
-
 4
4
-
 5
5
-
 6
6
-
 7
7
-
 8
8
-
 9
9
-
 10
10
-
 11
11
-
 12
12
-
 13
13
-
 14
14
-
 15
15
-
 16
16
-
 17
17
-
 18
18
-
 19
19
-
 20
20
-
 21
21
-
 22
22
-
 23
23
-
 24
24
-
 25
25
-
 26
26
-
 27
27
-
 28
28
-
 29
29
-
 30
30
-
 31
31
-
 32
32
-
 33
33
-
 34
34
-
 35
35
-
 36
36
-
 37
37
-
 38
38
-
 39
39
-
 40
40
-
 41
41
-
 42
42
-
 43
43
-
 44
44
-
 45
45
-
 46
46
-
 47
47
-
 48
48
-
 49
49
-
 50
50
-
 51
51
-
 52
52
-
 53
53
-
 54
54
-
 55
55
-
 56
56
-
 57
57
-
 58
58
-
 59
59
-
 60
60
-
 61
61
-
 62
62
-
 63
63
-
 64
64
-
 65
65
-
 66
66
-
 67
67
-
 68
68
-
 69
69
-
 70
70
-
 71
71
-
 72
72
-
 73
73
-
 74
74
-
 75
75
-
 76
76
-
 77
77
-
 78
78
-
 79
79
-
 80
80
-
 81
81
-
 82
82
-
 83
83
-
 84
84


Videotec Was 5 or 23 Liter Tank Benutzerhandbuch
- Typ
- Benutzerhandbuch
in anderen Sprachen
Verwandte Artikel
-
Videotec WAS-WASPT Benutzerhandbuch
-
-
Videotec WASNX Benutzerhandbuch
-
-
-
-
-
Videotec NXPTZT SERIES2 Benutzerhandbuch
-
-