
User Manual
ENG DE FR


Red Sea ReefMat®
3
ENG
User Manual
Smart– Plug&Play®– Efficient

Red Sea ReefMat®
4
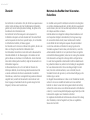
Contents
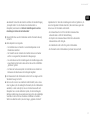
Introduction................................................................................................5
ReefMat Components...............................................................................6
Safety ........................................................................................................7
Overview.....................................................................................................8
Features of the ReefMat smart eece-mat roller lter........................8
Benets of roller lters over static mechanical lters...........................9
Preparations before installing the ReefMat roller lter.........................9
Installation of the ReefMat....................................................................12
LED Indicators..........................................................................................16
Settings Button - Function.....................................................................17
Wind / Unwind Buttons.........................................................................17
Connection and initial Setup..................................................................18
Inserting a new eece-mat roll............................................................18
Activating a new eece-mat roll..........................................................22
Operation.................................................................................................22
Other Settings.........................................................................................24
ReefMat Data..........................................................................................25
Partial Roll...............................................................................................26
Removing used eece-mat from the Take-up shaft...........................26
Device Maintenance...............................................................................27
Troubleshooting......................................................................................28
Warranty...................................................................................................30

Red Sea ReefMat®
5
ENG
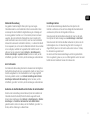
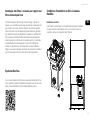
Introduction
Congratulations on your purchase of Red Sea’s ReefMat®.
The ReefMat is a plug & play, fully automated, smart fleece roller filter
that keeps your aquarium water crystal clear for weeks at a time.
Designed with the hobbyist in mind, the ReefMat features an easy
fleece-mat replacement system that allows you to switch rolls without
having to remove the filter from the sump or turn off the pumps.
ReefMat includes a smart drive unit that controls and monitors the exact
length of fleece-mat that is used as well as many other unique features.
ReefMat is part of Red Sea’s suite of smart devices that are operated
via Wi-Fi by Red Sea’s ReefBeat® App, which needs to be installed on a
smart mobile device with internet connectivity.
Welcome to Red Sea’s smart reef-keeping.
Sincerely,
The Red Sea Team

Red Sea ReefMat®
6
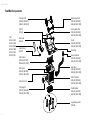
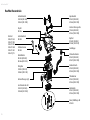
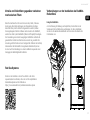
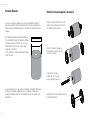
Take up shaft
R35450 (RM 500)
R35461 (RM 1200)
Dispensing shaft
R35449 (RM 500)
R35460 (RM 1200)
Front guide roller
R35456 (RM 500)
R35467 (RM 1200)
Front flap
Hose connector
R35459 (RM 500)
R35470 (RM 1200)
Head
R35453 (RM 500)
R35464 (RM 1200)
Inlet hose
R35458 (RM 500)
R35469 (RM 1200)
Media basket
R35451 (RM 500)
R35462 (RM 1200)
Filter chamber
R35452 (RM 500)
R35463 (RM 1200)
Legs/Bumpers kit
R35448
Drive-unit
R35444
Clip kit
R35446
Level sensor
R35445
Filter grids
R35454 (RM 500)
R35465 (RM 1200)
Inlet ports (x2)
Port plug kit
R35457 (RM 500)
R35468 (RM 1200)
Mat retainer
R35455 (RM 500)
R35466 (RM 1200)
PSU
R35447 AUS
R35447 CHN
R35447 EUR
R35447 GBR
R35447 USA
R35447 JPN
ReefMat Components

Red Sea ReefMat®
7
ENG
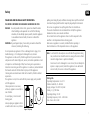
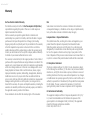
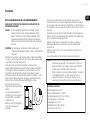
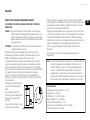
Safety
PLEASE READ AND FOLLOW ALL SAFETY INSTRUCTIONS.
THIS DEVICE IS INTENDED FOR HOUSEHOLD AND INDOOR USE ONLY.
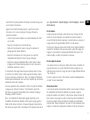
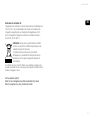
DANGER: To avoid possible electric shock, special care should be taken
when handling a wet aquarium. For each of the following
situations, do not attempt repairs yourself; return the appliance
to an authorized service facility for service or discard the
appliance.
WARNING: To guard against injury, basic safety precautions should be
observed, including the following:
Do not operate any appliance if it has a damaged cord or plug, if it is
malfunctioning, or if it is dropped or damaged in any manner.
This appliance can be used by children aged from 8 years and above
and persons with reduced physical, sensory or mental capabilities or lack
of experience and knowledge if they have been given supervision or
instruction concerning use of the appliance in a safe way and understand
the hazards involved. Children shall not play with the appliance.
Cleaning and user maintenance shall not be made by children without
supervision.
The appliance is only to be used with the power supply unit provided
with the appliance.
Close supervision is necessary
when any appliance is used by or
near children.
To avoid injury, do not contact
moving parts.
Always unplug an appliance from
an outlet when not in use, before
putting on or taking off parts, and before cleaning. Never pull the cord itself
to remove the plug from the outlet. Grasp the plug and pull to disconnect.
Do not use an appliance for anything other than its intended use.
The use of attachments not recommended or sold by the appliance
manufacturer may cause unsafe conditions.
Do not install or store the appliance where it will be exposed to the
weather or to temperatures below freezing point.
Make sure an appliance is securely installed before operating it.
Read and observe all the important notices on the appliance.
Note: A cord rated for less amperes or watts than the appliance rating
may overheat. Care should be taken to arrange the cord so that it
cannot be tripped over or pulled accidentally.
Do not use if cord is damaged. In case of need, do not attempt to
replace or repair yourself; return the appliance to an authorized
service facility for service or discard the appliance.
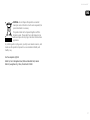
Rating info:
Operating Temperature: 5 to 45°C
Relative Humidity: 15~85%RH
Supply voltage: 100-240V 50/60Hz
Rating: 1A, @10W Max.
Operating Voltage 12 Vdc
Operating Frequency: 2402 - 2480 MHz
Max. Power: 32.43 mW
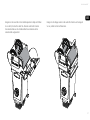
Figure 1: Drip Loop

Red Sea ReefMat®
8
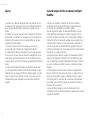
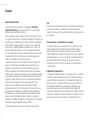
Overview
The ReefMat is a mechanical lter that removes particulate matter from
aquarium water by passing the water through a eece lter material
(eece-mat) that physically traps the particles that are larger than the
mesh of the lter material.
The ReefMat is designed to be located under an aquarium inside the
sump and is either gravity fed with water directly from the aquarium or
by a dedicated pump that is also located in the sump.
The eece-mat is supplied in the form of a continuous roll that passes
over a series of lter grids inside the lter chamber.
The ReefMat lter chamber is open at the bottom and when the eece-
mat is new the water level inside the chamber will be at the same level
as the water in the sump. As the eece-mat traps more and more waste
particles, the water level inside the lter chamber slowly rises.
A water level sensor that is located near the top of the lter body detects
the rising water level and at a predened point will trigger an automatic
advancement of the eece-mat thereby introducing a preset length
of clean material, reducing the water level inside unit. This process
continues automatically for the full length of the roll which then needs
to be replaced.
Features of the ReefMat smart fleece-mat roller
filter
Designed with the hobbyist in mind, the ReefMat features an easy mat
replacement system that allows rolls to be replaced without having to
remove the lter from the sump or even turn off the pumps.
ReefMat includes a dual, solid-state water level sensor and an
unprecedented smart drive unit that drives, controls and monitors the
exact length of mat that is used. ReefMat is Wi-Fi connected to Red Sea’s
ReefBeat smart aquarium eco-system and will give you a head’s up a
few days before the eece-mat needs replacing or let you know if it
needs your attention. The system provides you with a daily and hourly
usage log so that you can monitor the performance of your current roll
and even keeps track of your previous rolls.
The patent-pending drive-unit, drives the used material take-up shaft
while recording the rotation of the new material dispensing shaft. This
arrangement enables the unit to immediately turn off the motor if it
identies that the eece-mat has become blocked or torn as well as
sending a notication to the ReefBeat App.
The dual water level sensor is mounted at the top of the lter chamber
with one sensor inside the chamber and one outside. The internal sensor
is for the regular operation of the ReefMat while the external sensor will
detect if there is a high-water level in the sump (such as when the main
return pump is off) and prevent continuous dispensing of new eece-
mat.
The built-in media basket at the ReefMat outlet will improve the
performance of all ltration media by ensuring only pre-ltered water
ows through them.

Red Sea ReefMat®
9
ENG
Benefits of roller filters over static mechanical
filters
Static mechanical lters such as micron socks, oss, pads etc. do a
good job of trapping lter particles. However until these static lters
are removed and washed, the trapped particles remain in the water
and gradually decompose adding nutrients (nitrate and phosphate) to
the system. Using a correctly rated roller lter will physically remove
all collected particles within about a day, signicantly reducing their
decomposition. Due to the efciency of the ReefMat, especially with
carbon in the built-in media basket, you may well notice a drop in
nutrient levels shortly after it is added to an established aquarium.
Preparations before installing the ReefMat
roller filter
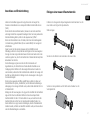
Hang-on Installation
For ease of maintenance, it is recommended to hang the ReefMat on the
front wall of the sump. For this installation insert the rubber spacers to
the bottom front of the filter chamber
Red Sea systems
If you are retrotting the ReefMat to a Red Sea REEFER or MAX
aquarium system, check out the recommended installation options
on the web-site:
https://www.redseash.com/reefmat-installation-options

Red Sea ReefMat®
10
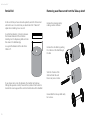
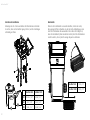
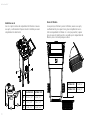
Freestanding installation
Attach the 4 legs to the bottom of the filter chamber and make sure that
there is enough room in front of the ReefMat to fully open the front flap.
D2 D3
D1
ReefMat 500 ReefMat 1200
D1 20.5cm / 8.1” 22cm / 8.7”
D2 7cm / 2.8” 8cm / 3.2”
D3 15cm / 5.9” 16cm / 6.3”
ReefMat 500 15cm / 6”
ReefMat 1200 20cm / 8”
Media Basket
If you plan on using the media basket, make sure that there is enough
room to slide the basket completely out from one side of the filter
chamber. If this is not possible the media basket (without cover
assembled) can be accessed through the filter chamber, however this is
less convenient to operate.

Red Sea ReefMat®
11
ENG
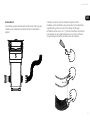
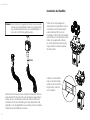
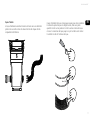
Inlet Hose
The kink-resistant corrugated inlet hose is supplied with one end ready
for connection to one of the inlet ports that are on either side of the
filter chamber.
Cut the free end of the hose to the required length according to your
installation. Using the finger-cover provided spread a small amount of
the liquid sealant on the first 2cm / 0.8” of the internal surface of the
hose and screw in the hose connector until it is tight. Remove the excess
sealant from inside the hose.
2cm / 0.8”

Red Sea ReefMat®
12
Note: This part has a left-hand thread. The pipe can be used before the
sealant is dry. The other side of the universal connector can be
glued to standard 32mm or 1” PVC piping.
Alternatively, the free end of the corrugated hose can also be attached
directly to standard 32mm diameter PVC tubing as used in most Red
Sea Reefer series systems. This join is not under any water pressure,
however it is advisable to use the liquid sealant and secure the
corrugated hose in place with a cable tie.
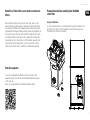
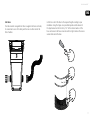
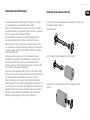
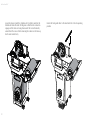
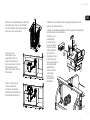
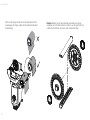
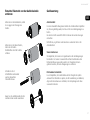
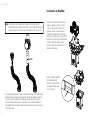
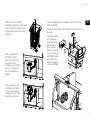
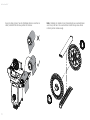
Installation of the ReefMat
Rotate the Take-up Shaft Locks to the open
position and remove the take up shaft
from the ReefMat Head. Open the front
flap by raising the handle and rotating it
forwards to its horizontal position, remove
the dispensing shaft, remove the front
guide roller, close the flap and secure in
position by lowering the handle.
Remove the ReefMat Head
from the Filter Chamber by
pressing on the side latches
while lifting it up.
32mm

Red Sea ReefMat®
13
ENG
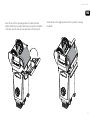
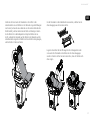
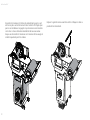
Remove the mat-retainer from the bottom
of the filter chamber by rotating the center
tube 180 degrees (water outlet slits facing
upwards) and lift.
Place the filter chamber into
the chosen location inside
the sump and connect the
inlet hose to the inlet port on
either the left or right side of
the filter chamber.
Make sure that the front and
rear filter grids are in position
inside the chamber and click
the ReefMat Head unit into
place.
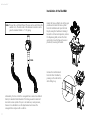
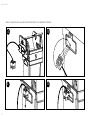
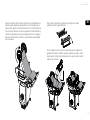
Connect the DC power-supply to the 2-pin power inlet port at the rear of the
drive-unit.
Connect the water level sensor to the 4-pin inlet port at the rear of the
drive-unit.
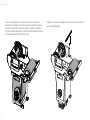
Mount the drive-unit on
either the left or right
side of the ReefMat
Head and secure it in
position with the clip
provided. Make sure
that you have enough
room by the side of the
drive-unit to operate the
Wi-Fi setting and Wind/
Unwind buttons.

Red Sea ReefMat®
14
Mount the level sensor to its operating position on the filter chamber.
BA
C D

Red Sea ReefMat®
15
ENG
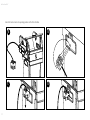
Thread the power-supply out the rear of the cabinet and insert it into the
wall outlet or other suitable power center. Check that the indicator LED on
front of the drive-unit is on.
Onboard the drive-unit to the ReefBeat App and complete the initial setup
before installing the fleece-mat.
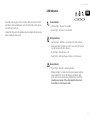
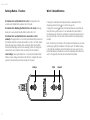
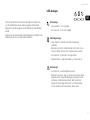
LED Indicators
Power Indicator:
• Solid Red light – DC power is available.
• No Red light – DC power is not available.
Settings Indicator:
• Solid Red light – ReefMat is connected to the Home network.
• Blinking Red light – ReefMat is in Wi-Fi Access Point (AP) mode
(can be discovered by Wi-Fi devices).
• No Red light – ReefMat Wi-Fi is off.
• Double blink – indicates change of status / end of process.
Status Indicator:
• No Red light – ReefMat is operating normally.
• Blinking Red light – indicates that the Auto-Advance mode has
been suspended for one of the following conditions: High-
Water, Level sensor disconnected, Jammed-Mat, End-of Roll.
Simultaneous pressing of the wind/unwind buttons resets
the ReefMat to Auto-Advance mode.

Red Sea ReefMat®
16
Settings Button - Function
If indicator LED is off (ReefMat Wi-Fi is off): Pressing button for 5
seconds (until double blink) activates Wi-Fi AP mode.
If indicator LED is blinking (ReefMat Wi-Fi is in AP mode): Pressing
button for 5 seconds (until double blink) switches Wi-Fi off.
If indicator LED is on (ReefMat Wi-Fi is connected to a Wi-Fi
network): Pressing button for 5 seconds (until double blink) disconnects
the ReefMat from the network and switches it to Wi-Fi AP mode. (Note:
before disconnecting a ReefMat from a network, delete the ReefMat
from the ReefBeat App via the Device Manager.) Note: All settings are
retained and can be restored when reconnected to the ReefBeat.
Clear Settings: Pressing the button for 15 seconds (until double blink)
deletes all user settings and switches off the Wi-Fi. Complete the reset
process by disconnecting and reconnecting the DC power.
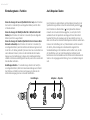
WindSettings Unwind
Wind / Unwind Buttons
Pressing the wind button will manually advance material from the
dispensing roll and wind ( ) it on to the take-up roll.
Pressing the unwind ( ) button will manually dispense used material
from the take-up roll however it is not automatically wound back to
the dispensing roll. This action is primarily to release the tension on the
take-up roll so that it can be easily removed from its normal operating
position.
Note: The direction of rotation of the wind/unwind buttons are set when
selecting the right/left installation of the drive-unit. The default setting
is for right side installation where the buttons will work correctly even
before onboarding to ReefBeat. For left side installation the buttons will
work in the opposite direction until onboarded to ReefBeat.

Red Sea ReefMat®
17
ENG
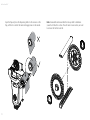
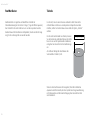
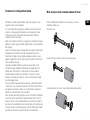
Inserting a new fleece-mat roll
Remove all of the packaging material and assemble the new mat onto
the dispensing shaft as follows:
Disassemble shaft.
Insert the shaft into the cardboard core of the new roll.
Insert the chuck on the shaft and screw the side plate firmly into
position.
Connection and initial setup
Download and install the ReefBeat-App from the app Store or Google
Play as appropriate for your Smart Mobile Device (SMD).
If this is your first ReefBeat device you will need to set up an account
and add some details of your aquarium. If you do not have a permanent
internet connection set the aquarium to “Offline”.
Set your ReefMat to AP mode by pressing the settings button for 5
seconds (until double blink). The indicator LED should be blinking.
Tap the Add Device button from the Device Manager page, select the
icon and follow the instructions in the app. This may take a few seconds.
If no devices appear on the list, check that the ReefMat is in AP mode
and/or refresh the page.
ReefBeat-App will now display a list of Wi-Fi networks and signal
strengths that are available to the ReefMat from its current location.
Select your preferred network and wait a few moments while the
ReefMat connects to it. The indicator LED will now be a solid red. Follow
the instructions on the app for initial settings.
If you have set the aquarium to Offline, select the “Direct Mode” option
at the top of the screen to skip the network connection. The indicator LED
will continue to blink as the ReefMat WI-Fi remains in AP mode.
Follow the instructions in the app for connecting the ReefMat to the
ReefBeat App and cloud. Then select the appropriate ReefMat model 500
or 1200 and select on which side of the ReefMat (Left or Right) you have
installed the drive-unit. It is best to come back to the App and confirm
that the fleece-mat roll has been installed after it has actually been
installed to avoid triggering any of the warning notifications.

Red Sea ReefMat®
18
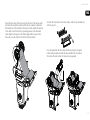
Note: Disassemble and reassemble the take-up shaft to familiarize
yourself with how this is done. This will make it easier when you need
to remove the first full used roll.
Open the flap and place the dispensing shaft into the recesses in the
flap, with the free end of the material hanging down on the outside.

Red Sea ReefMat®
19
ENG
Thread the free edge of the fleece-mat into the slot in the take-up shaft
and rotate the top side forwards (so that the new material comes from
the bottom rear of the shaft) for a few turns to firmly attach the material
to the shaft. Lower the shaft to its operating position in the Head and
rotate slightly as the gears on the shaft engage with the gears on the
drive-unit. Close the side locks to hold the shaft in position.
To insert the fleece-mat into the mat-retainer, slide the top assembly out
of the lower grid.
Place the grid under the fleece-mat with the openings for the guide
rollers facing forwards and slide the top assembly back into position.
Then rotate the tube so that the slots are facing upwards.

Red Sea ReefMat®
20
Lower the retainer inside the chamber until it is firmly seated at the
bottom and rotate the tube 180 degrees so that the side connectors
engage and the slots are facing downwards. The mat will naturally
unwind from the new roll while lowering the retainer as the take-up
shaft cannot rotate freely.
Return the front guide roller to the Head and click it into its operating
position.
Seite wird geladen ...
Seite wird geladen ...
Seite wird geladen ...
Seite wird geladen ...
Seite wird geladen ...
Seite wird geladen ...
Seite wird geladen ...
Seite wird geladen ...
Seite wird geladen ...
Seite wird geladen ...
Seite wird geladen ...
Seite wird geladen ...
Seite wird geladen ...
Seite wird geladen ...
Seite wird geladen ...
Seite wird geladen ...
Seite wird geladen ...
Seite wird geladen ...
Seite wird geladen ...
Seite wird geladen ...
Seite wird geladen ...
Seite wird geladen ...
Seite wird geladen ...
Seite wird geladen ...
Seite wird geladen ...
Seite wird geladen ...
Seite wird geladen ...
Seite wird geladen ...
Seite wird geladen ...
Seite wird geladen ...
Seite wird geladen ...
Seite wird geladen ...
Seite wird geladen ...
Seite wird geladen ...
Seite wird geladen ...
Seite wird geladen ...
Seite wird geladen ...
Seite wird geladen ...
Seite wird geladen ...
Seite wird geladen ...
Seite wird geladen ...
Seite wird geladen ...
Seite wird geladen ...
Seite wird geladen ...
Seite wird geladen ...
Seite wird geladen ...
Seite wird geladen ...
Seite wird geladen ...
Seite wird geladen ...
Seite wird geladen ...
Seite wird geladen ...
Seite wird geladen ...
Seite wird geladen ...
Seite wird geladen ...
Seite wird geladen ...
Seite wird geladen ...
Seite wird geladen ...
Seite wird geladen ...
Seite wird geladen ...
Seite wird geladen ...
Seite wird geladen ...
Seite wird geladen ...
Seite wird geladen ...
Seite wird geladen ...
Seite wird geladen ...
Seite wird geladen ...
Seite wird geladen ...
Seite wird geladen ...
Seite wird geladen ...
Seite wird geladen ...
Seite wird geladen ...
Seite wird geladen ...
-
 1
1
-
 2
2
-
 3
3
-
 4
4
-
 5
5
-
 6
6
-
 7
7
-
 8
8
-
 9
9
-
 10
10
-
 11
11
-
 12
12
-
 13
13
-
 14
14
-
 15
15
-
 16
16
-
 17
17
-
 18
18
-
 19
19
-
 20
20
-
 21
21
-
 22
22
-
 23
23
-
 24
24
-
 25
25
-
 26
26
-
 27
27
-
 28
28
-
 29
29
-
 30
30
-
 31
31
-
 32
32
-
 33
33
-
 34
34
-
 35
35
-
 36
36
-
 37
37
-
 38
38
-
 39
39
-
 40
40
-
 41
41
-
 42
42
-
 43
43
-
 44
44
-
 45
45
-
 46
46
-
 47
47
-
 48
48
-
 49
49
-
 50
50
-
 51
51
-
 52
52
-
 53
53
-
 54
54
-
 55
55
-
 56
56
-
 57
57
-
 58
58
-
 59
59
-
 60
60
-
 61
61
-
 62
62
-
 63
63
-
 64
64
-
 65
65
-
 66
66
-
 67
67
-
 68
68
-
 69
69
-
 70
70
-
 71
71
-
 72
72
-
 73
73
-
 74
74
-
 75
75
-
 76
76
-
 77
77
-
 78
78
-
 79
79
-
 80
80
-
 81
81
-
 82
82
-
 83
83
-
 84
84
-
 85
85
-
 86
86
-
 87
87
-
 88
88
-
 89
89
-
 90
90
-
 91
91
-
 92
92


Red Sea ReefMat 1200 Benutzerhandbuch
- Typ
- Benutzerhandbuch
- Dieses Handbuch eignet sich auch für
in anderen Sprachen
- English: Red Sea ReefMat 1200 User manual
- français: Red Sea ReefMat 1200 Manuel utilisateur
Verwandte Artikel
-
 Red Sea REEFER 170 G2+ Bedienungsanleitung
-
 Red Sea ReefATO+ Bedienungsanleitung
-
 Red Sea ReefRun 9000 Bedienungsanleitung
-
 Red Sea ReefWave 25 Benutzerhandbuch
-
 Red Sea REEFER DC Skimmer 300 Bedienungsanleitung
-
 Red Sea ReefLED 50 Benutzerhandbuch
-
 Red Sea ReefRun 9000 Bedienungsanleitung
-
Red Sea 7029 Benutzerhandbuch
-
Red Sea ReefRun Benutzerhandbuch


