Lenco CR-605BK Bedienungsanleitung
- Kategorie
- Wecker
- Typ
- Bedienungsanleitung

1
Model: CR-605
User manual - DAB+ and FM clock radio
Gebruikshandleiding - Wekkerradio met
DAB+ en FM
Bedienungsanleitung DAB+- und
FM-Radiowecker
Manuel d’utilisation - Radio-réveil
DAB+ et FM
Manual de usuario – radio reloj
DAB+ y FM
Index
English......................................................... 2
Nederlands ................................................ 10
Deutsch ..................................................... 19
Français ..................................................... 28
Español...................................................... 38
Version 1.0

2
English
CR-605
CAUTION:
Usage of controls or adjustments or
performance of procedures other than
those specified herein may result in
hazardous radiation exposure.
This unit should not be adjusted or
repaired by anyone except qualified
service personnel.
PRECAUTIONS BEFORE USE
KEEP THESE INSTRUCTIONS IN MIND:
1. Do not use this device near water.
2. Clean only with a slightly damp cloth.
3. Do not cover or block any ventilation
openings. When placing the device
on a shelf, leave 5 cm (2”) free space
around the whole device.
4. Install in accordance with the
supplied user manual.
5. * Don’t step on or pinch the power
adaptor. Be very careful, particularly
near the plugs and the cable’s exit
point. Do not place heavy items on
the power adaptor, which may
damage it. Keep the entire device out
of children’s reach! When playing
with the power cable, they can
seriously injure themselves.
6. * Unplug this device during lightning
storms or when unused for a long
period.
7. Keep the device away from heat
sources such as radiators, heaters,
stoves, candles and other heat-
generating products or naked flame.
8. Avoid using the device near strong
magnetic fields.
9. Electrostatic discharge can disturb
normal usage of this device. If so,
simply reset and restart the device
following the instruction manual.
During file transmission, please
handle with care and operate in a
static-free environment.
10. Warning! Never insert an object into
the product through the vents or
openings. High voltage flows through
the product and inserting an object
can cause electric shock and/or short
circuit internal parts. For the same
reason, do not spill water or liquid on
the product.
11. Do not use in wet or moist areas such
as bathrooms, steamy kitchens or
near swimming pools.
12. Do not use this device when
condensation may occur.
13. Although this device is manufactured
with the utmost care and checked
several times before leaving the
factory, it is still possible that
problems may occur, as with all
electrical appliances. If you notice
smoke, an excessive build-up of heat
or any other unexpected phenomena,
you should disconnect the plug from
the main power socket immediately.
14. This device must operate on a power
source as specified on the
specification label. If you are not sure
of the type of power supply used in
your home, consult your dealer or
local power company.
15. * The socket outlet must be installed
near the equipment and must be
easily accessible.
16. * Do not overload ac outlets or
extension cords. Overloading can
cause fire or electric shock.
17. * Devices with class 1 construction
should be connected to a main
socket outlet with a protective
earthed connection.
18. * Devices with class 2 construction
do not require a earthed connection.
19. Keep away from rodents. Rodents
enjoy biting on power cords.
20. * Always hold the plug when pulling
it out of the main supply socket. Do
not pull the power cord. This can
cause a short circuit.
21. Avoid placing the device on any
surfaces that may be subject to
vibrations or shocks.
22. To clean the device, use a soft dry
cloth. Do not use solvents or petrol
based fluids. To remove severe
stains, you may use a damp cloth
with dilute detergent.
23. The supplier is not responsible for
damage or lost data caused by
malfunction, misuse, modification of
the device or battery replacement.
24. Do not interrupt the connection
when the device is formatting or
transferring files. Otherwise, data
may be corrupted or lost.
25. If the unit has USB playback function,
the usb memory stick should be
plugged into the unit directly. Don’t
use an usb extension cable because it
can cause interference resulting in
failing of data.

3
26. The apparatus shall not be exposed
to dripping or splashing and make
sure that no objects filled with
liquids, such as vases, are placed on
or near the apparatus.
27. * To completely disconnect the
power input, the mains plug of the
apparatus shall be disconnected from
the mains, as the disconnect device is
the mains plug of apparatus.
28. If the unit works with battery,
Battery shall not be exposed to
excessive heat such as sunshine, fire
or the like.
29. Attention should be drawn to the
environmental aspects of battery
disposal.
30. The apparatus can only be used in
moderate extremely cold or climates
warm environments should be
avoided.
31. The rating label has been marked on
the bottom or back panel of the
apparatus.
32. This device is not intended for use by
people (including children) with
physical, sensory or mental
disabilities, or a lack of experience
and knowledge, unless they’re under
supervision or have received
instructions about the correct use of
the device by the person who is
responsible for their safety.
33. This product is intended for non-
professional use only and not for
commercial or industrial use.
34. Make sure the unit is adjusted to a
stable position. Damage caused by
using this product in an unstable
position or by failure to follow any
other warning or precaution
contained within this user manual
will not be covered by warranty.
35. Never remove the casing of this
apparatus.
36. Never place this apparatus on other
electrical equipment.
37. Do not use or store this product in a
place where it is subject to direct
sunlight, heat, excessive dust or
vibration.
38. Do not allow children access to
plastic bags.
39. Only use attachments/accessories
specified by the manufacturer.
40. Refer all servicing to qualified service
personnel. Servicing is required when
the apparatus has been damaged in
any way, such as the power supply
cord or the plug, when liquid has
been spilled or objects have fallen
into the apparatus, when the
apparatus has been exposed to rain
or moisture, does not operate
normally, or has been dropped.
41. *Do not use a damaged power cord
or plug or a loose outlet. Doing so
may result in fire or electric shock.
42. Prolonged exposure to loud sounds
from personal music players may
lead to temporary or permanent
hearing loss.
43. If the product contains or is delivered
with a remote control containing
coin/cell batteries:
Warning:
⚫ “Do not ingest battery, Chemical
Burn Hazard” or equivalent
working.
⚫ [The remote control supplied
with] This product contains a
coin/button cell battery is
swallowed, it can cause severe
internal burns in just 2 hours
and can lead to death.
⚫ Keep new and used batteries
away from children.
⚫ If the battery compartment
does not close securely, stop
using the product and keep it
away from children.
⚫ If you think batteries might have
been swallowed or placed inside
any part of the body, seek
immediate medical attention.
INSTALLATION
• Unpack all parts and remove protective
material.
• *Do not connect the unit to the mains
before checking the mains voltage and
before all other connections have been
made.
* These instructions are related only to
products using power cable or AC
power adaptor.

4
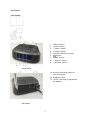
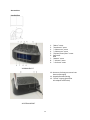
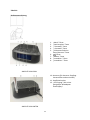
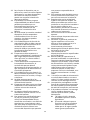
Accessories:
User manual
AC adaptor
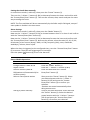
1. “Menu” button
2. “Preset” button
3. “< Select” button
4. “> Select” button
5. “Snooze Enter/Scan” button
6. “ ” button
7. “Mode” button
8. “- Volume” button
9. “+ Volume” button
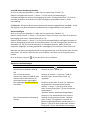
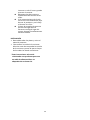
FRONT VIEW
10. Antenna (Extend and alter for
better reception)
11. Headphone jack
12. “DC-IN” jack (Plug in appropriate
AC adaptor)
BACK VIEW

5
Setting the time & date manually
In normal time mode (= radio off), short press the “Preset” button (2).
Then use the “< Select >” buttons (3 & 4) to decrease/increase the hours and confirm with
the “Snooze/Enter/Scan” button (5). Then set the minutes, date, month and year the same
way as setting the hours.
NOTE: The Time and date will be set automatically by the DAB+ and/or FM signal, except if
auto update is disable in the time menu.
Alarm Settings
In normal time mode (= radio off), short press the “Mode” button (7).
Now use the “< Select >” buttons (3 & 4) to choose between alarm 1 or alarm 2 and confirm
with the “Snooze/Enter/Scan” button (5).
Now use the “< Select >” buttons (3 & 4) to decrease/increase the hours and confirm with
the “Snooze/Enter/Scan” button (5). Now set the minutes, alarm duration (15, 30, 45, 60,
90 minutes), alarm source (buzzer, DAB+, or FM), frequency (daily, once, weekends,
weekdays), volume, alarm on/off.
When the alarm is triggered, at the configured time, press the “Snooze Enter/Scan” button
(5) to snooze. The alarm will trigger again in 9 minutes.
Press the power “ ” button (6) to turn the alarm off.
General Radio Operations
To
Do this
Turn radio on and off
Press the “ ” button (6)
Change function: DAB+ & FM
Press the “Mode” button (7)
Adjust volume
Press the “– Volume +” buttons (8 & 9)
Scan for stations (DAB+ &
FM)(stations will automatically be
saved as preset)
Press and hold down the “Snooze
Enter/Scan” button (5)
Select a stored preset station
Short press the “Preset” button (2). Select
your desired preset with the “< Select >”
buttons (3 & 4) and press the “Snooze
Enter/Scan” button (5) to confirm you
selection.
*Stations are stored automatically when
doing an auto scan.
Storing a preset manually
Tune to your desired station. Press and hold
the “Preset” button (2). Select the desired
preset location with the “< Select >” buttons
(3 & 4) and press the “Snooze Enter/Scan”
button (5) to confirm your selection.

6
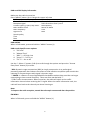
DAB+ and FM Display information
Make sure the radio is turned on.
Press “MENU” button (1) to change the screen info view
DAB+ mode
FM mode
Channel information Scrolling text
Channel information Scrolling text
Reception signal
Radio Broadcast Data System
Content type E.g. Sport, Pop music.
FM frequency
DAB+ Station name
Stereo or Mono
DAB+ frequency
Time
Signal error
Sound quality
Time
Date
Date
DAB+ MENU
When in DAB mode, press and hold the “MENU” button (1)
DAB+ mode Specific menu options
a. “Full scan”
b. “Manual Tune”
c. “DRC”* – off, high, low
d. “Prune”** – Yes or no
e. “TA”*** – On or Off
Use the “< Select >” buttons (3 & 4) to scroll through the options and press the “Snooze
Enter/Scan” button (5) to select.
* DRC: Dynamic range compression (DRC) or simply compression is an audio signal
processing operation that reduces the volume of loud sounds or amplifies quiet sounds thus
reducing or compressing an audio signal's dynamic range
** PRUNE: is a feature on most Digital Radios that deletes stations that are either no longer
transmitting or have moved frequency. These are often marked with '?'
***TA: Traffic Announcement. When turned on, the radio will switch to the traffic
information channel when receiving the TA signal. When the traffic information ends, the
radio will turn back to the channel you where listening to.
Note:
To improve the radio reception, extend the telescopic antenna and alter the position.
FM MENU
When in FM mode, press and hold the “MENU” button (1)

7
FM mode Specific menu options
a. “Scan Setting”: How the radio scans for radio stations
1. All stations
2. Strong stations
b. “Audio Setting”
1. Stereo allowed
2. Forced mono
Common settings
a. “System”
i. “Sleep” – off, 15, 30, 45, 60, 90 (minutes)
ii. “Alarm” (see Alarm Set above)
iii. “Time”
“Set Time/date” (also see the section “Setting the time & date manually”)
1. “Auto update”
a. Update from any
b. Update from DAB+
c. Update from FM
d. No update
2. “Set 12/24 hour” – set AM/PM or 24-hour
3. “Set date format” – DD MM YYYY, MM DD YYYY
4. “Backlight
a. “Timeout” – 10, 20, 30, 45, 60, 90, 120, 180 (seconds), On
b. “On level” – High, medium, low
c. “Dim level” – High, medium, low
5. “Language” – English, Deutsch, Italiano, Francais, Nederlands,
Espanol, Dansk,
6. “Factory reset”
7. “SW version”
Note:
To improve the radio reception, extend the telescopic antenna and alter the position.
Listen through a headphone
Plug a headphone into the headphone jack (11) on the back of the unit. (Headphone not
included). The headphone volume level can be controlled by the volume buttons (8 & 9)
Technical Specifications
Adaptor Input 100-240V~50/60 Hz
Clock input DC 5V/1A
Connections: 5VDC, 3.5mm headphone out
Power consumption 5W(Max)
Power consumption (standby) <1W
Operating Temperature 0°C-35°C
Operating position Horizontal

8
Dim. unit 150 x 120 x 50 mm (WxDxH)
Weight 270g
Power supply adaptor: (For EU only)
Manufacturer: DongGuan Obelieve Electronic Co., Ltd
Model Number: OBL-0501000E
Only use the original AC adaptor
Only use the power supply listed in these user instructions.
Guarantee
Lenco offers service and warranty in accordance to European law, which means that in case
of repairs (both during and after the warranty period) you should contact your local dealer.
Important note: It is not possible to send products that need repairs to Lenco directly.
Important note: If this unit is opened or accessed by a non-official service center in any way,
the warranty expires.
This device is not suitable for professional use. In case of professional use, all warranty
obligations of the manufacturer will be voided.
Disclaimer
Updates to Firmware and/or hardware components are made regularly. Therefore some of
the instruction, specifications and pictures in this documentation may differ slightly from
your particular situation. All items described in this guide for illustration purposes only and
may not apply to particular situation. No legal right or entitlements may be obtained from
the description made in this manual.
Disposal of the Old Device
This symbol indicates that the relevant electrical product or battery should
not be disposed of as general household waste in Europe. To ensure the
correct waste treatment of the product and battery, please dispose them in
accordance to any applicable local laws of requirement for disposal of
electrical equipment or batteries. In so doing, you will help to conserve
natural resources and improve standards of environmental protection in
treatment and disposal of electrical waste (Waste Electrical and Electronic
Equipment Directive).

9
CE Marking
Hereby, Lenco Benelux B.V., Thermiekstraat 1a, 6361 HB Nuth, The Netherlands,
declares that this product is in compliance with the essential EU directive
requirements.
The declaration of conformity may be consulted via techdoc@commaxxgroup.com
Service
For more information and helpdesk support, please visit www.lenco.com
Lenco Benelux BV, Thermiekstraat 1a, 6361 HB, The Netherlands.

10
Nederlands
CR-605
LET OP:
Gebruik van bedieningen of afstellingen of
uitvoer van procedures anders dan
gespecificeerd in deze documentatie kan
leiden tot blootstelling aan schadelijke
straling.
Dit apparaat dient uitsluitend te worden
aangepast of gerepareerd door
gekwalificeerd onderhoudspersoneel.
VOORZORGSMAATREGELEN VOOR
GEBRUIK
ONTHOUD DE VOLGENDE INSTRUCTIES:
1. Gebruik dit apparaat niet in de buurt
van water.
2. Reinig het uitsluitend met een licht
vochtige doek.
3. Bedek of blokkeer de
ventilatieopeningen niet. Wanneer u
het apparaat op een schap plaatst,
dient u 5 cm (2”) vrije ruimte rondom
het gehele apparaat te behouden.
4. Installeer het product volgens de
meegeleverde
gebruikershandleiding.
5. * Nooit op de stroomadapter
stappen of deze indrukken. Wees
voornamelijk voorzichtig in de buurt
van de stekkers en het punt waar de
kabel uit het apparaat komt. Plaats
geen zware voorwerpen op de
stroomadapter, om beschadiging
ervan te voorkomen. Houd het
gehele apparaat buiten bereik van
kinderen! Wanneer kinderen met de
voedingskabel spelen, kunnen zij
ernstig letsel oplopen.
6. * Haal de stekker uit het stopcontact
tijdens onweer of wanneer u deze
langere tijd niet gebruikt.
7. Houd het apparaat uit de buurt van
hittebronnen, zoals radiatoren,
verwarmingen, kachels, kaarsen en
andere hittegenererende producten
of open vuur.
8. Gebruik dit apparaat niet in de buurt
van krachtige magnetische velden.
9. Elektrostatische ontlading kan normaal
gebruik van dit apparaat verstoren. U
hoeft het apparaat in dit geval slechts
te resetten en opnieuw op te starten
volgens de gebruikershandleiding.
Wees voorzichtig tijdens
bestandsoverdracht en gebruik het
product in een omgeving zonder
statische interferentie.
10. Waarschuwing! Steek nooit een
voorwerp via de ventilatie- of andere
openingen in het product. Er is
hoogspanning in het product
aanwezig en als u er een object
insteekt, kan dat een elektrische
schok veroorzaken en/of kortsluiting
in de interne onderdelen. Mors om
dezelfde reden geen water of
vloeistof op het product.
11. Gebruik het toestel niet in vochtige
ruimtes, zoals badkamers, stomende
keukens of in de buurt van
zwembaden.
12. Gebruik dit apparaat niet wanneer
condensatie kan optreden.
13. Alhoewel dit apparaat met grote zorg
gefabriceerd en verschillende keren
geïnspecteerd is voordat het de
fabriek verlaat, is het nog steeds
mogelijk dat er problemen optreden,
zoals met alle elektrische apparaten.
Als u rook, een overmatige
hitteontwikkeling of enig ander
onverwacht verschijnsel opmerkt,
moet u onmiddellijk de stekker van
het netsnoer uit het stopcontact
halen.
14. Dit apparaat moet werken op een
voedingsbron, zoals aangegeven op
het specificatieplaatje. Als u twijfelt
over het type voeding dat gebruikt
wordt in uw huis, raadpleeg dan uw
dealer of plaatselijk energiebedrijf.
15. * Het stopcontact moet in de buurt
van de apparatuur zijn geïnstalleerd
en eenvoudig te bereiken zijn.
16. * Overbelast stopcontacten of
verlengsnoeren niet. Overbelasting
kan brand of een elektrische schok
veroorzaken.
17. * Apparaten met een Klasse 1
structuur dienen te worden
aangesloten op een stopcontact met
een beschermende aardverbinding.
18. * Apparaten met een Klasse 2
structuur vereisen geen
aardverbinding.
19. Houd het uit de buurt van
knaagdieren. Knaagdieren knauwen
graag aan voedingskabels.
20. * Houd altijd de stekker vast
wanneer u deze uit het stopcontact
trekt. Trek nooit aan de
voedingskabel. Dit kan tot een
kortsluiting leiden.
21. Vermijd om het toestel te plaatsen
op een ondergrond die blootgesteld

11
kan worden aan trillingen of
schokken.
22. Gebruik een zacht, droog doekje om
het apparaat te reinigen. Gebruik
geen oplosmiddelen of op benzine
gebaseerde vloeistoffen. U kunt een
vochtig doekje met verdund
schoonmaakmiddel gebruiken om
hardnekkige vlekken te verwijderen.
23. De leverancier is niet
verantwoordelijk voor schade of
verloren gegevens veroorzaakt door
storing, misbruik, modificatie van het
apparaat of batterijvervanging.
24. Onderbreek nooit de verbinding
wanneer het apparaat formatteert of
bestanden overdraagt. De gegevens
kunnen anders corrupt of verloren
raken.
25. Indien het apparaat een USB-
afspeelfunctie heeft, moet de USB-
geheugenstick rechtstreeks op het
apparaat worden aangesloten.
Gebruik geen USB-verlengkabel,
omdat die kan leiden tot storingen
met foutieve gegevens als gevolg.
26. Het apparaat mag niet worden
blootgesteld aan druppels of spatten
en zorg ervoor dat er geen met
vloeistof gevulde voorwerpen, zoals
vazen, op of nabij het apparaat zijn
geplaatst.
27. * Om de verbinding met de
stroomaansluiting volledig te
verbreken, moet de stekker van het
apparaat uit het stopcontact worden
gehaald, omdat de stekker van het
apparaat de hoofdschakelaar is.
28. Indien het apparaat op batterijen kan
werken, dan mogen de batterijen
niet aan overmatige hitte, zoals
zonlicht, open vuur e.d. worden
blootgesteld.
29. Aandacht voor het milieu is nodig bij
het verwijderen van de batterijen.
30. Het apparaat kan alleen worden
gebruikt in gematigde klimaten.
Extreem koude of warme
omgevingen moeten worden
vermeden.
31. Het nominale specificatielabel is te
vinden op het paneel aan de onder-
of achterkant van het apparaat.
32. Dit apparaat is niet bestemd voor
gebruik door mensen (inclusief
kinderen) met fysieke, zintuiglijke of
geestelijke gebreken of gebrek aan
kennis en ervaring, tenzij zij onder
toezicht staan of instructies hebben
over het juiste gebruik van het
apparaat hebben gekregen van de
persoon die verantwoordelijk is voor
hun veiligheid.
33. Dit product is alleen voor niet-
professioneel gebruik bedoeld en
niet voor commercieel of industrieel
gebruik.
34. Verzeker u ervan dat het apparaat in
een stabiele positie staat opgesteld.
Schade, veroorzaakt door het gebruik
van dit product in een onstabiele
positie, of door het niet naleven van
waarschuwingen of
voorzorgsmaatregelen genoemd in
deze handleiding, valt niet onder de
garantie.
35. Verwijder nooit de behuizing van dit
apparaat.
36. Plaats dit apparaat nooit op andere
elektrische apparatuur.
37. Dit product niet gebruiken of opslaan
op plaatsen waar het wordt
blootgesteld aan direct zonlicht,
hitte, buitensporig veel stof of
trillingen.
38. Geef kinderen geen gelegenheid in
aanraking met plastic zakken te
komen.
39. Gebruik uitsluitend
uitbreidingen/accessoires
gespecificeerd door de fabrikant.
40. Laat alle reparaties over aan
gekwalificeerd
onderhoudspersoneel. Onderhoud is
vereist als het toestel hoe dan ook is
beschadigd, zoals bijvoorbeeld het
netsnoer of de stekker, wanneer er
vloeistof of een voorwerp in het
apparaat is terechtgekomen,
wanneer het apparaat is blootgesteld
aan regen of vocht, als het niet
normaal werkt of is gevallen.
41. *Gebruik nooit een beschadigde
voedingskabel of stekker of een los
stopcontact. Dit vormt namelijk een
risico op brand of elektrische
schokken.
42. Langdurige blootstelling aan luid
geluid van persoonlijke
muziekspelers kan leiden tot
tijdelijke of permanente
gehoorbeschadiging.
43. Indien het product
knoopcelbatterijen bevat of wordt
geleverd met een afstandsbediening
die knoopcelbatterijen bevat:

12
Waarschuwing:
⚫ "Batterij niet inslikken, chemisch
brandgevaar” of gelijkwaardige
werking.
⚫ [De meegeleverd
afstandsbediening] Dit product
bevat een knoopcelbatterij. Bij
inslikking van de batterij kan dit
in minder dan 2 uur tijd tot
ernstige interne brandwonden
en de dood leiden.
⚫ Houd nieuwe en gebruikte
batterijen buiten bereik van
kinderen.
⚫ Als de batterijhouder niet goed
kan worden gesloten, dient u
het product niet meer te
gebruiken en buiten bereik van
kinderen te houden.
⚫ Als u denkt dat batterijen zijn
ingeslikt of binnenin een
willekeurig lichaamsdeel terecht
zijn gekomen, dient u
onmiddellijk medische hulp te
zoeken.
INSTALLATIE
• Pak alle onderdelen uit en verwijder de
beschermende materialen.
• *Sluit het apparaat niet aan op het
stopcontact, voordat u de netspanning
hebt gecontroleerd en voordat alle
andere aansluitingen zijn gemaakt.
* Deze instructies zijn enkel van
toepassing op producten met een
voedingskabel of een AC
voedingsadapter.

13
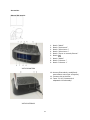
Accessoires:
Handleiding
AC-adapter
1. “Menu”-toets
2. “Voorkeuze”-toets
3. “< Selecteren”-toets
4. “> Selecteren”-toets
5. “Sluimer/Enter/Scan”-toets
6. “ ”-toets
7. “Modus”-toets
8. “- Volume”-toets
9. “+ Volume”-toets
VOORAANZICHT
10. Antenne (verleng en verstel voor
betere ontvangst)
11. Koptelefoonaansluiting
12. “DC-IN”-ingang (geschikte
AC-adapter aansluiten)
ACHTERAANZICHT

14
De tijd & datum handmatig instellen
Druk in de normale tijdmodus ( = radio uit) kort op de toets “Preset” (2).
Gebruik vervolgens de toetsen “< Select >” (3 & 4) om de uuraanduiding te
verhogen/verlagen en druk ter bevestiging op de toets “Snooze/Enter/Scan” (5). Stel de
minuten, de datum, de maand en het jaar vervolgens op dezelfde manier in als de
uurinstelling.
OPMERKING: De tijd en datum zullen automatisch worden ingesteld door het DAB+- en/of
FM-signaal, tenzij de automatische updatefunctie is uitgeschakeld in het tijdmenu.
Alarminstellingen
Druk in de normale tijdmodus ( = radio uit) kort op de toets “Modus” (7).
Gebruik nu de toetsen “< Select >” (3 & 4) om te kiezen uit alarm 1 en alarm 2 en druk ter
bevestiging op de toets “Snooze/Enter/Scan” (5).
Gebruik nu de toetsen “< Select >” (3 & 4) om de uuraanduiding te verhogen/verlagen en
druk ter bevestiging op de toets “Snooze/Enter/Scan” (5). Stel vervolgens de minuten, de
alarmduur (15, 30, 45, 60 of 90 minuten), de alarmbron (zoemer, DAB+ of FM), de
frequentie (dagelijks, eenmalig, weekends, weekdagen), het volume en alarm aan/uit in.
Wanneer het alarm wordt geactiveerd, op de ingestelde tijd, druk dan op de toets “Snooze
Enter/Scan” (5) om de sluimerfunctie in te schakelen. Het alarm zal na 9 minuten weer
klinken.
Druk op de aan-/uittoets “ ” (6) om het alarm uit te schakelen.
Algemene radiobedieningen
Functie
Actie
De radio in- en uitschakelen
Druk op de toets “ ” (6)
Van functie veranderen: DAB+ &
FM
Druk op de toets “Mode” (7)
Het volume aanpassen
Druk op de toetsen “– Volume +” (8 & 9)
Zoeken naar stations (DAB+ & FM)
(stations zullen automatisch als
voorkeuze worden opgeslagen)
Houd de toets “Snooze Enter/Scan” (5)
ingedrukt
Een opgeslagen voorkeuzestation
selecteren
Druk kort op de toets “Preset” (2). Selecteer
het gewenste voorkeuzestation met de
toetsen “< Select >” (3 & 4) en druk op de
toets “Snooze Enter/Scan” (5) om uw selectie
te bevestigen.
*Stations worden automatisch opgeslagen
wanneer u een automatische scan uitvoert.
Een voorkeuzestation handmatig
opslaan
Stem af op het gewenste station. Houd de
toets “Preset” (2) ingedrukt. Selecteer de
gewenste geheugenlocatie met de toetsen “<
Select >” (3 & 4) en druk op de toets “Snooze
Enter/Scan” (5) om uw selectie te bevestigen.

15
Scherminformatie voor DAB+ en FM
Zorg ervoor dat de radio is ingeschakeld.
Druk op de toets “MENU” (1) om de informatieweergave op het scherm te veranderen.
DAB+-modus
FM-modus
Scrollende tekst met
kanaalinformatie
Scrollende tekst met kanaalinformatie
Ontvangstsignaal
Radio Data-systeem
Het type inhoud zoals Sport of
Popmuziek.
FM-frequentie
DAB+-stationsnaam
Stereo of mono
DAB+-frequentie
Tijd
Signaalfout
Geluidskwaliteit
Tijd
Datum
Datum
DAB+-MENU
Houd in de DAB-modus de toets “MENU” (1) ingedrukt
Specifieke menu-opties in DAB+-modus
a. “Volledige scan”
b. “Handmatig afstemmen”
c. “DRC”* – uit, hoog, laag
d. “Inkorten”** – Ja of Nee
e. “TA”*** – Aan of Uit
Gebruik de toetsen “< Select >” (3 & 4) om de opties te doorlopen en druk op de toets
“Snooze Enter/Scan” (5) om te selecteren.
* DRC: Dynamische bereikcompressie (DRC) of simpelweg compressie is een
verwerkingsfunctie voor het audiosignaal die het volume van luidere geluiden verlaagt of
stillere geluiden juist versterkt, waardoor het dynamische bereik van het audiosignaal dus
wordt gereduceerd of gecomprimeerd
** Inkorten: is een functie in de meeste digitale radio’s die stations verwijdert die niet
langer worden uitgezonden of van frequentie zijn veranderd. Deze worden meestal
gemarkeerd met ‘?’
***TA: Verkeersinformatie. Wanneer ingeschakeld, dan zal de radio op het kanaal met
verkeersinformatie schakelen zodra deze het TA-signaal ontvangt. Wanneer de
verkeersinformatie eindigt, dan zal de radio weer terugkeren naar het laatst beluisterde
kanaal.
Opmerking:
Om de radio ontvangst te verbeteren, dient u de uitschuifbare antenne uit te trekken en
van positie te veranderen.

16
FM-MENU
Houd in de FM-modus de toets “MENU” (1) ingedrukt
Specifieke menu-opties in FM-modus
a. “Scaninstelling”: Hoe de radio naar radiostations zoekt
1. Alle stations
2. Krachtige stations
b. “Audio-instelling”
1. Stereo toegestaan
2. Geforceerd mono
Algemene instellingen
a. “Systeem”
i. “Slaap” – uit, 15, 30, 45, 60, 90 (minuten)
ii. “Alarm” (zie Alarminstellingen hierboven)
iii. “Tijd”
“Tijd/datum instellen” (zie ook paragraaf “De tijd & datum handmatig instellen”)
1. “Automatische update”
a. Update via alle
b. Update via DAB+
c. Update via FM
d. Geen update
2. “12/24 uur instellen” – AM/PM of 24-uurs formaat instellen
3. “Datumformaat instellen” – DD MM JJJJ, MM DD JJJJ
4. “Achtergrondlicht”
a. “Time-out” – 10, 20, 30, 45, 60, 90, 120,
180 (seconden), Aan
b. “Inschakelniveau” – Hoog, gemiddeld, laag
c. “Dimniveau” – Hoog, gemiddeld, laag
5. “Taal” – English, Deutsch, Italiano, Francais, Nederlands,
Espanol, Dansk,
6. “Fabrieksreset”
7. “SW-versie”
Opmerking:
Om de radioontvangst te verbeteren, dient u de uitschuifbare antenne te verlengen en
van positie te veranderen.
Luisteren via een hoofdtelefoon
Sluit een hoofdtelefoon aan op de hoofdtelefoonuitgang (11) op de achterzijde van het
apparaat. (Hoofdtelefoon niet inbegrepen). Het volumeniveau van de hoofdtelefoon kan
worden geregeld met de volumetoetsen (8 & 9)
Technische specificaties
Adapteringang 100-240 V~50/60 Hz
Wekkeringang DC 5 V/1 A
Aansluitingen: 5 VDC, 3,5 mm hoofdtelefoonuitgang

17
Stroomverbruik 5 W (max.)
Stroomverbruik (stand-by) <1 W
Bedrijfstemperatuur 0°C-35°C
Gebruikspositie Horizontaal
Afmetingen van apparaat 150 x 120 x 50 mm (BxDxH)
Gewicht 270 g
Voedingsadapter: (Alleen voor EU)
Fabrikant: DongGuan Obelieve Electronic Co., Ltd
Modelnummer: OBL-0501000E
Gebruik uitsluitend de originele AC-adapter
Gebruik uitsluitend de voeding vermeld in deze gebruiksaanwijzingen.
Garantie
Lenco biedt service en garantie aan overeenkomstig met de Europese wetgeving. Dit houdt
in dat u in het geval van reparaties (zowel tijdens als na de garantieperiode) contact moet
opnemen met uw lokale handelaar.
Belangrijke opmerking: Het is niet mogelijk om producten die moeten worden gerepareerd
rechtstreeks naar Lenco te sturen.
Belangrijke opmerking: De garantie verloopt als een onofficieel servicecenter het apparaat
op wat voor manier dan ook heeft geopend, of er toegang toe heeft gekregen.
Het apparaat is niet geschikt voor professioneel gebruik. In het geval van professioneel
gebruik worden alle garantieverplichtingen van de fabrikant nietig verklaard.
Disclaimer
Er worden regelmatig updates in de firmware en/of hardwarecomponenten gemaakt.
Daardoor kunnen gedeelten van de instructie, de specificaties en afbeeldingen in deze
documentatie enigszins verschillen van uw eigen situatie. Alle onderwerpen die staan
beschreven in deze handleiding zijn bedoeld als illustratie en zijn niet van toepassing op
specifieke situaties. Aan de beschrijving in dit document kunnen geen rechten worden
ontleend.
Afvoer van het oude apparaat
Dit symbool geeft aan dat het betreffende elektrische product of de
accu/batterij niet mag worden verwijderd als algemeen huishoudelijk afval
in Europa. Zorg voor een juiste afvalverwerking door het product en de
accu/batterij in overeenstemming met alle van toepassing zijnde lokale
wetten voor het verwijderen van elektrische apparatuur of accu's/batterijen
te verwijderen. Als u dit doet, helpt u de natuurlijke bronnen te behouden
en de standaard van milieubescherming te verbeteren bij de behandeling
en verwijdering van elektrisch afval (Afgedankte Elektrische en
Elektronische Apparatuur).

18
CE-markering
Lenco Benelux B.V., Thermiekstraat 1a, 6361 HB Nuth, Nederland, verklaart hierbij
dat dit product voldoet aan de vereisten van de essentiële EU-richtlijnen.
De verklaring van conformiteit kan worden aangevraagd via
techdoc@commaxxgroup.com
Service
Bezoek voor meer informatie en helpdeskondersteuning www.lenco.com
Lenco Benelux BV, Thermiekstraat 1a, 6361 HB, Nederland

19
Deutsch
CR-605
ACHTUNG:
Eine andere als die hier beschriebene
Bedienung, Einstellung oder Verwendung
der Funktionen kann zu gefährlicher
Strahlenbelastung führen.
Dieses Gerät darf nur von qualifizierten
Fachkräften und niemand anderem
repariert oder eingestellt werden.
VORSICHTSMASSNAHMEN VOR DER
BENUTZUNG
BEFOLGEN SIE IMMER FOLGENDE
ANWEISUNGEN:
1. Benutzen Sie das Gerät nicht in der
Nähe von Wasser.
2. Benutzen Sie zur Reinigung ein nur
leicht befeuchtetes Tuch.
3. Blockieren oder bedecken Sie keine
Lüftungsöffnungen. Wenn Sie das
Gerät auf ein Regal stellen, lassen Sie
um das gesamte Gerät 5 cm (2”)
freien Platz.
4. Stellen Sie das Gerät entsprechend
den Anweisungen der mitgelieferten
Bedienungsanleitung auf.
5. * Treten Sie nicht auf das Netzteil
und klemmen Sie es auch nicht ein.
Seien Sie im näheren Bereich des
Steckers und der Herausführungen
des Kabels besonders vorsichtig.
Stellen Sie keine schweren
Gegenstände auf das Netzteil, weil es
dadurch beschädigt werden könnte.
Halten Sie das gesamte Gerät
außerhalb der Reichweite von
Kindern! Durch Spielen mit dem
Netzkabel können sie sich ernsthafte
Verletzungen zuziehen.
6. * Trennen Sie das Gerät während
eines Gewitters oder bei längerer
Nichtbenutzung vom Netz.
7. Halten Sie das Gerät von Hitzequellen
wie Radiatoren, Heizern, Öfen,
Kerzen oder anderen
hitzeerzeugenden Produkten oder
offenen Flammen fern.
8. Meiden Sie bei der Nutzung des
Produkts die Nähe starker
Magnetfelder.
9. Elektrostatische Entladungen können
die normale Verwendung von diesem
Gerät stören. Sollte dies geschehen,
führen Sie einfach einen Reset aus
und starten Sie dann das Gerät
entsprechend den Anweisungen
dieser Bedienungsanleitung neu.
Gehen Sie besonders bei
Datenübertragungen mit dem Gerät
vorsichtig um und führen Sie diese
nur in einer antielektrostatischen
Umgebung aus.
10. Warnung! Niemals Gegenstände
durch die Lüftungsschlitze oder
Öffnungen in das Gerät stecken. In
diesem Gerät fließt Hochspannung
und das Hineinstecken von
Gegenständen kann zu elektrischem
Schock und/oder Kurzschluss
interner elektrischer Bauteile führen.
Aus dem gleichen Grund kein Wasser
oder Flüssigkeiten in das Gerät
geben.
11. Benutzen Sie das Gerät nicht in
nasser oder feuchter Umgebung wie
Bad, Dampfküche oder in der Nähe
von Schwimmbecken.
12. Benutzen Sie das Gerät nicht bei
Kondensationsgefahr.
13. Obwohl dieses Gerät unter größter
Sorgfalt und vor Auslieferung
mehrmals überprüft wurde, können
trotzdem wie bei jedem anderen
elektrischen Gerät auch Probleme
auftauchen. Trennen Sie das Gerät
im Falle einer Rauchentwicklung,
starker Hitzeentwicklung oder jeden
anderen unnatürlichen Erscheinung
sofort vom Netz.
14. Dieses Gerät ist durch eine
Stromquelle wie auf dem Typenschild
angegeben zu betreiben. Halten Sie
bei Unsicherheiten über die Art Ihrer
Stromversorgung in Ihrer Wohnung
Rücksprache mit Ihrem Händler oder
Ihrer Stromzuliefererfirma.
15. * Die Wandsteckdose muss sich in
der Nähe des Geräts befinden und
einfach zu erreichen sein.
16. * Überlasten Sie weder
Netzsteckdosen noch
Verlängerungskabel. Eine
Überlastung kann zu Brandgefahr
bzw. Stromschlag führen.
17. * Geräte der Schutzklasse 1 sind an
eine Netzsteckdose mit Schutzleiter
anzuschließen.
18. * Geräte der Schutzklasse
2 benötigen keinen
Schutzleiteranschluss.
19. Halten Sie Nagetiere vom Gerät fern.
Nagetiere lieben es, am Netzkabel zu
nagen.
20. * Halten Sie den Netzstecker in der
Hand, wenn Sie ihn aus der

20
Netzsteckdose ziehen. Ziehen Sie ihn
nicht durch Zerren am Kabel heraus.
Das kann zu einem Kurzschluss
führen.
21. Vermeiden Sie es, das Gerät auf
Oberflächen aufzustellen, die zu
Schwingungen oder Stoß neigen.
22. Benutzen Sie für die Reinigung ein
weiches und trockenes Tuch.
Benutzen Sie niemals Lösungsmittel
oder Flüssigkeiten auf Ölbasis.
Benutzen Sie zum Entfernen
hartnäckiger Flecken ein feuchtes
Tuch mit mildem Reinigungsmittel.
23. Der Hersteller haftet nicht für
Schäden oder Verluste durch
Fehlfunktion, Zweckentfremdung
oder Modifikation des Geräts oder
durch Wechseln der Batterien.
24. Unterbrechen Sie die Verbindung
nicht während einer Formatierung
oder einer Datenübertragung. Bei
Unterbrechung drohen Datenverlust
und Datenbeschädigung.
25. Wenn das Gerät eine USB-
Wiedergabefunktion besitzt, dann
stecken Sie den USB-Stick direkt in
das Gerät. Verwenden Sie kein USB-
Verlängerungskabel, weil die erhöhte
Störanfälligkeit zu Datenverlust
führen könnte.
26. Das Gerät darf weder Tropf- noch
Spritzwasser ausgesetzt werden und
es dürfen keine mit Flüssigkeit
gefüllten Behälter wie z.B. Vasen auf
das Gerät oder in der Nähe des
Gerätes gestellt werden.
27. * Um das Gerät vollständig vom Netz
zu trennen, muss der Netzstecker des
Gerätes vom Stromnetz getrennt
werden, wobei die zu trennende
Einheit den Netzstecker des Gerätes
bezeichnet.
28. Wenn das Gerät über Batterien
betrieben wird, dann sind diese vor
übermäßiger Wärme wie
Sonneneinstrahlung, Feuer oder
ähnlichem zu schützen.
29. Augenmerk ist auf den ökologischen
Aspekt der Batterieentsorgung zu
legen.
30. Das Gerät kann nur bei gemäßigten
Temperaturen verwendet werden.
Sehr kalte und heiße Umgebungen
sind zu vermeiden.
31. Das Typenschild befindet sich an der
Unter- oder Rückseite des Gerätes.
32. Dieses Gerät ist nicht zur Benutzung
durch Personen (auch Kinder) mit
physischen, sensorischen oder
mentalen Beeinträchtigungen oder
ohne ausreichender Erfahrung
vorgesehen, es sei denn, sie werden
durch eine verantwortliche Person
beaufsichtigt oder wurden in die
ordnungsgemäße Bedienung des
Gerätes durch eine für ihre Sicherheit
verantwortlichen Person
eingewiesen.
33. Dieses Produkt ist nur für den nicht-
professionellen Gebrauch und nicht
für gewerbliche oder industrielle
Zwecke bestimmt.
34. Stellen Sie sicher, dass das Gerät in
einer stabilen Position aufgestellt ist.
Schäden, die durch Verwendung
dieses Produkts in einer instabilen
Position oder durch Nichtbeachtung
der anderen in diesem Handbuch
enthaltener Warnungen und
Vorwarnung entstehen, werden nicht
durch die Garantie abgedeckt.
35. Entfernen Sie niemals das Gehäuse
dieses Geräts.
36. Stellen Sie dieses Gerät niemals auf
andere elektrische Geräte.
37. Verwenden oder bewahren Sie
dieses Produkt nicht an Orten auf, in
denen es direkter
Sonneneinstrahlung, Hitze,
übermäßigem Staub oder Vibration
ausgesetzt ist.
38. Halten Sie Kinder von den
Plastiktüten fern.
39. Benutzen Sie nur vom Hersteller
spezifizierte
Erweiterungen/Zubehörteile.
40. Lassen Sie alle Eingriffe von
qualifiziertem Servicepersonal
ausführen. Eingriffe werden
notwendig, wenn das Gerät in
irgendeiner Weise beschädigt wurde,
beispielsweise am Netzkabel oder am
Netzstecker oder wenn Flüssigkeit in
das Gerät gelangt ist bzw.
Gegenstände in das Gerät gefallen
sind, das Gerät Regen oder
Feuchtigkeit ausgesetzt war, es
heruntergefallen ist oder nicht
ordnungsgemäß funktioniert.
41. * Verwenden Sie weder ein
beschädigtes Netzkabel noch einen
beschädigten Stecker oder eine
lockere Steckdose. Es besteht Brand-
und Stromschlaggefahr.
Seite wird geladen ...
Seite wird geladen ...
Seite wird geladen ...
Seite wird geladen ...
Seite wird geladen ...
Seite wird geladen ...
Seite wird geladen ...
Seite wird geladen ...
Seite wird geladen ...
Seite wird geladen ...
Seite wird geladen ...
Seite wird geladen ...
Seite wird geladen ...
Seite wird geladen ...
Seite wird geladen ...
Seite wird geladen ...
Seite wird geladen ...
Seite wird geladen ...
Seite wird geladen ...
Seite wird geladen ...
Seite wird geladen ...
Seite wird geladen ...
Seite wird geladen ...
Seite wird geladen ...
Seite wird geladen ...
Seite wird geladen ...
-
 1
1
-
 2
2
-
 3
3
-
 4
4
-
 5
5
-
 6
6
-
 7
7
-
 8
8
-
 9
9
-
 10
10
-
 11
11
-
 12
12
-
 13
13
-
 14
14
-
 15
15
-
 16
16
-
 17
17
-
 18
18
-
 19
19
-
 20
20
-
 21
21
-
 22
22
-
 23
23
-
 24
24
-
 25
25
-
 26
26
-
 27
27
-
 28
28
-
 29
29
-
 30
30
-
 31
31
-
 32
32
-
 33
33
-
 34
34
-
 35
35
-
 36
36
-
 37
37
-
 38
38
-
 39
39
-
 40
40
-
 41
41
-
 42
42
-
 43
43
-
 44
44
-
 45
45
-
 46
46


Lenco CR-605BK Bedienungsanleitung
- Kategorie
- Wecker
- Typ
- Bedienungsanleitung
in anderen Sprachen
- English: Lenco CR-605BK Owner's manual
- français: Lenco CR-605BK Le manuel du propriétaire
- español: Lenco CR-605BK El manual del propietario
- Nederlands: Lenco CR-605BK de handleiding
Verwandte Artikel
-
Lenco DAR-010WH Bedienungsanleitung
-
Lenco 9000-0046-3114 Benutzerhandbuch
-
Lenco CR-630BK Bedienungsanleitung
-
Lenco CR-630 Bedienungsanleitung
-
-
-
-
-
-