
TS 223
auto
34
12
13 79 1315
810 14
511
61216
L
N
L'
N
230 V 50 Hz
230 V 50 Hz
10 A
10 A
N'
1,5 mm max
2
1,5 mm max
2
auto
34
12
TS 223 a1
599223
9
230 V
µ
6
A
A
C
1
6T 7065.b
●
4 sorties volets 230V AC TS 223
● 4 sorties stores 230V AC TS 224
Notice d’installation
TS 223 / TS 224
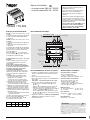
Raccordement électrique
Visualisation de
l’état de la sortie
Bouton-poussoir en façade pour :
a) la programmation
b) le forçage des sorties
en position du commutateur
Auto/Manu
suivant la chronologie ci-dessous :
-1
er
appui : descente des volets
-2
ème
appui : STOP
-3
ème
appui : montée des volets
-4
ème
appui : STOP
-5
ème
appui : descente des volets
Commutateur
Auto/Manu
Led et bouton
d’adressage
physique
24 mois contre tous vices de matières ou de fabrication, à
partir de leur date de production. En cas de défectuosité, le
produit doit être remis au grossiste habituel.
La garantie ne joue que si la procédure de retour via l’instal-
lateur et le grossiste est respectée et si après expertise notre
service contrôle qualité ne détecte pas un défaut dû à une
mise en œuvre et/ou une utilisation non conforme aux règles
de l’art.
Les remarques éventuelles expliquant la défectuosité devront
accompagner le produit.
Garantie
F
Principe de fonctionnement
TS 223 : module de sortie pour 4 volets
roulants
● ouverture et fermeture par un appui bref
● arrêt en position intermédiaire par un
appui bref.
TS 224 : module de sortie pour 4 stores
à lamelles
● ouverture et fermeture par un appui long
(400 ms)
● arrêt en position intermédiaire par un
appui bref.
● inclinaison des lamelles par un appui bref
En mode “Auto”, les ordres de mouvements
proviennent des modules d’entrées du
système TEBIS TS.
En mode “Manu” , ces commandes
sont accessibles par les boutons poussoirs
en façade du module (forçage).
Recommandations de mise en œuvre :
1. Installer le module dans le bas de l’armoire pour
éviter une température de fonctionnement trop
élevée.
2. Raccorder le module au bus 29 V.
3. Raccorder chaque moteur à une sortie différente
du module
Important : 1 seul moteur par voie de sortie.
4. Tester le raccordement électrique des volets :
- positionner le commutateur Auto/Manu en
position
- appuyer sur les différents boutons-poussoirs
-vérifier le sens de mouvement du volet en
s’assurant que le 1er appui après le passage en
position fait descendre les volets
- en cas d’anomalie, il suffit d’inverser les deux
fils de sortie
et raccordés aux bornes de
la voie concernée.
5. Suivre les instructions du Guide de Configuration
tébis TS pour réaliser les liaisons avec les
modules d’entrées.
Spécifications techniques
Caractéristiques électriques
●
Tension d’alimentation :
230 V 50 Hz + bus 29 V
●
Dissipation maximum du produit : 2 W
Caractéristiques fonctionnelles
●
Pouvoir de coupure : 6 A AC1
●
Durée de vie des contacts :
sous 6 A AC1 : 50 000 cycles
●
Temporisation entre deux mouvements
de sens opposé = 600 ms
Environnement
● T° de fonctionnement : 0 °C à +45 °C
● T° stockage : -20 °C à +70 °C
Raccordement
● Capacité : souple : 1 mm
2
à 6 mm
2
rigide : 1,5 mm
2
à 10 mm
2
Encombrement
● Dimensions : 4 modules
Attention :
- Appareil à installer uniquement par un
installateur électricien.
- Ce module est un élément du système
TEBIS TS, il est fonctionnellement
indissociable des autres modules du
système.
- Respecter les règles d’installation TBTS.
- Ce module pilote au maximum 4 volets
roulants / stores, un seul moteur par sortie.
Pour piloter plus que 4 moteurs, il faut utiliser
plusieurs TS 223/TS 224.
- Ne pas utiliser un module TEBIS TS en
provenance d’une autre installation
sans procéder à une “désinstallation”
(Guide technique du TS 100).
F
✂
Bus 29 V
Positionnement des stores et volets
roulants.
Il est possible de positionner les stores
ou volets roulants dans une position
intermédiaire.
Pour réaliser cette fonction, il est
nécessaire de mémoriser au préalable,
le temps de descente total du volet, et
d’associer un bouton poussoir de
commande supplémentaire.
Le positionnement désiré s’effectue en
utilisant la commande “descente tempo-
risée” (voir guide de configuration du
TS 100).
● Maintenir appuyé pendant plus de 6
secondes sur le bouton poussoir en
façade de la voie souhaitée.
⇒le volet se met en position haute.
⇒la Led de la voie clignote lentement.
● Appuyer sur le bouton poussoir de
commande de descente de la voie
⇒le chronométrage du temps démarre.
● Appuyer sur le même bouton poussoir
quand le volet arrive en position basse.
⇒le chronométrage du temps s’arrête.
● Maintenir appuyé le bouton poussoir en
façade de la voie jusqu’au clignotement
rapide de la Led.
⇒le temps précédemment chronométré
est alors mémorisé.
La valeur de la temporisation correspond
alors à une position déterminée.
Ex : si le temps de descente total de
l’ouvrant est de 30 secondes.
Position 1/4 1/3 1/2 2/3 3/4
Temps 7 s 10 s 15 s 20 s 22 s

6T 7065.b
TS 223
auto
34
12
13 79 1315
810 14
511
61216
L
N
L'
N
230 V 50 Hz
230 V 50 Hz
10 A
10 A
N'
1,5 mm max
2
1,5 mm max
2
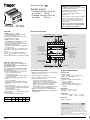
Schaltzustandsanzeige
Bedientasten:
a) Programmierung
b) Handbedienung :
-1
er
Druck : AB
-2
er
Druck : STOP
-3
er
Druck : AUF
-4
er
Druck : STOP
-5
er
Druck : AB
Wahlschalter
- oben:
Normalbetrieb bzw.
Programmierung
- unten:
Handbedienung
über Bedientasten
auto
34
12
TS 223 a1
599223
9
230 V
µ
6
A
A
C
1
Schaltausgang 4 fach
● Rolläden TS 223 230V AC
● Jalousien TS 224 230V AC
Installationsanleitung
TS 223 / TS 224
Anschlußbild
Es gelten die Allgemeinen Geschäfstbedingungen der Hager
Electro GmbH. bzw. die gesetzliche Regelung.
Garantie
D
Funktionsbeschreibung
TS 223: Ausgang für 4 Rolläden
● (AUF/AB) Öffnen und Schließen durch
kurzen Tastendruck
● Stop in Zwischenposition durch kurzen
Tastendruck
TS 224: Ausgang für 4 Jalousien
● (AUF/AB) Öffnen und Schließen durch langen
Tastendruck (400 ms)
● Stop in Zwischenposition durch kurzen
Tastendruck
● Schrägstellung der Lamellen durch kurzen
Tastendruck
Im Modus “Auto”, kommen die Richtungsbefehle
von den Eingangsgeräten des Systems
TEBIS TS.
Im Handbetriebsmodus “Manu” , können
die Befehle AUF, AB, STOP auch mit den
Tasten auf dem Gerät ausgeführt werden
(Vorrang).
Inbetriebnahmehinweise:
1. Betriebstemperatur beachten. Gerät im unteren
Bereich des Verteilers montieren.
2. Systemspannung 29 V anschließen
3. Ausgänge anschließen: je Ausgang nür ein
Antrieb.
4. Funktion der Ausgänge überprüfen:
- Wahlschalter in Stellung bringen
- Verbraucher durch Drücken der Bedientasten
schalten.
- Fahrtrichtung der Jalousien/Rolläden überprüfen:
Beim 1. Drücken der Bedientaste muß der
angeschlossene Antrieb abwärts fahren.
- ist das nicht der Fall, Anschluß der
Ausgänge
bzw. tauschen.
5. Inbetriebnahmehinweisen der Bedienungs-
anleitung tebis TS folgen.
Technische Daten
Elektrische Daten
●
Versorgungsspannung :
230 V 50 Hz + Systemspannung 29 V
●
Verlustleistung: max. 2 W
Betriebsdaten
●
Kontaktbelastbarkeit: 6 A AC1
●
Kontaktlebensdauer:
50 000 Schaltspiele bei 6 A AC1
●
Verzögerungszeit bei zwei entgegengesetzten
Richtungen = 600 ms
Umgebung
● Betrieb: 0 °C bis +45 °C
● Lagerung: -20 °C bis +70 °C
Anschluß
● Käfigklemmen: flexibel: 1 mm
2
bis 6 mm
2
massiv: 1,5 mm
2
bis 10 mm
2
Abmessungen
● Größe: 4 PLE
Sicherheitshinweise:
- Einbau und Montage dürfen nur durch
eine Elektrofachkraft erfolgen.
- Die Funktion des Geräts ist nur innerhalb
des Systems tebis TS gegeben.
- Installationsvorschriften zur
Schutzmaßnahme SELV beachten.
- Dieses Gerät steuert maximal 4 Rolläden/
Jalousien. An jeden Jalousieschalter kann
nur ein Antrieb angeschlossen werden.
Wenn Sie mehr als 4 Antriebe steuern
möchten, müssen Sie mehrere TS 223 /
TS 224 anschließen.
- Benutzen Sie kein TEBIS TS gerät, das
aus einer anderen installation stammt,
ohne es vorher sachgemäß zu
deinstallieren
(Technische Dokumentation TS 100).
D
Systemspannung
29 V DC (SELV)
✂
LED und
adressierungstate
Positionierung von Rollläden und Jalousien.
Rollläden und Jalousien können in eine vor-
gegebene Zwischenposition gefahren werden.
Hierzu ist die Speicherung der AUF/AB
Motorlaufzeit erforderlich.
Zuordnung der Motorlaufzeit:
● Zuordnen von Bedientastem, um die Jalousie
bzw. den Rollladen AUF und AB fahren zu
können.
● Betätigen der zugeordneten “AUF”-Taste für
mehr als 6 Sekunden
⇒der Rollladen fährt aufwärts.
⇒die Schaltzustandsanzeige des Ausgangs
blinkt langsam.
● Warten Sie bis die Jalousie/der Rollladen in
der oberen Endlage ist
● Betätigen Sie die zugeordnete “AB”-Tasten
⇒die Zeitmessung wird gestartet.
● Betätigen Sie die “AB”-Tasten emeut
⇒die Zeitmessung wird gestoppt.
● Betätigen Sie die Handbedientaste auf dem
Jalousienaktor bis die Schaltzustands-
anzeige des Ausgangs schnell blinkt
⇒die Laufzeit wird gespeichert
⇒die LED erlischt
Um die Positionierung zuzuordnen benützt
man den Befehl “AB mit Zeitwerzögerung”
(siehe Bedienungsanleitung TS 100).
Wenn Sie nin eine Verzögerungszeit für die
Positionierung der Jalousie/des Rollladens
zuordnen, wird die Jalousie/der Rollladen
zunächst in die obere Endlage gefahren, und
dann für die vorgegebene Zeit nach unten
gefahren.
Verzögerungszeit 7 s 10 s 15 s 20 s 22 s
Jalousie 1/4 1/3 1/2 2/3 3/4

TS 223
auto
34
12
13 79 1315
810 14
511
61216
L
N
L'
N
230 V 50 Hz
230 V 50 Hz
10 A
10 A
N'
1,5 mm max
2
1,5 mm max
2
auto
34
12
TS 223 a1
599223
9
230 V
µ
6 A
A
C
1
Switch output
● 4 voltage contacts 230 V AC
for shutters TS 223
● 4 voltage contacts 230 V AC
for blinds TS 224
User Instruction
TS 223 / TS 224
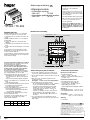
Electrical connectionFunction
TS 223 : output for 4 shutters
● (UP/DOWN) Close and open by briefly
pressing the push-button
● Stop in intermediate position by briefly
pressing the push-button.
TS 224 : output for 4 blinds
● (UP/DOWN) Close and open by pressing
the push-button long (400 ms)
● Stop in intermediate position by briefly
pressing the push-button.
● inclination of the blades by briefly pressing
the push-button
The orders for direction come directly from
the TEBIS TS input devices when in “Auto”
mode.
In the mode for the manuel operation
“Manu” , these orders can also be given
with the push-buttons in the device (override).
Installation instructions:
1. Observe operation temperature. Mount device in
lower part of the enclosure.
2. Connect a system voltage 29 V.
3. Connect outputs. Only one drive per output.
4. Verify the outputs’ function:
- put selection switch into position
- switch loads by pushing the push-buttons
- verify direction -> when pushing the first time,
after positioning the selection switch into
position , the shades must go down.
If this isn’t the case, exchange the connection
of the outputs
and respectively.
5. Observe carefully the rules of the Tebis TS
Operating Instructions when connecting the
input devices.
Technical Specifications
Electrical data
●
Supply voltage:
230 V 50 Hz + system voltage 29 V
●
Max. power dissipation: 2 W
Operation data
●
Contact’s loading capacity Indicator:
- AC1: 6 A 250 V
●
Electrical endurance:
- 50 000 operations at 6 A AC1
●
Delay time at two opposite directions
= 600 ms
Environment
● Operation: 0 °C to +45 °C
● Storage: -20 °C to +70 °C
Connection
● Cage clamps:flexible: 1 mm
2
to 6 mm
2
rigid: 1,5 mm
2
to 10 mm
2
Dimensions
● Size: 4 modules
Safety Recommendations:
- Installation should only be carried out by a
suitably qualified electrician.
- The function of this device is only possible
within the Tebis TS system.
- Strictly observe SELV installation
procedures.
- This module can drive 4 blinds / shutters
max., only one drive per output. If you
wish to connect more than 4 motors,
you must use more TS 223 and TS 224,
respectively.
- Never use a device from another instal-
lation without proper deprogramming
(See TS 100 Technical Guide).
GB
Hager 10.2000
électro S.A. - 132, bld d’Europe - BP3 - 67 215 Obernai cedex - Tél. 03.88.49.50.50
Indication of switch state
Operating push buttons :
a) Programming
b) Manual operation
-1
st
push: down
-2
nd
push: STOP
-3
rd
push: up
-4
th
push: STOP
-5
th
push: down
Selection switch
- up: normal function
or programming
- down: manual
handling with push
buttons
System voltage
29V DC (SELV)
A warranty period of 24 months is offered on hager products,
from date of manufacture, relating to any material of manu-
facturing defect. If any product is found to be defective it must
be returned via the installer and supplier (wholesaler). The
warranty is withdrawn if :
- after inspection by hager quality control dept the device is
found to have been installed in a manner which is contrary to
IEE wiring regulations and accepted practice within the indus-
try at the time of installation.
- the procedure for the return of goods has not been followed.
Explanation of defect must be included when returning
goods.
Warranty
GB
✂
LED and
adressing button
Blinds and shutters positioning.
Blinds and shutters may be stopped in an
intermediate position.
To use this function, you must first load,
the up-down delay.
The required position is obtained by using
the “delayed down control” (see TS 100
Operating instructions).
● Press for greater than 6 seconds the push
button of the required output :
⇒the shutter goes up.
⇒the Led showing switch state indication
is flashing slowly.
● Press on the operating push button of the
output :
⇒the timing begins.
● Press on the same operating push button,
immediately when the shutters is in down
position :
⇒the timing stops.
● Press on the same operating push button for
as long as the LED of switch state indication
is flashing quickly :
⇒the timing is now loaded.
This loaded time now corresponds to a specific
shutter position.
Ex : the loaded time is 30 seconds.
Positioning 1/4 1/3 1/2 2/3 3/4
Timing 7 s 10 s 15 s 20 s 22 s
6T 7065.b

TS 223
auto
34
12
13 79 1315
810 14
511
61216
L
N
L'
N
230 V 50 Hz
230 V 50 Hz
10 A
10 A
N'
1,5 mm max
2
1,5 mm max
2
Visualisering van de
uitgangstoestand
Drukknop voor :
a) de programmatie
b) de forcering van de
uitgangen in stand van
de omschakelaar Auto/Manu
volgens de chronologie
hieronder :
-1ste druk : neerlaten van
de rolluiken
-2de druk : STOP
-3de druk : optrekken van
de rolluiken
-4de druk : STOP
-5de druk : neerlaten van
de rolluiken
Omschakelaar
Auto/Manu
Hager 10.2000
électro S.A. - 132, bld d’Europe - BP3 - 67 215 Obernai cedex - Tél. 03.88.49.50.50
auto
34
12
TS 223 a1
599223
9
230 V
µ
6
A
A
C
1
Uitgangsmodule
● 4 kontakten rolluiken
230 V AC TS 223
● 4 kontakten gordijnen met lamellen
230 V AC TS 224
Bedieningshandleiding
TS 223 / TS 224
Elektrische aansluiting
Werkingsprincipe
TS 223 : uitgangsmodule voor 4 rolluiken
● openen en sluiten door een korte druk
● stopzetting en tussenstand door een korte
druk.
TS 224 : uitgangsmodule voor 4 gordijnen
met lamellen
● openen en sluiten door een lange druk
(400 ms)
● stopzetting en tussenstand door een korte
druk
● schuine stand van de lamellen door een korte
druk.
In stand “Auto” komen de bevelen voort de
bedieningen voort van de ingangsmodules
van het systeem TEBIS TS.
In stand “Manu” , zijn deze bevelen toegan-
kelijk door drukknoppen op de voorzijde van
de module (forcering).
Aanbevelingen bij het installeren :
1. De module onderaan in de kast installeren om
een te hoge werkingstemperatuur te vermijden.
2. De module aansluiten op het net 230 V en aan de
bus 29 V.
3. Elke motor aan een andere uitgang van de
module aansluiten
Belangrijk : 1 enkele motor per uitgangskring.
4. De aansluiting van de rolluiken testen :
- de omschakelaar Auto/Manu in stand plaatsen
- op de verschillende drukknoppen duwen
- de richting van de beweging van het rolluik
nakijken en er zich van verzekeren dat de
eerste druk na de doorgang in stand de
rolluiken neerlaat
- in geval van afwijking, hoeft u enkel de twee
aan de klemmen van de betrokken kring
aangesloten uitgangsdraden
en om te
wisselen.
5. Voor het realiseren van verbindingen met de
ingangsmodule de instructies van de technische
gids volgen.
Technische specificaties
Elektrische karakteristieken
●
Voedingsspanning :
230 V 50 Hz + bus 29V
●
Maximum warmteverspreiding van het
produkt : 2 W
Functionele karakteristieken
●
Scheidingsvermogen : 6 A AC1
●
Levensduur van de kontakten :
onder 6 A AC1 : 50 000 cyclussen
●
Tijdinstelling tussen twee
tegenovergestelde bewegingen = 600 ms
Omgeving
● Werkingstemperatuur: 0 °C tot +45 °C
● Stockagetemperatuur: -20 °C tot +70 °C
Aansluiting
● Capaciteit : soepele : 1 mm
2
tot 6 mm
2
stijve : 1,5 mm
2
tot 10 mm
2
Afmeting
● 4 modules
Opgepast :
- Dit apparaat mag enkel geplaatst
worden door een installateur
elektricien.
- Deze module is een element van het
systeem TEBIS TS, ze is functioneel
onscheidbaar van de andere modules
van het systeem.
- De installatieregels ZLVS respecteren.
- Om meer dan 4 motoren te besturen,
moet men verschillende TS 223 /
TS 224 gebruiken.
- Gelieve geen TEBIS TS module te
gebruiken die afkomotig is van een
andere installatie zonder deze eest
naar de fabrieksconfiguratie terug
te brengen.
NL
Waarborg
NL
24 maanden tegen elk materiaal- of fabricagegebrek,
en dit vanaf de fabricagedatum.
In geval van defect, moet het produkt, aan uw verdeler
overhandigd worden.
De waarborg is enkel geldig indien de procedure van
terugzending installateur/verdeler nageleefd wordt en
indien na onderzoek door onze controledienst geen
enkel gebrek vastgesteld werd wegens het verkeerd in
werking stellen en/of het niet gebruiken volgens de
regels van de kunst.
Eventuele opmerkingen betreffende het gebrek moeten
het produkt begeleiden.
ZLVS
✂
LED en drukknop
voor adressering
Instellen van lamellengordijnen en rolluiken.
lamellengordijnen en rolluiken kunnen in een
tussenstand worden geplaatst.
Om deze functie tot stand te brengen,
moet vooraf de totale tijdsduur voor het
neerlaten van de gordijn of het rolluik in
het geheugen worden opgeslagen.
De gewenste instelling gebeurt met behulp
van de bediening “neerlaten met vertraging”
(zie configuratiegids van de TS 100).
● Druk gedurende meer dan 6 seconden op
de drukknop van de gewenste kring.
⇒het rolluik komt in de bovenste stand te
staan.
⇒de Led van de kring knippert langzaam.
● Druk op de drukknop voor neerlaten van de
kring
⇒de tijdopneming start.
● Druk op dezelfde drukknop als het rolluik in
de onderste stand terechtkomt.
⇒de tijdopneming stopt.
● Druk op de drukknop van de kring tot de
Led snel begint te knipperen.
⇒de eerder opgenomen tijd wordt dan in
het geheugen opgeslagen.
De waarde van de vertragng komt overeen
met een bepaalde stand .
Voorbeeld : als de total tijdsduur voor het
neerlaten van de gordijn of het rolluik
30 seconden bedraagt.
Stand 1/4 1/3 1/2 2/3 3/4
Tijd 7 s 10 s 15 s 20 s 22 s
6T 7065.b
-
 1
1
-
 2
2
-
 3
3
-
 4
4


in anderen Sprachen
- English: Hager TS 223
- français: Hager TS 223
- Nederlands: Hager TS 223
Verwandte Artikel
-
Hager TYB621C Benutzerhandbuch
-
Hager TS 244 User Instruction Manual
-
-
-
-
-
-
-
-