Installation
Installation diagram A
Refer to the installation diagram and ask a
qualified technician for the installation of the
unit.
Be sure to securely fasten all equipment to
the car chassis, etc., to prevent them from
moving while your car is in motion.
Note
All equipment other than one Mobile Monitor and
one Connection Box is optional.
Before installing the
monitor
• This monitor is designed for safe operation
during driving.
• Be sure to install the unit in a suitable position.
Improper installation can cause a serious
accident.
• Be sure not to install the unit where it will
interfere with the airbag system.
Tips on the mounting location
• Choose the mounting location of the monitor
unit carefully.
• In order to prevent rattling from the vibration
of the car, make sure that the back or the
bottom of the cradle is touching the mounting
surface when mounting the monitor unit.
Caution on installation
Do not install the unit:
— in a hot place, subject to direct sunlight, near
a heater or in a car with the windows closed
(especially in summer) or in an extremely
cold place.
— in a place subject to excessive dust, moisture.
— in a place which could harm the passenger.
— in a place which could distract the driver.
— on a door or the ceiling.
Notes
• Clean the mounting surface well with the
cleaning cloth. (The cleaning cloth is a disposable
type.)
• Warm the mounting surface and the double-
sided tape to a room temperature of more than
20 °C and then press the base of the stand with
the double-sided tape attached, firmly against the
mounting surface.
• When tightening the screws, make sure that the
nearby wiring does not get caught.
• When drilling holes on the mounting surface,
make sure that there is nothing on the other side.
Installing the monitor
on the dashboard
You can install the monitor either on the
dashboard or behind the headrest. Switch
REAR/FRONT on the connection box to locate
the position you mount the monitor. See the
figure in the “Connections” section.
Make sure the installation surface and monitor
position are suitable before beginning
installation. If you cannot find a suitable
mounting location, consult your car dealer or
your nearest Sony dealer before installation.
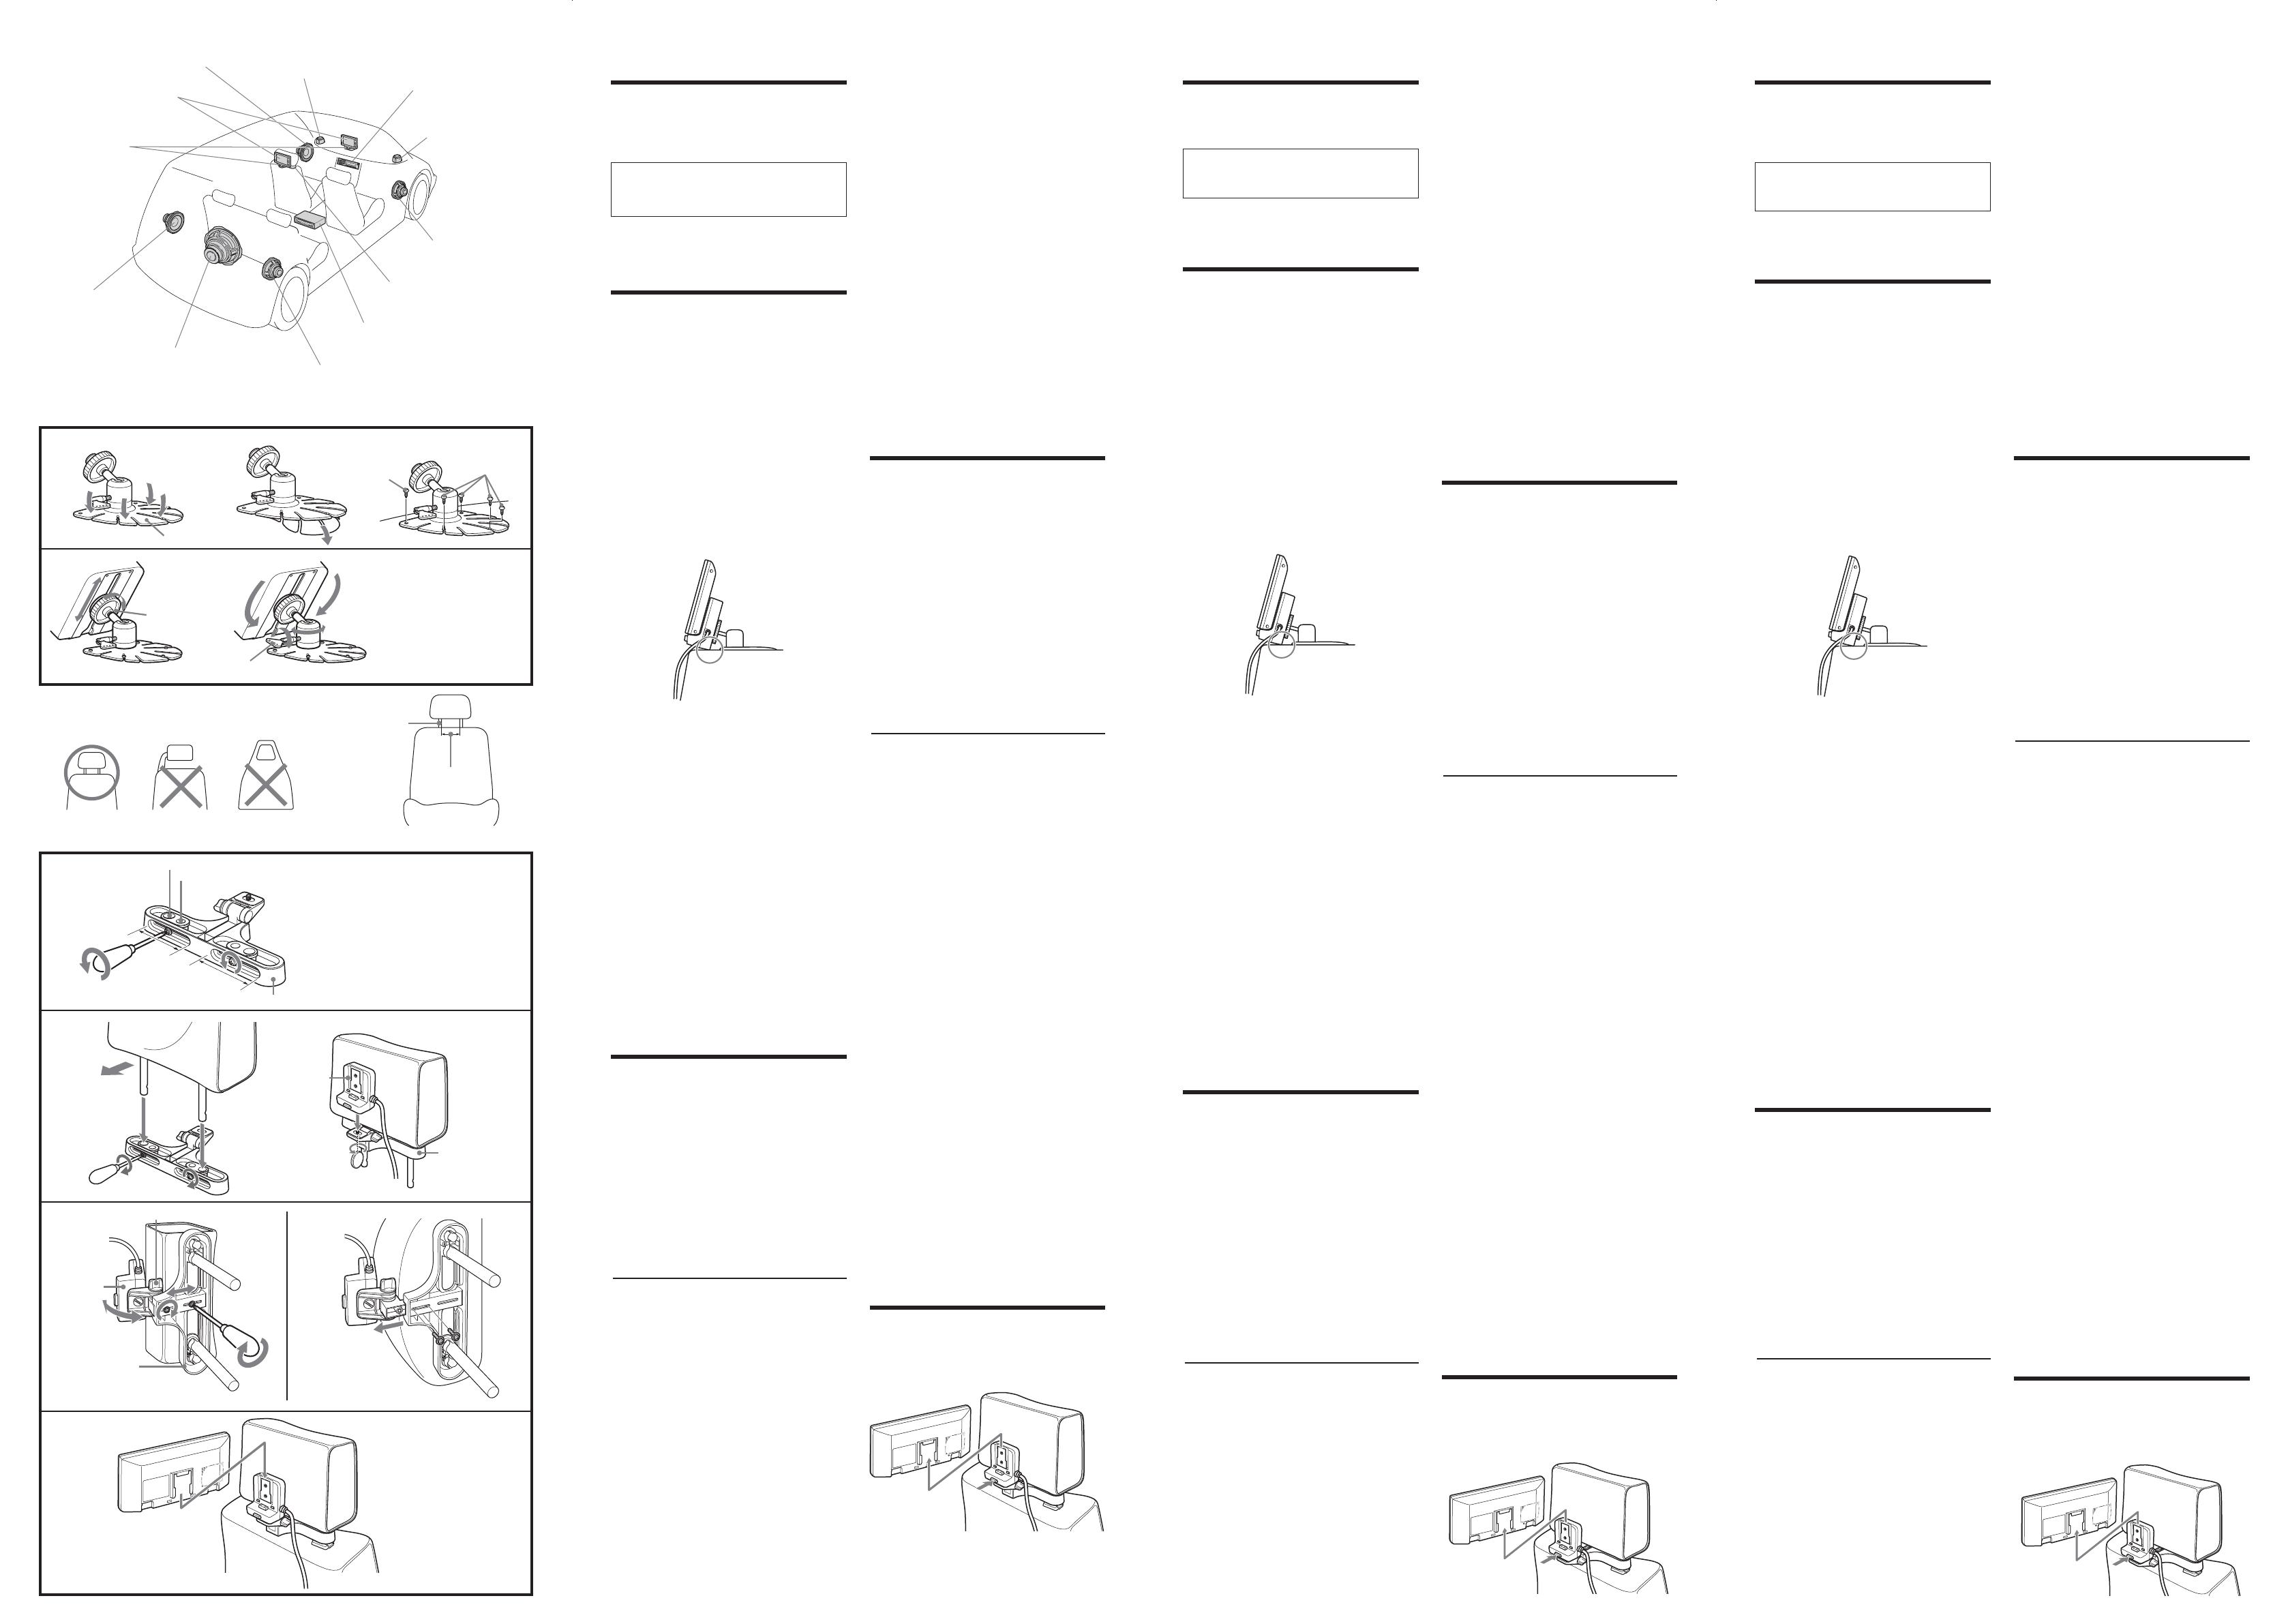
B
1 Choose the mounting position, then
shape the base of the monitor stand
8 to match the mounting surface.
Bend the base gently so there are no gaps
between the base and the mounting surface.
2 Peel off the protective film from the
base of the monitor stand 8 and
attach the base to the mounting
surface.
Make sure the base attaches to the mounting
surface completely.
Ø10 mm~15 mm
A
A
7
2
7
15 mm
12 mm
Front
Avant
Vorne
Front
Avant
Vorne
42 mm~192 mm
Notes
• The double-sided tape will not stick firmly if
the mounting surface temperature is less than
20 °C. Use a hairdryer, etc. to warm up the
mounting surface before mounting.
• Consider carefully the mounting position
beforehand. If you change the position soon
after mounting the double-sided tape will be
weakened.
• When removing the monitor stand, preheat
the mounting surface with a hairdryer then
slowly peel up to remove.
3 Fix the stand with the supplied
screws 9.
Note
Before drilling holes in the mounting surface,
make sure there is nothing behind the
dashboard.
4 Adjust the height.
When the monitor is at the right height,
tighten the clamp. To keep the monitor from
rattling while driving, make sure the back or
bottom of the cradle is resting firmly on the
mounting surface.
5 Adjust the angle.
Loosen the lever and adjust the angle. After
this adjustment, tighten the lever to fix the
angle.
Installing the monitor
on the headrest C
The monitor can be installed behind the
headrest by using the supplied headrest
installation kit.
Seat types on which you can
mount the installation kit
•A seat with 2 headrest rods of diameter 10 mm
to 15 mm.
•A seat with rods spaced between 42 mm and
192 mm.
Note
Depending on the seat type, it may not be possible
to mount this unit.
D
1 Remove the headrest from the seat.
2 Adjust the rod spacing A of the
installation kit depending on your
headrest.
Select either the 12 mm or 15 mm holes
depending on the diameter of the rod.
3 Insert the rods into the holes of the
installation kit and tighten the
screws.
4 Install the cradle 2 onto the
installation kit 7, and tighten the
screw on the bottom using things
like a coin.
5 Adjust the depth positioning of the
sliding part of the installation kit 7
according to the thickness of the
headrest, and tighten the screws.
If necessary, loosen the knob B and adjust
the angle of the installation cradle 2. Once
adjusted, tighten the knob firmly (5-1).
Note
The backside of the installation cradle 2
should be as close as possible to the headrest
to prevent the monitor from vibrating
during driving.
If the headrest is thick, take out the
screws, slide out the part of the
installation kit and retighten the
screws (5-2).
6 Replace the headrest to the seat.
Slide the monitor on the cradle until
you hear the click sound.
Removing the monitor
from the cradle E
Slide the monitor upwards while pressing the
button on the cradle.
9
9
8
Clamp
Pince
Klammer
Lever
Manette
Hebel
Mobile Monitor
Moniteur mobile
Mobiler Monitor
Front Left speaker
Enceinte avant gauche
Vorderer linker Lautsprecher
Tweeter Left
Haut-parleur d’aiguës gauche
Hochtöner links
Head unit
Appareil de tête
Haupteinheit
Tweeter Right
Haut-parleur d’aiguës droit
Hochtöner rechts
Front Right speaker
Enceinte avant droite
Vorderer rechter Lautsprecher
Installation kit
Kit d’installation
Einbausatz
Sony mobile DVD player DVX-11A, MEX-R1
Lecteur DVD mobile Sony DXA-11A, MEX-R1
Sony mobiler DVD-Player DVX-11A, MEX-R1
Rear Right speaker
Enceinte arrière droite
Hinterer rechter Lautsprecher
Subwoofer
Haut-parleur d’extrême grave
Subwoofer
Rear Left speaker
Enceinte arrière gauche
Hinterer linker Lautsprecher
Cradle
Berceau
Halterung
2
7
A
B
C
D
123
45
2
34
6
Installation
Schéma d’installation
A
Consultez le schéma d’installation et demandez
à un technicien qualifié d’installer l’appareil.
Fixez fermement tous les équipements au
châssis de la voiture etc. pour éviter leur
déplacement quand la voiture roule.
Remarque
Tous les équipements autres qu’un moniteur
mobile et une boîte de raccordement sont en option.
Avant l’installation du
moniteur
• Ce moniteur est conçu pour un
fonctionnement sûr pendant la conduite.
• Installez-le à une position convenable. Une
installation incorrecte pourrait provoquer un
accident grave.
• Installez l’appareil à un emplacement où il ne
gênera pas l’airbag.
Conseils pour l’emplacement de
montage
• Choisissez soigneusement l’emplacement de
montage du moniteur.
• Pour éviter tout cliquetis dû à la vibration de
la voiture, vérifiez que l’arrière ou la base du
berceau touche la surface de montage au
montage du moniteur.
Précautions pour l’installation
N’installez pas l’appareil:
—À un emplacement chaud, en plein soleil,
près d’un chauffage ou dans une voiture à
fenêtres fermées (en particulier en été) ou à
un endroit extrêmement froid.
—À un endroit soumis à une poussière et/ou
humidité excessives
—À un endroit où il pourrait blesser le
passager.
—A un endroit où il pourrait distraire le
conducteur.
— Sur une portière ou au plafond.
Remarques
• Nettoyez bien la surface de montage avec le
chiffon de nettoyage. (Le chiffon de nettoyage est
jetable.)
• Chauffez la surface de montage et le ruban
adhésif double face à une température ambiante
de plus de 20˚C, puis appuyez la base du support
sur laquelle est collé le ruban adhésif double face
fermement contre la surface de montage.
• Au serrage des vis, vérifiez que le câblage à
proximité n’est pas coincé.
• Au perçage des trous dans la surface de montage,
vérifiez qu’il n’y a rien de l’autre côté.
Installation du
moniteur sur le tableau
de bord
Vous pouvez installer le moniteur sur le tableau
de bord ou derrière l’appuie-tête. Commutez
REAR/FRONT sur la boîte de raccordement
pour localiser la position de montage du
moniteur. Consultez la figure dans la section
« Connexions ».
Vérifiez que la surface de montage et la position
du moniteur sont adaptées avant de commencer
l’installation. Si vous ne pouvez pas trouver
d’emplacement adapté, consultez votre
revendeur auto ou le revendeur Sony le plus
proche avant l’installation.
B
1 Choisissez la position de montage,
puis formez la base du support de
montage 8 pour l’adapter à la
surface de montage.
Recourbez légèrement la base pour qu’il n’y
ait pas de jeu entre la base et la surface de
montage.
2 Détachez le film protecteur de la
base du support de moniteur 8 et
attachez la base à la surface de
montage.
Vérifiez que la base s’attache complètement
à la surface de montage.
Remarques
• Le ruban adhésif double face ne collera pas
fermement si la surface de montage a une
température inférieure à 20˚C. Utilisez un
sèche-cheveux etc. pour chauffer la surface
de montage avant l’installation.
• Fixez soigneusement la position de montage
préalablement. Si vous changez la position
peu après le montage, le ruban adhésif
double face sera affaibli.
• Au retrait du support du moniteur,
préchauffez la surface de montage avec un
sèche-cheveux, puis détachez lentement pour
retirer.
3 Fixez le support avec les vis fournies
9.
Remarque
Avant de percer les trous dans la surface de
montage, vérifiez qu’il n’y a rien derrière le
tableau de bord.
4 Ajustez la hauteur.
Quand le moniteur est à la hauteur correcte,
serrez les pinces. Pour éviter le cliquetis du
moniteur pendant la conduite, vérifiez que
l’arrière ou le dessous du berceau est
fermement assis sur la surface de montage.
5 Ajustez l’angle.
Desserrez la manette et ajustez l’angle.
Après cet ajustement, serrez la manette pour
fixer l’angle.
Installation du
moniteur sur l’appuie-
tête C
Le moniteur peut être installé derrière l’appuie-
tête en utilisant le kit d’installation d’appuie-tête
fourni.
Types de sièges sur lesquels le
kit d’installation peut se monter
• Un siège avec 2 tiges d’appuie-tête d’un
diamètre de 10 mm à 15 mm.
• Un siège avec tiges espacées de 42 mm à
192 mm.
Remarque
Le montage de l’appareil peut être impossible selon
le type de siège.
D
1 Retirez l’appuie-tête du siège.
2 Ajustez l’espacement des tiges A du
kit d’installation selon votre appuie-
tête.
Sélectionnez des trous de 12 mm ou 15 mm
selon le diamètre de la tige.
3 Insérez les tiges dans les trous du kit
d’installation et serrez les vis.
4 Installez le berceau 2 sur le kit
d’installation 7, et serrez la vis à la
base avec une pièce de monnaie ou
similaire.
5 Ajustez le positionnement en
profondeur de la partie coulissante
du kit d’installation 7 selon
l’épaisseur de l’appuie-tête, et serrez
les vis.
Si nécessaire, desserrez le bouton B et
ajustez l’angle du berceau d’installation 2.
Une fois ajusté, serrez fermement le bouton
(5-1).
Remarque
L’arrière du berceau d’installation 2 doit
être aussi proche que possible de l’appuie-
tête pour éviter la vibration du moniteur
pendant la conduite.
Si l’appuie-tête est épais, retirez les
vis, faites glisser la partie kit
d’installation pour la sortir et
resserrez le vis (5-2).
6 Réinstallez l’appuie-tête sur le siège.
Glissez le moniteur sur le berceau
jusqu’au déclic de mise en place.
Retrait du moniteur du
berceau E
Glissez le moniteur vers le haut en appuyant sur
le bouton du berceau.
Einbau
Einbauzeichnung A
Richten Sie sich nach der Einbauzeichnung und
lassen Sie sich von einem qualifizierten
Techniker beim Einbau des Geräts beraten.
Stellen Sie sicher, dass alle Teile fest am
Chassis usw. befestigt werden, um
Bewegung beim Fahren zu verhindern.
Hinweis
Alle Geräte außer einem Mobilen Monitor und
einer Anschlussbox sind optional.
Vor dem Einbau des
Monitors
• Dieser Monitor ist für sicheren Betrieb beim
Fahren konstruiert.
• Bauen Sie das Gerät immer in einer geeigneten
Position ein. Falscher Einbau kan zu schweren
Unfällen führen.
• Stellen Sie sicher, dass das Gerät nicht so
angebracht wird, dass es die Funktion des
Airbagsystems behindert.
Tipps zum Einbauort
• Wählen Sie den Einbauort des Monitors
sorgfältig.
• Um Rattern durch Fahrzeugvibration zu
verhindern, stellen Sie sicher, dass die Rück-
oder Unterseite der Halterung beim
Anbringen der Monitoreinheit immer die
Montageoberfläche berührt.
Vorsichtsmaßregeln zum Einbau
Bauen Sie das Gerät nicht wie folgt ein:
— an einem heißen Ort, im direkten
Sonnenlicht, in der Nähe der Heizung oder
in einem Fahrzeug mit geschlossenen
Fenstern (besonders im Sommer) oder an
einem sehr kalten Ort.
— an einem Ort mit viel Staub oder
Feuchtigkeit.
— an einem Ort, wo eine Gefahr für Insassen
besteht.
— an einem Ort, wo der Fahrer abgelenkt
werden kann.
— an einer Tür oder am Fahrzeughimmel.
Hinweise
• Reinigen Sie die Montageoberfläche mit dem
Reinigungslappen. (Der Reinigungslappen ist
wegwerfbar.)
• Wärmen Sie die Montageoberfläche und das
doppelseitige Klebeband auf Raumtemperatur
von über 20(C auf und drücken dann die Basis
des Ständers mit angebrachtem doppelseitigem
Klebeband fest gegen die Montageoberfläche.
• Beim Festziehen der Schrauben stellen Sie sicher,
dass keine Kabel in der Nähe eingeklemmt
werden.
• Beim Bohren von Löchern auf der
Montageoberfläche stellen Sie sicher, dass sich
nichts auf der Gegenseite befindet.
Einbau des Monitors auf
dem Armaturenbrett
Sie können den Monitor entweder auf dem
Armaturenbrett oder hinter der Kopfstütze
einbauen. Schalten Sie REAR/FRONT an der
Anschlussbox auf die gewünschte
Einbauposition des Monitors. Siehe Abbildung
im Abschnitt „Anschlüsse“.
Stellen Sie vor dem Einbau sicher, dass die
Einbauoberflöche und die Monitorposition
geeignet sind. Wenn Sie keinen geeigneten
Einbauort finden, wenden Sie sich vor dem
Einbau an Ihren Autohändler oder ihren
nächsten Sony-Fachhändler.
B
1 Wählen Sie die Montageposition und
formen Sie dann die Basis des
Monitorständers 8 entsprechend
der Montageoberfläche.
Biegen Sie die Basis vorsichtig, so dass keine
Zwischenräume zwischen Basis und
Montageoberfläche vorhanden sind.
2 Ziehen Sie den Deckfilm von der
Basis des Monitorständers 8 ab und
bringen Sie die Basis an der
Montageoberfläche an.
Stellen Sie sicher, dass die Basis vollständig
an der Montageoberfläche haftet.
Hinweise
•
Das doppelseitige Klebeband haftet nicht fest,
wenn die Temperatur der Montageoberfläche
weniger als 20(C beträgt. Verwenden Sie
einen Föhn o.ä. zum Aufwärmen der
Montageoberfläche vor dem Anbringen.
• Prüfen Sie den Anbringungsort des Monitors
vorher sorgfältig. Wenn Sie den Ort bald
nach dem Einbau ändern, wird die Haftkraft
des doppelseitigen Klebebands geschwächt.
• Beim Abnehmen des Monitorständers
wärmen Sie die Montageoberfläche mit
einem Föhn vor und ziehen das Teil dann
langsam ab.
3 Befestigen Sie den Ständer mit den
mitgelieferten Schrauben 9.
Hinweis
Vor dem Bohren von Löchern auf der
Montageoberfläche stellen Sie sicher, dass sich
nichts hinter dem Armaturenbrett befindet.
4 Stellen Sie die Höhe ein.
Wenn der Monitor die richtige Höhe hat,
ziehen Sie die Klammer fest. Um Rattern des
Monitors beim Fahren zu verhindern, stellen
Sie sicher, dass die Rück- oder Unterseite
der Halterung fest an der
Montageoberfläche ansitzt.
5 Stellen Sie den Winkel ein.
Lösen Sie den Hebel und stellen den Winkel
ein. Nach dieser Einstellung ziehen Sie den
Hebel fest, um den Winkel zu fixieren.
Einbau des Monitors
auf der Kopfstütze C
Der Monitor kann hinter der Kopfstütze
eingebaut werden, indem der mitgelieferte
Kopfstützen-Einbausatz verwendet wird.
Sitztypen, bei denen der
Einbausatz verwendet werden
kann.
• Ein Sitz mit 2 Kopfstützenstäben mit einem
Durchmesser von 10 mm bis 15 mm.
• Ein Sitz mit Stäben in einem Abstand von
42 mm bis 192 mm.
Hinweis
Je nach Sitztyp kann Montage dieses Geräts
unmöglich sein.
D
1 Nehmen Sie die Kopfstütze vom Sitz
ab.
2 Stellen Sie den Stababstand A des
Einbausatzes je nach vorhandener
Kopfstütze ein.
Wählen Sie entweder die 12 mm oder die 15
mm großen Löcher je nach
Stabdurchmesser.
3 Setzen Sie die Stäbe in die Löcher
des Einbausatzes ein und ziehen Sie
die Schrauben fest.
4 Bauen Sie die Halterung 2 auf dem
Einbausatz 7 an, und ziehen Sie die
Schraube mit einem Gegenstand wie
einer Münze an der Unterseite fest.
5 Stellen Sie die Tiefenpositionierung
des Schiebeteils des Einbausatzes 7
entsprechend der Dicke der
Kopfstütze ein, und ziehen Sie die
Schrauben fest.
Wenn erforderlich lösen Sie den Knopf B
und stellen den Winkel der Einbauhalterung
2 ein. Wenn die Einstellung vorgenommen
ist, ziehen Sie den Knopf fest an (5-1).
Hinweis
Die Rückseite der Einbauhalterung 2 soll so
nahe wie möglich an der Kopfstütze sein,
um Vibrationen des Monitors beim Fahren
zu verhindern.
Wenn die Kopfstütze dick ist,
nehmen Sie die Schrauben heraus,
ziehen den Teil des Einbausatzes
heraus und ziehen die Schrauben
erneut an (5-2).
6 Bringen Sie die Kopfstütze wieder
am Sitz an. Schieben Sie den Monitor
auf die Halterung, bis sie ein
Klickgeräusch hören.
Abnehmen des Monitors
von der Halterung
E
Schieben Sie den Monitor nach oben, während
Sie den Knopf auf der Halterung drücken.
Press to release
B
5-1
5-2
Appuyez
pour libérer
Zum Lösen
drücken

