
LFH0955
For product information and support, visit
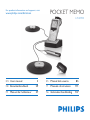
www.philips.com/dictation POCKET MEMO
ES Manual del usuario 85
IT Manuale di istruzioni 111
NL Gebruikershandleiding 137
EN User manual 3
DE Benutzerhandbuch 29
FR Manuel de l‘utilisateur 57


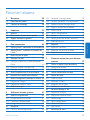
3User manual
ENGLISH
1 Welcome 4
1.1 Product highlights 4
1.2 What’s in the box 4
2 Important 5
2.1 Safety 5
2.2 Disposal of your old product 5
2.3 Technical support and warranty 5
3 Get started 6
3.1 Overview – controls and connections 6
3.2 Overview – display indicators and symbols 7
3.3 Install the batteries 8
3.4 Recharge the batteries 8
3.4.1 Recharge the batteries using the power supply 8
3.4.2 Recharge the batteries through the USB cable 8
3.4.3 Recharge the batteries through the docking
station 9
3.5 Insert and eject the memory card 9
3.6 Format a new memory card 10
3.7 Activate the digital recorder 10
3.7.1 Set the language 11
3.7.2 Set the date and time 11
3.8 Power-save mode 11
4 Using your meeting recorder 12
4.1 Before recording 12
4.1.1 Meeting recording: connect and position the
meeting microphones 12
4.1.2 Connect the remote control 13
4.1.3 Interview recording: connect the click-on
interview microphone 13
4.2 Recording 14
4.2.1 Create a new recording 14
4.2.2 Add to a recording (append) 15
4.2.3 Finish (lock) a recording 15
4.2.4 Change the recording format 15
4.2.5 Adjust the microphone sensitivity 16
4.2.6 Set the sound filter 17
4.2.7 Monitor recording 17
4.3 Playback 18
4.3.1 Overview playback functions 18
4.3.2 Noise reduction 19
4.4 Delete 19
4.4.1 Delete a file 19
4.4.2 Delete part of a recording 20
4.4.3 Delete all dictations 20
5 Use more of your meeting recorder 21
5.1 Use Philips SpeechExec software 21
5.1.1 Advanced configuration 21
5.1.2 Download recordings to the PC 21
5.2 Use voice-activated recording 22
5.3 Work with index marks 23
5.3.1 Insert an index mark 23
5.3.2 Delete an index mark 23
5.3.3 Delete all index marks 23
5.4 Assign an author’s name 24
5.5 Display and sound functions 24
5.5.1 Setting the language 24
5.5.2 Setting date and time 25
5.5.3 Backlight 25
5.5.4 Record lamp 26
5.5.5 LCD contrast 26
5.5.6 Device beep 27
5.6 Menu list 27
User manual

4 User manual
Welcome1
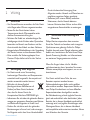
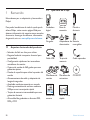
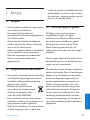
Congratulations on your purchase and welcome
to Philips!
To fully benefit from the support that Philips
oers, visit our Website for support information
such as user manuals, software downloads,
warranty information and more:
www.philips.com/welcome.
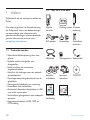
Product highlights1.1
Easy to use out-of-the-box solution•
Elegant metal carrying case for portability•
Quick set-up with innovative • meeting
microphones
360 degree sound pick-up for optimal •
recording
Boundary layer design using the sound •
pressure
Built-in wire storage and length adaptation•
Expandable through cascading•
Automatic file download via USB for quick •
transcription
Exchangeable memory card for unlimited •
recording
High recording quality in DSS, MP3 and PCM •
format
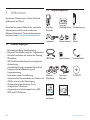
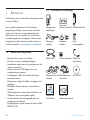
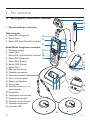
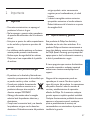
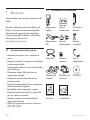
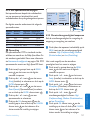
What’s in the box1.2
Digital recorder
For product information and support, visit
www.philips.com/dictation
LFH0955
Conference recording system with
SpeechExec dictation software
POCKET MEMO
EN
Quick start guide
DE
Kurzanleitung
FR
Guide de démarrage rapide
ES
Guía de inicio rápido
IT
Guida rapida di introduzione
NL
Snelle startgids
SV
Snabbstartsguide
Conference Recording System
For product information and supp ort, visit
www.philips.com/dictation
EN Us er manual 3
DE Benutzerhandbuch 29
FR Manuel de l‘utilisateur 57
ES Manual del usuario 85
NL Gebruikershandleiding 1 1 1
IT Manuale di istruzioni 1 3 9
LFH0955
EOL INDEX
REMOTE CONTROL
Docking station Remote control
AC charger Power clips Rechargeable
batteries
USB cable Memory card Splitter cable
Meeting
microphones
Interview
microphone
CD-ROM
User manual Quick start
guide

5User manual
ENGLISH
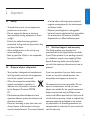
Important2
Safety2.1
To avoid short circuit, do not expose the •
product to rain or water.
Do not expose the device to excessive •
heat caused by heating equipment or direct
sunlight.
Protect the cables from being pinched, •
particularly at plugs and the point where they
exit from the device.
Active mobile phones in the vicinity may •
cause interference.
Back up your files. Philips is not responsible •
for any loss of data.
Disposal of your old product2.2
Your product is designed and manufactured •
with high quality materials and components,
that can be recycled and re-used.
When this crossed-out wheeled bin •
symbol is attached to a product, it
indicates that the product is covered
by the European Directive 2002/96/
EC.
Please become informed about the local •
separate collection system for electrical and
electronic products.
Please act according to your local rules and •
do not dispose of old products with your
normal household waste. The correct disposal
of old products will help prevent potential
negative consequences for the environment
and human health.
Batteries (including built-in rechargeable •
batteries) contain substances that may pollute
the environment. All batteries should be
disposed of at an ocial collection point.
Technical support and warranty2.3
This Philips product was designed and
manufactured to the highest quality standards.
If your Philips product is not working correctly
or is defective, contact your supplying Philips
Speech Processing dealer who will provide
you with the necessary information on how to
proceed.
If you have questions that your dealer cannot
answer or any other related question, visit
www.philips.com/support to contact us.
No components are user-serviceable. Do not
open or remove covers and do not insert
objects not suitable for the specific connectors.
Repairs may be made only by Philips service
centers and ocial repair facilities. Failure to do
so will void any warranty, stated or implied. Any
operation expressly prohibited in this manual,
any adjustments, or assembly procedures not
recommended or authorized in this manual will
void the warranty.

6 User manual
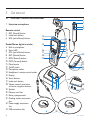
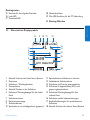
Get started3
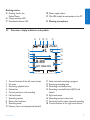
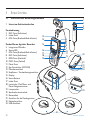
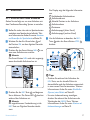
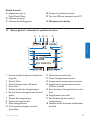
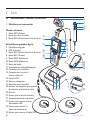
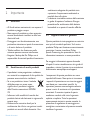
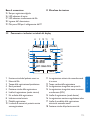
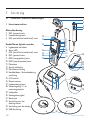
Overview – controls and connections3.1
Interview microphone1
Remote control
REC (Record) button2
Index mark button3
EOL (end-of-letter) button4
Pocket Memo digital recorder
Built-in microphone5
Status LED6
EOL (end-of-letter) button7
REC (Record) button8
REW (Rewind) button9
FWD (Forward) button10
Menu button11
On/o switch12
Microphone socket13
Headphone / remote control socket14
Display15
Smart buttons16
Index mark button17
Volume control, plus/minus 18
and menu navigation buttons
Speaker19
Memory card slot20
Battery compartment21
Docking station connection 22
slot
Power supply connection 23
slot
USB connection slot24
REMOTE CONTROL
24
21
20
5
6
7
2
3
4
1
8
9
10
12
11
15
16
18
17
19
13
14
22
25 26 27
30
29
28
23

7User manual
ENGLISH
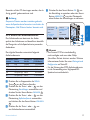
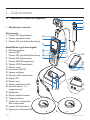
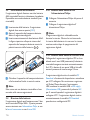
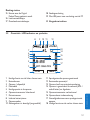
Current function of the left smart button1
File name2
Recording / playback time3
Position bar4
Current position in the recording5
Left level meter6
Recording number7
Battery level indicator8
Recording mode9
Memory card is write-protected (locked)10
Overview – display indicators and symbols3.2
Voice-activated recording in progress11
Remaining recording time12
Recording is marked priority13
Recording is marked finished (EOL) and 14
locked
Right level meter15
Recording contains index mark16
Sensitivity level for voice-activated recording17
Current function of the right smart button18
Docking station
Docking slot for the 25
Pocket Memo
Charge indicator LED26
Download indicator LED27
PLAY NEW
9:23
DPM 0955.MP3
HQ
-27
h
10
m
#1
8
1
13
2
6
4
5
7
14
17
15
18
9 10 11 12
3
16
Power supply socket28
Mini-USB socket for connection to the PC29
Meeting microphone30

8 User manual
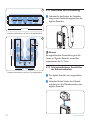
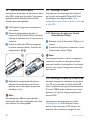
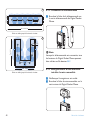
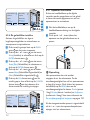
Install the batteries3.3
The digital recorder can be operated with the
two rechargeable AAA batteries delivered with
the product. Standard (non-rechargeable) AAA
alkaline batteries may also be used.
The on/o switch of the digital recorder 1
must be in the
OFF position.
Open the battery compartment on the 2
back side of the digital recorder by sliding it
outwards then folding it up.
Insert the two AAA batteries. The correct 3
polarity is indicated on the inside of the
battery compartment cover.
1
2
21
Close the battery compartment by folding 4
it back and sliding the battery compartment
cover inside until it clicks.
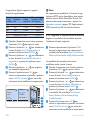
D Note
Do not mix battery types! Use two rechargeable
batteries or two non-rechargeable alkaline
batteries.
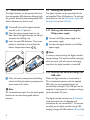
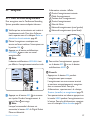
Recharge the batteries3.4
The digital recorder can be operated with the
rechargeable Philips AAA batteries. To recharge
these batteries, use the Philips power supply, the
Docking Station or the USB cable.
Recharge the batteries using the 3.4.1
Philips power supply
Connect the Philips power supply to the 1
main power supply.
Connect the digital recorder to the Philips 2
power supply.
D Note
It is okay to continue using the digital recorder
during recharge. The batteries will be recharged
while you work, and will continue recharging
even when the digital recorder is turned o.
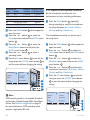
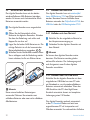
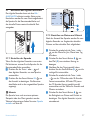
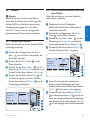
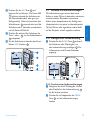
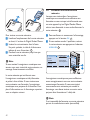
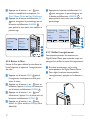
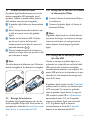
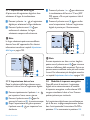
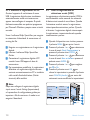
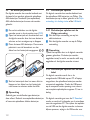
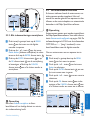
3.4.2 Recharge the batteries through the
USB cable
When the digital recorder is connected to a
PC or notebook computer with the supplied
USB cable, the rechargeable batteries are
automatically recharged. If the USB port on the
computer is high powered, a complete recharge
cycle takes about 2.5 hours.
The digital recorder switches into PC Download
mode and works like a loudspeaker and
microphone for the connected PC. To continue
recording on the digital recorder during USB
charging, change the USB mode to USB supply by

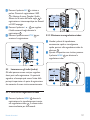
9User manual
ENGLISH
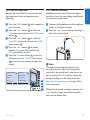
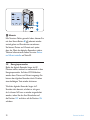
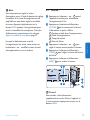
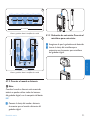
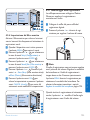
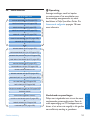
D Note
When the digital recorder is connected to
the docking station, it is powered by the
docking station and not by the batteries. If the
digital recorder is operated with rechargeable
batteries, the batteries are automatically
recharged while the digital recorder is
connected to the docking station.
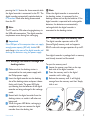
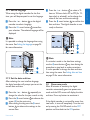
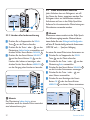
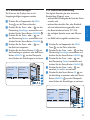
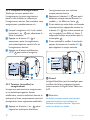
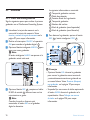
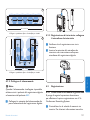
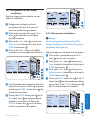
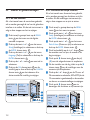
3.5 Insert and eject the memory card
The digital recorder operates with an SD
(Secure Digital) memory card and supports
SDHC cards with storage capacities of up to 32
GB.
Your digital recorder is packaged with a memory
card already inserted and formatted.
To eject the memory card:
Locate the memory card slot on the top 1
back side of the digital recorder.
Press the memory card in the digital 2
recorder until it clicks.
1
Release the memory card. It will slightly 3
emerge from the memory card slot. Simply
slide it out.
1 2
pressing the REC button for three seconds while
the digital recorder is connected to the PC. The
digital recorder automatically switches back to
PC Download Mode after being disconnected
from the PC.
D Note
The PC must be ON when charging battery via
the USB cable connection. The digital recorder
may become warm during fast recharging.
C Important
If the USB port of the computer does not supply
enough power capacity (500 mA), disable USB
quick charge in the menu of the digital recorder and
recharge the batteries using the power supply.
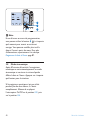
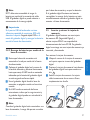
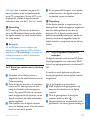
Recharge the batteries through the 3.4.3
docking station
Make sure that the docking station is 1
connected to the main power supply with
the Philips power supply.
Insert the digital recorder into the docking 2
slot of the docking station and press it down
firmly until it locks. The green LED lights
up, indicating that the batteries of the digital
recorder are being recharged in fast recharge
mode.
Record with the digital recorder from the 3
docking station, or switch it o when not
being used.
When the green LED blinks, recharging is 4
complete and you can remove the digital
recorder from the docking slot.

10 User manual
OK CANCEL
Delete all ?
Yes - format
!! ATTENTION !!
BACK ENTER
Format memory
Volume
Font
Language
Delete all ?
BACK ENTER
Delete all ?
All files
will be lost !
Yes - format
A B
C
1
2
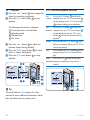
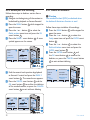
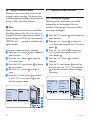
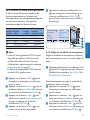
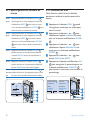
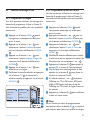
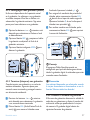
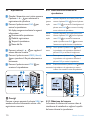
The digital recorder will be unable to record
without a properly formatted memory card.
If a new card was inserted and the formatting
process was cancelled, insert another card that
can be formatted or has already been formatted.
D Note
Formatting is not possible if the memory card is
in read-only mode (locked).
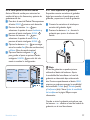
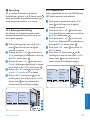
Activate the digital recorder3.7
The digital recorder is turned on and o by
sliding the
ON/OFF switch. When using it for
the first time, you will be prompted to set the
language, date and time.
To insert a memory card:
Locate the memory card slot on the top 1
back side of the digital recorder.
Slide the memory card into the slot. A small 2
illustration under the memory card slot
indicates the correct orientation.
2
Push the memory card in until you hear a 3
click.
D Note
If the digital recorder is turned to the
ON
position and there is no memory card inserted,
a warning screen is displayed.
The memory card that is packaged with the
digital recorder is already formatted and ready
for use. If a memory card is inserted that is not
formatted, the digital recorder will oer the
option to format it. Refer to the next chapter
for more information.
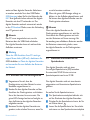
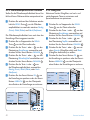
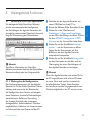
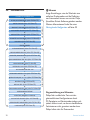
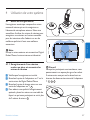
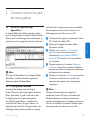
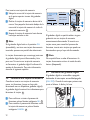
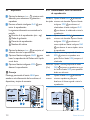
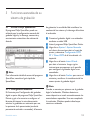
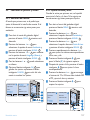
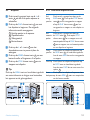
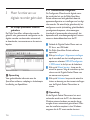
3.6 Format a new memory card
When a new, unformatted memory card (or a
memory card that was formatted with a non-
digital recorder device) is inserted, the digital
recorder will display a prompt to format the
memory card.
A
To confirm and start the formatting process, 1
press the
OK smart button
1
.
To cancel the formatting process, remove 2
the memory card or press the
CANCEL
smart button
2
.

11User manual
ENGLISH
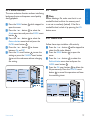
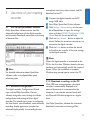
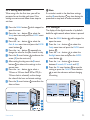
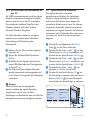
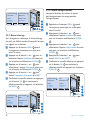
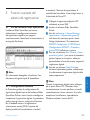
3.7.1 Set the language
When using the digital recorder for the first
time, you will be prompted to set the language.
Press the 1 + or – button
1
on the digital
recorder to select a language.
Press the 2
OK smart button
2
to confirm
your selection. The selected language will be
displayed.
D Note
It is possible to change the language later using
the menu. See Setting the language on page 24
for more information.
EXIT OK
LANGUAGE
LANGUE
SPRACHE
IDIOMA
INT
FR
DE
ES
- / +
EXIT OK
LANGUAGE
LANGUE
SPRACHE
IDIOMA
INT
FR
DE
ES
- / +
2
1
3.7.2 Set the date and time
After selecting the user interface language,
the digital recorder will prompt you to set the
current date and time.
Press the 1 + or – button
1
repeatedly to
change the value for the year, month or day.
Press the 2 → smart button
2
to advance the
arrow (↑) to the next entry.
After setting the day, press the 3 → smart
button
2
to advance the settings to the
correct time.
Press the 4 + or – button
1
to select a 2-
hour or 24-hour clock, AM or PM (if a 2-
hour clock is selected), and to change the
value of the hour and minute settings.
Press the 5 → smart button
2
to confirm the
date and time. The digital recorder is now
ready to function.
OK
DATE:
2007-10-01
12/24: TIME:
24 14:22
OK
DATE:
2007-10-01
12/24: TIME:
24 14:22
2
1
3
D Note
If a mistake is made in the date/time settings,
use the ← smart button
3
any time during the
procedure to step back to make corrections.
It is also possible to change the date and time
later using the menu. See Setting date and time
on page 25 for more information.
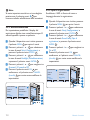
Power-save mode3.8
After 60 minutes of inactivity, the digital
recorder automatically goes into power-save
mode and the LCD screen will display the date
and time. Press any button to reactivate it.
If the digital recorder is not used for more than
two hours, it turns o completely. Turn the unit
on by moving the On/O switch to the OFF
position and then back to the ON position.

12 User manual
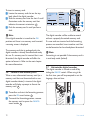
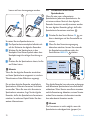
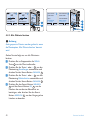
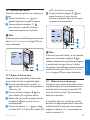
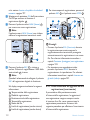
1
5 m / 16.5 ft.
2.5 m / 8 ft.
2 m / 6.5 ft.
2
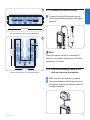
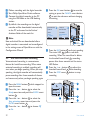
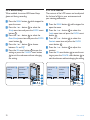
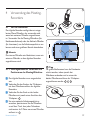
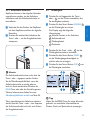
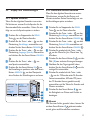
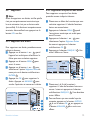
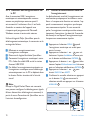
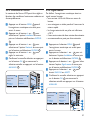
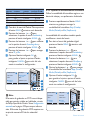
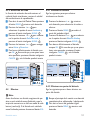
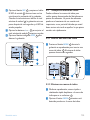
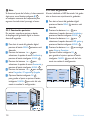
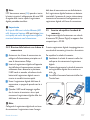
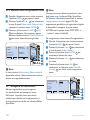
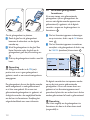
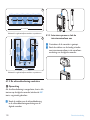
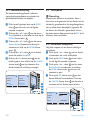
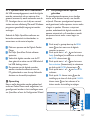
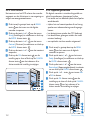
E Tip
For large conferences, the operating range can
be extended by joining together and connecting
three microphones on each of the two
microphone sockets of the Y adapter.
3
4
5
3
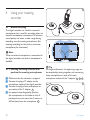
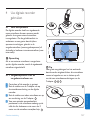
Using your meeting 4
recorder
Before recording4.1
The digital recorder has a built-in monaural
microphone that is used for recording when no
external microphone is connected. To enhance
sound quality and cover a wider range during
recording, use the meeting microphones (for
meeting recording) or the click-on interview
microphone (for interviews).
D Note
When an external microphone is connected to
the digital recorder, the built-in microphone is
disabled.
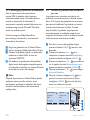
Meeting recording: connect and 4.1.1
position the meeting microphones
Make sure that the recorder is stopped.1
Connect the plug of Y adapter to the 2
microphone socket of the digital recorder.
Connect the plug of each microphone to 3
one socket of the Y adapter.
1
For optimal recording quality, position 4
the microphones on the table so that all
participants are not more that 2 meters or
6.5 feet away from the microphone.
2

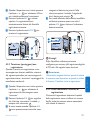
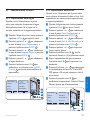
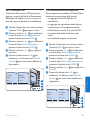
13User manual
ENGLISH
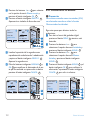
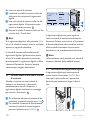
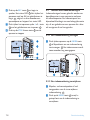
2.5 m / 8 ft.
13 m / 42.5 ft.
2 m / 6.5 ft.
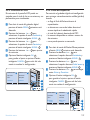
4
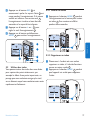
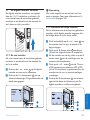
Connect and position up to 6 meeting microphones
6 m / 20 ft.
7 m / 23 ft.
5
2 m / 6.5 ft.
Connect and position up to 6 meeting microphones
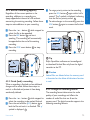
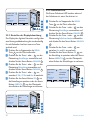
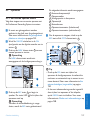
Connect the remote control4.1.2
Connect the plug of the remote control 1
to the remote control socket of the digital
recorder.
D Note
When the remote control is connected, all
buttons on the digital recorder are still usable
except the
REC button.
Interview recording: connect the 4.1.3
click-on interview microphone
Make sure that the recorder is stopped.1
Insert the connector of click-on interview 2
microphone into the microphone socket of
the digital recorder.

14 User manual
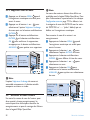
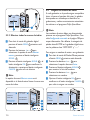
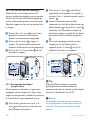
Recording4.2
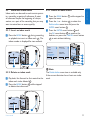
Create a new recording4.2.1
Follow these steps to create your first recording
with the Conference Recording System:
A memory card must be inserted into the 1
memory card slot. See Insert and eject the
memory card on page 9 for more information.
Slide the On/O switch to the 2
ON position
to switch on the digital recorder.
1
Press the 3 NEW smart button
2
to create a
new recording.
D Note
The
NEW smart button is not displayed if
the current recording is empty.
PLAY NEW
9:23
DPM 0955.MP3
HQ
-27
h
10
m
#1
PLAY NEW
9:23
DPM 0955.MP3
HQ
-27
h
10
m
#1
2
1
Press the 4 REC button
3
and start speaking.
The status
LED
4
glows in red while
recording.
D Note
When the remote control is connected, the
REC button on the digital recorder is
deactivated.
The following information is displayed:
a
Remaining recording time
b
Recording mode
c
Current position in the recording
d
Recording time
e
File name
f
Recording level meter (left channel)
g
Recording level meter (right channel)
PLAY STOP
2:34
DPM 0955.MP3
HQ
-27
h
18
m
PLAY STOP
2:34
DPM 0955.MP3
HQ
-27
h
18
m
EOL INDEX
REMOTE CONTROL
5
b
f
a
c
d
e
g
3
4
To stop recording, press the 5 REC button
3
or the STOP smart button
5
.
E Tips
Press the •
EOL button during recording to
mark the present recording as finished and
automatically continue recording into a new
file. See Finish (lock) a recording on page 15 for
more information.
An index mark can be set by pressing the •
INDEX button during record or playback. See
Work with index marks on page 23 for more
information.

15User manual
ENGLISH
4.2.2 Add to a recording (append)
Regardless of the current position in the
recording, additions to a recording are
always appended at the end of a file without
overwriting the existing recording. Follow these
steps to make additions to your recording:
Press the 1 + or – button
1
while stopped to
select the file to be appended.
Press the 2
REC button
2
and start
speaking. The recording will automatically
be appended to the end of the existing
recording.
Press the 3
STOP smart button
3
to stop
recording.
PLAY STOP
2:34
DPM 0955.MP3
HQ
-27
h
18
m
PLAY STOP
2:34
DPM 0955.MP3
HQ
-27
h
18
m
EOL INDEX
REMOTE CONTROL
3
1
2
4.2.3 Finish (lock) a recording
When a recording is finished and no additional
changes will be made, follow these steps to
mark it as finished and protect it from being
accidentally deleted:
Press the 1 + or – button
1
while stopped to
select the recording to be marked finished.
Press the end-of-letter (2
EOL) button
2
to
lock the file and mark it as finished. The ┱
symbol is displayed.
a
To assign priority status to the recording, 3
press the
EOL button
2
again within half a
second. The ! symbol is displayed, indicating
that the file has priority status.
b
To make changes to the recording, press the 4
EOL button
2
again to remove the finished
mark.
BEGIN NEW
9:23
DPM 0955.MP3
HQ
-27
h
10
m
#2
BEGIN NEW
9:23
DPM 0955.MP3
HQ
-27
h
10
m
#2
EOL INDEX
REMOTE CONTROL
1
2
a
b
E Tip
Philips SpeechExec software can be configured
to download finished files only from the digital
recorder to the PC.
C Caution
Locked files are deleted when the memory card
is formatted or the delete-all-dictations function
is used.
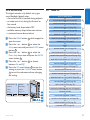
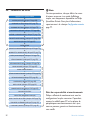
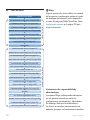
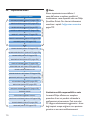
4.2.4 Change the recording format
The recording format determines the audio
quality of your recordings and aects the
number of audio files that can fit on the
memory card. The digital recorder supports the
following recording formats:

16 User manual
Recording
mode
File
format
Channels
recorded
Recording time
(1 GB memory)
PCM .wav 2 channels 1.5 hours
XHQ .mp3 2 channels 18 hours
HQ .mp3 2 channels 36 hours
QP .ds2 (DSS QP) Mono 85 hours
SP .dss (DSS SP) Mono 170 hours
Press the 1 MENU button
1
while stopped to
open the menu.
Press the 2 + or – button
2
to select the
Setup menu item and press the
ENTER smart
button.
3
Press the 3 + or – button
2
to select the
Record format menu item and press the
ENTER smart button
3
.
Press the 4 + or – button
2
to select a
recording mode.
Press the 5
OK smart button
4
to save the set-
ting or press the
CANCEL smart button
3
to
exit the menu without changing the setting.
OK CANCEL
Record format:
PCM <PCM>
XHQ <MP3>
HQ <MP3>
SP <DSS>
QP <DS2>
BACK ENTER
Delete dictation
Index set
Author
Setup
Language
BACK ENTER
Language
Record format
Sound filter
Voice activation
HQ <DSS>
A B
C
2
1
3
4
D Note
PCM recording mode is not available by default
and must be enabled through Philips SpeechExec
Dictate. See Advanced configuration on page 21
for more information. PCM recording mode
requires a high speed SD card.
4.2.5 Adjust the microphone sensitivity
Set the microphone sensitivity for the
environment and your recording preferences.
Press the 1
MENU button
1
repeatedly
during recording to switch the microphone
sensitivity between Low (Private), Medium
(Dictate) and High (Conference).
The microphone sensitivity can also be set in
the setup menu:
Press the 1
MENU button
1
while stopped to
open the menu.
Press the 2 + or – button
2
to select the
Setup menu item and press the
ENTER smart
button
3
.
Press the 3 + or – button
2
to select the
Microphone menu item and press the
ENTER
smart button.
3
Press the 4 + or – button
2
to choose the
microphone sensitivity: Low (Private), Medium
(Dictate) and High (Conference).
Press the 5
OK smart button
4
to save the
setting or press the
CANCEL smart button
3
to exit the menu without changing the
setting.
BACK ENTER
Delete dictation
Index set
Author
Setup
Language
BACK ENTER
Record lamp
Contrast
Device beep
Microphone
Conference
OK CANCEL
Microphone:
Conference
Dictate
Private
A B
C
2
1
3
4

17User manual
ENGLISH
Set the sound filter4.2.6
Activate the sound filter to minimize low- and
high-frequency sounds and optimize voice
recordings.
Press the 1
MENU button
1
while stopped to
open the menu.
Press the 2 + or – button
2
to select the
Setup menu item and press the
ENTER smart
button
3
.
Press the 3 + or – button
2
to select the
Sound filter menu item and press the
ENTER
smart button.
3
Press the 4 + or – button
2
to choose
between Voice (sound filter active), and
Music (sound filter inactive).
Press the 5
OK smart button
4
to save the
setting or press the
CANCEL smart button
3
to exit the menu without changing the
setting.
BACK ENTER
Delete dictation
Index set
Author
Setup
Language
BACK ENTER
Language
Record format
Sound filter
Voice activation
Voice
OK CANCEL
Sound filter:
Voice
Music
A B
C
2
1
3
4
Monitor recording4.2.7
Headphones can be connected to the digital
recorder to hear the sound being recorded and
to monitor the record level.
Connect the headphones to the headphone 1
socket of the digital recorder.
Press the 2 + or – button during recording to
adjust the sound volume.
D Note
The record level cannot be adjusted using
the volume button. Adjust the microphone
sensitivity if the record level is too low or too
high by pressing the
MENU button repeatedly
during recording or in the setup menu. See
Adjust the microphone sensitivity on page 16 for
more information.
When voice-activated recording is activate, the
+ or – button changes the record threshold
level, not the volume level.

18 User manual
Playback4.3
Press the 1 + or – button
1
while stopped to
select the recording to play back.
Press the 2
PLAY smart button
2
to start
playback.
The following information is displayed:
a
Current position in the dictation
b
Recording mode
c
Playback time
d
File name
Press the 3 + or – button
1
to adjust the
playback volume during playback.
Press the 4
SPEED smart button
3
to adjust
faster or slower file playback.
Press the 5
STOP smart button
2
to stop
playback.
STOP SPEED
2:34
DPM 0955.MP3
HQ
-27
h
18
m
STOP SPEED
2:34
DPM 0955.MP3
HQ
-27
h
18
m
PLAY NEW
0:00
DPM 0955.MP3
HQ
-27
h
18
m
#2
1
3
2
b a
dc
E Tip
Press and hold the
MENU button for a few
seconds to access additional information about
files, the device and the memory card.
Overview playback functions4.3.1
Fast
rewind
Press the REW button
1
briefly while
stopped. Press the STOP smart button
3
to stop winding or the PLAY smart button
4
to stop winding and start playback.
Fast
forward
Press the FWD button
2
briefly while
stopped. Press the STOP smart button
3
to stop fast forward or the PLAY smart
button
4
to stop fast forward and start
playback.
Rewind Press and hold the REW button
1
while
playing or recording. Release the REW but-
ton to stop winding.
Cue Press and hold the FWD button
2
while
playing. Release the FWD button to cue-
play.
Auto-
backspace
Press the REW
1
button briefly while
playing or recording to recap the last
second.
PLAY NEW
5:16
DPM 0955.MP3
HQ
-27
h
10
m
PLAY NEW
5:16
DPM 0955.MP3
HQ
-27
h
10
m
2
3
4
1

19User manual
ENGLISH
Noise reduction4.3.2
The noise reduction function reduces interfering
background noise and improves sound quality
during playback.
Press the 1
MENU button
1
while stopped to
open the menu.
Press the 2 + or – button
2
to select the
Setup menu item and press the
ENTER smart
button
3
.
Press the 3 + or – button
2
to select the
Noise reduction menu item and press the
ENTER smart button
3
.
Press the 4 + or – button
2
to choose
between On and O.
Press the 5
OK smart button
4
to save the
setting or press the
CANCEL smart button
3
to exit the sub-menu without changing
the setting.
BACK ENTER
Delete dictation
Index set
Author
Setup
Language
BACK ENTER
Contrast
Device beep
Microphone
Noise reduction
On
OK CANCEL
Noise reduction:
On
Off
A B
C
2
1
3
4
Delete4.4
D Note
Before deleting a file, make sure that it is not
marked finished and that the memory card
is not set to read-only (locked). If the file is
marked finished, unlock it by pressing the
EOL
button once.
4.4.1 Delete a file
Follow these steps to delete a file entirely:
Press the 1 + or – button
1
while stopped to
select the file to be deleted.
Press the 2
MENU button
2
to open the
menu.
Press the 3 + or – button
1
to select the
Delete dictation
menu item and press the
ENTER smart button
3
.
Press the 4
OK smart button
4
to delete the
file permanently. Press the
CANCEL smart
button
3
to cancel the operation and leave
the recording intact.
OK CANCEL
Delete dictation:
Delete ?
!! ATTENTION !!
BACK ENTER
Delete dictation
Index set
Author
Setup
Delete ?
OK CANCEL
Delete dictation:
Delete ?
!! ATTENTION !!
A B
1
2
3
4

20 User manual
4.4.2 Delete part of a recording
Follow these steps to delete a section from a
recording:
Navigate to the beginning of the section to 1
be deleted by playback or forward/rewind.
Press the 2
MENU button
1
while stopped to
open the menu.
Press the 3 + or – button
2
to select the
Delete section menu item and press the
OK
smart button
3
.
Press the 4
MARK smart button
4
. A cross
symbol appears on the screen.
CANCEL MARK 1
2:15
DPM 0955.MP3
HQ
-27
h
18
m
#2
OK CANCEL
Author
Setup
USB mode
Delete section
CANCEL MARK 1
2:15
DPM 0955.MP3
HQ
-27
h
18
m
#2
A B
2
1
4
3
Find the second mark position by playback 5
or forward / rewind and press the
MARK 2
smart button
5
. The second cross appears.
Press the 6
DELETE smart button
5
and the
OK smart button
6
to confirm the deletion
of the marked section, or press the
CANCEL
smart button
5
to exit without deleting.
PLAY MARK 2
3:38
DPM 0955.MP3
HQ
-27
h
18
m
#2
CANCEL DELETE
3:38
DPM 0955.MP3
HQ
-27
h
18
m
#2
OK CANCEL
3:38
Delete?
HQ
-27
h
18
m
#2
A B
C
6
5
4.4.3 Delete all dictations
C Caution
Files marked finished (EOL) are deleted when
the delete-all-dictations function is used.
Follow these steps to delete all recordings:
Press the 1
MENU button
1
while stopped to
open the menu.
Press the 2 + or – button
2
to select the
Setup menu item and press the
ENTER smart
button
3
.
Press the 3 + or – button
2
to select the
Delete dictations menu item and press the
ENTER smart button
3
.
Press the 4
ENTER smart button
3
and
the
OK smart button
4
to confirm the
deletion, or press the
CANCEL smart button
3
to exit without deleting.
OK CANCEL
Delete all ?
Yes - delete
!! ATTENTION !!
BACK ENTER
Noise reduction
Date & time
USB quick charge
Delete dictations
Delete all ?
BACK ENTER
Delete dictation
Index set
Author
Setup
Language
A B
C
2
1
3
4
Seite wird geladen ...
Seite wird geladen ...
Seite wird geladen ...
Seite wird geladen ...
Seite wird geladen ...
Seite wird geladen ...
Seite wird geladen ...
Seite wird geladen ...
Seite wird geladen ...
Seite wird geladen ...
Seite wird geladen ...
Seite wird geladen ...
Seite wird geladen ...
Seite wird geladen ...
Seite wird geladen ...
Seite wird geladen ...
Seite wird geladen ...
Seite wird geladen ...
Seite wird geladen ...
Seite wird geladen ...
Seite wird geladen ...
Seite wird geladen ...
Seite wird geladen ...
Seite wird geladen ...
Seite wird geladen ...
Seite wird geladen ...
Seite wird geladen ...
Seite wird geladen ...
Seite wird geladen ...
Seite wird geladen ...
Seite wird geladen ...
Seite wird geladen ...
Seite wird geladen ...
Seite wird geladen ...
Seite wird geladen ...
Seite wird geladen ...
Seite wird geladen ...
Seite wird geladen ...
Seite wird geladen ...
Seite wird geladen ...
Seite wird geladen ...
Seite wird geladen ...
Seite wird geladen ...
Seite wird geladen ...
Seite wird geladen ...
Seite wird geladen ...
Seite wird geladen ...
Seite wird geladen ...
Seite wird geladen ...
Seite wird geladen ...
Seite wird geladen ...
Seite wird geladen ...
Seite wird geladen ...
Seite wird geladen ...
Seite wird geladen ...
Seite wird geladen ...
Seite wird geladen ...
Seite wird geladen ...
Seite wird geladen ...
Seite wird geladen ...
Seite wird geladen ...
Seite wird geladen ...
Seite wird geladen ...
Seite wird geladen ...
Seite wird geladen ...
Seite wird geladen ...
Seite wird geladen ...
Seite wird geladen ...
Seite wird geladen ...
Seite wird geladen ...
Seite wird geladen ...
Seite wird geladen ...
Seite wird geladen ...
Seite wird geladen ...
Seite wird geladen ...
Seite wird geladen ...
Seite wird geladen ...
Seite wird geladen ...
Seite wird geladen ...
Seite wird geladen ...
Seite wird geladen ...
Seite wird geladen ...
Seite wird geladen ...
Seite wird geladen ...
Seite wird geladen ...
Seite wird geladen ...
Seite wird geladen ...
Seite wird geladen ...
Seite wird geladen ...
Seite wird geladen ...
Seite wird geladen ...
Seite wird geladen ...
Seite wird geladen ...
Seite wird geladen ...
Seite wird geladen ...
Seite wird geladen ...
Seite wird geladen ...
Seite wird geladen ...
Seite wird geladen ...
Seite wird geladen ...
Seite wird geladen ...
Seite wird geladen ...
Seite wird geladen ...
Seite wird geladen ...
Seite wird geladen ...
Seite wird geladen ...
Seite wird geladen ...
Seite wird geladen ...
Seite wird geladen ...
Seite wird geladen ...
Seite wird geladen ...
Seite wird geladen ...
Seite wird geladen ...
Seite wird geladen ...
Seite wird geladen ...
Seite wird geladen ...
Seite wird geladen ...
Seite wird geladen ...
Seite wird geladen ...
Seite wird geladen ...
Seite wird geladen ...
Seite wird geladen ...
Seite wird geladen ...
Seite wird geladen ...
Seite wird geladen ...
Seite wird geladen ...
Seite wird geladen ...
Seite wird geladen ...
Seite wird geladen ...
Seite wird geladen ...
Seite wird geladen ...
Seite wird geladen ...
Seite wird geladen ...
Seite wird geladen ...
Seite wird geladen ...
Seite wird geladen ...
Seite wird geladen ...
Seite wird geladen ...
Seite wird geladen ...
Seite wird geladen ...
Seite wird geladen ...
Seite wird geladen ...
Seite wird geladen ...
Seite wird geladen ...
Seite wird geladen ...
Seite wird geladen ...
Seite wird geladen ...
Seite wird geladen ...
-
 1
1
-
 2
2
-
 3
3
-
 4
4
-
 5
5
-
 6
6
-
 7
7
-
 8
8
-
 9
9
-
 10
10
-
 11
11
-
 12
12
-
 13
13
-
 14
14
-
 15
15
-
 16
16
-
 17
17
-
 18
18
-
 19
19
-
 20
20
-
 21
21
-
 22
22
-
 23
23
-
 24
24
-
 25
25
-
 26
26
-
 27
27
-
 28
28
-
 29
29
-
 30
30
-
 31
31
-
 32
32
-
 33
33
-
 34
34
-
 35
35
-
 36
36
-
 37
37
-
 38
38
-
 39
39
-
 40
40
-
 41
41
-
 42
42
-
 43
43
-
 44
44
-
 45
45
-
 46
46
-
 47
47
-
 48
48
-
 49
49
-
 50
50
-
 51
51
-
 52
52
-
 53
53
-
 54
54
-
 55
55
-
 56
56
-
 57
57
-
 58
58
-
 59
59
-
 60
60
-
 61
61
-
 62
62
-
 63
63
-
 64
64
-
 65
65
-
 66
66
-
 67
67
-
 68
68
-
 69
69
-
 70
70
-
 71
71
-
 72
72
-
 73
73
-
 74
74
-
 75
75
-
 76
76
-
 77
77
-
 78
78
-
 79
79
-
 80
80
-
 81
81
-
 82
82
-
 83
83
-
 84
84
-
 85
85
-
 86
86
-
 87
87
-
 88
88
-
 89
89
-
 90
90
-
 91
91
-
 92
92
-
 93
93
-
 94
94
-
 95
95
-
 96
96
-
 97
97
-
 98
98
-
 99
99
-
 100
100
-
 101
101
-
 102
102
-
 103
103
-
 104
104
-
 105
105
-
 106
106
-
 107
107
-
 108
108
-
 109
109
-
 110
110
-
 111
111
-
 112
112
-
 113
113
-
 114
114
-
 115
115
-
 116
116
-
 117
117
-
 118
118
-
 119
119
-
 120
120
-
 121
121
-
 122
122
-
 123
123
-
 124
124
-
 125
125
-
 126
126
-
 127
127
-
 128
128
-
 129
129
-
 130
130
-
 131
131
-
 132
132
-
 133
133
-
 134
134
-
 135
135
-
 136
136
-
 137
137
-
 138
138
-
 139
139
-
 140
140
-
 141
141
-
 142
142
-
 143
143
-
 144
144
-
 145
145
-
 146
146
-
 147
147
-
 148
148
-
 149
149
-
 150
150
-
 151
151
-
 152
152
-
 153
153
-
 154
154
-
 155
155
-
 156
156
-
 157
157
-
 158
158
-
 159
159
-
 160
160
-
 161
161
-
 162
162
-
 163
163
-
 164
164
-
 165
165
-
 166
166
-
 167
167
-
 168
168


Philips DVT7110 Bedienungsanleitung
- Typ
- Bedienungsanleitung
in anderen Sprachen
- français: Philips DVT7110 Le manuel du propriétaire
- español: Philips DVT7110 El manual del propietario
- italiano: Philips DVT7110 Manuale del proprietario
- Nederlands: Philips DVT7110 de handleiding
Verwandte Artikel
-
Philips LFH9375/27 Benutzerhandbuch
-
-
-
-
Philips LFH9120 Benutzerhandbuch
-
-
Philips DPM7700 Bedienungsanleitung
-
-
-
