Christopeit Sport Walking Pad 4.0 Benutzerhandbuch
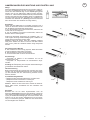
- Typ
- Benutzerhandbuch

1
DE
Montage- und Bedienungsanleitung
Seite: 2-10
Bestell-Nr.: 2325
Page: 11-18
Order No.: 2325 GB
Assembly and operating instructions
Page: 19-26
No. de commande: 2325 F
Instructions de montage et d'utilisation
Bestellnr.: 2325
Pagina: 27-34 NL
Montage- en bedieningsinstructies
ELEKTR. LAUFBAND FÜR WALK-/ GEHTRAINING
WALKING PAD 4.0

2
DE
INHALTSÜBERSICHT
SEHR GEEHRTE KUNDIN, SEHR GEEHRTER KUNDE,
wir gratulieren Dir zum Kauf dieses Heimsport-Trainingsgerätes und wünschen Dir viel Vergnügen damit. Bitte beachte und befolge
die Hinweise und Anweisungen dieser Montage- und Bedienungsanleitung. Wenn Du irgendwelche Fragen hast, kannst Du dich
selbstverständlich jederzeit an uns wenden.
Mit freundlichen Grüßen,
Deine Top-Sport Gilles GmbH
CHRISTOPEIT-GYM
CHRISTOPEIT-BLOG
SOCIAL-MEDIA
CHRISTOPEIT-SPORT COMMUNITY
In unserem Christopeit GYM ndest Du zu Deinem Trainings-
gerät verschiedene Programme mit unterschiedlichen Heraus-
forderungen. Wir wünschen Dir viel Freude bei Deinem täglichem
Training.
Scanne den QR-Code oder folge dem Link:
https://www.christopeit-sport.com/lifestyle/christopeit-gym/
Unser Ziel ist es, Dir nicht nur neue und großartige Sportgeräte für Dein Homestudio anzubieten, sondern Dich auch bei Deinem
täglichen Workout motivierend und abwechslungsreich zu unterstützen. Werde ein Teil unserer Christopeit-Sport Community.
Folgen uns auf Facebook, Instagram und Youtube.
Scanne den QR-Code oder suche auf den jeweiligen
Plattformen nach: Christopeit-Sport
Finde viele spannende Themen rund um Fitness und Gesundheit
bei uns im Blog.
Scanne den QR-Code oder folge dem Link:
https://www.christopeit-sport.com/lifestyle/blog/
InhaltSeite
GYM
BLOG
FACEBOOK INSTAGRAM YOUTUBE
Christopeit-Sport Community
Wichtige Empfehlungen und Sicherheitshinweise
Auspacken und in Betrieb nehmen
Anmerkungen zur Wartung und Einstellung
Computerbeschreibung
Garantiebestimmungen
Trainingsanleitung Allgemein
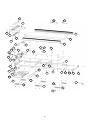
Stückliste - Ersatzteilliste
Explosionszeichnung
2
3
4
5
6-7
7
8
9-10
35

3
DE
WICHTIGE EMPFEHLUNGEN UND SICHERHEITSHINWEISE
Unsere Produkte sind grundsätzlich TÜV geprüft und entspre-
chen damit dem aktuellen, höchsten Sicherheitsstandard. Diese
Tatsache entbindet aber nicht, die nachfolgenden Grundsätze
strikt zu befolgen.
1. Das Gerät genau nach der Montageanleitung aufbauen und
nur die, für den Aufbau des Gerätes beigefügten und in der Mon-
tage aufgeführten, gerätespezischen Einzelteile verwenden.
Vor dem eigentlichen Aufbau die Vollständigkeit der Lieferung
anhand des Lieferscheins und die Vollständigkeit des Lieferum-
fanges anhand der Montageschritte grob kontrollieren.
2. Vor der ersten Benutzung und in regelmäßigen Abständen
(alle 1-2 Monate) den festen Sitz aller Schrauben, Muttern und
sonstigen Verbindungen prüfen, damit der sichere Betriebszu-
stand des Trainingsgerätes gewährleistet ist. Defekte Einzelteile
müssen unverzüglich ausgetauscht oder entfernt werden.
Gegebenenfalls das Gerät bis zur Instandsetzung sperren.
3. Das Gerät an einem trockenen, ebenen Ort aufstellen und es
vor Feuchtigkeit und Nässe schützen. Bodenunebenheiten sind
durch geeignete Maßnahmen am Boden und, sofern bei diesem
Gerät vorhanden, durch dafür vorgesehene, justierbare Teile des
Gerätes auszugleichen. Der Kontakt mit Feuchtigkeit und Nässe
ist auszuschließen.
4. Sofern der Aufstellort besonders gegen Druckstellen,
Verschmutzungen und ähnliches geschützt werden soll, eine
geeignete, rutschfeste Unterlage (z.B. Gummimatte, Holzplatte
o.ä.) unter das Gerät legen.
5. Am Aufstellort mindestens 0,6 Meter Freiraum um das Lauf-
band herum und nach hinten mindestens 2 Meter Abstand zu
anderen Gegenständen wie Möbel oder Wände berücksichtigen.
6. Für die Reinigung des Gerätes keine aggressiven Reinigungs-
mittel und zum Aufbau und für eventuelle Reparaturen nur die
mitgelieferten bzw. geeignete, eigene Werkzeuge verwenden.
Schweißablagerungen am Gerät sind direkt nach Trainingsende
zu entfernen.
7. Achtung! Systeme der Herzfrequenzüberwachung können
ungenau sein. Übermäßiges Trainieren kann zu ernsthaftem
gesundheitlichem Schaden oder zum Tod führen. Vor der Auf-
nahme eines gezielten Trainings ist daher ein geeigneter Arzt
zu konsultieren. Dieser kann denieren welcher maximalen
Belastung (Puls, Watt, Trainingsdauer u.s.w.) man sich aus-
setzen darf und genaue Auskünfte bzgl. der richtigen Körper-
haltung beim Training, der Trainingsziele und der Ernährung
geben. Es darf nicht nach schweren Mahlzeiten trainiert werden.
Es ist zu beachten, dass dieses Gerät nicht für therapeutische
Zwecke geeignet ist.
8. Mit dem Gerät nur trainieren wenn es einwandfrei funktioniert.
Für eventuelle Reparaturen nur Original-Ersatzteile verwenden.
Achtung! Sollten Teile bei Benutzung des Gerätes übermäßig
heiß werden ersetzen Sie diese umgehend und sichern Sie das
Gerät gegen Benutzung solange es noch nicht in Stand gesetzt
wurde.
9. Bei der Einstellung von verstellbaren Teilen auf die
richtige Position bzw. die markierte, maximale Einstellposition und
ordnungsgemäße Sicherung der neu eingestellten Position
achten. Sollten Hilfsmittel zur Einstellung nötig sein, müssen
diese nach dem Einstellvorgang wieder entfernt werden.
10. Sofern in der Anleitung nicht anders beschrieben, darf das
Gerät nur immer von einer Person zum Trainieren benutzt
werden. Die Trainingsleistung sollte insgesamt 45 Min./tägl. nicht
überschreiten.
11. Es sind Trainingskleidung und Schuhe zu tragen die für ein
Fitness- Training mit dem Gerät geeignet sind. Die Kleidung
muss so beschaen sein, dass diese aufgrund ihrer Form (z.B.
Länge) während des Trainings nicht hängen bleiben kann. Die
Trainingsschuhe sollten passend zum Trainingsgerät gewählt
werden, grundsätzlich dem Fuß einen festen Halt geben und eine
rutschfeste Sohle besitzen.
12. Achtung! Wenn Schwindelgefühle, Übelkeit, Brustschmer-
zen oder andere abnormale Symptome wahrgenommen werden,
das Training abbrechen und an einen geeigneten Arzt wenden.
13. Generell gilt, dass Sportgeräte kein Spielzeug sind. Sie
dürfen daher nur bestimmungsgemäß und von entsprechend
informierten und unterwiesenen Personen benutzt werden.
14. Personen wie Kinder, Invalide und behinderte Menschen
sollten, das Gerät nur im Beisein einer weiteren Person, die eine
Hilfestellung und Anleitung geben kann, benutzen. Die Benut-
zung des Gerätes durch unbeaufsichtigte Kinder ist durch
geeignete Maßnahmen auszuschließen.
15. Es ist darauf zu achten, dass der Trainierende und an-
dere Personen sich niemals mit irgendwelchen Körperteilen in
den Bereich von sich noch bewegenden Teilen begeben oder
benden.
16. Dieses Produkt darf am Ende seiner Lebensdauer nicht
über den normalen Haushaltsabfall entsorgt werden, sondern
muss an einem Sammelpunkt für das Recycling von elektrischen
und elektronischen Geräten abgegeben werden. Das Symbol
auf dem Produkt, der Gebrauchsanleitung oder der Verpackung
weist darauf hin. Die Werkstoe sind gemäß ihrer Kennzeichnung
wiederverwertbar. Mit der Wiederverwendung, der stoichen
Verwertung oder anderen Formen der Verwertung von Altgeräten
leisten Sie einen wichtigen Beitrag zum Schutze unserer Umwelt.
Bitte erfragen Sie bei der Gemeindeverwaltung die zuständige
Entsorgungsstelle.
17. Die Verpackungsmaterialien, leere Batterien und Teile des
Gerätes im Sinne der Umwelt nicht mit dem Hausmüll entsorgen,
sondern in dafür vorgesehene Sammelbehälter werfen oder bei
geeigneten Sammelstellen abgeben.
18. Die zulässige maximale Belastung (=Benutzergewicht) ist auf
100 kg festgelegt worden. Stellen Sie vor Trainingsbeginn sicher,
dass das zulässige Gesamtgewicht nicht überschritten wird.
19. Wenn die Anschlußleitung dieses Gerätes beschädigt ist,
muss diese durch den Hersteller oder den Kundendienst oder
durch eine elektrisch qualizierte Person ersetzt werden.
20. Lassen Sie das Produkt nicht unbeaufsichtigt eingeschaltet
oder in Betrieb und sichern Sie durch Ausstecken des Netz-
steckers eine unbeabsichtigte Nutzung.
21. Konformitätserklärung
Hersteller: Top-Sports Gilles GmbH, Friedrichstraße 55, D-42551
Velbert. Dieses Produkt entspricht den folgenden Europäischen
Richtlinien und Normen: 2014/30/EU (EMC), 2014/35/EU (LVD),
2011/65/EG (RoHS) und EN ISO 20957-1:2013, EN 957-6:2010 /
A1:2014 (Homesport).
22. Die Montage- und Bedienungsanleitung ist als Teil des
Produktes zu betrachten. Bei Verkauf oder der Weitergabe des
Produktes ist diese Dokumentation mitzugeben.
Achtung!
Vor Benutzung
Bedienungs-
anleitung lesen!

4
DE
AUSPACKEN UND IN BETRIEB NEHMEN
Bitte vor Benutzung unbedingt unsere Empfehlungen und
Sicherheitshinweise beachten!
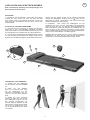
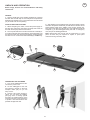
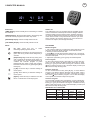
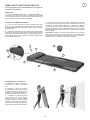
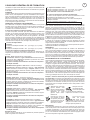
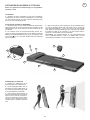
1. Entnehmen Sie die Kleinteile, sowie loses Verpackungs
material aus dem Karton und holen Sie dann mit Hilfe
einer zweiten Person das Walkingpad heraus. Fassen Sie
dabei unter den Grundrahmen (21) und achten Sie auf evtl.
Quetschgefahr.
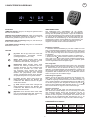
1. Schalten Sie das Walkingpad
aus und stecken Sie das Netzkabel
ab.
2. Heben Sie das Walking-
pad nur am hinteren Ende hoch
bis das Walkingpad auf den
vorderen Transportrollen (39) auf-
steht und es sich leicht bewegen
lässt.
3. Wählen Sie einen trockenen
Lagerort im Haus aus. Sie können
das Walkingpad liegend oder auf
den vorderen Standpunkten (19)
aufrecht stehend angelehnt an der
Wand lagern. Decken Sie das Gerät
ab um es vor Verfärbungen durch
evtl. Sonneneinstrahlung und Staub
zu schützen.
ENTNAHME
1. Wenn alles soweit in Ordnung ist, stecken Sie das Netz-
kabel (50) in eine vorschriftsmäßig installierte Steckdose
(220-240V~50/60Hz) und in die Netzanschlussdose (37) vorne
am Grundgerät ein und schalten Sie den Hauptschalter ein.
2. Der Computer signalisiert die Betriebsbereitschaft. Entfer-
nen Sie vorsichtig die Schutzfolie vom Display. Legen Sie die
Batterie unter der Berücksichtigung der Polarität in die Fernbe-
KONTROLLE UND INBETRIEBNAHME
TRANSPORT UND LAGERUNG
Hinweis: Bitte das Werkzeug-Set und die Anleitung sorgsam
aufbewahren, da diese bei ggf. später einmal erforderlichen
Reparaturen und Ersatzteilbestellungen benötigt werden.
dienung (49) ein. Stellen Sie sich auf die seitlichen Trittleisten
(26+36) am Walkingpad. Drücken Sie die [ ] Taste um das
Walkingpad zu starten. Nach einem 3 Sek. Count-Down setzt
sich die Lauäche (34) in Bewegung.
3. Unmittelbar nach Anlauf des Walkingpads auf die
Lauäche (34) treten und der eingestellten Geschwindigkeit
folgen. Machen Sie sich mit geringen Geschwindigkeiten mit
dem Gerät vertraut. Gehen Sie mittig auf der Lauäche (34) und
treten Sie nicht auf die seitlichen Trittauagen (26+36). Gehen
Sie nur mit Blickrichtung zum Computer (1) auf dem Walkingpad.
Steigen Sie im Notfall seitlich vom Walkingpad ab.
21
36
1
26
50 49
34
19
39 37

5
DE
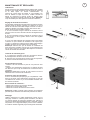
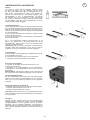
Pege
Damit das Walkingpad dauerhaft leicht und gut läuft, sollte im-
mer nach 50 Betriebsstunden die Unterseite der Lauäche,
welche auf dem Gleitbrett liegt auf Ihre Gleitfähigkeit geprüft
werden und ggf. mit Silikonspay/ Silikon-Öl (Kein Schmier-
sto auf ÖL- oder Petroleum Basisverwenden) nachbehandelt
werden. Dazu hebt man die Lauäche etwas von Gleitbrett an
und bringt Siliconöl zwischen Unterseite der Lauäche und
Oberseite vom Gleitbrett ein. (Achtung! Zuviel Schmiermittel
kann ein Rutschen der Lauäche zur Folge haben.)
Einstellung
Stellen Sie das Walkingpad im manuellen Programm auf 3
-5km/h ein. Benutzen Sie den Innensechskantschlüssel um an
den Endkappen das Band mittig auszurichten.
1. Um die Lauäche nach Links auszurichten, drehen Sie die
rechte Seite im Uhrzeigersinn.
2. Um die Lauäche nach Rechts auszurichten, drehen Sie
die linke Seite im Uhrzeigersinn
Sollte eine dauerhafte Ausrichtung der Lauäche wie o. g.
nicht möglich sein liegt eine Beschädigung der Lauäche vor,
welche dann ausgetauscht werden sollte.
Hinweis: Achten Sie darauf, dass die Lauäche möglichst
mittig läuft. Sobald sich diese zu weit aus der Mitte schiebt
(über 10mm) sollte die Lauäche wieder mittig nachjustiert
werden.
Durchrutschen des Bandes
a. Die Lauäche ist nicht richtig gespannt. Beide Schrauben
an den Endkappen etwas fester schrauben.
b. Der Flachriemen ist nicht richtig gespannt.
c. Zuviel Schmiermittel mit einem Tuch entfernen.
Keine Anzeige
- Überprüfen ob Stecker in der Steckdose und ob die
Steckdose Strom hat.
- Überprüfen ob Hauptschalter am Grundrahmen einge-
schaltet.
Achtung! Bei Überprüfung der Computer-Steckverbindungen
grundsätzlich den Netzstecker ziehen.
Überlastsicherung
Beim Hauptanschluss (37) bendet sich zwischen den Haupt-
schalter und der Netzanschlussbuchse das Sicherungsfach
(A). Dort bendet sich eine Feinsicherung 5x20mm mit den
Daten 6,3A/250V.
Fremde Betriebsgeräusche
- Überprüfung aller Schraubverbindungen auf festen Sitz.
- Überprüfen ob der Flachriemen in Ordnung ist.
- Überprüfen ob die Lauäche in Ordnung ist.
Hinweis: Sollten Sie den Fehler nicht anhand der beschrie-
benen Hilfen nden, kontaktieren Sie den Verkäufer oder
Hersteller.
Reinigung
Benutzen Sie nur ein leicht angefeuchtetes Tuch zur
Reinigung. Achtung! Benutzen Sie niemals Benzin, Verdünner
oder andere aggressive Reinigungsmittel zur Oberächenrei-
nigung da dadurch Beschädigungen verursacht werden. Das
Gerät ist nur für den privaten Heimgebrauch und zur Benut-
zung in Innenräumen geeignet. Halten Sie das Gerät sauber
und Feuchtigkeit vom Gerät fern.
ANMERKUNGEN ZUR WARTUNG UND EINSTELLUNG
1. 2.
a.
A
37

6
DE
[TIME] Zeit-Anzeige: Zeigt an, wie lange Sie gelaufen sind in
Minuten und Sekunden.
[SPEED] Geschwindigkeit-Anzeige: Zeigt die Geschwind-
igkeit des Laufbandes in Kilometer pro Stunde an. Zeigt im
Stillstand die gewählte Programm Nr. P01-P06 an.
[DISTANCE] Entfernung-Anzeige: Zeigt an, wie weit Sie ge-
laufen sind in Kilometer.
[CALORIES] Kalorien-Anzeige: Zeigt die ca. verbrauchten
Kilokalorien in kcal an.
[P] Taste: Mit der [P] Taste kann eines der
Vorgabeprogramme ausgewählt werden.
(Trainingsprogramme P01 - P06)
[Start] Taste: Durch Drücken dieser Taste
startet das ausgewählte Programm und die
Lauäche läuft 3 Sekunden verzögert an.
[Stop/Pause] Taste: Drücken dieser Taste
während des Trainings unterbricht das aus-
gewählte Programm und die Lauäche läuft
verzögert aus. Innerhalb von 5 Min. kann
das Programm durch Drücken der [Start]
Taste fortgesetzt werden oder durch erneutes
Drücken der [Stop/Pause] Taste beendet
werden. Vorgabewerte können durch Drücken
der [Stop/Pause] Taste auf 0 gesetzt werden.
[+] Taste: Drücken dieser Taste erhöht die
Geschwindigkeit während des Betriebs des
Laufbandes. Bei Stillstand können Eingabe-
werte erhöht werden.
[-] Taste: Drücken dieser Taste verringert die
Geschwindigkeit während des Betriebs des
Laufbandes. Bei Stillstand können Eingabe-
werte vermindert werden.
[M] Taste: Durch Drücken dieser Taste wählt
man die Vorgabemöglichkeit (Zeit, Entfernung,
Kalorien) im manuellen Programm aus.
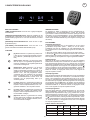
Das Walkingpad kann ausschließlich mit der mitgelie-
ferten Fernbedienung gesteuert werden. Die Fernbedienung
benötigt eine Knopfzelle Typ CR2032. Legen Sie die Batterie
unter der Berücksichtigung der Polarität in die Fernbedienung
ein. Führen Sie das Armband durch die beiden Önungen auf
der Rückseite der Fernbedienung um die Fernbedienung am
Handgelenk zu tragen und die Bedienung vorzunehmen. Die
Reichweite beträgt ca.1.5m. Sollte die Fernbedienung nicht
reagieren wechseln Sie als erstes die Batterie aus.
COMPUTERBESCHREIBUNG
ANZEIGEN
TASTEN
EINGABEMÖGLICHKEITEN
INBETRIEBNAHME
Anzeige Anzeige
Wert
Vorgabe
Möglichkeit
Anzeige
Möglichkeit
ZEIT (MIN:SEK) 0:00 30:00 5:00-99:00 0:00-99:59
KM/H 0.0 N/A N/A 0.8-5.0
KM 0.00 1.00 0.5-65.0 0.00-99.99
KALORIEN (Kcal) 0 50 10-995 0-999
Manuelles Programm
1. Verbinden Sie das Netzkabel (57) mit dem Laufband und mit
einer vorschriftsmäßig installierten Steckdose (230V~50Hz) und
schalten Sie den Netzschalter (46) unten vorne am Grundgerät
ein. Der Computer zeigt Ihnen das manuelle Programm an und
ist startbereit.
2. Stellen Sie sich auf den schwarzen Flächen am Seitenrand.
3. Drücken Sie die [ ] Taste um das Laufband zu starten. Nach ei-
nem 3 Sek. Count- Down setzt sich die Lauäche in Bewegung.
Unmittelbar nach Anlauf des Bandes auf das Laufband gehen
und der eingestellten Geschwindigkeit folgen.
Zeit- Programm:
Wählen Sie mit der [M] Taste das Zeit-Programm aus, dann blinkt
das Zeit-Display und zeigt einen Vorschlag von 30:00 Minuten
an. Diesen können Sie auf Wunsch mit den [+] und [-] Tasten
abändern. (Vorgabemöglichkeit 5:00-99:00Minuten.) Starten Sie
das Programm nach Vorgabe der Zeit mit der [ ] Taste und der
Vorgabewert zählt rückwärts bis auf „0“. Ist dieser Wert erreicht
ertönt ein Signal und das Laufband stoppt.
Entfernungs- Programm:
Wählen Sie mit der [M] Taste das Entfernungs-Programm aus,
dann blinkt das Entfernungs-Display und ein Vorschlag von
1,00KM wir angezeigt. Diesen können Sie auf Wunsch mit den [+]
und [-] Tasten abändern (Vorgabemöglichkeit 0,5-65,0KM) Start-
en Sie das Programm nach Vorgabe der Entfernung mit der [ ]
Taste und der Vorgabewert zählt rückwärts bis auf „0“. Ist dieser
Wert erreicht ertönt ein Signal und das Laufband stoppt.
Kalorien- Programm:
Wählen Sie mit der [M] Taste das Kalorien-Programm aus,
dann blinkt das Kalorien-Display und ein Vorschlag von 50kcal
wird angezeigt. Diesen können Sie auf Wunsch mit den [+]
und [-] Tasten abändern. (Vorgabemöglichkeit 10-995 kcal.)
Starten Sie das Programm nach Vorgabe der Kalorien mit der
[] Taste und der Vorgabewert zählt rückwärts bis auf „0“. Ist
dieser Wert erreicht ertönt ein Signal und das Laufband stoppt.

7
DE
Wählen Sie mittels der [P] Taste zwischen 6 unterschiedlichen Geschwindigkeitsprogrammen aus. In diesen Pro-
grammen wird die vorgegebene Zeit in 20 Teilintervalle unterteilt und die Geschwindigkeit ändert sich automatisch
wie in nachfolgender Tabelle ausgewiesen ist. Durch Drücken der [ ] Taste wird das Programm gestartet. Nach Ab-
lauf des Programms ertönt ein Signal und das Laufband stoppt. Um das Programm zu unterbrechen drücken Sie die
[ ] Taste.
GESCHWINDIGKEITSPROGRAMME P01-P06
Zeit Programme in 20 Zeiteinteilungen
Programm 1234567891011 12 13 14 15 16 17 18 19 20
P01 Km/h 12344432123444321232
P02 Km/h 22334455443322334433
P03 Km/h 12345432345432345432
P04 Km/h 12323434554343232123
P05 Km/h 22343233454332345432
P06 Km/h 12232334344543345543
GARANTIEBESTIMMUNGEN
Die Garantie beträgt 24 Monate, gilt für Neuware bei Ersterwerb
und beginnt mit dem Rechnungs- bzw. Auslieferdatum. Während
der Garantiezeit werden eventuelle Mängel kostenlos beseitigt.
Bei Feststellung eines Mangels sind Sie verpichtet diesen
unverzüglich dem Hersteller zu melden. Es steht im Ermes-
sen des Herstellers die Garantie durch Ersatzteilversand oder
Reparatur zu erfüllen. Bei Ersatzteilversand besteht die Befugnis
des Austausches ohne Garantieverlust. Eine Instandsetzung am
Aufstellort ist ausgeschlossen.
Heimsportgeräte sind nicht für eine kommerzielle oder gewerbli-
che Nutzung geeignet. Eine Zuwiderhandlung in der Nutzung hat
eine Garantieverkürzung oder Garantieverlust zur Folge.
Die Garantieleistung gilt nur für Material oder Fabrikationsfehler.
Bei Verschleißteilen oder Beschädigungen durch missbräuch-
liche oder unsachgemäße Behandlung, Gewaltanwendung und
Eingrien die ohne vorherige Absprache mit unserer Service
Abteilung vorgenommen werden, erlischt die Garantie.
Bitte bewahren Sie, falls möglich, die Originalverpackung für die
Dauer der Garantiezeit auf, um im Falle einer Rücksendung die
Ware ausreichend zu schützen und senden Sie keine Ware unfrei
zur Service Abteilung ein!
Eine Inanspruchnahme von Garantieleistungen erwirkt keine
Verlängerung der Garantiezeit.
Ansprüche auf Ersatz von Schäden welche evtl. außerhalb
des Gerätes entstehen (sofern eine Haftung nicht zwingend
gesetzlich geregelt ist) sind ausgeschlossen.
Hersteller:
Top-Sports Gilles GmbH, Friedrichstr. 55, 42551 Velbert
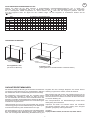
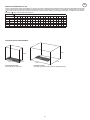
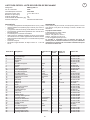
Trainingsäche in mm
(für Gerät und Benutzer) Freiäche in mm
(Trainingsäche und Sicherheitsäche umlaufend 600mm)
TRAININGSPLATZBEDARF
570
1510
2200 2200
1770
2110

8
DE
Um spürbare, körperliche und gesundheitliche Verbesserungen zu
erreichen, müssen für die Bestimmung des erforderlichen Trainingsauf-
wandes folgende Faktoren beachtet werden.
INTENSITÄT
Die Stufe der körperlichen Belastung beim Training muß den Punkt der
normalen Belastung überschreiten, ohne dabei den Punkt der Atemlosig-
keit und /oder der Erschöpfung zu erreichen. Ein geeigneter Richtwert
kann dabei der Puls sein. Mit jedem Training steigt die Kondition und
somit sollte mann die Trainingsanforderungen anpassen. Dieses ist durch
eine Verlängerung der Trainingsdauer, einer Erhöhung der Schwierig-
keitsstufen oder Veränderung der Trainingsart möglich.
HÄUFIGKEIT
Die meisten Experten empfehlen die Kombination von einer gesundheits-
bewußten Ernährung, die entsprechend dem Trainingsziel abgestimmt
werden muß, und körperliche Ertüchtigungen drei- bis fünfmal in der
Woche. Ein normaler Erwachsener muß zweimal pro Woche trainieren
um seine derzeitige Verfassung zu erhalten. Um seine Kondition zu ver-
bessern und sein Körpergewicht zu verändern benötigt er mindestens
drei Trainingseinheiten pro Wochen. Ideal bleibt natürlich eine Häufgkeit
von fünf Trainingseinheiten pro Woche.
GESTALTUNG DES TRAININGS
Jede Trainingseinheit sollte aus drei Trainingsphasen bestehen:
„Aufwärm-Phase“, „Trainings-Phase“ und „Abkühl-Phase“. In der
„Aufwärm-Phase“ soll die Körpertemperatur und die Sauerstozufuhr
langsam gesteigert werden. Dieses ist durch gymnastische Übungen
über eine Dauer von fünf bis zehn Minuten möglich. Danach sollte das
eigentliche Training „Trainings-Phase“ beginnen. Die Trainingsbelas-
tung sollte nach dem Trainingspuls gestaltet werden. Um den Kreislauf
nach der „Trainings-Phase“ zu unterstützen und einem Muskelkater oder
Zerrungen vorzubeugen, muß nach der „Trainings-Phase“ noch die
„Abkühl-Phase“ eingehalten werden. In dieser sollten, fünf bis zehn
Minuten lang, Dehnungsübungen und/oder leichte gymnastische Übun-
gen durchgeführt werden.
TRAININGSPULS
Um den Trainingspuls zu bestimmen können Sie wie folgt vorgehen. Bitte
beachten Sie, dass es sich hierbei um die Richtwerte handelt. Wenn Sie
gesundheitliche Probleme haben oder unsicher sind, wenden Sie sich an
einen Arzt oder Fitnesstrainer.
Beispielrechnung
Männlich, 30 Jahre alt und wiege 80 Kg. Ich bin Anfänger und möchte
etwas Abnehmen und meine Ausdauerleistung steigern.
01: Maximal Puls - Berechnung
Maximalpuls = 214 - (0,5 x Alter) - (0,11 x Körpergewicht)
Maximalpuls = 214 - (0,5 x 30) - (0,11 x 80)
Maximalpuls = ca. 190 Schläge/Min
Nachdem Sie Ihren Trainingspuls für Ihre Trainingskondition oder Ziele
ermittelt haben, können Sie mit dem Training beginnen. Die meisten
Ausdauertrainingsgeräte von uns verfügen über Pulssensoren oder
sind Pulsgurtkompatibel. Somit können Sie Ihren Puls während des
Trainings überwachen. Wird die Pulsfrequenz nicht in der Computeran-
zeige angezeigt oder wollen Sie sicherheitshalber Ihre Pulsfrequenz,
die durch eventuelle Anwendungsfehler o.ä. falsch angezeigt werden
könnte, kontrollieren, können Sie zu folgenden Hilfsmitteln greifen:
a. Puls-Messung auf herkömmliche Weise (Abtasten des Pulsschlages
z.B. am Handgelenk und zählen der Schläge innerhalb einer Minute).
b. Puls-Messung mit entsprechend geeigneten und geeichten Puls-Mess-
Geräten (im Sanitäts- Fachhandel erhältlich).
c. Pulsmessung mit weiteren Produkten wie Pulsuhr, Smartphone....
01 Maximalpuls-Berechnen
Die Ermittlung des maximalen Pulswertes kann auf vielen unterschiedli-
chen Wegen erfolgen, da der Maximalpuls von viel Faktoren abhängig
ist. Zur Berechnung nimmt mann gerne die Faust-Formel (Maximalpuls
= 220 - Lebensalter). Diese Formel ist sehr allgemein gehalten. Sie wird
in viele Heimsportprodukten verwendet, um den Maximalpuls zu bes-
timmen. Wir empfehlen Ihnen die Sally Edwards-Formel. Diese Formel
berechnet den Maximalpuls genauer und berücksichtigt das Geschlecht,
Alter und Körpergewicht.
Sally Edwards-Formel
Männer:
Maximalpuls = 214 - (0,5 x Alter) - (0,11 x Körpergewicht)
Frauen:
Maximalpuls = 210 - (0,5 x Alter) - (0,11 x Körpergewicht)
02 Trainingspuls-Berechnen
Der optimale Trainigspuls wird durch das Ziel des Trainings festgelegt.
Dafür wurden Trainingszonen deniert.
Gesundheits - Zone: REKOM - Regeneration und Kompensation.
Geeignet für: Anfänger
Trainingsart: sehr leichtes Ausdauertraining
Ziel: Erholung und Förderung der Gesundheit. Aufbau der Grundkon-
dition.
Trainingspuls = 50 bis 60% von dem Maximalpuls
Fettstowechsel - Zone: GA1 - Grundlagen - Ausdauertraining 1.
Geeignet für: Anfänger und Fortgeschrittene
Trainingsart: leichtes Ausdauertraining
Ziel: Aktivierung des Fettstowechsels (Kalorienverbrennung).
Verbesserung der Ausdauerleistung.
Trainingspuls = 60 bis 70% vom Maximalpuls
Aerobe - Zone: GA1/2 - Grundlagen - Ausdauertraining 1 bis 2.
Geignet für: Anfänger und Vortgeschrittene
Trainingsart: moderates Ausdauertraining.
Ziel: Aktivierung des Fettstowechsels (Kalorienverbrennung),
Verbesserung der Aerobenleistung, Steigerung der Ausdauerleistung.
Trainingspuls = 70 bis 80% vom Maximalpuls
Anaerobe - Zone: GA2 - Grundlagen - Ausdauertraining 2
Geeignet für: Fortgeschrittene und Leistungsportler
Trainingsart: moderates Ausdauertraining oder Intervalltraining
Ziel: Verbesserung der Laktattoleranz, maximale Steigerung der
Leistung.
Trainingspuls = 80 bis 90% vom Maximalpuls
Wettkampf - Zone: WSA - Laistung / Wettkampftraining
Geeignet für: Athleten und Hoch-Leistungsportler
Trainingsart: intensives Intervalltraining und Wettkampftraining
Ziel: Verbesserung der max. Geschwindigkeit und Leistung.
Achtung! Das Training in dem Bereich kann zu der Überlastung des
Herz-Kreislauf-Systems und gesundheitliche Schäden führen.
Trainingspuls = 90 bis 100% vom Maximalpuls
TRAININGSANLEITUNG ALLGEMEIN
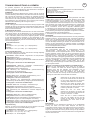
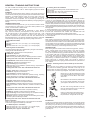
Beispiel - Dehnübungen für die Aufwärm/- und Abkühl-Phasen
Starten Sie Ihre Aufwärmphase durch Gehen auf der Stelle für
mind. 3 Minuten und führen Sie danach folgende gymnastische
Übungen durch. Bei den Übungen nicht übertreiben und nur
soweit ausführen bis ein leichtes Ziehen zu spüren ist. Diese
Position dann etwas halten. Wir empfehlen die Aufwärmübun-
gen zum Abschluss des Trainings erneut durchzuführen und das
Training mit Ausschütteln der Extremitäten zu beenden.
Greifen Sie mit der linken Hand hinter den
Kopf an die rechte Schulter und ziehen Sie
mit der rechten Hand etwas an der linken
Armbeuge. Nach 20Sek. Arm wechseln.
Beugen Sie sich soweit wie möglich nach
vorn und lassen Sie die Beine fast durch-
gestreckt. Zeigen Sie dabei mit den Fingern
in Richtung Fußspitze. 2 x 20Sek.
Setzen Sie sich mit einem Bein
gestreckt auf den Boden und beugen Sie
sich vor und versuchen Sie den Fuß mit den
Händen zu erreichen. 2 x 20Sek.
Knien Sie sich in weitem Ausfallschritt
nach vorn und stützen Sie sich mit den
Händen auf dem Boden ab. Drücken Sie
das Becken nach unten. Nach 20 Sek.
Bein wechseln.
MOTIVATION
Der Schlüssel für ein erfolgreiches Programm ist ein regelmäßiges
Training. Sie sollten sich einen festen Zeitpunkt und Platz pro
Trainingstag einrichten und sich auch geistig auf das Training vorbereiten.
Trainieren Sie nur gut gelaunt und halten Sie sich stets Ihr Ziel vor
Augen. Bei kontinuierlichem Training werden Sie Tag für Tag feststellen,
wie Sie sich weiterentwickeln und Ihrem persönlichen Trainingsziel Stück
für Stück näher kommen.
02: Trainingspuls-Berechnen
Durch meine Ziele und Trainingsgrad passt für mich die Fettstowech-
sel-Zone am besten.
Trainingspuls = 60 bis 70% von dem Maximalpuls
Trainingspuls = 190 x 0,6 [60%]
Trainingspuls = 114 Schläge/ Min

9
DE
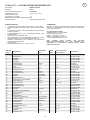
STÜCKLISTE - ERSATZTEILLISTE
Wenn ein Bauteil nicht in Ordnung ist oder fehlt, oder wenn
Sie in Zukunft ein Ersatzteil benötigen, wenden Sie sich bitte an:
Dieses Produkt ist nur für den privaten Heimsportbereich
gedacht und nicht für gewerbliche oder kommerzielle
Nutzung geeignet. Heimsportnutzung Klasse H/C.
• Motor Dauerleistung 1.0 PS (0,75 Kw), Motor Höchstleistung
1,5 PS (1,0Kw)
• Geschwindigkeit: 0,8km/h bis 5 km/h (in 0,1 km/h Schritten
einstellbar)
• 1 manuelles Programm mit Vorgabemöglichkeiten Zeit, Ent-
fernung und ca. Kalorienverbrauch
• 6 vorgegebene Trainingsprogramme mit programmierter
Geschwindigkeitsregelung
• 6 abgestimmte Dämpfer für ein komfortables Gehen
• LED Display mit gleichzeitiger Anzeige von: Zeit, Entfernung,
Geschwindigkeit, ca. Kalorienverbrauch
• Armband Fernbedienung zur einfachen und praktischen
Steuerung am Handgelenk
• Transportrollen für einen einfachen Standortwechsel
• Großzügige Lauäche: ca. L 120 x B 40 cm
Walking Pad 4.0
2325
05.07.2023
Top-Sports Gilles GmbH
Friedrichstraße 55, 42551 Velbert
www.christopeit-sport.com
Telefon: +49 (0)20 51 / 60 67-0
Telefax: +49 (0)20 51 / 60 67-44
e-mail: [email protected]
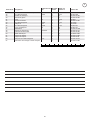
Abb.- Nr. Bezeichnung Abmessung
mm Menge Montiert an
Abb. Nr. ET Nummer
1 Computeranzeige 1 3 36-2325-03-BT
2Displayauage 1 3 36-2025-14-BT
3 Verkleidung 1 20 36-2325-01-BT
4 Steuerplatine 1 21 36-2325-04-BT
5 Spule 1 21 36-2025-06-BT
6 Sechskantschraube M8x25 2 8 39-10455
7 Unterlegscheibe 8//16 4 6+11 39-9862-CR
8 Motor 1 21 33-2325-04-SI
9 Antriebsriemen 140J 1 8+25 36-2025-32-BT
10 Selbstsichernde Mutter M8 1 6 39-9818-CR
11 Sechskantschraube M8x12 2 8 39-9922
12 Senkkopfschraube M6x16 3 8+19 36-9841205-BT
13 Dämpfer Vorne 155x40x30 2 21 36-2025-23-BT
14 Dämpfer Mitte 155x40x25 2 21 36-2325-06-BT
15 Kreuzschlitzschraube 4x12 2 47 36-9206104-BT
16 Gewindeniet M6 14 17+18 36-2325-07-BT
17 Kreuzschlitzschraube M6x16 2 33 39-10120-VC
18 Kreuzschlitzschraube M6x35 12 13,14+35 39-10085
19 Aufstellfuß 2 3 36-2025-31-BT
20 Verkleidung unten 1 21 36-2325-02-BT
21 Grundrahmen 1 33-2325-01-SW
22 Federring für M8 2 11 39-9864-VC
23 Gewindeeinsatz 4.2 6 3 36-2025-27-BT
24 Kreuzschlitzschraube 4x16 6 20 36-9206104-BT
25 Vordere Rolle 1 21 33-2325-06-SW
26 Seitenleiste links 1 21 36-2325-08-BT
27 Querstrebe 15x30x506mm 2 51 33-2025-03-SW
28 Gummiauage 490x30mm 2 27 36-1830-18-BT
29 Gummi-Pad 28x28mm 4 51 36-1830-19-BT
30 Hintere Rolle 1 51 33-2025-05-SW
31 Unterlegscheibe 8//14 3 32 39-9862
32 Innensechskantschraube M8x55 3 25+30 39-10056
33 Endkappe 1 51 36-2025-21-BT
34 Lauäche 1 30+47 36-2025-22-BT
35 Dämpfer Hinten 155x40x20 2 21 36-2325-09-BT
36 Seitenleiste rechts 1 51 36-2325-10-BT
Artikel:
Art.-Nr.:
Stand der technische Daten:
EIGENSCHAFTEN HINWEISE
L 151 x B 57 x H 14
25
100
220-240V/50-60Hz/750W
Stellmaß [cm]:
Gerätegewicht [kg]:
Benutzergewicht von max. [kg]
Elektrische Daten:
4Trainingsplatzbedarf [m2]:

10
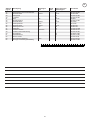
DE
Abb.- Nr. Bezeichnung Abmessung
mm Menge Montiert an
Abb. Nr. ET Nummer
37 Netzanschluss mit Hauptschalter 1 51 36-1970-09-BT
38 Sechskantschraube M6x40 2 44+21 39-9979-SW
39 Transportrolle 2 45 36-2025-26-BT
40 Laufbrett 1 51 36-2025-25-BT
41 Mutter M6 8 43+45 39-9861
42 Befestigungsring 8 37 36-2025-16-BT
43 Sechskantschraube M6x25 4 37+51 39-10029
44 Kreuzschlitzschraube 5x14 8 37 39-10188
45 Sechskantschraube M6x35 4 37+51 39-9979-VC
46 Selbstsichernde Mutter M6 2 38 39-9816-VC
47 Stabilisierung 1 20 33-2325-03-SW
48 Gummiauage 450x20x6 1 47 36-2325-11-BT
49 Armband Fernbedienung 1 36-2325-05-BT
50 Netzanschlusskabel 1 46 36-9836113-BT
51 Drehzahlsensor 1 52 36-2325-12-BT
52 Sensorhalter 1 8 33-2325-02-Si
53 Innensechskant-Schlüssel 6mm 1 36-9116-14-BT
54 Montage und Bedienungsanleitung 1 36-2325-13-BT
0 5 10 15 20 25 30 40 50 60 70 80 90 100

11
GB
CONTENTS
DEAR CUSTOMER,
we congratulate you on your purchase of this home training sports
unit and hope that we will have a great deal of pleasure with it.
Please take heed of the enclosed notes and instructions and
follow them closely concerning assembly and use. Please do not
hesitate to contact us at any time if you should have any
questions.
Top-Sport Gilles GmbH
ContentsPage
Attention!
Before use
read operating
instructions!
IMPORTANT RECOMMENDATIONS AND SAFETY INSTRUCTIONS
Our products are all TÜV tested and therefore represent the high-
est current safety standards. However, this fact does not make it
unnecessary to observe the following principles strictly.
1. Assembly the machine exactly as described in the installa-
tion instructions and use only the enclosed, specic parts of the
machine contained in the assembly. Before assembling, verify the
completeness of the delivery against the delivery notice and the
completeness of the carton against the installation and operating
instructions.
2. Check the rm seating o all screws, nuts and other connec-
tions before using the machine for the rst time and at regular
intervals (every 1-2 months) to ensure that the trainer is in a safe
condition. Replace defective components immediately and/or
keep the equipment put of the use until repair.
3. Set up the machine in a dry, level place and protect it from
moisture and water. Uneven parts of the oor must be compen-
sated by suitable measures and by the provided adjustable parts
of the machine if such are installed. Ensure that no contact occurs
with moisture or water.
4. Place a suitable base (e.g. rubber mat, wooden board etc.)
beneath the machine if the area of the machine must be specially
protected against indentations, dirt etc.
5. Leave at least 0.6 meter of free space around the treadmill at
the installation site and at least 2 meters to other objects such as
furniture or walls.
6. Do not use aggressive cleaning agents to clean the machine
and employ only the supplied tools or suitable tools of your own
to assemble the machine and for any necessary repairs. Remove
drops of sweat from the machine immediately after nishing
training.
7. Attention! Systems of the heart frequency supervision can be
inexact. Excessive training can lead to serious health damage or
to the death. Consult a doctor before beginning a planned training
programme. He can dene the maximum exertion (pulse, Watts,
duration of training etc.) to which you may expose yourself and
can give you precise information on the correct posture during
training, the targets of your training and your diet. Never train
after eating large meals.
8. Only train on the machine when it is in correct working
order. Use original spare parts only for any necessary repairs.
Attention! Replace the worm parts immediately and keep this
equipment out of use until repaired.
9. When setting the adjustable parts, observe the correct posi-
tion and the marked, maximum setting positions and ensure that
the newly adjusted position is correctly secured. Please remove
the tools you need to adjust after adjusting a new position.
10. Unless otherwise described in the instructions, the machine
must only be used for training by one person at a time. The exer-
cise time should not overtake 45 min./daily.
11. Wear training clothes and shoes which are suitable for tness
training with the machine. Your clothes must be such that they
cannot catch during training due to their shape (e.g. length). Your
training shoes should be appropriate for the trainer, must support
your feet rmly and must have non-slip soles.
12. Attention! If you notice a feeling of dizziness, sickness, chest
pain or other abnormal symptoms, stop training and consult a
doctor.
13. Never forget that sports machines are not toys. They must
therefore only be used according to their purpose and by suitably
informed and instructed persons.
14. People such as children, invalids and handicapped persons
should only use the machine in the presence of another person
who can give aid and advice. Take suitable measures to ensure
that children never use the machine without supervision.
15. Ensure that the person conducting training and other people
never move or hold any parts of their body into the vicinity of
moving parts.
16. At the end of its life span this product is not allowed to
dispose over the normal household waste, but it must be given to
an assembly point for the recycling of electric and electronic com-
ponents. You may nd the symbol on the product, on the instruc-
tions or on the packing. The materials are reusable in accordance
with their marking. With the re-use, the material utilization or the
protection of our environment. Please ask the local administration
for the responsible disposal place.
17. To protect the environment, do not dispose of the packaging
materials, used batteries or parts of the machine as household
waste. Put these in the appropriate collection bins or bring them
to a suitable collection point.
18. The maximum permissible load (=body weight) is specied
as 100 kg. Evaluate your body weight before you starting the
exercise.
19. If the power cord of this item is damaged, this must be re-
placed by the manufacturer or the customer service or with an
electrically certied person.
20. Do not leave the product switched on or in operation unat-
tended and secure unintentional use by unplugging the power
plug.
21. Declaration of Conformity
Manufacturer: Top-Sports Gilles GmbH, Friedrichstraße 55,
D-42551 Velbert. This product complies with the following
European directives and standards: 2014/30/EU (EMC), 2014/35/
EU (LVD), 2011/65/EG (RoHS) and EN ISO 20957-1:2013, EN
957-6: 2010 / A1:2014 (Home Sports).
22. The assembly and operating instructions are part of the
product to look at. If the product is sold or passed on, this
documentation must be included.
Important recommendations and safety instructions
Unpack and operation
Maintenance and adjusting
Computer manual
General training instructions
Parts List – Spare Parts List
Exploded drawing
11
12
13
14-15
16
17-18
35

12
GB
CHECKS AND HOW TO START
Note: Please keep the tool set and the instructions in a safe
place as these may be required for repairs or spare parts
orders becoming necessary later.
UNPACK AND OPERATION
Before usage, observe our recommendations and safety
instructions.
1. Remove small parts, loose packing material out of the box
and then take out with help of a second person the preassem-
bled frame of packaging. Put your hands below the main frame
(21) and take care of no squeezing.
UNPACK
1. When everything is in order, connect the power supply ca-
ble (50) with wall power (220-240V~50-60Hz) and socket on
the main switch (37) below the front frame.
2. The computer will show normal manual mode. Carefully re-
move the protective lm from the display. Insert the battery into
the remote control (49), observing the polarity. Press [ ] button
and after a 3 sec. Count Down the treadmill (34) start moving.
3. Start walking onto the walk surface (34) when speed is slowly
and follow the speed. Familiarize yourself with the machine at low
speed settings. Walk in the middle of the running surface (34).
Don’t step on the side foot rails (26+36). Only walk with look at the
computer (1) on the walkingpad during the walk. In emergency
case, step of the walkingpad lateral.
1. Turn o the walkingpad and dis-
connect the power cord.
2. Lift the walkingpad at the rear
end until the it stands on the front
transport rollers (39). So you can
easy move it.
3. Choose a dry indoor storage lo-
cation. You can store the walking-
pad lying down or leaning against
the wall in an upright position on the
stand up foots (19). Cover the device
to protect it from discoloration from
possible sunlight and dust.
TRANSPORT AND STORAGE
21
36
1
26
50 49
34
19
39 37

13
GB
Lubrication
In order to keep the machine in the best condition, please
add some Silicone oil between the running belt and the
running board after 50 hours of use. But the running belt
may slip, if you lubricate too much. To lubricate the belt
please pull the walking belt up and injection the silicon spray
or silicone oil into the gap between belt and walking deck.
(Attention: Too much lubricant can cause the tread to slip.)
Adjusting running belt
You need to adjust the walking belt to the normal position, per
the following steps if it is o. Set speed at 3-5km. Using the
Allen key to adjust the belt tension bolt on the end cap of the
system frame.
1. If you want to move the belt towards left, turn the right ten-
sion bolt clockwise.
2. If you want to move the belt towards right, turn the left ten-
sion bolt clockwise.
If you have already done according to the steps above and it
is still not at the good range, then the running belt should be
damaged already, please contact your local dealer for replace-
ment.
Note: Make sure that the running surface is as centered as
possible. Once these moves too far from the center, (about 10
mm) it should be readjusted into the center.
Running belt slips
a. The running surface is not properly tensioned. Slightly tight-
en both screws on the end caps.
b. Make sure the motor belt is not too loose.
c. Remove excess lubricant with a cloth.
No light on the Display
- Check whether the plug is in the socket and whether the
outlet has power.
- Check that the main switch on the base frame is switched on
and that the safety clip is correctly attached to the computer.
Attention! Always pull out the mains plug when checking the
computer plug connections.
Overload protection
The fuse compartment (A) is located between the main switch
and the mains connection socket for the main connection (37).
There is a microfuse 6,3x20mm with the data 5A/250V.
Abnormal noise from the machine:
- Check if any screw of machine is loose.
- Check if the motor belt is o.
- Check if the running belt is o.
Note: Please contact your local dealer if you have checked all
the above listed things but the problem is still there.
Cleaning
Use only a less wet cloth for cleaning. Caution: Never use
benzene, thinner or other aggressive cleaning agents for
surface cleaning as this damage caused. The device is only for
private home use and for use suitable indoors. Keep the unit
clean and moisture from the device.
MAINTENANCE AND ADJUSTING
1. 2.
a.
A
37

14
GB
COMPUTER MANUAL
DISPLAYS
KEYS:
RANGE OF ALL FUNCTIONS
START UP
PROGRAMS
[TIME] Display: Shows actually time of exercising in minutes
and seconds.
[SPEED] Display: Shows actually speed in km/h during exer-
cise mode. Shows programs P01-P06 in stop mode.
[DISTANCE] Display: Shows actually distance in Km.
[CALORIES] Display: Shows actually calories in kcal.
[P] Key: press this key to select
exercising speed programs P01-P6
[Start] Key: Press this key to start exercise pro-
gram. The runing surface starts delayed by 3
seconds.
[Stop/Pause] Key: Press this key during exer-
cise to interrupt the program (motor stops run-
ning). Within 5 min. you can press [Start] key to
continue this exercise program or press
[Stop/Pause] key again to nish this program.
Prevalues can set to zero by pressing the [Stop/
Pause] key.
[+] Key: Press this key to increase settings or
motor speed.
[-] Key: Press this key to decrease settings or
motor speed.
[M] Key: Press this key to select the time dis-
tance or calories in the manual program.
The walkingpad can only controlled with the supplied remote
control. The remote control requires a button cell type CR2032.
Insert the battery into the remote control, observing the polar-
ity. Guide the wristband through the two openings on the back
of the remote control to carry the remote control on your wrist
and to operate it. The range is approx.1.5m. If the remote con-
trol does not respond, rst change the battery.
Initial Initial
Value
Setting
Range
Display
Range
TIME (Min:Sec) 0:00 30:00 5:00-99:00 0:00-99:59
KM/H 0.0 N/A N/A 0.8-5.0
KM 0.00 1.00 0.5-65.0 0.00-99.99
CALORIES (Kcal) 0 50 10-995 0-999
Manual Program
1. Put in the AC cable (57) in wall power 230V~50Hz and put on
the power switch (46) and it will show normal manual mode.
2. Stand your feet on both side rails.
3. Press [ ] key to start with exercising. After a 3 sec. count down,
the motor begin to run slowly and you can step on the running belt
and follow the speed.
4. Adjust the speed with [+] and [-] keys into desired speed.
Time- Program:
On the normal manual mode, press [M] key, to enter time pro-
gram. The time display will ash and the initial value is 30:00.
Press [+] or [-] keys to set value. The range is: 5:00-99:00. Press
[] key to start the program. If set a value the display counts up till
zero and then stops running motor.
Distance- Program:
On the normal manual mode, press [M] key, to enter distance
program. The distance display will ash and the initial value is
1,00KM. Press [+] or [-] keys to set value. The range is: 0,5-65:0
KM. Press [ ] key to start the program. If set a value the display
counts up till zero and then stops running motor.
Calories- Program:
On the normal manual mode, press [M] key, to enter calories pro-
gram. The calories display will ash and the initial value is 50kcal.
Press [+] or [-] key to set value. The range is: 10-995kcal. Press [
] key to start the program. If set a value the display counts up till
zero and then stops running motor.

15
GB
On the normal manual mode, press [P] key to choose one of the 6 exercise speed programs. Each program is divided into 20 intervals
of time and the speed changes as following program list shows. Initial setting time is 30min, set a time for training session and press
[] key to start the program. If the program runs till end of time the motor will stop running after the display counts down time to zero.
Pressing [ ] key to nish earlier the program.
EXERCISE PROGRAMS P01-P06
Time Programs in 20 intervals of time
Program 1234567891011 12 13 14 15 16 17 18 19 20
P01 Km/h 12344432123444321232
P02 Km/h 22334455443322334433
P03 Km/h 12345432345432345432
P04 Km/h 12323434554343232123
P05 Km/h 22343233454332345432
P06 Km/h 12232334344543345543
Training area in mm
(for home trainer and user) Free area in mm
(Training area and security area (circulating 600mm))
TRAINING SPACE REQUIREMENT
570
1510
2200 2200
1770
2110

16
GB
You must consider the following factors in determining the amount of
training eort required in order to attain tangible physical and health
benets.
INTENSITY
The level of physical exertion during training must exceed the point of
normal exertion, without going beyond the point of breathlessness and/or
exhaustion. A suitable reference value can be the pulse. With each
training session, the condition increases and therefore the training
requirements should be adjusted. This is possible by extending the
duration of the training, increasing the level of diculty or changing the type of
training.
FREQUENCY
Most experts recommend the combination of a health-conscious diet,
which must be adjusted according to the training goal, and physical exer-
cise three to ve times a week. A normal adult needs twice a week exer-
cise to maintain its current condition. To improve his condition and change
his body weight, he needs at least three training sessions per week. Ideal
of course is a frequency of ve training sessions per week.
TRAINING PLAN
Each training session should consist of three training phases: „warmup
phase“, „training phase“ and „cool-down phase“. In the „warm-up phase“
the body temperature and the oxygen supply should be increased
slowly. This is possible through gymnastic exercises over a period of ve
to ten minutes. After that you start with actual training “training phase”.
The training load should be adapted according to the training heart
rate. In order to support the circulation after the training phase and to
preventaching or strained muscles later, it is necessary to follow the
training phase with a cool-down phase. This should be consist of
stretching exercises and/ or light gymnastic exercises for a period of ve
to ten minutes.
TRAINING HEART RATE
To determine the training heart rate, you can proceed as follows. Please
note that these are guide values. If you have health problems or are
unsure, consult a doctor or tness trainer.
Sample calculation
Male, 30 years old and weighs 80 kg. I am a beginner and would like
to lose some weight and increase my endurance.
01: Maximum pulse - calculation
Maximum heart rate = 214 - (0.5 x age) - (0.11 x body weight)
Maximum heart rate = 214 - (0.5 x 30) - (0.11 x 80)
Maximum pulse = approx. 190 beats/min
After you have set your training heart rate for your training condition
or Once you have identied goals, you can start training. Most of our
endurance training equipment have heart rate sensors or are heart rate
belt compatible. So you can check your heart rate on the monitor during the
workouts. If the pulse rate is not shown on the computer display or you want
to be on the safe side and want to check your pulse rate, which could be incor-
rectly displayed due to possible application errors or similar, you can use the
following tools:
a. Pulse measurement in the conventional way (sensing the pulse beat,
e.g. on the wrist and counting the beats within a minute).
b. Heart rate measurement with suitable and calibrated heart rate
measuring devices (available from medical supply stores).
c. Heart rate measurement with other products such as heart rate moni-
tors, smartphones....
01 Maximum heart rate calculation
The maximum pulse value can be determined in many dierent
ways, since the maximum pulse depends on many factors. You can
use the main-formula for the calculation (maximum heart rate = 220
- age). This formula is very general. It is used in many home sport
products to determine the maximum heart rate. We recommend the
Sally-Edwards-formula. This formula calculates the maximum heart rate
more precisely and takes gender, age and body weight into account.
Sally-Edwards-formula:
Men:
Maximum heart rate = 214 - (0.5 x age) - (0.11 x body weight)
Women:
Maximum heart rate = 210 - (0.5 x age) - (0.11 x body weight)
02 Training heart rate calculation
The optimal training heart rate is determined by the goal of the training.
Training zones were dened for this.
Health - Zone: Regeneration and Compensation
Suitable for: Beginners
Type of training: very light cardio training
Goal: recovery and health promotion. Building the basic condition.
Training heart rate = 50 to 60% of the maximum heart rate
Fat-Metabolism - Zone: Basics endurance training 1
Suitable for: beginners and advanced users
Type of training: light cardio training
Goal: activation of fat metabolism (calorie burning). improvement in
endurance performance.
Training heart rate = 60 to 70% of the maximum heart rate
Aerobic - Zone: Basics endurance training 1 to 2
Suitable for: beginners and advanced
Type of training: moderate cardio training.
Goal: Activation of the fat metabolism (calorie burning), improving
aerobic performance, Increase in endurance performance.
Training heart rate = 70 to 80% of the maximum heart rate
Anaerobic - Zone: Basics endurance training 2
Suitable for: advanced and competitive athletes
Type of training: moderate endurance training or interval training
Goal: improvement of lactate tolerance, maximum increase in perfor-
mance.
Training heart rate = 80 to 90% of the maximum heart rate
Competition - Zone: Performance / Competition Training
Suitable for: athletes and high-performance athletes
Type of training: intensive interval training and competition training /
Goal: improvement of maximum speed and power.
Attention! Training in this area can lead to overloading of the cardio-
vascular system and damage to health.
Training heart rate = 90 to 100% of the maximum heart rate
GENERAL TRAINING INSTRUCTIONS
Example - stretching exercises for the warm-up and cool-down
phases
Start your warm up by walking on the spot for at least 3 minutes and
then perform the following gymnastic exercises to the body for the
training phase to prepare accordingly. The exercises do not overdo it
and only as far run until a slight drag felt. This position will hold a while.
Reach with your left hand behind your head
to the right shoulder and pull with the right
hand slightly to the left elbow. After 20sec.
switch arm.
Bend forward as far forward as possible and
let your legs almost stretched. Show it with
your ngers in the direction of toe. 2 x 20sec.
Sit down with one leg stretched out on the
oor and bend forward and try to reach the
foot with your hands. 2 x 20sec.
Kneel in a wide lunge forward and support
yourself with your hands on the oor. Press
the pelvis down. Change after 20 sec leg.
MOTIVATION
The key to a successful program is regular training. You should set a xed
time and place for each day of training and prepare yourself mentally for
the training. Only train when you are in the mood for it and always have
your goalin view. With continuous training you will be able to see how you
are progressing day by day and are approaching your personal training
goal bit by bit.
02: Training heart rate calculation
Due to my goals and training level, the fat metabolism zone
suits me best.
Training heart rate = 60 to 70% of the maximum heart rate
Training heart rate = 190 x 0.6 [60%]
Training heart rate = approx. 114 beats/min

17
GB
• 1,0 HP Motor continuous (0,75Kw), maximum 1,5 HP Motor
Peak (1,0Kw)
• Speed from 0,8 km/h - 5 km/h (adjustable in 0,1 km/h steps)
• Manually program with targets of Time, Distance and Calories
• 6 installed programs with dierent speed
• Watch remote controller for easy handling
• 6 dampers for a comfortable walk
• LED Display showing: Time, Speed, Distance and approx.
Calories consumption
• Transport rollers for an easy and comfortable moving to lo-
cation
• Walking surface approx. L 120 x W 40 cm
Walking Pad 4.0
2325
Top-Sports Gilles GmbH
Friedrichstraße 55, 42551 Velbert
www.christopeit-sport.com
Telefon: +49 (0)20 51 / 60 67-0
Telefax: +49 (0)20 51 / 60 67-44
e-mail: [email protected]
Illustr.
No. Designation Dimension
mm Quantity Attached to
Illustration No. ET-Number
1 Display board 1 3 36-2325-03-BT
2 Overlay 1 3 36-2025-14-BT
3 Motor cover 1 20 36-2325-01-BT
4 Electric controller 1 21 36-2325-04-BT
5 Coil 1 21 36-2025-06-BT
6 Hex bolt M8x25 2 8 39-10455
7 Washer 8//16 4 6+11 39-9862-CR
8 Motor 1 21 33-2325-04-SI
9 Motor belt 140J 1 8+25 36-2025-32-BT
10 Nylon nut M8 1 6 39-9818-CR
11 Hex bolt M8x12 2 8 39-9922
12 Cross head countersunk screw M6x16 3 8+19 36-9841205-BT
13 Front foot bumper 155x40x30 2 21 36-2025-23-BT
14 Middle foot bumper 155x40x25 2 21 36-2325-06-BT
15 Cross head tapping Screw 4x12 2 47 36-9206104-BT
16 Rivet M6 14 17+18 36-2325-07-BT
17 Cross head tapping screw M6x16 2 33 39-10120-VC
18 Cross head tapping screw M6x35 12 13,14+35 39-10085
19 Plastic sleeve 2 3 36-2025-31-BT
20 Bottom cover 1 21 36-2325-02-BT
21 Main frame 1 33-2325-01-SW
22 Spring washer for M8 2 11 39-9864-VC
23 Spring nut 4.2 6 3 36-2025-27-BT
24 Cross head tapping screw 4x16 6 20 36-9206104-BT
25 Front roller 1 21 33-2325-06-SW
26 Side rail left 1 21 36-2325-08-BT
27 Reinforced tube 15x30x506mm 2 51 33-2025-03-SW
28 EVA pad adhesive 490x30mm 2 27 36-1830-18-BT
29 EVA bumper 28x28mm 4 51 36-1830-19-BT
30 Rear roller 1 51 33-2025-05-SW
31 Washer 8//14 3 32 39-9862
32 Inner hex screw M8x55 3 25+30 39-10056
33 End cover 1 51 36-2025-21-BT
34 Running belt 1 30+47 36-2025-22-BT
35 Rear foot bumper 155x40x20 2 21 36-2325-09-BT
36 Side rail right 1 51 36-2325-10-BT
L 151 x W 57 x H 14
25
100
220-240V/50-60Hz/750W
4
PARTS LIST – SPARE PARTS LIST
Type:
Order-Nr.:
Date of technical data:
Dimensions approx: [cm]:
Weight approx. [kg]:
Load max. (User weight) [kg]:
Electrical data:
Space requirements [m2]:
Please contact us if any components are defective or missing, or
if you need any spare parts or replacements in future.
This product is created only for private Home sports
activity and not allowed to us in a commercial or
professional area. Home Sport use class H/C.
FEATURES NOTE
05.07.2023

18
GB
Illustr.
No. Designation Dimension
mm Quantity Attached to
Illustration No. ET-Number
37 AC socket with switch 1 51 36-1970-09-BT
38 Hex bolt M6x40 2 44+21 39-9979-SW
39 Transportation wheel 2 45 36-2025-26-BT
40 Running board 1 51 36-2025-25-BT
41 Nut M6 8 43+45 39-9861
42 Fastener ring 8 37 36-2025-16-BT
43 Hex bolt M6x25 4 37+51 39-10029
44 Cross head tapping screw 5x14 8 37 39-10188
45 Hex bolt M6x35 4 37+51 39-9979-VC
46 Nylon nut M6 2 38 39-9816-VC
47 Reinforce tube 1 20 33-2325-03-SW
48 EVA pad adhesive 450x20x6 1 47 36-2325-11-BT
49 Watch Controller 1 36-2325-05-BT
50 AC cable 1 46 36-9836113-BT
51 Speed sensor 1 52 36-2325-12-BT
52 Speed sensor holder 1 8 33-2325-02-Si
53 Allen tool 6mm 1 36-9116-14-BT
54 Assembly and exercise instruction 1 36-2325-13-BT
0 5 10 15 20 25 30 40 50 60 70 80 90 100

19
F
SOMMAIRE
CHÈRE CLIENTE, CHER CLIENT,
Nous vous félicitons pour l’achat de ce cycle d’entraînement
intérieur et nous vous souhaitons beaucoup de plaisir avec.
Veuillez respecter et suivre les indications et les instructions de
montage et d’emploi. Si vous avez des questions, vous pouvez
bien sûr vous adresser à nous.
Top-Sport Gilles GmbH
ContenuPage
Respect!
Avant utilisation
Lisez les instruc-
tions d’utilisation!
RECOMMANDATIONS IMPORTANTES ET CONSIGNES DE SÉCURITÉ
Nos produits sont systématiquement soumis au contrôle TÜV et
sont ainsi conformes aux normes de sécurité actuelles les plus
élevées. Cependant, cela ne dégage pas de l’obligation de suivre
strictement les indications suivantes.
1. Monter l’appareil en suivant exactement les instructions de
montage et n’utiliser que les pièces spéciques à l’appareil et
ci-jointes pour le montage de l’appareil. Avant le montage en
lui-même, contrôler l’intégralité de la livraison à l’aide du bon
de livraison et l’intégralité des emballages en carton à l’aide de
la instructions de montage dans les instructions de montage et
d’utilisation.
2. Avant la première utilisation et à intervalles réguliers (tous les
1 à 2 mois), contrôler si tous les écrous, vis et autres raccords
sont bien serrés, an d’assurer un état de service sûr de l’appa-
reil d’entraînement. Veillez à remplacer ou à enlever immédiate-
ment les pièces défectueuses. Interdire l’accès à l’appareil, le cas
échéant.
3. Mettre en place l’appareil à un endroit sec et plan, et le
protéger contre l’humidité. Les inégalités du sol doivent être
compensées par des mesures appropriées et par les pièces
réglables de l’appareil, prévues à cet eet, si présentes. Il faut
exclure tout contact avec l’humidité et l’eau.
4. Dans la mesure où le lieu de montage doit être protégé contre
des points de pression, des saletés ou autres, prévoir un support
antidérapant (p. ex. tapis en caoutchouc, plaque en bois etc.)
sous l’appareil.
5. Laissez un espace d’au moins 0,6 mètre autour du tapis rou-
lant et d’au moins 2 mètres derrière le tapis roulant.
6. Pour nettoyer l’appareil, ne pas utiliser de détergents
agressifs, et pour le montage ainsi que d’éventuelles réparations,
n’utiliser que les outils fournis ou des outils appropriés. Les traces
de sueur sur l’appareil doivent être enlevées tout de suite après
l’entraînement.
7. Respect! Des systèmes de la fréquence de coeur peuvent
être inexacts. Le fait de s‘entraîner excessif sait dommage
de santé sérieux ou mènent vers la mort Un entraînement
inadapté ou excessif peut entraîner des risques pour la santé.
C’est pourquoi, avant de commencer un entraînement précis, il
faut consulter un médecin. Ce dernier peut dénir les sollicitations
maximales (pouls, watts, durée d’entraînement etc.) auxquelles
on peut se soumettre, et donner des renseignements exacts sur
les conditions de l’entraînement, les objectifs et l’alimentation. Il
ne faut pas s’entraîner après un repas lourd.
8. Ne s’entraîner avec l’appareil que lorsque celui-ci est en par-
fait état de fonctionnement. Pour les réparations éventuelles,
n’utiliser que des pièces de rechange originales. Respect! Si des
parties sont excessivement chaudes à l‘utilisation de l‘appareil
ils remplacent immédiatement celui-ci et sûr cet équipement de
l‘utilisation jusqu‘à réparé.
9. Pour le réglage des pièces, faire attention à régler la bonne
position ou la position de réglage maximale marquée, et à
bloquer correctement la nouvelle position réglée.
10. Si rien d’autre n’est indiqué dans le mode d’emploi, l’appareil
ne doit être utilisé que par une personne pour l’entraînement. Le
temps d‘entraînement ne devait pas dépasser au total 45 Min./
chaque jour.
11. Il faut porter des vêtements et des chaussures adaptés à un
entraînement tness avec l’appareil. Les vêtements doivent être
conçus de manière à ce que de par leur forme (p. ex. longueur),
ils ne puissent pas rester accrocher pendant l’entraînement.
Les chaussures d’entraînement doivent être choisies en
fonction de l’appareil, doivent systématiquement bien tenir le
pied et posséder une semelle antidérapante.
12. Respect! Si des sensations de vertige, des nausées, des
douleursdans la poitrine ou d’autres symptômes anormaux se
font sentir, arrêter l’entraînement et consulter un médecin adapté.
13. Il faut savoir que les appareils de sport ne sont pas des
jouets. C’est pourquoi, ils ne doivent être utilisés que de manière
conforme à l’emploi prévu et uniquement par des personnes
informées et initiées en conséquence.
14. Les personnes, telles que les enfants, les invalides ou
les handicapés, ne doivent utiliser l’appareil qu’en présence
d’une autre personne qui peut fournir son aide ou donner des
instructions. Il faut exclure l’utilisation de l’appareil par des
enfants sans surveillance, par des mesures appropriées.
15. Il faut faire attention à ce que la personne qui s’entraîne, ainsi
que d’autres personnes, ne se trouvent jamais dans la zone des
pièces encore en mouvement.
16. Ce produit ne peut pas être enlevé les déchets à la n
de sa durée de vie sur les déchets budgétaires normaux, main
doit être livre à un point collectif pour le recyclage des appareils
électriques et électroniques. Le symbole sur le produit du mode
d’emploi ou de l’emballage fait rem arguer sur cela.
17. Les matériaux d’emballage, les piles vides et les pièces de
l’appareil doivent être évacués en respectant l’environnement,
pas avec les ordures ménagères, mais dans les containers de
collecte prévus à cet eet, ou remis aux services de collecte
adaptés.
18. La charge (=poids) maximale admise a été xée à 100 kg.
Avant de commencer l’entraînement, assurez-vous de ne pas
dépasser le poids total admissible.
19. Si le câble d’électrique de cet appareil est endommagée,
celui-ci doit être remplacé par le fabricant ou le service de client
ou par une personne électriquement qualiée.
20. Ne laissez pas le produit allumé ou en fonctionnement
sans surveillance et sécurisez toute utilisation involontaire en
débranchant la che d’alimentation.
21. Déclaration de conformité
Fabricant : Top-Sports Gilles GmbH, Friedrichstraße 55, D-42551
Velbert. Ce produit est conforme à ce qui suit directives et normes
européennes: 2014/30/EU (EMC), 2014/35/EU (LVD), 2011/65/
EG (RoHS) et EN ISO 20957-1:2013, EN 957-6:2010 / A1:2014
(Homesport).
22. Les instructions de montage et d‘utilisation doivent être
considérées comme faisant partie du produit. Cette documen-
tation doit être fournie lors de la vente ou du passage du produit.
Recommandations importantes et consignes
de sécurité
Déballer et mettre en service
Maintenance et réglages
Description de l’ordinateur
Consignes générales de formation
Liste des pièces- Liste des pièces de rechange
Dessin éclaté
19
20
21
22-23
24
25-26
35

20
F
CONTRÔLE ET MISE EN MARCHE
Remarques: Veuillez conserver soigneusement le jeu d’outils
ainsi que les instructions de montage dont vous aurez évent-
uellement besoin ultérieurement pour eectuer les réparations
nécessaires et commander le pièces de rechange.
DÉBALLER ET METTRE EN SERVICE
Veillez à respecter nos recommandations et consignes de
sécurité avant utilisation
1. Retirez les petites pièces et le matériel d‘emballage en
vrac hors de la boîte, puis sortez le walkingpad avec l‘aide
d‘une deuxième personne. Saisir sous le cadre de base (21)
et faire attention à tout risque d‘écrasement
DÉBALLER
1. Si tout va bien, branchez le cordon d’alimentation (50)
dans une prise correctement installée (220-240V~ 50-60Hz)
et activez l’interrupteur principal (37) en bas à l’avant de l’ap-
pareil de base.
2. L’ordinateur achera le mode manuel normal. Retirez déli-
catement le lm protecteur de l’écran. Insérez la pile dans la
télécommande (49) en respectant la polarité. Appuyez sur le
bouton [ ] et après 3 sec. comptez à rebours le tapis roulant
(34) commence à bouger.
3. Commencez à marcher sur la surface de marche (34) lorsque
la vitesse est lente et suivez la vitesse. Familiarisez-vous avec
la machine à basse vitesse. Marchez au milieu de la surface
de course (34). Ne marchez pas sur les repose-pieds latéraux
(26+36). Ne marchez qu’en regardant l’ordinateur (1) sur le tapis
de marche pendant la marche. En cas d’urgence, pas du tapis de
marche latéral.
1. Éteignez le tapis de marche et
débranchez le cordon d’alimenta-
tion.
2. Soulevez le tapis de marche
uniquement à l’arrière jusqu’à ce que
le tapis de marche se trouve sur les
rouleaux de transport avant (39). se
tient debout et est facile à déplacer.
3. Choisissez un endroit de stock-
age intérieur sec. Vous pouvez
ranger le tapis de course allongé
ou appuyé contre le mur en position
verticale à l‘avant (19). Couvrez l‘ap-
pareil pour le protéger de la décolor-
ation due au soleil et à la poussière.
TRANSPORT ET STOCKAGE
21
36
1
26
50 49
34
19
39 37
Seite wird geladen ...
Seite wird geladen ...
Seite wird geladen ...
Seite wird geladen ...
Seite wird geladen ...
Seite wird geladen ...
Seite wird geladen ...
Seite wird geladen ...
Seite wird geladen ...
Seite wird geladen ...
Seite wird geladen ...
Seite wird geladen ...
Seite wird geladen ...
Seite wird geladen ...
Seite wird geladen ...
Seite wird geladen ...
-
 1
1
-
 2
2
-
 3
3
-
 4
4
-
 5
5
-
 6
6
-
 7
7
-
 8
8
-
 9
9
-
 10
10
-
 11
11
-
 12
12
-
 13
13
-
 14
14
-
 15
15
-
 16
16
-
 17
17
-
 18
18
-
 19
19
-
 20
20
-
 21
21
-
 22
22
-
 23
23
-
 24
24
-
 25
25
-
 26
26
-
 27
27
-
 28
28
-
 29
29
-
 30
30
-
 31
31
-
 32
32
-
 33
33
-
 34
34
-
 35
35
-
 36
36


Christopeit Sport Walking Pad 4.0 Benutzerhandbuch
- Typ
- Benutzerhandbuch
in anderen Sprachen
Verwandte Artikel
-
 Christopeit Sport Laufband CS 4000 Benutzerhandbuch
-
 Christopeit Sport Laufband CS 4000 mit Gestensteuerung Benutzerhandbuch
-
 Christopeit Sport Laufband TM 2400 S mit Gestensteuerung Benutzerhandbuch
-
 Christopeit Sport Ergometer AX 4000 Benutzerhandbuch
-
 Christopeit Sport Laufband TM 3000 S mit Gestensteuerung Benutzerhandbuch
-
 Christopeit Sport Crosstrainer-Ergometer AX 8000 Benutzerhandbuch
-
 Christopeit Sport Sitz-Ergometer RS 3 Benutzerhandbuch
-
 Christopeit Sport Racer Bike 4.0 Benutzerhandbuch
-
 Christopeit Sport EM 8 Bedienungsanleitung
-
 Christopeit Sport EM 3 Bedienungsanleitung


