City Theatrical CS-WP3 Bedienungsanleitung
- Typ
- Bedienungsanleitung

Product Instruction
Model:CS-WP3
Please read the instruction carefully before using
V2021.0.1

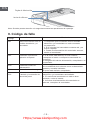
Catalog
1.Security Precautions........................................................... 1
2.Warranty Commitment......................................................... 2
3.Configuration List and Technical Parameters..................... 2
4.Product Structure................................................................ 3
5.Assembly Instructions......................................................... 3
6.Functional Operation Instructions........................................ 5
7.Warm-up Exercise............................................................... 7
8
9
.Maintenance Guide............................................................... 9
.Error Code........................................................................... 11

-1-
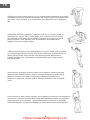
Thank you for purchasing our product, which will help to improve your health.
1. Safety Precautions
In order to ensure your safety and avoid accidents, please read the instructions carefully
before use.
This product is an indoor household equipment, please do not modify it for use or outdoor use,
treadmill placement should be placed flat and clean. Do not place it in a thick carpet or near the
water position. Treadmill should have a security distance of 1000 x 1000mm behind, as well as
500mm left and right for free safety area.
This product is intended for adult use, and minors need to have adult escort when use. It is
prohibited in use by persons who are physically unwell or mentally defective and who lack common
sense, unless they are under the supervision or guidance of a person responsible for their safety
regarding the use of the product.
If the power cable is damaged, it must be replaced by the manufacturer or professional service
personnel to avoid danger.
This product is only used at 220V-240V AC voltages. Please use a power outlet in a safe ground.
Ground plug installation and grounding must be consistent with the user's reference to the area.
If the plug and socket are not compatible, please arrange for qualified electricians or after-sales
persons to handle.
Check all components before use to make sure that the screws and nuts are locked.
Wear comfortable tight clothing when using in order to avoid being hooked by the machine. Do
not let children or pets get near in case of accidents.
Avoid all moving parts with both hands and do not place hands and feet in the space below the
running belt.
This product is suitable for home use, not suitable for professional training and testing, and cannot
be used for medical purposes.
The heart rate display of this product does not provide data for clinical medicine.
This product is available for one person only when it is running.
Shut down and unplug before cleaning and maintenance.
Please turn off and unplug when someone left.
Please use the original supplied accessories, it is strictly prohibited to replace.
The product is HC-level and the maximum weight of the user is 110kg.

-2-
2. Warranty Commitment
We make sure that the product is made of high quality materials.
In normal use, if there is a problem and we will be responsible for the warranty.
.
The warranty is 1 year (from the date of purchase), and if you have quality issues with your purchase,
please contact our customer service within 12 months and do not handle it without permission.
The following conditions are not covered by the warranty:
Damage Caused by External Causes.
Use Non-Original Accessories.
Handle Itself Incorrectly.
Do not Follow the Instructions.
This warranty promises to be valid for private use only for the family and not for professional training such
as gyms.
If you need to purchase non-warranty accessories, please contact customer service. Please provide
the following information at the time of ordering:
Instructions.
Product Model.
Accessory Serial Number.
Proof of Purchase Date.
Please do not send the product back to our company without the confirmation of customer service.
If without permission, our company does not bear any costs.
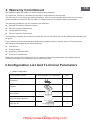
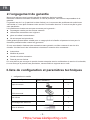
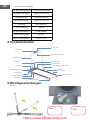
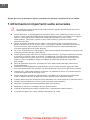
3.Configuration List And Technical Parameters
1. Model Configuration
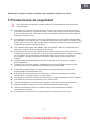
Configuration Name A Brief Diagram (for Reference) Qty.
Treadmill 1
Shaker 1
Instructions
Inner HexagonSpanner 1
1
Silicone Oil 1

-3-
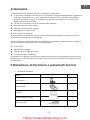
2. Technical parameters
Product Configuration Technical Parameters
Package Size 1450*735*150 mm
Folding Size 1390*676*120 mm
Group Size 1340*676*1018 mm
Running Area 430*1080 mm
Rated Function 440 W
Speed Range 1.0-8.0 KM/H
110 KG
26.6 / 31 KG
Maximum Load
Net / Gross Weight
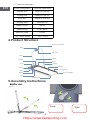
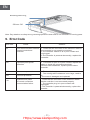
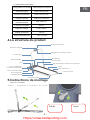
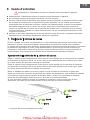
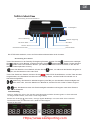
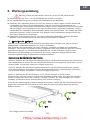
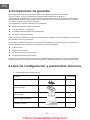
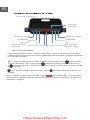
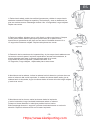
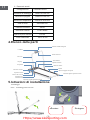
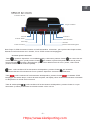
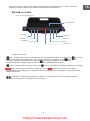
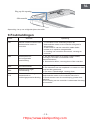
4.Product Structure
Assembly steps
Step 1:
Loose
Tight
Display
Hi-Fi
Motor
Pillar
Motor
Column
Foot Edge Strip
Running
Shaker
Emergency Stop Button
Rear Corner Right
Rear Corner left
Safety Lock
Meter
Column
Refueli
Lock
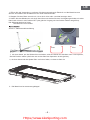
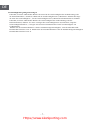
5.Assembly Instructions

-4-
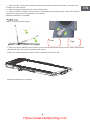
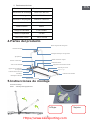
1Open the box, remove the relevant accessories and the machine from the box, and place the
machine on a flat surface.
2Fold the risepipe upward until it can't move forward.
3With one hand to hold the column tube, one hand will lock the switch back, hit the OFF position
(the left and right side of the operation is the same).
1.With one hand to hold the column tube, and one hand will lock the switch forward, hit the ON position
(the left and right side of the operation is the same).
2.With your hand holding the column tube to fold back, so that it is flat.
3Machine assembly is complete!
Machine assembly is complete!
Step 1: Column armrest folding
Loose
Tight

-5-
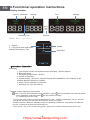
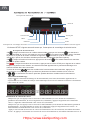
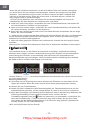
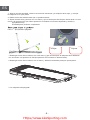
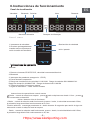
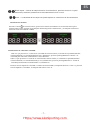
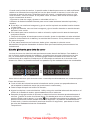
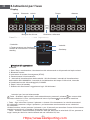
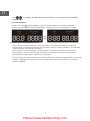
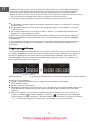
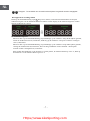
6.Functional operation instructions
Display window
Shaker Panel (Optional)
Instructions Operation
Function:
1: The Remote Control Or Keyboard Keys Start/Stop, Speed+/Speed-
2: Bluetooth Music.
3 Emergency Stop SwitchSTOP).
4: Pause In Operation.
5: Speed Display 1.0-8.0 km, Calories Display 0001-9999KCAL,Time Display 01-99
Minutes,Mileage Display 0.01-99KM.
6: Sleep Time In Standby Is 5 Minutes
7: Refueling Tip: Tips Per 100 km.
Remote Control Operating Instructions
+ Key: Each click of the key during the operation, the + speed increases by 0.5 km, and the
long press and key can increase continuously at 0.5 km speed.
Another function: Machine standby unlock no operating conditions, long press and hold the
key for 10 seconds to clear the refueling icon.
- Key: Press - Key, 0.5 km less, long press - key can be reduced continuously at 0.5 km.
(i.e. start/stop function loop)
Key: The host in the standby unlock condition, press the key machine from the low speed
1.0 km operation, and then press the key machine to stop.
SpeedCaloriesTime Mileage
Bluetooth
Refueling Tips Infrared
Speed -
1. Speed +
2. Long Press And Hold Under
Standby Derefueling Tips Start/Stop

Key: The machine in the standby unlock condition, press the key machine from the low speed
1.0 km operation, and then press the key machine pause, pause during the pause key light
continues to flash. (I'm starting/pausing the function loop, where you can save the current data).
- 6 -
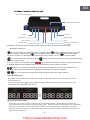
Key Function Description
Description of Function
Phone placement slot
Speed +
Speed-
Start / Pause
Safety lock
Speed 6KMSpeed 3KM
Stop
Emergency ammonium
key (STOP
Description: The STOP font continues to flash when the safety lock switch does not snap.
Key: The machine is in operation, press the key machine to slowly stop during operation until the
machine stops running.
Key: The machine is in operation, press the key STOP font flashes, and the key light is turned off,
a crossbar appears on the display panel, and the machine is down within 6 seconds.
Shortcut: The machine is operating, slowly rising (or falling) from the current speed to 3 km
or 6 km, when the machine is in operation, pressing the 3 or 6 key operation.
Key: The machine can adjust the speed and slow under the health condition.
Start-up Instructions
Note: Make sure that the meter's safety lock switch is in the suction state before use, otherwise it will
not be switched on.
Press the rocker start key , display digital tube lamp from the bottom up in turn appear three bars,
the machine at 1.0KM speed Start the run.
Speed Control Instructions
Each time you press the remote control speed (or instrument button) + button during operation, the
speed increases by 0.5 kilometers; long press the speed + button to increase continuously at 0.5 kilometers.
Each time you press the speed of the remote control (or the instrument button) during operation-the
button decreases the speed by 0.5 kilometers; long press the speed-the button continuously decreases at
a speed of 0.5 kilometers.

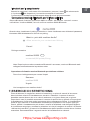
7.Warm-up Exercise
Shutdown Instructions
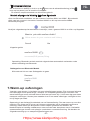
Mobile Bluetooth Music Connection Operation
Press the instrument speed shortcut key 3 when running, the machine runs at 3KM / H;
press the instrument speed shortcut key 6, the machine runs at 6KM / H.
Open the Bluetooth search address from maxfree 00001 to 65000 numbers: for example: search
for the number in the address "maxfree 00008", click on the maxfree 00008 Bluetooth icon
The machine is in operation, press the rocker key (or the key on the meter),
the machine stops running.
The machine runs for 99 minutes and automatically shuts down
If the next step is paired or the password appears, just enter 0000 and click on the pair.
Pairing success
Note: Bluetooth music will be automatically connected next time after the
first connection to bluetooth
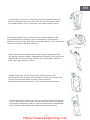
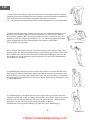
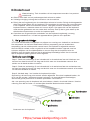
Before exercise, it's best to do stretching, and a successful exercise plan must include warm-up,
aerobics, and soothing exercises. The number of exercises is performed at least two or three
times a week, one day off, and after a few months, you can increase the number of exercises to
four to five days a Week.
Warming is an important part of your fitness exercise, warm up before each exercise, moderate
warm-up will allow your body to prepare for the next more intense exercise, because warm-up
can help the muscle warm up and stretch, improve blood circulation to improve the pulse, more
oxygen into the muscle. After aerobic exercise, repeated warm-up exercise can also reduce
muscle soreness. The following warm-up and soothing exercises are recommended.
Mobile phone Bluetooth music release operation
Click on the link to find Unpair
Do you want to pair with maxfree-Audio?
Want to pair with maxfree-Audio?
Cancel Yes
maxfree 00008
Remame
Unpair
maxfree 0008
connected/full power/Using
Allow access to your contacts and history
SBC
- 7 -

1.Stretch down: knees curl, body slowly bending forward,Relax your
back and shoulders and touch your toes as much as possible with
your hands.Hold for 10 to 15 seconds, then relax. Repeat 3 times.
2.Hamstring stretch: Sit on a clean cushion and straighten one leg.
To hold the other leg inward so that it is attached to a straight leg.
Medial. Try to touch your toes with your hands. Hold for 10 to 15 seconds,
Then relax. Repeat 3 times for each leg.
3.Calf and hamstring stretch: body forward, hands against the wall,
The left leg is bowed forward. Straighten the right leg, his left leg on the
ground;Then bend your left leg, hold for 10 to 15 seconds, and then
relax. Each leg is remade 3 times.
4.Head movement : tilt your head to the right and feel the left
stretching the neck muscles; then turning your head to the rear of the
second;Turn the head to the left again and count three;
Drop back to the chest count four. Then relax and repeat 3 times.
5.Waist movement: Stretch your arms to the left and right, then slowly
Lift up, raise it above your head. Put your right arm as far as possible
to the ceiling Straighten, hold for 1 second, and feel the stretchofness
of your right muscle. Repeat the same action with the left arm.
Figure 1
Figure 2
Figure 3
Figure 4
Figure 5
- 8 -

-9-
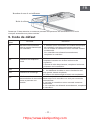
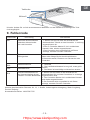
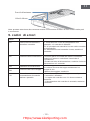
8. Maintenance Guide
1、Adjusting The Running Belt
Adjusting The Running Belt Method
tight
loose
loose
Warning Always unplug the walker before maintaining the appliance.
Use a cloth to clean the surface of the appliance.
Full cleaning will extend the life of the machine.
Regularly remove dust to keep parts clean, sweeping both sides of the running belt and exposing
the exposed parts, which will reduce the accumulation of impurities in the running belt. Keep your
sneakers clean and avoid carrying foreign objects under the running belt, wearing the running
board and running belt. The surface of the running belt should be scrubbed with a damp cloth
coat coat edgy with soap, be careful not to spill water on the electrical components and under
the running belt.
Step 1: Insert the 5mm hex wrench into the adjustment screw on the left side of the running belt
and rotate the wrench clockwise 1/4 turn to adjust the rear roller to tighten the running belt.
Step 2: Insert the 5mm hex wrench into the adjustment screw on the right side of the running belt
and rotate the wrench clockwise 1/4 turn to adjust the rear roller to tighten the running belt.
Step 3: Repeat steps one and two until the running belt does not slip.
Note that the running belt cannot be adjusted too tightly. This will pull the running belt, increase
the pressure of the front / rear drum, the drum bearings, etc. bring damage, produce a different
sound or other problems.
If you want to reduce the tension of the running belt, rotate the wrench counterclockwise, noting
that the left and right sides rotate the same distance.
The running belt is adjusted to the center
If you appear to be running with slips or is not smooth when using a walking machine, you can
adjust the tightness of the running belt to improve.
Adjusting running has two functions: loose adjustment and center of the running belt. The
running belt is already adjusted at the factory, but after use, the running belt will be stretched
and will deviate from the center of the running band to rub the foot edge and the rear cover
and damage. It is normal for the running belt to be stretched during use.
Check and lock all parts of the treadmill frequently, replace those defective parts and/or leave
the equipment idle for repair.
tight

- 10 -
2.Walker and Oiling
When you use a walking machine, because the force of both feet is not the same when running,
the pressure on the running belt is unbalanced, causing the running belt to deviate from the
center. This deviation is normal, and when no one runs in the running, it returns to the center.
If you can't get back to the center, you'll need to bring the running belt back to the center.
1Run the machine empty and set the speed to 6km/H.
2. Observe the distance from the run to the left and right bars.
3.adjust the running to the middle, the speed to high speed, and observe the deviation of the
running belt and running smoothness, if there is a deviation, repeat the adjustment step.
The walker has been pre-added with lubricant before the factory. However, due to the friction
between the running belt and the running board has a great impact on the service life and
performance of the product, it is necessary to add lubricant according to the machine prompt.
Whenever the accumulated mileage of the walk-off machine reaches 50KM, the display will
appear red refueling to provide a display.
Note: Please use treadmill-specific lubricants or contact our company directly.
Cut the seal of the inner mouth of the oil bottle and cut the cap of the bottle open a small
mouth (can be smoothly squeezed out);
Turn the filling hole plug;
Turn the machine to 1KM speed, the bottle port is aimed at the fuel pipe hole to squeeze out
the right amount of oil, about 20 ml a time;
After adding the silicone oil, the machine runs for about 3 minutes. After the silicone oil is
evenly distributed to the running belt, press the remote control button (or the button on
the instrument) to stop, and then long press the remote control + button for 10 seconds
(or the keyboard simultaneously press the plus button and (Press and hold the speed 6 button
for 10 seconds) Cancel the refueling prompt icon.
Finished!
Refueling Operation:
4.If the above steps do not work, you need to tighten the running belt again.
Warning! Do not overtighten the drum! This will result in permanent damage to the bearings!
If to the left, use a hex wrench and turn the left screw 1/4 turn clockwise
If to the right, use a hex wrench and turn the right screw 1/4 turn clockwise
If the running belt is still not in the middle, repeat the above action until adjusted to the middle
Refueling

- 11 -
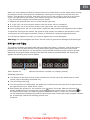
9. Error Code
Note: Pay attention to safety during refueling operations and hand is not accessible to moving parts.
Fault code
E01
E02
E05
E06
E10
Poor communication between
electronic watch and
controller
Explosion-proof punch
protection
Over-current protection
Overload protection
Keyboard and panel
on-control connection
communication failure
1The motor is open or in poor contact, replace the
motor or check the connection terminals.
2.Power tube breakdown, replace power tube or
controller.
1The load is heavy.
2The running table resistance is too large, need to
oil.
3.The motor is damaged and replaced.
1. Check that the connector of the electronic watch
and the controller is not connected properly.
2 . The controller plug is in poor contact and
re-plugged.
3. The controller is powered abnormally, replace the
controller.
1. Check that the connector of the electronic table to
the controller is not properly connected.
2.The controller master IC is in poor contact and
re-plugged.
3.The controller is powered abnormally, replace the
controller.
Cause Solution
Refueling Hole Plug
Silicone Oil


Sommaire
1.Précautions de sécurité.....................................
...........................................
.................. 1
2.Engagement de garantie ............ 2
3.Liste de configuration et paramètres techniques ................ 2
4. Structure du produit ............................................................ 3
5.Instructions de montage .................................................... 3
6.Instructions de l’opération.......................................... ........ 5
7.Exercice d'échauffement ....................................................... 7
8.Guide de maintenance ....................................................... 9
9. Code d'erreur ................................................ ..................... 11

Merci d’acheter nos produits vous aideront à améliorer votre santé.
1.Précautions de sécurité
Pour assurer votre sécurité et éviter les accidents, lisez attentivement l’instruction avant
l’utilisation.
Ce produit est un équipement ménager d’intérieur, ne le modifient pas pour une autre utilisation ou
à l’extérieur, Le placement de tapis de course doit être plat et propre. Ne la placez pas sur un tapis
épais ou un lieu près de l'eau. Il doit y avoir 1000 * 1000 mm derrière le tapis de course et 500 mm
des deux côtés de la zone de sécurité sans obstacle.
Ce produit est destiné à l’usage adulte, les mineurs doivent être accompagnés d'un adulte. Il est
interdit à ceux qui ne se sentent pas bien ou mentalement affaiblis et manquent de bon sens. À
moins qu’ils ne soient sous la supervision ou les conseils d’une personne responsable de sa
sécurité en ce qui concerne l’utilisation du produit.
Si le cordon d’alimentation est endommagé, il doit être remplacé par le fabricant ou le personnel
de service professionnel pour éviter le danger.
Ce produit est uniquement utilisé pour une tension de 220V-240VAC. Veuillez utiliser une prise
de courant avec une terre de sécurité. L'installation et la mise à la terre de la fiche doivent être
conformes aux paramètres de la zone d'utilisation de l'utilisateur. Si la fiche et la prise ne sont
pas compatibles, veuillez demander à un électricien qualifié ou au personnel après-vente de
s'en occuper.
Vérifiez tous les composants avant utilisation pour vous assurer que les vis et les écrous sont
verrouillés.
Portez des vêtements serrés confortables lors de l’utilisation pour éviter d’être accroché par la
machine. Ne laissez pas les petits enfants ou les animaux de compagnie s’approcher pour
éviter les accidents.
Évitez toutes les pièces mobiles avec les deux mains et ne placez pas les mains et les pieds
dans l’espace sous la ceinture de course.
Ce produit est adapté à l’usage à domicile, ne convient pas à la formation professionnelle et
aux tests, et ne peut pas être utilisé à des fins médicales.
L’affichage de fréquence cardiaque de ce produit ne fournit pas de données pour la médecine
clinique.
Ce produit n’est disponible pour une seule personne que lorsqu’il est en cours d’exécution.
Arrêt et débrancher avant le nettoyage et l’entretien;
S’il vous plaît éteindre la machine et débrancher quand quelqu’un part.
S’il vous plaît utiliser les accessoires fournis d’origine, est strictement interdit de remplacer.
Le produit est de classe HC et le poids maximum de l’utilisateur est de 110kg.
-1 -

-2-
2.l’engagement de garantie
Nous nous assurons que le produit est fait de matériaux de haute qualité.
Dans des conditions normales d'utilisation, en cas de problème, nous serons responsables de la
garantie.
La garantie est de 1 an (à partir de la date d’achat), et si vous avez des problèmes de qualité avec
votre achat, s’il vous plaît contacter notre service à la clientèle dans les 12 mois et ne pas le gérer
sans permission.
Les conditions suivantes ne sont pas couvertes par la garantie :
.
Dommages causés par des causes externes.
Utilisez des accessoires non originaux.
gérer soi-même incorrectement.
Ne suivez pas les instructions.
Cette garantie promet d’être valable pour un usage privé et la famille uniquement et non pour la
formation professionnelle comme les gymnases.
Si vous avez besoin d’acheter des accessoires sans garantie, veuillez contacter le service à la
clientèle. Veuillez fournir les informations suivantes au moment de la commande :
Instructions.
Modèle de produit.
Numéro de série accessoire.
Date de preuve d’achat.
S’il vous plaît ne pas renvoyer le produit à notre entreprise sans la confirmation du service à la clientèle,
si vous renvoyez le produit sans permission, notre société ne supporte aucun coût.
3.liste de configuration et paramètres techniques
1. configuration du modèle
Nom de configuration Un bref diagramme
(pour référence) Nombre
Tapis de course 1
Télécommande
1
Instructions
Clé hexagonale intérieure 1
1
Huile de silicone 1

-3-
2. paramètres techniques
Configuration du produit Paramètres techniques
Taille du paquet 1450*735*150 mm
Dimensions pliantes 1390*676*120 mm
Taille du groupe 1340*676*1018 mm
Zone de
fonctionnement 430*1080 mm
Fonction nominale 440 W
Plage de vitesse 1.0-8.0 KM/H
110 KG
26.6 / 31 KG
Charge maximale
Poids net/Poids brut
4.La structure du produit
Étape 1 : Assemblage d’accoudoirs de colonne
Lâche
Serré
Panneau d’affichage
Hi-Fi
Couverture motrice
Pièce en aluminium de accoudoirs de colonne droite
Ceinture
Bande de bord de pied
Accoudoir pilier
Télécommande
Bouton d’arrêt d’urgence
Coin arrière à droite
Coin arrière à gauche
Étapes de l’Assemblée
Commutateur de buté
Point de remplissage
Couvercle inférieur du moteur
Pièce en aluminium de
accoudoirs de colonne gauche
Interrupteur de verrouillage de sécurité
Bouton de l’instrument
5.Instructions de montage

-4-
1Ouvrez la boîte d'emballage, retirez les accessoires et la machine concernés de la boîte et
placez la machine sur un sol plat.
2Relevez d'abord la colonne montante jusqu'à ce qu'elle ne puisse pas avancer.
3Tenez le tube de la colonne d'une main et tournez commutateur de buté vers l'arrière en
position OFF (l'opération est la même des deux côtés).
L’assemblage de la machine est terminé!
1.Tenez le tube de la colonne d'une main et tournez commutateur de buté vers l'avant en position
ON (l'opération est la même des deux côtés).
2.Tenez le tube de la colonne avec vos mains et repliez-le pour qu'il repose à plat.
3Pliage de la machine terminé.
Étape 1 : Pliage de l’accoudoir de colonne
Lâche
Serré

-5-
6.Instructions de l’opération
Panneau d’affichage
Panneau de télécommande (Facultatif)
Instructions de opération
Caractéristiques:
1: Démarrage / arrêt, accélération / décélération de la télécommande ou des touches du clavier.
2: Musique Bluetooth.
3 Interrupteur d'arrêt d'urgence (STOP).
4: Pause pendant le fonctionnement.
5: Affichage de la vitesse 1.0-8.0 kilomètres, affichage des calories 0001-9999KCAL, affichage
du temps 01-99 minutes, Affichage du kilométrage 0,01 à 99 km.
6: L’hibernation en veille est de 5 minutes.
7: Conseil de ravitaillement : Conseils tous les 100 km
Utilisation de la télécommande
Clé + : Chaque clic de la clé + pendant le fonctionnement, la vitesse augmente de 0,5 km,
et Appuyez longuement sur la touche + pour augmenter en continu à une vitesse de 0,5 km.
Une autre caractéristique: La machine en veille et en l’état de déverrouille et sous condition
de non-fonctionnement, appuyez longuement et maintenez la clé + pendant 10 secondes
pour enlever conseils de ravitaillement.
Clé - : Pendant le fonctionnement, appuyez sur la touche - pour diminuer la vitesse de
0,5 km; appuyez longuement sur la touche - pour diminuer continuellement à une vitesse
de 0,5 km.
(c.-à-d. boucle de fonction de démarrage/arrêt)
Clé: Lorsque la machine est en veille et l’état de déverrouillée, appuyez sur la machine
pour fonctionner à une vitesse faible de 1,0 km, puis appuyez sur la machine pour arrêter.
vitesse Calorie Temps kilomètrage
Indicateur
Bluetooth
Conseils de ravitaillement Réception infrarouge
vitesse moins
1. Vitesse plus
2. Appui long en veille
Pour enlever conseils de
ravitaillement Démarrer / Arrêter
Seite wird geladen ...
Seite wird geladen ...
Seite wird geladen ...
Seite wird geladen ...
Seite wird geladen ...
Seite wird geladen ...
Seite wird geladen ...
Seite wird geladen ...
Seite wird geladen ...
Seite wird geladen ...
Seite wird geladen ...
Seite wird geladen ...
Seite wird geladen ...
Seite wird geladen ...
Seite wird geladen ...
Seite wird geladen ...
Seite wird geladen ...
Seite wird geladen ...
Seite wird geladen ...
Seite wird geladen ...
Seite wird geladen ...
Seite wird geladen ...
Seite wird geladen ...
Seite wird geladen ...
Seite wird geladen ...
Seite wird geladen ...
Seite wird geladen ...
Seite wird geladen ...
Seite wird geladen ...
Seite wird geladen ...
Seite wird geladen ...
Seite wird geladen ...
Seite wird geladen ...
Seite wird geladen ...
Seite wird geladen ...
Seite wird geladen ...
Seite wird geladen ...
Seite wird geladen ...
Seite wird geladen ...
Seite wird geladen ...
Seite wird geladen ...
Seite wird geladen ...
Seite wird geladen ...
Seite wird geladen ...
Seite wird geladen ...
Seite wird geladen ...
Seite wird geladen ...
Seite wird geladen ...
Seite wird geladen ...
Seite wird geladen ...
Seite wird geladen ...
Seite wird geladen ...
Seite wird geladen ...
Seite wird geladen ...
Seite wird geladen ...
Seite wird geladen ...
Seite wird geladen ...
Seite wird geladen ...
Seite wird geladen ...
-
 1
1
-
 2
2
-
 3
3
-
 4
4
-
 5
5
-
 6
6
-
 7
7
-
 8
8
-
 9
9
-
 10
10
-
 11
11
-
 12
12
-
 13
13
-
 14
14
-
 15
15
-
 16
16
-
 17
17
-
 18
18
-
 19
19
-
 20
20
-
 21
21
-
 22
22
-
 23
23
-
 24
24
-
 25
25
-
 26
26
-
 27
27
-
 28
28
-
 29
29
-
 30
30
-
 31
31
-
 32
32
-
 33
33
-
 34
34
-
 35
35
-
 36
36
-
 37
37
-
 38
38
-
 39
39
-
 40
40
-
 41
41
-
 42
42
-
 43
43
-
 44
44
-
 45
45
-
 46
46
-
 47
47
-
 48
48
-
 49
49
-
 50
50
-
 51
51
-
 52
52
-
 53
53
-
 54
54
-
 55
55
-
 56
56
-
 57
57
-
 58
58
-
 59
59
-
 60
60
-
 61
61
-
 62
62
-
 63
63
-
 64
64
-
 65
65
-
 66
66
-
 67
67
-
 68
68
-
 69
69
-
 70
70
-
 71
71
-
 72
72
-
 73
73
-
 74
74
-
 75
75
-
 76
76
-
 77
77
-
 78
78
-
 79
79


City Theatrical CS-WP3 Bedienungsanleitung
- Typ
- Bedienungsanleitung
in anderen Sprachen
- français: City Theatrical CS-WP3 Mode d'emploi
- español: City Theatrical CS-WP3 Instrucciones de operación
- italiano: City Theatrical CS-WP3 Istruzioni per l'uso
- Nederlands: City Theatrical CS-WP3 Handleiding
Andere Dokumente
-
 CITYSPORTS CS-WP2 Electric Walking Treadmill Benutzerhandbuch
-
 JBM 53934 Benutzerhandbuch
-
 CITYSPORTS CS-WP2 Benutzerhandbuch
-
 CITYSPORTS WP1 Benutzerhandbuch
-
 CITYSPORTS WP1D Benutzerhandbuch
-
 GEARSTONE CS-WP7 Benutzerhandbuch
-
 Fitfiu MC-400 Benutzerhandbuch
-
 Fitfiu MC-120 Benutzerhandbuch
-
CITYSPORTS CS10 Benutzerhandbuch
-
SPORTSTECH F37 Bedienungsanleitung


