
SGR-DH-F300W
Dehumidier
Dehumidier
Luftentfeuchter
Odvlhčovač vzduchu
Odvlhčovač vzduchu
Páramentesítő
EN Translation of the operating instructions from the original language.
DE Übersetzung der Bedienungsanleitung aus der Originalsprache.
CZ Návodkpoužitívoriginálnímjazyce.
SK Prekladnávodunapoužitiezoriginálnehojazyka.
HU Ahasználatiutasításfordításaeredetinyelvről.

ENGLISH 5
Safety information 5
Technical parameters 15
Use 15
Cleaning and maintenance 19
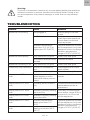
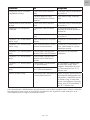
Troubleshooting 21
DEUTSCH 23
Sicherheitshinweise 23
Technische parameter 34
Verwendung 34
Reinigung und wartung 40
Problemlösung 41
ČESKY 43
Bezpečnostní informace 43
Technické parametry 53
Použití 53
Čištění a údržba 58
Řešení problémů 59
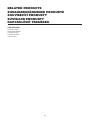
SLOVENSKY 62
Bezpečnostné informácie 62
Technické parametre 72
Použitie 72
Čistenie aúdržba 77
Riešenie problémov 78
MAGYAR 80
Biztonsági információk 80
Műszaki paraméterek 90
Használat 90
Tisztítás és karbantartás 95
Problémamegoldás 96

1
8
2
3
4
5
6
7
1 2 3 4 5
6
7 8

A1 A2
B

EN
EN - 5 EN - 5
Thank you for purchasing aSIGURO appliance. We thank you for
your trust and are proud to introduce on the following pages the
device, its functions and uses.
We believe in afair and responsible company, and therefore we only work
with suppliers who meet our strict criteria to protect the interests of employ-
ees, prevent their abuse and fair working conditions.
If you need help with extensive maintenance or repair of the product’sinter-
nal workings, contact the vendor’shelpline or our authorized service center
at siguro@alza.cz. For your convenience in solving any problems with the
product, we have unied these contact points and the above contacts can
be used in the event of any complaints or post-warranty service.
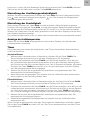
SAFETY INFORMATION
Please read this manual carefully before
use and keep it for future reference.
Read this manual thoroughly before using the appliance.
Additional information is available in the operating instructions and ser-
vice manual.
Service personnel are obliged to read the operating instructions and ser-
vice instructions carefully before putting the appliance into operation.
1. Children aged at least 8, persons with physical, sensory or mental
impairment, and the untrained or inexperienced may use this appliance
with instruction or supervision in its safe use, provided they understand
the potential dangers.
2. Children must not play with the device.
3. Cleaning and user maintenance may not be performed by unsupervised
children.
4. If the power cord is damaged, it must be replaced by the manufacturer,
its service agent or similarly qualied persons in order to avoid
adangerous situation.
5. This appliance is designed for home, ofce and similar use. This
appliance is designed for expert and trained operator use in retail, light
ENGLISH

EN
EN - 6
industry and agriculture, and for untrained commercial use.
6. This appliance is designed for dehumidication of normal-use interiors. It
is not designed for commercial or industrial dehumidication.
7. This appliance is not designed for outdoor use.
8. Before plugging the appliance in, make sure the outlet voltage matches
the values specied on the appliance rating plate.
9. This appliance may only be powered from properly grounded mains
outlets.
10. This appliance should not be operated and stored in rooms smaller than
4 m2 (43 sq ft).
11. The mains socket should remain accessible to allow easy unplugging if
necessary.
12. Do not use extension cords or multi-plug sockets.
13. The power cord should be routed so as to prevent tripping or tangling.
Do not place heavy objects on the power cord. Do not let the power cord
touch sharp or hot objects or hang over the edge of adesk.
14. Do not use the appliance in dusty rooms. The appliance is safe for
bathroom use, provided it is kept away from dripping or splashing water
or other liquids.
15. Do not immerse the appliance in water or other liquids.
16. Do not operate or store the appliance where chemicals, volatiles or
explosives are stored, near open ame or other heat sources, in direct
sunlight, etc.
17. The appliance is not designed for control by programmer, external time
switch or remote other than those specied by the manufacturer.
18. Do not place the appliance on unstable surfaces, such as on acarpet with
dense long bres.
19. The appliance may only be used on dry, stable, smooth, level surfaces.
20. Place the appliance at least 30 cm away from surrounding objects and
walls. Provide clearance of at least 50 cm (20 in) above the appliance.
21. The appliance is equipped with castors, so take extra care when handling
it, for example, to prevent it from falling down stairs or going off sloping
surfaces. If necessary, use stops to keep the castors in place.
22. Only assemble the appliance using its original parts. Before assembly,
make sure the appliance is powered down and unplugged from the
mains.
23. Before plugging in, check that the appliance has been correctly
assembled as described in this manual.
24. Do not touch the appliance with wet hands, particularly when it is
plugged in.
25. To avoid damage to the appliance, do not cover or place anything in its
vents and intakes.
26. Do not cover the appliance, particularly not when it is running.
27. Always power the appliance on and off using the buttons on its control
panel and / or remote (if supplied). Do not power the appliance off by
unplugging it.
28. Do not remove the condensation pan while the appliance is running.
29. Do not insert anything into or place anything on top of the appliance.

EN
EN - 6 EN - 7
30. Do not sit on or climb onto the appliance; do not use it as afootstool.
31. Do not expose yourself to cold air ow for along time. This could have an
adverse effect on your health.
32. Always power down and unplug the appliance when leaving it
unattended, during prolonged disuse, before relocation, cleaning, or
emptying the condensation pan.
33. Do not attempt to disassemble the outer casing of the appliance.
34. Unplug the appliance by pulling on the plug, not the cord. Pulling on the
cord might damage it or the socket.
35. Do not use the appliance if it or its power cord appear damaged, or if it
fell to the ground or in water. Never repair the appliance yourself. To avoid
the risk of electrocution, do not modify the appliance. Have all repairs
and adjustments to this appliance carried out by an authorized service
centre.
36. Do not clean with abrasives, chemical cleaners or similar substances.
Follow the cleaning instructions in this manual.
37. Only use manufacturer-recommended means of defrosting and cleaning
the appliance.
38. For efcient operation, regularly clean the appliance, empty the
condensation pan, and clean the intake and vent grilles and carbon lter.
39. For optimum dehumidication efciency, close doors and windows.
40. The appliance must be stored in such away as to avoid the possibility of
mechanical damage.
41. The appliance should be kept in awell-ventilated room of the size
required by the appliance’soperating parameters.
42. The appliance must be stored in aroom where there is no open re (e.g.
gas appliance in operation) and ignition sources (e.g. electric heater in
operation).
43. Store the appliance in avertical position. It may be transported upright or
on its side. If the appliance had been used before transport, check that all
condensation has been emptied. Once at the new location, wait at least 1
hour before using the appliance.
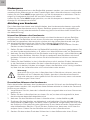
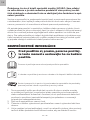
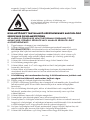
This appliance contains ammable refrigerant.
Leaked refrigerant forms atoxic, ammable gas when heat-
ed by re or contact with hot objects.
SPECIAL NOTICE FOR APPLIANCES USING R290 REFRIGERANT
FAILURE TO FOLLOW THESE WARNINGS CAN CAUSE BURNS, DEATH,
INJURY OR DAMAGE TO PROPERTY.
1. Read this notice carefully.
2. This appliance is only designed for use with R290 as the specied
refrigerant.

EN
EN - 8
3. WARNING: Do not use any means to speed up the defrosting process or
cleaning other than those recommended by the manufacturer.
4. The appliance must be stored in aroom where ignition sources are not
permanently in operation (e.g. open ame, gas appliance in operation,
electric heating system in operation).
5. Do not puncture or incinerate the appliance.
6. Be aware that refrigerants do not have to be smelled.
7. The appliance must be installed, operated and stored in aroom with
aoor area of more than 4 m2.
8. The appliance must be installed in accordance with national installation
regulations.
9. The refrigerant is located in aclosed circuit. Only aqualied
technician may service!
10. Do not release refrigerant into the atmosphere.
11. Refrigerant R290 is ammable and heavier than air. It usually collects
close to the ground, but fans can suck it in and put it into circulation.
12. If refrigerant is released or suspected leaked, untrained personnel must
not be allowed to try to nd the cause.
13. The refrigerant used in the appliance is odorless.
14. The fact that the refrigerant is odorless does not mean that there could
be no leakage.
15. If aleak occurs, immediately evacuate all persons from the room, ensure
adequate ventilation and inform the local re department of the location
of the propane gas leak.
16. Do not allow anyone to re-enter the room until aqualied service
technician has conrmed it to be safe.
17. Open ame, cigarettes, or other potential igniters must not be used
around the appliance.
18. The components are designed for refrigerant and are non-ammable
and non-igniting. Components must always be replaced with identical
original spare parts.
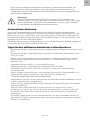
Service instructions
Warning:
Any person involved in or participating in work on the refrigeration circuit
should have avalid certicate from an industry-accredited assessment
body that ofcially approves his/her competence to safely handle refriger-
ants to an industry-recognized specication.
Warning:
Service must only be performed as recommended by the manufacturer.
Maintenance and repairs require the assistance of additional professional
personnel competent to use ammable refrigerant.
If you do not understand some parts or need help, contact the manufacturer’sservice
department.
1. Service information
When servicing this appliance, observe these safety instructions for working with R290
refrigerant.

EN
EN - 8 EN - 9
1.1 Workspace control
Prior to working on asystem containing ammable refrigerants, safety checks are nec-
essary to ensure that the risk of ignition is minimized. The following precautions must
be observed before repairing the cooling system.
1.2 Work procedure
The work must be carried out in acontrolled manner so as to minimize the risk of
ammable gases or vapors leaking.
1.3 Total workspace
The entire maintenance crew and others working on site must be instructed about the
nature of the work performed. Work in conned spaces must be avoided. The space
around the workplace must be divided into sections. Safe indoor conditions must be
ensured by inspecting ammable materials.
1.4 Checking the presence of refrigerant
The room must be inspected with an appropriate refrigerant detector before and
during work to ensure that technicians are aware of the potentially ammable atmos-
phere. It must be ensured that the use of leak detection equipment is suitable for use
on ammable refrigerants, that is, non-sparking, appropriately sealed or inherently
safe.
1.5 Presence of re extinguisher
If any work is to be carried out on the refrigeration equipment or associated parts in
warm area, asuitable re extinguishing system must be available. The re extinguisher
must be powder or CO2 in the vicinity of the lling area.
1.6 No sources of ignition
No person performing work on the refrigeration system that involves exposing any
piping that contains or has contained ammable refrigerant shall use any sources of
ignition in away that could lead to arisk of re or explosion. The site of installation,
repair, removal, or disposal works during which ammable refrigerant may leak or be
let out should be kept clear of all potential ignition sources, including lit cigarettes. The
area around the appliance must be inspected prior to commencement of works to
ensure it is free of re and ignition hazards. "No smoking" signs must be posted.
1.7 Ventilated space
It must be ensured that the room is open or adequately ventilated before the system
is disrupted or work in warm environment is carried out. The ventilation intensity must
last for the duration of the work. Ventilation should safely disperse any discharged
refrigerant and preferably vent it to the atmosphere.
1.8 Inspection of cooling equipment
If electrical components are changed, these components must be suitable for this
purpose and meet the correct specications. The manufacturer’smaintenance and
service instructions must always be followed. If in doubt, contact the manufactur-
er’stechnical department for assistance.
The following checks must be carried out on installations containing ammable refrig-
erants:
• The volume of the ll is in accordance with the size of the room in which the parts
containing the refrigerant are installed;
• Ventilation units and outlets are working at full capacity and are not blocked;
• If an indirect refrigeration circuit is used, the second circuit must be checked for
the presence of refrigerant;
• The various markings on the appliance must at all times remain legible; illegible
ones must be repaired;
• Refrigeration pipes or components are installed in locations where they are
unlikely to be exposed to any substances that may corrode refrigerant-containing
components unless the components are constructed of materials that are

EN
EN - 10
intrinsically corrosion-resistant or are adequately protected against corrosion.
1.9 Inspection of electrical components
Repairs and maintenance of electrical components must include safety checks and
inspections of the components. If amalfunction occurs that could compromise safety,
then no power supply must be connected to the circuit until the fault has been satis-
factorily resolved. If the malfunction cannot be repaired immediately, it has to contin-
ue working; an appropriate temporary solution must be used. The appliance owner
must be informed of this state of affairs.
Initial safety checks must ensure:
• That the capacitors are discharged: this must be done in asafe way to avoid the
possibility of sparking;
• That no electrical components and wiring is exposed when lling, restoring and
cleaning the system;
• That grounding is not interrupted.
2. Repairs of sealed components
2.1 During the repair of sealed components, all electrical supply must be disconnect-
ed from the equipment being worked on before the sealed covers are removed,
etc. If the equipment absolutely must be powered during servicing, then acontin-
uously operating leak detector must be placed in the most critical location to alert
staff of apotentially dangerous situation.
2.2 Special care must be taken to ensure that work on electrical components does
not alter the cover to such an extent as to affect the level of protection. Cable
damage, extra connections and terminals outside the original specication,
seal damage and improper sealing, etc. should be included in this assess-
ment. Ensure the appliance is installed safely. It must be ensured that the
seals or sealing materials are not degraded in such away that they no longer
serve the purpose of preventing the entering of ammable materials. Spare parts
must comply with the manufacturer’sspecication. The use of asilicone seal may
suppress the effectiveness of some types of leak detection devices. Internally safe
components do not have to be disconnected before they can be worked on.
3. Repairs of internal safe components
No permanent inductive or capacitive loads shall be applied to the circuit without
ensuring that the permissible voltage and current permitted for the equipment used
are not exceeded.
Internally safe components are the only types that can be worked on in aammable
environment, even if they are live. The test equipment must be correctly dimensioned.
Parts are replaced only by parts specied by the manufacturer. Other parts may ignite
the refrigerant if it leaks into the environment.
4. Wiring
Check that the wiring is not exposed to wear, corrosion, excessive pressure, vibration,
sharp edges or any other adverse environmental effects. The inspection must also
take into account the effects of aging or permanent vibrations from sources such as
compressors or fans.
5. Detection of ammable refrigerants
Under no circumstances may potential sources of ignition be used to search for or
detect refrigerant leaks. The halogen burner (or any other detector using open ame)
must not be used.
6. Leak detection methods
The following leak detection methods are considered acceptable for systems contain-
ing ammable refrigerants.

EN
EN - 10 EN - 11
Electronic leak detectors must be used to detect ammable refrigerants, but their sen-
sitivity may not be adequate or may require recalibration. (The detection device must
be calibrated in arefrigerant-free space). It must be ensured that the detector is not
apotential source of ignition and is suitable for the refrigerant used. The leak detec-
tion device must be set to the percentage of LFL refrigerant and must be calibrated to
the refrigerant used and the appropriate gas percentage (maximum 25%) conrmed.
Leak detection uids are suitable for use with most refrigerants, but the use of chlo-
rine-containing detergents must be avoided because chlorine can react with the
refrigerant and corrode copper piping.
If aleak is suspected, all open res must be eliminated / extinguished.
If arefrigerant leak is found, which requires brazing; all refrigerant must be removed
from the system or separated (by closing the valves) in the part of the system remote
from the leak. The system must then be purged with oxygen-free nitrogen (OFN), both
before and after the brazing process.
7. Removal and pumping
Conventional procedures must be used if the cooling circuit is disturbed due to repairs
- or for any other reason. However, it is important to keep to the best method due to
ammability. The following procedure must be followed:
• remove the refrigerant;
• purge the circuit with inert gas;
• pump away;
• purge again with inert gas;
• open the circuit by cutting or brazing.
The circuit lling must be taken to the correct collection cylinders. The system must be
"ooded" with OFN (oxygen-free nitrogen) to make the unit safe. The procedure may
need to be repeated several times. Compressed air or oxygen must not be used for this
task.
Flushing may be done by breaking the system’svacuum seal and lling with OFN until
operating pressure is reached, then venting to atmosphere, then restoring vacuum.
This process must be repeated while the refrigerant is in the system. After the last OFN
cycle, vent the system to atmosphere so that work may be done. This is absolutely
necessary when the piping is to be brazed.
It must be ensured that the outlets are not close to any source of ignition and that
ventilation is provided.
8. Filling procedure
In addition to conventional lling procedures, the following requirements must be
met.
• Care must be taken to ensure that using the lling equipment does not
contaminate the various refrigerants. Hoses or piping must be as short as possible
to minimize the amount of refrigerant contained in them.
• The cylinders must be held vertically.
• It must be ensured that the cooling system is grounded before lling the system
with refrigerant.
• When lling is complete, the system must be appropriately labeled (if it is not
already).
• Extreme care must be taken to ensure that the cooling system is not overlled.
Before relling the system, it must be pressure-tested with OFN. The system must be
tested for leaks after lling but before starting operation. Averication test must be
carried out before leaving the installation site.
9. Taking out of operation
Before performing this procedure, it is essential that the technician is fully acquaint-

EN
EN - 12
ed with the equipment and all its details. Good practice is recommended to remove
all refrigerant safely. Oil and refrigerant samples must be taken before this operation
begins, if analysis is required before the regenerated refrigerant can be used again. It
is essential that electricity is available before starting this activity.
a) Introduction to the device and its operation.
b) Electrical disconnection of the system.
c) Before initiating the procedure, it must be ensured that:
• mechanical equipment for handling the refrigerant cylinders was available if
required;
• all personal protective equipment was available and used correctly;
• the removal procedure was constantly under the supervision of acompetent
person;
• collection devices and cylinders complied with the relevant standards.
d) Drain the cooling system if possible.
e) If it is not possible to achieve avacuum, amanifold is made so that the refrigerant
can be taken from different parts of the system.
f) It must be ensured that the cylinder is placed on the scale before the collection
takes place.
g) The collection device is switched on and the manufacturer’sinstructions are used.
h) Do not overll the cylinders. (Not more than 80% of the liquid content).
i) The maximum operating pressure of the cylinder is not exceeded, even
temporarily.
j) When the cylinders are properly lled and the process is completed, it is ensured
that the cylinders and equipment are immediately removed from the installation
site and all separation valves on the equipment are closed.
k) The removed refrigerant must not be lled into another cooling system until it has
been cleaned and inspected.
10. Labelling
The appliance must get alabel stating that it has been taken out of service and does
not contain refrigerant. The label must be dated and signed. It shall be ensured that
the equipment has labels indicating that the equipment contains aammable refrig-
erant.
11. Removal
When refrigerant is removed from the system, either for service or decommissioning,
good practice recommends removing all refrigerants safely.
When transferring refrigerant to the cylinders, make sure that only the appropriate
refrigerant removal cylinders are used. It must be ensured that the correct number of
cylinders is available to contain the total ll of the system. Only cylinders designed to
hold the refrigerant used by the appliance and so labeled (i.e., special refrigerant col-
lection cylinders) may be used. The cylinders must be complete with asafety valve and
holding shutoff valves in good working order. Empty collection cylinders are drained
and if possible cooled before collecting.
The drainage equipment must be in good working order and suitable for ammable
refrigerants, and its manual should be to hand. In addition, aset of calibrated scales
must be available in good working order. The hoses must be complete with detach-
able couplings without leakage and in good condition. Before using the collecting
device, it must be checked that it is in asatisfactory operating condition, has been
properly maintained and that all associated electrical components are sealed to
prevent ignition in the event of refrigerant discharge. In case of doubt, consult the
manufacturer.
The drained refrigerant must be returned to the refrigerant supplier in the correct

EN
EN - 12 EN - 13
collecting cylinder and with the relevant agreed waste shipment letter. Refrigerants
do not mix in the collection units and especially not in the cylinders.
If compressors or compressor oils are to be removed, ensure that they have been
pumped to an acceptable level to ensure that ammable refrigerant does not remain
in the lubricant. The pumping out procedure must be performed before the com-
pressor is returned to the supplier. Only electric compressor housing heating may be
used to speed up this process. When oil is drained from the system, it must be safely
disposed of.

EN
EN - 14
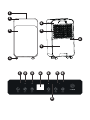
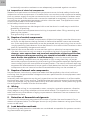
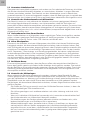
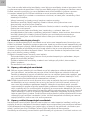
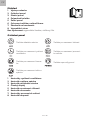
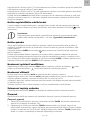
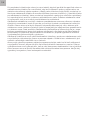
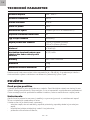
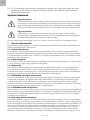
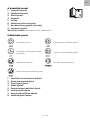
Overview
1 Air outlet
2 Control panel
3 Front panel
4 Castors
5 Rear panel
6 Microlter grille
7 Condensation pan
8 Drain hole
Not pictured: drainage hose, carbon lter
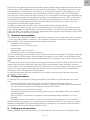
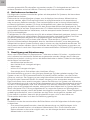
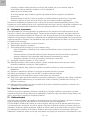
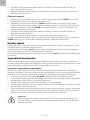
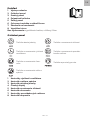
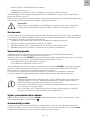
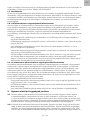
Control panel
Child lock button Humidity target setting button
Fan speed button Mode button
Timer setting button. Power button
Night Mode button
1 Fan speed indicator lights
2 Night Mode indicator light
3 Child lock indicator light
4 Numerical display
5 Humidity target indicator light
6 Timer indicator light
7 Mode indicator lights
8 Power indicator light
3

EN
EN - 14 EN - 15
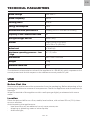
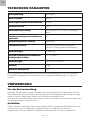
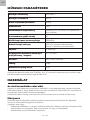
TECHNICAL PARAMETERS
Rated voltage 220–240 V~
Rated frequency 50 Hz
Cooling power 270 W
Energy consumption 1.4 A
Dehumidication performance 16 l/day (at 30 °C and 80% humidity)
Capacity of the condensation tank 2 l
Refrigerant type and ll R290 / 65 g
Airow High: 170 m3/h (70 cfm)
Low: 150 m3/h (60 cfm)
Noise level ≤ 38 dB (A)
Maximum operating pressure– low
/ high
0,7 / 3,2 MPa
Dimensions 344 × 264 × 555 mm
Weight 12 kg
Minimum room size 4 m2
The declared noise emission value of the appliance is ≤ 38 dB (A), which represents the
sound power level Awith respect to the reference sound power of 1 pW.
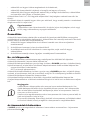
USE
Before First Use
Remove the appliance and its accessories from the packaging. Before disposing of the
packaging, be sure to remove all components. Check the appliance and accessories for
damage.
Wipe the outside of the appliance with asoft sponge slightly moistened with warm
water.
Location
Place the dehumidier on arm, stable, level surface, with at least 30 cm (12 in) clear-
ance on all sides.
Avoid exposing the appliance to:
• heat sources, such as radiators, hot-air vents, stoves, etc.
• dripping or splashing water or other liquids;
• direct sunlight;

EN
EN - 16
• mechanical vibration or tremors;
• excessive dust;
• inadequate air circulation, e.g. due to built-in installation.
The appliance should be installed, operated, and stored in aroom of at least 4 m2 (43
sq ft).
Ensure the mains outlet remains easily accessible, to allow for quick unplugging in
case of emergency.
Warning:
Do not store or operate the appliance where chemicals, volatiles, or explo-
sives are stored, or near open ame.
Assembly
Before rst use, install the carbon lter, which is placed separately in the shipping
package in protective foil. To avoid damage, do not use the appliance if the carbon
lter or its cover grille have not been installed.
1. Check that the appliance is powered down and unplugged.
2. Carefully release and remove the grille.
3. Unpack the carbon lter from its foil wrap and mount it on the appliance.
4. Replace the grille and check it sits well in place.
Power On / Off
Plug the power cord into aproperly grounded mains outlet.
The appliance will enter standby mode.
Short-press POWER to power on. The Power indicator light will come on and the appli-
ance will power up with these default settings:
• default fan speed: high;
• default target humidity: 60%.
To power down, short-press POWER. Indicator lights, display, and compressor will
power off immediately; the fan will power off after about 10 seconds. The appliance will
enter standby mode.
When powered on again, the appliance will retain the most recently used settings.
To power down completely, unplug the appliance.
Note:
Do not power the appliance back on immediately after it has been pow-
ered off. Wait at least 3 minutes before powering back on. Even when the
appliance is reactivated sooner, the compressor will still wait for about 3
minutes since the last power-down before powering back on.
When the operating mode is changed, the compressor will cut out for
about 3 minutes, then power back on.
This is normal behavior, caused by the compressor’sprotection circuits.
Operating Mode Selection
Repeatedly press MODE to select operating mode: automatic– continuous .
Automatic Mode
In automatic mode, dehumidication cuts in and out as needed to maintain the set
target humidity level given the set fan speed. When automatic mode is selected, the
Auto indicator will ash for 3 seconds, then automatic mode starts.
Press HUM to set target humidity and FAN to set fan speed. The available humidity
Warning:
XXXXXXXXXXXXXXXXXXXXXXXX

EN
EN - 16 EN - 17
and fan speed settings are listed further down in this manual.
When ambient humidity exceeds the set target by at least 3%, the fan will start imme-
diately, and the compressor about 3 seconds later.
When ambient humidity drops at least 3% below the set target, the compressor will
stop immediately, and the fan about 30 seconds later.
If the Auto indicator keeps ashing, the humidity target exceeds the current ambient
humidity reading. In this case, the compressor will remain ofine and no dehumidi-
cation will take place.
Continuous Mode
In this mode, the appliance is continuously on regardless of the ambient humidity
level. Target humidity and fan speed settings are not available. The indicator is lit.
Note:
We recommend regularly emptying the condensation pan or providing
continuous drainage– see the “Draining Condensate” section.
Sleep mode
This mode is suitable for nighttime use– control panel lights are off and the appliance
runs more quietly. Target humidity and fan speed settings are not available.
Press SLEEP; the indicator will come on. The appliance will enter standby mode.
If no buttons are pressed for 10 seconds after Night Mode has been set, the display and
indicator lights will dim to zero and the fan will switch to low speed. Press any button
(except SLEEP) to reactivate the control panel. Pressing SLEEP also cancels Night
Mode.
Fan Speed Setting
Repeatedly press FAN to set fan speed high or low . The corresponding indicator
light will come on.
Humidity settings
Press HUM once to display the built-in sensor’scurrent ambient humidity reading.
Press HUM again to set ahumidity target. The available range is 20– 95%, with 5%
steps.
Wait 3 seconds for the setting to be saved. The display will then show current ambient
humidity.
Target humidity cannot be set in continuous dehumidication mode.
Room Temperature Display
Long-press HUM to display the built-in sensor’scurrent ambient temperature reading.
Timer
The appliance has two separate timers, for power up and power down.
Power Down Timer
1. When the appliance is running, press TIMER. The timer indicator light will come on
and the display will show “00”.
2. Repeatedly press TIMER to set the time until the appliance shuts down and goes to
standby. The available timer range is 1 to 12 hours. Each press of TIMER adds 1 hour
to the current setting. The display will show the currently set timer duration.
3. Wait for the value to stop ashing, at which point it is stored in memory. The
countdown will automatically begin.

EN
EN - 18
4. Once the set time has elapsed, the appliance will automatically switch to standby
mode.
Power Up Timer
1. When the appliance is running, press TIMER. The timer indicator light will come on
and the display will show “00”.
2. Repeatedly press TIMER to set the time until the appliance powers on. The
available timer range is 1 to 12 hours. Each press of TIMER adds 1 hour to the current
setting. The display will show the currently set timer duration.
3. Wait for the value to stop ashing, at which point it is stored in memory. The
countdown will automatically begin.
4. Once the set time has elapsed, the appliance will power up automatically.
To cancel either timer, press TIMER and set the value to “00”. The timer indicator will
turn off and the countdown will be cancelled.
Child lock
The Child Lock feature locks down the control panel to prevent accidental change of
the appliance’ssettings.
Activate Child Lock by long-pressing LOCK. The Child Lock indicator will come on and
all buttons will become inactive.
Long-press LOCK again to deactivate Child Lock. The Child Lock indicator will turn off.
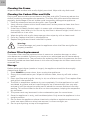
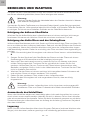
Draining Condensate
The water condensate produced by the appliance may be drained either manually (by
regularly emptying the condensation pan) or continuously (by drainage hose).
Manual Drainage
Condensate produced by the appliance collects in abuilt-in pan, which is equipped
with aoat. Once the oat, therefore the water level, reaches aparticular height in the
pan, the appliance will stop dehumidifying and sound achime. Proceed as follows:
1. Press POWER to power down, then unplug the appliance.
2. If needed, carefully move the appliance to aspot suitable for emptying the pan, e.g.
into abathroom.
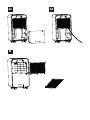
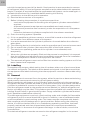
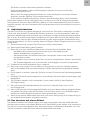
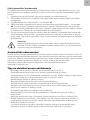
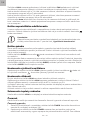
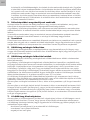
3. Carefully remove the pan at the rear of the appliance– see Figure A1.
4. Empty the pan. Wipe the pan interior with aclean sponge and the exterior with
adry cloth.
5. Replace the pan in the appliance, plug the appliance back in, and power it on.
Ideally use both hands when replacing the pan in the appliance. If the pan is
improperly inserted, the appliance will not power on.
Warning:
To avoid damage to the appliance or apotentially dangerous situation, do
not attempt to use the appliance while the pan is full.
Continuous Drainage
For continuous condensate drainage, the drainage hose must be connected to the
drainage port. We recommend setting up for continuous drainage when the appli-
ance is to be used in continuous dehumidication mode.
1. Check that the appliance is powered down and unplugged.
2. Site the appliance in aspot where continuous drainage can be implemented.
3. Remove the condensation pan– see Figure A1.
4. Remove the drainage port cap and attach the drainage hose– see Figure A2. Lay
the hose out straight and check it is not bent, broken, or set against furniture

EN
EN - 18 EN - 19
edges or other sharp objects. Route the hose so as to avoid tripping on it. Replace
the condensation pan in the appliance.
5. Insert the far end of the hose into adrain or bucket. Condensate must be able to
ow freely out of the appliance. To ensure this, the far end of the hose should be
lower to the ground than the drainage port on the appliance.
Warning:
Do not immerse the far end of the hose in water. Do not attempt to attach
extenders to the hose. If the supplied hose is too short, purchase alonger
hose of otherwise the same specication.
Automatic De-Icing
When the appliance’sbuilt-in temperature sensor detects low ambient temperature
(5–18 °C / 41–65 °F), automatic de-icing will turn on to prevent ice buildup on the run-
ning compressor. When automatic de-icing is on, the power indicator light will ash
red. The compressor will stop for de-icing, while the fan will remain in operation.
Once de-icing completes, the compressor will restart.
This behavior is normal.
Efciency and Effectiveness Advice
• Only use the appliance when ambient temperature is in the range 5–35 °C (41–
95 °F).
• Only use the appliance indoors. It is not designed for outdoor use.
• Leave adequate clearance between the appliance and walls, curtains, furniture and
other objects that might block or plug its vents or intakes.
• Do not cover the vents or intakes.
• Regularly check the appliance for signs of damage.
• Keep doors and windows closed while the appliance is in operation.
• Do not expose the appliance to direct sunlight, heat sources (radiators, stoves, etc.),
or dripping or splashing water.
• Regularly empty the condensation pan.
• Before powering on, check that the condensation pan is properly inserted.
• Keep the appliance clean. Regularly clean the carbon lter and its grille.
• We recommend keeping the appliance upright for at least 24 hours before
powering on after it had been tilted to more than 45°, to allow the refrigerant to
settle in its circuit.
• On hot days, the exhaust vent may get warm, particularly during longer periods of
operation. This is anormal occurrence.
CLEANING AND MAINTENANCE
Before any cleaning or maintenance work, always power the appliance off, unplug it
from the mains and let it cool down completely.
Warning:
Never immerse the appliance, the power cord or the plug in water or
other liquids.
Do not use plastic or metal scrapers, harsh cleaners, chemicals, petrol, solvents or
other similar substances to clean any parts of the appliance. The surface nish could
be seriously damaged.

EN
EN - 20
Cleaning the Frame
Wipe the outer surface with asoft, slightly wet cloth. Wipe with dry dish towel.
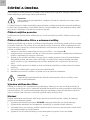
Cleaning the Carbon Filter and Grille
During use, dust and dirt accumulate on the lter and grille. These may reduce the
airow, impairing the appliance’soperation. The lter and grille need to be cleaned
regularly, as blockage of the air intake could irreversibly damage the appliance.
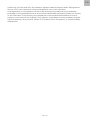
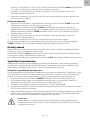
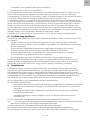
1. Carefully release and remove the grille– see Figure B.
2. Use avacuum cleaner with abrush attachment at low power to clean dust from
the lter and grille.
3. If the lter is heavily fouled, wash it in water with mild detergent. Wipe dry
thoroughly, then let dry in air. Do not dry the lter in direct sunlight, with ahair or
clothes drier or in an oven.
4. Wipe the grille with asoft, damp sponge, then wipe dry with aclean towel.
5. Once dry, replace the lter in the appliance.
6. Replace the grille and check it sits well in place.
Warning:
To avoid damage, only use the appliance when the lter and grille are
properly installed.
Carbon Filter Replacement
The carbon lter must be replaced when it wears out, sustains damage, or other-
wise becomes unusable. Contact your vendor or an authorized service center about
procuring areplacement. The procedure for replacing the lter is the same as the rst
assembly procedure described above in this manual, except the old lter needs to be
removed rst.
Storage
Before prolonged disuse (weeks or longer), the appliance should be thoroughly
cleaned and dried off.
1. Press POWER to power down, then unplug the appliance.
2. Empty the condensation pan. Wipe the interior clean, then dry off with aclean
towel.
3. Clean the lter and its grille. Let dry in air, out of direct sunlight. Then replace lter
and grille in the appliance.
4. The built-in evaporator needs to dry out completely. Put the appliance in awell-
ventilated, dry place, and let it stand there for up to several days. You may also
activate it with the target humidity set 5% above the current ambient humidity
reading. This will activate the fan but not the compressor, helping the evaporator
dry out faster.
5. The power cord may be stored in the condensation pan for convenience.
6. Store the appliance in adry, well ventilated place. Only store the appliance in the
upright position.
7. Do not store the appliance where chemicals, volatiles or explosives are stored or
used, near open ame or other heat sources, in direct sunlight, etc.
8. Do not put anything on top of the appliance.
Seite wird geladen ...
Seite wird geladen ...
Seite wird geladen ...
Seite wird geladen ...
Seite wird geladen ...
Seite wird geladen ...
Seite wird geladen ...
Seite wird geladen ...
Seite wird geladen ...
Seite wird geladen ...
Seite wird geladen ...
Seite wird geladen ...
Seite wird geladen ...
Seite wird geladen ...
Seite wird geladen ...
Seite wird geladen ...
Seite wird geladen ...
Seite wird geladen ...
Seite wird geladen ...
Seite wird geladen ...
Seite wird geladen ...
Seite wird geladen ...
Seite wird geladen ...
Seite wird geladen ...
Seite wird geladen ...
Seite wird geladen ...
Seite wird geladen ...
Seite wird geladen ...
Seite wird geladen ...
Seite wird geladen ...
Seite wird geladen ...
Seite wird geladen ...
Seite wird geladen ...
Seite wird geladen ...
Seite wird geladen ...
Seite wird geladen ...
Seite wird geladen ...
Seite wird geladen ...
Seite wird geladen ...
Seite wird geladen ...
Seite wird geladen ...
Seite wird geladen ...
Seite wird geladen ...
Seite wird geladen ...
Seite wird geladen ...
Seite wird geladen ...
Seite wird geladen ...
Seite wird geladen ...
Seite wird geladen ...
Seite wird geladen ...
Seite wird geladen ...
Seite wird geladen ...
Seite wird geladen ...
Seite wird geladen ...
Seite wird geladen ...
Seite wird geladen ...
Seite wird geladen ...
Seite wird geladen ...
Seite wird geladen ...
Seite wird geladen ...
Seite wird geladen ...
Seite wird geladen ...
Seite wird geladen ...
Seite wird geladen ...
Seite wird geladen ...
Seite wird geladen ...
Seite wird geladen ...
Seite wird geladen ...
Seite wird geladen ...
Seite wird geladen ...
Seite wird geladen ...
Seite wird geladen ...
Seite wird geladen ...
Seite wird geladen ...
Seite wird geladen ...
Seite wird geladen ...
Seite wird geladen ...
Seite wird geladen ...
Seite wird geladen ...
Seite wird geladen ...
Seite wird geladen ...
Seite wird geladen ...
Seite wird geladen ...
Seite wird geladen ...
-
 1
1
-
 2
2
-
 3
3
-
 4
4
-
 5
5
-
 6
6
-
 7
7
-
 8
8
-
 9
9
-
 10
10
-
 11
11
-
 12
12
-
 13
13
-
 14
14
-
 15
15
-
 16
16
-
 17
17
-
 18
18
-
 19
19
-
 20
20
-
 21
21
-
 22
22
-
 23
23
-
 24
24
-
 25
25
-
 26
26
-
 27
27
-
 28
28
-
 29
29
-
 30
30
-
 31
31
-
 32
32
-
 33
33
-
 34
34
-
 35
35
-
 36
36
-
 37
37
-
 38
38
-
 39
39
-
 40
40
-
 41
41
-
 42
42
-
 43
43
-
 44
44
-
 45
45
-
 46
46
-
 47
47
-
 48
48
-
 49
49
-
 50
50
-
 51
51
-
 52
52
-
 53
53
-
 54
54
-
 55
55
-
 56
56
-
 57
57
-
 58
58
-
 59
59
-
 60
60
-
 61
61
-
 62
62
-
 63
63
-
 64
64
-
 65
65
-
 66
66
-
 67
67
-
 68
68
-
 69
69
-
 70
70
-
 71
71
-
 72
72
-
 73
73
-
 74
74
-
 75
75
-
 76
76
-
 77
77
-
 78
78
-
 79
79
-
 80
80
-
 81
81
-
 82
82
-
 83
83
-
 84
84
-
 85
85
-
 86
86
-
 87
87
-
 88
88
-
 89
89
-
 90
90
-
 91
91
-
 92
92
-
 93
93
-
 94
94
-
 95
95
-
 96
96
-
 97
97
-
 98
98
-
 99
99
-
 100
100
-
 101
101
-
 102
102
-
 103
103
-
 104
104


in anderen Sprachen
- English: SIGURO SGR-DH-F300W User manual
- slovenčina: SIGURO SGR-DH-F300W Používateľská príručka
Verwandte Artikel

Andere Dokumente
-
Inventum AC907W Benutzerhandbuch
-
-
 Olimpia Splendid Dolceclima Easy 10 P Benutzerhandbuch
-
Bauknecht SPIW312A3BK Benutzerhandbuch
-
Bauknecht PACW29HP BK Bedienungsanleitung
-
-
Emerio PAC-127032.1 Portable Air Conditioner Benutzerhandbuch
-
eta 2630 Fainer Bedienungsanleitung
-
Truelife AIR Dehumidifier DH5 Touch Bedienungsanleitung
-
bewello BW2011 Benutzerhandbuch
