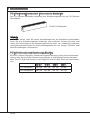
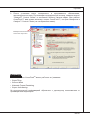
MSI FUZION Bedienungsanleitung
- Kategorie
- Motherboards
- Typ
- Bedienungsanleitung
Dieses Handbuch eignet sich auch für

FUZION seres
MS-7582 (v1.x) Manboard
G52-75821X2

Preface
▍
Copyrght Notce
The materal n ths document s the ntellectual property of MICRO-STAR INTERNA-
TIONAL. We take every care n the preparaton of ths document, but no guarantee s
gven as to the correctness of ts contents. Our products are under contnual mprove-
ment and we reserve the rght to make changes wthout notce.
Trademarks
All trademarks are the propertes of ther respectve owners.
MSI
®
s regstered trademark of Mcro-Star Int’l Co.,Ltd.
NVIDIA
®
s regstered trademark of NVIDIA Corporaton.
ATI
®
s regstered trademark of ATI Technologes, Inc.
AMD
®
s regstered trademarks of AMD Corporaton.
Intel
®
s regstered trademarks of Intel Corporaton.
Wndows
®
s regstered trademarks of Mcrosoft Corporaton.
AMI
®
s regstered trademark of Amercan Megatrends, Inc.
Award
®
s a regstered trademark of Phoenx Technologes Ltd.
Sound Blaster
®
s regstered trademark of Creatve Technology Ltd.
Realtek
®
s regstered trademark of Realtek Semconductor Corporaton.
JMcron
®
s regstered trademark of JMcron Technology Corporaton.
Netware
®
s a regstered trademark of Novell, Inc.
Revson Hstory
Revson Revson Hstory Date
V1.0 Frst release for Europe November 2009
Techncal Support
If a problem arses wth your system and no soluton can be obtaned from the user’s
manual, please contact your place of purchase or local dstrbutor. Alternatvely, please
try the followng help resources for further gudance.
Vst the MSI webste for FAQ, techncal gude, BIOS updates, drver updates,
and other nformaton:
http://www.ms.com/ndex.php?func=servce
Contact our techncal sta at:
http://ocss.ms.com
■
■
■
■
■
■
■
■
■
■
■
■
◙
◙

MS-7582
Safety Instructons
Always read the safety nstructons carefully.
Keep ths User’s Manual for future reference.
Keep ths equpment away from humdty.
Lay ths equpment on a relable at surface before settng t up.
The openngs on the enclosure are for ar convecton hence protects the equpment
from overheatng. DO NOT COVER THE OPENINGS.
Make sure the voltage of the power source and adjust properly 110/220V before
connectng the equpment to the power nlet.
Place the power cord such a way that people can not step on t. Do not place any
-
thng over the power cord.
Always Unplug the Power Cord before nsertng any add-on card or module.
All cautons and warnngs on the equpment should be noted.
Never pour any lqud nto the openng that could damage or cause electrcal
shock.
If any of the followng stuatons arses, get the equpment checked by servce
personnel:
The power cord or plug s damaged.
Lqud has penetrated nto the equpment.
The equpment has been exposed to mosture.
The equpment does not work well or you can not get t work accordng to User’s
Manual.
The equpment has dropped and damaged.
The equpment has obvous sgn of breakage.
DO NOT LEAVE THIS EQUIPMENT IN AN ENVIRONMENT UNCONDITIONED,
STORAGE TEMPERATURE ABOVE 600 C (1400F), IT MAY DAMAGE THE
EQUIPMENT.
CAUTION: Danger of exploson f battery s ncorrectly replaced.
Replace only wth the same or equvalent type recommended by the manufacturer.
警告使用者:
這是甲類資訊產品,在居住的環境中使用時,可能會造成無線電干擾,在這種情況下,
使用者會被要求採取某些適當的對策。
廢電池請回收
For better envronmental protecton, waste batteres should be
collected separately for recyclng specal dsposal.
■
■
■
■
■
■
■
■
■
■
■
◯
◯
◯
◯
◯
◯

v
Preface
▍
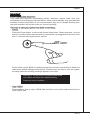
FCC-B Rado Frequency Interference Statement
Ths equpment has been tested and found
to comply wth the lmts for a Class B dg-
tal devce, pursuant to Part 15 of the FCC
Rules. These lmts are desgned to provde
reasonable protecton aganst harmful nter-
ference n a resdental nstallaton. Ths equpment generates, uses and can radate
rado frequency energy and, f not nstalled and used n accordance wth the nstruc-
tons, may cause harmful nterference to rado communcatons. However, there s no
guarantee that nterference wll not occur n a partcular nstallaton. If ths equpment
does cause harmful nterference to rado or televson recepton, whch can be deter-
mned by turnng the equpment o and on, the user s encouraged to try to correct the
nterference by one or more of the measures lsted below.
Reorent or relocate the recevng antenna.
Increase the separaton between the equpment and recever.
Connect the equpment nto an outlet on a crcut derent from that to whch the
recever s connected.
Consult the dealer or an experenced rado/televson techncan for help.
Notce 1
The changes or modcatons not expressly approved by the party responsble for com
-
plance could vod the user’s authorty to operate the equpment.
Notce 2
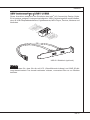
Shelded nterface cables and A.C. power cord, f any, must be used n order to comply
wth the emsson lmts.
VOIR LA NOTICE D’INSTALLATION AVANT DE RACCORDER AU RESEAU.
◯
◯
◯
◯
Ths devce comples wth Part 15 of the FCC Rules. Operaton s subject to the follow
-
ng two condtons:
ths devce may not cause harmful nterference, and
ths devce must accept any nterference receved, ncludng nterference that may
cause undesred operaton.
1)
2)
Mcro-Star Internatonal
MS-7582

v
MS-7582
WEEE (Waste Electrcal and Electronc Equpment) Statement
ENGLISH
To protect the global envronment and as an envronmentalst, MSI must re-
mnd you that...
Under the European Unon (“EU”) Drectve on Waste Electrcal and Elec
-
tronc Equpment, Drectve 2002/96/EC, whch takes eect on August 13,
2005, products of “electrcal and electronc equpment” cannot be dscarded
as muncpal waste anymore and manufacturers of covered electronc equp
-
ment wll be oblgated to take back such products at the end of ther useful lfe. MSI wll
comply wth the product take back requrements at the end of lfe of MSI-branded prod
-
ucts that are sold nto the EU. You can return these products to local collecton ponts.
DEUTSCH
Hnwes von MSI zur Erhaltung und Schutz unserer Umwelt
Gemäß der Rchtlne 2002/96/EG über Elektro- und Elektronk-Altgeräte dürfen Elek
-
tro- und Elektronk-Altgeräte ncht mehr als kommunale Abfälle entsorgt werden. MSI
hat europawet verschedene Sammel- und Recyclngunternehmen beauftragt, de n
de Europäsche Unon n Verkehr gebrachten Produkte, am Ende senes Lebenszyklus
zurückzunehmen. Btte entsorgen Se deses Produkt zum gegebenen Zetpunkt aus-
schlesslch an ener lokalen Altgerätesammelstelle n Ihrer Nähe.
FRANÇAIS
En tant qu’écologste et an de protéger l’envronnement, MSI tent à rappeler cec...
Au sujet de la drectve européenne (EU) relatve aux déchets des équpement élec
-
trques et électronques, drectve 2002/96/EC, prenant eet le 13 août 2005, que les
produts électrques et électronques ne peuvent être déposés dans les décharges ou
tout smplement ms à la poubelle. Les fabrcants de ces équpements seront oblgés de
récupérer certans produts en n de ve. MSI prendra en compte cette exgence relatve
au retour des produts en n de ve au sen de la communauté européenne. Par con-
séquent vous pouvez retourner localement ces matérels dans les ponts de collecte.
РУССКИЙ
Компания MSI предпринимает активные действия по защите окружающей среды,
поэтому напоминаем вам, что....
В соответствии с директивой Европейского Союза (ЕС) по предотвращению
загрязнения окружающей среды использованным электрическим и электронным
оборудованием (директива WEEE 2002/96/EC), вступающей в силу 13
августа 2005 года, изделия, относящиеся к электрическому и электронному
оборудованию, не могут рассматриваться как бытовой мусор, поэтому
производители вышеперечисленного электронного оборудования обязаны
принимать его для переработки по окончании срока службы. MSI обязуется
соблюдать требования по приему продукции, проданной под маркой MSI на
территории EC, в переработку по окончании срока службы. Вы можете вернуть
эти изделия в специализированные пункты приема.

v
Preface
▍
ESPAÑOL
MSI como empresa comprometda con la proteccón del medo ambente, recomenda:
Bajo la drectva 2002/96/EC de la Unón Europea en matera de desechos y/o equ
-
pos electróncos, con fecha de rgor desde el 13 de agosto de 2005, los productos
clascados como “eléctrcos y equpos electróncos” no pueden ser depostados en
los contenedores habtuales de su muncpo, los fabrcantes de equpos electróncos,
están oblgados a hacerse cargo de dchos productos al termno de su período de vda.
MSI estará comprometdo con los térmnos de recogda de sus productos venddos en
la Unón Europea al nal de su perodo de vda. Usted debe depostar estos productos
en el punto lmpo establecdo por el ayuntamento de su localdad o entregar a una
empresa autorzada para la recogda de estos resduos.
NEDERLANDS
Om het mleu te beschermen, wl MSI u eraan hernneren dat….
De rchtljn van de Europese Une (EU) met betrekkng tot Vervulng van Electrsche
en Electronsche producten (2002/96/EC), de op 13 Augustus 2005 n zal gaan kun
-
nen net meer beschouwd worden als vervulng. Fabrkanten van dt soort producten
worden verplcht om producten retour te nemen aan het end van hun levenscyclus.
MSI zal overeenkomstg de rchtljn handelen voor de producten de de merknaam MSI
dragen en verkocht zjn n de EU. Deze goederen kunnen geretourneerd worden op
lokale nzamelngspunten.
SRPSKI
Da b zašttl prrodnu srednu, kao preduzeće koje vod računa o okoln prrodnoj
sredn, MSI mora da vas podest da…
Po Drektv Evropske unje (“EU”) o odbačenoj ekektronskoj elektrčnoj oprem, D
-
rektva 2002/96/EC, koja stupa na snagu od 13. Avgusta 2005, prozvod koj spadaju
pod “elektronsku elektrčnu opremu” ne mogu vše bt odbačen kao občan otpad
prozvođač ove opreme bće prnuđen da uzmu natrag ove prozvode na kraju njhovog
uobčajenog veka trajanja. MSI će poštovat zahtev o preuzmanju ovakvh prozvoda
kojma je stekao vek trajanja, koj maju MSI oznaku koj su prodat u EU. Ove proz-
vode možete vratt na lokalnm mestma za prkupljanje.
POLSKI
Aby chronć nasze środowsko naturalne oraz jako rma dbająca o ekologę, MSI przy-
pomna, że...
Zgodne z Dyrektywą Un Europejskej (“UE”) dotyczącą odpadów produktów elektry
-
cznych elektroncznych (Dyrektywa 2002/96/EC), która wchodz w życe 13 serpna
2005, tzw. “produkty oraz wyposażene elektryczne elektronczne “ ne mogą być trak
-
towane jako śmec komunalne, tak węc producenc tych produktów będą zobowązan
do odberana ch w momence gdy produkt jest wycofywany z użyca. MSI wypełn
wymagana UE, przyjmując produkty (sprzedawane na terene Un Europejskej) wy
-
cofywane z użyca. Produkty MSI będze można zwracać w wyznaczonych punktach
zborczych.

v
MS-7582
TÜRKÇE
Çevrec özellğyle blnen MSI dünyada çevrey korumak çn hatırlatır:
Avrupa Brlğ (AB) Kararnames Elektrk ve Elektronk Malzeme Atığı, 2002/96/EC
Kararnames altında 13 Ağustos 2005 tarhnden tbaren geçerl olmak üzere, elektrkl
ve elektronk malzemeler dğer atıklar gb çöpe atılamayacak ve bu elektonk chazların
üretcler, chazların kullanım süreler bttkten sonra ürünler ger toplamakla yükümlü
olacaktır. Avrupa Brlğ’ne satılan MSI markalı ürünlern kullanım süreler bttğnde MSI
ürünlern ger alınması steğ le şbrlğ çersnde olacaktır. Ürünlernz yerel toplama
noktalarına bırakablrsnz.
ČESKY
Záleží nám na ochraně žvotního prostředí - společnost MSI upozorňuje...
Podle směrnce Evropské une (“EU”) o lkvdac elektrckých a elektronckých výrobků
2002/96/EC platné od 13. srpna 2005 je zakázáno lkvdovat “elektrcké a elektroncké
výrobky” v běžném komunálním odpadu a výrobc elektronckých výrobků, na které se
tato směrnce vztahuje, budou povnn odebírat takové výrobky zpět po skončení je
-
jch žvotnost. Společnost MSI splní požadavky na odebírání výrobků značky MSI,
prodávaných v zemích EU, po skončení jejch žvotnost. Tyto výrobky můžete odevzdat
v místních sběrnách.
MAGYAR
Annak érdekében, hogy környezetünket megvédjük, lletve környezetvédőként fellépve
az MSI emlékeztet Önt, hogy ...
Az Európa Unó („EU”) 2005. augusztus 13-án hatályba lépő, az elektromos és elek
-
tronkus berendezések hulladékaról szóló 2002/96/EK rányelve szernt az elektromos
és elektronkus berendezések többé nem kezelhetőek lakosság hulladékként, és az
lyen elektronkus berendezések gyártó kötelessé válnak az lyen termékek vsszavé-
telére azok hasznos élettartama végén. Az MSI betartja a termékvsszavétellel kapc-
solatos követelményeket az MSI márkanév alatt az EU-n belül értékesített termékek
esetében, azok élettartamának végén. Az lyen termékeket a legközelebb gyűjtőhelyre
vhet.
ITALIANO
Per proteggere l’ambente, MSI, da sempre amca della natura, t rcorda che….
In base alla Drettva dell’Unone Europea (EU) sullo Smaltmento de Materal Elettrc
ed Elettronc, Drettva 2002/96/EC n vgore dal 13 Agosto 2005, prodott appartenent
alla categora de Materal Elettrc ed Elettronc non possono pù essere elmnat come
rut muncpal: produttor d dett materal saranno obblgat a rtrare ogn prodotto
alla ne del suo cclo d vta. MSI s adeguerà a tale Drettva rtrando tutt prodott
marchat MSI che sono stat vendut all’nterno dell’Unone Europea alla ne del loro
cclo d vta. È possble portare prodott nel pù vcno punto d raccolta

v
Preface
▍
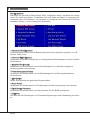
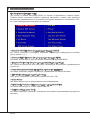
CONTENTS
Copyrght Notce ............................................................................................
Trademarks ....................................................................................................
Revson Hstory.............................................................................................
Techncal Support..........................................................................................
Safety Instructons .........................................................................................
FCC-B Rado Frequency Interference Statement.......................................... v
WEEE (Waste Electrcal and Electronc Equpment) Statement .................... v
Englsh ...................................................................................................... En-1
Manboard Speccatons ...................................................................................En-2
Quck Components Gude
..................................................................................En-4
CPU (Central Processng Unt)
..........................................................................En-5
Memory ..............................................................................................................En-9
Power Supply ...................................................................................................En-11
Back Panel .......................................................................................................En-12
Connectors .......................................................................................................En-13
Button ...............................................................................................................En-19
Swtch
...............................................................................................................En-21
Slots .................................................................................................................En-23
LED Status Indcators
......................................................................................En-27
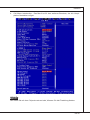
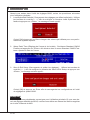
BIOS Setup ......................................................................................................En-30
Software Informaton
........................................................................................En-42
Deutsch .................................................................................................... De-1
Spezcatonen .................................................................................................. De-2
Komponenten-Überscht
................................................................................... De-4
CPU (Prozessor) ............................................................................................... De-5
Specher
............................................................................................................ De-9
Stromversorgung ............................................................................................. De-11
Rücktafel ......................................................................................................... De-12
Anschlüssen .................................................................................................... De-13
Tasten ............................................................................................................. De-19
Schalter ........................................................................................................... De-21
Steckplätze ...................................................................................................... De-23
LED Statusdkatoren
....................................................................................... De-27
BIOS Setup ..................................................................................................... De-30
Software-Informaton
....................................................................................... De-42
▍

x
MS-7582
Franças ..................................................................................................... Fr-1
Spéccatons ......................................................................................................Fr-2
Gude Rapde Des Composants
..........................................................................Fr-4
Processeur : CPU ...............................................................................................Fr-5
Mémore
..............................................................................................................Fr-9
Connecteurs d’Almentaton
..............................................................................Fr-11
Panneau Arrère
................................................................................................Fr-12
Connecteurs ......................................................................................................Fr-13
Bouton ...............................................................................................................Fr-19
Interrupteur ........................................................................................................Fr-21
Slots ..................................................................................................................Fr-23
Indcateur De Statut LED
..................................................................................Fr-27
Réglage BIOS ...................................................................................................Fr-30
Informaton De Logcel
.....................................................................................Fr-42
Русский ....................................................................................................Ru-1
Характеристики ............................................................................................... Ru-2
Размещение компонентов системной платы ................................................ Ru-4
CPU (Центральный процессор) ...................................................................... Ru-5
Память .............................................................................................................. Ru-9
Разъем питания ............................................................................................. Ru-11
Задняя панель ............................................................................................... Ru-12
Коннекторы .................................................................................................... Ru-13
Кнопки............................................................................................................. Ru-19
Переключатели .............................................................................................. Ru-21
Слоты ............................................................................................................. Ru-23
Световые индикаторы ................................................................................... Ru-27
Настройка BIOS ............................................................................................. Ru-30
Сведения о программном обеспечении ...................................................... Ru-43


Englsh
Europe verson
FUZION Seres

En-2
MS-7582 Manboard
▍
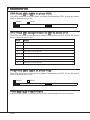
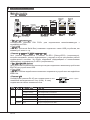
Mainboard SpecificationS
Processor Support
Intel
®
Core™ 7 and Core™ 5 (Lynneld & Clarkdale) processor n the LGA1156
package
(For the latest nformaton about CPU, please vst http://www.ms.com/ndex.
php?func=cpuform2)
Base Clock
133 MHz
Chpset
Intel
®
P55 / Lucd
®
Hydra 200 chpset
Memory Support
4 DDR3 DIMMs support DDR3 2133 *(OC)/ 2000 *(OC)/ 1800 *(OC)/1600 *(OC)/
1333/ 1066 DRAM (16GB Max)
Supports Dual-Channel mode
*(For more nformaton on compatble components, please vst
http://www.ms.com/ndex.php?func=testreport)
LAN
Supports Dual LAN (10/100/1000) by Realtek
®
RTL8111DL
IEEE 1394
Chp ntegrated by VIA
®
VT6315N
Transfer rate s up to 400Mbps
Audo
QuantumWave
TM
Audo Card
Creatve EAX
®
ADVANCED HD 5.0
THX TruStudo PC
TM
Creatve ALchemy
7.1 Channel Hgh Denton Audo Codec wth jack sensng
Realtek
®
ALC889
Complant wth Azala 1.0 Spec
Supports1x S/PDIF out header
Supports Coaxal/Optcal S/PDIF out ports on rear
IDE
1 IDE port by JMcron
®
JMB363
Supports Ultra DMA 66/100/133 mode
Supports PIO, Bus Master operaton mode
SATA
6 SATAII (SATA1~6) ports by Intel
®
P55
4 SATAII (SATA7/ 8/ 9/ 10) ports by two JMcron
®
JMB322
2 ESATA/ USB Combo port (back panel) by JMcron
®
JMB362
Supports storage and data transfers at up to 3 Gb/s
■
■
■
■
■
■
■
■
■
■
■
■
■
■
■
■
■
■
■
■
■
■
■
■

En-3
Englsh
RAID
SATA1~6 support Intel
®
Matrx Storage Technology (AHCI/ RAID 0/ 1/ 5/ 10) by Intel
®
P55
Hardware RAID
SATA7 & SATA8 support RAID 0/ 1 & JBOD mode by 1st JMcron
®
JMB322
SATA9 & SATA10 support RAID 0/ 1 & JBOD mode by 2nd JMcron
®
JMB322
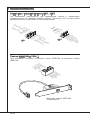
Connectors
Back panel
1 PS/2 keyboard port
1 PS/2 mouse port
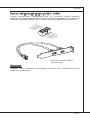
1 D-LED3 panel connector (optonal)
8 USB 2.0 ports
1 IEEE 1394 port
2 ESATA/ USB Combo port
2 LAN ports
On-Board
2 USB 2.0 connectors
1 IEEE 1394 connector
1 Chasss Intruson connector
1 TPM Module connector (optonal)
1 Green Power Gene connector (optonal)
1 Over-Voltage swtch & 1 set voltage check pont
1 Power button
1 Reset button
1 Green Power button
1 Clear CMOS button
1 OC Gene button
1 CPU Phase LED panel
Slots
3 PCI Express 2.0 x16 slots
PCI_E2/ PCI_E4/ PCI_E5 wll be x16/ x16/ x0 or x16/ x8/ x8
2 PCI Express 2.0 x1 slots
Only PCI_E1 supports nstallng the Realtek
®
Audo card
2 PCI 2.2 slots, support 3.3V/ 5V PCI bus Interface
Form Factor
ATX (30.5cm X 24.4 cm)
Mountng
9 mountng holes
If you need to purchase accessores and request the part numbers, you could search
the product web page and nd detals on our web address below
http://www.ms.com/ndex.php
■
■
■
■
-
-
-
-
-
-
-
■
-
-
-
-
-
-
-
-
-
-
-
-
■
-
■
-
■
■
■

En-4
MS-7582 Manboard
▍
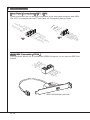
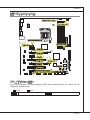
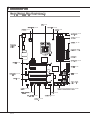
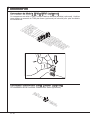
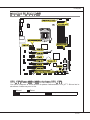
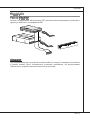
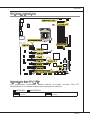
Quick coMponentS Guide
Back Panel,
En-12
CPU, En-5
CPUFAN, En-15
DDR3, En-9
JCI1, En-14
JSMB1, En-18
JPWR1, En-11
IDE1, En-13
JTPM1, En-18
SATA, En-14
SYSFAN1, En-15
JFP1/ JFP2,
En-16
JUSB1~2, En-17
J1394_1, En-16
PCI, En-26
PCIE, En-23
SYSFAN4, En-15
OC_Gene, En-19
JPWR2, En-11
SYSFAN2, En-15
V Swtch,
En-21
Green Power/ Reset/ Power, En-20
CLR_CMOS1, En-19
SYSFAN3, En-15
V-Check Pont,
En-22

En-5
Englsh
cpu (central proceSSinG unit)
When you are nstallng the CPU, make sure to nstall the cooler to prevent overheatng.
If you do not have the CPU cooler, consult your dealer before turnng on the computer.
For the latest nformaton about CPU, please vst http://www.ms.com/ndex.
php?func=cpuform2
Important
Overheatng
Overheatng wll serously damage the CPU and system. Always make sure the coolng
fan can work properly to protect the CPU from overheatng. Make sure that you apply
an even layer of thermal paste (or thermal tape) between the CPU and the heatsnk to
enhance heat dsspaton.
Replacng the CPU
Whle replacng the CPU, always turn o the ATX power supply or unplug the power
supply’s power cord from the grounded outlet rst to ensure the safety of CPU.
Overclockng
Ths manboard s desgned to support overclockng. However, please make sure your
components are able to tolerate such abnormal settng, whle dong overclockng. Any
attempt to operate beyond product speccatons s not recommended. We do not guar
-
antee the damages or rsks caused by nadequate operaton or beyond product spec-
catons.
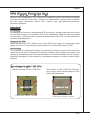
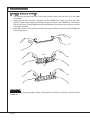
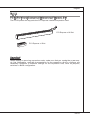
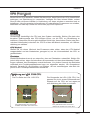
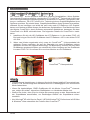
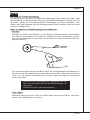
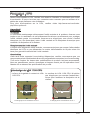
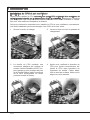
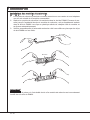
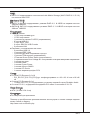
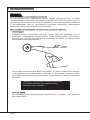
Introducton to LGA 1156 CPU
The pn-pad sde of LGA 1156 CPU. The surface of LGA 1156 CPU. Remem-
ber to apply some thermal paste on t for
better heat dsperson.
Algnment Key
Yellow trangle s the Pn 1 ndcator
Algnment Key
Yellow trangle s the Pn 1 ndcator

En-6
MS-7582 Manboard
▍
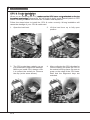
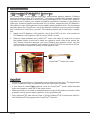
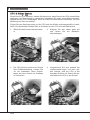
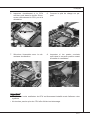
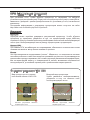
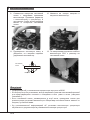
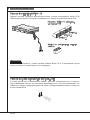
CPU & Cooler Installaton
When you are nstallng the CPU, make sure the CPU has a cooler attached on the top
to prevent overheatng. Meanwhle, do not forget to apply some thermal paste on CPU
before nstallng the heat snk/cooler fan for better heat dsperson.
Follow the steps below to nstall the CPU & cooler correctly. Wrong nstallaton wll
cause the damage of your CPU & manboard.
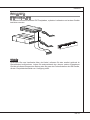
Open the load level.
1.
Lft the load lever up to fully open
poston
2.
The CPU socket has a plastc cap on
t to protect the contact from damage.
Before you nstall CPU, always cover
t to protect the socket pn. Romove
the cap (as the arrow shows).
3. After conrmng the CPU drecton for
correct matng, put down the CPU n
the socket housng frame. Be sure to
grasp on the edge of the CPU base.
Note that the algnment keys are
matched.
4.
Algnment Key

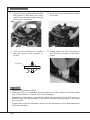
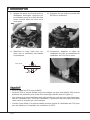
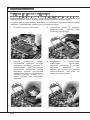
En-7
Englsh
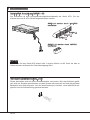
Vsually nspect f the CPU s seated
well nto the socket. If not, take out
the CPU wth pure vertcal moton
and renstall.
5. Engage the load lever whle pressng
down lghtly onto the load plate.
6.
Secure the lever near the hook end
under the retenton tab.
7. Make sure the four hooks are n por-
per poston before you nstall the
cooler.
8.
Important
Conrm f your CPU cooler s rmly nstalled before turnng on your system.
Do not touch the CPU socket pns to avod damagng.
•
•
Algnment Key

En-8
MS-7582 Manboard
▍
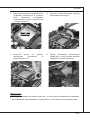
Manboard
Hook
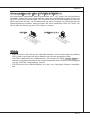
Important
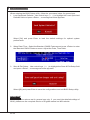
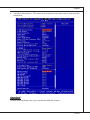
Read the CPU status n BIOS.
Whenever CPU s not nstalled, always protect your CPU socket pn wth the plastc
cap covered (shown n Fgure 1) to avod damagng.
Manboard photos shown n ths secton are for demonstraton of the CPU/ cooler n
-
stallaton only. The appearance of your manboard may vary dependng on the model
you purchase.
Please refer to the documentaton n the CPU fan package for more detals about the
CPU fan nstallaton.
•
•
•
•
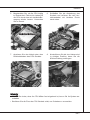
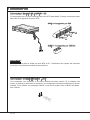
Algn the holes on the manboard wth
the heatsnk. Push down the cooler
untl ts four clps get wedged nto the
holes of the manboard.
9. Press the four hooks down to fasten
the cooler.
10.
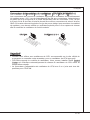
Turn over the manboard to conrm
that the clp-ends are correctly n
-
serted.
11. Fnally, attach the CPU Fan cable to
the CPU fan connector on the man-
board.
12.

En-9
Englsh
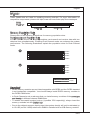
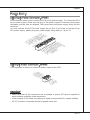
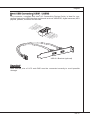
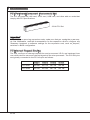
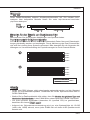
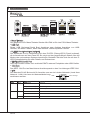
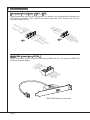
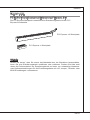
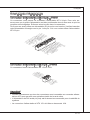
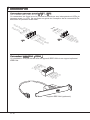
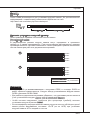
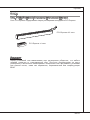
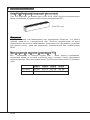
MeMory
These DIMM slots are used for nstallng memory modules. For more nformaton on
compatble components, please vst
http://www.ms.com/ndex.php?func=testreport
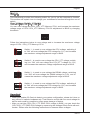
DDR3
240-pn, 1.5V
48x2=96 pn 72x2=144 pn
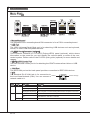
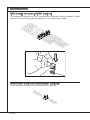
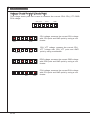
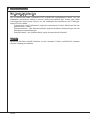
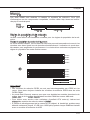
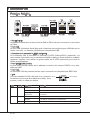
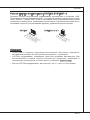
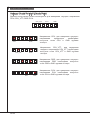
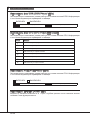
Memory Populaton Rule
Please refer to the followng llustratons for memory populaton rules.
Dual-Channel mode Populaton Rule
In Dual-Channel mode, the memory modules can transmt and receve data wth two
data bus lnes smultaneously. Enablng Dual-Channel mode can enhance the system
performance. The followng llustratons explan the populaton rules for Dual-Channel
mode.
1
DIMM2
DIMM1
DIMM4
DIMM3
2
DIMM2
DIMM1
DIMM4
DIMM3
Important
DDR3 memory modules are not nterchangeable wth DDR2 and the DDR3 standard
s not backwards compatble. You should always nstall DDR3 memory modules n
the DDR3 DIMM slots.
In Dual-Channel mode, make sure that you nstall memory modules of the
same type
and densty n derent channel DIMM slots.
To enable successful system boot-up (Lynneld CPU especally), always nsert the
memory modules nto the
DIMM1 rst.
Due to the chpset resource deployment, the system densty wll only be detected up
to 15+GB (not full 16GB) when each DIMM s nstalled wth a 4GB memory module.
•
•
•
•
Installed
Empty

En-10
MS-7582 Manboard
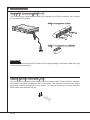
▍
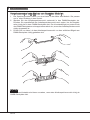
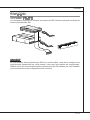
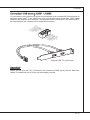
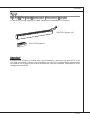
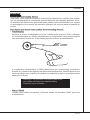
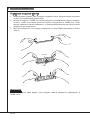
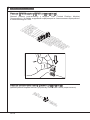
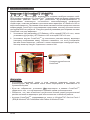
Installng Memory Modules
The memory module has only one notch on the center and wll only t n the rght
orentaton.
Insert the memory module vertcally nto the DIMM slot. Then push t n untl the
golden nger on the memory module s deeply nserted n the DIMM slot. The plastc
clp at each sde of the DIMM slot wll automatcally close when the memory module
s properly seated.
Manually check f the memory module has been locked n place by the DIMM slot
clps at the sdes.
Notch
Volt
Important
You can barely see the golden nger f the memory module s properly nserted n the
DIMM slot.
1.
2.
3.
Seite wird geladen ...
Seite wird geladen ...
Seite wird geladen ...
Seite wird geladen ...
Seite wird geladen ...
Seite wird geladen ...
Seite wird geladen ...
Seite wird geladen ...
Seite wird geladen ...
Seite wird geladen ...
Seite wird geladen ...
Seite wird geladen ...
Seite wird geladen ...
Seite wird geladen ...
Seite wird geladen ...
Seite wird geladen ...
Seite wird geladen ...
Seite wird geladen ...
Seite wird geladen ...
Seite wird geladen ...
Seite wird geladen ...
Seite wird geladen ...
Seite wird geladen ...
Seite wird geladen ...
Seite wird geladen ...
Seite wird geladen ...
Seite wird geladen ...
Seite wird geladen ...
Seite wird geladen ...
Seite wird geladen ...
Seite wird geladen ...
Seite wird geladen ...
Seite wird geladen ...
Seite wird geladen ...
Seite wird geladen ...
Seite wird geladen ...
Seite wird geladen ...
Seite wird geladen ...
Seite wird geladen ...
Seite wird geladen ...
Seite wird geladen ...
Seite wird geladen ...
Seite wird geladen ...
Seite wird geladen ...
Seite wird geladen ...
Seite wird geladen ...
Seite wird geladen ...
Seite wird geladen ...
Seite wird geladen ...
Seite wird geladen ...
Seite wird geladen ...
Seite wird geladen ...
Seite wird geladen ...
Seite wird geladen ...
Seite wird geladen ...
Seite wird geladen ...
Seite wird geladen ...
Seite wird geladen ...
Seite wird geladen ...
Seite wird geladen ...
Seite wird geladen ...
Seite wird geladen ...
Seite wird geladen ...
Seite wird geladen ...
Seite wird geladen ...
Seite wird geladen ...
Seite wird geladen ...
Seite wird geladen ...
Seite wird geladen ...
Seite wird geladen ...
Seite wird geladen ...
Seite wird geladen ...
Seite wird geladen ...
Seite wird geladen ...
Seite wird geladen ...
Seite wird geladen ...
Seite wird geladen ...
Seite wird geladen ...
Seite wird geladen ...
Seite wird geladen ...
Seite wird geladen ...
Seite wird geladen ...
Seite wird geladen ...
Seite wird geladen ...
Seite wird geladen ...
Seite wird geladen ...
Seite wird geladen ...
Seite wird geladen ...
Seite wird geladen ...
Seite wird geladen ...
Seite wird geladen ...
Seite wird geladen ...
Seite wird geladen ...
Seite wird geladen ...
Seite wird geladen ...
Seite wird geladen ...
Seite wird geladen ...
Seite wird geladen ...
Seite wird geladen ...
Seite wird geladen ...
Seite wird geladen ...
Seite wird geladen ...
Seite wird geladen ...
Seite wird geladen ...
Seite wird geladen ...
Seite wird geladen ...
Seite wird geladen ...
Seite wird geladen ...
Seite wird geladen ...
Seite wird geladen ...
Seite wird geladen ...
Seite wird geladen ...
Seite wird geladen ...
Seite wird geladen ...
Seite wird geladen ...
Seite wird geladen ...
Seite wird geladen ...
Seite wird geladen ...
Seite wird geladen ...
Seite wird geladen ...
Seite wird geladen ...
Seite wird geladen ...
Seite wird geladen ...
Seite wird geladen ...
Seite wird geladen ...
Seite wird geladen ...
Seite wird geladen ...
Seite wird geladen ...
Seite wird geladen ...
Seite wird geladen ...
Seite wird geladen ...
Seite wird geladen ...
Seite wird geladen ...
Seite wird geladen ...
Seite wird geladen ...
Seite wird geladen ...
Seite wird geladen ...
Seite wird geladen ...
Seite wird geladen ...
Seite wird geladen ...
Seite wird geladen ...
Seite wird geladen ...
Seite wird geladen ...
Seite wird geladen ...
Seite wird geladen ...
Seite wird geladen ...
Seite wird geladen ...
Seite wird geladen ...
Seite wird geladen ...
Seite wird geladen ...
Seite wird geladen ...
Seite wird geladen ...
Seite wird geladen ...
Seite wird geladen ...
Seite wird geladen ...
Seite wird geladen ...
Seite wird geladen ...
Seite wird geladen ...
Seite wird geladen ...
Seite wird geladen ...
-
 1
1
-
 2
2
-
 3
3
-
 4
4
-
 5
5
-
 6
6
-
 7
7
-
 8
8
-
 9
9
-
 10
10
-
 11
11
-
 12
12
-
 13
13
-
 14
14
-
 15
15
-
 16
16
-
 17
17
-
 18
18
-
 19
19
-
 20
20
-
 21
21
-
 22
22
-
 23
23
-
 24
24
-
 25
25
-
 26
26
-
 27
27
-
 28
28
-
 29
29
-
 30
30
-
 31
31
-
 32
32
-
 33
33
-
 34
34
-
 35
35
-
 36
36
-
 37
37
-
 38
38
-
 39
39
-
 40
40
-
 41
41
-
 42
42
-
 43
43
-
 44
44
-
 45
45
-
 46
46
-
 47
47
-
 48
48
-
 49
49
-
 50
50
-
 51
51
-
 52
52
-
 53
53
-
 54
54
-
 55
55
-
 56
56
-
 57
57
-
 58
58
-
 59
59
-
 60
60
-
 61
61
-
 62
62
-
 63
63
-
 64
64
-
 65
65
-
 66
66
-
 67
67
-
 68
68
-
 69
69
-
 70
70
-
 71
71
-
 72
72
-
 73
73
-
 74
74
-
 75
75
-
 76
76
-
 77
77
-
 78
78
-
 79
79
-
 80
80
-
 81
81
-
 82
82
-
 83
83
-
 84
84
-
 85
85
-
 86
86
-
 87
87
-
 88
88
-
 89
89
-
 90
90
-
 91
91
-
 92
92
-
 93
93
-
 94
94
-
 95
95
-
 96
96
-
 97
97
-
 98
98
-
 99
99
-
 100
100
-
 101
101
-
 102
102
-
 103
103
-
 104
104
-
 105
105
-
 106
106
-
 107
107
-
 108
108
-
 109
109
-
 110
110
-
 111
111
-
 112
112
-
 113
113
-
 114
114
-
 115
115
-
 116
116
-
 117
117
-
 118
118
-
 119
119
-
 120
120
-
 121
121
-
 122
122
-
 123
123
-
 124
124
-
 125
125
-
 126
126
-
 127
127
-
 128
128
-
 129
129
-
 130
130
-
 131
131
-
 132
132
-
 133
133
-
 134
134
-
 135
135
-
 136
136
-
 137
137
-
 138
138
-
 139
139
-
 140
140
-
 141
141
-
 142
142
-
 143
143
-
 144
144
-
 145
145
-
 146
146
-
 147
147
-
 148
148
-
 149
149
-
 150
150
-
 151
151
-
 152
152
-
 153
153
-
 154
154
-
 155
155
-
 156
156
-
 157
157
-
 158
158
-
 159
159
-
 160
160
-
 161
161
-
 162
162
-
 163
163
-
 164
164
-
 165
165
-
 166
166
-
 167
167
-
 168
168
-
 169
169
-
 170
170
-
 171
171
-
 172
172
-
 173
173
-
 174
174
-
 175
175
-
 176
176
-
 177
177
-
 178
178
-
 179
179
-
 180
180


MSI FUZION Bedienungsanleitung
- Kategorie
- Motherboards
- Typ
- Bedienungsanleitung
- Dieses Handbuch eignet sich auch für
in anderen Sprachen
- English: MSI FUZION Owner's manual
- français: MSI FUZION Le manuel du propriétaire
- русский: MSI FUZION Инструкция по применению
Verwandte Artikel
-
MSI P55 GD80 - Motherboard - ATX Benutzerhandbuch
-
MSI P67A-GD65 Bedienungsanleitung
-
-
MSI G52-76601X7 Bedienungsanleitung
-
MSI H67MA-E35 Benutzerhandbuch
-
-
-
-
-