
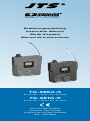
Tour Guide System
Système Tour Guide
Sistema de Visitas Guiadas
506 – 542 MHz
TG-98RA /5
Bestell-Nr. • Order No. 25.7400
TG-98TA /5
Bestell-Nr. • Order No. 25.7410
Bedienungsanleitung
Instruction Manual
Mode d’emploi
Manual de Instrucciones
Vertrieb von JTS-Produkten
Distrubution of JTS products

2
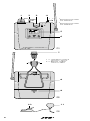
Wireless Tout Guide Transmitter
TG-98TA
VOL
bei / for/avec /con
TG-98RA/5
1
22
1 = schließen / close
fermer / cerrar
2 = öffnen / open
ouvrir / abrir
1
1 2
2
bei / for/avec /con
TG-98TA/5
12
POWER
MUTE
1 2 3 4
5
6
8
9
7
1110
➀
➁
➂

3
Deutsch . . . . Seite 4
English. . . . . Page 7
Français . . . . Page 10
Español . . . . Página 13
Übertragungsfrequenzen
Transmission frequencies
Fréquences de transmission
Frecuencias de transmisión
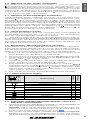
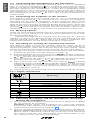
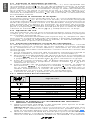
Group 1 2 3
Channel MHz MHz MHz
1 507,272 506,250 506,500
2 508,100 506,750 507,150
3 510,625 508,750 508,500
4 512,275 510,000 509,200
5 512,875 511,000 510,650
6 520,575 511,500 511,400
7 525,050 512,375 513,100
8 530,950 513,375 514,500
9 534,900 513,875 517,100
10 535,825 514,625 518,900
11 537,425 517,250 520,050
12 538,050 518,375 521,950
13 539,550 520,125 526,150
14 509,225 521,625 528,800
15 526,400 523,250 529,600
16 518,850 524,250 535,100
17 521,400 525,875 536,350
18 522,925 529,000 539,750
19 524,100 531,125 —
20 525,625 534,875 —
21 532,775 540,375 —
22 — 541,875 —
Group 4 5 6
Channel MHz MHz MHz
1 506,750 507,100 507,850
2 507,250 508,700 509,450
3 509,250 509,400 510,150
4 510,500 510,900 511,650
5 511,500 511,925 512,675
6 512,000 512,675 513,425
7 512,875 514,100 514,850
8 513,875 515,675 516,425
9 514,375 516,500 517,250
10 515,125 517,825 518,575
11 517,775 521,300 522,050
12 518,875 523,450 524,200
13 520,625 525,300 526,050
14 522,125 526,475 527,225
15 523,750 528,700 529,450
16 524,750 531,825 532,575
17 526,375 532,625 533,375
18 529,500 533,725 534,475
19 531,625 534,600 535,350
20 535,375 535,750 536,500
21 540,875 536,300 537,050
Group Channel

English
English Page
Contents
Français
Français Page
Table des matières
Español
Español Página
Contenidos
4
Deutsch
Deutsch Seite
Inhalt
Deutsch
Tour-Guide-System
Diese Anleitung richtet sich an Bediener ohne besondere Fachkennt-
nisse. Bitte lesen Sie die Anleitung vor dem Betrieb gründlich durch
und heben Sie sie für ein späteres Nachlesen auf. Auf der Seite 2 ist
das Gerät abgebildet.
1 Verwendungsmöglichkeiten
Der Sender TG-98TA / 5 bildet in Verbindung mit einem oder mehreren
Empfänger / n TG-98RA / 5 ein mobiles Funksystem zur Sprachüber-
tragung, geeignet z. B. für Gruppenführungen oder mehrsprachige
Vorträge. Die Übertragungsreichweite hängt von den örtlichen Ge-
gebenheiten ab und kann bis zu 200 m betragen.
Die Funkübertragung erfolgt im Bereich 506 – 542 MHz. Die
Übertragungskanäle sind in 6 Gruppen eingeordnet. Alle Kanäle
einer Gruppe (maximal 22) können gleichzeitig genutzt werden,
ohne sich gegenseitig zu stören.
1.1 Konformität und Zulassung
Hiermit erklärt MONACOR INTERNATIONAL, dass die Geräte
TG-98TA / 5 und TG-98RA / 5 der Richtlinie 2014 / 53 / EU entsprechen.
Die EU-Konformitätserklärungen sind im Internet verfügbar:
www.jts-germany.de oder www.monacor.de
Es bestehen Beschränkungen oder Anforderungen in folgen-
den Ländern:
CZ DE EL FI FR
IT LT MT PL
Die Geräte müssen im Gebiet der Bundesrepublik Deutschland eine
Frequenzzuteilung (kostenpflichtig) erhalten. Die Formulare und
Hinweise zur Anmeldung finden Sie im Internet auf der Seite der
Bundesnetzagentur:
www.bundesnetzagentur.de
In anderen Ländern muss eine entsprechende Ge nehmigung bean-
tragt werden. Informieren Sie sich bitte vor der Inbetriebnahme der
Geräte außerhalb Deutschlands bei der MONACOR-Niederlassung
oder der entsprechenden Behörde des Landes. Links zu den nationa-
len Behörden finden Sie über die folgende Internetadresse:
www.cept.org
t ECC
t Topics
t Other spectrum topics: SRD Regulations and indicative list of
equipment sub-classes
t EFIS and National Frequency Tables
2 Wichtige Hinweise für den Gebrauch
Der Sender / Empfänger entspricht allen relevanten Richtlinien der EU
und trägt deshalb das -Zeichen.
•
Verwenden Sie den Sender / Empfänger nur im Innenbereich und
schützen Sie ihn vor Tropf- und Spritzwasser sowie vor hoher
Luftfeuchtigkeit. Die zulässige Einsatztemperatur beträgt 0 – 40 °C.
•
Verwenden Sie für die Reinigung nur ein trockenes, weiches Tuch,
niemals Wasser oder Chemikalien.
•
Wird der Sender / Empfänger zweckentfremdet, falsch bedient
oder nicht fachgerecht repariert, kann keine Haftung für daraus
resultierende Sach- oder Personenschäden und keine Garantie für
den Sender / Empfänger übernommen werden.
Soll der Sender / Empfänger endgültig aus dem Betrieb
genommen werden, übergeben Sie ihn zur umweltge-
rechten Entsorgung einem örtlichen Recyclingbetrieb.
3 Inbetriebnahme
3.1 Batterien einlegen / wechseln
Für die Stromversorgung werden zwei 1,5-V-Batterien der Größe
Mignon (A A) benötigt. Leuchtet die Taste POWER / MUTE (2) rot, sind
die Batterien verbraucht und sollten gewechselt werden.
•
Setzen Sie nur Batterien des gleichen Typs ein und tauschen Sie
sie immer zusammen aus.
•
Nehmen Sie bei längerem Nichtgebrauch die Batterien sicher-
heitshalber heraus. So bleibt der Sender / Empfänger bei einem
eventuellen Auslaufen der Batterien unbeschädigt.
Auf der Geräterückseite das Batteriefach (9) öffnen. Die Batterien,
wie im Fach angegeben, einsetzen und das Fach wieder schließen.
Batterien dürfen nicht in den Hausmüll geworfen werden.
Geben Sie sie zur umweltgerechten Entsorgung nur in
den Sondermüll (z. B. Sammelbehälter im Einzelhandel).

5
Deutsch
3.2 Mikrofon an den Sender anschließen
Der Sender (schwarzes Gehäuse mit einem „T“) hat ein Mikrofon
(3) eingebaut. Stattdessen kann auch das Ansteckmikrofon (11)
verwendet werden. Den Poppschutz auf das Mikrofon stecken. Das
Mikrofonkabel in die Halterung (10) klemmen, siehe Abb. 3 und die
Halterung an der Kleidung (z. B. Krawatte) festklemmen, möglichst
nah am Mund. Das Mikrofon an die Buchse (4) anschließen. Damit
ist das interne Mikrofon abgeschaltet.
3.3 Ohrhörer an den Empfänger anschließen
Der Empfänger (graues Gehäuse mit einem „R“) hat einen Laut-
sprecher (3) eingebaut. Statt der Wiedergabe hierüber kann auch
der beiliegenden Ohrhörer verwendet werden. Zum Polstern des
Ohrhörers den Schaumstoffüberzug umwickeln: Den Ohrhörer, mit
dem JTS-Logo nach hinten zeigend, in die unbedruckte Tasche des
Überzugs stecken. Den Überzug um den Hörer legen und die zweite
Tasche über den Hörer stülpen. Die Bedruckung kennzeichnet
dann die Schallaustrittsseite. Den Ohrhörer an die Buchse (4)
anschließen und an die Ohrmuschel hängen.
3.4 Gerät am Körper tragen
Der Sender / Empfänger lässt sich entweder über seinen Bügel (8)
an der Kleidung festklemmen (z. B. am Gürtel, an der Hosentasche)
oder mit dem beiliegenden Halsband (7) tragen:
Die dünne Schlaufe des Bands über den Bügel ziehen (Abb.2).
Durch Verschieben des Druckknopfes am Band die gewünschte Band-
länge einstellen. Das Band um den Hals hängen. Durch Entriegeln
der Schnappvorrichtung lässt sich das Gerät leicht abnehmen und
z. B. gegen ein anderes austauschen.
3.5 Einschalten / Übertragungskanal einstellen
In der Tabelle auf der Seite 3 sind alle verfügbaren Kanäle angegeben.
Beim gleichzeitigen Betrieb von bis zu 22 Tour-Guide-Systemen,
z. B. für mehrsprachige Vorträge, die Kanäle dazu aus einer Gruppe
wählen. Die Kanäle einer Gruppe stören sich nicht gegenseitig.
1) Zuerst nur den Empfänger einschalten: Die Taste POWER (2) so
lange drücken, bis das Display (5) aufleuchtet.
2)
Die Taste SET (6) so lange drücken, bis kurz angezeigt wird.
Anschließend blinkt die linke Ziffer für die Kanalgruppe. Mit der
Taste oder die Gruppe wählen.
3)
Wieder die Taste SET drücken: Die rechte Ziffer für den Kanal
blinkt. Den Kanal mit der Taste oder wählen.
4) Zum Speichern die Taste SET erneut drücken. Es wird kurz
angezeigt und das Symbol ( kein Empfang ) erscheint. Erscheint
stattdessen das Antennensymbol , werden Störungen oder
Signale eines anderen Funksystems empfangen. In diesem Fall
einen anderen Kanal einstellen.
5) Den Sender einschalten und auf denselben Kanal einstellen.
3.5.1 Informationen im Display
Bedeutung
Sender
Empfänger
/
Sendeleistung 10 mW / 20 mW ×
Empfangsanzeige ×
Automatisches Ausschalten ×
Mikrofon stummgeschaltet ×
kein Empfang ×
akustische Batteriewarnung ×
Batterie voll × ×
Batterie leer × ×
Tastensperre × ×
Gruppennummer – Kanalnummer × ×
3.6 Lautstärke und Mikrofonempfindlichkeit einstellen /
Mikrofon stummschalten
1) Am Empfänger mit dem Regler VOLUME (1) die Lautstärke für
den Lautsprecher oder Ohrhörer einstellen.
Vorsicht: Stellen Sie die Ohrhörerlautstärke nie sehr hoch ein.
Hohe Lautstärken können auf Dauer das Gehör schädigen! Der
Limiter sollte immer eingeschaltet sein (Kap. 3.7).
2)
Am Sender mit dem Regler VOLUME die Mikrofonempfind
-
lichkeit einstellen: Ist das Mikrofonsignal zu laut und verzerrt,
die Empfindlichkeit verringern. Bei einem zu leisen Signal ergibt

Deutsch
sich dagegen ein schlechter Rauschabstand; die Empfindlichkeit
dann entsprechend erhöhen.
3)
Zum Stummschalten des Mikrofons während einer Sprech-
pause kurz die Taste POWER / MUTE (2) am Sender drücken. Im
Display erscheint das Symbol und nach kurzer Zeit blinkt die
Displaybeleuchtung. Zum Wiedereinschalten des Mikrofons die
Taste POWER / MUTE erneut kurz drücken.
3.7 Sendeleistung einstellen / Lautstärke begrenzen
Links oben im Batteriefach des Senders und Empfängers befindet sich
ein kleiner Schalter. (Eventuell die Batterien entfernen.)
Am Sender die Sendeleistung einstellen:
H (high) = hohe Leistung für eine große Reichweite, jedoch kürzere
Betriebsdauer der Batterien (Anzeige
)
L (low) = geringe Leistung für eine längere Betriebsdauer, jedoch
kürzere Reichweite (Anzeige )
Am Empfänger den Limiter zum Begrenzen der Lautstärke für den
Ohrhörer ein- (ON) oder ausschalten (OFF).
3.8 Automatisches Ausschalten / Batteriewarnung
Der Empfänger kann sich automatisch ausschalten, wenn er 30Mi-
nuten lang kein Signal vom Sender empfängt.
1) Zum Einschalten dieser Funktion, am Empfänger die Taste SET
so lange drücken, bis kurz angezeigt wird. Anschließend
blinkt die linke Ziffer für die Kanalgruppe.
2) Nun die Taste SET zweimal drücken, sodass angezeigt
wird.
3)
Mit der Taste die Funktion einschalten (Anzeige ). Es
erscheint ein Uhrensymbol ; dieses blinkt, wenn kein Signal
empfangen wird. Mit der Taste lässt sich die Funktion wieder
ausschalten.
4) Zum Speichern der Einstellung die Taste SET erneut drücken.
Sind die Batterien verbraucht, leuchtet die Taste POWER / MUTE (2)
rot und das Batteriesymbol blinkt. Zusätzlich kann der Empfänger
zwei kurze Signaltöne abgeben.
1) Zum Einschalten der akustischen Signalisierung, am Empfänger
die Taste SET so lange drücken, bis kurz angezeigt wird.
Anschließend blinkt die linke Ziffer für die Kanalgruppe.
2)
Nun die Taste SET dreimal drücken, sodass angezeigt wird.
3)
Mit der Taste die Funktion einschalten (Anzeige ). Es
erscheint ein Klingelsymbol . Mit der Taste lässt sich die
Funktion wieder ausschalten.
4) Zum Speichern der Einstellung die Taste SET erneut drücken.
3.9 Tastensperre
Zum Schutz vor Verstellen oder Manipulation lässt sich eine Tas-
tensperre einschalten: Die Tasten und gleichzeitig so lange
drücken, bis kurz angezeigt wird und das Symbol erscheint.
Wenn jetzt eine Taste gedrückt wird, erscheint die Meldung .
Zum Ausschalten der Sperre die Tasten und so lange drü-
cken, bis kurz angezeigt wird und das Symbol erlischt.
3.10 Ausschalten
Zum Ausschalten der Geräte die Taste POWER so lange gedrückt
halten, bis das Display anzeigt.
4 Technische Daten
Funkfrequenzbereich: � � � � � � � 506 – 542 MHz (Kanäle siehe Seite 3)
Audiofrequenzbereich:
� � � � � � � 40 Hz – 18 kHz
Sendeleistung (EIRP): � � � � � � � � L: 10 mW, H: 20 mW
Reichweite: � � � � � � � � � � � � � � � bis zu 200 m
Mikrofon im Sender: � � � � � � � � Elektret-Mikrofon
Stromversorgung:
� � � � � � � � � � 2 Batterien /Akkus der Größe Mignon (AA)
Betriebsdauer: � � � � � � � � � � � � � ca� 10 h
Abmessungen (B × H × T):� � � � 62 × 112 × 28 mm
Gewicht: � � � � � � � � � � � � � � � � � 72 g
Änderungen vorbehalten.
Diese Bedienungsanleitung ist urheberrechtlich für MONACOR
®
INTERNATIONAL
GmbH & Co. KG geschützt. Eine Reproduktion für eigene kommerzielle Zwecke
– auch auszugsweise – ist untersagt.
6

7
Español
Español Página
Contenidos
English
Tour Guide System
These instructions are intended for users without any specific tech-
nical knowledge. Please read the instructions carefully prior to op-
eration and keep them for later reference. An illustration of the unit
can be found on page 2.
1 Applications
Combined with a receiver or several receivers of the type TG-98RA / 5,
the transmitter TG-98TA / 5 creates a mobile wireless voice transmis-
sion system, e. g. for guided tours or lectures in various languages.
The transmission range depends on local conditions; the maximum
range is 200 m.
The wireless transmission range is 506 – 542 MHz. The trans-
mission channels are divided into 6 groups. All channels of a group
(22 channels max.) may be used at the same time without mutual
interference.
1.1 Conformity and approval
Herewith, MONACOR INTERNATIONAL declare that the units
TG-98TA / 5 and TG-98RA / 5 comply with the directive 2014 / 53 / EU.
The EU declarations of conformity are available on the Internet:
www.jts-germany.com or www.monacor.com
Restrictions or requirements apply in the following countries:
CZ DE EL FI FR
IT LT MT PL
In the Federal Republic of Germany, the units require a frequency
assignment (for which a fee is charged).
In other countries, it is necessary to apply for a corresponding ap-
proval. Prior to operating the wireless transmission system outside
Germany, please contact the MONACOR subsidiary or the corre-
sponding authorities of the respective country. Links to the national
authorities can be found via the following Internet address:
www.cept.org
t ECC
t Topics
t Other spectrum topics: SRD Regulations and indicative list of
equipment sub-classes
t EFIS and National Frequency Tables
2 Important Notes
The transmitter / receiver corresponds to all required directives of the
EU and is therefore marked with .
•
The transmitter / receiver is suitable for indoor use only. Protect it
against dripping water, splash water and high air humidity. The
admissible ambient temperature range is 0 – 40 °C.
•
For cleaning only use a dry, soft cloth; never use water or chemicals.
•
No guarantee claims for the transmitter / receiver and no liability
for any resulting personal damage or material damage will be
accepted if the transmitter / receiver is used for other purposes
than originally intended, if it is not correctly operated, or if it is
not repaired in an expert way.
If the transmitter / receiver is to be put out of operation
definitively, take it to a local recycling plant for a disposal
which is not harmful to the environment.
3 Operation
3.1 Inserting / Replacing batteries
For power supply, two 1.5 V batteries of size AA are required. When
the button POWER / MUTE (2) lights up in red, the batteries are dis-
charged and should be replaced.
•
Only insert batteries of the same type and always replace both
of them.
•
If the transmitter / receiver is not in use for a longer period of time,
always remove the batteries as a precaution to prevent damage
due to battery leakage.
Open the battery compartment (9) on the rear. Insert the batteries
as indicated in the compartment, and then close the compartment.
Never put batteries in the household waste. To protect
the environment, always take them to a special waste
disposal, e. g. collection container at your retailer.
English
English Page

8
English
3.2 Connecting the microphone to the transmitter
The transmitter (black housing marked with a “T”) is equipped
with an internal microphone (3). Instead of the internal micro-
phone, the clip-on microphone (11) can be used alternatively. Place
the pop shield on the microphone. Clamp the microphone cable
into the holder (10) as illustrated in fig. 3 and attach the holder to
your clothes (e. g. tie), as close to your mouth as possible. Connect
the microphone to the jack (4). Thus, the internal microphone is
switched off.
3.3 Connecting the earphone to the receiver
The receiver (grey housing marked with an “R”) is equipped with
an integrated speaker (3). Instead of this speaker, the earphone
provided can be used to reproduce sound. Wrap the foam cover
around the earphone as a padding: Put the earphone (with the JTS
logo to the rear) into the unprinted pocket of the cover. Wrap the
cover around the earphone and slip the second pocket over it. The
printing will mark the side where sound is emitted. Connect the
earphone to the jack (4) and attach the earphone to your ear.
3.4 Wearing options
There are two wearing options for the transmitter / receiver: Attach
its clip (8) to your clothes (e. g. belt or trouser pocket) or wear it on
the lanyard provided (7):
Pull the thin loop of the lanyard over the clip (fig. 2), shift the
stopper to adjust the desired length of the lanyard and put the
lanyard around your neck. When the snap buckle is unlocked, the
transmitter / receiver can be easily removed or exchanged.
3.5 Switching on / Setting the transmission channel
The table on page 3 shows all available channels. When up to 22
tour guide systems are used at the same time (e. g. for lectures in
various languages), select the channels from the same group. There
will be no mutual interference with channels of the same group.
1) For the time being, switch on the receiver only: Keep the button
POWER (2) pressed until the display (5) lights up.
2) Keep the button SET (6) pressed until is briefly indicated.
The left digit for the channel group starts flashing. Use the button
or to select the group.
3) Press the button SET again: The right digit for the channel starts
flashing. Use the button or to select the channel.
4) Press the button SET again to save the setting. is briefly
indicated and the symbol (no reception) appears. If the antenna
symbol appears instead, interference signals or signals from
another wireless transmission system are received. In this case,
use a different channel.
5)
Switch on the transmitter and set it to the channel of the receiver.
3.5.1 Display information
Meaning
Transmitter
Receiver
/
transmission power 10 mW / 20 mW ×
reception indication ×
automatic switch-off ×
microphone muted ×
no reception ×
low battery alarm (beep) ×
battery full × ×
battery discharged × ×
key lock × ×
group number – channel number × ×
3.6 Adjusting the volume and the microphone sensitivity/
Muting the microphone
1)
Use the control VOLUME (1) of the receiver to adjust the volume
for the speaker or earphone.
Caution: Never adjust the earphone to a very high volume.
Permanent high volumes may damage your hearing! The limiter
should always be activated (chapter 3.7).
2) Use the control VOLUME of the transmitter to adjust the micro-
phone sensitivity. When the volume is too high and the micro-
phone signal is distorted, reduce the sensitivity. If the volume of
the signal is too low, the signal-noise ratio will be poor; in this
case, increase the sensitivity accordingly.

9
English
3)
To mute the microphone during intervals, briefly press the
button POWER / MUTE (2) on the transmitter. The symbol is
displayed and the display backlight starts flashing after a while. To
unmute the microphone, briefly press the button POWER / MUTE
again.
3.7 Adjusting the transmission power / Limiting the volume
A small switch can be found on the top left of the battery compart-
ment of the transmitter / receiver (remove the batteries, if necessary).
Use the switch to adjust the transmission power on the transmitter:
H = high power for a high range, but shorter battery life (indication
)
L = low power for a long battery life, but shorter range (indication )
The receiver is equipped with a limiter for limiting the volume of
the earphone. To activate this limiter, set it to ON; to deactivate it,
set it to OFF.
3.8 Automatic switch-off / Low battery alarm
A function is available which will automatically switch off the
receiver if the receiver does not receive any signal from the trans-
mitter for 30 minutes.
1)
To activate this function, keep the button SET pressed on the
receiver until is briefly indicated. The left digit for the
channel group starts flashing.
2) Press the button SET twice so that is indicated.
3)
Use the button to activate the function (indication ).
A clock symbol appears; this symbol starts flashing when no
signal is received. To deactivate the function, use the button .
4) Press the button SET again to save the setting.
When the batteries are discharged, the button POWER / MUTE
(2) lights up in red and the battery symbol starts flashing. In
addition, a low battery alarm is available: The receiver will emit two
short beeps when the batteries are discharged.
1) To activate the alarm feature, keep the button SET pressed on
the receiver until is briefly indicated. The left digit for the
channel group starts flashing.
2) Press the button SET three times so that is indicated.
3)
Use the button to activate the function (indication ).
A bell symbol appears. To deactivate the function, use the
button .
4) Press the button SET again to save the setting.
3.9 Key lock
A key lock feature is provided to protect the transmitter / receiver
from inadvertent operation or tampering: Keep the buttons and
pressed at the same time until is briefly indicated and the
symbol appears. When any button is pressed now, the message
will appear.
To deactivate the key lock feature, keep the buttons and
pressed until is briefly indicated and the symbol disappears.
3.10 Switching off
To switch off the transmitter / receiver, keep the button POWER
pressed until the display indicates .
4 Specifications
Radio frequency range: � � � � � � 506 – 542 MHz (for channels refer to page 3)
Audio frequency range: � � � � � � 40 Hz – 18 kHz
Transmission power (EIRP): � � � L: 10 mW, H: 20 mW
Operating range: � � � � � � � � � � � 200 m max�
Microphone in the transmitter� � electret microphone
Power supply:
� � � � � � � � � � � � � 2 (rech�) batteries of size AA
Operating time: � � � � � � � � � � � � 10 h approx�
Dimensions (W × H × D): � � � � 62 × 112 × 28 mm
Weight: � � � � � � � � � � � � � � � � � � 72 g
Subject to technical modification.
All rights reserved by MONACOR
®
INTERNATIONAL GmbH & Co. KG.
No part of this instruction manual may be reproduced in any form or by any
means for any commercial use.

Français
10
Deutsch
Deutsch Seite
Inhalt
Español
Español Página
Contenidos
Français
Français Page
Table des matières
Système pour guide touristique
Cette notice s’adresse aux utilisateurs sans connaissances techniques
particulières. Veuillez lire la notice avec attention avant le fonction-
nement et conservez-la pour pouvoir vous y reporter ultérieurement.
Vous trouverez une présentation de l’appareil sur la page 2.
1 Possibilités d’utilisation
L’émetteur TG-98TA / 5 constitue, avec un ou plusieurs récepteurs
TG-98RA / 5, un système de transmission de la parole sans fil, adapté
par exemple pour les visites de groupes ou présentations multilingues.
La portée de transmission dépend de la configuration des lieux d’uti-
lisation et peut atteindre 200 m.
La transmission radio s’effectue dans la plage 506 – 542 MHz.
Les canaux de transmission sont divisés en 6 groupes. Tous les canaux
d’un groupe (22 maximum) peuvent être utilisés simultanément sans
créer en eux d’interférences.
1.1 Conformité et autorisation
Par la présente, MONACOR INTERNATIONAL déclare que les ap-
pareils TG-98TA / 5 et TG-98RA / 5 se trouvent en conformité avec
la directive 2014 / 53 / UE. Les déclarations UE de conformité sont
disponibles sur Internet :
www.jts-germany.com ou www.monacor.com
Il existe des limitations ou exigences d’utilisation dans les pays
suivants :
CZ DE EL FI FR
IT LT MT PL
En Allemagne, les appareils doivent recevoir une attribution de fré-
quence (payante).
Dans les autres pays, une autorisation correspondante doit être
éventuellement demandée. Avant la mise en service du système
de transmission sans fil en dehors de l’Allemagne, renseignez-vous
auprès de la succursale MONACOR ou des autorités nationales du
pays correspondant. Vous trouverez les liens permettant d’accéder
aux agences nationales compétentes à l’adresse Internet suivante :
www.cept.org
t ECC
t Topics
t Other spectrum topics: SRD Regulations and indicative list of
equipment sub-classes
t EFIS and National Frequency Tables
2 Conseils importants d’utilisation
L’émetteur / récepteur répond à toutes les directives nécessaires de
l’Union européenne et porte donc le symbole .
•
L’émetteur / récepteur n’est conçu que pour une utilisation en inté-
rieur. Protégez-le de tout type de projections d’eau, des éclabous-
sures et d’une humidité de l’air élevée. Plage de température de
fonctionnement autorisée : 0 – 40 °C.
•
Pour le nettoyer, utilisez uniquement un chiffon sec et doux, en
aucun cas de produits chimiques ou d’eau.
•
Nous déclinons toute responsabilité en cas de dommages matériels
ou corporels si l’émetteur / récepteur est utilisé dans un but autre
que celui pour lequel il a été conçu, s’il n’est pas correctement
utilisé ou s’il n’est pas réparé par un technicien habilité ; en outre,
la garantie deviendrait caduque.
Lorsque l’émetteur / récepteur est définitivement retiré du
service, vous devez le déposer dans une usine de recy-
clage de proximité pour contribuer à son élimination non
polluante.
CARTONS ET EMBALLAGE
PAPIER À TRIER
3 Utilisation
3.1 Insertion / remplacement des batteries
Pour l’alimentation, deux batteries 1,5 V de type R6 sont nécessaires.
Si la touche POWER / MUTE (2) brille en rouge, les batteries sont
mortes et doivent être remplacées.
•
Insérez uniquement des batteries de même type, remplacez tou-
jours les deux en même temps.
•
En cas de non utilisation prolongée de l’émetteur / récepteur, retirez
les batteries, elles pourraient couler et endommager l’appareil.

11
Français
Ouvrez le compartiment batterie (9) sur la face arrière de l’appareil. In-
sérez les batteries comme indiqué dans le compartiment et refermez.
Ne jetez pas les batteries dans la poubelle domestique.
Déposez-les dans un container spécifique pour contribuer
à leur élimination non polluante.
3.2 Branchement du microphone à l’émetteur
L’émetteur (corps noir avec un «T») a un microphone (3) intégré.
A la place, on peut utiliser le microphone cravate (11). Placez la
bonnette anti-pop sur le microphone. Fixez le cordon microphone
dans la pince (10), voir schéma 3, et fixez la pince sur le vêtement (par
exemple cravate), le plus près possible de la bouche. Reliez le micro-
phone à la prise (4). Le microphone interne est alors déconnecté.
3.3 Branchement de l’écouteur sur le récepteur
Le récepteur (boîtier gris avec un «R») a un microphone (3) intégré.
A la place, on peut utiliser l’écouteur livré. Pour habiller l’écouteur,
enroulez le revêtement en mousse autour de l’écouteur : placez
l’écouteur, avec le logo JTS vers l’arrière, dans la pochette sans im-
pression du revêtement. Mettez le revêtement autour de l’écouteur,
placez la seconde pochette sur l’écouteur. Le repère symbolise le
côté de la sortie du son. Reliez l’écouteur à la prise (4) et placez
l’écouteur sur votre oreille.
3.4 Positionnement de l’appareil sur le corps
L’émetteur / récepteur peut être fixé sur un vêtement (par exemple
ceinture, poche de pantalon) via son étrier (8) ou porté avec le tour
de cou livré (7) :
Attachez la boucle fine sur le clip (schéma 2), réglez la longueur
souhaitée en faisant glisser le bouton à pression et suspendez la
cordelette autour du cou. Lorsque le verrouillage est déverrouillé,
l’émetteur / récepteur peut être retiré facilement ou remplacé.
3.5 Allumage / réglage du canal de transmission
Tous les canaux disponibles sont indiqués dans le tableau sur la
page3. Pour un fonctionnement simultané de 22 systèmes au plus,
par exemple pour des présentations multilingues, sélectionnez les
canaux dans le même groupe. Les canaux d’un groupe n’interfèrent
pas entre eux.
1) Allumez tout d’abord uniquement le récepteur : maintenez la
touche POWER (2) enfoncée jusqu’à ce que l’affichage (5) brille.
2) Maintenez la touche SET (6) enfoncée jusqu’à ce que soit
brièvement affiché. Ensuite le chiffre gauche pour le groupe de
canal clignote. Avec la touche ou , sélectionnez le groupe.
3) Appuyez à nouveau sur la touche SET : le chiffre droit pour le
canal clignote. Sélectionnez le canal avec la touche ou .
4)
Pour mémoriser, appuyez à nouveau sur la touche SET.
s’affiche brièvement, le symbole (aucune réception) est visible.
Si, à la place, le symbole d’antenne s’affiche, des interférences
ou signaux d’un autre système de transmission sans fil sont reçus.
Dans ce cas, réglez un autre canal.
5) Allumez l’émetteur et réglez-le sur le même canal.
3.5.1 Informations sur l’affichage
Signification
Emetteur
Récepteur
/
Puissance émission 10 mW/ 20 mW ×
Témoin de réception ×
Arrêt automatique ×
Microphone coupé ×
Aucune réception ×
Avertissement sonore batterie ×
Batterie pleine × ×
Batterie vide × ×
Verrouillage des touches × ×
Numéro de groupe – numéro de canal × ×
3.6 Réglage du volume et de la sensibilité microphone /
coupure du son du microphone
1)
Sur le récepteur, réglez le volume pour le haut-parleur ou l’écou-
teur avec le réglage VOLUME (1).
Attention : ne réglez pas le volume de l’écouteur trop fort ; des
volumes élevés peuvent, à la longue, engendrer des troubles de
l’audition ! Le limiteur devrait toujours être allumé (chapitre 3.7).

Français
2)
Sur l’émetteur, réglez la sensibilité du microphone avec le
réglage VOLUME : si le volume est trop élevé et le signal mi-
crophone distordu, diminuez la sensibilité. Si le signal est trop
faible, on a un mauvais rapport signal / bruit ; augmentez alors
la sensibilité en conséquence.
3)
Pour couper le son du microphone pendant une pause de
discours, appuyez brièvement sur la touche POWER / MUTE (2)
sur l’émetteur. Sur l’affichage, le symbole est visible, et peu de
temps après, l’éclairage de l’affichage clignote. Pour rallumer le
microphone, appuyez à nouveau sur la touche POWER / MUTE.
3.7 Réglage de la puissance émission / limitation du volume
En haut à gauche dans le compartiment batterie de l’émetteur et du ré-
cepteur se trouve un petit interrupteur. (Si besoin, retirez les batteries.)
Utilisez l’interrupteur sur l’émetteur pour régler la puissance d’émis-
sion :
H (high) = puissance élevée pour une grande portée, mais durée de
fonctionnement des batteries réduite (affichage )
L (low) = faible puissance pour une durée de fonctionnement plus
longue mais faible portée (affichage )
Sur le récepteur, activez (ON) ou désactivez (OFF) le limiteur pour
limiter le volume pour l’écouteur.
3.8 Arrêt automatique / alerte batterie faible
Le récepteur peut s’éteindre automatiquement s’il ne reçoit pas
de signal de l’émetteur pendant 30 minutes.
1) Pour activer cette fonction, maintenez la touche SET sur le ré-
cepteur enfoncée jusqu’à ce que soit brièvement affiché.
Ensuite le chiffre gauche pour le groupe de canaux clignote.
2)
Maintenant, appuyez deux fois sur la touche SET pour que
s’affiche.
3) Avec la touche , activez la fonction (affichage ). Un sym-
bole de pendule s’affiche : il clignote si aucun signal n’est reçu.
Avec la touche , vous pouvez désactiver la fonction.
4)
Pour mémoriser le réglage, appuyez à nouveau sur la touche SET.
Si les batteries sont mortes, la touche POWER / MUTE (2) brille en
rouge, le symbole de batterie clignote. En plus, le récepteur émet
deux brefs signaux sonores.
1) Pour activer la signalisation acoustique, maintenez la touche SET
sur le récepteur enfoncée jusqu’à ce que s’affiche briève-
ment. Ensuite le chiffre gauche clignote pour le groupe de canaux.
2) Maintenant, appuyez trois fois sur la touche SET jusqu’à ce que
s’affiche.
3) Avec la touche , activez la fonction (affichage ). Un sym-
bole de sonnette s’affiche. Avec la touche , vous pouvez
désactiver la fonction.
4)
Pour mémoriser le réglage, appuyez à nouveau sur la touche SET.
3.9 Verrouillage des touches
Pour protéger de tout déréglage ou manipulation, on peut activer un
verrouillage des touches : maintenez les touches et enfoncées
simultanément jusqu’à ce que s’affiche brièvement et que
le symbole s’affiche. Si maintenant une touche est enfoncée, le
message s’affiche.
Pour désactiver le verrouillage, maintenez les touches et
enfoncées jusqu’à ce que soit brièvement affiché et le
symbole s’éteint.
3.10 Arrêt
Pour arrêter les appareils, maintenez la touche POWER enfoncée
jusqu’à ce que l’affichage indique .
4 Caractéristiques techniques
Plage de fréquence radio : � � � � 506 – 542 MHz (canaux voir page 3)
Plage de fréquences audio :
� � � 40 Hz – 18 kHz
Puissance émission (EIRP) : � � � L : 10 mW, H : 20 mW
Portée : � � � � � � � � � � � � � � � � � � jusqu’à 200 m
Microphone dans l’émetteur : � microphone électret
Alimentation :
� � � � � � � � � � � � � 2 batteries / accus de type R6
Durée fonc� : � � � � � � � � � � � � � � 10 h environ
Dimensions (l × h × p) : � � � � � � 62 × 112 × 28 mm
Poids : � � � � � � � � � � � � � � � � � � � 72 g
Tout droit de modification réservé.
Notice d’utilisation protégée par le copyright de MONACOR
®
INTERNATIONAL
GmbH & Co. KG. Toute reproduction même partielle à des fins commerciales
est interdite.
12

13
Español
Español Página
Contenidos
Español
Sistema de Visitas Guiadas
Estas instrucciones van dirigidas a usuarios sin ningún conocimiento
técnico específico. Lea atentamente estas instrucciones antes de
funcionamiento y guárdelas para usos posteriores. Podrá encontrar
una ilustración del aparato en la página 2.
1 Aplicaciones
En combinación con uno o varios receptores del tipo TG-98RA / 5, el
emisor TG-98TA / 5 crea un sistema de transmisión de voz inalámbrico
móvil, p. ej. para visitas guiadas o discursos en varios idiomas. El
rango de transmisión depende de las condiciones del lugar; el rango
máximo es de 200 m.
El rango de transmisión inalámbrico es 506 – 542 MHz. Los ca-
nales de transmisión están divididos en 6 grupos. Se pueden utilizar
todos los canales de un grupo (22 canales máximo) al mismo tiempo
sin interferencias mutuas.
1.1 Conformidad y aprobación
Por la presente, MONACOR INTERNATIONAL declara que los aparatos
TG-98TA / 5 y el TG-98RA / 5 cumplen con la directiva 2014 / 53 / UE. Las
declaraciones de conformidad de la UE están disponibles en Internet:
www.jts-germany.com o www.monacor.com
Se aplican restricciones o requisitos en los siguientes países:
CZ DE EL FI FR
IT LT MT PL
En la República Federal Alemana, los aparatos necesitan una asigna-
ción de frecuencia (para lo que hay que pagar un cargo).
En otros países, se necesita presentar la aprobación correspondiente.
Antes de utilizar el sistema de transmisión fuera de Alemania, pón-
gase en contacto con la filial de MONACOR o con las autoridades
competentes del país. Puede encontrar enlaces a las autoridades
nacionales desde las siguientes direcciones de Internet:
www.cept.org
t ECC
t Topics
t Other spectrum topics: SRD Regulations and indicative list of
equipment sub-classes
t EFIS and National Frequency Tables
2 Notas Importantes
El emisor / receptor cumple con todas las directivas requeridas por la
UE y por lo tanto está marcado con el símbolo .
•
El emisor / receptor está adecuado para utilizarse sólo en interiores.
Protéjalo contra goteos, salpicaduras y humedad elevada. Rango
de temperatura ambiente admisible: 0 – 40 °C.
•
Utilice sólo un paño suave y seco para la limpieza; no utilice nunca
ni agua ni productos químicos.
•
No podrá reclamarse garantía o responsabilidad alguna por cual-
quier daño personal o material resultante si el emisor / receptor se
utiliza para otros fines diferentes a los originalmente concebidos,
si no se utiliza adecuadamente o no se repara por expertos.
Si va a poner el emisor / receptor definitivamente fuera de
servicio, llévelo a la planta de reciclaje más cercana para
que su eliminación no sea perjudicial para el medioam-
biente.
3 Funcionamiento
3.1 Insertar / Sustituir las baterías
Para la alimentación, se necesitan dos baterías de 1,5 V tipo AA.
Cuando se ilumina en rojo el botón POWER / MUTE (2), significa que
las baterías están descargadas y deberían cambiarse.
•
Inserte sólo dos baterías del mismo tipo y sustitúyalas siempre
a la vez.
•
Si el emisor / receptor no se va a utilizar durante un largo periodo
de tiempo, extraiga las baterías para prevenir daños por culpa de
algún derrame.
Abra el compartimento de las baterías (9) de la parte posterior. Inserte
las baterías como se indica en el compartimento y luego cierre el
compartimento de nuevo.
No deposite nunca las baterías gastadas en el contenedor
normal. Para proteger el medioambiente, llévelas siem-
pre a un contenedor especializado (p. ej. el contenedor
selectivo de su tienda).
Español
Español Página

14
Español
3.2 Conectar el micrófono al emisor
El emisor (carcasa negra marcada con una “T”) está equipado con
un micrófono interno (3). En vez del micrófono interno, se puede
utilizar como alternativa el micrófono de pinza (11). Coloque la es-
puma de protección en el micrófono. Ponga el cable del micrófono
en el soporte (10) como se ilustra en la fig. 3 y fije el soporte a su
ropa (p. ej. a la corbata), y tan cerca de su boca como sea posible.
Conecte el micrófono a la toma (4). De este modo, se desconectará
el micrófono interno.
3.3 Conectar el auricular al receptor
El receptor (carcasa gris marcada con una “R”) está equipado con un
altavoz integrado (3). En vez de este altavoz, el auricular entregado
se puede utilizar para reproducir sonido. Envuelva el auricular con la
funda de espuma como si fuera una almohadilla: Ponga el auricular
(con el logo de JTS detrás) en el bosillo sin estampar de la funda.
Envuelva la funda alrededor del auricular y deslice el segundo bolsillo
por él. La impresión marcará el lado por el que se emite el sonido.
Conecte el auricular a la toma (4) y colóqueselo en su oreja.
3.4 Opciones de uso
Hay dos opciones de uso para el emisor / receptor: Fije la pinza (8) en
su ropa (p. ej. en el cinturón o en el bolsillo del pantalón) o póngalo
en el cordón entregado (7):
Pase el lazo fino del cordón por la pinza (fig. 2), desplace el tope
para ajustar la longitud deseada del cordón y póngalo alrededor de
su cuello. Cuando se desbloquee la hebilla, el emisor / receptor se
podrá cambiar o quitar con facilidad.
3.5 Conectar / Configurar el canal de transmisión
La tabla de la página 3 muestra todos los canales disponibles. Cuando
se utilizan hasta 22 sistemas de visitas guiadas al mismo tiempo
(p. ej. conferencias en varios idiomas), seleccione los canales del
mismo grupo. No habrá interferencias mutuas entre los canales del
mismo grupo.
1) Por el momento, conecte sólo el receptor: Mantenga pulsado el
botón POWER (2) hasta que se ilumine el visualizador (5).
2)
Mantenga pulsado el botón SET (6) hasta que en el visualizador se
indique . El dígito izquierdo del grupo de canales empezará
a parpadear. Pulse el botón o para seleccionar el grupo.
3)
Pulse de nuevo el botón SET: El dígito derecho del grupo de
canales empezará a parpadear. Utilice el botón o para
seleccionar el canal.
4) Pulse el botón SET de nuevo para guardar el ajuste. Se indicará
brevemente y aparecerá el símbolo (sin recepción). Si
en su lugar aparece el símbolo de antena , significa que se
reciben interferencias o señales de otro sistema de transmisión
inalámbrico. En este caso, utilice un canal diferente.
5) Conecte el emisor y ajústelo en el canal del receptor.
3.5.1 Información del visualizador
Significado
Emisor
Receptor
/
Potencia de transmisión 10 mW/ 20 mW ×
Indicación de recepción ×
Desconexión automática ×
Micrófono silenciado ×
Sin recepción ×
Alarma de batería baja (pitido) ×
Batería llena × ×
Batería descargada × ×
Bloqueo × ×
Numero de grupo – número de canal × ×
3.6 Ajustar el volumen y la sensibilidad del micrófono /
Silenciar el micrófono
1) Utilice el control VOLUME (1) del receptor para ajustar el volu-
men de los altavoces o del auricular.
Advertencia: No ajuste nunca el auricular en un volumen muy
elevado. Los volúmenes altos permanentes pueden dañar su
oído. El limitador debería estar siempre activado (apartado 3.7).
2)
Utilice el control VOLUME del emisor para ajustar la sensibilidad
del micrófono. Cuando el volumen es demasiado alto y se distor-
siona la señal del micrófono, reduzca la sensibilidad. Si el volumen

15
Español
de la señal es demasiado bajo, habrá una relación ruido / sonido
baja; en este caso, aumente la sensibilidad según corresponda.
3)
Para silenciar el micrófono durante intervalos, pulse breve-
mente el botón POWER / MUTE (2) del emisor. Se mostrará el
símbolo y la luz de fondo del visualizador empezará a parpadear
en unos instantes. Para quitar el silencio del micrófono, pulse
brevemente el botón POWER / MUTE de nuevo.
3.7 Ajustar la potencia de transmisión / Limitar el volumen
Podrá encontrar un pequeño interruptor en la parte superior iz-
quierda del compartimento de la batería del emisor / receptor (extraiga
las baterías, si es necesario).
Utilice el interruptor para ajustar la potencia de transmisión del
emisor:
H (high) = potencia alta para un rango largo pero con una duración
de las baterías corta (indicación )
L (low) = potencia baja para una duración de las baterías larga pero
con un rango corto (indicación )
El receptor está equipado con un limitador para limitar el volumen
del auricular. Para activar este limitador, ajústelo en ON; para desac-
tivarlo, ajústelo en OFF.
3.8 Desconexión automática /Alarma de batería baja
Hay una función disponible que desconectará automáticamente
el receptor si éste no recibe ninguna señal del emisor en 30 minutos.
1) Para activar esta función, mantenga pulsado el botón SET del
receptor hasta que se indique brevemente. El dígito iz-
quierdo del grupo de canales empezará a parpadear.
2) Pulse el botón SET dos veces hasta que se indique .
3)
Utilice el botón para activar la función (indicación ).
Aparecerá un símbolo de reloj ; este símbolo empezará a par-
padear cuando no se reciba ninguna señal. Para desactivar la
función, utilice el botón .
4) Pulse el botón SET de nuevo para guardar el ajuste.
Cuando las baterías estén descargadas, el botón POWER / MUTE (2)
se iluminará en rojo y el símbolo de batería empezará a parpa-
dear. Además, está disponible una alarma de batería baja: El receptor
emitirá dos pitidos breves cuando las baterías estén descargadas.
1)
Para activar la función de alarma, mantenga pulsado el botón SET
del receptor hasta que se indique brevemente. El dígito
izquierdo del grupo de canales empezará a parpadear.
2) Pulse el botón SET tres veces para que en el visualizador se in-
dique .
3)
Utilice el botón para activar la función (indicación ).
Aparecerá un símbolo de campana . Para desactivar la función,
utilice el botón .
4) Pulse el botón SET de nuevo para guardar el ajuste.
3.9 Bloqueo
Se ofrece una función de bloqueo para proteger el emisor / receptor
del funcionamiento no deseado o de la manipulación: Mantenga
pulsados los botones y al mismo tiempo hasta que se
indique brevemente y aparezca el símbolo . Ahora, cuando se pulse
cualquier botón, aparecerá el mensaje .
Para desactivar la función de bloqueo, mantenga pulsados los
botones y hasta que se indique brevemente y desa-
parezca el símbolo .
3.10 Desconexión
Para desconectar el emisor / receptor, mantenga pulsado el botón
POWER hasta que en el visualizador se indique .
4 Especificaciones
Rango de frecuencias de radio: 506 – 542 MHz
(para los canales, consultar la página 3)
Rango de frecuencias de audio:
40 Hz – 18 kHz
Potencia de transmisión (EIRP): L: 10 mW, H: 20 mW
Rango de funcionamiento: � � � � 200 m máx�
Micrófono del emisor: � � � � � � � Micrófono electret
Alimentación:
� � � � � � � � � � � � � 2 baterías (rec�) tipo AA
Tiempo de funcionamiento: � � � 10 h aprox�
Dimensiones (B × H × P): � � � � 62 × 112 × 28 mm
Peso: � � � � � � � � � � � � � � � � � � � � 72 g
Sujeto a modificaciones técnicas.
Manual de instrucciones protegido por el copyright de MONACOR
®
INTERNATIONAL GmbH & Co. KG. Toda reproducción mismo parcial para fines
comerciales está prohibida.

-
 1
1
-
 2
2
-
 3
3
-
 4
4
-
 5
5
-
 6
6
-
 7
7
-
 8
8
-
 9
9
-
 10
10
-
 11
11
-
 12
12
-
 13
13
-
 14
14
-
 15
15
-
 16
16


Monacor JTS TG-98RA /5 Benutzerhandbuch
- Typ
- Benutzerhandbuch
- Dieses Handbuch eignet sich auch für
in anderen Sprachen
- English: Monacor JTS TG-98RA /5 User manual
- français: Monacor JTS TG-98RA /5 Manuel utilisateur
- español: Monacor JTS TG-98RA /5 Manual de usuario
Verwandte Artikel
Andere Dokumente
-
IMG Stage Line TXS-865HT Benutzerhandbuch
-
IMG STAGELINE TXS-865HSE Benutzerhandbuch
-
-
-
IMG STAGELINE 25.5350 Benutzerhandbuch
-
-
IMG Stage Line TXS-727 Benutzerhandbuch
-
-
JTS MH-8990 Benutzerhandbuch
-