JTS UF-10TH/12 Benutzerhandbuch
- Kategorie
- Mikrofone
- Typ
- Benutzerhandbuch

Bedienungsanleitung
Instruction Manual
Mode d’emploi
Manual de instrucciones
Vertrieb von JTS-Produkten — Distribution of JTS products
UF-10TH/12
Dynamisches Mikrofon mit UHF-Sender
Dynamic Microphone with UHF Transmitter
Microphone main dynamique avec émetteur UHF
Micrófono Dinámico con Emisor UHF
®
624 – 694 MHz

2
DEUTSCHENGLISHESPAÑOL FRANÇAIS
Bevor Sie einschalten …
Wir wünschen Ihnen viel Spaß mit Ihrem
neuen Gerät von JTS. Bitte lesen Sie diese
Bedienungsanleitung vor dem Betrieb gründ-
lich durch. Nur so lernen Sie alle Funktions-
möglichkeiten kennen, vermeiden Fehlbe-
dienungen und schützen sich und Ihr Gerät
vor eventuellen Schäden durch unsachge-
mäßen Ge brauch. Heben Sie die Anleitung
für ein späteres Nach lesen auf.
Der deutsche Text beginnt auf der Seite 4.
Before switching on …
We wish you much pleasure with your new
JTS unit. Please read these operating in -
structions carefully prior to operating the unit.
Thus, you will get to know all functions of the
unit, op er ating errors will be prevented, and
yourself and the unit will be protected against
any damage caused by improper use. Please
keep the operating instructions for later use.
The English text starts on page 10.
Avant toute installation …
Nous vous souhaitons beaucoup de plaisir à
utiliser cet appareil JTS. Lisez ce mode d'em-
ploi entièrement avant toute utilisation. Uni-
quement ainsi, vous pourrez apprendre lʼen-
semble des possibilités de fonctionnement
de lʼappareil, éviter toute manipulation erro-
née et vous protéger, ainsi que lʼappareil, de
dommages éventuels engendrés par une uti-
lisation inadaptée. Conservez la notice pour
pouvoir vous y reporter ultérieurement.
La version française se trouve page 16.
Antes de cualquier instalación ...
Le deseamos una buena utilización para su
nue vo aparato de JTS. Por favor, lea estas
in s trucciones de uso atentamente antes de
hacer funcionar el aparato. De esta manera
conocerá todas las funciones de la unidad,
se pre vendrán errores de operación, usted y
el apa rato estarán protegidos en contra de
todo daño causado por un uso inadecuado.
Por favor, guarde las instrucciones para una
futura utilización.
La versión española comienza en la pági-
na 22.


DEUTSCH
4
Inhalt
1 Übersicht der Bedienelemente . . . . . . . . . 4
2 Wichtige Hinweise für den Gebrauch . . . . 5
3 Einsatzmöglichkeiten . . . . . . . . . . . . . . . . . 5
3.1 Konformität und Zulassung . . . . . . . . . . . . . 5
4 Inbetriebnahme . . . . . . . . . . . . . . . . . . . . . . 5
4.1 Batterien einsetzen oder wechseln . . . . . . . 5
4.2 Mikrofon ein- und ausschalten . . . . . . . . . . . 6
4.3 Einstellungen über das Menü . . . . . . . . . . . . 6
4.4 Grundeinstellungen . . . . . . . . . . . . . . . . . . . 6
4.5 Übertragungsfrequenz einstellen . . . . . . . . . 7
4.5.1 REMOSET®-Funktion . . . . . . . . . . . . . . . . 7
4.5.2 Frequenz manuell einstellen . . . . . . . . . . . 8
4.5.3 Frequenz aus einer Gruppe wählen . . . . . 8
4.6 Sendeleistung einstellen . . . . . . . . . . . . . . . 8
4.7 Mikrofonempfindlichkeit einstellen . . . . . . . . 8
4.8 Mikrofon stummschalten . . . . . . . . . . . . . . . 8
4.9 Tastensperre . . . . . . . . . . . . . . . . . . . . . . . . . 9
5 Technische Daten . . . . . . . . . . . . . . . . . . . . 9
Übertragungsfrequenzen . . . . . . . . . . . . . . 28
Auf der ausklappbaren Seite 3 finden Sie alle
beschriebenen Bedienelemente.
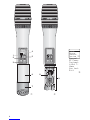
1 Übersicht der Bedienelemente
1Taste zum Ein- und Ausschalten und zum
Stummschalten des Mikrofons
Einschalten: Taste kurz drücken
Stummschaltung ein/aus: Taste kurz drücken;
wenn das Mikrofon stummgeschaltet ist, blinkt
die LED (2)
Ausschalten: Taste 2 Sek. gedrückt halten, bis
das Display Power OFF anzeigt.
2Signal-LED
blinkt rot,
wenn das Mikrofon stummgeschaltet ist
leuchtet 5 Sekunden lang blau,
wenn durch die REMOSET-Funktion das
Mikrofon vom zugehörigen Empfänger auf
dieselbe Frequenz eingestellt wurde
(Kap. 4.5.1)
3Tasten und zum Anwählen eines Menü-
punktes und zum Ändern von Einstellungen
4Display, es zeigt an:
den Gerätenamen, frei wählbar (10 Zeichen)
G = die Gruppennummer (1 … 12)
C = die Kanalnummer (1 … 60)
MHz = die Empfangsfrequenz
(624,000 … 693,975 MHz)
. . dB = die eingestellte Mikrofonempfindlichkeit
(
-
18 dB … 12 dB)
= den Batteriezustand
5Taste SET zum Aufrufen des Einstellmenüs
Abb. 3 (Taste 2 s gedrückt halten, bis das Menü
im Display erscheint), zum Aufrufen eines
Menüpunktes und zum Speichern einer Einstel-
lung (Kap. 4.3)
6Schraubhülse für das Batteriefach (9)
7Kappe zur Kennzeichnung verschiedener Mikro-
fone: Kann abgezogen werden und gegen eine
der beiliegenden Farbkappen ausgetauscht
werden
8Riegel zum Halten der Batterien; lässt sich zum
Wechseln der Batterien nach unten schieben
und aufklappen
9Batteriefach

DEUTSCH
5
2 Wichtige Hinweise für den Gebrauch
Das Funkmikrofon entspricht allen relevanten Richt-
linien der EU und ist deshalb mit gekennzeichnet.
GDas Mikrofon ist nur zur Verwendung im Innen-
bereich geeignet. Schützen Sie es vor Tropf- und
Spritzwasser, hoher Luftfeuchtigkeit und Hitze
(zulässiger Einsatztemperaturbereich 0 – 40 °C).
GVerwenden Sie für die Reinigung nur ein trocke-
nes, weiches Tuch, niemals Wasser oder Chemi-
kalien.
GWird das Mikrofon zweckentfremdet, falsch
bedient oder nicht fachgerecht repariert, kann
keine Haftung für daraus resultierende Sach-
oder Personenschäden und keine Garantie für
das Mikrofon übernommen werden.
3 Einsatzmöglichkeiten
Dieses dynamische Handmikrofon mit integriertem
UHF-Sender bildet mit dem Empfänger UF-10R /12
ein drahtloses Audio-Übertragungssystem. Zum
Lieferumfang gehören ein Mikrofonkoffer, ein
Mikrofonhalter und aufsteckbare Farbkappen zur
Kennzeichnung des Mikrofons.
Besonders komfortabel ist das Audio-Übertra-
gungssystem durch die REMOSET-Funktion. Damit
wird per Knopfdruck über ein 2,4-GHz-Funksignal
das Mikrofon auf die am Empfänger gewählte
Übertragungsfrequenz eingestellt.
3.1 Konformität und Zulassung
Hiermit erklärt MONACOR INTERNATIONAL, dass
sich das Funkmikrofon UF-10TH/12 in Überein-
stimmung mit den grundlegenden Anforderungen
und den übrigen einschlägigen Be stimmungen der
Richt linie 1999 / 5 / EG befindet. Die Konformitätser-
klärung ist im Internet verfügbar:
www.jts-germany.de oder www.monacor.com
Dieses Funkmikrofon darf in folgenden Ländern
betrieben werden:
DE
Das Funkmikrofon muss im Gebiet der Bundes -
republik Deutschland eine Frequenzzuteilung
(kostenpflichtig) erhalten. Die Formulare und Hin-
weise zur Anmeldung finden Sie im Internet auf der
Seite der Bundesnetzagentur:
www.bundesnetzagentur.de
In anderen Ländern muss eine entsprechende Ge -
nehmigung beantragt werden. Informieren Sie sich
bitte vor der Inbetriebnahme des Geräts außerhalb
Deutschlands bei der MONACOR-Niederlassung
oder der entsprechenden Behörde des Landes.
Links zu den nationalen Behörden finden Sie über
die folgende Internetadresse:
www.cept.org
→ECC
→Topics
→Short Range Devices (SRD) and other R&T TE
sub-classes
→EFIS and National Frequency Tables
4 Inbetriebnahme
4.1 Batterien einsetzen oder wechseln
Für die Stromversorgung werden zwei 1,5-V-
Batterien der Größe Mignon (AA) benötigt.
GSetzen Sie nur Batterien des gleichen Typs ein
und tauschen Sie sie immer zusammen aus.
GNehmen Sie bei längerem Nichtgebrauch die
Batterien sicherheitshalber heraus. So bleibt das
Mikrofon bei einem eventuellen Auslaufen der
Batterien unbeschädigt.
1) Die Hülse (6) unten am Mikrofon ab schrauben.
2) Den Riegel (8) zum Halten der Batterien nach
unten schieben und aufklappen.
3) Die Batterien, mit den Plus- und Minuspolen wie
im Fach aufgedruckt, einsetzen.
4) Den Riegel zurückklappen und zur Verriegelung
nach oben schieben.
5) Die Hülse wieder auf das Mikrofon schrauben.
Soll das Mikrofon endgültig aus dem
Betrieb genommen werden, übergeben
Sie es zur umweltgerechten Entsorgung
einem örtlichen Recyclingbetrieb.
Verbrauchte Batterien dürfen nicht im
Hausmüll entsorgt werden. Geben Sie sie
nur in den Sondermüll (z. B. Sammelbe-
hälter bei Ihrem Fachhändler).

DEUTSCH
6
4.2 Mikrofon ein- und ausschalten
1) Das Mikrofon mit der Taste (1) einschalten.
Die Hintergrundbeleuchtung des Displays (4)
leuchtet einige Sekunden lang. Beim Betätigen
einer Taste (1, 3, 5) schaltet die Beleuchtung er -
neut ein.
2) Das Display zeigt folgende Informationen an:
den Gerätenamen (10 Zeichen), frei wählbar,
z. B. UF-10TH wie in Abb. 1
G = die Gruppennummer (1 … 12)
C = die Kanalnummer (1 … 60)
MHz = die Empfangsfrequenz
(624,000 … 693,975 MHz)
. . dB = die eingestellte Mikrofonempfindlichkeit
(
-
18 dB … 12 dB)
den Batteriezustand:
voll entladen
3) Die Kappe (7) zur Kennzeichnung verschiede-
ner Mikrofone lässt sich abziehen und gegen
eine der beiliegenden Farbkappen austauschen.
4) Zum Ausschalten die Taste 2 Sek. gedrückt
halten, bis das Display Power OFF anzeigt.
4.3 Einstellungen über das Menü
Alle Einstellungen erfolgen über ein Menü:
1) Zum Aufrufen des Hauptmenüs (Abb. 3) die
Taste SET (5) zwei Sekunden gedrückt halten,
bis das Menü im Display (4) erscheint.
2) Den gewünschten Menüpunkt mit der Taste
oder (3) anwählen und mit der Taste SET den
Menüpunkt aufrufen.
3) Die Einstellung mit der Taste oder vorneh-
men.
4) Sind bei einem Menüpunkt mehrere Einstell-
funktionen vorhanden (z. B. Gruppen- und
Kanalnummer), mit der Taste SET von einer
Funktion zur nächsten weiterspringen.
5) Zum Speichern einer Einstellung die Taste SET
drücken. Das Display zeigt kurz Saving… an,
dann erscheint wieder das Hauptmenü.
Um einen Menüpunkt ohne Änderung zu
verlassen, ebenfalls die Taste SET drücken.
Das Display zeigt kurz Cancel an, dann er -
scheint wieder das Hauptmenü.
6) Zum Verlassen des Hauptmenüs den Menü-
punkt Exit mit der Taste oder anwählen
und die Taste SET drücken.
Alle Einstellmöglichkeiten über das Menü sind in
den folgenden Kapiteln beschrieben.
4.4 Grundeinstellungen
1) Lässt sich das Display (4) nicht gut ablesen,
über den Menüpunkt Contrast die Kontrast-
einstellung aufrufen:
a) Die Taste SET (5) zwei Sekunden gedrückt
halten, bis das Hauptmenü (Abb. 3) erscheint.
b) Den Menüpunkt Contrast mit der Taste
oder (3) anwählen und die Taste SET
drücken.
Abb. 4
c) Den Kontrast mit der Taste oder ein-
stellen. Das Display zeigt den eingestellten
Wert zwischen
-
3 und 3 an.
d) Die Einstellung mit der Taste SET speichern.
Das Hauptmenü erscheint wieder.
e) Zum Ausblenden des Hauptmenüs den
Menüpunkt Exit mit der Taste oder
anwählen und die Taste SET drücken oder
zum Ändern einer anderen Einstellung den
entsprechenden Menüpunkt anwählen und
die Taste SET drücken.
2) Die Dauer der Displaybeleuchtung lässt sich
über den Menüpunkt Light T einstellen:
Abb. 5
Always OFF= keine Beleuchtung
5 - 30 Sec. = Zeit in Sekunden
Always ON = ständige Beleuchtung
Tipp: Um die Batterien zu schonen, sollte Always ON
nicht als endgültige Einstellung gewählt werden.
3) Über den Menüpunkt Name lässt sich ein Gerä-
tename eingeben (max. 10 Zeichen), der im
Display erscheint, wie in der Abb. 1 als Beispiel
der Name UF-10TH. Bei dem Betrieb mit meh-
reren Mikrofonen können so die Mikrofone
leicht unterschieden und zugeordnet werden.
Nach dem Aufrufen des Menüpunkts Name ist
die erste Zeichenstelle angewählt.
Abb. 6
Das gewünschte Zeichen mit der Taste oder
auswählen. Mit der Taste SET auf die
nächste Zeichenstelle springen. Nach dem Ein-
stellen des Namens die Taste SET so oft drü-
cken, bis das Display Saving… anzeigt.
Danach er scheint wieder das Hauptmenü.
User Name
UF-10TH
Char:1/10
Light Time
15 Sec.
Contrast
0

DEUTSCH
7
4.5 Übertragungsfrequenz einstellen
Das Mikrofon noch ausgeschaltet lassen. Zuerst
den Empfänger auf eine störungsfreie Frequenz
einstellen, siehe Bedienungsanleitung des Emp-
fängers. Dann das Mikrofon auf dieselbe Frequenz
einstellen. Dazu gibt es drei Möglichkeiten:
1. Wird das Mikrofon mit dem Empfänger UF-
10R/12 betrieben, ist es am einfachsten die pa -
tentierte REMOSET-Funktion zu nutzen. Durch
Drücken der Taste REMOSET am Empfänger
stellt sich das Mikrofon auf die am Empfänger
gewählte Übertragungsfrequenz ein (Kap. 4.5.1).
2. Die Übertragungsfrequenz lässt sich zwischen
624,000 MHz und 693,975 MHz manuell ein-
stellen (Kap. 4.5.2).
3. Für den Betrieb von mehreren Audio-Übertra-
gungssystemen gleichzeitig sind in 12 Gruppen
bis zu 60 Kanäle pro Gruppe zusammengestellt
(Tabelle Seite 28, 29). Unter optimalen
Bedingungen können aus einer Gruppe bis zu
40 Kanäle gleichzeitig für die Audio-Übertragun-
gen genutzt werden. Wurde der Empfänger auf
einen Kanal aus diesen Gruppen eingestellt,
denselben Kanal für das Mikrofon auswählen
(Kap. 4.5.3).
4.5.1 REMOSET®-Funktion
Für die REMOSET-Funktion müssen folgende Be -
dingungen erfüllt sein:
1. Weder am Mikrofon noch am Empfänger darf
ein Menü aufgerufen sein.
2. Das Mikrofon muss eingeschaltet sein und sich
in der Nähe des Empfängers befinden (Reich-
weite der REMOSET-Übertragung ca. 10 m).
3. Das Mikrofon muss auf dieselbe Identifikations-
nummer (ID-Nr.) wie der Empfänger eingestellt
sein oder die Funktion ID-Nr. muss ausgeschal-
tet sein (siehe Absatz „Identifikationsnummer“).
4. Die REMOSET-Funktion darf nicht gesperrt sein
(siehe Absatz „REMOSET-Funktion sperren“).
5. Der Empfänger oder das Mikrofon darf nicht ge -
sperrt sein (Kap. 4.9).
6. Die Signal-LED (2) darf nicht blinken. Blinkt sie,
ist das Mikrofon stummgeschaltet. Dann die
Taste (1) drücken, sodass die LED erlischt.
Identifikationsnummer
Jedem Mikrofon / Empfänger-Paar muss eine andere
Identifikationsnummer (ID-Nr.) zugewiesen wer-
den, damit sich die einzelnen Paare bei der REMO-
SET-Übertragung nicht gegenseitig beeinflussen.
Wird nur ein Mikrofon / Empfänger-Paar verwendet,
kann die voreingestellte ID-Nr. 0 beibehalten wer-
den. Zum Ändern der ID-Nr.:
1) Über den Menüpunkt Device ID des Haupt-
menüs die Einstellung für die ID-Nr. aufrufen.
Abb. 7
2) Die ID-Nr. mit der Taste oder einstellen.
3) Die Taste SET drücken. Jetzt mit der Taste
die Funktion ausschalten (OFF) oder mit der
Taste einschalten (ON). Bei ausgeschalteter
Funktion kann die REMOSET-Übertragung von
jedem Empfänger UF-10R /12 erfolgen, bei ein-
geschalteter Funktion nur vom einem Empfän-
ger mit derselben ID-Nr.
4) Die Einstellung mit der Taste SET speichern.
REMOSET®-Übertragung
Am Empfänger die Taste REMOSET drücken.
Sobald das Mikrofon auf die Übertragungsfrequenz
bzw. auf die Gruppe und den Übertragungskanal
des Empfängers eingestellt ist, leuchtet die Signal-
LED (2) fünf Sekunden lang blau.
Leuchtet die Signal-LED nicht auf, konnte das
Mikrofon nicht automatisch eingestellt werden. Am
Empfänger blinkt dann die Taste REMOSET lang-
sam. Zur möglichen Fehlerursache siehe die
Punkte 1. – 6. am Anfang des Kapitels. Die Einstel-
lungen am Mikrofon und eventuell am Empfänger
überprüfen und korrigieren. Dann die Taste REMO-
SET des Empfängers erneut betätigen.
REMOSET-Funktion sperren
Um eine automatische Frequenzeinstellung zu ver-
hindern, lässt sich die REMOSET-Funktion sperren.
1) Im Hauptmenü den Menüpunkt Remoset auf-
rufen.
Abb. 8
2) Die Funktion mit der Taste sperren (OFF)
oder mit der Taste einschalten (ON).
3) Die Einstellung mit der Taste SET speichern.
Remote Set
ON
OFF
Device ID
0
ID:ON

4.5.2 Frequenz manuell einstellen
1) Über den Menüpunkt Freq. des Hauptmenüs
die Frequenzeinstellung aufrufen.
Abb. 9
2) Die Frequenz mit der Taste oder in 1-MHz-
Schritten einstellen.
3) Die Taste SET drücken, sodass die Ziffern nach
dem Punkt (= Komma) markiert sind. Eine Fein-
einstellung in 0,025-MHz-Schritten mit der
Taste oder vornehmen. Ist die Frequenz
identisch mit der eines Kanals in einer Gruppe,
wird die Gruppen- und Kanalnummer in der
mittleren Zeile angezeigt.
4) Zum Speichern der eingestellten Frequenz die
Taste SET ein zweites Mal drücken.
4.5.3 Frequenz aus einer Gruppe wählen
1) Über den Menüpunkt Group des Hauptmenüs
die Gruppen- und Kanalauswahl aufrufen.
Abb. 10
2) Die Gruppe mit der Taste oder auswählen.
3) Die Taste SET drücken, sodass die Kanalzahl
markiert ist. Dann mit der Taste oder den
Kanal auswählen. Die zugehörige Empfangsfre-
quenz wird in der unteren Zeile angezeigt.
4) Die Einstellung mit der Taste SET speichern.
4.6 Sendeleistung einstellen
1) Im Hauptmenü den Menüpunkt RF Power auf-
rufen.
Abb. 11
2) Mit der Taste die Einstellung Low oder mit
der Taste die Einstellung Hi wählen.
Hi = hohe Leistung (50 mW) für eine große
Reichweite, jedoch kürzere Betriebs-
dauer der Batterien
Low = geringe Leistung (10 mW) für eine län-
gere Betriebsdauer, jedoch dafür kür-
zere Reichweite
3) Die Einstellung mit der Taste SET speichern.
4.7 Mikrofonempfindlichkeit einstellen
Mit der Einstellung der Empfindlichkeit wird das
Mikrofon an die Lautstärke der Stimme oder des
Instruments angepasst.
1) Im Hauptmenü den Menüpunkt Sensit. auf-
rufen.
Abb. 12
2) Die Empfindlichkeit nach der Anzeige AF des
Empfängers so einstellen, dass ein optimaler
Lautstärkepegel des Mikrofons er reicht wird.
Bei zu hoher Lautstärke verzerrt das Mikrofon,
dann mit der Taste einen niedrigeren Wert
einstellen (min.
-
18 dB). Bei zu geringer Laut-
stärke ergibt sich ein schlechter Rauschab-
stand, dann mit der Taste einen höheren
Wert einstellen (max. 12 dB).
4.8 Mikrofon stummschalten
Um das Mikrofon für kurze Zeit stummzuschalten,
z. B. in Sprech- oder Gesangspausen, die Taste
kurz drücken. Zur Signalisierung blinkt die LED (2)
rot und bei dem Empfänger UF-10R /12 wird im Dis-
play anstelle des Batteriesymbols die Meldung
MUTE angezeigt. Das Mikrofon sendet zwar weiter-
hin, aber es wird kein Ton übertragen. Zum Wie-
dereinschalten des Tons die Taste erneut drü-
cken.
Sensitivity
0 dB
Frequency
G:7 C:13
640.000
RF Power
Hi
Low
Group/Chan
G: 5
C: 1
625.975
8
DEUTSCH

4.9 Tastensperre
Zum Schutz gegen ein versehentliches Ausschal-
ten und Verstellen des Mikrofons kann eine Tas-
tensperre aktiviert werden. Bei aktivierter Sperre
kann das Mikrofon aber weiterhin stummgeschaltet
und auch wieder eingeschaltet werden.
Sperre aktivieren
1) Über den Menüpunkt Key Lock des Haupt -
menüs die Sperrfunktion aufrufen.
Abb. 13
2) Die Sperre mit der Taste einschalten (ON).
3) Die Einstellung mit der Taste SET speichern.
Wird jetzt die Taste SET, oder gedrückt,
erscheint die Meldung:
Press Set for 2 Sec. to unlock keypad
Sperre deaktivieren
1) Die Taste SET zwei Sekunden gedrückt halten,
bis das Menü Key Lock erscheint.
2) Die Sperre mit der Taste ausschalten (OFF).
3) Die Einstellung mit der Taste SET speichern.
5 Technische Daten
Mikrofontyp: . . . . . . . . . . dynamisches Hand -
mikrofon
Richtcharakteristik: . . . . . Niere
Trägerfrequenzbereich: . 624 – 694 MHz
Frequenzstabilität: . . . . . ±0,005 %
Sendeleistung (EIRP): . . umschaltbar 10 mW
oder 50 mW
REMOSET-Frequenz: . . 2,4 GHz
Audiofrequenzbereich: . . 50 – 16 500 Hz
Einsatztemperatur: . . . . . 0 – 40 °C
Stromversorgung: . . . . . . zwei 1,5-V-Batterien
der Größe Mignon (AA)
Betriebsdauer: . . . . . . . . > 10 h
Abmessungen: . . . . . . . . ∅50 mm × 260 mm
Gewicht: . . . . . . . . . . . . . 350 g
Änderungen vorbehalten.
Key Lock
ON
OFF
9
DEUTSCH
Diese Bedienungsanleitung ist urheberrechtlich für MONACOR ®INTERNATIONAL GmbH & Co. KG ge schützt.
Eine Reproduktion für eigene kommerzielle Zwecke – auch auszugsweise – ist untersagt.

Contents
1 Operating Elements and Connections . . 10
2 Important Notes . . . . . . . . . . . . . . . . . . . . 11
3 Applications . . . . . . . . . . . . . . . . . . . . . . . 11
3.1 Conformity and approval . . . . . . . . . . . . . . . 11
4 Operation . . . . . . . . . . . . . . . . . . . . . . . . . . 11
4.1 Inserting / Replacing the batteries . . . . . . . . 11
4.2 Switching on / off the microphone . . . . . . . . 12
4.3 Settings via the menu . . . . . . . . . . . . . . . . . 12
4.4 Basic settings . . . . . . . . . . . . . . . . . . . . . . . 12
4.5 Setting the transmission frequency . . . . . . 13
4.5.1 REMOSET®function . . . . . . . . . . . . . . . . 13
4.5.2 Setting the frequency manually . . . . . . . . 14
4.5.3 Selecting a frequency from a group . . . . 14
4.6 Adjusting the transmission power . . . . . . . . 14
4.7 Adjusting the microphone sensitivity . . . . . 14
4.8 Muting the microphone . . . . . . . . . . . . . . . . 14
4.9 Key lock . . . . . . . . . . . . . . . . . . . . . . . . . . . 15
5 Specifications . . . . . . . . . . . . . . . . . . . . . . 15
Transmission frequencies . . . . . . . . . . . . . . 28
All operating elements and connections de -
scribed can be found on the fold-out page 3.
1 Operating Elements
and Connections
1Button to switch on / off and to mute the micro-
phone
To switch on, press the button briefly.
To mute / unmute, press the button briefly; when
the microphone is muted, the LED (2) keeps
flashing.
To switch off, keep the button pressed for 2 sec-
onds until the display shows Power OFF.
2Signal LED
LED keeps flashing in red
when the microphone is muted
LED shows blue for 5 seconds
when the corresponding receiver has set the
microphone to the same frequency via the
REMOSET function (chapter 4.5.1)
3Buttons and to select a menu item and to
change settings
4Display, showing:
the name of the unit, any name may be selected
(10 characters)
G = the group number (1 … 12)
C = the channel number (1 … 60)
MHz = the receiving frequency
(624.000 … 693.975 MHz))
. . dB = the microphone sensitivity adjusted
(
-
18 dB … 12 dB)
= the battery status
5Button SET to call up the setup menu shown in
fig. 3 (keep the button pressed for 2 seconds until
the menu appears on the display), to call up a
menu item and to save a setting (chapter 4.3)
6Screw sleeve for the battery compartment (9)
7ID cap to distinguish between different micro-
phones: can be removed and replaced by one of
the colour ID caps supplied with the microphone
8Latch to hold the batteries; to replace the bat-
teries, slide down and fold up the latch
9Battery compartment
10
ENGLISH

2 Important Notes
The wireless microphone corresponds to all rele-
vant directives of the EU and is therefore marked
with .
GThe microphone is suitable for indoor use only.
Protect it against dripping water and splash
water, high air humidity and heat (admissible
ambient temperature range: 0 – 40 °C).
GFor cleaning only use a dry, soft cloth; never use
water or chemicals.
GNo guarantee claims for the microphone and no
liability for any resulting personal damage or
material damage will be accepted if the micro-
phone is used for other purposes than originally
intended, if it is not correctly operated, or if it is
not repaired in an expert way.
3 Applications
Combined with the receiver UF-10R /12, this
dynamic hand-held microphone with integrated
UHF transmitter creates a wireless audio transmis-
sion system. The microphone is supplied with a
microphone case, a microphone holder and push-
on ID caps in various colours to identify the micro-
phone.
Operation of the audio transmission system via
the REMOSET function is most convenient: Simply
press a button and, via a 2.4 GHz radio signal, the
microphone is matched to the transmission fre-
quency selected on the receiver.
3.1 Conformity and approval
Herewith, MONACOR INTERNATIONAL declare
that the wireless microphone UF-10TH /12 is in ac -
cordance with the basic requirements and the other
relevant regulations of the directive 1999 / 5 / EC.
The declaration of conformity can be found on the
Internet:
www.jts-germany.de or www.monacor.com
This wireless microphone may be operated in the
following countries:
DE
In the Federal Republic of Germany, the wireless
microphone UF-10TH /12 requires a frequency
assignment (for which a fee is charged).
In other countries, it is necessary to apply for a cor-
responding approval. Prior to operating the system
outside Germany, please contact the MONACOR
subsidiary or the corresponding authorities of the
respective country. Links to the national authorities
can be found via the following Internet address:
www.cept.org
→ECC
→Topics
→Short Range Devices (SRD) and other R&T TE
sub-classes
→EFIS and National Frequency Tables
4 Operation
4.1 Inserting/Replacing the batteries
For power supply, two 1.5 V batteries of size AA are
required.
GOnly insert batteries of the same type and always
replace both of them.
GIf the microphone is not in use for a longer period
of time, always remove the batteries to prevent
damage due to battery leakage.
1) Unscrew the sleeve (6) on the lower end of the
microphone.
2) Slide down and fold up the latch (8) holding the
batteries.
3) Insert the batteries with the positive and nega-
tive poles as indicated in the battery compart-
ment.
4) Fold back and slide up the latch to lock it.
5) Screw the sleeve on the microphone again.
Never put used batteries in the household
waste; always take them to a special
waste disposal, e. g. collection container at
your retailer.
If the microphone is to be put out of opera-
tion definitively, take it to a local recycling
plant for a disposal which is not harmful to
the environment.
11
ENGLISH

4.2 Switching on/off the microphone
1) Switch on the microphone with the button (1).
The backlight of the display (4) lights up for a
few seconds. When you press a button (1, 3, 5),
the backlight is switched on again.
2) The display shows the following information:
the name of the unit, (10 characters), any name
may be selected (e. g. UF-10TH as shown in
fig. 1)
G = the group number (1 …12)
C = the channel number (1 … 60)
MHz = the receiving frequency
(624.000 … 693.975 MHz)
. . dB = the microphone sensitivity adjusted
(
-
18 dB … 12 dB)
the battery status:
full discharged
3) To identify different microphones, remove the
cap (7) and replace it by one of the colour ID
caps supplied with the microphone.
4) To switch off, keep the button pressed for
2 seconds until the display shows Power OFF.
4.3 Settings via the menu
All settings are made via a menu:
1) To call up the main menu (fig. 3), keep the but-
ton SET (5) pressed for two seconds until the
menu appears on the display (4).
2) Press the button or (3) to select the
desired menu. Then call up the menu item with
the button SET.
3) To make the setting, press the button or .
4) If several setup functions are available for a
menu item (e. g. group number and channel
number), press the button SET to go from one
function to the next one.
5) To save a setting, press the button SET. The dis-
play briefly shows Saving… before the main
menu reappears.
To exit a menu item without a change, also
press the button SET. The display briefly shows
Cancel before the main menu reappears.
6) To exit the main menu, press the button or
to select the menu item Exit. Then press the
button SET.
All setting options via the menu can be found in the
following chapters.
4.4 Basic settings
1) If it is difficult to read the display (4), call up the
contrast setting via the menu item Contrast:
a) Keep the button SET (5) pressed for two
seconds until the main menu (fig. 3) ap -
pears.
b) Press the button or to select the menu
item Contrast. Then press the button SET.
Fig. 4
c) Press the button or to set the contrast.
The display shows the value adjusted (be -
tween
-
3 and 3).
d) Press the button SET to save the setting.
The main menu reappears.
e) To deactivate the main menu, press the but-
ton or to select the menu item Exit
and press the button SET or to change
another setting, select the corresponding
menu item and press the button SET.
2) Set the time for the display backlight via the
menu item Light T:
Fig. 5
Always OFF= no backlight
5 - 30 Sec. = time in seconds
Always ON = backlight always on
Hint: To save the batteries, it is not advisable to use
Always ON as a final setting.
3) Via the menu item Name, a unit name can be
entered (10 characters max.) which will appear
on the display (e. g. UF-10TH as shown in
fig. 1). When several microphones are used,
this will make it easier to distinguish between
the microphones and to identify them. After the
menu item Name has been called up, the first
character position is selected:
Fig. 6
Press the button or to select the desired
character. Press the button SET to go to the next
character position. After setting the name, press
the button SET repeatedly until the display
shows Saving…. The main menu reappears.
User Name
UF-10TH
Char:1/10
Light Time
15 Sec.
Contrast
0
12
ENGLISH

4.5 Setting the transmission frequency
Before switching on the microphone, set the
receiver to an interference-free frequency (see
instruction manual of the receiver). Then set the
microphone to the same frequency: There are
three methods to do this:
1. If you operate the microphone with the receiver
UF-10R /12, the easiest way is to use the
patented REMOSET function. When you press
the button REMOSET on the receiver, the
microphone is set to the transmission frequency
selected on the receiver (chapter 4.5.1).
2.
The transmission frequency can be adjusted man-
ually between 624.000 MHz and 693.975 MHz
(chapter 4.5.2).
3. For operating several audio transmission sys-
tems at the same time, there are 12 groups with
up to 60 channels in each group (table on
page 28, 29). In ideal conditions, up to 40 chan-
nels from a group can be used for audio trans-
mission at the same time. If the receiver has
been set to a channel from these groups, select
the same channel for the microphone (chap -
ter 4.5.3).
4.5.1 REMOSET®function
For the REMOSET function always make sure that
1. no menu is called up on the receiver or on the
transmitter.
2. the microphone is switched on and close to
the receiver (REMOSET transmission range:
approx. 10 m).
3. the microphone and the receiver are set to the
same identification number (ID No.) or that the
function ID No. is deactivated (see paragraph
“Identification number”).
4. the REMOSET function is not deactivated (see
paragraph “Deactivating the REMOSET®func-
tion”).
5. the receiver and the transmitter are not locked
(chapter 4.9).
6. the signal LED (2) does not flash. If it keeps
flashing, the microphone is muted. In this case,
press the button (1) so that the LED is extin-
guished.
Identification number
To prevent mutual interference of individual pairs of
microphone / receiver during REMOSET transmis-
sion, each pair must have a different identification
number (ID No.). If you only use one pair of micro-
phone / receiver, there is no need to change the pre-
set ID No. 0. To change the ID No.:
1) Call up the setting for the ID No. via the menu
item Device ID of the main menu.
Fig. 7
2) Press the button or to set the ID No.
3) Press the button SET. Then press the button
to deactivate the function (OFF) or the button
to activate the function (ON). If the function has
been deactivated, the REMOSET transmission
will be possible from any UF-10R /12 receiver; if
it has been activated, the REMOSET transmis-
sion will only be possible from a receiver with
the same ID No.
4) Press the button SET to save the setting.
REMOSET®transmission
Press the button REMOSET on the receiver. As
soon as the microphone has been set to the trans-
mission frequency or to the group and the trans-
mission channel of the receiver, the signal LED (2)
shows blue for five seconds.
If the signal LED does not light up, the auto-
matic synchronization of the microphone has failed.
In this case, the button REMOSET on the receiver
keeps flashing slowly. For troubleshooting see
steps 1 – 6 at the beginning of this chapter. Check
the settings on the microphone and possibly on the
transmitter and correct them. Then press the button
REMOSET on the receiver again.
Deactivating the REMOSET®function
The REMOSET function can be deactivated to pre-
vent automatic frequency setting.
1) Call up the menu item Remoset in the main
menu.
Fig. 8
2) Press the button to deactivate the function
(OFF) or the button to activate it (ON).
3) Press the button SET to save the setting.
Remote Set
ON
OFF
Device ID
0
ID:ON
13
ENGLISH

4.5.2 Setting the frequency manually
1) Call up the frequency setting via the menu item
Freq. of the main menu.
Fig. 9
2) Press the button or to set the frequency in
steps of 1 MHz.
3) Press the button SET so that the digits after the
decimal point are highlighted. To make a fine
adjustment in steps of 0.025 MHz, press the
button or . If the frequency is identical to
the frequency of a channel in a group, the group
number and the channel number will be indi-
cated in the middle line.
4) Press the button SET a second time to store the
frequency selected.
4.5.3 Selecting a frequency from a group
1) Call up the group and channel selection via the
menu item Group of the main menu.
Fig. 10
2) Press the button or to select the group.
3) Press the button SET to highlight the channel
number. Then press the button or to select
the channel. The corresponding receiving fre-
quency is indicated in the bottom line.
4) Press the button SET to save the setting.
4.6 Adjusting the transmission power
1) Call up the menu item RF Power in the main
menu.
Fig. 11
2) Press the button for the setting Low or the
button for the setting Hi.
Hi = high power (50 mW): high range, but
short battery life
Low = low power (10 mW): long battery life, but
short range
3) Press the button SET to save the setting.
4.7 Adjusting the microphone sensitivity
The sensitivity is used to adjust the microphone to
the volume of the voice or the instrument.
1) Call up the menu item Sensit. in the main
menu.
Fig. 12
2) Adjust the sensitivity according to the indication
AF of the receiver in such a way that an opti-
mum volume level of the microphone is
obtained. If the volume is too high, the micro-
phone will distort; in this case, press the button
to adjust a lower value (min.
-
18 dB). If the
volume is too low, there will be a poor signal-to-
noise ratio; in this case, press the button to
adjust a higher value (max. 12 dB).
4.8 Muting the microphone
To briefly mute the microphone, e. g. in speech/
music pauses, briefly press the button . As an
indication, the LED (2) keeps flashing in red and
the display of the receiver UF-10R /12 shows the
message MUTE instead of the battery symbol. The
microphone keeps transmitting, but no sound is
transmitted. To reactivate the sound, press the but-
ton again.
Sensitivity
0 dB
RF Power
Hi
Low
Group/Chan
G: 5
C: 1
625.975
Frequency
G:7 C:13
640.000
14
ENGLISH

4.9 Key lock
The microphone is provided with a key lock to pre-
vent inadvertent switch-off or operation. When the
key lock has been activated, it is still possible to
mute/unmute the microphone.
Activating the lock
1) Call up the lock function via the menu item Key
Lock of the main menu.
Fig. 13
2) Press the button to activate the lock (ON)
3) Press the button SET to save the setting.
When you press the button SET, or , the fol-
lowing message appears:
Press Set for 2 Sec. to unlock keypad
Deactivating the lock
1) Keep the button SET pressed for two seconds
until the menu Key Loc appears.
2) Press the button to deactivate the lock (OFF).
3) Press the button SET to save the setting.
5 Specifications
Type of microphone: . . . . dynamic hand-held
microphone
Polar pattern: . . . . . . . . . cardioid
Carrier frequency range: 624 – 694 MHz
Frequency stability: . . . . ±0.005 %
Transmission power
(EIRP): . . . . . . . . . . . . . . switchable 10 mW
or 50 mW
REMOSET frequency: . . 2.4 GHz
Audio frequency range: . 50 – 16 500 Hz
Ambient temperature: . . . 0 – 40 °C
Power supply: . . . . . . . . . two 1.5 V batteries
of size AA
Operating time: . . . . . . . . > 10 h
Dimensions : . . . . . . . . . ∅50 mm × 260 mm
Weight: . . . . . . . . . . . . . . 350 g
Subject to technical modification.
Key Lock
ON
OFF
15
ENGLISH
All rights reserved by MONACOR ®INTERNATIONAL GmbH & Co. KG. No part of this instruction manual may
be reproduced in any form or by any means for any commercial use.

Table des matières
1 Eléments et branchements . . . . . . . . . . . 16
2 Conseils importants dʼutilisation . . . . . . 17
3 Possibilités dʼutilisation . . . . . . . . . . . . . 17
3.1 Conformité et autorisation . . . . . . . . . . . . . 17
4 Fonctionnement . . . . . . . . . . . . . . . . . . . . 17
4.1 Insérer ou remplacer les batteries . . . . . . . 17
4.2 Allumer et éteindre le microphone . . . . . . . 18
4.3 Réglages via le menu . . . . . . . . . . . . . . . . . 18
4.4 Réglages de base . . . . . . . . . . . . . . . . . . . 18
4.5 Réglage de la fréquence de transmission . 19
4.5.1 Fonction REMOSET® . . . . . . . . . . . . . . . 19
4.5.2 Réglage manuel de la fréquence . . . . . . 20
4.5.3 Sélection dʼune fréquence
dans un groupe . . . . . . . . . . . . . . . . . . . . 20
4.6 Réglage de la puissance dʼémission . . . . . 20
4.7 Réglage de la sensibilité du micro . . . . . . . 20
4.8 Coupure du son du micro . . . . . . . . . . . . . . 20
4.9 Verrouillage des touches . . . . . . . . . . . . . . 21
5 Caractéristiques techniques . . . . . . . . . . 21
Fréquences de transmission . . . . . . . . . . . 28
Vous trouverez sur la page 3, dépliable, les élé-
ments et branchements décrits.
1 Eléments et branchements
1Touche pour allumer et éteindre et couper le
son du microphone
allumer : appuyez brièvement sur la touche
activer / désactiver la coupure du son : appuyez
brièvement sur la touche : lorsque le son du
microphone est coupé, la LED (2) clignote.
éteindre : maintenez la touche enfoncée 2 se -
condes jusquʼà ce que lʼaffichage indique
Power OFF.
2LED signal
clignote en rouge,
lorsque le son du micro est coupé
brille pendant 5 secondes en bleu,
lorsque le microphone est réglé, via la fonc-
tion REMOSET, sur la même fréquence par le
récepteur correspondant (chapitre 4.5.1)
3Touches et pour sélectionner un point de
menu et modifier les réglages
4Affichage, indique :
le nom de lʼappareil, librement sélectionnable
(10 caractères)
G = numéro du groupe (1 ... 12)
C = numéro du canal (1 ... 60)
MHz = fréquence de réception
(624,000 … 693,975 MHz)
. . dB = sensibilité réglée du micro
(
-
18 dB … 12 dB)
= état de la batterie
5Touche SET pour appeler le menu de réglage,
schéma 3 (maintenez la touche enfoncée 2 se -
condes jusquʼà ce que le menu soit visible sur
lʼaffichage), pour appeler un point de menu et
mémoriser un réglage (chapitre 4.3).
6Capot vissable pour le compartiment batterie (9)
7Capot de repérage pour différencier les micro-
phones : peut être retiré et remplacé par un des
capots de couleur livré
8Verrou de maintien de la batterie : pour rempla-
cer les batteries, poussez-le vers le bas et
ouvrez
9Compartiment batterie
16
FRANÇAIS

2 Conseils importants dʼutilisation
Le microphone sans fil répond à toutes les direc-
tives nécessaires de lʼUnion européenne et porte
donc le symbole .
GLe microphone nʼest conçu que pour une utilisa-
tion en intérieur. Protégez-le de tout type de pro-
jections dʼeau, des éclaboussures, dʼune humidité
de lʼair élevée et de la chaleur (plage de tempéra-
ture de fonctionnement autorisée : 0 – 40 °C).
GPour le nettoyer, utilisez uniquement un chiffon
sec et doux, en aucun cas de produits chimiques
ou dʼeau.
GNous déclinons toute responsabilité en cas de
dommages matériels ou corporels si le micro-
phone est utilisé dans un but autre que celui pour
lequel il a été conçu, sʼil nʼest pas correctement
utilisé ou ne pas réparé par un technicien habi-
lité ; en outre, la garantie deviendrait caduque.
3 Possibilités dʼutilisation
Ce microphone main dynamique avec émetteur
UHF intégré constitue avec le récepteur UF-10R/12
un système de transmission audio sans fil. Sont
livrés, une valise micro, une pince micro et des
capots de couleur pour repérer le micro.
Lʼutilisation du système de transmission audio
est très agréable grâce à la fonction REMOSET.
Par une simple pression sur un bouton, le micro se
règle, via un signal radio 2,4 GHz, sur la fréquence
de transmission réglée sur le récepteur.
3.1 Conformité et autorisation
Par la présente, MONACOR INTERNATIONAL
déclare que le microphone sans fil UF-10TH /12 se
trouve en conformité avec les exigences fonda-
mentales et les réglementations inhérentes à la
directive 1999 / 5 / CE. La déclaration de conformité
est disponible sur Internet : www.jts-germany.de ou
www.monacor.com.
Ce microphone sans fil peut fonctionner dans le
pays suivant : DE
En Allemagne, le microphone doit recevoir une
attribution de fréquence (payante). Dans les
autres pays, une autorisation correspondante doit
être éventuellement demandée. Avant la mise en
service de lʼappareil en dehors de lʼAllemagne, ren-
seignez-vous auprès de la succursale MONACOR
ou des autorités nationales du pays correspondant.
Vous trouverez les liens permettant dʼaccéder aux
agences nationales compétentes à lʼadresse sui-
vante :
www.cept.org
→ECC
→Topics
→Short Range Devices (SRD) and other R&T TE
sub-classes
→EFIS and National Frequency Tables
4 Fonctionnement
4.1 Insérer ou remplacer les batteries
Deux batteries 1,5 V de type R6 sont nécessaires
pour lʼalimentation.
GInsérez uniquement deux batteries de même
type et remplacez-les toujours ensemble.
GEn cas de non utilisation prolongée, retirez les
batteries, elles pourraient couler et endommager
le micro.
1) Dévissez le capot (6) en bas du microphone.
2) Poussez vers le bas le verrou (8) de maintien
des batteries et ouvrez.
3) Insérez les batteries en respectant les pôles
plus et moins comme indiqué dans le comparti-
ment.
4) Refermez le verrou et poussez-le vers le haut
pour verrouiller.
5) Remettez le capot et vissez.
Ne jetez pas les batteries usagées dans la
poubelle domestique ; déposez-les dans
un container spécifique ou ramenez-les à
votre détaillant.
Lorsque le microphone est définitivement
retiré du service, vous devez le déposer dans
une usine de recyclage de proximité pour
contribuer à son élimination non polluante.
17
FRANÇAIS

4.2 Allumer et éteindre le microphone
1) Allumez le microphone avec la touche (1). Le
rétroéclairage de lʼaffichage (4) brille pendant
quelques secondes. Lorsque vous activez une
touche (1, 3, 5), lʼéclairage se rallume.
2) Lʼaffichage indique les informations suivantes :
le nom de lʼappareil (10 caractères), librement
sélectionnable, par exemple UF-10TH, comme
sur le schéma 1
G = le numéro du groupe (1 ... 12)
C = le numéro du canal (1 ... 60)
MHz = la fréquence de réception
(624,000 … 693,975 MHz)
. . dB = la sensibilité réglée du micro
(
-
18 dB … 12 dB)
lʼétat de la batterie :
plein vide
3) Pour pouvoir repérer les différents microphones,
vous pouvez retirer le capot (7) et le remplacer
par un des autres capots de couleur livrés.
4) Pour éteindre, maintenez la touche enfoncée
pendant 2 secondes jusquʼà ce que lʼaffichage
indique Power OFF.
4.3 Réglages via le menu
Tous les réglages sʼeffectuent via un menu :
1) Pour appeler le menu principal (schéma 3),
maintenez la touche SET (5) enfoncée pendant
2 secondes jusquʼà ce que le menu soit visible
sur lʼaffichage (4).
2) Sélectionnez le point de menu souhaité avec la
touche ou (3) et appelez le point de menu
avec la touche SET.
3) Effectuez le réglage avec la touche ou .
4) Si pour un point de menu, il y a plusieurs ré glages
(p. ex. numéro du groupe et du canal), passez
avec la touche SET dʼune fonction à une autre.
5) Pour mémoriser un réglage, appuyez sur la
touche SET. Lʼaffichage indique brièvement
Saving…, puis le menu principal sʼaffiche.
Pour quitter un point de menu sans modifi-
cation, appuyez également sur la touche SET.
Lʼaffichage indique brièvement Cancel puis le
menu principal sʼaffiche à nouveau.
6) Pour quitter le menu principal, sélectionnez le
point de menu Exit avec la touche ou et
appuyez sur la touche SET.
Toutes les possibilités de réglage via le menu sont
décrites dans les chapitres suivants.
4.4 Réglages de base
1) Si lʼaffichage (4) nʼest pas assez lisible, appe-
lez, via le point de menu Contrast, le réglage
du contraste :
a) Maintenez la touche SET (5) enfoncée pen-
dant 2 secondes jusquʼà ce que le menu
principal sʼaffiche (schéma 3).
b) Sélectionnez le point de menu Contrast
avec la touche ou (3) et appuyez sur la
touche SET.
schéma 4
c) Réglez le contraste avec la touche ou .
Lʼaffichage indique la valeur réglée entre
-
3
et 3.
d) Mémorisez le réglage avec la touche SET.
Le menu principal sʼaffiche à nouveau.
e)
Pour désactiver le menu principal, sélection-
nez le point Exit avec la touche ou et
appuyez sur la touche SET ou pour modifier un
autre réglage, sélectionnez le point de menu
correspondant et appuyez sur la touche SET.
2) Il est possible de régler la durée dʼéclairage de
lʼaffichage, via le point de menu Light T :
schéma 5
Always OFF= pas dʼéclairage
5 - 30 Sec. = durée en secondes
Always ON = éclairage constant
Remarque : Pour économiser les batteries, Always
ON ne devrait pas être le réglage définitif.
3) Via le point de menu Name, vous pouvez saisir
le nom de lʼappareil (10 caractères maximum)
qui est visible sur lʼaffichage, comme sur le
schéma 1 lʼexemple du nom UF-10TH. Pen-
dant le fonctionnement avec plusieurs micro-
phones, on peut ainsi facilement les différencier
et les attribuer. Lorsque le point de menu Name
est appelé, le premier emplacement de carac-
tère est sélectionné.
schéma 6
Sélectionnez le caractère voulu avec la touche
ou . Avec la touche SET, allez à lʼemplace-
ment suivant. Une fois le nom saisi, appuyez sur
la touche SET de manière répétée jusquʼà ce
que lʼaffichage indique Saving… . Le menu
principal sʼaffiche ensuite.
User Name
UF-10TH
Char:1/10
Light Time
15 Sec.
Contrast
0
18
FRANÇAIS

4.5 Réglage de la fréquence
de transmission
Laissez le microphone encore éteint. Réglez tout
dʼabord le récepteur sur une fréquence sans inter-
férence, voir notice dʼutilisation du récepteur.
Réglez ensuite le microphone sur la même fré-
quence. Il y a trois possibilités :
1. Si le microphone fonctionne avec le récepteur
UF-10R/12, le plus simple est dʼutiliser la fonc-
tion REMOSET (déposée). En appuyant sur la
touche REMOSET sur le récepteur, le micro-
phone se règle sur la fréquence de transmission
sélectionnée sur le récepteur (chapitre 4.5.1).
2. Vous pouvez régler manuellement la fré -
quence de transmission entre 624,000 MHz
et 693,975 MHz (chapitre 4.5.2).
3. Pour le fonctionnement simultané de plusieurs
systèmes de transmission audio, 60 canaux par
groupe sont proposés en 12 groupes (tableau
page 28, 29). Dans des conditions optimales, on
peut utiliser simultanément jusquʼà 40 canaux
dans un groupe pour la transmission audio. Si le
récepteur est réglé sur un canal de ces groupes,
sélectionnez le même canal pour le microphone
(chapitre 4.5.3).
4.5.1 Fonction REMOSET®
Pour la fonction REMOSET, il faut remplir les
conditions suivantes :
1. Un menu ne doit pas être appelé ni sur le micro
ni sur le récepteur.
2. Le micro doit être allumé et être à proximité du
récepteur (portée de la transmission REMOSET :
10 m environ).
3. Le micro doit être réglé sur le même numéro
dʼidentification (ID N°) que le récepteur ou la
fonction ID N° doit être coupée (voir point
“numéro dʼidentification).
4. La fonction REMOSET ne doit pas être ver -
rouillée (voir point “verrouillage de la fonction
REMOSET®)
5. Le récepteur ou le micro ne doit pas être ver-
rouillé (chapitre 4.9).
6. La LED (2) ne doit pas clignoter. Si elle clignote,
le son du micro est coupé. Appuyez sur la
touche (1) pour que la LED sʼéteigne.
Numéro dʼidentification
Chaque paire micro / récepteur doit recevoir un autre
numéro dʼidentification (ID N°) pour que les paires
individuelles ne sʼinfluencent pas lors de la trans-
mission REMOSET. Si seule une paire micro/récep-
teur est utilisée, on peut conserver le préréglage ID
N° 0. Pour modifier le numéro dʼidentification :
1) Via le point de menu Device ID du menu
principal, appelez le réglage pour le numéro
dʼidentification.
schéma 7
2) Réglez le numéro dʼidentification avec la touche
ou .
3) Appuyez sur la touche SET. Maintenant, avec la
touche , désactivez la fonction (OFF) ou avec
la touche , activez-la (ON). Lorsque la fonction
est désactivée, la transmission REMOSET peut
sʼeffectuer de chaque récepteur UF-10R/12,
lorsque la fonction est activée, uniquement de -
puis un récepteur avec le même numéro dʼiden-
tification.
4) Mémorisez le réglage avec la touche SET.
Transmission REMOSET®
Sur le récepteur, appuyez sur la touche REMOSET.
Dès que le micro est réglé sur la fréquence de
transmission ou le groupe et le canal de transmis-
sion du récepteur, la LED (2) brille pendant 5
secondes en bleu.
Si la LED ne brille pas, il est possible que le
micro ne soit pas réglé automatiquement. Sur le
récepteur, la touche REMOSET clignote lentement.
En cas de problème, voir les ponts 1 à 6 au début
du chapitre. Vérifiez les réglages sur le micro et
éventuellement sur le récepteur et faites les cor-
rections nécessaires. Ensuite, appuyez une nou-
velle fois sur la touche REMOSET du récepteur.
Verrouillage de la fonction REMOSET®
Pour empêcher tout réglage automatique de fré-
quence, on peut verrouiller la fonction REMOSET.
1) Sur le menu principal, appelez le point de menu
Remoset.
schéma 8
2) Verrouillez la fonction avec la touche (OFF)
ou activez avec la touche (ON).
3) Mémorisez le réglage avec la touche SET.
Remote Set
ON
OFF
Device ID
0
ID:ON
19
FRANÇAIS

4.5.2 Réglage manuel de la fréquence
1) Appelez le réglage de fréquence via le point de
menu Freq. du menu principal.
schéma 9
2) Réglez la fréquence avec la touche ou par
palier de 1 MHz.
3) Appuyez sur la touche SET pour que les chiffres
après le point (= virgule) soient mis en surbril-
lance. Effectuez un réglage précis avec la
touche ou par palier de 0,025 MHz. Si la
fréquence est identique avec celle dʼun canal
dans un groupe, le numéro du groupe ou du
canal est indiqué sur la ligne du milieu.
4) Pour mémoriser la fréquence réglée, appuyez
une seconde fois sur la touche SET.
4.5.3 Sélection dʼune fréquence
dans un groupe
1) Via le point de menu Group du menu principal,
appelez la sélection de groupe et de canal.
schéma 10
2) Sélectionnez le groupe avec la touche ou .
3) Appuyez sur la touche SET pour que le numéro
du canal soit repéré. Avec la touche ou ,
sélectionnez le canal. La fréquence de récep-
tion correspondante est indiquée sur la ligne
inférieure.
4) Mémorisez le réglage avec la touche SET.
4.6 Réglage de la puissance dʼémission
1) Dans le menu principal, appelez le point de
menu RF Power.
schéma 11
2) Avec la touche , sélectionnez le réglage Low
ou avec la touche , le réglage Hi.
Hi = puissance élevée (50 mW) pour une por-
tée importante mais une durée de vie
des batteries plus courte
Low = puissance faible (10 mW) pour une
durée de vie des batteries plus longue
mais une portée plus courte
3) Mémorisez le réglage avec la touche SET.
4.7 Réglage de la sensibilité du micro
Avec le réglage de la sensibilité, on peut adapter le
micro au volume de la voix ou de lʼinstrument.
1) Sur le menu principal, appelez le point de menu
Sensit.
schéma 12
2) Réglez la sensibilité selon lʼaffichage de la LED
AF du récepteur pour atteindre un niveau de
volume du micro optimal. Si le volume est trop
élevé, il y a des distorsions sur le micro, réglez
alors une valeur inférieure (minimum
-
18 dB)
avec la touche . Si le volume est trop faible,
on a un mauvais rapport signal sur bruit, réglez
alors une valeur plus élevée (12 dB maximum)
avec la touche .
4.8 Coupure du son du micro
Pour couper le son du micro pendant un temps
bref, par exemple pauses de discours ou de chant,
appuyez brièvement sur la touche . La LED (2) cli-
gnote en rouge pour lʼindiquer ; sur le récepteur
UF-10R /12, le message MUTE sʼaffiche à la place
du symbole de batterie. Le micro continue à émet-
tre mais le son est coupé. Pour réactiver le son,
appuyez une nouvelle fois sur la touche .
Sensitivity
0 dB
RF Power
Hi
Low
Group/Chan
G: 5
C: 1
625.975
Frequency
G:7 C:13
640.000
20
FRANÇAIS
Seite wird geladen ...
Seite wird geladen ...
Seite wird geladen ...
Seite wird geladen ...
Seite wird geladen ...
Seite wird geladen ...
Seite wird geladen ...
Seite wird geladen ...
Seite wird geladen ...
Seite wird geladen ...
-
 1
1
-
 2
2
-
 3
3
-
 4
4
-
 5
5
-
 6
6
-
 7
7
-
 8
8
-
 9
9
-
 10
10
-
 11
11
-
 12
12
-
 13
13
-
 14
14
-
 15
15
-
 16
16
-
 17
17
-
 18
18
-
 19
19
-
 20
20
-
 21
21
-
 22
22
-
 23
23
-
 24
24
-
 25
25
-
 26
26
-
 27
27
-
 28
28
-
 29
29
-
 30
30


JTS UF-10TH/12 Benutzerhandbuch
- Kategorie
- Mikrofone
- Typ
- Benutzerhandbuch
in anderen Sprachen
- English: JTS UF-10TH/12 User manual
- français: JTS UF-10TH/12 Manuel utilisateur
- español: JTS UF-10TH/12 Manual de usuario
Verwandte Artikel
Andere Dokumente
-
Monacor JTS TG-98RA /5 Benutzerhandbuch
-
IMG STAGELINE TXS-606HT Benutzerhandbuch
-
Monacor JTS SIEM-2/R5 Benutzerhandbuch
-
-
-
-
-