WolfVision EYE-14 Kurzanleitung zur Einrichtung
- Typ
- Kurzanleitung zur Einrichtung

www.wolfvision.comPrinted in Austria - May 2014
Mount the camera as desired according to country specific and local regulations.
Connect the supplied power supply to the PoE+ port and monitor or projector to RGB and/or HDMI ports.
The user manual, example videos, documentation and software will be found on the internal memory of the
EYE-14. Just connect a computer to the USB port and a pop-up explorer message will inform you about a
new local drive. The files are provided in common formats such as PDF, JPG and AVI.
Before Starting
Quick Setup Guide - First Steps
When the EYE-14 is switched on for the first time, the Quick Setup Guide will open automatically on-screen
(visible on HDMI and RGB output). Use the arrow keys on the remote control to navigate through the menu.
Basic Menu Settings
Language
Select the desired language for the on-screen menu.
Ethernet Settings
The IP-address, Subnet Mask and Gateway IP-address can be set automatically by a DHCP-server or
manually.
Time Settings
The EYE-14 offers the possibility to use the internal clock or an external time server (a valid time server IP
address and Internet connection are required).
Audio Settings
Changes the behaviour of audio processing and audio output.
Center Lasermarker adjustment
The EYE-14 offers a Center Lasermarker for easy identification of the pick-up area. The Center
Lasermarker has to be adjusted to the working level (Allen key 2.5mm necessary) - see user manual for
further information
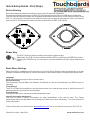
Power Key
F
The EYE-14 will fully power up after connecting the power supply.
Additionally, the EYE-14 can be switched ON and OFF by pressing the POWER key quickly.
Pressing the POWER key for more than 4 seconds activates the XGA output resolution at
60Hz.
Further information can be found on and on the internal memory of the EYE-14.www.wolfvision.com

Montieren Sie die Kamera wie erwünscht unter Beachtung länderspezifischer und lokaler Bestimmungen.
Verbinden Sie das mitgelieferte Netzteil an PoE+ und Monitor oder Projektor am RGB und/oder HDMI
Anschluss.
Bedienungsanleitung, Beispielvideos, Dokumentation und Software befinden sich im Gerätespeicher der
EYE-14. Verbinden Sie einen Computer mit der USB Schnittstelle und der Dateimanager informiert Sie
über ein neues Laufwerk. Die Unterlagen werden in einem üblichen Dateiformat, wie PDF, JPG oder AVI
zur Verfügung gestellt.
Beim ersten Einschalten der EYE-14 startet der Quick Setup Guide automatisch (On-Screen Menü am
HDMI und RGB Ausgang). Navigieren Sie mit den Pfeil Tasten der Fernbedienung durch dieses Menü.
Grundlegende Menüeinstellungen
Sprache (Language)
Wählen Sie die gewünschte Sprache für das On-Sreen Menü.
Netzwerk Einstellungen (Ethernet Settings)
Die IP-Adresse, Subnetzmaske und die Gateway IP-Adresse kann von einen DHCP-Server automatisch
bezogen oder manuell gesetzt werden.
Zeit Einstellung (Time Settings)
Die EYE-14 hat eine eingebaute Uhr, bietet aber auch die Möglichkeit der Verwendung eines externen
TimeServers (Voraussetzungen: gültige TimeServer IP-Adresse und Internetverbindung).
Audio Einstellungen
Beeinflusst die Verarbeitung und Ausgabe der Audio Signale.
Laser Zentrumsmarkierung
Die EYE-14 strahlt einen Laserstrahl zur Zentrumsmarkierung der Aufnahmefläche aus. Dieser Laserstrahl
muss auf die spätere Arbeitsebene eingestellt werden (Inbusschlüssel 2,5mm nötig) - weitere
Informationen finden Sie in der Bedienungsanleitung.
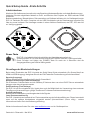
Power Taste
F
Die EYE-14 schaltet sich beim Anschließen des Netzteiles automatisch ein.
Zudem wird die EYE-14 durch kurzes Drücken der POWER Taste aus- und eingeschaltet.
Durch Drücken und Halten der POWER Taste für mehr als 4 Sekunden wird die
Ausgangsauflösung auf XGA bei 60Hz gestellt.
Inbetriebnahme
Quick Setup Guide - Erste Schritte
www.wolfvision.comGedruckt in Österreich - Mai 2014
Weiter Informationen finden Sie unter und im Gerätespeicher.www.wolfvision.com
-
 1
1
-
 2
2


WolfVision EYE-14 Kurzanleitung zur Einrichtung
- Typ
- Kurzanleitung zur Einrichtung
in anderen Sprachen
- English: WolfVision EYE-14 Quick setup guide
Verwandte Papiere
-
WolfVision EYE-12 Instructions Manual
-
WolfVision VZ-C12³ Datenblatt
-
WolfVision EYE-10 Benutzerhandbuch
-
-
-
WolfVision VZ-P38 Datenblatt
-
-
-