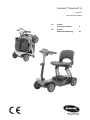
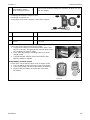
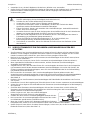
Invacare SCORPIUS Bedienungsanleitung
- Kategorie
- Roller
- Typ
- Bedienungsanleitung
Dieses Handbuch eignet sich auch für


Scorpius-A Instruction Booklet
1654768~A_ 2
Table of Contents
INTRODUCTION ....................................................................................................................... 3
IMPORTANT PRECAUTIONS ................................................................................................... 3
2.1 BEFORE DRIVING SCOOTER........................................................................................... 3
2.2 CAUTIONS WHEN DRIVING ............................................................................................. 4
2.3 CAUTIONS WHEN FOLDING/UNFOLDING SCOOTER .................................................... 5
2.4 CAUTIONS WHEN DRIVING ON INCLINE ........................................................................ 6
2.5 CAUTIONS WHEN CLIMBING ........................................................................................... 6
2.6 ELECTROMAGNETIC INTERFERENCE AND WARNINGS ............................................... 7
2.7 SAFETY WARNING AND INSTRUCTION LABELS ............................................................ 8
IDENTIFICATION OF PARTS .................................................................................................. 10
INTRODUCTION AND OPERATION OF SCOOTER ............................................................... 11
4.1 IDENTIFICATION AND OPERATION OF CONTROL PANEL .......................................... 11
4.2 OPERATION OF MAIN SWITCH ...................................................................................... 14
4.3 OPERATION OF THROTTLE ........................................................................................... 14
4.4 OPERATION OF FREE-WHEELING (N-D LEVER) .......................................................... 14
4.5 TILLER HEIGHT ADJUSTMENT ...................................................................................... 15
4.6 SEAT ADJUSTMENT / DISMANTLE ................................................................................ 15
FOLDING / UNFOLDING YOUR SCOOTER ........................................................................... 16
BATTERY GAUGE AND CHARGING THE BATTERIES ......................................................... 18
6.1 DISASSEMBLING BATTERY BOX ................................................................................... 18
6.2 CAUTIONS FOR BATTERY AND CHARGER .................................................................. 18
6.3 BATTERY GAUGE ........................................................................................................... 19
6.4 OPERATING THE CHARGER .......................................................................................... 20
CARE AND MAINTENANCE ................................................................................................... 22
7.1 INSPECTION CHECKS .................................................................................................... 22
7.2 CLEANING AND MAINTENANCE .................................................................................... 23
TROUBLESHOOTING ............................................................................................................. 24
OTHER INFORMATION .......................................................................................................... 27
9.1 OPTIONS ......................................................................................................................... 27
TECHNICAL SPECIFICATIONS .......................................................................................... 29

Scorpius-A Instruction Booklet
1654768~A_ 3
INTRODUCTION
Thank you and congratulations on purchasing your new Invacare scooter.
It is designed to provide the transportation ability indoors and outdoors for persons whose ability to walk is
impaired, but who are still in terms of their eyesight and physically and mentally able to operate an electric
scooter.
We pride ourselves on providing safe and comfortable products. Our goal is to ensure your complete
satisfaction. We sincerely hope you enjoy your Invacare scooter.
Please read and observe all warnings and instructions provided in the owner’s manual before you operate the
various functions of this scooter. Also, please retain this booklet for future reference.
If you have any questions, please contact your
Invacare representative. See addresses at the end
of this document.
IMPORTANT PRECAUTIONS
2.1 BEFORE DRIVING SCOOTER
• Before taking the first trip with the scooter, you should familiarize yourself well with the operation of the
scooter and with the operation elements. Please take your time to read this instruction booklet.
• Before driving, please evaluate the personal condition, and fully understand the operation of scooter.
• Before charging the scooter, please release the Circuit Breaker on the battery box first to activate the
system. See section 3.
• The scooter is shipped with 30 % of battery charge only, batteries should be fully charged before your
journey for maximum performance and longevity. See section 6.
• The scooter is equipped with a certain type of batteries (lithium or optional lead-acid). If you want to
change it, please contact your dealer to reset the battery system such as charging port and controller
setting. Only one type of batteries can be used on scooter. Do not mix the batteries and charge, or it may
result in injury.
• The maximum load of the scooter is 115 kg. Do not exceed the maximum permissible load. Exceeding the
max. weight rating may result in injury to yourself.
• The scooter is only designed for use by a single occupant whose maximum weight does not exceed the
maximum permissible load of the device. Never use the scooter to transport more than one person
(including children).
• You should not assemble, maintain, and operate the scooter before you read this instruction booklet.
• Do not attempt to modify or dismantle the battery box or carry out any maintenance work that is not
described in this user manual.
• Do not change, modify, remove any parts (seat, shroud) from products, especially safety-related parts
such as anti-tippers.
• Materials and assemblies of the scooter are flame resistant.
• Always keep the battery box installed on the scooter to avoid short-circuit. Do not attempt to remove the
battery box.
• Always keep the tiller screw knob fastened at all time except when adjusting the tiller height.
• Do not sit or stay on the scooter when it is on moving transport vehicles to avoid dangers.
• Turn the power (key) off before getting on or off. See section 4-2.
• Do not drive your scooter if you are under the influence of alcohol or medication that may affect your
ability to drive.
• Do not turn off the power while driving. Doing so will bring the scooter to an abrupt stop and risk of injury.
• Please observe all relevant rules and regulations pertaining to pedestrians and road users at all times
when driving the scooter.
• The scooter may only be used on the traffic routes for which it is approved in accordance with the relevant
national legislation.
• Always be aware of pedestrians and situations which might require extra care when using your scooter on
public walkways and footpaths.
• Avoid driving the scooter in the dark or in conditions of bad weather and visibility for safety.

Scorpius-A Instruction Booklet
1654768~A_ 4
Practice Tips:
• If you are new to driving a scooter, it is a good idea to practice in a clear, safe space on a flat level surface
(i.e. park, playground).
• Basic functions to practice: Wigwag accelerate/Wigwag release/Stop/Reverse/Turn/Ramp proceeding.
• Set the speed control to its lowest speed. Slightly increase the speed when you are getting familiar with
the scooter.
2.2 CAUTIONS WHEN DRIVING
• Please always do the daily check before your journey. See section 7-1.
• Do not stretch your body out on the scooter.
• Do not use the mobile phone and wireless mobile devices while driving.
• Do not use the batteries of the scooter to charge any other electric devices, except the accessories from
the original manufacturer.
• Do not drive on a slope which is over the limit. See section 2-4.
• Please bypass and do not drive across obstacles over the limit. See section 2-5.
• Do not attempt to drive the scooter under hazardous road conditions. If necessary, please drive it in the
presence of an attendant:
- Dark, bad weather such as in rain, snow, mist, storm, and poor visibility.
- Narrow paths, level crossing, and uneven terrain.
• Wet grass, sand, gravel, or any other potentially hazardous condition.
• Please stop operating the scooter if the batteries have drained. Continuous operation may damage the
scooter.
• Do not drive when the seat lock is positioned in folding point (red). Scooter can be operated only when the
seat lock is in the fixation point (green). See section 4-6.
• When turning, reduce your speed and maintain a stable center of gravity. This greatly reduces the
possibility of a tip or fall.
• Do not bounce or jam on the footplate.
• Please always set the speed control to its lowest speed when you start to drive, and observe all relevant
rules and regulations pertaining to pedestrians and road users at all times.
• Do not turn the power on before you get in and sit securely on the seat.
• Be certain that the power is turned off when getting in or getting out. This will eliminate the
possibility of accidentally activating the wigwag controls and causing injury.
• Keep your weight toward the middle of the deck. Putting most or all your weight on the edge of
the deck may cause an unstable condition.
• Do not use hose pipe or splash water directly onto the scooter or store the scooter in a humid
condition such as rain or snow as this may cause damage to the electronics.
• Do not remove safety-related parts such as anti-tippers from the scooter.
• Do not use unauthorized parts such as battery or charger on the scooter.
• Use the accessories supplied from the original dealer only.
• Do not exceed the maximum permissible load of the scooter or it may cause unbalance.
• Please stop operating the scooter and contact your dealer, if you find signs of scooter
malfunction.
• Please pay more attention when driving the scooter. The emergency stop may be activated by,
for example, scooter malfunction, out of power, over-voltage, or EMI interference
• Practice operating your scooter in the presence of an attendant. Remember that only with
practice will you become a competent driver.
• Practice these basic functions until you feel that you have control of your scooter.
Accessories Contents for Your Scooter:
• Auto-folding version: remote control x 1
• Manual-folding version: key x 2

Scorpius-A Instruction Booklet
1654768~A_ 5
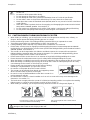
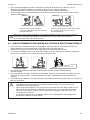
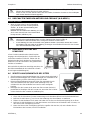
2.3 CAUTIONS WHEN FOLDING/UNFOLDING SCOOTER
• When folding or unfolding, you must place the scooter on a flat ground to avoid tip-over, rollaway, or
dangers. Never operate the folding/unfolding process on a slope.
• Please read through section 5 for folding/unfolding operation before you operate the scooter.
• Turn off the power before you fold/unfold the scooter. See section 4-2.
• Folding/unfolding actions will stop if any malfunctions are detected. See section 8.
• Please make sure the lever for engaging and disengaging the motors is locked firmly into the “DRIVE”
position before you fold/unfold the scooter. Never proceed the folding/unfolding under freewheel mode in
“Neutral” position. See section 4-4.
• The scooter can be charged when it is folded or unfolded. However, the scooter will not respond to
folding/unfolding commands when the charger is plugged in. To operate the folding/unfolding, please
unplug the charger from the scooter. See section 6-4.
• Please remove all the accessories such as armrests or bags before folding/unfolding the scooter.
• Please observe the environment around you for safety before folding/unfolding the scooter.
• When the folding or unfolding is processing, please pay attention to the movement of tiller for your safety.
• When the folding or unfolding is processing, do not sit on the scooter or interrupt the process or it may
cause damage to the scooter or risk of injury to yourself.
• Please double check and make sure the procedure of folding/
unfolding is completed before you get on the scooter.
• Do not turn on the power when the scooter is folded.
• The scooter can be rolled by front wheels and supporting castors
when it is folded (refer to picture on the right).
• Do not sit or stay on folded/unfolded scooter when scooter is on
moving transport vehicles.
• Do not store the scooter in a humid condition such as rain or snow as this may cause damage to the
electronics. See section 7-2.
• The brake does not apply when the scooter is in folded and standing position. Do not place the standing
folded scooter on a slope to avoid roll-away and risk of injury (Figure 1).
• When folding or unfolding, you must place and lay down the scooter on a flat ground (Figure 2).
Do not place scooter on a slope when
scooter is folded and standing.
Place and laydown the scooter before
unfolding.
Do not sit or stay on the scooter when the folding or unfolding is processing. Otherwise, it may cause
damage to the scooter or risk of injury to the user.
• Reduce speed when descending to prevent any danger. Increase speed when ascending. See
section 2-4.
• Do not turn off the power while driving.
• Do not operate on staircases or escalators.
• Do not attempt to climb curbs greater than limitation show on Technical Specification.
• Do not make S turns or sharp turns while driving. This may cause the scooter to tip.
•
Never place the scooter in freewheel mode (Neutral) when on any sort of an incline or decline to
avoid rollaway.
• When the scooter is parked, the lever for engaging and disengaging the motors must be locked
firmly into the “DRIVE” position. See section 4-4.
• Do not conduct any adjustment such as tiller / light setting / control panel setting while driving.
• Do not pull the seat springs while driving to avoid dangers. See section 4-6.

Scorpius-A Instruction Booklet
1654768~A_ 6
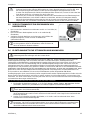
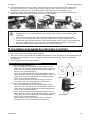
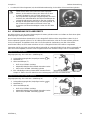
2.4 CAUTIONS WHEN DRIVING ON INCLINE
• The scooter has been rated to a maximum climbable height, obstacle height, and gap. See section 10.
• Never drive on a slope that exceeds the rated slope.
• For maximum stability, lean forward with your body while proceeding up ramps, inclines, curbs, or any low
rise. Please refer to the following pictures.
On flat road On slope
• The weight capacity and ramp degree limit are shown in the above picture.
• Your scooter’s ability to travel up inclines is affected by your weight, your scooter’s speed, your angle of
approach to the incline, and your scooter setup.
• Please avoid driving on a long ramp or any uneven terrain to prevent any damage to the motor.
2.5 CAUTIONS WHEN CLIMBING
• The maximum height of obstacles and curbs that the scooter can
climb is up to 5 cm (A).
• The maximum gap that the scooter can drive over is 10 cm (B).
• When driving the scooter on a ramp, adjust body center of gravity for
scooter stability. See section 2-4.
• Drive close to the roadside when descending. The batteries voltage normally will go up when
driving on a descending road. If the battery voltage becomes too high, the over-voltage
protection will be activated by slowing the speed until the scooter stops (error light indicator will
flash 3 times). Release the wigwags and restart the scooter again.
• Drive the scooter along the roadside while going uphill. The motor might be over-heating when
overloaded. The protection system will be activated by slowing the speed until the scooter stops
to prevent damage to the motor. Turn off the main switch then wait for at least 15 minutes before
restarting the scooter.
• When driving down a ramp or uneven terrain, keep the scooter’s speed adjustment set to the
slowest to ensure safe, controlled driving.
• If the speed is too fast, release the throttle control lever and let the scooter stop. When you feel
that you again have control of your scooter, push the throttle control lever forward and continue
safe driving.
• To prevent any danger, do not make turns on ascending or descending ramps.
Even though your scooter has been rated with a maximum
obstacle height, we suggest not to drive through an obstacle.

Scorpius-A Instruction Booklet
1654768~A_ 7
2.6 ELECTROMAGNETIC INTERFERENCE AND WARNINGS
Scooters may be susceptible to electromagnetic interference (EMI), which is interfering electromagnetic
energy (EM) emitted from sources such a radio stations, TV stations, amateur radio (HAM) transmitters, two-
way radios, and mobile phones. The interference (from radio wave sources) can cause the scooter to release
its brakes, move by itself, or move in unintended directions. It can also permanently damage the scooter
control system. The intensity of the interfering EM energy can be measured in volts per meter (V/m). Each
scooter can resist EMI up to a certain intensity. This is called its "immunity level." The higher the immunity
level, the greater the protection. At this time, current technology can achieve at least a 20 V/m immunity level,
which would provide useful protection from the more common sources of radiated EMI.
There are a number of sources of relatively intense electromagnetic fields in the everyday environment. Some
of these sources are obvious and easy to avoid. Others are not apparent, and exposure is unavoidable.
However, we believe that by following the warnings listed below, your risk to EMI will be minimized.
The sources of radiated EMI can be broadly classified into three types:
1. Hand-held portable transceivers (transmitters-receivers) with the antenna mounted directly on the
transmitting unit. Examples include: citizens band (CB) radios, "walkie talkie," security, fire, and police
transceivers, mobile phones, and other personal communication devices.
2. Medium-range mobile transceivers, such as those used in police cars, fire trucks, ambulances, and
taxis. These usually have the antenna mounted on the outside of the vehicle.
3. Long-range transmitters and transceivers such as commercial broadcast transmitters (radio and TV
broadcast antenna towers) and amateur (HAM) radios.
Scooter Electromagnetic Interference:
Because EM energy rapidly becomes more intense as one moves closer to the transmitting antenna (source),
the EM fields from hand-held radio wave sources (transceivers) are of special concern. It is possible to
unintentionally bring high levels of EM energy very close to the motorized scooter control system while using
these devices. This can affect scooter movement and braking. The warnings listed below are therefore
recommended to prevent possible interference with the control system of the scooter.
Warnings:
Electromagnetic interference (EMI) from sources such as radio and TV stations, amateur radio (HAM)
transmitters, two-way radios, and mobile phones can affect scooters.
Following the warnings listed below should reduce the chance of unintended brake release or scooter
movement which could result in serious injury.
1. Do not operate hand-held transceivers (transmitters-receivers), such as citizens band (CB) radios, or
turn on personal communication devices, such as mobile phones, while the scooter is turned ON.
2. Be aware of nearby transmitters, such as radio or TV stations, and try to avoid coming close to them.
3. If unintended movement or brake release occurs, turn the scooter OFF as soon as it is safe.
4. Be aware that adding accessories or components, or modifying the scooter, may make it more
susceptible to EMI.
5. Report all incidents of unintended movement or brake release to the distributor listed at the end of this
manual. Note whether there is a source of EMI nearby.
It is very important that you read this information regarding the possible effects of electromagnetic
interference on your mobility scooter.
Other types of hand-held devices, such as cordless phones, laptop computers, AM/FM radios, TV
sets, CD players, and cassette players, and small appliances, such as electric shavers and hair
dryers, so far as we know, are not likely to cause EMI problems to your mobility scooter.
There is no easy way to evaluate their effect on the overall immunity of the mobility scooter.
Some mobile phones and similar devices transmit signals while they are ON, even when not being
used

Scorpius-A Instruction Booklet
1654768~A_ 8
Important Information:
1. 20 volts per meter (V/m) is a generally achievable and useful immunity level against EMI (as of May
1994). The higher the level, the greater the protection.
2. The immunity level of this product is at least 20 V/m.
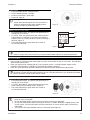
2.7 SAFETY WARNING AND INSTRUCTION LABELS
1
Warning sticker
1. Please read the instruction booklet carefully before using your scooter.
2. Do not drive the scooter on slippery surfaces or on slopes over 6~10
degrees limit.
3. Do not drive on highway, crowded roads, or in unfamiliar areas.
4. Do not turn at high speed in either forward or reverse.
5. Do no wash with water or leave scooter in humid environment since water
can damage the electronic parts.
6. Always re-engage the emergency freewheel device after use.
7. Always switch off the scooter before demounting or rotating the seat.
8. Weight restriction of the device: 115 kg (255 lbs)
9. Do not operate on staircase or escalators.
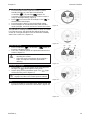
2
B C D
E
F
A
Scooter information label
A. Serial number barcode. B. Medical device. C. Date of manufacture. D.
European conformity. E. It may contain substances that could be harmful to the
environment. Recycling must be carried out in accordance with the respective
national legal provisions.
F. Caution.
3
Power warning label
11
Wiring diagram for batteries
4
Instruction of battery lock nut
(circuit breaker) label
12
Seat position warning plate
Do not get on the scooter if the
seat is not fixed. Push the seat
forward until the seat locks to its
position (green), you will hear a
click sound.
5
Battery charging warning label
13
Automatic Version Only
Folding / unfolding button
instruction label:
Press folding or unfolding button
(either by pressing button on
scooter or by remote) once for 3
seconds to wake up or turn off the
folding / unfolding function.
6
European representative label
10
11
12
13
14
15
16
17

Scorpius-A Instruction Booklet
1654768~A_ 9
7
N-D Lever adjustment label
Instructs freewheel mode
operation. See section 4-4.
14
Safety instruction label of
Lithium battery:
Read carefully to prevent improper
operation.
8
Heat caution warning label
Be aware that the motor may
normally become hot during
operation. Please avoid skin
contact.
15
Fixation point reminder
Sit only when the seat slide is fixed
to green point.
16
Seat position indication label
Seat latch is locked when seat is
positioned in green. Seat latch is
released when seat is positioned
in red. Do not sit if seat is
positioned in red.
9
Pinch point warning label
Keep hands away.
10
Charge port cap sticker
17
Pinch point warning label
Keep hands away.
CAUTION
Hot Surface.
Do not touch.

Scorpius-A Instruction Booklet
1654768~A_ 10
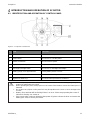
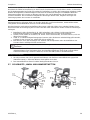
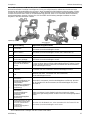
IDENTIFICATION OF PARTS
1
2
3 5
6
8
4
7
Figure 4
No.
ITEM
No.
ITEM
01
Steering
13
Seat backrest
02
Tiller height adjustment
14
Seat knob
03
Head light
15
Battery box
04
Front wheels
16
Battery box handle
05
Footplate cover
17
Charging port (battery box)
06
Seat springs
18
Circuit breaker
07
Supporting wheels
19
Tail light / Brake light
08
Rear wheels
20
Folding / unfolding light indicator / buttons
09
Charging port (upper)
21
N-D lever
10
Control panel / power switch
22
Anti-tippers
11
Throttle
23
Rear bumper
12
Seat
*Above is only for reference, actual product may vary.
10
11
13
12
16
15
21
20
22
23
19
17
18

Scorpius-A Instruction Booklet
1654768~A_ 11
INTRODUCTION AND OPERATION OF SCOOTER
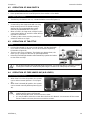
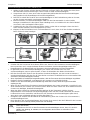
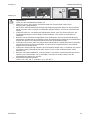
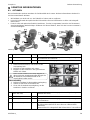
4.1 IDENTIFICATION AND OPERATION OF CONTROL PANEL
Figure 5 – Scorpius-A Control Panel
No.
ITEM
FUNCTION
1
Speed deceleration
Press to decrease speed.
2
Power switch
Press to turn on / off the power.
3
Speed acceleration
Press to increase speed.
4
Digital lock (number pad)
Set a password to lock the scooter.
5
Head-light / tail-light switch
Press to turn on headlight and taillight.
6
Battery gauge / error light indicator
Showing battery status or errors.
7
Horn
Press to sound warning tone when necessary.
8
Digital lock (enter key)
Press Enter when password is confirmed.
• Please keep the panel clean, away from water, oil, and dust as the RF reading range may be
reduced or malfunction may result.
•
When operating the panel, always press on the center of the button to ensure the button press is
detected.
•
Do not place any objects on the panel or it may disrupt the touch screen or cause damage to the
scooter.
• Battery / Error Indicator will be flashing if there is an error. Please stop operating the scooter if
indicator is flashing. See section 8.
•
If the power switch continues lightening after power off, please release the lever and remove the
battery pack. Please contact your dealer.

Scorpius-A Instruction Booklet
1654768~A_ 12
Power Switch:
• Press the button to turn on/off the power
• Power standby (locked) - red light
• Power on (unlocked) - green light
• Power off - light off
Figure 6
Digitally Unlock Your Scooter:
• Press the power switch. The power (red light) will be on
standby for you to unlock.
• To unlock, enter your password on the number pad (D).
Light indicator (C) will light up each time the number is
entered. Press (E) on the pad when password entering is
finished. (Figure 7)
• The power light will turn green when the scooter is
successfully unlocked.
(C)
(D)
(E)
Figure 7
Password Setting:
• Once scooter is unlocked (power green light on), press and hold the (E) key for 3 seconds. The pad light
will be flashing three times.
• Enter your password on number pad (D). The password can be a 1-4 digits number. Digits can be
repeated. Light indicator (C) will light up each time the number is entered.
• Press (E) on the pad when password entering is finished. Pad light will be flashing three times.
RF Sensor Unlock Your Scooter:
• Press the power switch. The power (red light) will be on
standby for you to unlock.
• To unlock, place the RF remote to the panel (spot near
power switch for best reading result). (Figure 8)
• The power light will turn green when the scooter is
successfully unlocked.
Figure 8
Factory Default Password: 1234
If there is a type error, press the (E) key or power switch button again to re-enter the password.
Auto-power off:
Power will automatically be off in 30 seconds if no
activity is detected during power standby period
(locked, red light) to prevent tap error.
If there is a type error, press the power switch button again or wait for 30 seconds to re-enter the
password. Scooter must be unlocked before you can reset the password. If you forget the password,
please unlock the scooter by RF remote control.
• The sensor transmit is up to 20 mm. However, please keep the distance between RF sensor and
panel as close as possible.
• Do not dissemble the RF remote. The inner sensor chip may be damaged.
• Do not turn off the power while unlocking the scooter, no matter whether it is digital unlock or RF
sensor unlock. The user will need to turn the power back on and re-unlock again if unlocking is
interrupted.
• The scooter cannot be operated unless it is unlocked (green light on).

Scorpius-A Instruction Booklet
1654768~A_ 13
Panel Backlight Adjustment (Five Levels):
• Press the power switch to get the scooter on power
standby (red light on), then press and hold both
acceleration [ ] / deceleration [ ] buttons for
2 seconds. The panel light will be all on when scooter is
ready for backlight setting. (Figure 9)
• Press [ ] to increase level of backlight. Press [ ] to
decrease level of backlight.
• Press the power switch to save the backlight setting.
• Panel backlight can be adjusted under power standby
mode (red light), user does not have to unlock the scooter.
Figure 9
Battery / Error Light Indicator:
The light will be showing the battery status or errors of scooter.
If scooter has errors, the light indicator will be flashing (see
section 8). This light indicator is also the indication of battery
status (see section 6-3). (Figure 10)
Figure 10
Speed Adjustment:
• Press acceleration [ ] / deceleration [ ] button to
increase / decrease speed.
• There are 3 different speeds of adjustment fastest 3>2>1
slowest. (Figure 11)
(1) (2) (3)
Figure 11
Head-Light / Tail-Light:
• Press button [ ] once to switch on the head-light and
tail-light. The [ ] will be lighted on the panel.
• Switch off by pressing the button again. The [ ] light
will be off on the panel. (Figure 12)
Figure 12
Horn:
• Press horn button to sound the buzzer. Buzzer sound and
light will last until you release the horn button. (Figure 13)
Figure 13
Tail-light will be on anyway when the brake is
engaged and when the scooter speed is reduced.
• Do not set the speed at maximum when
operating the scooter.
• Adjust the speed at maximum when inclining a
slope, and adjust to minimum speed when
declining.

Scorpius-A Instruction Booklet
1654768~A_ 14
4.2 OPERATION OF MAIN SWITCH
Main Switch (Touch Screen Version):
• Press power button to turn on/off (Figure 14). See section 4-1 for details.
Main Switch (Key Version):
• Turn the key clockwise to turn on, counterclockwise to turn off (Figure 15).
Sleep Mode:
• Scooter will go into sleep mode with one long
beep warning sound if no throttle activity is
detected for a programmable time period.
(Default programmable time is 10 mins.)
• When scooter is in sleep mode, all lights on the
control panel will be off, and the scooter will not
respond to commands.
• To wake up the scooter, turn the power (key)
switch off and then on again.
4.3 OPERATION OF THROTTLE
Throttle:
• Pull the right throttle (F) to move scooter forward. Pull the left throttle
(G) to move scooter backward. This can be reversed if required by
local dealer. (Figure 16)
• These are also your accelerator. The further you depress them, the
faster you go. (Subject to the level of speed adjustment)
• Releasing both left/right throttles will automatically operate the brakes
to slow down and stop.
4.4 OPERATION OF FREE-WHEELING (N-D LEVER)
Free-Wheeling (N-D Lever):
• When lever is in Drive (D) position, the scooter
can be driven. Normal position is in D (Figure
17).
• When lever is Neutral (N) position, the scooter
can be moved manually without power (Figure
18).
• Freewheel operation is only recommended on flat surfaces. Never leave your scooter on
gradient with its motors disengaged.
• When adjusting N-D lever, do not sit on the scooter.
• It is not possible to drive the scooter when the lever is in Neutral. You must turn off the scooter
first and switch to D lever, then turn on and drive scooter.
• Do not pull both right and left throttle at the same time; you might not able to control the scooter.
•
Turning the scooter OFF whilst driving will bring the scooter to an abrupt stop and danger.

Scorpius-A Instruction Booklet
1654768~A_ 15
4.5 TILLER HEIGHT ADJUSTMENT
Loosen (counterclockwise) the screw knob to adjust
the tiller height. Tighten (clockwise) screw knob
again to lock at a desired position.
There is a stop point on the tiller, the height cannot
exceed the stop point (approx. 20 cm) (Figure 19).
4.6 SEAT ADJUSTMENT / DISMANTLE
• Please refer to section 5 for scooter folding / unfolding.
• When scooter is being folded, the seat latch will automatically release,
and seat will move backwards.
• After unfolding, the seat shall automatically move forwards. However,
please always double check and manually push the seat to its locked
position if necessary.
• Do not get on the scooter if the seat is positioned in red point (H). Get
on the scooter only if the seat is locked in its green point position
(Figure 20).
Seat Dismantle:
1. Loosen the screws (I) by wrench and hex key.
2. Press the springs (J) to remove from the seat slide bracket.
3. Pull down and hold the seat springs to release the seat latch (K).
4. Push the seat bracket (L) by thumbs towards the back of the scooter to release the seat from the
latch.
5. When the seat is released from the latch, grab the seat (L1) and push it towards the back of the
scooter to remove the seat.
❖ When putting the seat back, insert the seat back to the seat slide bracket. Push the seat towards the front
of the scooter (green point), fasten the screws (Figure 21) and insert the springs back to the seat slide
bracket (J).
❖ Please make sure to follow the direction of step 2 (Figure 22), shown when putting the springs (J) back to
the bracket. Otherwise, it may cause damage.
• Do not conduct any adjustment (tiller / seat / armrest) while driving the scooter.
• Do not get on the scooter until the seat firmly locks in the green point position.
• Except for removing the seat, do not operate the seat springs if not necessary.
•
When pulling the seat springs, please grab and hold down springs on both sides. This helps the
user to easily release the seat latches. The latches may not be released if the holding point of
the seat springs is incorrect.
• If there is any defect on a spring, please contact your dealer.
20cm

Scorpius-A Instruction Booklet
1654768~A_ 16
FOLDING / UNFOLDING YOUR SCOOTER
Folding / unfolding your scooter only when the scooter is under below circumstances:
• When the scooter is placed on a flat ground and in a lay down position.
• When the scooter is switched off and on standby for folding / unfolding, the folding / unfolding light
indicator (M) on the scooter will be orange. (Figure 23)
• When the seatback is flipped down.
Folding / Unfolding Buttons
• Buttons on scooter (Figure 23)
- Press folding button (N) once to auto-fold. Please make sure
the scooter is fully expanded before folding.
- Press unfolding button (O) once to auto-unfold. Please make
sure the scooter is fully folded before unfolding.
- Press (N) / (O) again to fold / unfold if folding / unfolding
process is interrupted.
• Buttons on remote (Figure 24)
- Press folding button (P) once to auto-fold. Please make sure
the scooter is fully expanded before folding.
- Press unfolding button (Q) to auto-unfold. Please make sure
the scooter is fully folded before unfolding.
- Press (P) / (Q) again to fold / unfold if folding / unfolding
process is interrupted.
(M)
(N) (O)
Figure 23
(P)
(Q)
Figure 24
How to wake up the folding / unfolding function:
• The folding / unfolding buttons will power off if no action is detected in 3 minutes.
• Please wake up the folding / unfolding function before folding / unfolding. There are 3 ways:
1. Press power switch button and turn off the power.
2. Press and hold the folding button (N) or unfolding button (O) on scooter for 3 seconds to wake up the
folding / unfolding function. The light indicator (M) will be orange. To turn off the folding / unfolding
function, press and hold the folding button (N) or unfolding button (O) on scooter for 3 seconds again.
3. Press and hold the folding button (P) or unfolding button (Q) on scooter for 5 seconds to wake up the
folding / unfolding function. To turn off the folding / unfolding function, press and hold the folding
button (N) or unfolding button (O) on scooter for 5 seconds again.
How to fold the scooter (Figure 25):
1. Turn off the power.
2. Flip down the seatback.
3. Press folding button on the remote or on scooter once to auto-fold the scooter. The seat will
automatically move backwards during folding.
4. The seat latches will automatically release, and the seat will move backwards.
• The remote is not designed to be water-proof. Please keep it away from humid environment.
• Do not press the folding / unfolding button more than one time continuously on the remote
control.
• Best transmit range of remote is within 10 m. (The reading range will be affected by the
environment, barriers, and weather).
• The scooter may not be folded / unfolded if the battery is low. Please re-charge the scooter by
upper tiller charging port immediately and operate the folding / unfolding later when the scooter
is fully charged. See section 6-4.
• Keep the remote safe. Please contact dealer if it gets lost.

Scorpius-A Instruction Booklet
1654768~A_ 17
Figure 25
How to unfold the scooter (Figure 26):
1. Place the scooter on a flat ground and lay down the scooter. Make sure the rear wheels lie on the
ground before unfolding the scooter.
2. Make sure the scooter is switched off, however is awake for unfolding (the light indicator M will be
orange).
3. Press unfolding button on the remote or scooter once to auto-unfold the scooter.
4. When folding and unfolding, the seat shall automatically shift to its position. However, please double
check and manually push the seat to its locked position (green) if necessary.
5. Slide the seat forwards to the green point to lock the seat. You will hear a click sound when the seat is
locked to its position.
6. Flip up the seat back and double check if lock is in its position before you get on the scooter.
Figure 26
Cautions When Folding / Unfolding:
• Please turn off the power on the flat ground before folding / unfolding. The scooter can only be folding /
unfolding when it is switched off. The folding / unfolding light indicator will be orange.
• There is protection for tapping error. The scooter cannot unfold when it is in standing position without rear
wheels touching the ground.
• Press folding / unfolding button one time to fold / unfold the scooter. Do not press the button more than
one time continuously. It may cause abnormal folding / unfolding movements.
• Actions will stop if any foreign objects are detected during folding / unfolding process.
• Please remove the objects and conduct the actions again. See section 8.
• When operating the remote, please stand beside the scooter for best receiving signal.
• When operating the folding / unfolding buttons on the scooter, please reach the buttons from the back of
scooter. User may get pinched if reaching buttons from other sides of scooter.
• The scooter may not be folded / unfolded if the battery is less than 3 segments. Please re-charge the
scooter by upper tiller charging port immediately and operate the folding / unfolding later when the scooter
is fully charged. See section 6-3.

Scorpius-A Instruction Booklet
1654768~A_ 18
• Check and replace the battery of the remote control if the scooter is not able to fold / unfold.
• After completion of unfolding the scooter, it is normal that the scooter foot area will slightly sink while
seating for the first time.
BATTERY GAUGE AND CHARGING THE BATTERIES
6.1 DISASSEMBLING BATTERY BOX
• Each battery box contains one lithium battery or two lead-acid
batteries (optional).
• The battery box is designed for a better stability. Please follow the
instruction to disassemble the battery box (figure 27). Push the battery
backwards (1.) and pull it upwards (2.).
• It is highly recommended not to remove the battery box if not
necessary. Always keep the battery box installed on the scooter.
• If for any reason the battery box was removed, please make sure the
connectors are in sequence and in position when putting it back to
scooter.
6.2 CAUTIONS FOR BATTERY AND CHARGER
Lithium Battery:
• Only certain type and voltage of battery can be used on the scooter. Your scooter may be supplied with a
standard lithium battery or an optional lead-acid battery.
• The scooter can be charged when it’s folded or unfolded. Please turn the power (key) off when charging.
See section 4-2.
• Only use the lithium battery charger (2A/4A) supplied with your scooter for lithium battery.
• Do not switch off, unplug or interrupt the charging cycle until it has completed (charger indicator turns
green).
• If storing your scooter for a prolonged period (1 month or more), store the batteries at at least 30 %-50 %
state of charge (voltage between: 25.2 V~25.9 V). Batteries must be recharged at least once every three
months if storing for more than three months. On returning, make sure to charge them again before using
the scooter.
• Store the scooter in a dry, well-ventilated environment. Do not store your scooter where it will be exposed
to sources of direct heat, damp, water, oil, acid, alkaline, or where ozone could be possibly generated. All
the above will minimize the scooter’s lifetime.
• Recommended range of storage: Temperature: 20-30 °C, Humidity: 25 % ~ 85 %, Values outside this
range might affect the performance of the charger and battery.
• Rough handling operations, throwing, rolling, crushing, shaking, overly strong impact and extrusion to
batteries should be avoided to prevent battery casing breakage or internal structure damage.
• It is highly recommended to have your scooter inspected for battery every six months despite how often
you use the scooter. Please contact your dealer.
• Batteries are subject to disposal and recycling regulations that vary by country and region. Always check
and follow your applicable regulations before disposing of any battery.
• Please see number 14 safety instruction label of lithium battery in section 2-7 for more details.
• Manufacturer will not assume any liability or responsibility for any loss, damage or injury arising from or in
respect of any misuse of the lithium battery.
• When putting battery box back to scooter, gently press battery box downward to make sure it is
firmly connected to the scooter.
•
Do not disassemble battery box and open sealed parts by yourself to prevent electric shock and
damage to the battery.
•
Maintenance and repair must only be carried out by a competent engineer or authorized dealer.
Please contact the dealer if you need to replace the internal battery.
• If there is any abnormality during folding / unfolding, the action will stop. See section 8.
• Please make sure the N-D lever is in D position before folding / unfolding to avoid scooter
sliding. See section 4-4.

Scorpius-A Instruction Booklet
1654768~A_ 19
24V/12A Lead-Acid Battery (optional):
• Only certain type and voltage of battery can be used on the scooter. Your scooter may be supplied with a
standard lithium battery or an optional lead-acid battery.
• Only use the lead-acid battery charger (2A/4A) supplied with your scooter for lead-acid batteries.
• Adding acid electrolyte to battery is prohibited.
• Batteries will only give maximum performance after scooter has been used and batteries have been
recharged several times.
• The minimum time needed to recharge will vary depending on the depletion of the batteries.
• Excessive or short-period charging will be detrimental to battery life.
• Charge the batteries after each trip. Do not turn the key on while scooter is charging.
• Please charge the scooter in 0 °C ~ 40 °C. Temperatures outside this range might affect the performance
of the charger and battery.
• If storing your scooter for a prolonged period, batteries must be recharged at least once every three
months.
• For longest life, your batteries should be recharged regularly. Please recharge the batteries before they
run down to 20 %.
• It is highly recommended to have your scooter inspected for battery every six month despite how often
you use the scooter. Please contact your dealer.
Chargers (lithium / lead-acid):
• Do not leave charger plugged into your scooter with charger switched off as this may discharge your
batteries. Always unplug the cables when finished charging.
• Inspect the battery charger before each use. Make sure connectors are dry and clean.
• Do not attempt to use an extension cord to plug in your battery charger.
• Be aware that the battery charger case may become hot during charging. Please avoid skin contact.
• Do not cover charger with any objects. Use the charger in a well-ventilated area. Do not smoke as
explosive gases may be generated while charging the batteries.
• Keep the charger stored in a well-ventilated area. Do not drop the charger.
6.3 BATTERY GAUGE
There is an indicator shows battery capacity status (Figure 22):
• Touch screen version: 6 segments
• Key switch version: 5 segments
• When battery gauge light trends to right (green), it indicates sufficient power capacity.
• When battery gauge light trends to left (red), it indicates insufficient power capacity.
• Lead-acid battery chargers cannot be alternatively used on lithium batteries. Please only use a
specific lithium battery charger for your lithium battery. A lead-acid battery charger can be used
only if your scooter comes with lead-acid batteries (optional). (Please see section 9-1 for details.)
• If you want to change to optional lead-acid batteries, please contact your dealer to reset the
battery system such as charging port and controller setting.
• Please keep the above cautions in mind. Any battery / charger faults due to the unauthorized
maintenance, dismantle, misuse or accidental damage is not covered by the manufacturer’s
warranty.
• Check battery capacity before driving. Recharge the battery
immediately when the red light is flashing as the remaining
power can only keep the scooter going for buffering 2 km or
less.
•
Displayed segments on panel are for reference only. Please
refer to LED indicator of charger for more accurate charging
status.
•
The scooter may not be able to fold/unfold when the battery
capacity status is less than 3 segments. Please recharge the
battery immediately.

Scorpius-A Instruction Booklet
1654768~A_ 20
6.4 OPERATING THE CHARGER
Batteries must be charged before using the scooter for the first time and should be recharged after each day
use.
Your scooter may come with standard lithium 24V/2A charger, or optional bigger 24V/4A charger if you
upgrade the lithium battery to 17.4 Ah. Your scooter may come with 24V/2A lead-acid charger if you optionally
choose lead-acid batteries for your scooter.
Do not alternatively use a lead-acid charger to charge the lithium battery. They are not compatible and may
cause damages and dangers if doing so.
Lithium Battery Charger:
Output Voltage: 100 V~240 V (Figure 29)
1. Charger output cable, 4-pin connector (R)
2. AC power cord (S)
3. LED indicator (T)
• RED LIGHT ON: Pre-charging
• ORANGE LIGHT ON: Normal charging
• GREEN LIGHT ON: Fully charged.
4. It takes 7 hours for a full charge. Remove the AC plug
first after charging.
Lead-Acid Battery Charger (Optional):
Output Voltage: 100 V~240 V (Figure 30)
1. Charger output cable, 3-pin connector (U)
2. AC power cord (V)
3. LED indicator (W)
• RED LIGHT ON: Pre-charging
• ORANGE LIGHT ON: Normal charging
• GREEN LIGHT ON: Fully charged.
4. It takes 7 hours for a full charge. Remove the AC plug
first after charging.
• Each country may supply different chargers. The charging procedure may be different from
below. Chargers for lithium batteries and lead-acid batteries (optional) are different.
• The charger LED light should indicate red when pre-charging. If not, please contact your
authorized dealer.
• Inspect the battery charger before each use, make sure connectors are dry and clean. Do not
attempt to use an extension cord to plug in your battery charger.
• Do not use other brands of charger to charge the scooter. Only use the charger equipped with
originally.
• The battery charger is equipped with a cooling fan. If the fan does not appear to be working
correctly, please turn off the charger immediately as it may be overheated. Please contact your
authorized scooter dealer.
• Do not leave the charger plugged into your scooter with charger switched off as this may
discharge your batteries. Always unplug the cables when finished charging.
• Be aware that the battery charger case may become hot during charging. Please avoid skin
contact.
• Keep the charger stored in a well-ventilated area. Do not drop the charger.
(R)
(S)
(T)
Figure 29
Seite wird geladen ...
Seite wird geladen ...
Seite wird geladen ...
Seite wird geladen ...
Seite wird geladen ...
Seite wird geladen ...
Seite wird geladen ...
Seite wird geladen ...
Seite wird geladen ...
Seite wird geladen ...
Seite wird geladen ...
Seite wird geladen ...
Seite wird geladen ...
Seite wird geladen ...
Seite wird geladen ...
Seite wird geladen ...
Seite wird geladen ...
Seite wird geladen ...
Seite wird geladen ...
Seite wird geladen ...
Seite wird geladen ...
Seite wird geladen ...
Seite wird geladen ...
Seite wird geladen ...
Seite wird geladen ...
Seite wird geladen ...
Seite wird geladen ...
Seite wird geladen ...
Seite wird geladen ...
Seite wird geladen ...
Seite wird geladen ...
Seite wird geladen ...
Seite wird geladen ...
Seite wird geladen ...
Seite wird geladen ...
Seite wird geladen ...
Seite wird geladen ...
Seite wird geladen ...
Seite wird geladen ...
Seite wird geladen ...
Seite wird geladen ...
Seite wird geladen ...
Seite wird geladen ...
Seite wird geladen ...
-
 1
1
-
 2
2
-
 3
3
-
 4
4
-
 5
5
-
 6
6
-
 7
7
-
 8
8
-
 9
9
-
 10
10
-
 11
11
-
 12
12
-
 13
13
-
 14
14
-
 15
15
-
 16
16
-
 17
17
-
 18
18
-
 19
19
-
 20
20
-
 21
21
-
 22
22
-
 23
23
-
 24
24
-
 25
25
-
 26
26
-
 27
27
-
 28
28
-
 29
29
-
 30
30
-
 31
31
-
 32
32
-
 33
33
-
 34
34
-
 35
35
-
 36
36
-
 37
37
-
 38
38
-
 39
39
-
 40
40
-
 41
41
-
 42
42
-
 43
43
-
 44
44
-
 45
45
-
 46
46
-
 47
47
-
 48
48
-
 49
49
-
 50
50
-
 51
51
-
 52
52
-
 53
53
-
 54
54
-
 55
55
-
 56
56
-
 57
57
-
 58
58
-
 59
59
-
 60
60
-
 61
61
-
 62
62
-
 63
63
-
 64
64


Invacare SCORPIUS Bedienungsanleitung
- Kategorie
- Roller
- Typ
- Bedienungsanleitung
- Dieses Handbuch eignet sich auch für
in anderen Sprachen
Andere Dokumente
-
Pride Mobility Full-Size Scooter Bedienungsanleitung
-
 Pride Mobility Mid-Size Scooter Bedienungsanleitung
-
MPMan OV10 PACK Bedienungsanleitung
-
Prairie View Industries UTW830 Dimensions Guide
-
Vermeiren Antares 4 Bedienungsanleitung
-
-
 M SCOOTER S1 Original Instruction User Manual
-
-
-

