
I N S T R U C T I O N M A N U A L
B R U K S A N V I S N I N G
BETJENINGSVEJLEDNING
B E D IE N UN G SA N LE I TU N G
M O D E D ’ E M P L O I
MANUAL DE INSTRUÇÕES
INSTRUCCIONES DE U SO
K Ä Y T T Ö O H J E E T
GEBRUIKERSHANDLEIDING
I N S T R U K C J A O B S Ł U G I
MANUALE D’ISTRUZIONI
www.denver-electronics.com
www.facebook.com/denverelectronics
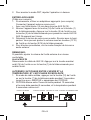
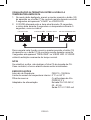
CRL-310

ENGLISH
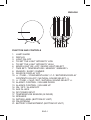
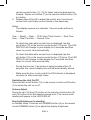
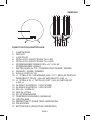
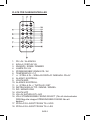
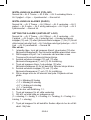
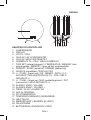
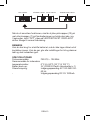
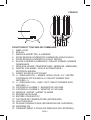
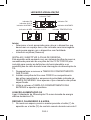
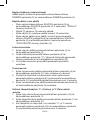
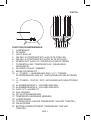
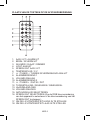
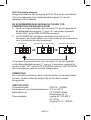
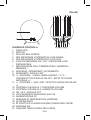
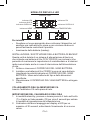
FUNCTION AND CONTROLS
1. LAMP SHADE
2. DISPLAY
3. LIGHT ON-OFF
4. TO SET THE LIGHT INTENSITY LOW
5. TO SET THE LIGHT INTENSITY HIGH
6. MOOD LIGHT ON –OFF / MOOD LIGHT SELECT
7. TIME SET / TEMPERATURE / MEMORY / MEMORY+
8. SNOOZE / SLEEP / DIMMER
9. SOURCE/ DISPLAY OFF
10. << / TUNE - / YEAR/MONTH-DAY / C-F / BETWEEN DISPLAY
CONTENTS ON-OFF / NATURAL SOUND SELECT <<
11. >> / TUNE + / NAP / DST / NATURAL SOUND SELECT >>
12. ALARM 1 CONTROL / VOLUME DOWN
13. ALARM 2 CONTROL / VOLUME UP
14. ON / OFF / ALARM OFF
15. AUX IN JACK
16. DC POWER INPUT
17. TEMPERATURE SENSOR (IN DOOR)
18. SPEAKER
19. RATING LABEL (BOTTOM OF UNIT)
20. FM ANTENNA
21. BATTERY COMPARTMENT (BOTTOM OF UNIT)
ENG-1

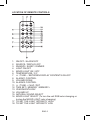
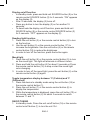
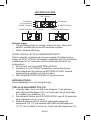
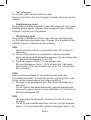
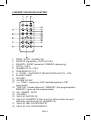
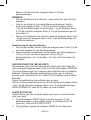
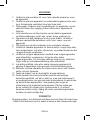
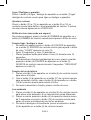
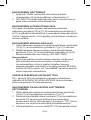
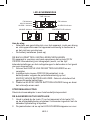
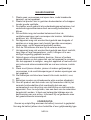
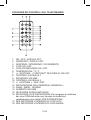
LOCATION OF REMOTE CONTROLS
1. ON/OFF / ALARM OFF
2. SOURCE / DISPLAY OFF
3. SNOOZE / SLEEP / DIMMER
4. LIGHT ON/OFF
5. MOOD LIGHT ON / OFF
6. TEMPERATURE / C-F
7. << / TUNE - / BETWEEN DISPLAY CONTENTS ON-OFF
8. ALARM 1 CONTROL
9. VOLUME DOWN
10. ALARM 2 CONTROL
11. >> / TUNE + / NAP / DST
12. TIME SET / MEMORY / MEMORY+
13. YEAR/MONTH-DAY
14. VOLUME UP
15. NATURAL SOUND SELECT
16. MOOD LIGHT SELECT (To turn the unit RGB color changing or
to stop the MOOD LIGHT color changing.)
17. TO SET THE LIGHT INTENSITY HIGH
18. TO SET THE LIGHT INTENSITY LOW
ENG-2

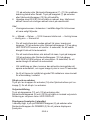
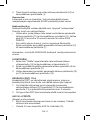
LED DISPLAY MODE
Get started
• Select a proper place for the device such as a dry, and even non
slip area where you can easily operate the device.
• Inserting the Battery (Backup)
INSTALLING/REPLACING THE BACK-UP BATTERY
This unit is equipped with a battery back-up system, requiring one
DC3V CR2032 lithium battery (not included) to maintain the time/
calendar settings and radio presets during AC power outage.
1. Unscrew and remove the BATTERY COMPARTMENT COVER.
2. Install one fresh CR2032 lithium battery into the battery
compartment following the polarity diagram on the BATTERY
COMPARTMENT COVER. Use only the specied size and type
of battery.
3. Replace the BATTERY COMPARTMENT COVER and tighten its
screw.
AC POWER CONNECTION
Plug the AC Power Adaptor into a household outlet AC source.
SETTING THE CALENDAR AND TIME
1. In standby mode, press and hold the unit button (7) or the
remote control button (12) for about 2 seconds to enter the
calendar/time set mode.
2. The year indicator will ash on the LED DISPLAY for up to 30
seconds prompting for a new entry.
3. While the display is ashing, repeatedly tap the unit buttons
(10), (11) or the remote control button (7), (11) to adjust to the
correct year. Press and hold the unit (10), (11) button or the
ENG-3
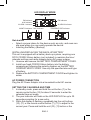
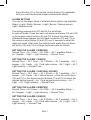
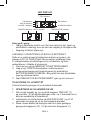
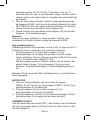
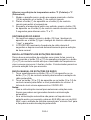
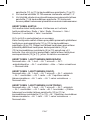
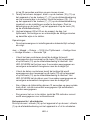
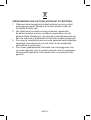
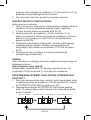
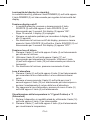
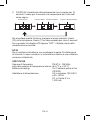
PM Indicator
AUX Indicator
ALARM 1 Indicator
FM Indicator
ALARM 2 Indicator
TIME Indicator
TEMPERATURE Indicator
MONTH Indicator
DAY Indicator

remote control button (7), (11) for faster scanning backward or
forward. Tap the unit button (7) or the remote control button (12)
to conrm.
4. Repeat steps #2 to #3 to adjust the month, day, time format,
current hour and nally current minute in the same way.
Notes:
- The display sequence in calendar / time set mode will be as
follows:
Year → Month → Date → 12/24 Hour Time Format → Real Time
Hour → Real Time Min → Normal Time
- To check the year while current time is displayed, tap the
unit button (10) or the remote control button (13) once. The LED
DISPLAY will change to year display for 5 seconds and then
revert to current time automatically.
- To check the date while current time is displayed, tap the
unit button (10) or the remote control button (13) twice. The LED
DISPLAY will change to date display for 5 seconds and then
revert to current time automatically.
- During the time set, if no button is being pressed within 10
seconds, the current display time will be automatically stored.
- Make sure the hour is set so that the PM indicator is displayed
correctly for afternoon/night times.
Switching the Unit On/Off
Press the unit on/off button (14) or the remote control on/off button
(1) to switch the unit on or off.
Volume Adjust
Press the unit (12) and (13) button or the remote control button (9)
and (14) button to set the desired volume level. The volume level
reading will appear in the LED DISPLAY.
Display Brightness (in standby)
In standby mode, Press the unit DIMMER button (8) or the remote
control DIMMER button (3) to adjust the display brightness.
ENG-4

Display on/off function
• In standby mode, press and hold unit SOURCE button (9) or the
remote control SOURCE button (2) for 3 seconds. “ON” appears
on the display (2).
• After 15 seconds, the display (2) turns off.
• Press any button to turn the display (2) on for another 15
seconds.
• To deactivate the display on/off function, press and hold unit
SOURCE button (9) or the remote control SOURCE button (2)
for 3 seconds. “OFF” appears on the display (2).
Reading light function
1. Press the unit button (3) or the remote control button (4) to turn
on the function.
2. Use the unit button (5) or the remote control button (17) to
increase the brightness. Use the unit button (4) or the remote
control button (18) to reduce the brightness.
3. In order to turn off the function, press the button again.
Mood light
1. Press the unit button (6) or the remote control button (5) to turn
on the mood light. The light will alternate in different colors.
2. Press and hold the unit button (6) for about 3 seconds or Press
the remote control button (16) to stop or start the mood light
color changing.
3. In order to turn off the mood light, press the unit button (6) or the
remote control button (5) again.
Toggle temperature display between °C (Celsius) and °F
(Fahrenheit)
1. Press the device to standby mode using the unit button (14) or
the remote control button (1).
2. Press the unit button (7) or the remote control button (6) to
display the temperature.
3. While the temperature is displayed, press the unit button (10) or
the remote control button (6) for about 3 seconds to switch
between °C and °F.
RADIO TUNING
1. In standby mode, Press the unit on/off button (14) or the remote
control on/off button (1) to turn the unit ‘On’.
ENG-5

2. The LED DISPLAY will show the radio frequency for about 5
seconds and then revert to normal time display.
AUTOMATIC SEARCH FOR RADIO STATIONS
To automatically search for stations with strong signals, press and
hold the main unit button (10) and (11) or the remote control button
(7) and (11) until the frequency readout on the display begins to
scan. Release the button. The tuner will stop on the rst strong
station it nds.
MANUAL SEARCH FOR RADIO STATIONS
1. Tap the unit (10) and (11) button or the remote control button (7)
and (11) repeatedly to choose your desired radio station.
2. Tap the unit (12) and (13) button or the remote control button (9)
and (14) to set the desired volume level. The volume level
reading will appear in the LED DISPLAY.
Notes:
- Use manual tuning to select weaker stations that might be
skipped during automatic tuning.
- If the automatic tuning does not stop on the exact frequency of
the station, for example, it stops on 88.9 MHz instead of 88.8
MHz, use the manual tuning method to “ne tune” to the exact
frequency of the desired station.
HINTS FOR BEST RECEPTION
FM - To insure maximum FM tuner reception, unwrap and fully
extend the EXTERNAL FM WIRE ANTENNA for best FM radio
reception.
TO SET/RECALL RADIO STATION PRESETS
1. Press the unit button (10) and (11) or the remote control button
(7) and (11) select the desired radio station.
2. Press and hold the unit (7) button or the remote control button
(12), the next available preset memory number will ash on
the LED display. (Note: “P01” will ash in the display if you are
programming presets for the rst time.)
3. Press the unit button (10) and (11) or the remote control button
(7) and (11) to change to the desired preset number P01 thru
P10.
4. Repeat steps 1 thru 3 to preset up to10 FM stations.
5. To recall one of the preset stations already programmed, Press
ENG-6

the unit button (7) or the remote control button (12) repeatedly
until you reach the desired preset number/radio station.
ALARM SETTING
You can set two alarm times. 6 different alarm options are available:
Radio + Light / Radio / Buzzer + Light / Buzzer / Natural sound +
Light / Natural sound.
The setting sequence for AL1 and AL2 is as follows:
In radio off mode, Press the main unit alarm set buttons (12) and (13)
or the remote control buttons (8) and (10) to show the alarm time.
Afterwards keep depress the unit alarm set button (12) and (13) or
the remote control button (8) and (10) over 2 seconds to enter the
alarm set mode. After enter the setting mode, press the unit alarm
set button (12) and (13) to change the mode cycle as follows:
SETTING THE ALARM 1 (BEEPER)
Normal Time→ AL 1 Hour → AL 1 Min → AL 1 weekday Alarm →
AL 1 beeper →Light → Light intensity → Normal Time.
SETTING THE ALARM 1 (RADIO)
Normal Time → AL 1 Hour → AL 1 Minute → AL 1 weekday → AL 1
beeper → AL 1 radio → AL 1 nal radio volume →AL 1 Light → AL 1
Light intensity → Normal Time.
SETTING THE ALARM 1 (NATURAL SOUND)
Normal Time → AL 1 Hour → AL 1 Minute → AL 1 weekday → AL 1
beeper → AL 1 radio →AL 1 natural sound →(Use the unit buttons
(10) and (11) or the remote control buttons (7) and (11) to select the
desired natural sound) →AL 1 nal natural sound volume →AL 1
Light → AL 1 Light intensity → Normal Time
SETTING THE ALARM 2 (BEEPER)
Normal Time→ AL 2 Hour → AL 2 Min → AL 2 weekday Alarm →
AL 2 beeper →Light → Light intensity → Normal Time.
SETTING THE ALARM 2 (RADIO)
Normal Time → AL 2 Hour → AL 2 Minute → AL 2 weekday → AL 2
beeper → AL 2 radio → AL 2 nal radio volume →AL 2 Light → AL 2
Light intensity → Normal Time.
ENG-7

SETTING THE ALARM 2 (NATURAL SOUND)
Normal Time → AL 2 Hour → AL 2 Minute → AL 2 weekday → AL 2
beeper → AL 2 radio →AL 2 natural sound →(Use the unit buttons
(10) and (11) or the remote control buttons (7) and (11) to select the
desired natural sound) →AL 2 nal natural sound volume →AL 2
Light → AL 2 Light intensity → Normal Time.
Proceed as follows:
1. In standby mode, Press the unit Alarm1 button (12) or the
remote control button (8). The currently set alarm time is shown.
2. Keep the button pressed for approx. 3 seconds when the alarm
time is displayed. The hours of the currently set alarm time start
to ash.
3. Use the unit buttons (10) and (11) or the remote control button
(7) and (11) for setting.
4. Press the unit Alarm 1 button (12) or the remote control button
(8) for conrmation. The minutes start to ash.
5. Use the unit buttons (10) and (11) or the remote control button
(7) and (11) for setting.
6. Now select the days you want the alarm to sound. The following
selections can be made:
• 1-5 = Monday to Friday
• 1-7 = Monday to Sunday
• 6-7 = Saturday and Sunday
• 1-1 = Weekday
6a. When you have selected the setting 1-1:
1. Press the button to select the weekday.
2. Make your selection with the buttons and.
(1 = Monday, 2 = Tuesday, 3 = Wednesday, 4 = Thursday, 5 = Friday,
6 = Saturday, 7 = Sunday)
7. Press the button to conrm. Then select how you want to be
awakened. Select from:
• “bu” (buzzer):
A buzzer sounds when the alarm time is reached.
The buzzer interval increases from slow to fast. The volume cannot
be adjusted.
• Radio frequency is displayed:
As soon as your set alarm time is shown, the radio switches on. The
last set station is played. The volume increases slowly to the set
volume. The volume cannot be adjusted.
ENG-8

• NS (natural sound):
As soon as your set alarm time is shown, the natural sound switches
on. The natural sound is played. The volume increases slowly to the
set volume. The volume cannot be adjusted.
NOTE:
• The alarm function turns off automatically after 30 minutes until
the next day.
7a. If you want to be awakened by a radio station, select the
maximum alarm volume using the unit (10) and (11) buttons or
the remote control (7) and (11) buttons.
8. Press the unit Alarm 1 button (12) or the remote control Alarm 1
button (8) to conrm. Then select the light intensity (L) for the
alarm function. Selecting “OFF” will cancel this function.
NOTE:
The light inside the lamp shade (1) will turn on 30 minutes prior
to the pre-set alarm time. The brightness will gradually increase,
starting at the intensity level previously set.
9. Finally, press the button again. The rst alarm time is now
activated.
To set the second alarm time, repeat the above steps with the
main unit Alarm 2 button (13) or the remote control Alarm 2
button (10).
NOTE:
• If the alarm time has been activated, AL1 or AL2 will appear in
the display.
• In order to briey display the set alarm times, press the unit
Alarm 1 button (12) or the remote control Alarm 1 button (8),
respectively the unit Alarm 2 button (13) or the remote control
Alarm 2 button (10).
• Turning off the Alarm Press the unit on/off button (14) or the
remote control on/off button (1) to stop the alarm.
Deactivate the Alarm Function
1. Switch the device to standby with the unit button (14) or the
remote control button (1).
2. To deactivate the alarm function, press and hold the main unit
button (12) and (13) or the remote control button (8) and (10) for
about 3 seconds. AL1 or AL2 will disappear.
ENG-9

SNOOZE FUNCTION (MAIN UNIT)
When the alarm source is sounding, press the unit any buttons
(except on/off button (14)) or the remote control SNOOZE button (3)
to suspend the alarm and activate the snooze function. The Alarm
will temporarily stop and sound again 9 minutes later but the AL1 (or
AL2) indicator will keep ashing.
Notes:
This manual snooze operation can be repeated again and again.
To turn off the snooze function, Press the main unit on/off button
(14) or the remote control on/off button (1). The AL1 (or AL2)
INDICATOR will stop ashing
SLEEP OPERATION
The sleep timer allows you to turn the unit off after a designated
time has elapsed.
1. While listening to the radio, tap the unit button SLEEP button
(8) or the remote control button (3) the sleep time ‘90’ (minutes)
appears in the LED DISPLAY.
2. Repeatedly tap the SLEEP button to select a sleep timer of 90,
60, 30 or 15 minutes. Wait for about 10 seconds after your
selection for the unit to conrm the selection, the unit will play
for the selected length of time then turn itself ‘Off’ automatically.
3. To cancel the sleep timer, repeatedly tap the SLEEP button until
you see the current time in the LED DISPLAY after last sleep
timer option (15 minutes).
• This function can be cancelled with the button (14).
4. This function can be cancelled with the unit button (14) or the
remote control button (1).
Note:
There is no sleep indicator in this unit. To check the remaining sleep
time, tap the SLEEP button once.
Nap alarm
The nap alarm can be used for e.g. a short “nap”. The function only
operates in standby.
• Press the unit button (11) or the remote control button (11) to
select the time after which the device will beep. Select from 90
to 10 minutes or OFF (off) in steps of 10 minutes.
• After the selected time has elapsed, an increasingly fast beep
will sound. Use the unit button (14) or the remote control button
(1) to turn off the beep.
ENG-10

Note: When using the NAP alarm the wake up light function is
inactive.
NATURAL SOUND
1. In standby mode, tap the unit ON-OFF button (14) or the remote
control ON-OFF button (1) to turn the unit ‘On’.
2. Press the unit button (9) or the remote control button (2) to
switch to natural sound mode.
3. Use the main unit buttons (10) and (11) or the remote control
button (15) to select the desired natural sound.
DAYLIGHT SAVING TIME (DST) MODE
If daylight saving time (DST) is available in the summer time in your
State, you may use this option to adjust to the correct time easily.
1. In standby mode, press and hold the unit DST button (11) or the
remote control button (11) for 2 seconds to advance the
displayed time by one hour.
2. To cancel DST mode, repeat the above operation.
AUX IN JACK
(Cable not included)
1. If required, use a suitable adapter (not included). Connect the
external device as follows :
• With a 3.5 mm stereo jack plug to the AUX IN socket (15).
2. Turn the device on using the unit button (14) or the remote
control button (1). Press the unit button (9) or the remote control
button (2) to switch to AUX IN mode. AUX IN appears in the
display.
3. Start the playback of your audio source. Listen to the sound
playback via the speaker. You can adjust the volume using the
unit buttons (11/12) or the remote control button (9/14).
4. For the further procedure, please refer to the user manual of the
external audio source.
NOTE:
If possible, adjust the volume of the external unit to a comfortable
level.
Stop AUX IN operation
Disconnect the cable from the AUX IN jack. Press the unit on/off
button (14) or the remote control button (1) to turn the unit off.
ENG-11

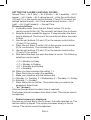
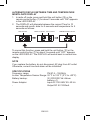
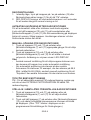
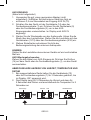
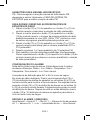
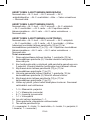
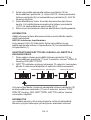
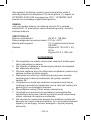
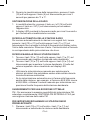
ALTERNATE DISPLAY BETWEEN TIME AND TEMPERATURE
MONTH-DATE DISPLAY
1. In radio off mode, press and hold the unit button (10) or the
remote control button (7) for about 3 seconds until “ON” appears
in the LED DISPLAY.
2. The DISPLAY will alternate between the current Time for 10
seconds and month- date for 5 seconds and temperature for 5
seconds as follows:
To cancel this function, press and hold the unit button (10) or the
remote control button (7) for about 3 seconds until “OFF” appears
on the LED DISPLAY. The DISPLAY will switch back to normal time
display.
NOTE
If you replace the battery, do not disconnect AC plug from AC outlet.
Otherwise, current time and alarm will be initialized.
SPECIFICATIONS
Frequency range: FM 87.5 – 108 MHz
In door Temperature Sensor Range: 32 °F to 122 °F (0°C to +50°C)
Battery backup: 3V (CR2032 Flat Lithium
battery x 1)
Power Adaptor: Input AC 100-240V 50- 60 Hz
- Output DC 5V 1200mA
ENG-12
TIME Indicator
Display for 10 second Display for 5 second Display for 5 second
TEMPERATURE IndicatorMONTH Indicator
DAY Indicator

WARNING
1. No naked ame sources, such as lighted candles, should be
placed on the apparatus.
2. Do not place the product in closed bookcases or racks without
proper ventilation.
3. The mains plug is used as the disconnect device, the disconnect
device shall remain readily operable.
4. The ventilation should not be impeded by covering the
ventilation openings with items, such as newspapers, table-
cloths, curtains, etc.
5. It shall not be exposed to dripping or splashing and that no
objects lled with liquids, such as vases, shall be placed on the
apparatus.
6. Do not connect FM antenna to outside antenna.
7. The unit should not be exposed to direct sunlight, very high or
low temperature, moisture, vibrations or placed in dusty
environment.
8. Do not use abrasive, benzene, thinner or other solvents to
clean the surface of the unit. To clean, wipe it will mild non-
abrasive detergent solution and clean soft cloth.
9. Never attempt to insert wires, pins or other such objects into the
vents or opening of the unit.
10. Batteries shall not be exposed to excessive heat such as
sunshine, re or the like.
11. Attention should be drawn to the environmental aspects of
battery disposal.
12. Do not dispose this product into usual household garbage at the
end of its lifecycle; hand it over to a collection center for
recycling the electrical and electronic appliances. By recycling,
some of the materials can be reused. You are making an
important contribution to protect our environment. Please inquire
your community administration for the authorized disposal
center.
CAUTION
Danger of explosion if battery is incorrectly replaced
Replace only with the same or equivalent type
ENG-13

DISPOSAL OF YOUR OLD APPLIANCE OR BATTERY:
1. When this crossed-out wheeled bin symbol is attached to a
product, it means the product is covered by the European
Directive.
2. All electrical and electronic products including battery should
be disposed of separately from the municipal waste stream via
designated collection facilities appointed by the government or
the local authorities.
3. The correct disposal of your old appliance will help prevent
potential negative consequences for the environment and
human health.
4. For more detailed information about disposal of your old
appliance, please contact your city ofce, waste disposal
service or the shop where you purchased the product.
ENG-14

ALL RIGHTS RESERVED, COPYRIGHT DENVER ELECTRONICS A/S
Electric and electronic equipment and included batteries contains
materials, components and substances that can be hazardous to
your health and the environment, if the waste material (discarded
electric and electronic equipment and batteries) is not handled
correctly.
Electric and electronic equipment and batteries is marked with the
crossed out trash can symbol, seen below. This symbol signies
that electric and electronic equipment and batteries should not be
disposed of with other household waste, but should be disposed of
separately.
As the end user it is important that you submit your used batteries
to the appropriate and designated facility. In this manner you make
sure that the batteries are recycled in accordance with legislature
and will not harm the environment.
All cities have established collection points, where electric and
electronic equipment and batteries can either be submitted free
of charge at recycling stations and other collection sites, or be
collected from the households. Additional information is available at
the technical department of your city.
Imported by:
DENVER ELECTRONICS A/S
Stavneagervej 22
DK-8250 Egaa
Denmark
www.facebook.com/denverelectronics
www.denver-electrionics.com
ENG-15

SWEDISH
FUNKTION OCH KONTROLLER
1. LAMPSKÄRM
2. DISPLAY
3. LJUS PÅ-AV
4. STÄLLA IN LJUSSTYRKAN TILL LÅG
5. STÄLLA IN LJUSSTYRKAN TILL HÖG
6. STÄMNINGSBELYSNING PÅN –AV / VAL AV
STÄMNINGSBELYSNING
7. INSTÄLLNING AV TID / TEMPERATUR/ MINNE / MINNE+
8. SNOOZE / SÖMN / DIMMER
9. KÄLLA / DISPLAY AV
10. << / STÄLLA IN- / ÅR/MÅNAD-DAG / C-F / MELLAN DISPLAY
INNEHÅLLET PÅ-AV / VAL AV NATURLIGT LJUD <<
11. >> / STÄLLA IN + / TUPPLUR / DST / VAL AV NATURLIGT
LJUD >>
12. ALARM 1 KONTROLL / VOLYM NED
13. ALARM 2 KONTROLL / VOLYM UPP
14. PÅ / AV / LARM AV
15. AUX IN-UTTAG
16. DC-STRÖMINGÅNG
17. TEMPERATURGIVARE (INOMHUS)
18. HÖGTALARE
19. MÄRKETIKETT (ENHETENS UNDERSIDA)
20. FM-ANTENN
21. BATTERIFACK (ENHETENS UNDERDEL)
SWE-1

PLATS FÖR FJÄRRKONTROLLER
1. PÅ / AV / ALARM AV
2. KÄLLA / DISPLAY AV
3. SNOOZE / SÖMN / DIMMER
4. LAMPA PÅ / AV
5. STÄMNINGSBELYSNING PÅ / AV
6. TEMPERATUR / C-F
7. << / STÄLLA IN - / MELLAN DISPLAY INNEHÅLL PÅ-AV
8. ALARM 1 KONTROLL
9. VOLYM NED
10. ALARM 2 KONTROLL
11. >> / STÄLLA IN + / TUPPLUR / DST
12. INSTÄLLNING AV TID / MINNE / MINNE+
13. ÅR / MÅNAD-DAG
14. VOLYM UPP
15. VAL AV NATURLIGT LJUD
16. VÄLJ STÄMNINGSBELYSNING SELECT (För att växla enheten
RGB färg eller stoppa STÄMNINGSBELYSNING från att
ändras.)
17. STÄLLA IN LJUSSTYRKAN TILL HÖG
18. STÄLLA IN LJUSSTYRKAN TILL LÅG
SWE-2

LED-DISPLAYLÄGE
Komma igång
• Välj en lämplig plats för enheten såsom ett torrt, jämnt och
halkfritt område där du kan lätt använda enheten.
• Sätta i batteriet (Backup)
INSTALLATERA / BYTE AV RESERVBATTERIET
Denna enhet är utrustad med ett reservsystem för batteriet som
kräver ett DC3V CR2032 litiumbatteri (medföljer inte) för att behålla
inställningar för tid / kalender och förinställningar för radio vid
strömavbrott.
1. Skruva loss och ta bort BATTERILUCKAN.
2. Installera ett nytt CR2032 litiumbatteri i batterifacket som
följer diagramet för polaritet på BATTERILUCKAN. Använd
endast angiven storlek och typ av batteri.
3. Sätt tillbaka BATTERILUCKAN och dra åt skruven.
NÄTANSLUTNING
Anslut nätadaptern in i ett vanligt eluttag.
STÄLLA IN KALENDER OCH TID
1. I standby-läge, tryck och håll nere knappen (7) på enheten
eller fjärrkontrollknappen (12) i ca 2 sekunder för att ange läge
för inställning av kalender / tid.
2. Årsindikatorn blinkar på LED-DISPLAYEN i upp till 30 sekunder
som uppmanar om en ny post.
3. Medan displayen blinkar, knacka upprepade gånger på
knapparna (10), (11) på enheten eller fjärrkontrollknapparna
(7), (11) för att ställa in korrekt år. Tryck och håll knapparna (10),
SWE-3
PM indikator
AUX IN indikator
ALARM 1 indikator
FM indikator
ALARM 2 indikator
TIME-indikator
TEMPERATURE indikator
MONTH indikator
DAY indikator

(11) på enheten eller fjärrkontrollknapparna (7), (11) för snabbare
scanning bakåt eller framåt. Tryck på knappen (7) på enheten
eller fjärrkontrollknappen (12) för att bekräfta.
4. Upprepa steg #2 till #3 för att ställa in månad, dag, tidsformat,
aktuell timme och slutligen aktuell minut på samma sätt.
Obs!
- Visningssekvensen i kalendern / inställda läget för tid kommer
att vara enligt följande:
År → Månad → Datum → 12/24 timmars tidsformat → Verklig timme
→ Verklig min → Normal tid
- För att kontrollera året medan aktuell tid visas, knacka på
knappen (10) på enheten eller fjärrkontrollknappen (13) en gång.
LED-DISPLAY kommer att visa år i 5 sekunder, för att sedan
återgå till aktuell tid automatiskt.
- För att kontrollera datum när aktuell tid visas, tryck på knappen
(10) på enheten eller fjärrkontrollknappen (13) två gånger.
LED-DISPLAYEN kommer att visa datum i 5 sekunder, för att
sedan återgå till aktuell tid automatiskt.
- Vid inställning av tiden, kommer den aktuella visningstiden att
sparas automatiskt, om ingen knapp trycks in inom 10 sekunder.
- Se till att timme är inställd så gjorde PM-indikatorn visas korrekt
för eftermiddag / nattetid.
Slå på och av enheten
Tryck på / av-knappen för enheten (14) eller fjärrkontrollens på / av-
knapp (1) för att slå på / av enheten.
Volyminställning
Tryck på knapparna (12) och (13) på enheten eller
fjärrkontrollknapparna (9) och (14) för att ställa in önskad volymnivå.
Avläsning av volymen visas i LED-DISPLAY.
Displayens ljusstyrka (i standby)
I standby-läge, tryck på DIMMER-knappen (8) på enheten eller
fjärrkontrollknappen för DIMMER (3) för att justera displayens
ljusstyrka.
SWE-4
Seite laden ...
Seite laden ...
Seite laden ...
Seite laden ...
Seite laden ...
Seite laden ...
Seite laden ...
Seite laden ...
Seite laden ...
Seite laden ...
Seite laden ...
Seite laden ...
Seite laden ...
Seite laden ...
Seite laden ...
Seite laden ...
Seite laden ...
Seite laden ...
Seite laden ...
Seite laden ...
Seite laden ...
Seite laden ...
Seite laden ...
Seite laden ...
Seite laden ...
Seite laden ...
Seite laden ...
Seite laden ...
Seite laden ...
Seite laden ...
Seite laden ...
Seite laden ...
Seite laden ...
Seite laden ...
Seite laden ...
Seite laden ...
Seite laden ...
Seite laden ...
Seite laden ...
Seite laden ...
Seite laden ...
Seite laden ...
Seite laden ...
Seite laden ...
Seite laden ...
Seite laden ...
Seite laden ...
Seite laden ...
Seite laden ...
Seite laden ...
Seite laden ...
Seite laden ...
Seite laden ...
Seite laden ...
Seite laden ...
Seite laden ...
Seite laden ...
Seite laden ...
Seite laden ...
Seite laden ...
Seite laden ...
Seite laden ...
Seite laden ...
Seite laden ...
Seite laden ...
Seite laden ...
Seite laden ...
Seite laden ...
Seite laden ...
Seite laden ...
Seite laden ...
Seite laden ...
Seite laden ...
Seite laden ...
Seite laden ...
Seite laden ...
Seite laden ...
Seite laden ...
Seite laden ...
Seite laden ...
Seite laden ...
Seite laden ...
Seite laden ...
Seite laden ...
Seite laden ...
Seite laden ...
Seite laden ...
Seite laden ...
Seite laden ...
Seite laden ...
Seite laden ...
Seite laden ...
Seite laden ...
Seite laden ...
Seite laden ...
Seite laden ...
Seite laden ...
Seite laden ...
Seite laden ...
Seite laden ...
Seite laden ...
Seite laden ...
Seite laden ...
Seite laden ...
Seite laden ...
Seite laden ...
Seite laden ...
Seite laden ...
Seite laden ...
Seite laden ...
Seite laden ...
Seite laden ...
Seite laden ...
Seite laden ...
Seite laden ...
Seite laden ...
Seite laden ...
Seite laden ...
Seite laden ...
Seite laden ...
Seite laden ...
Seite laden ...
Seite laden ...
Seite laden ...
Seite laden ...
Seite laden ...
Seite laden ...
Seite laden ...
Seite laden ...
Seite laden ...
Seite laden ...
Seite laden ...
Seite laden ...
Seite laden ...
Seite laden ...
Seite laden ...
Seite laden ...
Seite laden ...
Seite laden ...
Seite laden ...
Seite laden ...
Seite laden ...
Seite laden ...
Seite laden ...
Seite laden ...
Seite laden ...
Seite laden ...
Seite laden ...
Seite laden ...
Seite laden ...
Seite laden ...
-
 1
1
-
 2
2
-
 3
3
-
 4
4
-
 5
5
-
 6
6
-
 7
7
-
 8
8
-
 9
9
-
 10
10
-
 11
11
-
 12
12
-
 13
13
-
 14
14
-
 15
15
-
 16
16
-
 17
17
-
 18
18
-
 19
19
-
 20
20
-
 21
21
-
 22
22
-
 23
23
-
 24
24
-
 25
25
-
 26
26
-
 27
27
-
 28
28
-
 29
29
-
 30
30
-
 31
31
-
 32
32
-
 33
33
-
 34
34
-
 35
35
-
 36
36
-
 37
37
-
 38
38
-
 39
39
-
 40
40
-
 41
41
-
 42
42
-
 43
43
-
 44
44
-
 45
45
-
 46
46
-
 47
47
-
 48
48
-
 49
49
-
 50
50
-
 51
51
-
 52
52
-
 53
53
-
 54
54
-
 55
55
-
 56
56
-
 57
57
-
 58
58
-
 59
59
-
 60
60
-
 61
61
-
 62
62
-
 63
63
-
 64
64
-
 65
65
-
 66
66
-
 67
67
-
 68
68
-
 69
69
-
 70
70
-
 71
71
-
 72
72
-
 73
73
-
 74
74
-
 75
75
-
 76
76
-
 77
77
-
 78
78
-
 79
79
-
 80
80
-
 81
81
-
 82
82
-
 83
83
-
 84
84
-
 85
85
-
 86
86
-
 87
87
-
 88
88
-
 89
89
-
 90
90
-
 91
91
-
 92
92
-
 93
93
-
 94
94
-
 95
95
-
 96
96
-
 97
97
-
 98
98
-
 99
99
-
 100
100
-
 101
101
-
 102
102
-
 103
103
-
 104
104
-
 105
105
-
 106
106
-
 107
107
-
 108
108
-
 109
109
-
 110
110
-
 111
111
-
 112
112
-
 113
113
-
 114
114
-
 115
115
-
 116
116
-
 117
117
-
 118
118
-
 119
119
-
 120
120
-
 121
121
-
 122
122
-
 123
123
-
 124
124
-
 125
125
-
 126
126
-
 127
127
-
 128
128
-
 129
129
-
 130
130
-
 131
131
-
 132
132
-
 133
133
-
 134
134
-
 135
135
-
 136
136
-
 137
137
-
 138
138
-
 139
139
-
 140
140
-
 141
141
-
 142
142
-
 143
143
-
 144
144
-
 145
145
-
 146
146
-
 147
147
-
 148
148
-
 149
149
-
 150
150
-
 151
151
-
 152
152
-
 153
153
-
 154
154
-
 155
155
-
 156
156
-
 157
157
-
 158
158
-
 159
159
-
 160
160
-
 161
161
-
 162
162
-
 163
163
-
 164
164
-
 165
165
-
 166
166
-
 167
167
-
 168
168
-
 169
169
-
 170
170
-
 171
171


in anderen Sprachen
- français: Denver CRL-310 Manuel utilisateur
- español: Denver CRL-310 Manual de usuario
- italiano: Denver CRL-310 Manuale utente
- Nederlands: Denver CRL-310 Handleiding
- português: Denver CRL-310 Manual do usuário
- dansk: Denver CRL-310 Brugermanual
Verwandte Papiere
-
Denver CRL-310 Benutzerhandbuch
-
Denver CR-419 MK2 Benutzerhandbuch
-
Denver CR-416 Spezifikation
-
Denver CR-918BLACK Benutzerhandbuch
-
-
-
Denver CRP-618 Benutzerhandbuch
-
-
Denver CRP-716 Benutzerhandbuch
-
Denver IR-110 Benutzerhandbuch
Sonstige Unterlagen
-
OK. OCR 160PR Benutzerhandbuch
-
Muse M-170 CRW Benutzerhandbuch
-
Tokai TCP-124 Benutzerhandbuch
-
-
Lenco CR-16 Bedienungsanleitung
-
AEG MRC 4121 Bedienungsanleitung
-
MT Logic CL-471MT Bedienungsanleitung
-
Silvercrest SKRI 2000 A1 Bedienungsanleitung
-
Muse M-185 CR Bedienungsanleitung
-
Trevi EC 889 Alarm Clock Benutzerhandbuch