Seite wird geladen ...

Instruction manual
Инструкция по эксплуатации
Espresso machine BR1105
Рожковая кофеварка BR1105
brayer.ru

СОДЕРЖАНИЕ
EN ......................................................................................................................................3
DE ....................................................................................................................................16
RU ...................................................................................................................................31
KZ ....................................................................................................................................45

3
EN
ATTENTION!
For additional protection it is reasonable to install a
residual current device (RCD) with nominal operation
current not exceeding 30 mA, to install RCD, contact
a specialist.
EN
ESPRESSO MACHINE BR1105
The coee maker is intended for making “espresso”
and “cappuccino” coee.
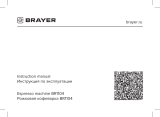
DESCRIPTION
1. Drip tray
2. Drip tray grid
3. Tray lling pop-up indicator
4. Filter holder handle
5. Filter holder
6. Coee lter
7. Control panel
8. Cup warming tray
9. Steam supply control knob « »
10. Cappuccinator pipe
11. Espresso machine body
12. Cappuccinator pipe tip
13. Water tank handle
14. Water tank lid
15. Removable water tank
16. Measuring spoon with ground coee tamper
Control panel
17. Espresso machine on/o button « »
18. One cup button « »
19. Steam supply on button « »
20. Two cups button « »
20
16
15
14
9
13
18
17
1
4
3
2
5
6
7
8
10
11
12
19

4
EN
SAFETY MEASURES AND COFFEE MAKER
OPERATION RECOMMENDATIONS
Read the operation instructions carefully before
using the coee maker and keep it for future
reference.
• Use the coee maker for its intended purpose only,
as specied in this manual.
• Mishandling the coee maker can lead to its
breakage and cause harm to the user or damage to
his/her property and it is not covered by warranty.
• The coee maker is intended for making espresso
and cappuccino coee and warming up ready drinks.
Do not warm any other liquids.
• Make sure that the operating voltage of the coee
maker indicated on the label corresponds to your
home mains voltage.
• The power plug is equipped with a grounding contact,
plug it into the socket with reliable grounding contact.
In case of short circuit the grounding reduces the risk
of electric shock.
• Contact an electrical technician, if you are not
sure that your sockets are installed properly and
grounded.
• To prevent re do not use adapters designed for
connecting the power plug to the mains socket
without grounding contact.
• In case of sparking in the mains socket and
occurrence of smell of burning, unplug the unit and
apply to the organization maintaining your home
mains.
• If smoke appears from the unit body, unplug the unit
and take measures to prevent re spreading.
• Use and store the coee maker at the temperature
above 0 °C.
• Do not use the coee maker outdoors.
• It is not recommended to use the unit during lightning
storms.
• Protect the unit from impacts, falling, vibrations and
other mechanical stress.
• Never leave the plugged-in coee maker unattended.
• To avoid re, electric shock or physical injuries, do
not immerse the power plug, the power cord or the
coee maker body into water or any other liquids.
• Do not use the coee maker in proximity to the
kitchen sink, in bathrooms, near swimming pools or
other containers lled with water.
• If the unit is dropped into water, unplug it
immediately, and only then you can take the unit out
of water. Apply to the service center for testing or
repairing the unit.
• Do not use the coee maker near heating appliances,
heat sources or open ame.
• Do not use the unit in places where aerosols are
used or sprayed, and in proximity to inammable
liquids.
• Place the coee maker on a at stable surface; do
not place it on the edge of a table. Do not let the

5
EN
power cord hang from the edge of the table and
make sure it does not touch hot surfaces or sharp
edges of furniture.
• Do not place the coee maker on hot surfaces.
• Do not touch the power cord and the power plug with
wet hands.
• Use only the coee maker parts and accessories
supplied with the unit.
• Before switching the coee maker on, make sure that
all removable parts are installed properly.
• Ensure that the water level in the water tank is not
below the minimal mark.
• Do not switch the coee maker on if the water tank
is empty.
• To avoid getting burns by hot steam be careful when
frothing milk or warming the ready drinks.
• The lter holder surface, the cappuccinator pipe and
the cappuccinator tip can get rather hot. Be cautious
and careful when in contact with hot surfaces.
• Do not remove the lter holder during coee maker
operation.
• Let the unit cool down completely before cleaning
and removing the accessories.
• Unplug the coee maker before cleaning or when you
are not using it. When unplugging the coee maker
hold only the power cord plug and carefully remove it
from the mains socket, do not pull the power cord —
this can lead to damage of the power cord or the
socket or cause short circuit.
• For children safety reasons do not leave polyethylene
bags, used as a packaging, unattended.
ATTENTION!
Do not allow children to play with polyethylene bags
or packaging lm. Danger of suocation!
• The coee maker is not intended for usage by
children.
• Do not leave children unattended to prevent using
the unit as a toy.
• Do not allow children to touch the unit and the power
cord during the coee maker operation.
• Place the unit out of reach of children during the
operation and cooling down.
• This unit is not intended for usage by physically or
mentally disabled persons (including children) or by
persons lacking experience or knowledge if they are
not under supervision of a person who is responsible
for their safety or if they are not instructed by this
person on the usage of the unit.
• From time to time check the power cord and the
power plug integrity.
• If the power cord is damaged, it should be replaced
by the manufacturer, a maintenance service or
similar qualied personnel to avoid danger.
• Do not repair the unit by yourself. Do not
disassemble the unit by yourself, if any malfunction
is detected, and after it was dropped, unplug the unit

6
EN
and apply to the service center.
• Transport the coee maker in the original package.
• Keep the unit out of reach of children and disabled
• persons.
COFFEE MAKER IS INTENDED FOR HOUSEHOLD
USE ONLY, DO NOT USE THE COFFEE MAKER FOR
COMMERCIAL OR LABORATORY PURPOSES.
BEFORE USING THE COFFEE MAKER
After unit transportation or storage at low
temperature, it is necessary to keep it for at least
three hours at room temperature.
• Unpack the coee maker and remove all the
packaging materials.
• Keep the original package.
• Read the safety measures and operating
recommendations.
• Check the delivery set.
• Examine the coee maker for damages, in case of
damage do not plug it into the mains.
• Make sure that the specications of power supply
voltage specied on the lower panel of the unit
correspond to the specications of your mains.
• Wipe the surface of the coee maker body with a
clean, slightly damp cloth to remove dust.
• Make sure that the steam supply is closed. To do this
turn the knob (9) « » clockwise until bumping
«•».
• Before using the espresso machine for the rst time,
wash all removable parts (1, 2, 5, 6, 12, 15, 16) with
warm water and neutral detergent, rinse and dry
them.
• Remove the water tank (15), ll it with cold water up
to the MAX mark and install it back to its place.
Notes:
- to ll the water tank (15) with water you can open
the lid (14) and pour water into the tank (15).
-to carry the water tank (15), take it by the handle
(13).
• Install the coee lter (6) (do not add ground coee
into the lter) into the holder (5) having preliminary
matched the ledge on the lter (6) with the groove on
the holder (5) and turn the lter (6) counter/clockwise
to x the lter.
• Install the lter holder (5) into the coee maker. The
holder (5) ledges should match the grooves on the
boiler «INSERT», after that turn the lter holder
handle (4) to the right until bumping «LOCK».
• Place a suitable cup on the grid (2).
• Insert the power plug into the mains socket.
Note: - the buttons on the control panel (7) are
sensory, you just need to touch the button to switch the
necessary operation mode on.
• Switch the espresso machine on by pressing the on/
o button (17) « », the button (17) illumination
will light up, and the illumination of buttons (18,

7
EN
19, 20) will be ashing. When the buttons (18, 19,
20) illumination will glow constantly, it means that
preheating is nished.
Notes:
- when switching the unit for the rst time, the
buttons (18, 19, 20) illumination will be ashing
quickly, because the boiler is empty. Press the
two cups button (20) « », the pump will be
switched on and start injecting water into the
boiler, the buttons (18, 19, 20) illumination will stop
ashing and start glowing constantly;
- the rst switching on of the pump may be
accompanied by an uncharacteristic sound, this
is a normal. After lling the boiler with water, the
sound of the pump will return to normal.
• Wait until the buttons (18, 19, 20) illumination glows
constantly, then switch the water supply on by
pressing the button (20) « », the pump will switch
on for 25 seconds, pour the water out from the cup
and press the button (20) again « » to switch the
water supply on again. After switching the pump o,
pour the water out from the cup.
• Repeat this procedure several times, the boiler will
be clean after that.
• To switch the espresso machine o, press the on/
o button (17) « », the buttons (17, 18, 19, 20)
illumination will go out.
AUTO SWITCH OFF FUNCTION
• If no actions were performed during 25 minutes
after switching on, the coee maker will switch o
automatically.
HOW TO MAKE A GOOD ESPRESSO
• Use ground coee for espresso coee makers.
• Slightly tamp the ground coee in the lter (6), you
can do it with the back side of the measuring spoon
(17).
• Coee strength depends on the quality and grinding
degree of coee beans. If coee is pouring out too
long, this means the coee powder is too ne or it is
tamped too strongly.
PREHEATING
• To make a cup of hot espresso, it is recommended to
preliminary heat up the coee lter (6) and the lter
ATTENTION!
• Do not remove the lter holder (5) during espresso
machine operation.
• Do not remove the lter holder (5) immediately
after preparing coee as there is redundant water
and steam pressure inside the lter (5), let the
coee maker cool down completely.
• To remove the lter holder (5) turn the handle (4) to
the left «INSERT» and remove the lter holder (5).

8
EN
holder (5).
• Open the lid (14) and ll the tank (15) with water, or
remove the tank (15) and ll it with water, then install
the tank (15) back to its place.
• Install the coee lter (6) into the holder (5) having
preliminary matched the ledge on the lter (6) with
the groove on the holder (5) and turn the lter (6)
counter/clockwise to x the lter.
• Install the lter holder (5) into the coee maker. The
holder (5) ledges should match the grooves on the
boiler «INSERT », after that turn the lter holder
handle (4) to the right until bumping «LOCK».
• Place a suitable cup on the grid (2).
• Insert the power plug into the mains socket.
• Switch the espresso machine on by pressing the on/
o button (17) « », the button (17) illumination
will light up, and the illumination of buttons (18,
19, 20) will be ashing. When the buttons (18, 19,
20) illumination will glow constantly, it means that
preheating is nished.
• Switch the water supply on by pressing the button
(20) « », the pump will switch on for 25 seconds
and hot water will be poured into the cup. After
switching the pump o, pour the water out from the
cup.Preheating is over.
MAKING ESPRESSO
AFTER PREHEATING:
• Make sure that the steam supply is closed. To do this
turn the knob (9) « » clockwise until bumping
«•».
• Remove the lter holder (5) by turning the handle (4)
to the left «INSERT» and remove the lter holder (5).
• Put ground coee in the lter (6), slightly tamp the
ground coee with the back side of the measuring
spoon (16).
• Install the lter holder (5) into the coee maker. The
holder (5) ledges should match the grooves on the
boiler «INSERT», after that turn the lter holder handle
(4) to the right until bumping «LOCK».
• Wait until the buttons (18, 19, 20) illumination glows
constantly, the espresso machine is ready for
operation.
• Switch the water supply on by pressing the button
(18) « » to make one cup of coee. The pump
will switch on and will be operating for 15 seconds.
The operation time of the pump 15 seconds is set by
default.
• To make two cups of coee press the button (20) «
». The pump will switch on and will be operating
ATTENTION!
When making coee do not leave the operating
coee maker unattended, as it is necessary to watch
the cup being lled with ready coee!

9
EN
for 25 seconds. The operation time of the pump 25
seconds is set by default.
Note: - watch the cup lling with the ready coee, if
you need t switch the water supply o, press again the
button (18) « » or the button (20) « ».
• Switch the espresso machine o by pressing the on/
o button (17) « », the buttons (17, 18, 19, 20)
illumination will go out.
• Wait until the coee maker cools down and remove
the lter holder (5) by turning the handle (4) to the left
«INSERT». Remove the ground coee remnants and
wash the lter (6).
• For easy removing of the coee remnants use the
retainer on the handle (4) to prevent the lter (6) from
falling o the holder (5).
• Notes:
-the cups should be preliminary heated up, when
water heats up in the boiler, put the cups on the
tray (8).
- if you need to promptly remove the lter holder
(5), you have to reduce the pressure in the boiler,
switch the coee maker o by pressing the on/
o button (17) « », place a suitable cup under
the tip (12) and slightly open the steam supply by
turning the knob (9) « » counterclockwise.
After the pressure in the boiler is released, you
can remove the lter holder (5).
ESPRESSO PORTION SETTING
-To enter the programming mode, press and hold
the one cup button (18) « » for 3 seconds, the
button (18) « » illumination will be ashing.
Press the button (18) « » again. After the
required amount of ready coee is poured into the
cup, press the button (18) « » again to nish
setting. Maximum time of water supply for making
one cup of coee is 45 seconds.
-To enter the programming mode, press and hold
the two cups button (20) « » for 3 seconds,
the button (20) « » illumination will be
ashing. Press the button (20) « » again. After
the required amount of ready coee is poured into
the cup, press the button (20) « » again to
nish setting. Maximum time of water supply for
making two cups of coee is 90 seconds.
Notes:
- if you have programmed the water supply time
for making one cup of coee, then the water
supply time for making two cups of coee will be
automatically set doubled;
- water supply time for two cups of coee can be set
up to 90 seconds. If the water supply time for two
cups of coee was set, then the water supply time
for making one cup of coee will be automatically
set as half the time for making two cups of coee.
RETURN TO THE FACTORY SETTINGS
• Switch the espresso machine on and wait until the

10
EN
• Make coee, as described in the chapter «MAKING
ESPRESSO», in the cup with enough capacity to add
frothed milk.
• Make sure that the steam control knob (9) « »
is in the position «the steam supply is o «•».
• Press the steam supply button (19) « » and
wait until the button (19) « » illumination glows
constantly. Place any suitable bowl under the tip (12)
for water. Carefully turn the steam supply knob (9)
« » counterclockwise for a quarter of a turn to
remove the condensed uid from the cappuccinator
pipe (10).
• After removing the condensed uid close the steam
supply by turning the knob (9) « » clockwise
until bumping «•».
Note: some water or steam may appear from the lter
holder (5), it is normal.
• Put the cappuccinator pipe tip (12) into a glass with
cold milk or cream, the amount of milk or cream
should be about 100 ml. Carefully turn the steam
supply control knob (9) « » counterclockwise for
a quarter of a turn or more. The tip (12) should not
touch the bottom of the glass, as this can hinder the
steam release; you can make thick frothed milk in
several seconds.
Note:
-to avoid splashing milk always immerse the tip
(12) deeper than 1 cm from the milk surface.
-to avoid splashing milk or cream, do not open the
steam supply with a sharp turn of the knob (9) «
», always turn the knob (9) « » carefully.
- when selecting a cup for milk or cream, keep
in mind that the frothed milk amount increases
approximately twice;
-during the operation in the steam supply mode
the button (19) « » illumination will be ashing
and glowing constantly; it means that the water
temperature in the boiler is maintained within the
set limits;
• The outgoing steam creates whirls which froths milk;
from time to time lift and lower the bowl with milk
against the tip (12) to make the milk foam.
• Making the milk foam is an art. You may not make it
at the rst try, don’t worry and experiment until you
espresso machine is preheated and the buttons (18,
19, 20) indicators glow constantly.
• After the preheating is nished, press and hold
simultaneously the buttons (19) « » and (20) «
» for 3 seconds, the buttons (19 and 20) illumination
will ash 3 times, and the espresso machine will
return to the factory settings.
MAKING CAPPUCCINO
ATTENTION!
Be careful to avoid burns by the released hot steam.

11
EN
achieve good results.
• When frothing milk you can remove the tip (12) and
try to froth milk directly with the steam releasing from
the cappuccinator pipe (10).
• Close the steam supply by turning the knob (9) «
» clockwise until bumping «•».
• Add frothed milk to the ready espresso, and the
cappuccino is ready. Add sugar to your taste, you can
decorate frothed milk with cocoa powder.
• Switch the coee maker o by pressing the on/
o button (17) « », the buttons (17, 18, 19, 20)
illumination will go out.
IMPORTANT:
- It is important that milk for making frothed milk is
fresh and without additives.
- Take usual whole milk with fat status from 4% to
6%, cream fat status is not less than 10%.
-Clean the cappuccinator pipe tip (12) right
after milk or cream frothing — to do this put the
cappuccinator pipe tip (12) into a glass of water
and switch the steam supply on by pressing
the button (9), turn the steam supply knob (9) «
» counterclockwise to release some steam.
After that close the steam supply by turning the
knob (9) « » clockwise until bumping «•».
Switch the steam supply o by pressing the steam
supply button (9) and switch the coee maker o.
- Wait until the coee maker cools down and
remove the tip (12) from the cappuccinator pipe
(10), wipe the outer side of the cappuccinator pipe
(10) with a soft damp cloth and wash the tip (12)
under a water jet.
Note: after frothing milk, if you press the water supply
button (18) « » or the button (20) « », and
the button (18) « », (19) « » and (20) « »
illumination will be ashing quickly, the pump will not
switch on, because the water temperature in the boiler
is high. To decrease the water temperature, place
a cup under the tip (12), turn the knob (9) « »
counterclockwise and drain hot water. When the buttons
(18, 19, 20) illumination glows constantly, the pump will
stop operating, turn the knob (9) « » to the position
«o». After that you can continue making coee.
HOT WATER AND ITS USAGE
• You can use hot water for warming the cups before
making coee or, for instance, for brewing tea.
• Drain hot water to decrease the boiler temperature
after frothing the milk.
• Switch the espresso machine on and wait until the
espresso machine is preheated and the buttons (18,
19, 20) illumination glows constantly.
• Place a cup under the tip (12) and switch the water
supply on by pressing the button (20) « »,
carefully turn the steam supply control knob (9) «
» counterclockwise for a quarter of a turn or

12
EN
more, hot water will be poured into the cup.
• Turn the steam supply control knob (9) « »
clockwise to the position «o» to switch the hot water
supply o.
Notes:
- if you need to stop the water supply, press the
button (20) « » again;
-you can set up the pump operation time (see the
chapter «ESPRESSO PORTION SETTING»).
WARMING THE DRINKS
You can warm up your drinks by putting the
cappuccinator pipe (10) without the tip (12) into the cup
with the drink.
• Switch the espresso machine on and wait until the
espresso machine is preheated and the buttons (18,
19, 20) illumination glows constantly.
• Press the steam supply button (19) « ».
• Put the cappuccinator pipe (10) without the tip (12)
into the cup with the drink you want to warm up.
Carefully turn the steam supply control knob (9) «
» counterclockwise.
• Close the steam supply by turning the knob (15) «
» clockwise until bumping «•».
• Switch the coee maker o by pressing the on/
o button (17) « », the buttons (17, 18, 19, 20)
illumination will go out.
TROUBLESHOOTING
Problem Cause Solution
Water leaks from
the bottom of the
coee maker
The tray is full of
water. Please, clean the tray.
The coee
maker is
damaged.
Please, apply to the service
center for repairing the
coee maker.
Water leaks from
the lter holder.
There is ground
coee on the
lter.
Clean the lter edges from
ground coee.
Ready coee
has unpleasant
taste.
The coee
maker was not
washed after
descaling.
Clean the coee maker
from mineral scale and
wash it from the remaining
descaling agent.
Ground coee
was stored in a
humid place for
a long time.
Please, use fresh ground
coee. Keep unused
ground coee in a hermetic
package in a dry cool place.
The unit cannot
be switched on
No voltage in the
mains socket.
The power plug
is not completely
inserted into the
socket.
Make sure that the mains
socket is properly operating.
Check whether the power
plug is completely inserted
into the socket.
Steam doesn’t
froth milk
The steam ready
indicator is
ashing.
You can use steam to froth
milk only after the indicator
starts glowing white.
The used cup
does not suit
for proper milk
frothing.
Use a tall and narrow cup.
You used
skimmed milk.
Use only whole milk with fat
content 4-6%.

13
EN
will light up, and the illumination of buttons (18,
19, 20) will be ashing. When the buttons (18, 19,
20) illumination will glow constantly, it means that
preheating is nished.
9. Press the button (20) « », depending on the
preset water supply time, press the button (20) «
» once or twice, ll a cup of approximately 100
ml capacity with water (it is necessary to remove
water from the boiler and ll it with citric acid
solution), if necessary, switch the water supply o
by pressing the button (20) « » again. Pour the
liquid out from the cup.
10. Switch the water supply on by pressing the button
(20) « » and ll a cup of about 100 ml capacity,
press the button (20) « » again to switch the
water supply o and pour the liquid out of the cup.
11. After a while repeat the procedure described in
the paragraph 10 and ll the cup of about 100 ml
capacity again.
12. Press the steam supply button (19) « ». Put a
suitable bowl under the tip (12) and slightly open
the steam supply by turning the knob (9) « »
counterclockwise. Carefully turn the knob (9) «
» to the maximal steam release position,
release the steam for about 1 minute, then close
the steam by turning the knob (9) « »
clockwise until bumping «•».
13. Switch the coee maker o by pressing the on/o
button (17) « »,. Wait for 10-15 minutes.
Note: some water or steam may appear from the lter
holder (5), it is normal.
REMOVING MINERAL SCALE
For eective operation of the coee maker we
recommend removing scale every 2-3 months and when
using “hard” water more often.
1. Make sure that the power plug is not inserted into
the mains socket.
2. Make sure that the steam supply is closed. To
do this turn the knob (9) « » clockwise until
bumping «•».
3. Make citric acid solution: 2 teaspoons of acid to 1
litre of water and pour the solution into the water
tank (15). Install the tank (15) back to its place.
4. Install the coee lter (6) into the holder (5) having
preliminary matched the ledge on the lter (6) with
the groove on the holder (5) and turn the lter (6)
counter/clockwise to x the lter. Do not put ground
coee into the lter (6).
5. Install the lter holder (5) into the coee maker. The
holder (5) ledges should match the grooves on the
boiler «INSERT», after that turn the lter holder
handle (4) to the right until bumping «LOCK».
6. Place a suitable cup on the grid (2).
7. Insert the power plug into the mains socket.
8. Switch the espresso machine on by pressing the
on/o button (17) « », the button (17) illumination

14
EN
14. Perform the steps 10 and 11 at least 3 times.
15. Repeat the cleaning procedure for the steam
release channels described in the paragraph 12.
16. With small intervals, repeat the boiler cleaning
procedure (paragraph 10) until the citric acid
solution dissolves in the tank (20) completely.
17. Switch the coee maker o by pressing the on/o
button (17) « ».
18. Fill the water tank (15) with clear water until
maximal level and repeat the steps 10, 12 at least 3
times without the 10-15 minute break.
19. Switch the coee maker o by pressing the on/
o button (17) « » the buttons (17, 18, 19, 20)
illumination will go out.
Note: to remove the scale you can use special
descaling agents for coee makers and coee
machines, strictly following the instructions on their
usage.
CLEANING THE COFFEE MAKER
• If there is ground coee scale remainin in the lter (6)
openings, clean the lter (6) with a small brush.
• Wipe the coee maker body with a soft, slightly damp
cloth and then wipe the coee maker body (11) dry.
Do not use abrasives and solvents to clean the coee
maker body.
• Do not immerse the coee maker body (11), the
power cord and the power plug into water or any
other liquids.
• Wash the removable parts of the coee maker with
warm water and neutral detergent, then rinse them
and dry.
DRIP TRAY (1)
• A red pop-up indicator (3) in the grid (2) will show
when the tray (1) is full.
• Remove the grid (2) from the tray (1), remove the
tray (1) and pour out water, install the tray back to its
place, put the grid (2) on the tray (1).
• If necessary, wash the tray (1) and the grid (2) with
water and soft detergent, rinse and dry.
STORAGE
• Before taking the coee maker away for long storage,
unplug it and let the unit cool down.
• Clean the coee maker.
• Pack the coee maker in the original package.
• Use and store the coee maker at the temperature
above 0 °C.
• Keep the coee maker in a dry cool place out of
reach of children and disabled persons.
DELIVERY SET
Coee maker — 1 pc.
Measuring spoon — 1 pc.
Manual — 1 pc.

15
EN
TECHNICAL SPECIFICATIONS
• Power supply 220-240 V, ~ 50 Hz
• Rated input power: 850 W
• Water tank capacity: 1,5 l
RECYCLING
For environment protection apply to the
specialized centers for further recycling after
the service life expiration of the unit.
The waste generated during the disposal of
the unit is subject to mandatory collection
and consequent disposal in the prescribed manner.
For further information about recycling of this product
apply to a local municipal administration, a disposal
service or to the shop where you purchased this
product.
The manufacturer reserves the right to change the
design, structure and specications not aecting general
principles of the unit operation, without prior notice.
The unit operating life is 3 years
The manufacturing date is specied in the serial
number.
In case of any malfunctions promptly apply to the
authorized service center.

16
DE
ACHTUNG!
Als zusätzlicher Schutz ist es zweckmäßig, den
FI-Schalter mit Nennstrom maximal bis 30 mA im
Stromversorgungskreis aufzustellen; wenden Sie sich
dafür an einen Spezialisten.
DE
ESPRESSOKAFFEEMASCHINE
BR1105
Die Kaeemaschine ist für die Zubereitung von
Espresso und Cappuccino bestimmt.
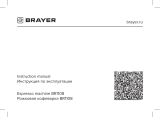
BESCHREIBUNG
1. Tropfschale
2. Gitter der Tropfschale
3. Popup-Anzeige der Tropfschalenauüllung
4. Gri des Filterhalters
5. Filterhalter
6. Kaeelter
7. Bedienungsplatte
8. Tassenaufheizplatte
9. Gri des Dampfreglers « »
10. Cappuccinatore-Rohr
11. Kaeemaschinengehäuse
12. Endstück des Cappuccinatore-Rohrs
13. Gri des Wasserbehälters
14. Deckel des Wasserbehälters
15. Abnehmbarer Wasserbehälter
16. Messlöel mit Mahlkaeepresse
Bedienungsplatte
17. Ein-/Ausschalttaste der Kaeemaschine « »
18. Taste für eine Tasse Kaee « »
19. Dampfzufuhrtaste « »
20. Taste für zwei Tassen Kaee « »
20
16
15
14
9
13
18
17
1
4
3
2
5
6
7
8
10
11
12
19

17
DE
SICHERHEITSHINWEISE UND BEDIENUNGS-
ANLEITUNG FÜR DIE KAFFEEMASCHINE
Bevor Sie die Kaeemaschine benutzen, lesen Sie
die Bedienungsanleitung aufmerksam durch und
bewahren Sie sie zum späteren Gebrauch auf.
• Benutzen Sie die Kaeemaschine nur bestimmungs-
mäßig und laut dieser Bedienungsanleitung.
• Der Missbrauch der Kaeemaschine kann zu ihrer
Störung führen, den Benutzer oder sein Eigentum
beschädigen und ist kein Garantiefall.
• Die Kaeemaschine ist zum Zubereiten von Espres-
so und Cappuccino, zum Aufheizen von Fertiggeträn-
ken und zu keinem Erhitzen anderer Flüssigkeiten
bestimmt.
• Vergewissern Sie sich, dass die auf dem Bezeich-
nungszettel angegebene Betriebsspannung der Kaf-
feemaschine und die Netzspannung übereinstimmen.
• Der Netzstecker hat einen Erdungskontakt; stecken
Sie ihn nur in eine Steckdose mit dem zuverlässigen
Erdungskontakt. Bei einem Kurzschluss verringert
die Erdung das Stromschlagrisiko.
• Wenden Sie sich an einen Elektriker, wenn Sie sich
nicht sicher sind, ob Ihre Steckdosen richtig installiert
und geerdet sind.
• Verwenden Sie keine Adapterstecker, die zum An-
schließen des Netzsteckers an eine Steckdose ohne
Erdungskontakt bestimmt sind, um das Brandrisiko
zu vermeiden.
• Bei Brandgeruch und Funken in der Steckdose zie-
hen Sie den Netzstecker aus der Steckdose heraus
und wenden Sie sich an den Ihr Hausstromnetz
leistenden Dienst.
• Wenn Rauch aus dem Gerätegehäuse austritt,
ziehen Sie das Netzkabel aus der Steckdose heraus
und treen Sie die Feuerverhinderungsmaßnahmen.
• Benutzen und lagern Sie die Kaeemaschine bei
einer Temperatur über 0°C.
• Es ist nicht gestattet, die Kaeemaschine draußen
zu benutzen.
• Es ist nicht empfohlen, das Gerät bei Gewitter zu
benutzen.
• Schützen Sie das Gerät vor Stößen, Stürzen, Vibrati-
onen und anderen mechanischen Einwirkungen.
• Lassen Sie die ans Stromnetz angeschlossene
Kaeemaschine nie unbeaufsichtigt.
• Um Brand, Stromschlag oder Verletzungen zu ver-
meiden, tauchen Sie den Netzstecker, das Netzkabel
oder das Gehäuse der Kaeemaschine ins Wasser
oder jegliche andere Flüssigkeiten nicht ein.
• Benutzen Sie die Kaeemaschine in der Nähe
von Spülbecken, in Badezimmern und neben den
Wasserbecken oder anderen mit Wasser gefüllten
Behältern nicht.
• Falls das Gerät ins Wasser gefallen ist, ziehen Sie
den Netzstecker aus der Steckdose sofort heraus,
erst danach holen Sie das Gerät aus dem Wasser
heraus. Wenden Sie sich an einen autorisierten

18
DE
Kundendienst, um das Gerät prüfen oder reparieren
zu lassen.
• Benutzen Sie die Kaeemaschine in direkter Nähe
von Heizgeräten, Wärmequellen oder oenem Feuer
nicht.
• Es ist verboten, das Gerät an den Orten, wo Sprays
verwendet werden, sowie in der Nähe von leichtent-
zündbaren Flüssigkeiten, zu benutzen.
• Stellen Sie die Kaeemaschine auf eine ebene
standfeste Oberäche auf, stellen Sie sie an den
Tischrand nicht auf. Achten Sie darauf, dass das
Netzkabel vom Tisch nicht herabhängt und heiße
Oberächen und scharfe Möbelkanten nicht berührt.
• Es ist nicht gestattet, die Kaeemaschine auf heiße
Oberächen zu stellen.
• Berühren Sie das Netzkabel und den Netzstecker mit
nassen Händen nicht.
• Benutzen Sie nur die mitgelieferten Kaeemaschi-
nenteile und -zubehör.
• Vergewissern Sie sich vor der Einschaltung der Kaf-
feemaschine, dass alle abnehmbaren Teile korrekt
aufgestellt sind.
• Achten Sie darauf, dass der Wasserstand im Behäl-
ter nicht unter der Minimalmarke liegt.
• Schalten Sie die Kaeemaschine ohne Wasser nicht
ein.
• Seien Sie beim Zubereiten von Milchschaum oder
beim Erhitzen von Fertiggetränken vorsichtig, um
Verbrühung durch heißen Dampf zu vermeiden.
• Die Oberäche des Filterhalters, des Cappuccinato-
re-Rohres und des Cappuccinatore- Aufsatzes kann
ziemlich heiß sein. • Seinen Sie beim Kontakt mit
heißen Oberächen vorsichtig und sorgfältig.
• Es ist nicht gestattet, den Filterhalter während des
Betriebs der Kaeemaschine abzunehmen.
• Lassen Sie das Gerät vollständig abkühlen, bevor
Sie das Zubehör entfernen und reinigen.
• Trennen Sie die Kaeemaschine vor der Reinigung
oder wenn Sie sie nicht benutzen vom Stromnetz
ab. Wenn Sie die Kaeemaschine vom Stromnetz
abtrennen, halten Sie nur den Netzstecker fest und
ziehen Sie ihn aus der Steckdose vorsichtig heraus;
ziehen Sie das Netzkabel nicht, da es zu seiner
Beschädigung und Steckdosenstörung sowie einem
Kurzschluss führen kann.
• Aus Kindersicherheitsgründen lassen Sie Plastiktü-
ten, die als Verpackung verwendet werden, nie ohne
Aufsicht.
ACHTUNG!
Lassen Sie Kinder mit Plastiktüten oder Verpa-
ckungsfolien nicht spielen. Erstickungsgefahr!
• Die Kaeemaschine ist nicht für Kinder bestimmt.
• Beaufsichtigen Sie Kinder, damit sie das Gerät als
Spielzeug nicht benutzen.
• Lassen Sie Kinder das Gerät und das Netzkabel
während des Kaeemaschinenbetriebs nicht berüh-
ren.

19
DE
• Während des Betriebs und des Abkühlens stellen
Sie das Gerät an einen für Kinder unzugänglichen
Ort auf.
• Dieses Gerät ist für Personen (darunter Kinder) mit
Körper-, Nerven- und Geistesstörungen oder Perso-
nen ohne ausreichende Erfahrung und Kenntnisse
nicht geeignet, wenn sie sich unter Aufsicht der
Person, die für ihre Sicherheit verantwortlich ist, nicht
benden oder entsprechende Anweisungen über die
Nutzung des Geräts nicht bekommen haben.
• Überprüfen Sie regelmäßig den Zustand des Netzka-
bels und des Netzsteckers.
• Wenn das Netzkabel beschädigt ist, soll es vom
Hersteller, vom Kundendienst oder von ähnlich
qualiziertem Personal ersetzt werden, um Gefahren
zu vermeiden.
• Es ist nicht gestattet, das Gerät selbständig zu repa-
rieren. Es ist nicht gestattet, das Gerät selbständig
auseinanderzunehmen; bei der Feststellung jeglicher
Beschädigungen, sowie im Sturzfall, trennen Sie das
Gerät vom Stromnetz ab und wenden Sie sich an
einen Kundendienst.
• Transportieren Sie die Kaeemaschine nur in der
Fabrikverpackung.
• Bewahren Sie das Gerät an einem für Kinder und
behinderte Personen unzugänglichen Ort auf.
DIE KAFFEEMASCHINE IST NUR FÜR DEN GE-
BRAUCH IM HAUSHALT GEEIGNET, ES IST VERBO-
TEN, SIE ZU INDUSTRIE- ODER LABORZWECKEN
ZU BENUTZEN.
VORBEREITUNG DER KAFFEEMASCHINE
ZUR INBETRIEBNAHME
Nachdem Sie das Gerät bei niedriger Temperatur
transportiert oder gelagert haben, müssen Sie es
mindestens drei Stunden bei Raumtemperatur
aufbewahren.
• Packen Sie die Kaeemaschine aus und entfernen
Sie alle Verpackungsmaterialien.
• Bewahren Sie die Originalverpackung auf.
• Lesen Sie die Sicherheitsmaßnahmen und Bedie-
nungsempfehlungen.
• Prüfen Sie die Komplettheit.
• Prüfen Sie die Kaeemaschine auf Beschädigun-
gen; wenn sie beschädigt ist, schließen Sie sie ans
Stromnetz nicht an.
• Vergewissern Sie sich, dass die Stromversor-
gungsparameter auf der Geräteunterplatte und die
Netzstromparameter übereinstimmen.
• Wischen Sie das Kaeemaschinengehäuse mit
einem sauberen, leicht angefeuchteten Tuch zur
Staubentfernung ab.
• Vergewissern Sie sich, dass die Dampfzufuhr ge-
schlossen ist, drehen Sie dafür den Gri (9) « »
im Uhrzeigersinn bis zum Anschlag «•» um.

20
DE
• Vor dem ersten Gebrauch der Kaeemaschine
waschen Sie alle abnehmbaren Teile (1, 2, 5, 6, 12,
15, 16) mit Warmwasser und einem neutralen Reini-
gungsmittel, spülen und trocknen Sie sie ab.
• Nehmen Sie den Behälter (15) ab, füllen Sie ihn mit
Kaltwasser bis zum „MAX“-Zeichen auf und stellen
Sie diesen zurück auf.
• Anmerkungen:
- um den Behälter (15) zu füllen, können Sie den
Deckel (14) önen und Wasser in den Behälter
(15) gießen.
- tragen Sie den Behälter (15) mit dem Gri (13).
• Setzen Sie den Kaeelter (6) (schütten Sie gemah-
lenen Kaee ins Filter nicht ein) in den Halter (5)
ein, indem Sie den Vorsprung am Filter (6) und die
Aussparung am Filterhalter (5) vorher zusammenfal-
len lassen, und drehen Sie das Filter (6) im/entgegen
dem Uhrzeigersinn zum Einrasten um.
• Setzen Sie den Filterhalter (5) in die Kaeemaschine
ein. Die Vorsprünge des Halters (5) und die Ausspa-
rungen am Boiler «INSERT» sollen zusammenfallen,
danach drehen Sie den Gri des Filterhalters (4)
nach rechts bis zum Anschlag «LOCK» um.
• Stellen Sie eine passende Tasse aufs Gitter (2).
• Stecken Sie den Netzstecker in die Steckdose ein.
Anmerkung:
- die Tasten auf der Bedienungsplatte (7) sind
berührungsempndlich, um den gewünschten
Betrieb zu aktivieren, berühren Sie einfach die
Taste.
• Schalten Sie die Kaeemaschine durchs Drücken
der Ein-/Ausschalttaste (17) « » ein, dabei leuchtet
die Beleuchtung der Taste (17), die Beleuchtung der
Tasten (18, 19, 20) blinkt; wenn die Beleuchtung der
Tasten (18, 19, 20) konstant leuchtet, bedeutet das
das Vorheizende.
Anmerkungen:
-beim ersten Einschalten blinkt die Beleuchtung
der Tasten (18, 19, 20) schnell, da es kein Wasser
im Boiler gibt; drücken Sie die Taste für 2 Tassen
Kaee (20) « », die Pumpe schaltet sich
ein und pumpt Wasser in den Boiler ein; die
Beleuchtung der Tasten (18, 19, 20) hört auf zu
blinken und leuchtet konstant;
-die erste Pumpenaktivierung kann von einem
ungewöhnlichen Geräusch begleitet sein, es ist
normal, nach dem Befüllen des Boilers mit Wasser
normalisiert sich das Pumpenbetriebsgeräusch.
• Warten Sie ab, bis die Beleuchtung der Tasten (18,
19, 20) konstant leuchtet, und schalten Sie dann die
Wasserzufuhr durchs Drücken der Taste (20) «
» ein; dabei schaltet sich die Pumpe für 25 Sekunden
ein, gießen Sie Wasser aus der Tasse ab und drü-
cken Sie die Taste (20) « », um die Wasserzu-
fuhr wieder zu aktivieren; gießen Sie Wasser aus der
Tasse nach dem Pumpenausschalten ab.
• Führen Sie diesen Vorgang mehrmals durch, wonach
/