intertechno MasterGate IT-MG Benutzerhandbuch
- Typ
- Benutzerhandbuch


Contents
INTRODUCTION – INTERTECHNO MASTERGATE 4
WHAT DOES A MODERN SMART HOME REQUIRE? 4
WHAT IS THE CONCEPT UNDERPINNING THE INTERTECHNO MASTERGATE? 4
HOW DO YOU TELL IF YOU'RE IN CONFIGURATION MODE OR USER MODE? 5
STEP 1: DOWNLOAD THE INTERTECHNO MASTERGATE APP 6
STEP 2: CONNECT THE INTERTECHNO MASTERGATE TO YOUR WI-FI NETWORK 6
CONNECTING FOR THE FIRST TIME 6
STEP 3: CREATE DEFAULT CONFIGURATION (CONFIGURATION MENU) 8
8
BASIC SETTINGS: ADDING/DELETING/RENAMING ROOMS 9
BASIC SETTINGS: ADDING RECEIVERS 9
BASIC SETTINGS: EDITING RECEIVERS 10
BASIC SETTINGS: PAIRING RECEIVERS 10
ADVANCED SETTINGS: ADDING TRANSMITTERS/SENSORS OR WALL SWITCHES 12
ADVANCED SETTINGS: CREATING IF-THEN RELATIONSHIPS 12
ADVANCED SETTINGS: PAIRING TRANSMITTER/SENSORS, WALL SWITCHES AND INFRARED
EQUIPMENT 13
STEP 4: DEFINING SCENARIOS 14
DEFINING BASIC MOODS 14
CHANGING THE PROPERTIES OF TRANSMITTERS/SENSORS TO MATCH THE DURATION OF SCENARIOS
15
STEP 5: DEFINING AUTOMATION RULES 15
STEP 6: TRANSFERRING TO THE MASTERGATE 16
STEP 7: SETTING UP VOICE COMMAND 17
VOICE COMMAND AS STANDARD 17
SENTENCE STRUCTURE - RECEIVER/DIMMER 17
SENTENCES - SCENARIOS 17
AMAZON ALEXA 17
SENTENCE STRUCTURE - RECEIVER/DIMMER 18
SENTENCES - SCENARIOS 19
STEP 8: ACTIVATING PUSH NOTIFICATIONS 19
STEP 9: WORLDWIDE ACCESS 19
STEP 10: FIRMWARE UPDATE 20
STEP 11: UPDATE SUMMERTIME/WINTERTIME 20
STEP 12: INTERTECHNO MASTERGATE STATUS DISPLAY 21
SMART OPTIONS – INTERTECHNO MASTERGATE 22

Introduction – intertechno MasterGate
Your home is now part of a smart and connected network!
We’re delighted to be able to help you step into the future! Your home
is now intelligent and will react to you. The intertechno MasterGate
turns all intertechno receivers built in 1995 or later into smart devices.
You’ll soon discover that it's even possible to use the app to
completely change how transmitters affect receivers, regardless of
the time/time of day or whether you’re at home or not (e.g. all
dimmers are capped to 50% brightness after 10 pm)
The aim is to minimise the number of manual adjustments you have to make in
the future.
All you have to do is to configure it once, then your smart home will have all
the information it needs. The MasterGate is the brain of your modern smart
home, take plenty of time to set it up.
What does a modern smart home require?
A modern smart home has to have a permanent and reliable connection to your
Wi-Fi router as well as an active internet connection. Please make sure these
connections are working, otherwise server requests (e.g. what time it gets dark)
will not be possible. An active internet connection is also required if you want
to access the device remotely.
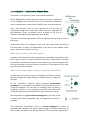
What is the concept underpinning the intertechno MasterGate?
Up until now you've been living in an analogue world where making
dynamic changes to settings using your smart home was simply not
possible.
So far, intertechno products have employed decentralised
intelligence, i.e. transmitters are DIRECTLY connected to receivers.
Using this approach, the only way of modifying this link was by
removing it entirely or by resetting the devices; this meant that
scenario configurations and automation rules could not be set up.
We recommend using decentralised intelligence if you want to put
an extra light switch somewhere that it's impossible to build, for
example.
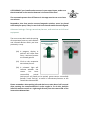
The intertechno MasterGate relies on central intelligence in which all
communication between the devices goes through the Smart Home Hub. In
other words, all devices are directly linked to the intertechno MasterGate.

Transmitters and receivers no longer have to be directly linked to each other!
We recommend this specifically if you want to change the properties of
individual sensors according to the duration of a scenario (e.g. all dimmers are
capped to 50% brightness after 10 pm).
After initial set up of the intertechno MasterGate, all transmitters and receivers
in your smart home are linked to the intertechno hub, this means that you can
digitally and dynamically change the connection between transmitters and
receivers using the app. You can define scenarios or even change the function
of light switches/remote controls. For more information, see Adding
transmitters/sensors.
How do you tell if you're in configuration mode or user mode?
As mentioned above, we strongly advise going through the complete
configuration mode at least once. Configuration mode is available only on your
home network, to which an intertechno MasterGate must be connected.
Configuration mode allows you to set up your smart home to perfection. We
recommend proceeding one step at a time by first connecting and pairing
receivers. We suggest that you first get familiar with the intertechno
MasterGate before moving on to setting up other configurations.
User mode allows you to control your smart home by switching individual
receivers on/off or activating scenarios for example. This mode is not designed
to be used to make changes to settings.
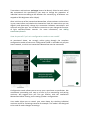
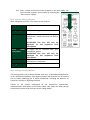
Black background:
User mode
White background:
Configuration mode

Step 1: Download the intertechno MasterGate app
System requirements:
Android
iOS
version 5.0 or higher
version 11.0 or higher
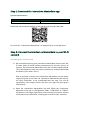
Download and install the Android or iOS app for free using this QR code:
Or search for "intertechno MasterGate" on Google Play or in the App Store.
Step 2: Connect the intertechno MasterGate to your Wi-Fi
network
Connecting for the first time
1) We recommend placing your intertechno MasterGate close to your Wi-
Fi router (with an active Internet connection) the first time you try to
connect. The intertechno MasterGate uses the 2.4 GHz frequency band.
The 5 GHz frequency band may cause interference, so please deactivate
this band if your router uses it.
How to proceed: Connect the intertechno MasterGate to the power
supply using the micro USB. The intertechno MasterGate will wait for
an initial connection to be established with the app. This will be
signalled by two orange flashes and then the light will glow green
continuously.
2) Open the intertechno MasterGate app and follow the instructions
displayed in the app. In configuration mode, “CONTINUE" or "FINISH”
will appear in the upper right corner of the screen once you’ve entered
all the necessary information, allowing you to confirm your selection.

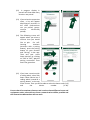
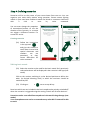
(1) Touch and give your intertechno MasterGate a
name. We chose “MyHome” for the example below. You
can even add several intertechno MasterGate devices,
which can be useful if you want to use an intertechno
MasterGate in your holiday home, for example. Touch
the name of the intertechno MasterGate you added in
order to begin the initial set up.
3) The initial set up is divided into three steps:
(2) In Step 1 you can enter the serial number (S/N) or firmware version
of your intertechno MasterGate. You'll find the serial number (S/N)
on the label on the bottom of your intertechno MasterGate.
Distinctions are made between S/N 850 or V1.0 or S/N 910 or higher
or V2.0 or higher (the following description applies to S/N 910 or
V2.0 or higher).
After selecting the version, exit the intertechno MasterGate app and
access your Wi-Fi settings on your smartphone. Connect to the Wi-Fi
network MasterGate AP. No password is required.
(3) Step 2: Open the intertechno MasterGate app and enter the details
of the Wi-Fi network (SSID and password) you want to connect your
intertechno MasterGate to.
(4) Step 3: Now disconnect from the MasterGate AP network and
connect to the Wi-Fi network which you entered the SSID and
(3)

password for in step 2. Touch “Update”. Your intertechno
MasterGate will now appear in the list.
(5) Touch to choose one of the following functions:
Configure
Reconfigure your intertechno MasterGate or
override an existing configuration
Load (family approval)
The existing configuration (saved on the
intertechno MasterGate) is loaded locally onto a
smartphone, allowing multiple users to use the
configuration you created.
Reset
Your intertechno MasterGate is reset to factory
settings.
Step 3: Create default configuration (configuration menu)
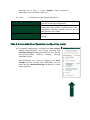
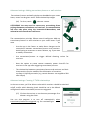
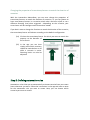
(6) The default configuration is divided into basic settings
(adding rooms/receivers and pairing receivers) and
advanced settings (adding transmitters/sensors, pairing
transmitters/sensors, defining scenarios, creating
automation rules).
We recommend you start by configuring the basic
settings and then testing them. Afterwards you can
move onto the advanced settings and become a smart
home specialist.
(6)

Basic settings: Adding/deleting/renaming rooms
Touch "CONTINUE" in the top right to go to the next screen. Here
you can add rooms which can then be assigned to the various
intertechno receivers.
(7) Touch to add new rooms.
Basic settings: Adding receivers
The intertechno MasterGate can control all intertechno receivers which were
built in 1995 or after. You can give any
receiver any name and even choose
from different icons. Ensure that the
name of the receiver does not contain
any special characters or numbers, as
they are not supported by voice
command.
.
(8) To add receivers simply
click on the room name and
then
(9) touch to add new
receivers.
(10) Select the receiver type.
Short press on the
room name
Overview of receivers which have
already been added and the option
to add new receivers
Long press on the room
name
“Delete” or “Change name”

(11) Enter a name and select an icon to appear in the user mode. You
can even take a picture and use that by selecting the
"Edit receiver” option.
Basic settings: Editing receivers
After adding the receiver, short press on the receiver.
Change name
The name of the receiver can be changed
Change image
Icon can be changed
Take photo
A photo can be taken using the
smartphone's camera which can be used as
an icon
ATTENTION! The icon will only be
displayed on the respective local
smartphone
Select image
from gallery
An image can be selected from your
smartphone gallery
ATTENTION! The icon will only be
displayed on the respective local
smartphone
Remove photo
The icon is removed and the previously
selected icon is displayed
Pairing
Pairing the receiver directly
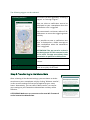
Basic settings: Pairing receivers
The pairing process has to be performed once only. A subsequent modification
in the relationship between transmitters/sensors and receivers can be carried
out by simply modifying the IF-THEN relationship, including the duration of
scenarios, see Step 4: Defining scenarios.
Thanks to the central intelligence of the intertechno MasterGate,
communication takes place via the Smart Home Hub. Note this when pairing
transmitters/sensors and receivers with a coding wheel.
(11)
))

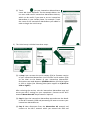
(12) A progress display in
percent will show how many
receivers are paired.
(13) If you select the respective
room, a list will appear
displaying all receivers in
the room (red=receiver
not yet paired, green=
receiver successfully
paired).
(14) The following screen will
appear when you select a
receiver that you would
like to pair. For self-
learning receivers
(receivers with a pairing
button), press the pairing
button on your receiver
and "Pairing” in the app.
Then test your smart
home devices by clicking
on "ON” or "OFF". Was the
pairing successful? Then
touch the green box.
(15) If you have a receiver with
a coding wheel, select "My
Smart Home Device has a
coding wheel instead of a
pairing button” at the top
of the screen. Then you will be able to select the house code (A-P)
and the device number (1-26).
Ensure that all transmitters/sensors and receivers have different house and
equipment codes, otherwise no direct communication will be possible and
the intertechno MasterGate will not work.

Advanced settings: Adding transmitters/sensors or wall switches
Transmitters/sensors and wall switches can be added to your smart
home, names can be given and IF-THEN relationships taught.
(16) To do so, touch and enter a name.
ATTENTION! You may need to remove any pre-existing direct
pairings between transmitters and receivers, as communication
will now take place using the intertechno MasterGate, and
otherwise radio interference will occur.
The communication principle follows central intelligence. Add any
transmitters/sensors or wall switches to your smart home if you
want to:
- Use the app in the future to make direct changes to the
connections between transmitters/sensors and receivers.
Avoid having to reconnect or move cabinets, e.g. if you want
to modify connections.
- Use transmitters/sensors to trigger defined dimming values for
receivers.
- Have the option to create custom automatic power shut-offs for
receivers in the app after triggering transmitters/sensors.
- The relationship between transmitters/sensors and receivers and their
characteristics may be modified for the duration of scenarios,
see Step 4: Defining scenarios (e.g. certain dimmers are capped to 50%
after 10 pm)
Advanced settings: Creating IF-THEN relationships
In the next screen, you’ll be able to select which receivers should be switched
on/off, and/or which dimming levels should be set in the default
configuration when transmitters/sensors are triggered.
(17) Click on the receiver or set the exact percentage for a
dimmer using the slider.
You can also program it to turn off automatically when
transmitters/sensors are triggered, e.g. for a stairwell light.

ATTENTION! If you install motion sensors in your smart home, make sure
that the switch on the motion detector is 1 metre off the floor.
The automatic power shut-off feature in the app must be set to at least
one minute.
Remember also that motion sensors/magnetic switches must be placed
sufficiently far apart, if they're too close it can interfere with the radio signals.
Advanced settings: Pairing transmitter/sensors, wall switches and infrared
equipment
The next screen deals with the pairing
of transmitters/sensors, wall switches
and infrared devices which you have
previously set up.
(18) A progress display in
percent will show how
many receivers/sensors
are already paired.
(19) Click on the respective
transmitter/sensor.
(20) A coloured light will
indicate whether the
sensor has been
successfully paired
(red=sensor still needs to be paired, green=sensor successfully
paired). Touch "Pairing" to teach in transmitters/sensors to the
intertechno MasterGate.
Please remember when pairing infrared devices to wait about half a second
after pressing the command which is to be taught in. To do this, hold the
infrared remote control at a right angle directly over the status LED of the
intertechno MasterGate.
(18.19)
))
(20)
))

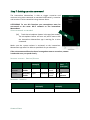
Step 4: Defining scenarios
Scenarios will be at the centre of your smart home from now on. You can
organise your entire daily routine using scenarios. Create custom lighting
moods in your own home and basic moods for blinds or consumer electronics
with a click or even by voice command.
You can even change the properties
of transmitters/sensors to suit the
duration of the scenario, i.e. a sensor
can trigger a different function if a
scenario is active.
Creating scenarios
(21) Follow the instructions
in the app and touch
and give the scenario a
name. Bear in mind that
special characters and
numbers are not
permitted, as they
create difficulties for
voice command.
Defining basic moods
(22) Select the receiver to be used for the basic mood. Only previously
selected receivers will be displayed in the scenario in the app (user
mode).
Click on the receiver and drag it to the desired position to define the
order (or desired dimming level) in which the receivers should be
switched on/off.
(23) Clicking on allows you to set up delays.
Receivers which are not included in the basic mood can be actively switched off
when the scenario is triggered using the setting "Switch off all other devices".
Scenarios can be controlled from anywhere in the world using the app (user
mode).
Your smartphone must not be connected to any other Wi-Fi network for this
to work.

Changing the properties of transmitters/sensors to match the duration of
scenarios
With the intertechno MasterGate, you can even change the properties of
transmitter/sensors to match the duration of scenarios, i.e. you can choose to
have transmitters/sensors in a scenario switch other receivers on/off or set a
different dimming level when triggered – depending on the scenario, your
smart home will be intelligent and create other moods.
If you don’t want to change the function to match the duration of the scenario,
the transmitter/sensor will behave according to the default configuration.
(24) Click on the transmitter/sensor for which you want to match the
property to the duration of
the scenario.
(25) In the app you can then
simply select which receivers
should be switched on or off
while a scenario is active.
Dimming levels can also be
adjusted.
Step 5: Defining automation rules
Automation rules allow you to automatically activate scenarios from your smart
home whenever you want. Follow the instructions in the app and enter a name
for the automation rule you want to create. Next, you can choose which
scenario you want to control.
(24)
))
(25)
))
(24)
))
(25)
))

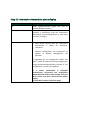
The following triggers can be selected:
Proximity/Distance
A scenario can be triggered by “entering a
region” or “leaving a region”.
You can select a notification text to be
displayed on your smartphone when the
automation rule is triggered.
We recommend a minimum radius of 50-
100 metres to ensure the triggering works
reliably.
It is possible to enter a notification text
that is displayed as a PUSH message on
your smartphone when the automation
rule is triggered.
ATTENTION! The app must be active in
the background for this automation rule
to be used. The app must always have
permission to perform its GPS queries.
Twilight
A scenario can be activated at sunrise or
sunset.
Time/Day
A scenario can be triggered at a defined
time on any day of the week.
Step 6: Transferring to the MasterGate
After selecting all the desired settings, you can choose to either
save them to your smartphone only by clicking "Without transfer",
in this case the settings will not yet be applied to your smart
home. Alternatively, you can select "With transfer” to transfer
your settings to your intertechno MasterGate and they will be
effective.
ATTENTION! Make sure you connect to the same Wi-Fi network
as the intertechno MasterGate.

Step 7: Setting up voice command
The intertechno MasterGate is able to trigger scenarios and
receivers using voice command as standard. Alternatively, scenarios
and receivers can be controlled using Amazon Alexa.
ATTENTION! To use this function your smartphone must be
connected to the same Wi-Fi network as the intertechno
MasterGate.
Voice command as standard
(26) Touch the microphone button in the app (user mode).
The microphone button will turn red, which means that
the intertechno MasterGate app is waiting for a voice
command.
Make sure the system volume is activated, as the intertechno
MasterGate app won't be able to speak back to you otherwise.
If the voice command function doesn’t recognise a room or a receiver, rename
it and make sure you speak clearly.
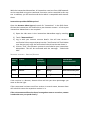
Sentence structure - Receiver/Dimmer
Component
Status
Receiver
(example)
Room
Dimming
level
(example)
ON/OFF
Receiver
Activate/
disable
Light
in/on/at
Living
room
Dimmer
Activate/
disable
Light
in/on/at
Living
room
to
20
percent
Sentences - Scenarios
Status
Scenario
(example)
Scenario name
(example)
Activate
Scenario
Garden
Amazon Alexa

With the intertechno MasterGate, all intertechno receivers from 1995 onwards
can be controlled using voice command. Scenarios can be controlled in this way
too. In addition, you will need an end device which is compatible with Amazon
Alexa.
Intertechno provides EXTRA options!
Open the Amazon Alexa App and search for "intertechno" in the Skills Store.
Activate the intertechno skill and link it to your Amazon account – a link to your
intertechno MasterGate is now required:
1) Open the side menu in the intertechno MasterGate app by touching
.
2) Touch “Amazon Alexa”.
3) Log in with your Amazon account details. You will now receive a
verification link to copy and paste into the “Verification link” field. Make
sure that you only copy the verification link and not the text above it.
4) Click on “Link”. Your Amazon account is now linked to your intertechno
MasterGate. This will be confirmed with the message: “Iinked with
XXX”.
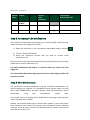
Sentence structure - Receiver/Dimmer
Amazon
Alexa
Status
Receiver
(example)
Intertechno
MasterGate Skill
Alexa,
activate/disable
Light
with intertechno plus
Alexa,
switch
Light
on/off
with intertechno plus
Alexa,
turn
Light
on/off
with intertechno plus
If the receiver is a dimmer, Amazon Alexa will ask you what percentage you
want to dim the light.
If the same name has been used for a receiver in several rooms, Amazon Alexa
will ask which room the respective receiver is in.
If the voice command function doesn’t recognise a room or a receiver, rename
it and make sure you speak clearly!

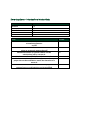
Sentences - Scenarios
Amazon
Alexa
Status
Scenario
name
(example)
Intertechno
MasterGate Skill
Alexa,
activate/
disable
Scenario
Garden
with intertechno plus
Alexa,
switch
Scenario
Garden
on/off
with intertechno plus
Alexa,
turn
Scenario
Garden
on/off
with intertechno plus
Step 8: Activating PUSH notifications
The intertechno MasterGate app allows you to activate PUSH notifications for
motion detectors and magnetic switches:
1) Open the side menu in the intertechno MasterGate app by touching
.
2) Click on “PUSH notifications”.
3) Select the respective sensors that you want to receive PUSH
notifications for.
Each user can use the intertechno MasterGate app to define which sensors they
would like to receive notifications for.
The PUSH notification will appear 1-3 minutes after the sensor has been
triggered.
The intertechno MasterGate app must be active in the background for this
function to work!
Step 9: Worldwide access
You can control scenarios worldwide using the intertechno MasterGate. No
special settings are required. For worldwide access, please make sure that
you're NOT CONNECTED to any Wi-Fi network. Data communications will be
transmitted using your smartphone's mobile data.
You can tell if you're in remote access mode from the message in the app (user
mode) "Remote Access Mode".
Remote access mode allows you to activate basic moods in your smart home
from anywhere in the world. This feature is not intended to control individual
receivers. If you do want to control an individual receiver, create a scenario and
then add this receiver to it.

Step 10: Firmware update
Intertechno is constantly striving to give you maximum freedom
through our products. We are continuously further developing our
products and we want to provide you with free and easy access to
these new possibilities.
(27) Du erkennst, dass eine neue Firmwareversion und
dadurch viele neue Features veröffentlicht wurde an
dem roten Informationsbutton im Benutzermodus
The other method is as follows:
1) Open the side menu in the intertechno MasterGate app by touching
.
2) Touch “Firmware update” and confirm the selection.
3) A message in the app and a short status of the intertechno MasterGate
displayed in blue will inform you that the operation was completed
successfully.
Your custom configuration will not be erased by a firmware update!
Step 11: Update summertime/wintertime
With the intertechno MasterGate you don’t have to go through the hassle of
manually adjusting the time and the date yourself, this information is obtained
through regular server requests. For this to work, please ensure that your
intertechno MasterGate has a stable internet connection (this is also required
for various automation rules).
The request to determine if it is currently summer or winter is only carried out
when you connect the device to the power supply.
For this reason, briefly disconnect and then reconnect the power supply to
prompt the summer/wintertime server request.
Seite wird geladen ...
Seite wird geladen ...
-
 1
1
-
 2
2
-
 3
3
-
 4
4
-
 5
5
-
 6
6
-
 7
7
-
 8
8
-
 9
9
-
 10
10
-
 11
11
-
 12
12
-
 13
13
-
 14
14
-
 15
15
-
 16
16
-
 17
17
-
 18
18
-
 19
19
-
 20
20
-
 21
21
-
 22
22


intertechno MasterGate IT-MG Benutzerhandbuch
- Typ
- Benutzerhandbuch
in anderen Sprachen
Verwandte Artikel
Andere Dokumente
-
fontastic 254871 Bedienungsanleitung
-
-
-
Allnet ALL3500 Bedienungsanleitung
-
Allnet Sensoren Datenblatt
-
-
-
DELTA DORE TTGSM TYXAL+ EU Installationsanleitung
-
-
Legrand In One Celiane 672 15 Benutzerhandbuch