
Quick Installation Guide
English Deutsch Español
Italiano Français
Driver Installation WiFi Adapter Mode
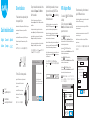
1. Please insert the usb adapter directly into
the computer's USB port.
Bitte stecken Sie den USB-Adapter direkt in den USB-Port des Computers.
Inserte el adaptador USB directamente en el puerto USB de la
computadora.
Inserire l'adattatore USB direttamente nella porta USB del computer.
Veuillez insérer l'adaptateur USB directement dans le port USB de
l'ordinateur.
USB USB
3. Open the driver folder and double click the
installation file "Setup.exe". Click "Next"to
finish the installation.
Öffnen Sie den Treiberordner und doppelklicken Sie auf die
Installationsdatei "Setup.exe". Klicken Sie auf "Next", um die Installation
abzuschließen.
Abra la carpeta del controlador y haga doble clic en el archivo de
instalación "Setup.exe"". Haga clic en "Next" para finalizar la instalación.
Aprire la cartella del driver e fare doppio clic sul file di installazione
"Setup.exe". Fare clic su "Next" per terminare l'installazione.
Ouvrez le dossier du pilote et double-cliquez sur le fichier d'installation
"Setup.exe". Cliquez sur "Next" pour terminer l'installation.
"Setup.exe"
"Next"
3.Enter the network key, confirm the network
key, click "OK" as shown below:
Geben Sie den Netzwerkschlüssel ein, bestätigen Sie den Netzwerkschlüs-
sel, klicken Sie auf "OK", wie unten gezeigt:
Ingrese la clave de red, confirme la clave de red, haga clic en "OK" como
se muestra a continuación:
Immettere la chiave di rete, confermare la chiave di rete, fare clic su "OK"
come mostrato di seguito:
Entrez la clé réseau, confirmez la clé réseau, cliquez sur "OK" comme
indiqué ci-dessous:
"OK"
2. Put the CD into the computer drive.
Legen Sie das CD-Laufwerk in den Computer-Laufwerk.
Coloque la unidad de CD en la unidad de la
computadora.
Inserisci l'unità CD nel drive del computer.
Placez le lecteur de CD dans le lecteur
de l'ordinateur.
CD
REALTEK USB Wireless LAN Software
REALTEK USB Wireless LAN Software
Back Next Cancel
The InstallShield Wizard will install
REALTEK 11n USB Wirekess LAN Software
on your computer. To continue,click Next.
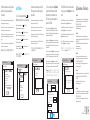
4. After finishing the installation, in the lower
right corner of the taskbar, [REALTEK Client
Management Software ] appears, indicating
the installation succeed.
Nach Abschluss der Installation wird in der rechten unteren Ecke der
Taskleiste [REALTEK Client Management Software ] angezeigt, um
anzugeben, dass die Installation erfolgreich abgeschlossen wurde.
Después de finalizar la instalación, en la esquina inferior derecha de la
barra de tareas, aparece [REALTEK Client Management Software ], que
indica que la instalación se realizó correctamente.
Al termine dell'installazione, nell'angolo in basso a destra della barra delle
applicazioni, viene visualizzato [Software di gestione client REALTEK ],
che indica che l'installazione è stata eseguita correttamente.
Une fois l'installation terminée, dans le coin inférieur droit de la barre des
tâches, [Logiciel de gestion du client REALTEK ] apparaît pour indiquer
que l'installation a réussi.
[REALTEK Client
Management Software ]
REALTEK USB Wireless LAN Utility
RefreshRModeM AboutA
MyComputer
Realtek RTL General
Refresh Add to Profile
Profile StatisticsStatusAvailable Network
Available Network(S)
SSID Channel Encryption Network Authentication Signal
XXXX 4 AES WPA PSK 100%
XXXX 12 AES WPA PSK 50%
Wireless Network Properties
Wireless network security
This network requires a key for the following
Profile Name XXXX
Network Authentication WPA2-PSK
Data encryption AES
Network key
Confirm network key
************
************
OK Cancel
Doppelklick " " REALTEK USB Wireless LAN Utility
Klicken Sie im oberen Menü auf "Available Network" (Verfügbares
Netzwerk) und wählen Sie die SSID des drahtlosen Netzwerks aus, zu der
Sie eine Verbindung herstellen möchten.
Haga doble clic " " REALTEK USB Wireless LAN Utility
Haga clic en el menú superior "Available Network", seleccione el SSID de
la red inalámbrica al que desea conectarse.
1. Double-click " " REALTEK USB Wireless
LAN Utility
2. Click on the upper menu "Available
Network", select the wireless network SSID
you want to connect to
Doppio click " " REALTEK USB Wireless LAN Utility
Fare clic sul menu superiore "Available Network", selezionare il SSID della
rete wireless a cui si desidera connettersi.
Double-cliquez " " REALTEK USB Wireless LAN Utility
Cliquez sur le menu supérieur "Available Network", sélectionnez le SSID
du réseau sans fil auquel vous souhaitez vous connecter.
" " REALTEK USBLAN
[]
SSID
Email:
Driver & Manual:
www.cudytech.com/download

4.After the connection is successful, the signal
strength and link quality are displayed, as
shown below:
Nachdem die Verbindung hergestellt wurde, werden die Signalstärke und
die Verbindungsqualität wie folgt angezeigt:
Una vez que la conexión es exitosa, se muestran la intensidad de la señal y
la calidad del enlace, como se muestra a continuación:
Dopo che la connessione ha avuto esito positivo, vengono visualizzati la
potenza del segnale e la qualità del collegamento, come mostrato di
seguito:
Une fois la connexion établie, l’intensité du signal et la qualité de la liaison
sont affichées, comme indiqué ci-dessous:
RefreshRModeM AboutA
REALTEK USB Wireless LAN Utility
MyComputer
Realtek RTL
General Profile
ReNewIP
Statistics
98%
100%
StatusAvailable Network
StatusAssociated
SpeedTx:150Mbps Rx:300Mbps
TypeInfrastructure
EncryptionAES
SSIDXXXX
Signal Strength
Link Quality
2. After switching to access point mode, the
SSID displays the name of the computer, as
shown below:
Nach dem Umschalten in den Zugangspunktmodus zeigt die SSID den
Namen des Computers an (siehe unten)
Después de cambiar al modo de punto de acceso, el SSID muestra el
nombre de la computadora, como se muestra a continuación:
Dopo il passaggio alla modalità punto di accesso, l'SSID visualizza il nome
del computer, come mostrato di seguito:
Après avoir basculé en mode point d’accès, le SSID affiche le nom de
l’ordinateur, comme indiqué ci-dessous:
SSID
3. Click on the image above "Configuration"
to open the Wireless Network Properties
Settings dialog to set the network name
(SSID), channel, encryption algorithm and
password. Click "OK".
Klicken Sie auf das Bild über "Configuration", um das Dialogfeld
"Einstellungen für Drahtlosnetzwerk-Eigenschaften zu öffnen und den
Netzwerknamen (SSID), den Kanal, den Verschlüsselungsalgorithmus und
das Kennwort festzulegen. "OK" klicken.
Haga clic en la imagen "Configuration" para abrir el cuadro de diálogo
Configuración de las propiedades de la red inalámbrica para configurar el
nombre de la red (SSID), el canal, el algoritmo de cifrado y la contraseña.
Haga clic en "OK".
Fare clic sull'immagine sopra "Configuration" per aprire la finestra di dialogo
Impostazioni proprietà della rete wireless per impostare il nome della rete
(SSID), il canale, l'algoritmo di crittografia e la password. Fai clic su "OK".
Cliquez sur l'image ci-dessus "Configuration" pour ouvrir la boîte de
dialogue Paramètres de réseau sans fil afin de définir le nom du réseau (SSID),
le canal, l'algorithme de cryptage et le mot de passe. Cliquez sur "OK".
"Configuration"
SSID
OK
4. Click "ICS" to select the network connected
to your computer, click "Application" , as shown
below:
Klicken Sie auf "ICS", um das mit Ihrem Computer verbundene Netzwerk
auszuwählen, und klicken Sie auf "Application" (siehe unten):
Haga clic en "ICS" para seleccionar la red conectada a su computadora,
haga clic en "Application", como se muestra a continuación:
Fai clic su "ICS" per selezionare la rete collegata al tuo computer, fai clic su
"Application", come mostrato di seguito:
Cliquez sur "ICS" pour sélectionner le réseau connecté à votre ordinateur,
cliquez sur "Application", comme indiqué ci-dessous:
"ICS"
"Application"
Soft AP Mode
1. Click on the management software menu
[Mode] to select [Access Point], as shown below:
Klicken Sie auf die Verwaltungssoftware Menü [Modus], um
[Zugangspunkt] auszuwählen, wie unten gezeigt:
Haga clic en el software de gestión Menú [Modo] para seleccionar
[Punto de acceso], como se muestra a continuación:
Clicca sul software di gestione menu [Mode] per selezionare [Access
Point], come mostrato di seguito:
Cliquez sur le logiciel de gestion menu [Mode] pour sélectionner
[Point d'accès], comme indiqué ci-dessous:
[][
]
Available Network
REALTEK USB Wireless LAN Utility
RefreshRModeM AboutA
MyComputer
Realtek RTL
Base station
Access Point
Virtual WiFi
StatisticsStatus
Type
Encryption
Signal Strength
Link Quality
ReNewIP
REALTEK USB Wireless LAN Utility
RefreshRModeM AboutA
MyComputer
Realtek RTL
Configuration
AID MAC Address Period of use
SSID
BSSID00:0D:B1:A2:0B:D1
Association Table
AdvancedGeneral Statistics ICS
REALTEK USB Wireless LAN Utility
RefreshRModeM AboutA
MyComputer
Realtek RTL
Application
Device name
11b/g Wireless LAN Mini PCI
Express Adapter III
ConnName
WiFi connection 4
Set up Internet connection sharingICS
AdvancedGeneral Statistics ICS
Wireless network security
This network requires a key for the following
Network Authentication WPA2-PSK
Data encryption AES
Network key
OK Cancel
Confirm network key
************
************
Wireless Network Properties
Network name (SSID) XXXX_AP
Channel 6 2437MHz)
EU Declaration of Conformity
1. English:
Cudy hereby declares that the device is in compliance with the essential
requirements and other relevant provisions of directives 2014/53/EU,
2009/125/EC and 2011/65/EU.
The original EU declaration of conformity may be found at
http://www.cudytech.com/ce.
2. Deutsch:
Cudy erklärt hiermit, dass dieses Gerät die Grundanforderungen und
andere relevante Vorgaben der Richtlinien 2014/53/EU, 2009/125/EG und
2011/65/EU erfüllt.
Die Original-EU-Konformitätserklärung kann in englischer Sprache hier
heruntergeladen werden:
http://www.cudytech.com/ce.
3. Español:
Por la presente Cudy declara que este dispositivo cumple con los
requisitos esenciales y otras disposiciones relevantes de las directivas
2014/53/UE, 2009/125/CE y 2011/65/UE.
La declaración original CE de la conformidad puede encontrarse en:
http://www.cudytech.com/ce.
4. ltaliano:
Cudy dichiara che questo dispositivo è conforme ai requisti fondamentali e
alle altre disposizioni delle direttive 2014/53/UE, 2009/125/CE e
2011/65/UE.
La dichiarazione di conformità EU originale si trova in
http://www.cudytech.com/ce.
5. Français:
Cudy par la présente déclare que cet appareil est conforme aux exigences
essentielles et autres dispositions pertinentes des directives 2014/53/UE,
2009/125/CE et 2011/65/UE.
La déclaration CE de conformité originelle peut être trouvée à l'adresse
http://www.cudytech.com/ce.
810600044
-
 1
1
-
 2
2


in anderen Sprachen
- français: Cudy WU650 Guide d'installation
- español: Cudy WU650 Guía de instalación
- italiano: Cudy WU650 Guida d'installazione
- 日本語: Cudy WU650 インストールガイド
Verwandte Papiere
Sonstige Unterlagen
-
Approx appR300V2 Installationsanleitung
-
aqprox! appR150V2 Benutzerhandbuch
-
Approx APPUSB300 Benutzerhandbuch
-
aqprox! appUSB150 Benutzerhandbuch
-
Longshine LCS-8131N2 Benutzerhandbuch
-
Hama 00062765 Bedienungsanleitung
-
-
-