Cadac 20162 Bedienungsanleitung
- Kategorie
- Kochfelder
- Typ
- Bedienungsanleitung

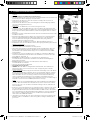
503-0623 LEV13
MODEL No: 20162
28/37/50 mbar
USER INSTRUCTIONS
LIVE THE BRAAI LIFE
CITI CHEF 50
NOTE! PRODUCT MAY VARY FROM ILLUSTRATIONS
GB DE DK ES FR IT NL NO PL SE SI
503-0623 LEV13 (20162) Citi Chef 50 - User Manual (EU & SA).indd 1 2018/09/28 12:34:27

11
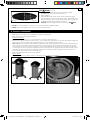
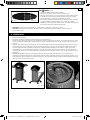
CAUTION
For Outdoor use only!
This appliance may not be used in an exterior enclosed balcony, porch or entertainment area!
IMPORTANT
Read these instructions for use carefully so as to familiarize yourself with the appliance before connecting it to
its gas container. Keep these instructions for future reference.
GB
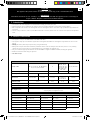
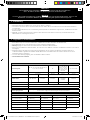
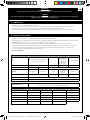
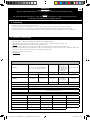
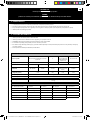
2. General information
• This appliance complies with EN498:2012 and SANS 1539:2012
• This appliance may only be used with an approved hose and regulator (A 2.8kPa hose and regulator supplied with this unit in South
Africa)
• Warning: Accessible parts may be very hot. Keep young children away.
• Gas appliances require ventilation for efcient performance and to ensure the safety of users and other persons in close proximity,
therefor do not use the appliance in an unventilated area. It is intended for use outdoors only.
• Only to be used with a gas cylinder that does not exceed 500mm in height and 350mm in width (including the regulator).
• Read the instructions before using the appliance.
• Use outdoors only!
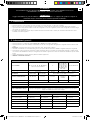
Gas Supply Sources
An approved hose and regulator connected to a rellable gas container not exceeding 9kg and
complying with local regulation in force
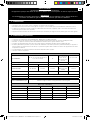
Country of Use
BE, CH, CY, CZ, ES, FR, GB, GR, IE,
IT, LT, LU, LV, PT, SK & SI
PL
BE, CY, DK, EE,
FR, FI, HU, IT,
LT, NL, NO, SE,
SI, SK, RO, HR,
TR, BG, IS,LU,
MT, & ZA
AT, CH, DE & SK
Appliance Catagories I
3+(28-30/37)
I
3B/P (37)
I
3B/P (30)
I
3B/P (50)
Allowable gasses Butane-G30 Propane-G31 Butane-G30, Propane-G31 or their mixture
Gas Pressure 28~30 mBar 37 mbar 37 mbar
28~30 mbar
(2.8 kPa for
South Africa)
50 mbar
Jet Number (mm) 0.95 0.91 0.95 0.85
Nominal Usage 270 g/h
Gross nom. heat input 3.7 kW
Country Name and Abbreviations
AE = United Arab Emirates AL = Albania AT = Austria BE = Belgium CH = Switzerland
CZ = Czech Republic DE = Germany DK = Denmark ES = Spain FI = Finland
FR = France GB = United Kingdom GR = Greece HR = Croatia IT = Italy
JP = Japan KR = Korea NL = Netherlands NO = Norway PL = Poland
PT = Portugal RO = Romania RU = Russia RS = Serbia SI = Slovenia
SK = Slovakia SE = Sweden TR = Turkey ZA = South Africa
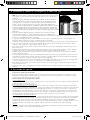
1. Introduction
• This appliance has been designed to be used for outdoor cooking, specically on a patio.
• Various food types can be prepared on this appliance. The Citi Chef 50 is designed to utilize various cooking surfaces.
• Gas is supplied to the unit via a hose and regulator. The hose and regulator can be connected to a gas cylinder (Not supplied with the
appliance).
• The unit is easy to switch on, and to operate (Described below in section 6) and the user can control the heat input with an adjustable
valve.
503-0623 LEV13 (20162) Citi Chef 50 - User Manual (EU & SA).indd 1 2018/09/28 12:34:28

22
3. Safety Information
Hose
• This appliance may only be used outdoors.
• A hose and regulator is supplied with this appliance (South Africa Only)
• The hose must be checked for wear or damage before every use and before connecting
to the gas container.
• Do not use the appliance if it has a damaged or worn hose. Replace the hose.
• Do not use the appliance if it is leaking, damaged or which does not operate properly.
Gas Container
• Only use a cylinder that is approved by your countries regulations.
• Ensure that the gas container is tted or changed in a well-ventilated location,
preferably outdoors, away from any sources of ignition such as naked ames, pilots,
electric res and away from other people.
• Keep gas containers away from heat and ame. Do not place on a stove or any other hot
surface.
• Gas cartridges/re llable cylinders are to be used only in the upright position so as to
ensure proper fuel withdrawal. Failure to adhere to this may cause liquid discharge from
the gas container resulting in a dangerous operating condition.
• Do not try to remove the cylinder whilst the unit is in operation.
• The gas cylinder must be disconnected from the appliance after use or when in storage.
Assembly and use
• Use only on a rm level surface.
• Do not move the appliance during use.
• Should the Heat Shield, Fat Pan or Burner Pan become damaged in such a way that
permanent contact between the Heat Shield and the Fat Pan occurs during use, do not
use the appliance. Return it to your Cadac stockist for repair.
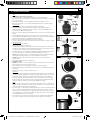
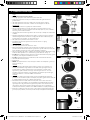
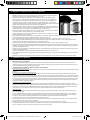
• Ensure the appliance is used away from ammable materials. Minimum safe distances
are: Above the appliance 1.2m. At the rear and sides 600mm. (See Fig. 2)
• Caution: When using the appliance, we recommend the use of protective gloves when
removing and applying the dome, as the dome handle may become hot.
• Caution: Accessible parts may become very hot, the use of protective gloves is
recommended.
• Keep young children away from the appliance.
• Use Outdoors Only
• NOTE! If the appliance is used in windy conditions, the dome must be used as a wind
shield, and placed in position as shown in Fig. 4.
• Do not modify the appliance. Modifying the appliance may be dangerous.
• Warning: Any cylinder not connected for use should not be stored within the applaince
at any time.
• Turn off the gas supply at the gas cylinder after use.
Light back
• In the event of light back (where the ame burns back and ignites inside the burner or
venturi housing), immediately turn off the gas supply by rstly closing the control valve
on the gas container and then the appliance valve. After the ame is extinguished,
remove the regulator and check the condition of the seal; replace the seal if in doubt.
Re-light the appliance as described in Section 6 below. Should the ame persistently
light back, return the product to your authorised CADAC repair agent.
Leaks
• If there is a leak on your appliance (smell of gas), immediately close the control knob on
the gas cylinder. If you wish to check for leaks on your appliance, do it outside. Do not
try to detect leaks using a ame; use soapy water.
• The correct way is to smear the joints with soapy water. If a bubble or bubbles form then
there is a gas leak. Immediately turn off the gas supply rstly by closing the control
valve on the gas container and then the appliance valve. Check that all the connections
are properly tted. Re-check with soapy water. If a gas leak persists, return the product
to your CADAC dealer for inspection / repair.
• Check for leaks on the tailpiece by the valve and on the cylinder regulator tting with
gas open on cylinder but not open or switched on by the appliance control knob.
Fig. 2
Fig. 3
Fig. 4
WIND
GB
Fig. 1
503-0623 LEV13 (20162) Citi Chef 50 - User Manual (EU & SA).indd 2 2018/09/28 12:34:35

33
GB
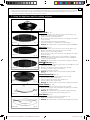
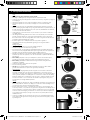
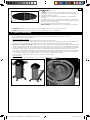
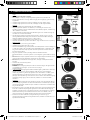
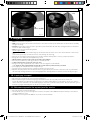
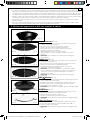
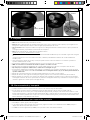
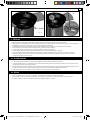
Flame visibility check
• It is important to check that the ame is still burning once you have lit your appliance.
• To check for ame visibility, there is a visual slot on the BBQ grid. Flame visibility can
also be viewed through the grid slots.
• For easy visibility, place the visual slot at the front (as shown).
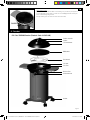
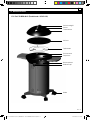
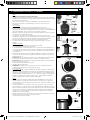
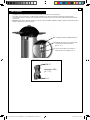
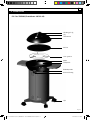
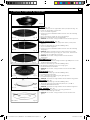
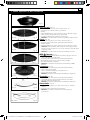
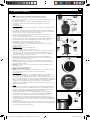
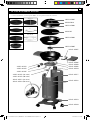
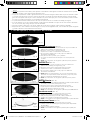
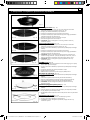
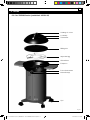
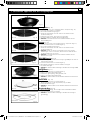
4. Combos
Citi Chef 50 BBQ Combo (Product Code: 20162-20)
Fig. 6a
Dome Handle
Thermometer
Dome
BBQ Grid
Locator
Fat Pan
Control Knob
Burner Pan
Castor
Pot Stand
503-0623 LEV13 (20162) Citi Chef 50 - User Manual (EU & SA).indd 3 2018/09/28 12:34:41

44
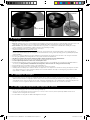
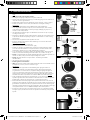
5. Fitting and Changing the Hose and Gas Cylinder
• NOTE! When installing the tailpiece, ensure it is held straight while tightening the tailpiece
nut, in order to prevent a possible gas leak. Tighten with a suitable spanner. (Fig. 10)
• I 3B/P (30), I 3B/P (37) and I 3+ (28-30/37) Appliance categories: Fit the valve tailpiece
onto the valve by screwing it on in an anti-clockwise direction. Push an approved hose
onto the valve tailpiece until it is properly seated. On the other end, attach a suitable
low pressure regulator (I3B/P (30) : 30 mbar G30/G31 con gurations regulator; I3+(28-
30/37): 28~30 mbar G30 regulator or 37 mbar G31 regulator); I3B/P(37): 37 mbar G30/
G31 con gurations regulators). Again making sure that the hose is well seated. The type
of hose used shall comply with the relevant EN standard and local requirement. In South
Africa the regulator used must comply with SANS 1537.
• I 3B/P (50) Appliance category: Screw a Hose with the correct threaded ttings on each
end, onto the left hand ¼“ BSP thread of the Valve. Attach a suitable 50 mbar G30/G31
low-pressure regulator on the other end of the hose. The hose used must comply with DIN
4815 part 2 or equivalent.
• The hose length should be no less than 800mm and shall not exceed 1.5m. Check the manufacture date on the hose and replace
when necessary or when national regulations require it.
• Do not twist or pinch hose. Ensure the hose does not come into contact with any surfaces that would become hot during use.
• Before tting the regulator to a gas container, ensure that the seal on the regulator is in position and in good condition. This should be
done with every connection and before every use.
• Before tting your gas cylinder, ensure that the valves are all in the “OFF” position by turning the control knob clockwise to its stop.
• Ensure that the gas container is tted or changed in a well-ventilated location, preferably outdoors, away from any source of ignition
such as naked ames or electric res and away from other people.
• Making sure that the gas container is kept upright, screw the regulator onto the container until it is fully engaged. Hand-tighten only.
• If there is a leak on your appliance (smell of gas), close the cylinder valve immediately and follow the procedure to detect and stop a
leak under Section 3. If you wish to check for leaks on your appliance, do it outside using soapy water only, which is applied to the
joints. A formation of bubbles will indicate the gas leak.
• Check that all the connections are securely tted and re-check with soapy water. If you cannot rectify the gas leak, do not use the
appliance. Contact your local CADAC stockist for assistance.
• When changing a gas container, rstly close the container valve (if tted) and then turn the control knob clockwise to its stop position.
• Ensuring that the ame is extinguished, unscrew the regulator. Re t a full container following the same precautions as described
above.
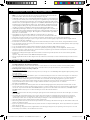
6. Lighting the appliance
Precautions to observe before lighting.
• After prolonged storage, inspect the air holes in the valve cover for insects, which may affect gas ow. Inspect the inlet of the venturi
for insects. After checking, re t all components into the prescribed position.
• Use this appliance only on a rm level surface.
Using the control knob
The control knob is tted with two positive stop positions, one at low, and one at Ignite / High. This limits the adjustment of the ame
to between these two points.
Lighting up using the Piezo Igniter
• To light up the appliance using the piezo igniter, push in and turn the control knob in an anti-clockwise direction until you hear a
click. If the gas does not ignite on the rst spark, push in, and turn the control knob fully clockwise. Try again, by pushing in and
turning the control knob anti-clockwise until you hear a click. If the gas has not ignited in the rst two to three seconds you should
close the control valve by pushing in the control knob, and turning it fully clockwise. Wait approximately thirty seconds to let any
accumulated gas within the burner pan assembly escape. Repeat the above process if necessary until the ame ignites. The ame
should normally light up within the rst one or two seconds.
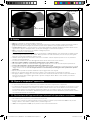
Lighting up using a BBQ lighter
• When starting cold, the appliance may be lit from the top prior to tting the desired cooking surface onto the fat pan. When lighting
up a hot appliance however, it is recommended that this be done by sticking barbecue lighter through one of the Vent Holes
underneath the Burner, until it is in line with the burner(DO NOT place the BBQ lighter through the large hole directly underneath the
burner). Ignite the BBQ lighter. Whilst the BBQ lighter is lit, push in and turn the control knob anti-clockwise to light the burner.
General
• Once the appliance is lit, the ame intensity may be adjusted by turning the valve knob anti-clockwise to reduce the ame, or
clockwise to increase the ame.
• The fully closed position is at the furthest clockwise position. To rotate the valve from the fully closed position it is necessary to rst
depress the knob just enough to move out of the lock mechanism. While holding the knob in, turn it in an anti-clockwise direction.
Once the spindle has moved out of the lock position it is no longer necessary to keep the control knob depressed and it can be rotated
freely to the desired ame setting.
• When cooking food with a high fat content, aring may occur if the selected heat setting is too high. Should this happen, turn the heat
down until the aring ceases.
Fig. 10
GB
503-0623 LEV13 (20162) Citi Chef 50 - User Manual (EU & SA).indd 4 2018/09/28 12:34:43

55
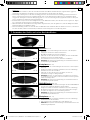
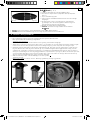
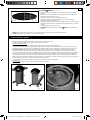
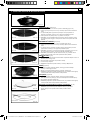
7. Using the Appliance and its cooking surfaces
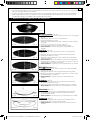
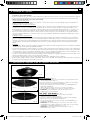
BBQ Grid (Fig. 13)
• The BBQ grid locates on three die-cast locators in the fat pan (Fig. 11).
• Available as an additional accessory and spare
• Ceramic non-Stick coated cooking surface
• Do not use metal cooking utensils as this will cause damage to the ceramic
non-stick coating.
• Ideal for grilling meat, sh, chicken and vegetables
• A convenient carry bag is included with this cooking surface.
• WARNING: We recommend the use of gloves when handling the BBQ Grid.
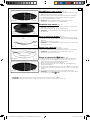
Chef Pan (Fig. 15)
• The Chef Pan locates on three die-cast locators in the fat pan (Fig. 11).
• Available as an additional accessory and spare (not included)
• Ceramic non-Stick coated cooking surface.
• Do not use metal cooking utensils as this will cause damage to the ceramic
non-stick coating.
• WARNING: When pre-heating, do not use the Chef Pan on a high ame
setting with the dome for more than 15 minutes as this can damage the
non-stick coating and the Pan .
• WARNING: We recommend the use of gloves when handling the Chef Pan.
Enamel Roast Pan (Fig. 17)
• Available as an additional accessory and spare (not included)
• Porcelain enamel-coated cooking surface
• Ideal for preparing roast chicken, lamb, vegetables, etc.
• Porcelain enamel-coated cooking surface
• WARNING: We recommend the use of gloves when handling the Roast Pan.
Locators
Fig. 11
Fig. 18
Fig. 17
Fig. 15
Fig. 13
• Do not move the appliance when in use as, apart from being an unsafe practice, to move the appliance whilst lit, may cause aring.
• After use, rst close the valve on the gas container (where applicable). When the ame has extinguished, close the valve on the
appliance by pushing in and turning the control knob fully clockwise.
GB
Pizza Stone (Fig. 18)
• Available as an additional accessory and spare (not included)
• 10mm thick baking stone that can withstand temperatures of up to 500C
• Includes nickel-plated wire holder.
• WARNING: We recommend the use of gloves when handling the baking
Stone. Please read pizza stone manual carefully before use.
Fig. 19
Pot Stand (Fig. 19)
• Nickle-plated pot stand, to support most standard size pots.
• Available as an additional accessory and spare.
• WARNING: We recommend the use of gloves when handling the Pot Stand.
BBQ 2 Plancha (Fig. 16)
• The BBQ Plancha gives maximum versatility with open grill BBQ on one side
and at grill pan on the other.
• Available as an additional accessory and spare (not included)
• The ceramic coated top is easy to use and clean.
• A convenient carry bag is included.
• WARNING: We recommend the use of gloves when handling the BBQ
Plancha.
Fig. 16
8910-101
8910-102
8910-108
8910-105
8910-110
8910-SP003
503-0623 LEV13 (20162) Citi Chef 50 - User Manual (EU & SA).indd 5 2018/09/28 12:35:27

66
8. General Maintenance
• The onus of maintaining this appliance solely rests on the consumer from date of purchase.
This appliance does not require scheduled maintenance.
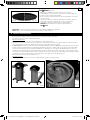
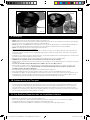
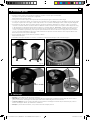
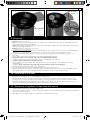
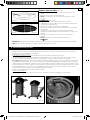
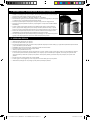
Replacing a Blocked Jet:
• Your Citi Chef is tted with a speci c size jet to regulate the correct amount of gas.
• Should the hole in the jet become blocked, this may result in a small ame or no ame at all. Do not attempt to clean the jet with a
pin or other such device as this may damage the ori ce, which could make the appliance unsafe.
• To replace the jet: Pull the back panel out using the handle (Fig 20) Remove the dome, BBQ grid, pot stand and any other loose items
from the appliance. Now unscrew the 3 screws from underneath the appliance as shown in Fig 21, this will loosen the burner. Now
remove the burner gently by lifting it out (Fig22), NOTE that it is attached to the piezo ignition wire. DO NOT yank the burner out
otherwise you risk snapping the piezo ignition wire from your appliance. Gently lay the burner to the side, this will reveal the jet (Fig
23). The jet can now be removed using a suitable spanner. Do not use pliers on the jet as this may damage the jet, making it unusable
or impossible to remove. Screw the new jet into the valve. Do not over tighten as this may damage the jet.
• Reverse the above procedure to re-assemble the unit.
Replacing the Hose:
• The tting of a hose is described in Section 4 - Fitting and replacing the hose and gas cylinder.
Fig. 21
Fig. 20
GB
Grill 2 Braai (Fig. 19.1)
• Available as an additional accessory and spare (not included).
• The Grill2Braai locates on three die-cast locators in the fat pan (Fig. 11).
• Ceramic non-Stick coated cooking surface.
• Do not use metal cooking utensils as this will cause damage to the ceramic
non-stick coating.
• The at half is ideal for cooking sh, breakfasts, and pancakes, whilst the
ribbed half is ideal for grilling meat, sh, chicken, and vegetables.
• A convenient carry bag is included with this cooking surface.
• WARNING: We recommend the use of gloves when handling the
Grill 2 Braai.
Fig. 19.1
8910-100
IMPORTANT! To ensure validity of your warranty, use only dedicated CADAC cooking surfaces
NOTE! Always use the wind shield if you use the appliance in windy conditions
503-0623 LEV13 (20162) Citi Chef 50 - User Manual (EU & SA).indd 6 2018/09/28 12:35:56

77
Fig. 23Fig. 22
9. Cleaning
• Note: For Parts Reference (See Section 7)
• BBQ: Remove the fat from the moat at the bottom of the Fat Pan. Wash the grid in warm water with non-abrasive detergent after
wiping off any excess fat left after cooking.
• BBQ Lid: Wash the BBQ Lid in warm water using a suitable non-abrasive detergent. Do not use sharp metal objects or abrasive
detergents, as this will damage the surface coating.
• Note: For stubborn stains, oven cleaner may be used.
Care of Ceramic non-Stick Cooking surfaces:
• The ceramic non-stick cooking surfaces are coated with a ceramic non-stick coating that has been used with great success on some
of the best cookware in the world. Nevertheless, taking care of it can help you to enjoy extra years of healthy, easy, ceramic non-stick
cooking.
• Use only low or medium heat settings to help retain the valuable nutrients in the food and maintain the ceramic non-stick cooking
surface.
• The ceramic non-stick coating can easily be damaged by the use of metal cooking utensils.
• Important! It is recommended that only plastic or wooden utensils be used when cooking.
• Do not overheat the ceramic non-stick cooking surfaces and always add a little cooking oil to the surface before use.
• Always allow the ceramic non-stick surfaces to cool before immersing it in water.
• The ceramic non-stick coating is perfectly safe in the dishwasher, but the ceramic non-stick surface is so easy to clean that a quick
hand-wash does the trick. The use of abrasive detergents is not recommended, as this will permanently damage the ceramic non-stick
surface.
• After cleaning recondition the surface with a light wipe of vegetable oil.
• After every use, remove the fat from the fat pan and clean as described for the BBQ above.
• Drip cup: Turn the drip cup clockwise to unlock and remove from the BBQ. Wash in warm water using a suitable non-abrasive
detergent. Do not use sharp metal objects or abrasive detergents. Turn anti-clockwise to fasten the drip cup back onto the BBQ.
10. Storing and Carrying
• BBQ Lid ts on the rear of the bag with the support straps that are provided.
• Should the appliance operate abnormally after storage and all checks referred to in Sections 5 & 8 have not isolated any problem, the
Venturi may be blocked. A blocked Venturi would be indicated by a weaker yellowish ame or no ame at all in extreme cases. Under
these circumstances it will be necessary to remove the burner as described under Section 8 - general maintenance, and to check and
thoroughly clean out any foreign matter which may have gathered in the venturi.
20162-SP011
Jet
20162-SP005
GB
11. Returning the appliance for repair or service.
• Do not modify the appliance, as this could be dangerous.
• If you cannot rectify a fault by following these instructions, contact your local CADAC distributor for details on how to return the
product for attention.
• Your CADAC Citi Chef is guaranteed by CADAC for a period of 5 years against factory fault.
503-0623 LEV13 (20162) Citi Chef 50 - User Manual (EU & SA).indd 7 2018/09/28 12:36:01

88
12. Spares and Accessories
• Always use genuine CADAC spares as they have been designed to give optimum performance.
GB
*sold in certain regions only
20162-SP001
20162-SP002
8910-SP028
8910-101
20162-SP003
20162-SP005
20162-SP007
20162-SP006
20162-SP008
20162-SP010
20162-SP011 (28 mbar)
20162-SP022 (50 mbar)
20162-SP009
20162-SP017
20162-SP018
20162-SP019
20162-SP020
20162-SP012 (28 mbar)
20162-SP013 (50 mbar)
20162-SP014
20162-SP015
20162-SP016
8910-101
8910-102
8910-108
8910-105
8910-110
8910-SP003
8910-100
503-0623 LEV13 (20162) Citi Chef 50 - User Manual (EU & SA).indd 8 2018/09/28 12:36:44

99
VORSICHT
Nur im Außenbereich verwenden! Dieses Gerät darf nicht in umschlossenen Räumen
(wie z. B. Balkon, Veranda oder Bewirtungsbereich) verwendet werden!
WICHTIG
Lesen Sie diese Gebrauchsanweisung sorgfältig und machen Sie sich mit dem Gerät vertraut, bevor Sie den
Gasbehälter anschließen. Bewahren Sie diese Anleitung zum späteren Nachschlagen auf.
DE
2. Allgemeine Informationen
• Dieses Gerät entspricht den Normen EN498:2012, EN484:1997 und SANS 1539:2012. BS EN 498:2012,
• Dieses Gerät darf nur mit einem zugelassenen Schlauch und Regler verwendet werden.
• Warnung: Zugängliche Teile können sehr heiß werden. Kleine Kinder vom Gerät fernhalten.
• Darf nur mit einer Gasasche verwendet werden, die nicht höher ist als 500 mm in der Höhe und 350mm in der Breite (einschließlich
des Reglers).
• Gasgeräte benötigen für efziente Leistung ausreichend Belüftung, um die Sicherheit der Benutzer und anderer Personen in
unmittelbarer Nähe zu gewährleisten. Deshalb darf das Gerät nicht in unbelüfteten Bereichen betrieben werden. Es ist nur zur
Verwendung im Freien vorgesehen.
• Lesen Sie diese Anleitung sorgfältig, bevor Sie das Gerät in Betrieb nehmen.
• Nur im Außenbereich verwenden!
Gasversorgungsquellen
zugelassener Schlauch und Regler, an einen nachfüllbaren Gasbehälter angeschlossen
(nicht mehr als 9 kg); unter Einhaltung der örtlichen Vorschriften.
Verwendungsland
BE, CH, CY, CZ, ES, FR, GB, GR, IE, IT,
LT, LU, LV, PT, SK & SI
PL
BE, CY, DK, EE, FR,
FI, HU, IT, LT, NL,
NO, SE, SI, SK, RO,
HR, TR, BG, IS,LU,
MT, & ZA
AT, CH, DE & SK
Geräteklassen I
3+(28-30/37)
I
3B/P (37)
I
3B/P (30)
I
3B/P (50)
Zulässige Gase Butan-G30 Propan-G31 Butan-G30, Propan-G31 oder deren Gemisch
Betriebsdrücke 28~30 mbar 37 mbar 37 mbar
28~30 mbar
(Südafrika
2.8 kPa)
50 mbar
Anzahl Düsen (mm) 0.95 0.91 0.95 0.85
Nenn-Verbrauch 270 g/h
Nominale Bruttowärmezufuhr 3.7 kW
Landesnamen und Abkürzungen:
AE = United Arab Emirates AL = Albania AT = Austria BE = Belgium CH = Switzerland
CZ = Czech Republic DE = Germany DK = Denmark ES = Spain FI = Finland
FR = France GB = United Kingdom GR = Greece HR = Croatia IT = Italy
JP = Japan KR = Korea NL = Netherlands NO = Norway PL = Poland
PT = Portugal RO = Romania RU = Russia RS = Serbia SI = Slovenia
SK = Slovakia SE = Sweden TR = Turkey ZA = South Africa
1. Einführung
• Diese Gerät wurde für den Außenbereich, speziell für die Terrasse, entwickelt.
• Verschiedene Lebensmittel können auf diesem Gerät zubereitet werden. Der Citi Chef 50 kann mit verschiedenen Grilloberächen
genutzt werden.
• Schlauch und Druckminderer (nicht im Lieferumfang enthalten) werden an die Gasasche angeschlossen, und Gas wird so mit dem
Gerät verbunden.
• Das Gerät ist einfach einzuschalten und zu betreiben (dies wird unten in Abschnitt 6 beschrieben), und der Benutzer kann die
Wärmezufuhr mit einem Regler kontrollieren.
503-0623 LEV13 (20162) Citi Chef 50 - User Manual (EU & SA).indd 9 2018/09/28 12:36:44

1010
3. Sicherheitsinformationen
Schlauch
• Dieses Gerät darf nur im Außenbereich verwendet werden.
• Vor jeder Verwendung und vor dem Anschließen an den Gasbehälter muss der Schlauch auf
Verschleißspuren oder Beschädigungen überprüft werden.
• Verwenden Sie das Gerät nicht, wenn der Schlauch beschädigt oder verschlissen ist.
Tauschen Sie den Schlauch aus.
• Verwenden Sie das Gerät nicht, wenn es Undichtigkeiten oder Beschädigungen aufweist
oder nicht ordnungsgemäß funktioniert.
Gasbehälter
• Verwenden Sie nur Gas aschen, die in Ihrem Land zugelassen sind.
• Stellen Sie sicher, dass der Gasbehälter an einem gut belüfteten Ort angeschlossen oder
ausgewechselt wird, vorzugsweise im Außenbereich, fern von Entzündungsquellen wie zum
Beispiel offenen Flammen, Kontroll ammen, elektrischen Heizgeräten sowie von anderen
Personen.
• Gasbehälter von Hitze und Flammen fernhalten. Nicht auf einem Herd oder anderen heißen
Ober ächen abstellen.
• Gaspatronen/nachfüllbare Flaschen dürfen nur in aufrechter Position verwendet werden,
damit eine ordnungsgemäße Brennstoffentnahme gewährleistet ist. Nichteinhaltung
kann zum Austreten von Flüssigkeit aus dem Gasbehälter führen, was gefährliche
Betriebsbedingungen zur Folge haben kann.
• Versuchen Sie nicht, die Gas asche zu entfernen, während das Gerät in Betrieb ist.
• Die Gas asche muss nach dem Gebrauch und bei der Lagerung vom Gerät getrennt werden.
Aufbau und Verwendung
• Nur auf festem, ebenem Untergrund betreiben.
• Während des Betriebs darf das Gerät nicht bewegt werden.
• Wenn Hitzeschild, Fettpfanne oder Brennerpfanne derart beschädigt werden, dass beim
Betrieb permanenter Kontakt zwischen dem Hitzeschild und der Fettpfanne entsteht,
darf das Gerät nicht verwendet werden. Bringen Sie es zur Reparatur zu Ihrem CADAC-
Vertriebshändler.
• Vergewissern Sie sich, dass das Gerät nicht in der Nähe von entzündlichen Materialien
betrieben wird. Mindestsicherheitsabstände: über dem Gerät 1,2 m. Hinten und an den
Seiten 600 mm. (Siehe Abb. 2)
• Vorsicht: Wenn das Gerät in Betrieb ist, empfehlen wir die Verwendung von
Schutzhandschuhen beim Abnehmen und Aufsetzen des Deckels. Der Handgriff des
Deckels kann heiß werden.
• Vorsicht: Zugängliche Teile können sehr heiß werden. Es wird empfohlen,
Schutzhandschuhe zu verwenden.
• Halten Sie kleine Kinder vom Gerät fern.
• Nur im Außenbereich verwenden
• HINWEIS! Wenn das Gerät bei windigem Wetter verwendet wird, muss der Deckel als
Windschutz genutzt und in eine Position wie in Abb. 4 dargestellt gebracht werden.
Flammenrückschlag
• Im Falle eines Flammenrückschlags (wenn die Flamme zurückschlägt und sich das Gas im
Brenner oder Venturigehäuse entzündet), müssen Sie sofort das Gas abdrehen, indem Sie
zuerst das Regelventil am Gasbehälter und anschließend das Ventil am Gerät schließen.
Wenn die Flamme erloschen ist, den Regler entfernen und den Zustand der Dichtung
prüfen. Im Zweifelsfall die Dichtung erneuern. Entzünden Sie das Gerät wieder, wie
untenstehend in Abschnitt 6 beschrieben. Falls die Flamme nach wie vor zurückschlägt, ist
das Gerät zu einem autorisierten CADAC-Reparaturdienst zu bringen.
Lecks
• Im Falle eines Lecks an Ihrem Gerät (Gasgeruch) sofort den Drehknopf an der Gas asche
schließen. Wenn Sie Ihr Gerät auf Lecks prüfen wollen, machen Sie dies bitte im Freien.
Versuchen Sie nicht, Lecks mit Hilfe einer Flamme aus ndig zu machen. Verwenden Sie
dazu Seifenwasser.
• Bestreichen Sie die Verbindungsstellen mit Seifenwasser. Wenn sich Blasen bilden, deutet
dies auf ein Gasleck hin. Drehen Sie die Gasversorgung sofort ab, indem Sie zuerst das
Regelventil am Gasbehälter und anschließend das Ventil am Gerät schließen. Überprüfen
Sie alle Verbindungen auf ordnungsgemäßen Zustand. Prüfen Sie erneut mit Seifenwasser.
Wenn weiterhin ein Gasleck auftritt, bringen Sie das Gerät zur Inspektion/Reparatur zu
Ihrem autorisierten CADAC-Fachhändler.
• Überprüfen Sie die Anlage auf Lecks am Schlauchstutzen beim Ventil und am Regler der
Gas asche. Dabei ist der Gashahn an der Flasche geöffnet, der Regler am Gerät jedoch
geschlossen.
Abb. 1
WIND
Abb. 2
Abb. 3
Abb. 4
DE
503-0623 LEV13 (20162) Citi Chef 50 - User Manual (EU & SA).indd 10 2018/09/28 12:36:53

1111
4. Kombinationen
Citi Chef 50 BBQ Grill (Produktcode: 20162-20)
Deckelhandgriff
Thermometer
Deckel
Grillrost
Positionierter
Fettpfanne
Bedienknopf
Brennerpfanne
Räder
Abb. 5a
DE
Topfständer
503-0623 LEV13 (20162) Citi Chef 50 - User Manual (EU & SA).indd 11 2018/09/28 12:36:57

1212
5. Anbringen und Auswechseln des Schlauchs und der Gasasche
• Geräteklasse I 3B/P (50): Schrauben Sie einen Schlauch mit korrekten Gewindeanschlüssen
an beiden Enden auf das viertelzöllige BSP Linksgewinde am Ventil. Bringen Sie am anderen
Ende des Schlauchs einen geeigneten 50 mbar Niederdruck-Regler an. Die Schlauchleitung
verwendet werden, müssen mit DIN 4815 Teil 2 oder gleichwertig erfüllen.
• Die Schlauchlänge soll nicht weniger als 800 mm betragen und 1,5 m nicht übersteigen. Prüfen
Sie das Verfallsdatum am Schlauch und ersetzen Sie ihn falls erforderlich bzw. wenn nationale
Vorschriften dies vorschreiben.
• Den Schlauch nicht verdrehen oder quetschen. Stellen Sie sicher, dass der Schlauch nicht in
Kontakt mit Oberächen kommt, die beim Betrieb heiß werden.
• Bevor Sie den Regler an einen Gasbehälter anschließen, müssen Sie sicherstellen, dass die
Dichtung am Regler guten Sitz hat und in gutem Zustand ist. Dies muss bei jedem Anschließen
und vor jeder Verwendung geschehen.
• Bevor Sie die Gasasche anschließen, stellen Sie sicher, dass alle Ventile geschlossen sind.
Drehen Sie dazu den Bedienknopf im Uhrzeigersinn bis zum Anschlag.
• Stellen Sie sicher, dass der Gasbehälter an einem gut belüfteten Ort angeschlossen oder ausgewechselt wird, vorzugsweise im
Außenbereich, fern von Entzündungsquellen wie zum Beispiel offenen Flammen, Kontrollammen, elektrischen Heizgeräten sowie von
anderen Personen.
• Achten Sie darauf, dass der Gasbehälter in aufrechter Position ist, und schrauben Sie den Regler auf den Behälter, bis er vollständig
befestigt ist. Nur handfest anziehen.
• Im Falle eines Lecks an Ihrem Gerät (Gasgeruch) sofort den Drehknopf am Gasbehälter schließen und das in Abschnitt 3 beschriebenen
Verfahren zum Aufspüren und Schließen von Lecks ausführen. Wenn Sie Ihr Gerät auf Lecks überprüfen wollen, müssen Sie dies im
Freien mit Seifenwasser tun, welches auf die Verbindungen aufgebracht wird. Bilden sich Blasen, so deutet dies auf ein Gasleck hin.
• Überprüfen Sie, ob alle Anschlüsse fest angezogen sind, und wiederholen Sie die Prüfung mit der Seifenlauge. Falls Sie das Gasleck
nicht ausndig machen können, darf das Gerät nicht verwendet
werden. Wenden Sie sich in diesem Fall an Ihren CADAC-Vertriebshändler.
• Wenn Sie einen Gasbehälter auswechseln, schließen Sie zunächst das Ventil am Behälter (falls montiert), und drehen Sie dann den
Bedienknopf im Uhrzeigersinn bis zum Anschlag.
• Vergewissern Sie sich, dass die Flamme erloschen ist, und schrauben Sie den Regler ab. Schließen Sie einen vollen Behälter an.
Beachten Sie dabei die oben beschriebenen Vorsichtsmaßnahmen.
6. Entzünden des Geräts
Vor dem Entzünden zu beachtende Vorsichtsmaßnahmen
• Nach längerer Lagerung müssen die Luftlöcher im Ventildeckel daraufhin überprüft werden, ob der Gasstrom durch Insekten
beeinträchtigt wird. Überprüfen Sie den Einlass des Venturis auf Insekten. Bringen Sie nach diesen Überprüfungen alle Komponenten
wieder in ihre vorgeschriebene Position.
• Das Gerät darf nur auf einem stabilen, ebenen Untergrund verwendet werden.
Verwendung des Bedienknopfes
Der Bedienknopf hat zwei positive Endpositionen: Kleine Flamme und Anzünden / große Flamme. Dadurch wird die Einstellung der
Flamme auf den Bereich zwischen diesen beiden Punkten eingeschränkt.
Entzünden mit dem Piezo-Anzünder
• Um das Gerät mit dem Piezo-Anzünder zu entzünden, drücken Sie den Bedienknopf ein und drehen ihn entgegen dem Uhrzeigersinn,
bis Sie ein Klick-Geräusch hören. Wenn Sich das Gas nicht mit dem ersten Funken entzündet, drücken Sie den Bedienknopf ein
und drehen ihn im Uhrzeigersinn bis zum Anschlag. Versuchen Sie es erneut, indem Sie den Bedienknopf eindrücken und entgegen
dem Uhrzeigersinn drehen, bis Sie ein Klick-Geräusch hören. Wenn sich das Gas nicht innerhalb der ersten zwei bis drei Sekunden
entzündet hat, müssen Sie das Regelventil schließen, indem Sie den Bedienknopf eindrücken und im Uhrzeigersinn bis zum
Anschlag drehen. Warten Sie ca. dreißig Sekunden, damit Gas, dass sich ggf. in der Brennerpfanne angesammelt hat, entweichen
kann. Wiederholen Sie erforderlichenfalls den oben beschriebenen Vorgang, bis sich die Flamme entzündet. Die Flamme sollte sich
normalerweise innerhalb der ersten ein bis zwei Sekunden entzünden.
Entzünden mit einem Grillanzünder
• Wenn das Gerät kalt ist, kann es von oben entzündet werden, bevor die gewünschte Kochoberäche auf die Fettpfanne montiert
wird. Beim Entzünden des Geräts im heißen Zustand wird jedoch empfohlen dies zu tun, indem ein Grillanzünder so weit durch
eine der Belüftungsöffnungen unterhalb des Brenners gesteckt wird, bis er mit dem Brenner auf gleicher Höhe ist. (Stecken Sie den
Grillanzünder NICHT durch die große Öffnung direkt unterhalb des Brenners.) Zünden Sie den Grillanzünder. Drücken Sie, während
der Grillanzünder brennt, den Bedienknopf hinein und drehen Sie ihn entgegen dem Uhrzeigersinn, um den Brenner zu entzünden.
Abb. 10
DE
503-0623 LEV13 (20162) Citi Chef 50 - User Manual (EU & SA).indd 12 2018/09/28 12:36:59

1313
7. Verwenden des Geräts und seiner Kochober ächen
Grillrost (Abb. 13)
• Der Grillrost ruht auf drei Druckguss-Positionierern in der Fettpfanne
(Abb. 11).
• Verfügbar als zusätzliches Zubehör und Ersatzteil
• GreenGrill-Keramikbeschichtete Kochober äche
• Verwenden Sie keine Kochutensilien aus Metall, da diese die GreenGrill-
Keramikbeschichtete beschädigen würden.
• Ideal zum Grillen von Fleisch, Fisch, Hähnchen und Gemüse
• WARNUNG: Wir empfehlen die Verwendung von Schutzhandschuhen bei
der Handhabung des BBQ-Grills.
Kochpfanne (Abb. 15)
• Die Kochpfanne ruht auf drei Druckguss-Positionierern in der Fettpfanne
(Abb. 11).
• Verfügbar als zusätzliches Zubehör und Ersatzteil (nicht im Lieferumfang)
• Antihaftbeschichtete Kochober äche
• Verwenden Sie keine Kochutensilien aus Metall, da diese die
Antihaftbeschichtung beschädigen würden.
• WARNUNG: Benutzen Sie die Kochpfanne beim Vorheizen nicht länger
als 15 Minuten mit der Haube, da dies die Antihaftbeschichtung und die
Pfanne beschädigen kann.
• WARNUNG: Wir empfehlen die Verwendung von Schutzhandschuhen bei
der Handhabung der Kochpfanne.
Positionierer
Abb. 11
Abb. 15
Abb. 13
Allgemeines
• Wenn die Flamme entzündet ist, kann die Intensität der Flamme durch Drehen des Bedienknopfes eingestellt werden: gegen den
Uhrzeigersinn zum Reduzieren der Flamme, bzw. mit dem Uhrzeigersinn zum Hochregeln der Flamme.
• Am Anschlag im Uhrzeigersinn ist das Ventil vollständig geschlossen. Um das Ventil aus der vollständig geschlossenen Position zu
drehen, muss der Knopf zuerst so weit eingedrückt werden, dass sich die Verriegelung löst. Drehen Sie den eingedrückten Knopf
entgegen dem Uhrzeigersinn. Sobald die Verriegelung gelöst ist, ist es nicht mehr nötig, den Knopf gedrückt zu halten. Er kann jetzt
frei bis zur gewünschten Flammeneinstellung gedreht werden.
• Beim Zubereiten von Speisen mit hohem Fettgehalt kann es zum Auf ackern kommen, wenn die Hitze zu hoch eingestellt ist. Regeln
Sie in diesem Fall die Hitze herunter, bis das Flackern aufhört.
• Während des Betriebs darf das Gerät nicht bewegt werden. Abgesehen davon, dass dies gefährlich ist, kann das Bewegen des Geräts
während des Betriebs zum Auf ackern führen.
• Nach der Verwendung schließen Sie zuerst das Ventil am Gasbehälter (falls zutreffend). Wenn die Flamme erloschen ist, schließen Sie
das Ventil am Gerät, indem Sie den Bedienknopf eindrücken und im Uhrzeigersinn bis zum Anschlag drehen.
Abb. 16
8910-101
8910-102
8910-108
DE
BBQ 2 Plancha (Abb. 16)
• Der Grill Plancha sorgt für maximale Vielseitigkeit mit offenem Grill BBQ auf
der einen Seite und achen Grillpfanne auf der anderen.
• Verfügbar als zusätzliches Zubehör und Ersatzteil (nicht im Lieferumfang)
• Die keramisch beschichtete Spitze ist leicht zu bedienen und zu reinigen.
• Ein praktischer Tragetasche ist im Lieferumfang enthalten.
• WARNUNG: Wir empfehlen die Verwendung von Schutzhandschuhen bei
der Handhabung des Grill Plancha.
Abb. 17
8910-105
Röstpfanne (Abb. 17)
• Verfügbar als zusätzliches Zubehör und Ersatzteil (nicht im Lieferumfang)
• Porzellanemaillierte Kochober äche
• Ideal zum Zubereiten von Brathähnchen, Lamm, Gemüse usw.
• WARNUNG: Wir empfehlen die Verwendung von Schutzhandschuhen bei der
Handhabung der Bratpfanne.
503-0623 LEV13 (20162) Citi Chef 50 - User Manual (EU & SA).indd 13 2018/09/28 12:37:41

1414
Topfständer (Abb. 19)
• Vernickelter Topfständer für die meisten Standard-Topfgrößen
• Verfügbar als zusätzliches Zubehör und Ersatzteil.
• WARNUNG: Wir empfehlen die Verwendung von Schutzhandschuhen bei
der Handhabung des Topf-Untersetzers.
• WICHTIG! Benutzen Sie nur die vorgesehenen CADAC-Kochober ächen, um die Gültigkeit der Garantie nicht zu gefährden.
• HINWEIS! Verwenden Sie immer den Windschutz, wenn Sie das Gerät bei windigen Wetter benutzen.
Pizzastein (Abb. 18)
• Verfügbar als zusätzliches Zubehör und Ersatzteil (nicht im Lieferumfang)
• 10 mm dicker Backstein, der Temperaturen von bis zu 500°C standhält
• Mit einem Handgriff aus vernickeltem Draht
• WARNUNG: Wir empfehlen die Verwendung von Schutzhandschuhen bei der
Handhabung des Backsteins.
Abb. 18
Abb. 19
8. Allgemeine Wartung
• Die Last der Wartung dieses Geräts liegt ab dem Tag des Kaufs einzig beim Verbraucher.
Dieses Gerät bedarf keiner planmäßigen Wartung.
Austausch einer verstopften Düse:
• Ihr Citi Chef ist mit einer Düse in spezieller Größe ausgestattet, um die korrekte Gasmenge zu regulieren.
• Verstopft die Bohrung in der Düse, kann dies dazu führen, dass sich nur eine kleine oder gar keine Flamme bildet. Versuchen Sie
nicht, die Düse mit einer Nadel o. Ä. zu reinigen, da dies die Bohrung beschädigen und den sicheren Betrieb des Geräts gefährden
könnte.
• Um die Düse zu tauschen ziehen Sie die Rückwand mit dem Griff heraus (abb. 20). Entfernen Sie den Deckel, das Grillrost, den
Topfständer sowie die anderen losen Gegenstände aus dem Gerät. Schrauben Sie nun die 3 Schrauben unterhalb des Gerätes ab, wie
in Abb. 21 gezeit, dadurch wird der Brenner gelöst. Entfernen Sie den Brenner vorsichtig, indem Sie ihn herausnehmen (Abb. 22).
HINWEIS, der Piezodraht ist am Brenner befestigt, bitte vorsichtig herausnehmen, ohnen den Piezodraht zu beschädigen. Legen Sie
den Brenner vorsichtig zur Seite (Abb. 23). Die Düse kann nun mit einem geeigneten Schraubenschlüssel entfernt warden. Verwenden
Sie keine Zange, um die Düse nicht zu beschädigen. Schrauben Sie die neue Düse ein. Achtung, nicht zu fest drehen, um die Düse
nicht zu beschädigen.
• Beim Wiedereinbau in umgekehrter Reihenfolge vorgehen.
Austausch des Schlauchs
• Das Anbringen eines Schlauchs wird in Abschnitt 5 - Anbringen und Auswechseln des Schlauchs und der Gas asche - beschrieben.
8910-110
8910-SP003
DE
Abb. 20 Abb. 21
Grill 2 Braai (Abb. 19.1)
• Verfügbar als zusätzliches Zubehör und Ersatzteil (nicht im Lieferumfang)
• Der Grill 2 Braai ruht auf drei Druckguss-Positionierern in der Fettpfanne
(Abb. 11).
• GreenGrill-Keramikbeschichtung Kochober äche
• Verwenden Sie keine Kochutensilien aus Metall, da diese die
Antihaftbeschichtung beschädigen würden.
• Die ache Hälfte ist ideal zum Zubereiten von Fisch, Frühstück und
Pfannkuchen geeignet, während die gerippte Hälfte ideal zum Grillen von
Fleisch, Fisch, Hähnchen und Gemüse geeignet ist.
• Diese Kochober äche wird mit einer praktischen Tragetasche geliefert.
• WARNUNG: Wir empfehlen die Verwendung von Schutzhandschuhen bei der
Handhabung des Grill 2 Braai.
Abb. 19.1
8910-100
503-0623 LEV13 (20162) Citi Chef 50 - User Manual (EU & SA).indd 14 2018/09/28 12:38:17

1515
DE
Abb. 23
Abb. 22
20162-SP011
Düse
20162-SP005
9. Reinigung
• Hinweis: Zu den Komponenten und ihrer Bezeichnung (siehe Abschnitt 7)
• Grillrost: Entfernen Sie das Fett aus der Rinne im Boden der Fettpfanne. Wischen Sie nach dem Kochen verbliebenes überschüssiges
Fett ab mit einem nicht scheuernden Reinigungsmittel in warmem Wasser.
• Deckel: Waschen Sie den BBQ-Deckel mit einem geeigneten nicht scheuernden Reinigungsmittel in warmem Wasser. Verwenden Sie
keine scharfen Metall-Gegenstände oder Scheuermittel, denn diese würde die Oberächenbeschichtung beschädigen.
• Hinweis: Für hartnäckige Flecken kann Ofenreiniger verwendet werden.
Pege der keramikbeschichteten Kochoberächen:
• Die Kochoberächen sind mit einer speziellen Keramikbeschichtung beschichtet, der mit großem Erfolg bei einigen der weltbesten
Kochgeräte verwendet wird. Dennoch kann sorgfältige Behandlung Ihnen zusätzliche Jahre gesunden, problemlosen, anbrennfreien
Kochens schenken.
• Verwenden Sie nur niedrige oder mittlere Hitzeeinstellungen, um die wertvollen Nährstoffe in den Nahrungsmitteln zu erhalten und die
antihaftbeschichteten Kochoberächen instand zu halten.
• Die Keramikbeschichtung kann durch die Verwendung metallener Kochutensilien leicht beschädigt werden.
• HINWEIS! Es wird empfohlen, zum Kochen nur Utensilien aus Kunststoff oder Holz zu verwenden.
• Überhitzen Sie die antihaftbeschichteten Kochoberächen nicht, und tragen Sie vor der Verwendung immer ein wenig Speiseöl auf die
Oberäche auf.
• Lassen Sie die keramikbeschichteten Oberächen immer abkühlen, bevor Sie sie in Wasser tauchen.
• Die Keramikbeschichtung ist absolut Geschirrspülfest, aber die keramikbeschichtete Oberäche ist so einfach zu reinigen, dass
eine schnelle Handwäsche es auch tut. Die Verwendung scheuernder Reinigungsmittel wird nicht empfohlen, weil dadurch die
Keramikbeschichtung dauerhaft beschädigt wird.
• Nach dem Reinigen die Oberäche durch Bestreichen mit etwas Panzenöl auffrischen.
• Nach jeder Verwendung das Fett aus der Fettpfanne entfernen und diese, wie oben für das BBQ beschrieben, reinigen.
• Fettauffangschale: Drehen Sie die Fettauffangschale im Uhrzeigersinn um diese zu entsperren, entfernen Sie diese. Waschen Sie die
Fettauffangschale in warmen Seifenwasser. Verwenden Sie keine scharfen Metallgegenstände oder Scheuermittel. Drehen Sie die
Fettauffangschale gegen den Uhrzeigersinn, um die Fettauffangschale wieder auf dem Grill zu befestigen.
10. Aufbewahrung und Transport
• Sollte das Gerät nach der Aufbewahrung unnormal arbeiten und alle in den Abschnitten 5 und 8 aufgeführten Prüfungen nicht die
Ursache des Problems aufgezeigt haben, kann das Venturi blockiert sein. Ein blockiertes Venturi würde sich in einer schwächeren
gelblichen Flamme oder in extremen Fällen darin äußern, dass überhaupt keine Flamme brennt. Unter diesen Umständen wird es
erforderlich sein, den Brenner wie in Abschnitt 8 - Allgemeine Wartung - beschrieben, auszubauen und eventuelle Verschmutzungen,
die sich im Venturi angesammelt haben, gründlich zu beseitigen.
11. Das Gerät zur Reparatur oder zur Inspektion einliefern
• Modizieren Sie das Gerät nicht, denn das könnte gefährlich sein.
• Wenn es nicht gelingt, einen Fehler anhand dieser Anleitung zu beheben, erkundigen Sie sich bei Ihrem örtlichen CADAC-
Vertriebshändler danach, wie das Produkt zur Reparatur eingeliefert werden kann.
• Ihr CADAC Carri Chef wird von CADAC mit einer Garantie von 5 Jahren gegen werksseitige Fehler geliefert.
503-0623 LEV13 (20162) Citi Chef 50 - User Manual (EU & SA).indd 15 2018/09/28 12:38:22

1616
12. Ersatzteile und Zubehör
• Verwenden Sie immer Originalersatzteile von CADAC, denn diese sind für optimale Funktion ausgelegt.
*In bestimmten Regionen nur verkauft
DE
20162-SP001
20162-SP002
8910-SP028
8910-101
20162-SP003
20162-SP005
20162-SP007
20162-SP006
20162-SP008
20162-SP010
20162-SP011 (28 mbar)
20162-SP022 (50 mbar)
20162-SP009
20162-SP017
20162-SP018
20162-SP019
20162-SP020
20162-SP012 (28 mbar)
20162-SP013 (50 mbar)
20162-SP014
20162-SP015
20162-SP016
8910-101
8910-102
8910-108
8910-105
8910-110
8910-SP003
8910-100
503-0623 LEV13 (20162) Citi Chef 50 - User Manual (EU & SA).indd 16 2018/09/28 12:39:05

1717
WAARSCHUWING
Alleen voor gebruik buitenshuis!
Dit apparaat mag niet worden gebruikt op een afgesloten balkon, veranda of terras!
BELANGRIJK
Lees deze gebruiksinstructies zorgvuldig door om vertrouwd te raken met het apparaat voordat u het aansluit op
de gases. Bewaar deze instructies voor toekomstig gebruik.
NL
2. Algemene informatie
• Dit apparaat voldoet aan EN498:2012, EN484:1997 en SANS 1539:2012
• Dit apparaat mag alleen worden gebruikt met een goedgekeurde slang en drukregelaar (in Zuid-Afrika zijn de slang en drukregelaar
meegeleverd met het apparaat).
• Waarschuwing: aanraakbare onderdelen kunnen erg heet zijn. Houd kleine kinderen uit de buurt van het apparaat.
• Alleen te gebruiken met een gases die niet hoger is dan 500 mm in hoogte en 350mm in breedte (inclusief de regelaar).
• Gasapparaten hebben ventilatie nodig voor een efciënte werking en om de veiligheid van gebruikers en andere personen in de buurt
te garanderen. Gebruik het apparaat daarom niet in een ongeventileerde ruimte. Het apparaat is uitsluitend bedoeld voor gebruik
buitenshuis.
• Lees deze instructies zorgvuldig door voordat u het apparaat gebruikt.
• Alleen buitenshuis gebruiken!
Gasbronnen
Een goedgekeurde slang en drukregelaar aangesloten op een hervulbare gases die niet zwaarder
is dan 9 kg en die voldoet aan de lokale voorschriften.
Land van gebruik
BE, CH, CY, CZ, ES, FR, GB, GR, IE,
IT, LT, LU, LV, PT, SK & SI
PL
BE, CY, DK, EE,
FR, FI, HU, IT,
LT, NL, NO, SE,
SI, SK, RO, HR,
TR, BG, IS,LU,
MT, & ZA
AT, CH, DE & SK
Apparaatcategorieën I
3+(28-30/37)
I
3B/P (37)
I
3B/P (30)
I
3B/P (50)
Toegestane gassen Butaan-G30 Propaan-G31 Butaan-G30, Propaan-G31 of hun mengsels
Bedrijfsdruk 28~30 mbar 37 mbar 37 mbar
28~30 mbar
(Zuid-Afrika 2.8
kPa)
50 mbar
Nummer straalpijp (mm) 0.95 0.91 0.95 0.85
Nominaal verbruik 270 g/h
Bruto nominaal vermogen 3.7 kW
Landnamen en afkortingen
AE = United Arab Emirates AL = Albania AT = Austria BE = Belgium CH = Switzerland
CZ = Czech Republic DE = Germany DK = Denmark ES = Spain FI = Finland
FR = France GB = United Kingdom GR = Greece HR = Croatia IT = Italy
JP = Japan KR = Korea NL = Netherlands NO = Norway PL = Poland
PT = Portugal RO = Romania RU = Russia RS = Serbia SI = Slovenia
SK = Slovakia SE = Sweden TR = Turkey ZA = South Africa
1. Inleiding
• Deze barbecue is ontworpen voor buiten koken, speciaal voor op een veranda, balkon of in de tuin.
• Dit apparaat kan worden gebruikt voor de bereiding van verschillende soorten gerechten. De Citi Chef 50 kan gebruikt worden met veel
verschillende (optionele) kookoppervlakken.
• Het gas wordt aangesloten middels een gasslang en drukregelaar, welke worden aangesloten op een gases (niet meegeleverd).
• Het apparaat is eenvoudig in te schakelen en te bedienen (zie de beschrijving hieronder in sectie 6). De hittetoevoer kan door de
gebruiker worden afgesteld met een regelbaar ventiel.
503-0623 LEV13 (20162) Citi Chef 50 - User Manual (EU & SA).indd 17 2018/09/28 12:39:06

1818
3. Veiligheidsinformatie
Slang
• Dit apparaat mag alleen buitenshuis worden gebruikt.
• Een slang en drukregelaar zijn meegeleverd met dit apparaat (alleen ZA)
• Controleer de slang voor ieder gebruik en voordat u die aansluit op de gas es op slijtage en
beschadigingen.
• Gebruik het apparaat niet als de slang beschadigd of versleten is. Vervang de slang.
• Gebruik het apparaat niet als het lekt, beschadigd is of niet naar behoren werkt.
Gas es
• Gebruik alleen essen die zijn goedgekeurd overeenkomstig de wetgeving in uw land.
• Plaats of vervang de gas es altijd in een goed geventileerde ruimte, bij voorkeur buiten, uit
de buurt van mogelijke ontstekingsbronnen, zoals open vuur, waakvlammen en radiatoren,
en niet in de buurt van andere mensen.
• Houd gas essen uit de buurt van hitte en open vuur. Niet op een fornuis of ander heet
oppervlak plaatsen.
• Gascartridges/hervulbare gas essen dienen alleen in rechtopstaande positie te worden
gebruikt, zodat de brandstof op correcte wijze wordt onttrokken. Het niet naleven van
deze instructie kan leiden tot het weglekken van vloeistof uit de gas es. Hierdoor kunnen
gevaarlijke gebruiksomstandigheden ontstaan.
• Probeer de gas es niet te verwijderen wanneer het apparaat in gebruik is.
• Na gebruik of wanneer het apparaat wordt opgeborgen, moet de gas es worden
losgekoppeld.
Montage en gebruik
• Gebruik het apparaat alleen op een stevige, vlakke ondergrond.
• Verplaats het apparaat niet wanneer het in gebruik is.
• Als het hitteschild, de vetopvangbak of branderbak dermate beschadigd raken dat het
hitteschild en de vetopvangbak elkaar raken tijdens het gebruik, kunt u het apparaat niet
gebruiken. Breng het apparaat ter reparatie naar uw CADAC-leverancier.
• Gebruik het apparaat niet in de buurt van brandbare materialen. De minimale veilige
afstanden zijn: Boven het apparaat 1,2 m. Aan de achterkant en zijkanten 600 mm (Zie
afbeelding 2.)
• Waarschuwing: wij raden u aan bij het verwijderen en plaatsen van de deksel tijdens
gebruik van het apparaat ovenwanten te dragen. Het handvat kan erg heet zijn.
• Waarschuwing: aanraakbare onderdelen kunnen erg heet worden. Het gebruik van
ovenwanten is raadzaam.
• Houd kleine kinderen uit de buurt van het apparaat.
• Alleen buitenshuis gebruiken
• LET OP! Als het apparaat wordt gebruikt bij winderig weer, moet het deksel worden
gebruikt als windscherm in de positie zoals getoond op afbeelding 4.
Terugslag (vlam).
• In het geval van terugslag (waarbij de vlam terugslaat en in de brander of de Venturi-
behuizing ontbrandt), dient u de gastoevoer onmiddellijk af te sluiten door eerst het
regelventiel op de gas es dicht te draaien en daarna het ventiel op het apparaat. Nadat de
vlam is gedoofd, verwijdert u de drukregelaar en controleert u de conditie van de pakking.
Vervang de pakking als u niet zeker weet of die nog goed is. Steek het apparaat opnieuw
aan zoals beschreven in sectie 6 hieronder. Als de vlam blijft terugslaan, brengt u het
apparaat naar een bevoegde CADAC-reparateur.
Lekkage
• Als het apparaat gas lekt (gaslucht), draait u onmiddellijk de regelknop op de gas es dicht.
Als u het apparaat wilt controleren op lekkage, doet u dit buiten. Probeer lekkages niet op
te sporen met behulp van vuur, maar gebruik zeepwater.
• De juiste manier om dit te doen, is zeepwater aan te brengen op de aansluitingen. Als
zich belletjes vormen, is er sprake van een gaslek. Sluit de gastoevoer onmiddellijk af door
eerst het regelventiel op de gas es dicht te draaien en daarna het ventiel op het apparaat.
Controleer of alle aansluitingen goed vastzitten en controleer opnieuw met zeepwater. Als
u het gaslek niet kunt verhelpen, brengt u het product ter inspectie/reparatie naar een
CADAC-leverancier.
• Controleer op lekkage aan het sluitstuk van het ventiel en bij de drukregelaaraansluiting
van de gas es met de gastoevoer van de gas es geopend, maar met de regelknop van het
apparaat gesloten.
Afb. 1
Afb. 2
Afb. 3
Afb. 4
WIND
NL
503-0623 LEV13 (20162) Citi Chef 50 - User Manual (EU & SA).indd 18 2018/09/28 12:39:15

1919
4. Combinaties
Citi Chef 50 BBQ Combo (productcode: 20162-20)
NL
Afb. 6a
Handvat
Thermometer
Deksel
Barbecuerooster
Steun
Vetopvangbak
Regelknop
Branderbak
Wiel
Pandrager
503-0623 LEV13 (20162) Citi Chef 50 - User Manual (EU & SA).indd 19 2018/09/28 12:39:18
Seite laden ...
Seite laden ...
Seite laden ...
Seite laden ...
Seite laden ...
Seite laden ...
Seite laden ...
Seite laden ...
Seite laden ...
Seite laden ...
Seite laden ...
Seite laden ...
Seite laden ...
Seite laden ...
Seite laden ...
Seite laden ...
Seite laden ...
Seite laden ...
Seite laden ...
Seite laden ...
Seite laden ...
Seite laden ...
Seite laden ...
Seite laden ...
Seite laden ...
Seite laden ...
Seite laden ...
Seite laden ...
Seite laden ...
Seite laden ...
Seite laden ...
Seite laden ...
Seite laden ...
Seite laden ...
Seite laden ...
Seite laden ...
Seite laden ...
Seite laden ...
Seite laden ...
Seite laden ...
Seite laden ...
Seite laden ...
Seite laden ...
Seite laden ...
Seite laden ...
Seite laden ...
Seite laden ...
Seite laden ...
Seite laden ...
Seite laden ...
Seite laden ...
Seite laden ...
Seite laden ...
Seite laden ...
Seite laden ...
Seite laden ...
Seite laden ...
Seite laden ...
Seite laden ...
Seite laden ...
Seite laden ...
Seite laden ...
Seite laden ...
Seite laden ...
Seite laden ...
Seite laden ...
Seite laden ...
Seite laden ...
Seite laden ...
Seite laden ...
Seite laden ...
Seite laden ...
Seite laden ...
-
 1
1
-
 2
2
-
 3
3
-
 4
4
-
 5
5
-
 6
6
-
 7
7
-
 8
8
-
 9
9
-
 10
10
-
 11
11
-
 12
12
-
 13
13
-
 14
14
-
 15
15
-
 16
16
-
 17
17
-
 18
18
-
 19
19
-
 20
20
-
 21
21
-
 22
22
-
 23
23
-
 24
24
-
 25
25
-
 26
26
-
 27
27
-
 28
28
-
 29
29
-
 30
30
-
 31
31
-
 32
32
-
 33
33
-
 34
34
-
 35
35
-
 36
36
-
 37
37
-
 38
38
-
 39
39
-
 40
40
-
 41
41
-
 42
42
-
 43
43
-
 44
44
-
 45
45
-
 46
46
-
 47
47
-
 48
48
-
 49
49
-
 50
50
-
 51
51
-
 52
52
-
 53
53
-
 54
54
-
 55
55
-
 56
56
-
 57
57
-
 58
58
-
 59
59
-
 60
60
-
 61
61
-
 62
62
-
 63
63
-
 64
64
-
 65
65
-
 66
66
-
 67
67
-
 68
68
-
 69
69
-
 70
70
-
 71
71
-
 72
72
-
 73
73
-
 74
74
-
 75
75
-
 76
76
-
 77
77
-
 78
78
-
 79
79
-
 80
80
-
 81
81
-
 82
82
-
 83
83
-
 84
84
-
 85
85
-
 86
86
-
 87
87
-
 88
88
-
 89
89
-
 90
90
-
 91
91
-
 92
92
-
 93
93


Cadac 20162 Bedienungsanleitung
- Kategorie
- Kochfelder
- Typ
- Bedienungsanleitung
in anderen Sprachen
- français: Cadac 20162 Le manuel du propriétaire
- español: Cadac 20162 El manual del propietario
- italiano: Cadac 20162 Manuale del proprietario
- Nederlands: Cadac 20162 de handleiding
- dansk: Cadac 20162 Brugervejledning
- polski: Cadac 20162 Instrukcja obsługi
Verwandte Papiere
-
Cadac 8910 Bedienungsanleitung
-
-
Cadac 5650 Bedienungsanleitung
-
Cadac 5610 Bedienungsanleitung
-
-
-
Cadac 202P0 Bedienungsanleitung
-
-
-
Cadac 6540H0 Bedienungsanleitung
Sonstige Unterlagen
-
Dometic 5841 Bedienungsanleitung
-
Elementi OFP121BB Bedienungsanleitung
-
-
-
-
Dometic 203P1 Benutzerhandbuch
-
-
 Mestic MB-100 Benutzerhandbuch
-
Kayoba 956125 Bedienungsanleitung
-
Aeg-Electrolux EGL6000X Benutzerhandbuch
