LIVARNO 273024 Bedienungsanleitung
- Kategorie
- Baby Nachtlichter
- Typ
- Bedienungsanleitung

LED SOLAR WALL LIGHT
IAN 273024
LED SOLAR WALL LIGHT
Assembly, operating and safety instructions
LED-SOLAR-WANDLEUCHTE
Montage-, Bedienungs- und Sicherheitshinweise
LAMP A LEDOWO-SOLARNA
Wskazówki montażu, obsługi i bezpieczeństwa

GB / IE Assembly, operating and safety instructions Page 5
PL Wskazówki montażu, obsługi i bezpieczeństwa Strona 14
DE / AT / CH Montage-, Bedienungs- und Sicherheitshinweise Seite 24

A B C
H I
D E F
HG00375A
1 2 3
12 7
6
8
9
G
11
13
10

A B C
G H I
D E F
HG00375B
1 2 3 4
57
6
8
11
10
9

A B C
G H I
D E F
HG00375C
1 2 3 4
5
6
8
7
10
9
11

5 GB/IE
Intended use ...................................................................................................................... Page 6
Parts description ............................................................................................................Page 6
Technical Data ..................................................................................................................Page 6
Scope of delivery...........................................................................................................Page 6
General safety instructions ...................................................................................Page 7
Safety instructions for rechargeable batteries ........................................................................Page 8
Function..................................................................................................................................Page 8
Installation ..........................................................................................................................Page 9
Replacing the rechargeable batteries .....................................................................................Page 10
Winter-time use .........................................................................................................................Page 10
Cleaning and Care ........................................................................................................Page 11
Troubleshooting .............................................................................................................Page 11
Disposal .................................................................................................................................Page 12
Warranty .............................................................................................................................. Page 13

6 GB/IE
LED Solar wall light
Intended use
The LED solar-powered wall light is intended to
illuminate outdoor areas without electrical con-
nection, e.g. garden sheds etc. The LED solar-p
ow-
ered wall light is not suitable for commercial use.
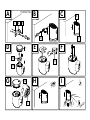
Parts description
1 Rawlplug
2 Mounting plate
3 Screws (4 x 30 mm)
4 Hanger (for HG00375B/ HG00375C only)
5 Receiver (for HG00375B/ HG00375C only)
6 Solar cell
7 Sensor
8 Battery cover
9 Battery compartment
10 Rechargeable batteries
11 ON / OFF switch
12 Screws (3.7 x 5.5 mm) (for HG00375A only)
13 Lamp Shade (for HG00375A only)
Technical Data
Operating voltage: 3.6 V
Rechargeable
batteries:
3 x 1.2 V NiMH batteries
,
900 mAh, AAA
Light bulb: 4 LEDs, approx. 0.5 W
(LEDs not replaceable.)
Solar cell: approx. 5.5 V, approx.
100 mA
Sensor: Range: max. 5 m, detection
angle: approx. 100° hori-
zontal, approx. 90° vertical
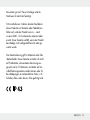
Protection class: IP43 (spray-proof)
Scope of delivery
Check immediately after unpacking that the
parts are complete and that the product is in
proper condition.

7 GB/IE
1 Main unit
3 NiMH-rechargeable batteries type AAA,
1.2 V , 900 mAh – (preinstalled)
1 Mounting plate
2 Screws (4 x 30 mm) (Model HG00375A)
2 Rawlplugs ø 6 mm (Model HG00375A)
2 Screws (3.7 x 5.5mm) (Model HG00375A)
3 Screws (4 x 30 mm) (Model HG00375B /
Model HG00375C)
3 Rawlplugs ø 6 mm (Model HG00375B /
Model HG00375C)
1 Instructions for assembly and use
General safety
instructions
BEFORE USING THE PRODUCT, PLEASE
FAMILIARISE YOURSELF WITH ALL OF THE
SAFETY INFORMATION AND INSTRUCTIONS
FOR USE! WHEN PASSING THIS PRODUCT
ON TO OTHERS, PLEASE ALSO INCLUDE ALL
THE DOCUMENTS!
This device may be used by children age
8 years and up, as well as by persons with
reduced physical, sensory or mental capaci-
ties, or lacking experience and / or knowle
dge,
so long as they are supervised or instructed
in the safe use of the device and understand
the associated risks. Children should not be
allowed to play with the device. Cleaning
and user maintenance should not be per-
formed by children without supervision.
Never leave children unsupervised with the
packaging material. The packaging material
represents a danger of suffocation. Children
frequently underestimate the dangers.
Keep children out of the area you are work-
ing in. A large number of screws and other
small parts are included with delivery. These
may prove life-threatening if swallowed or in-
haled.
Do not use this product if you notice any
damage!

8 GB/IE
Safety instructions for
rechargeable batteries
DANGER TO LIFE!
Rechargeable batteries are not intended to be in
the hands of children. If accidentally swallowed
seek immediate medical attention!
CAUTION! EXPLOSION
HAZARD!
Never throw batteries into fire or water!
Do not exert mechanical strain on batteries!
Do not use disposable batteries.
Never short-circuit or open rechargeable
batteries.
Risk of equipment damage
Only use the battery type specified!
When inserting the battery ensure the correct
polarity! This is shown inside the battery
compartment!
If necessary, clean the battery and device
contacts before inserting the battery!
Function
Solar cell
The solar cell 6 converts energy from sunlight
into electricity. Using this electricity, the installed
batteries 10 are charged in the battery com-
partment 9.
These batteries store the electricity fed by the
solar cell. Fully charged batteries deliver light
for approximately 6 hours, when the ON / OFF
switch 11 is in the „ON“ position.
I
n summer, completely drained batteries take ab
out
1 to 2 days to fully recharge in good sunlight.
Sensor
During periods of twilight or darkness, the sen-
sor 7 registers a change in the angle of heat
radiation, triggered by people passing by the
sensor (Fig. I). When the sensor recognises a
moving person the light is switched on. The light
goes off after approx. 1 minute, after the last
movement was recognised.

9 GB/IE
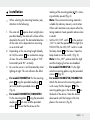
Installation
When selecting the mounting location, pay
attention to the following:
1.
The solar cell
6
requires direct sunlight wh
en
possible. Ideally, the solar cell surface will be
directed to the south. The horizontal direction
of the solar cell is dependent on mounting
on a vertical wall.
2. Depending on the mounting height (ideally
at 2 m) the sensor 7 has a detection range
of max. 5m with a detection angle of 100°
horizontally and 90° vertically.
3. Be sure the sensor is not illuminated by street
lighting at night. This can influence the effect.
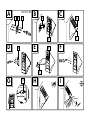
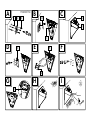
For model HG00375A: Fix the mounting
plate 2 using the provided rawlplugs 1
(ø 6 mm) and the provided screws 3
(Fig. A).
For model HG00375B / HG00375C:
Fix the mounting plate 2 using the provided
rawlplugs 1 (ø 6 mm) and the provided
screws 3. Ensure that the arrow on the
marking of the mounting plate ( UP) is show-
ing vertically upward (Fig. A).
Note: The enclosed mounting material is
suitable for ordinary masonry construction.
Other wall substrates may require other fas-
tening materials. Seek specialist advice when
in doubt.
Set the ON / OFF switch 11 to the position
„ON“ to start the operation of the light (For
HG00375A, the ON/OFF switch is inside
the lamp shade 13 at the base. Open the
lamp shade to set the switch.) (Fig. G).
Note: In the „OFF“ position both the light
and the charging function are disabled.
For model HG00375A: Fix the light
onto the mounting plate using the provided
screws 12 (Fig. B).
For model HG00375B / HG00375C:
Attach the device to the mounting plate in
such a way that the hangers 4 of the
mounting plate grip in the receivers 5 on
the back of the device. Slide the device
downwards until the hangers click into
place in the receivers (Fig. B).

10 GB/IE
After mounting, check that the main unit is
fitted securely.
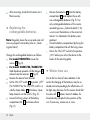
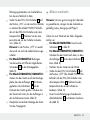
Replacing the
rechargeable batteries
Note: Regularly clean the sensor and solar cell
to ensure proper functionality (refer to „Clean-
ing and Care“).
Change the rechargeable batteries as follows:
For model HG00375A: Loosen the
screws
12
(Fig. B).
For model HG00375B / HG00375C:
Slide the device upwards until the hangers
4
release from the receivers 5 (Fig. B).
Remove the device from the wall.
Set the ON / OFF switch
11
to position „O
FF“
(For HG00375A, the ON/OFF switch is in-
side the lamp shade
13 at the base. Open
lamp shade to set the switch.) (Fig. G).
Loosen the fixing screws of the battery
compartment lid 8 and remove these
(Fig. D).
Remove the batteries 10 from the battery
compartment 9 and replace these with
new rechargeable batteries (Fig. E). Use
only rechargeable batteries of the recom-
mended type (see „Technical details“). Be
sure to insert the batteries in the correct di-
rection. It is indicated in the battery com-
partment.
Close the battery compartment by fixing the
b
attery compartment lid with the fixing screws.
Return the ON / OFF switch to the position
„ON“ before you return the device to the
hooks of the mounting plate.
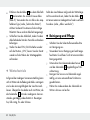
Winter-time use
Due to the low level of solar radiation in the
winter the charging of the batteries may be re-
duced and correspondingly the effectiveness of
the light may decrease. For this reason check that
the solar cell 6 remains clear of shadow for
the whole day, despite the low position of the
sun. If necessary, remove ice or snow.

11 GB/IE
If the light ON time is inadequate due to the
weather, recharge or replace the batteries 10
using an external charging device or replace
these (refer to „Charging batteries“).
Cleaning and Care
Before cleaning, switch the solar-powered
wall light off.
Use a slightly dampened, lint-free cloth and
mild cleaning agent to clean.
Regularly check the sensor 7 and solar
cell 6 particularly for dirt.
Regularly clean the sensor and solar cell to
ensure proper functionality.
Keep the solar cell free of snow and ice,
especially in winter.
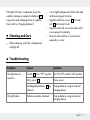
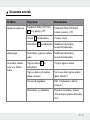
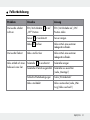
Troubleshooting
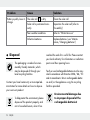
Problem Cause Solution
The light does not
switch on.
Switch 11 set to “OFF“ position Set ON / OFF switch to “ON” position
Dirty sensor 7Clean sensor
Rechargeable batteries 10 are
drained
Charge batteries using an external
charging device
The light flickers. Batteries are almost drained Charge batteries using an external
charging device

12 GB/IE
Problem Cause Solution
Battery quickly loses its
charge.
The solar cell 6 is dirty. Clean the solar cell
Solar cell is positioned incor-
rectly
Reposition the solar cell (refer to
“Assembly“)
Poor weather conditions Refer to “Winter-time use“
Defective batteries. Replace batteries (see “Mainte-
nance / Changing batteries“)
Disposal
The packaging is made of environ-
mentally friendly materials, which
may be disposed of through your
local recycling facilities.
Contact your local community or municipal ad-
ministration for more details on how to dispose
your worn-out product.
To help protect the environment, please
dispose of the product properly, and
not in household waste, when it has
reached the end of its useful life. Please contact
your local authority for information on collection
points and their opening hours.
Faulty or used rechargeable batteries must be recy-
cled in accordance with Directive 2006 / 66 / EC
and its amendments.
Return rechargeable batter-
ies and / or the appliance using the recycling
facilities provided.
Pb
Environmental damage due
to improper disposal of the
rechargeable batteries!

13 GB/IE
Never dispose of rechargeable batteries in your
household waste. They may contain toxic heavy
metals and are subject to hazardous waste reg-
ulations. The chemical symbols of the heavy
metals are: Cd = cadmium, Hg = mercury, Pb =
lead. Therefore dispose of used rechargeable
batteries through your local collection site.
Warranty
The device has been manufactured to strict
quality guidelines and meticulously examined
before delivery. In the event of product defects
you have legal rights against the retailer of this
product. Your legal rights are not limited in any
way by our warranty detailed below.
The warranty for this device is 3 years from the
date of purchase. Should this device show any
fault in materials or manufacture within 3 years
from the date of purchase, we will repair or re-
place it – at our choice – free of charge to you.
The warranty period begins on the date of pur-
chase. Please keep the original sales receipt in
a safe location. This document is required as your
proof of purchase. This warranty becomes void
if the device has been damaged or improperly
used or maintained.
The warranty applies to faults in material or man-
ufacture. This warranty does not cover product
parts subject to normal wear, thus possibly con-
sidered consumables (e.g. batteries) or for dam-
age to fragile parts, e.g. switches, rechargeable
batteries or glass parts.

14 PL
Zastosowanie zgodne z przeznaczeniem ............................................Strona 15
Opis części ........................................................................................................................Strona 15
Dane techniczne...........................................................................................................Strona 15
Zawartość.........................................................................................................................Strona 16
Ogólne wskazówki dot. bezpieczeństwa ............................................ Strona 16
Wskazówki dotyczące bezpieczeństwa użytkowania akumulatorów ..............................Strona 17
Funkcja ................................................................................................................................Strona 17
Montaż ................................................................................................................................Strona 18
Wymiana akumulatorów ...................................................................................................... Strona 19
Użytkowanie wokresie zimowym .......................................................................................Strona 20
Czyszczenie i pielęgnacja ....................................................................................Strona 20
Usuwanie usterek ......................................................................................................Strona 21
Utylizacja ..........................................................................................................................Strona 22
Gwarancja .......................................................................................................................Strona 22

15 PL
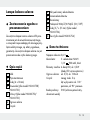
Lampa ledowo-solarna
Zastosowanie zgodne z
przeznaczeniem
Zewnętrzna lampa ścienna solarna LED prze-
znaczona jest do oświetlenia zewnętrznego,
wmiejscach nieposiadających własnego przy-
łącza elektrycznego, np. altany ogrodowe,
garaże itp. Zewnętrzna lampa solarna nie jest
przeznaczona do użytku komercyjnego.
Opis części
1 Kołki
2 Płyta montażowa
3 Śruby (4 x 30 mm)
4 Zawieszka (tylko model HG00375B/
HG00375C)
5 Uchwyt (tylko model HG00375B/
HG00375C)
6 Ogniwo solarne
7 Czujnik
8 Pokrywa komory akumulatorów
9 Komora akumulatorów
10 Akumulatory
11 Przełącznik WŁĄCZ/WYŁĄCZ (ON / OFF)
12 Śruby (3,7 x 5,5 mm) (tylko model
HG00375A)
13 Klosz (tylko model HG00375A)
Dane techniczne
Napięcie robocze: 3,6 V
Akumulator: 3 x akumulator NiMH
1,2 V , 900 mAh, AAA
Elementy świetlne: 4 diody LED, ok. 0,5 W
(diody LED są niewymienne.)
Ogniwo solarne: ok. 5,5 V, ok. 100 mA
Czujnik: zasięg: maks. 5 m,
kąt wykrywania: ok. 100°
poziomo, ok. 90° pionowo
Rodzaj ochrony: IP43 (ochrona przed natry-
skiwaniem wodą)

16 PL
Zawartość
Bezpośrednio po wypakowaniu należy spraw-
dzić, czy zestaw jest kompletny oraz czy urzą-
dzenie znajduje się w nienagannym stanie:
1 urządzenie główne
3 akumulatory NiMH typu AAA, 1,2 V ,
900 mAh (już wbudowane)
1 płyta montażowa
2 śruby (4 x 30 mm) (model HG00375A)
2 kołki ø 6 mm (model HG00375A)
2 śruby (3,7 x 5,5 mm) (model HG00375A)
3 śruby (4 x 30 mm) (model HG00375B /
model HG00375C)
3 kołki ø 6 mm (model HG00375B /
model HG00375C)
1 instrukcja montażu i obsługi
Ogólne wskazówki
dot. bezpieczeństwa
PRZED PIERWSZYM UŻYCIEM PRODUKTU
NALEŻY ZAPOZNAĆ SIĘ ZE WSZYSTKIMI
WSKAZÓWKAMI DOTYCZĄCYMI OBSŁUGI
IBEZPIECZEŃSTWA! W PRZYPADKU PRZE-
KAZANIA PRODUKTU INNEJ OSOBIE NA-
LEŻY DOŁĄCZYĆ DO NIEGO CAŁĄ JEGO
DOKUMENTACJĘ!
Niniejsze urządzenie może być używane
przez dzieci od lat 8 oraz przez osoby z
obniżonymi zdolnościami fizycznymi, senso-
rycznymi lub mentalnymi lub brakiem do-
świadczenia i/lub wiedzy, jeśli pozostają
pod nadzorem lub zostały pouczone w
kwestii bezpiecznego użycia urządzenia i
rozumieją wynikające z niego zagrożenia.
Dzieci nie mogą bawić się urządzeniem.
Czyszczenie i konserwacja nie mogą być
przeprowadzane przez dzieci bez nadzoru.
Nigdy nie należy pozostawiać dzieci bez
nadzoru zmateriałem opakowaniowym.
Istnieje niebezpieczeństwo uduszenia się
materiałem opakowaniowym. Dzieci często
nie dostrzegają niebezpieczeństwa.
Podczas montażu należy pilnować, aby
wpobliżu miejsca pracy nie było dzieci. W
zestawie znajduje się wiele śrub i innych

17 PL
małych elementów. W razie ich połknięcia
lub przedostania się do dróg oddechowych
mogą stanowić zagrożenie dla życia.
W razie stwierdzenia jakichkolwiek uszko-
dzeń nie używać urządzenia!
Wskazówki dotyczące
bezpieczeństwa użytko-
wania akumulatorów
ZAGROŻENIE ŻYCIA!
Akumulatory nie powinny dostać się w ręce
dzieci. W przypadku połknięcia należy natych-
miast udać się do lekarza!
OSTROŻNIE!
NIEBEZPIECZEŃSTWO
WYBUCHU!
Nigdy nie należy wrzucać akumulatorów
do ognia lub wody!
Należy chronić akumulatory przed obcią-
żeniem mechanicznym!
Nie używać baterii, których nie można
ponownie ładować.
Akumulatorów nie należy zwierać ani/lub
otwierać.
Niebezpieczeństwo uszkodzenia
urządzenia
Używać wyłącznie zalecanego rodzaju
akumulatorów!
Podczas wkładania baterii do urządzenia
należy zwrócić uwagę na prawidłowe
ułożenie biegunów! Jest ona oznaczona
wkomorze akumulatorów!
Wrazie potrzeby przed włożeniem baterii
oczyścić ich styki istyki urządzenia!
Funkcja
Ogniwo solarne
Ogniwo solarne 6 przetwarza energię świetlną
słońca na energię elektryczną. W ten sposób w
komorze akumulatorów 9 ładowane są wbu-
dowane akumulatory 10 .
Akumulatory magazynują energię dostarczoną
przez ogniwo solarne. Cąłkowicie naładowane
akumulatory dostarczają około 6 godzin

18 PL
światła, jeśli przełącznik WŁĄCZ/WYŁĄCZ 11
znajduje się na pozycji „ON“.
Całkowite naładowanie zupełnie rozładowa-
nych akumulatorów trwa w lecie przy dobrym
nasłonecznieniu około 1 do 2 dni.
Czujnik
Podczas zmierzchu lub ciemności czujnik 7 re-
jestruje zmianę kąta promieniowania cieplnego
wydzielanego przez osoby, które poruszają się
przy czujniku (rys. I). Jeśli czujnik wykryje poru-
szającą się osobę, światło włączy się. Światło
gaśnie po ok. 1 minucie od wykrycia ostatniego
ruchu przez czujnik.
Montaż
Podczas wyboru miejsca montażu należy
zwracać uwagę na następujące czynniki:
1. Ogniwo solarne 6 wymaga możliwie naj-
bardziej bezpośredniego promieniowania
słonecznego. Optymalne jest ustawienie
powierzchni ogniwa solarnego wkierunku
południowym. Poziome ustawienie ogniwa
solarnego wyznaczane jest przez montaż
na pionowej ścianie.
2. Zakres detekcji czujnika 7 wynosi (w zależ-
ności o wysokości zamontowania, optymalna
wysokość to 2 m) maks. 5 m, przy kącie de-
tekcji wpoziomie 100° iwpionie 90°.
3. Należy zwracać uwagę, aby nocą czujnik
nie był oświetlany przez oświetlenie uliczne.
Może to wpłynąć na jegho działanie.
Dla modelu HG00375A: Zamocować
płytkę montażową 2 za pomocą dołączo-
nych kołków (6 mm) 1 i śrub 3 (rys. A).
Dla modelu
HG00375B / HG00375C: Zamocować
płytkę montażową 2 za pomocą dołączo-
nych kołków (6 mm) 1 i śrub 3. Uważać
na to, aby strzałka na oznaczeniu płytki
montażowej ( UP) wskazywała w górę
(rys. A).
Uwaga: Dołączone elementy montażowe
przeznaczone są do mocowania na typo-
wym murze. Wprzypadku innych podłoży
mogą być potrzebne inne elementy mocu-

19 PL
jące. Wrazie wątpliwości należy
zasięgnąć porady specjalisty.
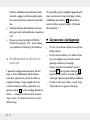
Ustawić przełącznik WŁĄCZ/WYŁĄCZ 11
na pozycji „ON“, aby uruchomić lampę.
(Dla modelu HG00375A przełącznik
WŁĄCZ/WYŁĄCZ znajduje się pod klo-
szem 13 . Zdjąć klosz, aby uruchomić
przełącznik.) (Rys. G).
Wskazówka: W pozycji „OFF“ wyłą-
czona jest funkcja lampy, jak i ładowania.
Dla modelu HG00375A: Zamocować
lampę za pomocą dołączonych śrub 12 na
płytce montażowej (rys. B).
Dla modelu HG00375B / HG00375C :
Nałożyć urządzenie na płytkę montażową
w taki sposób, aby zawieszki 4 płyty
montażowej sięgały w uchwyty 5 po dru-
giej stronie urządzenia. Przesunąć urządze-
nie w dół, aby zawieszki zatrzasnęły się w
uchwytach (rys. B).
Po zamontowaniu należy sprawdzić, czy
urządzenie główne jest stabilnie zamoco-
wane.
Wymiana akumulatorów
Wskazówka: Aby zapewnić wydajne dzia-
łania ogniwa solarnego, należy je regularnie
czyścić (patrz „Czyszczenie i pielęgnacja“).
Aby wymienić akumulatory, należy wykonać
następujące kroki:
Dla modelu HG00375A: Odkręcić
śruby 12 (patrz rys. B).
Dla modelu HG00375B / HG00375C :
Przesunąć urządzenie górę, aby wysunąć-
zawieszki 4 z uchwytów 5 (rys. B).
Zdjąć urządzenie ze ściany.
Ustawić przełącznik WŁĄCZ/WYŁĄCZ 11
na pozycji „OFF“ (Dla modelu HG00375A
przełącznik WŁĄCZ/WYŁĄCZ znajduje się
pod kloszem 13 . Zdjąć klosz, aby urucho-
mić przełącznik.) (Rys. G).
Odkręcić śruby mocujące pokrywy komory
akumulatorów 8 i zdjąć ją (rys. D).
Wyjąć akumulatory 10 w komory akumula-
torów 9 i wymienić je na nowe (rys. E).
Używać wyłącznie akumulatorów zaleca-
nego typu (patrz „Dane techniczne“).
Seite wird geladen ...
Seite wird geladen ...
Seite wird geladen ...
Seite wird geladen ...
Seite wird geladen ...
Seite wird geladen ...
Seite wird geladen ...
Seite wird geladen ...
Seite wird geladen ...
Seite wird geladen ...
Seite wird geladen ...
Seite wird geladen ...
Seite wird geladen ...
Seite wird geladen ...
Seite wird geladen ...
-
 1
1
-
 2
2
-
 3
3
-
 4
4
-
 5
5
-
 6
6
-
 7
7
-
 8
8
-
 9
9
-
 10
10
-
 11
11
-
 12
12
-
 13
13
-
 14
14
-
 15
15
-
 16
16
-
 17
17
-
 18
18
-
 19
19
-
 20
20
-
 21
21
-
 22
22
-
 23
23
-
 24
24
-
 25
25
-
 26
26
-
 27
27
-
 28
28
-
 29
29
-
 30
30
-
 31
31
-
 32
32
-
 33
33
-
 34
34
-
 35
35


LIVARNO 273024 Bedienungsanleitung
- Kategorie
- Baby Nachtlichter
- Typ
- Bedienungsanleitung
in anderen Sprachen
- English: LIVARNO 273024 Owner's manual
- polski: LIVARNO 273024 Instrukcja obsługi
Verwandte Artikel
-
LIVARNO 388035 Bedienungsanleitung
-
-
-
-
-
-
-
-
-