
00053301/11.08
All listed brands are trademarks of the corresponding companies. Errors and omissions excepted,
and subject to technical changes. Our general terms of delivery and payment are applied.
Hama GmbH & Co KG
D-86651 Monheim/Germany
www.hama.com

Express Card
eSata, 1-fach
eSata, 1 port
eSata, simple
COMPUTER
00053301

2
Inhalt:
1. Verpackungsinhalt
2. Hardwareinstallation
3. Softwareinstallation
3.1 Windows 2000/XP
3.2 Windows Vista
4. Kontakt und Supportinformationen
1. Verpackungsinhalt
• eSATA Express Karte
• Treiber CD
• Installationsanleitung
2. Hardware-Installation
Starten Sie Ihr Notebook und setzen Sie anschließend
die eSATA Express Karte in den ExpressCard Slot Ihres
Notebooks ein.
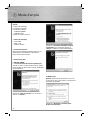
3. Treiberinstallation
3.1 Windows 2000/XP
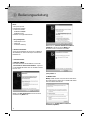
Nach dem Hochfahren des Notebooks erscheint der
„Assistent für das Suchen neuer Hardware“. Legen Sie
nun die beiliegende Treiber-CD in das CD-Rom Laufwerk
Ihres PC´s ein.
Wählen Sie „Nein, diesmal nicht“ und fahren Sie mit
einem Klick auf „Weiter“ fort.
Wählen Sie nun „Software automatisch installieren
(empfohlen)” und fahren Sie mit „Weiter“ fort.
Der Treiber wird nun automatisch installiert.
Schließen Sie die Installation mit einem Klick auf
„Fertig stellen“ ab.
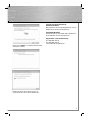
3.2 Windows Vista
Wichtig: Stellen Sie bitte sicher, das der PC keine Verbin-
dung zum Internet hat, legen Sie anschließend die Treiber
CD in das CD-Rom Laufwerk ein.
Wählen Sie nun „Treibersoftware suchen und
installieren (empfohlen)”.
d
Bedienungsanleitung

3
g
Operating Instruction
Klicken Sie auf „Weiter“ anschließend wird der Treiber
automatisch installiert.
Die Karte wurde korrekt installiert und kann nun
verwendet werden. Starten Sie Ihr Notebook neu.
4. Kontakt- und Supportinformationen
Bei defekten Produkten:
Bitte wenden Sie sich bei Produktreklamationen an Ihren
Händler oder an die Hama Produktberatung.
Internet/World Wide Web
Produktunterstützung, neue Treiber oder Produktinforma-
tionen bekommen Sie unter www.hama.com
Support Hotline – Hama Produktberatung:
Tel. +49 (0) 9091 / 502-115
Fax +49 (0) 9091 / 502-272
e-mail: [email protected]

4
Contents:
1. Package contents
2. Installing the hardware
3. Installing the software
3.1 Windows 2000/XP
3.2 Windows Vista
4. Contact and support information
1. Package contents
• eSATA Express Card
• Driver CD
• Installation instructions
2. Installing the hardware
Start your laptop and then place the eSATA Express
Card in the ExpressCard slot of your laptop.
3. Installing the driver
3.1 Windows 2000/XP
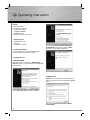
After the laptop has booted up, the „New Hardware
Assistant“ appears. Insert the driver CD into the CD ROM
drive of your PC.
Choose „No, not this time“ and then click „Next“.
Now choose „Install the software automatically
(recommended)“ and continue by clicking „Next“.
The driver is now installed automatically.
To complete the installation, click „Finish“.
3.2 Windows Vista
Important: Ensure that the PC is not connected to the
Internet and then insert the driver CD into the CD-ROM
drive.
Now choose „Locate and install driver software
(recommended)“.
g
Operating Instruction

5
Choose „Next“ and the driver is then installed
automatically.
The card has been installed correctly and can now
be used. Restart your laptop.
4. Support and Contact Information
If products are defective:
Please contact your dealer or Hama Product Consulting if
you have any product claims.
Internet / World Wide Web:
Product support, new drivers or product information can
be found at www.hama.com
Support Hotline – Hama Product Consulting:
Tel. +49 (0) 9091 / 502-115
Fax +49 (0) 9091 / 502-272
E-mail: [email protected]

6
Contenu :
1. Contenu de l‘emballage
2. Installation du matériel
3. Installation du logiciel
3.1 Windows 2000/XP
3.2 Windows Vista
4. Contact et support technique
1. Contenu de l‘emballage
• Carte eSATA
• Pilote sur CD
• Guide d’installation
2. Installation du matériel :
Démarrez votre ordinateur portable et insérez la carte
eSATA (ExpressCard eSATA) dans l’emplacement
ExpressCard de votre ordinateur.
3. Installation du pilote
3.1 Windows 2000/XP
L‘ « assistant de recherche de nouveau périphérique »
apparaît sur votre écran après le démarrage du système.
Insérez le pilote sur CD fourni dans le lecteur de CD-ROM
de votre ordinateur.
Sélectionnez « Non, pas cette fois », puis continuez en
cliquant sur « Suivant ».
Sélectionnez « Installation automatique du logiciel
(recommandé) », puis continuez en cliquant sur
« Suivant ». Le pilote est installé automatiquement.
Quittez l‘installation en cliquant sur « terminer ».
3.2 Windows Vista
Important : Vérifi ez que votre ordinateur n’est pas con-
necté à internet, puis insérez le pilote sur CD fourni dans
votre lecteur de CD-ROM.
Sélectionnez « Rechercher et installer le pilote
du logiciel (recommandé) ».
f
Mode d‘emploi

7
g
Operating Instruction
Cliquez sur « Suivant » ; le pilote est installé
automatiquement.
La carte a été correctement installée et peut être utilisée.
Redémarrez votre ordinateur.
4. Support technique et contact
En cas d’appareil défectueux :
En cas de réclamation concernant le produit, veuillez
vous adresser à votre revendeur ou au département
conseil produits de Hama.
Internet / World Wide Web
Notre support technique, les nouveaux pilotes et les
informations produits sont disponibles sous :
www.hama.com
Ligne téléphonique directe d’assistance – Conseil
produits Hama :
Tél. +49 (0) 9091 / 502-115
Fax +49 (0) 9091 / 502-272
e-mail : [email protected]

8
996350_Infoblatt_Entsorgung_NEU.1 1 10.11.2008 14:31:10 Uhr

9
g
Operating Instruction
996350_Infoblatt_Entsorgung_NEU.2 2 10.11.2008 14:31:12 Uhr
-
 1
1
-
 2
2
-
 3
3
-
 4
4
-
 5
5
-
 6
6
-
 7
7
-
 8
8
-
 9
9
-
 10
10


Hama 1 port Operating
- Typ
- Operating
- Dieses Handbuch eignet sich auch für
in anderen Sprachen
- English: Hama 1 port
- français: Hama 1 port
Verwandte Artikel
-
Hama 00053301 Bedienungsanleitung
-
-
-
-
-
-
-
Hama 00053161 Bedienungsanleitung
-
-