
IAN 367512_2101
KFZ
- BATTERIELADEGERÄT
MIT STARTHILFEFUNKTION
Bedienungs- und Sicherheitshinweise
Originalbetriebsanleitung
DE AT CH
OS
CAR BATTERY CHARGER &
JUMP STARTER
Operation and Safety Notes
Translation of the original instructions
GB IE NI CY MT
CHARGEUR DE BATTERIE
POUR VOITURE AVEC
FONCTION D’AIDE AU DÉMAR-
RAGE
Consignes d’utilisation et de sécurité
Traduction du mode d’emploi d‘origine
FR BE CH
AUTO-ACCUOPLADER MET
STARTHULPFUNCTIE
Bedienings- en veiligheidsinstructies
Vertaling van de originele bedieningshandleiding
NL BE
AUTONABÍJEČKA S FUNKCÍ
POMOCNÉHO STARTOVÁNÍ
Návodkobsluzeabezpečnostnípokyny
Originálnínávodkobsluze
CZ
PROSTOWNIK DO AKUMULATORÓW
SAMOCHODOWYCH Z FUNKCJĄ
WSPOMAGANIA ROZRUCHU
Wskazówkidotyczącemontażu,obsługii
bezpieczeństwa
Tłumaczenieoryginalnejinstrukcjieksploatacji
PL
AUTONABÍJAČKA S FUNKCIOU
POMOCNÉHO ŠTARTOVANIA
Návodnaobsluhuabezpečnostnéupozornenia
Originálnynávodnaobsluhu
SK
CARGADOR DE BATERÍA PARA
COCHE CON FUNCIÓN AUXILIAR
DE ARRANQUE
Instruccionesdefuncionamientoydeseguridad
Traduccióndelmanualdefuncionamientooriginal
ES
BATTERIOPLADER MED STARTH-
JÆLPFUNKTION
Oversættelseafdenoriginaledriftsvejledning
DK
CAR BATTERY CHARGER & JUMP STARTER ULG 17 A1
KFZ-BATTERIELADEGERÄT MIT STARTHILFEFUNKTION ULG 17 A1
CHARGEUR DE BATTERIE POUR VOITURE AVEC FONCTION D’AIDE AU
DÉMARRAGE ULG 17 A1

GB IE NI CY MT
Before reading, unfold the page containing the illustrations and familiarise yourself with all
functions of the device.
DE AT CH
Klappen Sie vor dem Lesen die Seite mit den Abbildungen aus und machen Sie sich
anschließend mit allen Funktionen des Gerätes vertraut.
FR BE CH
Avant de lire le document, allez à la page avec les illustrations et étudiez toutes les fonctions
de l’appareil.
NL BE
Klap, voordat u begint te lezen, de pagina met afbeeldingen uit en maak u aansluitend
vertrouwd met alle functies van dit apparaat.
CZ
Nežzačnetečísttentonávodkobsluze,rozložtestránkusobrázkyaseznamtesesevšemifunkcemi
zařízení.
PL
Przedprzeczytaniemproszęrozłożyćstronęzilustracjami,anastępnieproszęzapoznaćsięz
wszystkimifunkcjamiurządzenia.
SK
Prvnežzačnetečítaťtentonávod,rozložtesistranusobrázkamiapotomsaoboznámtesovšetkými
funkciamizariadenia.
ES
Antes de leer, abra la página con las ilustraciones y familiarícese con todas las funciones
del dispositivo.
DK
Før du læser, vend siden med billeder frem og bliv bekendt med alle apparatets funktioner.
GB / IE /NI /CY/MT Operation and Safety Notes Page 5
DE / AT / CH Montage-, Bedienungs- und Sicherheitshinweise Seite 19
FR / BE / CH Consignes d’utilisation et de sécurité Page 33
NL / BE Bedienings- en veiligheidsinstructies Pagina 49
CZ Návodkobsluzeabezpečnostnípokyny Strana 63
PL Wskazówkidotyczącemontażu,obsługiibezpieczeństwa Strona 77
SK Návodnaobsluhuabezpečnostnéupozornenia Strana 93
ES Instrucciones de funcionamiento y de seguridad Página 107
DK Brugs- og sikkerhedsanvisninge Side 123

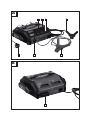
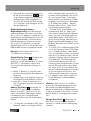
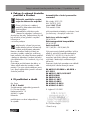
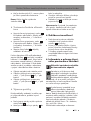
A
B
1 2 3 4
567
8


5GB/IE/NI/CY/MT
Table of pictograms used ............................................................................... Page 6
Introduction ........................................................................................................... Page 6
Intended use ............................................................................................................. Page 6
Package contents ...................................................................................................... Page 7
Parts description ....................................................................................................... Page 7
Technical specifications ............................................................................................ Page 7
Safety instructions .............................................................................................. Page 8
Operation ............................................................................................................... Page 11
Product properties ..................................................................................................... Page 11
Connecting to use the charging modes .................................................................... Page 11
Disconnect after using the loading modes ................................................................ Page 12
Select charging mode and start charging process.................................................... Page 12
Using the jump-start function ..................................................................................... Page 13
Alternator test function .............................................................................................. Page 14
Replacing the fuse .................................................................................................... Page 15
Maintenance and care ..................................................................................... Page 15
Information about recycling and disposal ............................................. Page 15
EU Declaration of Conformity ....................................................................... Page 15
Warranty and service information ............................................................ Page 16
Warranty conditions ................................................................................................. Page 16
Warranty period and statutory claims for defects .................................................... Page 16
Extent of warranty .................................................................................................... Page 16
Processing of warranty claims .................................................................................. Page 17
Table of contents

6 GB/IE/NI/CY/MT
Car battery charger & jump
starter ULG 17 A1
zIntroduction
Congratulations!
Y
ou have purchased one
of our high-quality products.
Please familiarise yourself with the
product before setup or first use. Read
the following original operating and
safety instructions carefully. This product
must be set up or used only by people who
have been trained to do so.
z Intended use
The Ultimate Speed ULG 17 A1 is a car
battery charger with pulse maintenance
charge (chip software), used for charging
and maintenance charging and suitable
for the following 6 V or 12 V-lead
rechargeable batteries (batteries)
with electrolyte solution, AGM batteries,
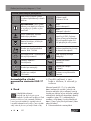
Table of pictograms used / Introduction
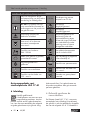
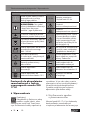
Table of pictograms used
Read the operating instructions
of this product attentively and
with care before use. ~50 Hz Alternating voltage with
a frequency of 50 Hz
NOTE: This symbol indicates
additional information and
explanations on the product
and its use.
Caution! Possible risks!
Caution! Explosion hazard!
Caution! Risk of electric shock! Protection class IP20:
Protection from the device
housing against touching live
or internal moving parts with
the fingers.
Dispose of the batteries in the
specified battery collection
points.
Suitable for lead-acid battery:
8 Ah – 250 Ah
Do not dispose of any
electrical devices in domestic
waste!
Only for use in closed,
ventilated rooms!
Dispose of packaging prop-
erly.
Do not dispose of the device in
household waste!
Packaging material –
corrugated paper Suitable for cars
Suitable for motorbikes Suitable for the charging
of 6-V batteries
Suitable for the charging
of 12-V batteries Made from recycling material

7GB/IE/NI/CY/MT
Introduction
lead-acid batteries, deep –
cycle (boat
batteries) or gel batteries:
For car and motorcycle batteries with
12 V/6 V and 8-250Ah capacity
You can also regenerate discharged batteries
(depending on the battery type). The car
battery charger has a safety circuit against
sparking and overheating. Keep these instruc-
tions in a safe place. Ensure you hand over
all documentation when passing the product
on to anyone else. Any use that differs to the
intended use as stated above is prohibited
and potentially dangerous. Damage or injury
caused by misuse or disregarding the above
warning is not covered by the warranty or
any liability on the part of the manufacturer.
The device is not intended for commercial
use. Commercial use will void the guarantee.
Note: The car battery charger cannot charge
any electrical vehicles with
integrated rechargeable battery.
Note: No jumpstart of 6-V batteries possible.
zPackage contents
Check the scope of delivery and
the device as well as all parts for
damage right after unpacking.
Do not put a defective unit or
defective parts into operation.
1 Car battery charger Ultimate Speed
ULG 17 A1
2 Quick contact connection terminals
(1 red, 1 black)
1 original operating instructions
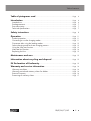
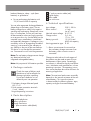
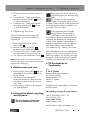
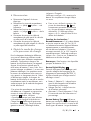
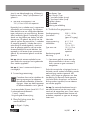
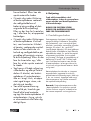
zParts description
1
Digital display button
2
Battery type button
3
Charge start button
4
“–” pole connection cable (black)
5
“+” pole connection cable (red)
6
Digital display
7
Mains cable
8
Fuse with cover
zTechnical specifications
Input voltage: 230V~ 50Hz
Return current*: < 5mA
(no AC input)
Nominal output voltage: 6V/12V
Charge current: 2A, 6A,
17 A ± 10%
Battery type with: 12V/6V and
8-250Ah capacity
Housing protection type: IP 20
* = Return current means the current that
the car battery charger consumes from
the battery when no mains current is
connected.
Changes to technical and visual aspects of
the product may be made as part of future
developments without notice. Accordingly,
no warranty is offered for the physical dimen-
sions, information and specifications in these
operating instructions. The operating instruc-
tions cannot therefore be used as the basis for
asserting a legal claim.
Note: The maximum load current essentially
depends on the internal resistance of the con-
nected battery. This internal resistance
is determined by the following factors: ages,
capacity and type of connected battery.

8 GB/IE/NI/CY/MT
Safety instructions
zSafety instructions
KEEP OUT OF THE REACH OF
CHILDREN!
DANGER! Avoid danger to
life and danger of injury from
improper use!
CAUTION! Do not operate
the device with a damaged
cable, mains cable or mains
plug. Damaged mains cables
pose danger to life from elec-
tric shock.
In case of damage, the mains
cable must only be repaired
by authorized and trained
specialists! Contact the service
point of your country if you
need any repair!
DANGER OF ELECTRIC
SHOCK! Ensure that
the vehicle is not in operation
if the battery is installed firmly
in the vehicle! Switch off the
ignition and put the vehicle
into the parking position, with
the parking brake engaged
(e.g. car) or the rope attached
(e.g. electric boat)!
DANGER OF ELECTRIC
SHOCK! Disconnect
the car battery charger from
the mains before removing
the connection terminals.
Connect the connection termi-
nal that is not connected to the
car body first.
Connect the other connection
terminal to the car body
away from the battery and
the gasoline line.
Connect the car battery
charger to the supply grid
only thereafter.
Disconnect the car battery
charger from the supply grid
after charging.
Only then disconnect the
connection terminal from the
car body. Then disconnect the
connection terminal from the
battery.
DANGER OF ELECTRIC
SHOCK! Only touch
the pole connection cables
(“–” and “+”) in the insulated
area!
DANGER OF ELECTRIC
SHOCK! Conduct the
connection to the battery and
the socket of the mains grid
completely protected from
moisture!
DANGER OF ELECTRIC
SHOCK! Perform
installation, servicing and
maintenance of the car battery
charger only when the mains
current is not connected!
DANGER OF ELECTRIC
SHOCK! First discon-
nect the minus pole connection

9GB/IE/NI/CY/MT
Safety instructions
cable (black) of the car battery
charger from the minus pole
of the battery upon completing
the charging and maintenance
charging process if the battery
is continually connected in the
vehicle.
Do not leave any toddlers or
children unsupervised around
the car battery charger!
Children cannot assess possi-
ble dangers in use of electrical
devices. Children must be
supervised to ensure that they
do not play with the device.
This device may be used by
children aged 8 years and
older, and by persons with
reduced physical, sensory or
mental capacities, or a lack
of experience and knowledge,
if they are supervised or have
been instructed in how to use
the device safely and under-
stand the dangers that may arise
when using it. Do not allow
children to play with the device.
Cleaning and day-to-day mainte-
nance must not be performed by
children without supervision.
EXPLOSION
HAZARD! Protect
yourself from highly explosive
oxyhydrogen reactions!
Gaseous hydrogen can escape
during charging or mainte-
nance charging of the battery.
Oxyhydrogen
is a potentially
explosive mixture
of gaseous
hydrogen and oxygen. The
oxyhydrogen reaction occurs
at contact with open fire
(flames, smouldering or sparks)!
Perform charging and
maintenance charging in a
weather-protected space that
is ventilated well. Ensure that
there are no open light
(flames, embers or sparks)
during charging or mainte-
nance charging!
EXPLOSION AND FIRE
HAZARDS! Ensure that
explosive or flammable
substances, such as gasoline
or solvents cannot be ignited
when you are using the car
battery charger!
EXPLOSIVE GASES!
Avoid flames and sparks!
Ensure sufficient ventilation
when charging.
Put the battery onto a well-
ventilated surface when
charging. Otherwise, the
device can be damaged.
EXPLOSION
HAZARD! Ensure that
the plus-pole connection cable
has no contact with a fuel line
(e.g. petrol line)!

10 GB/IE/NI/CY/MT
DANGER OF CAUSTIC
BURNS!
Protect your eyes and skin from
caustic burns from the acid
(sulphuric acid) when it comes
into contact with the battery!
Use acid-resistant safety
goggles, clothing and gloves!
If your eyes or skin have come
into contract with the sulphuric
acid, flush the affected body
region with plenty of clear, run-
ning water and seek
medical advice at once!
Avoid electrical short circuits
when connecting the car
battery charger to the battery.
Only connect the minus pole
connection cable to the minus
pole of the battery or the car
body. Only connect the plus
pole connection cable to the
plus pole of the battery!
Prior to connecting the mains
current, ensure that the mains
current is properly equipped
with 230 V~ 50 Hz, an
earthed zero conductor and
an FI-switch (fault-circuit
interrupter)! Otherwise, the
device can be damaged.
Do not use the car battery
charger near any fires, heat
and long-term temperatures
above 50°C! For higher
temperatures, the output power
of the car battery charger will
drop automatically.
Only use the car battery
charger with the original
parts it was delivered with!
Do not cover the car battery
charger with any objects!
Otherwise, the device can
be damaged.
Protect the electrical contact
surfaces of the battery from
short circuit!
Only use the car battery
charger for the charging and
maintenance charging of
undamaged 6V-/12V-lead
batteries (with electrolyte
solution or gel)! Otherwise,
property damage may be the
consequence.
Do not use the car battery
charger for the charging and
maintenance charging of
non-rechargeable batteries.
Otherwise, property damage
may be the consequence.
Do not use the car battery
charger for the charging and
maintenance charging of
damaged or frozen batteries!
Otherwise, property damage
may be the consequence.
Please refer to the original
operating instructions about
the maintenance of your
battery prior to connecting
Safety instructions

11GB/IE/NI/CY/MT
Safety instructions / Operation
the car battery charger!
Otherwise, there is a danger
of injury and/or the risk of
damage to the device.
Before connecting the car
battery charger to a battery
that is continually connected
to the vehicle, learn about
compliance with the electrical
safety and maintenance in the
original operating instructions
of the vehicle! Otherwise,
there is a danger of injury
and/or the risk of property
damage.
Disconnect the car battery
charger from the mains current
when it is not in use to protect
the environment as well! Note
that power is also consumed in
the standby operation.
Always pay attention and be
aware of what you are doing.
Proceed reasonably and do
not put the car battery charger
into operation when you are
not focused or not feeling well.
zOperation
Always disconnect the mains plug
from the socket before perform any
work on the car battery charger or if
you leave the unit unattended.
DANGER OF ELECTRIC SHOCK!
DANGER OF PROPERTY DAMAGE!
DANGER OF INJURY!
zProduct properties
This device is designed for charging many
SLA batteries (sealed lead-acid batteries),
which are mostly used in cars, motorcycles
and some other vehicles. They can be,
e.g., WET (with liquid electrolyte), GEL
(with electrolyte gel) or AGM batteries
(with electrolyte-absorbent mats). A special
design of the device (also called a “three-
stage charging strategy”) permits recharging
of the battery to nearly 100% of its capacity.
The battery may also be permanently
connected to the car battery charger in order
to keep it in optimal condition at all times.
Furthermore, the battery charger has an
integrated temperature sensor in the device
in order to safely charge the battery to full
even in cold weather (e.g. in the winter).
The device measures the ambient temperature
and automatically sets the optimal charging
voltage.
Note: The ambient temperature is measured
in the charger. Hence, for optimum function,
make sure the battery exhibits the same
temperature as the environment.
zConnecting to use the
charging modes
Disconnect the minus pole connection
cable (black) of the vehicle from the minus
pole of the battery first before charging
and maintenance charging if the battery
is continually connected in the vehicle.
The minus pole of your battery is usually
connected to the car body of the vehicle.
Then disconnect the plus pole connection
cable (red) of the vehicle from the plus
pole of the battery.
Only then connect the “+” pole quick con-
tact connection terminals (red)
5
of the
car charger to the “+”-pole of the battery.
Connect the “–”-pole quick contact-con-
nection terminal (black)
4
to the “–”-pole

12 GB/IE/NI/CY/MT
Operation
of the battery. Connect the mains cable
7
of the car charger to the socket.
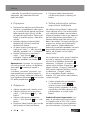
Note: If the connection terminals are
connected correctly, the digital display
6
indicates the voltage and the “connected”
display lights up. In the event of reverse
polarity, the display will show 0.0 and the
reverse polarity LED will light up in
red in the digital display
6
.
zDisconnect after using the
loading modes
Disconnect the device from the mains cur-
rent.
Disconnect the “–”-pole quick con-
tact-connection terminal (black) 4 from
the “–”-pole of the battery.
Disconnect the “+”-pole quick contact-
connection terminal (red)
5
from the
“+”-pole of the battery.
Reconnect the plus pole connection
cable of the battery to the plus pole
of the battery.
Reconnect the minus pole connection
cable of the battery to the minus pole
of the battery.
zSelect charging mode
and start charging process
You can choose from different charging
modes to charge different batteries.
As compared to conventional car battery
chargers, this device has a special function
for reuse of a flat battery/rechargeable
battery. You can recharge a completely
discharged battery/rechargeable battery.
Protection against wrong connection and
short circuit ensures safe charging. The
integrated electronics do not start the car
battery charger at once after connection of
the battery, but only after a charging mode
has been selected.
If the connection terminals are connected to
the battery and the device is connected to
the mains, the digital display
6
will show
the “Connected” display. Once the charging
mode has been selected with the
charge
start button
3
, the “Charging” display will
light up. When charging is complete, the
“Charged” display lights up.
If the digital display “0.0” is continually lit
before the battery is completely charged,
there is a defect.
In this case, check again if the connection
terminals
4
,
5
are correctly attached to
the battery and whether the correct bat-
tery type has been chosen. If the display
continually shows “0.0”, there may be a
defect in the battery.
Reactivation function /
reconditioning: If a voltage between
8.5 V and 10.5 V is detected in the connect-
ed battery, the device will automatically start
a reconditioning process in order to reactivate
the battery. If a voltage between 8.5 V and
10.5 V is measured after the reconditioning
process, then “Err” will be shown on the
digital display. In this case, the battery is
faulty and must be replaced.
Note: This function is only available
for 12V batteries.
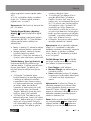
Digital display button
1
: Enables the
switch between the digital display of the
voltage and charging progress in percent
(BATTERY %). Use this button to switch
between the following displays:
Battery %: shows the charging progress
of the connected battery in percent.
Voltage: shows the voltage of the
connected battery.
Alternator % check: Output power of the
alternator in percent.
Battery type button
2
: Use this button
to set the battery type to be charged. You

13GB/IE/NI/CY/MT
Operation
can choose between different battery types.
The battery type must be correctly set before
starting the charging process:
12 V – regular: These batteries (lead-acid
batteries) are usually used in cars, trucks
and motorcycles. They have venting caps
and are often marked as “low-mainte-
nance” or “no maintenance”. This battery
type is meant for transferring energy
quickly (e.g. starting an engine).
“Regular” batteries should not be
used for “Deep – Cycle” applications.
12 V Deep Cycle: These batteries are
usually also marked as “Deep – Cycle”
or “Marine”. Batteries of this type are
usually larger than other battery types.
This supplies less short-term energy,
but a longer-term energy transmission.
These batteries can withstand a large
number of discharge cycles.
12 V – AGM/gel: The AGM battery
types are usually good deep – cycle bat-
teries. They have the best “service life”
when they are recharged before they
have been discharged by more than
50%. At complete discharge they can
withstand about 300 charge cycles.
The battery type GEL is similar to the
battery type AGM. The voltage during
recharging is lower than in other lead-
acid batteries. If you use the wrong car
battery charger for a gel battery,
a reduced output or shorter service life
can be expected.
6 V – regular: Choose this mode for
commercial rechargeable 6-V batteries.
Note: If you connect a 12 V car battery
to a car battery charger and the car battery
charger automatically detects it as a 6V
battery, it can be assumed that this 12V car
battery is faulty and needs to be replaced.
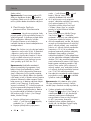
Charge-start button
3
: Use this button
to switch between the following options and
start the charging process:
Fast Charge: fast charging
Normal charge: normal charging
(normal speed)
Start: briefly supplies 75 Ampere to
bridge batteries with a weak charge
or flat 12 V batteries for the purpose
of starting the engine
Note: In the Fast Charge mode the charger
automatically switches to maintenance
charging after a successful charging process
(the “Charged” LED lights up in green in the
digital display
6
), provided the car battery
charger remains connect to the battery and
mains current.
Attention: Mode can only be terminated
by pulling the mains plug
7
or by
repeatedly pressing the charge start button
3
(repeated pressing until no mode is
displayed).
Note: If the “Charged” LED in the digital
display
6
lights up in green, the battery
is sufficiently charged and a repeated fast
or normal charging process is no longer
permitted.
zUsing the jump-start
function
Always make all connections
as described and in the proper order. Other-
wise, the electronic system of the vehicle can
be damaged.
If proceeding contrary to the specifications
described, you will act at your own risks and
responsibility.
Attention:
This function is not suitable for
batteries below 45 Ah. For batteries below
45 Ah, this function may damage the battery.
For diesel vehicles and large-volume gasoline
motors, higher currents than 75 A are needed
for starting at times.
Note: The car battery charger has an analysis

14 GB/IE/NI/CY/MT
Operation
program that protects the battery from dam-
age, particularly for the jump-start function
(e.g. sulphatisation, excessive voltage drops).
If the batteries are discharged very strongly or
subject to very high stress the device will not
activate the jump-starter to protect the battery.
During this process, the battery is already
being charged at low currents (charging is
lit). The display then stays at “0”. In this case,
jump starting is not possible. This protects the
battery from damage. The battery should be
charged first. The function “Fast Charge” or
“Normal Charge” can be used for this.
Connect the “+” pole quick contact
connection terminals (red)
5
of the car
charger to the “+”-pole of the battery.
Connect the “–”-pole quick contact-
connection terminal (black)
4
to the
“–”-pole of the battery. Connect the mains
cable
7
of the car charger to the socket.
If the connection terminals are correctly
connected, the car battery charger will
automatically choose the correct 6 V or
12V voltage. You may review the battery
type in the “Battery Type“ option field and
if necessary change it by pressing the
battery type button
2
.
Now use the Charge-Start button
3
to
select the function “Start”. The car battery
charger now analyses the charge condi-
tion of the battery. The display will now
read “0“.
Now actuate the vehicle's ignition. The
display will now show a 5second count-
down (of which 2 second priming/
analysis function and 3 second jump start
function at 75 A) when needing the car
battery charger for jump starting
(previously analysed by the car battery
charger). During this countdown, your car
battery charger will briefly supply 75A,
in order to bridge the battery for the
purposes of starting the engine. This will
be followed by a break of 180 seconds to
protect the battery. Now the cycle restarts
(2seconds lead or analysis function and
3seconds jump-start function at 75A/
180seconds pause).
To disconnect the device, first remove the
connection terminals first (
4
/
5
) and
then pull the mains cable
7
.
Note: If the battery is discharged entirely,
the 75 A will not be sufficient to start the
engine in all vehicles (e.g. diesel vehicles).
In this case, use the
Charge-Start button
3
to select the option “Fast Charge”
and then charge the battery to 60%
(for diesel engines, the warm-up with-
draws energy from the battery. The 60%
must be pending after warm-up).
You can track the charging progress on
the display by selecting the “Battery %”
option with the digital display button
1
.
When 60% is reached, repeat the jump-
start function.
Attention: End the mode by pulling the
mains plug
7
.
zAlternator test function
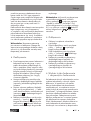
Attach the red connection terminals
5
to the plus pole of your battery. (The plus
pole is marked by a “+” and a red mark.)
Attach the black connection terminals 4
to the minus pole of your battery.
(The minus pole is marked by a “–” and a
black mark.)
Connect the mains cable
7
of the car
battery charger to the socket.
Set the “Alternator” function (LED next to
the alternator) via the button
1
. A %-value
is displayed. Start the engine. If the %-value
rises with the engine running, the alternator
will charge the battery. If the %-value drops
or remains the same, there is a problem with
the alternator, the connection or the battery.

15GB/IE/NI/CY/MT
Operation / Maintenance and care / ... / EU Declaration of Conformity
Disconnect the device from the mains cur-
rent.
Disconnect the “–”-pole quick contact-
connection terminal (black) 4 from the
“–”-pole of the battery.
Disconnect the “+”-pole quick contact-
connection terminal (red)
5
from the
“+”-pole of the battery.
zReplacing the fuse
The fuse of the car battery charger may
be damaged, e.g. by a device defect,
overload, etc.
Before replacing the fuse, pull the
mains cable
7
.
Remove the cover of the fuse 8
by depressing it slightly on the side.
Unscrew the fuse with a suitable open-
end spanner and secure the new fuse.
Then tighten it and reattached the cover
8
.
Note: If you need a new fuse, contact our
service (see chapter with notes on guarantee
and service processing).
zMaintenance and care
Always pull the mains cable
7
from the
socket before you perform any work at
the car charger.
The device is maintenance-free.
Deactivate the device. Clean the metal
and plastic surfaces of the device with
a dry cloth.
Never use any solvents or other aggres-
sive cleaning agents.
zInformation about recycling
and disposal
Do not dispose of electrical
tools in household waste!
Please return this device, accessories
and packaging to your local recycling
depot.
Do not dispose of the car battery
charger in household waste, in fire or
in water. Devices that are no longer functional
should be recycled wherever possible. Ask
your local stockist for advice.
As the consumer you are legally
obliged (by the German Battery
Ordinance) to return any and all
used batteries. Batteries containing harmful
substances are labelled with the adjacent
symbol, which indicates the prohibition on
disposal in household waste. The abbrevia-
tions for the relevant heavy metals are:
Cd = cadmium, Hg = mercury, Pb = lead.
Take used batteries to a waste management
company in your city or community or return
them to your dealer. This satisfies your legal
obligations while also making an important
contribution to protecting the environment.
zEU Declaration of
Conformity
We,
C. M. C. GmbH
Responsible for documentation:
Dr. Christian Weyler
Katharina-Loth-Str. 15
66386 St. Ingbert
Germany
hereby take sole responsibility for declaring
that the product
Car battery charger & jump starter
Year of manufacture: 2021 / 39
IAN: 367512_2101
Model: ULG 17 A1
Model number: 2386
meets the basic safety requirements as

16 GB/IE/NI/CY/MT
EU Declaration of Conformity / Warranty and service information
specified in the European Directives
Low Voltage Directive
2014/35/EU
Electromagnetic Compatibility
2014/30/EU
RoHS Directive
2011/65/EU+2015/863/EU
and the amendments to these directives.
The object of the declaration described
above meets the requirements of Directive
2011/65/EU of the European Parliament
and of the Council of 8 June 2011 on the
restriction of the use of certain hazardous sub-
stances in electrical and electronic equipment.
This conformity assessment is based on the
following harmonised standards:
EN 60335-2-29:2004 + A2:2010 +
A11:2018
EN 60335-1:2012/A2:2019
EN 62233:2008
EN 50498:2010
EN 55014-1:2017
EN 55014-2:2015
EN 61000-3-2:2014
EN 61000-3-3:2013+A1:2019
St. Ingbert, 01.02.2021
Dr. Christian Weyler
– Quality Assurance –
zWarranty and service
information
Warranty from Creative
Marketing & Consulting GmbH
Dear Customer,
The warranty for this equipment is 3 years
from the date of purchase. In the event of
product defects, you have legal rights against
the retailer of this product. Your statutory
rights are not affected in any way by our
warranty conditions, which are described
below.
zWarranty conditions
The warranty period begins on the date
of purchase. Please retain the original
proof of purchase. This document is required
as your proof of purchase. Should this
product have a material or manufacturing
error within three years of the purchase
date, the product will be repaired or
replaced – dependent on our choice – by
us at no cost to you. This warranty service
requires that you retain proof of purchase
(sales receipt) for the defective device for the
three year period and that you briefly explain
in writing what the fault entails and when it
occurred.
If the defect is covered by our warranty, we
will repair and return your product or send
you a replacement. The original warranty
period is not extended when a device is
repair or replaced.
zWarranty period and
statutory claims for defects
The warranty period is not extended by the
guarantee. This also applies to replaced
and repaired parts. Any damages or defects
detected at the time of purchase must be
reported immediately after unpacking. Any
incidental repairs after the warranty period
are subject to a fee.
zExtent of warranty
This device has been manufactured accord-
ing to strict quality guidelines and carefully

17GB/IE/NI/CY/MT
inspected before delivery.
The warranty applies to material and
manufacturing defects only. This warranty
does not extend to product parts, which are
subject to normal wear and tear and can
thus be regarded as consumable parts, or
for damages to fragile parts, e.g. switches,
rechargeable batteries or parts made from
glass. This warranty is voided if the product
becomes damaged or is improperly used or
maintained. For proper use of the product,
all of the instructions given in the original
operating instructions must be followed
precisely. Uses and acts that the original
operating instructions advise or warn against
are to be avoided without question.
The product is for consumer use only and is
not intended for commercial or trade use. The
warranty becomes void in the event of misuse
and improper use, use of force, and any work
on the device that has not been carried out
by our authorised service branch.
zProcessing of warranty
claims
Please follow the instructions below to
ensure quick processing of your claim:
Please retain proof of purchase and the
article number (e.g. IAN) for all inquiries.
The product number can be found on the type
plate, an engraving, the cover page of your
instructions (bottom left), or the sticker on the
back or underside of the device. In the event
of malfunctions or other defects, please first
contact our service department below by
phone or email.
If your product is found to be defective, you
can then send your product with proof of
purchase (till receipt) and a statement
describing what the fault involves and when
it occurred free of charge to the service –
address given.
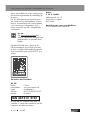
Note:
You can download this handbook
and many more, as well as product videos
and software at www.lidl-service.com.
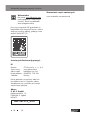
With this QR code you can gain
immediate access to the Lidl Service page
(www.lidl-service.com) and you can open
your operating instructions by entering the
article number (IAN) 367512.
How to contact us:
GB, IE, NI, CY, MT
Name: C. M. C. GmbH
Website: www.cmc-creative.de
E-mail: ser[email protected]
Phone: 0-808-189-0652
Registered office: Germany
IAN 367512_2101
Please note that the following address is not
a service address. Please first contact the
service point given above.
Address:
C. M. C. GmbH
Katharina-Loth-Str. 15
66386 St. Ingbert
GERMANY
Ordering spare parts:
www.ersatzteile.cmc-creative.de
Warranty and service information

18 GB/IE/NI/CY/MT

19DE/AT/CH
Tabelle der verwendeten Piktogramme ......................................................Seite 20
Einleitung ........................................................................................................................Seite 20
Bestimmungsgemäße Verwendung .................................................................................Seite 20
Lieferumfang.....................................................................................................................Seite 21
Teilebeschreibung ............................................................................................................Seite 21
Technische Daten .............................................................................................................Seite 21
Sicherheitshinweise ..................................................................................................Seite 22
Bedienung ...................................................................................................................... Seite 25
Produkteigenschaften .......................................................................................................Seite 25
Anschließen zur Verwendung der Lademodi ................................................................. Seite 26
Trennen nach Verwendung der Lademodi .....................................................................Seite 26
Lademodus auswählen und Ladevorgang starten .........................................................Seite 26
Starthilfefunktion verwenden...........................................................................................Seite 28
Lichtmaschinen - Test - Funktion ..........................................................................................Seite 29
Sicherung wechseln ......................................................................................................... Seite 29
Wartung und Pflege ................................................................................................Seite 30
Umwelthinweise und Entsorgungsangaben .............................................Seite 30
EU-Konformitätserklärung ................................................................................... Seite 30
Hinweise zu Garantie und Serviceabwicklung .......................................Seite 31
Garantiebedingungen .....................................................................................................Seite 31
Garantiezeit und gesetzliche Mängelansprüche ........................................................... Seite 31
Garantieumfang ..............................................................................................................Seite 31
Abwicklung im Garantiefall ............................................................................................Seite 32
Inhaltsverzeichnis

20 DE/AT/CH
Kfz - Batterieladegerät mit
Starthilfefunktion ULG 17 A1
zEinleitung
Herzlichen Glückwunsch!
Sie haben sich für ein hochwertiges
Produkt aus unserem Hause ent-
schieden. Machen Sie sich vor der ersten
Inbetriebnahme mit dem Produkt vertraut.
Lesen Sie hierzu aufmerksam die nachfol-
gende Originalbetriebsanleitung und die
Sicherheitshinweise. Die Inbetriebnahme
dieses Produktes darf nur durch unterwiesene
Personen erfolgen.
z Bestimmungsgemäße
Verwendung
Das Ultimate Speed ULG 17 A1 ist ein Kfz - Batte-
rieladegerät mit Pulserhaltungsladung (Chip - Soft-
ware), das zur Aufladung und Erhaltungsladung
von folgenden 6 V - oder 12 V - Blei - Akkus
(Batterien) mit Elektrolyt - Lösung, AGM - Batteri-
en, Blei - Säure - Batterien, Deep - Cycle (Bootsbatte-
rien) oder Gel - Batterien geeignet ist:
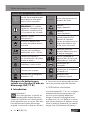
Tabelle der verwendeten Piktogramme / Einleitung
Tabelle der verwendeten Piktogramme
Lesen Sie vor dem Gebrauch
die Bedienungsanleitung dieses
Produktes aufmerksam und voll-
ständig durch.
~50 Hz Wechselspannung mit einer
Frequenz von 50 Hz
HINWEIS: Dieses Symbol weist
auf zusätzliche Informationen
und Erklärungen zum Produkt
und dessen Nutzung hin.
Vorsicht! Mögliche Gefahren!
Vorsicht! Explosionsgefahr!
Vorsicht! Stromschlaggefahr! Schutzart IP20: Schutz durch
das Gerätegehäuse gegen
Berühren unter Spannung
stehender oder innerer sich
bewegender Teile mit den
Fingern.
Entsorgen Sie Batterien in dafür
vorgesehenen Batteriesammel-
stellen.
Geeignet für Blei-Säure-Batterie:
8 Ah - 250 Ah Entsorgen Sie Elektrogeräte
nicht über den Hausmüll!
Nur zur Verwendung in geschlos-
senen, belüfteten Räumen! Entsorgen Sie Verpackung und
Gerät umweltgerecht!
Verpackungsmaterial -
Wellpappe Geeignet für PKWs
Geeignet für Motorräder Geeignet zum Laden von
6 V-Batterien
Geeignet zum Laden von
12 V-Batterien Hergestellt aus
Recyclingmaterial
Seite wird geladen ...
Seite wird geladen ...
Seite wird geladen ...
Seite wird geladen ...
Seite wird geladen ...
Seite wird geladen ...
Seite wird geladen ...
Seite wird geladen ...
Seite wird geladen ...
Seite wird geladen ...
Seite wird geladen ...
Seite wird geladen ...
Seite wird geladen ...
Seite wird geladen ...
Seite wird geladen ...
Seite wird geladen ...
Seite wird geladen ...
Seite wird geladen ...
Seite wird geladen ...
Seite wird geladen ...
Seite wird geladen ...
Seite wird geladen ...
Seite wird geladen ...
Seite wird geladen ...
Seite wird geladen ...
Seite wird geladen ...
Seite wird geladen ...
Seite wird geladen ...
Seite wird geladen ...
Seite wird geladen ...
Seite wird geladen ...
Seite wird geladen ...
Seite wird geladen ...
Seite wird geladen ...
Seite wird geladen ...
Seite wird geladen ...
Seite wird geladen ...
Seite wird geladen ...
Seite wird geladen ...
Seite wird geladen ...
Seite wird geladen ...
Seite wird geladen ...
Seite wird geladen ...
Seite wird geladen ...
Seite wird geladen ...
Seite wird geladen ...
Seite wird geladen ...
Seite wird geladen ...
Seite wird geladen ...
Seite wird geladen ...
Seite wird geladen ...
Seite wird geladen ...
Seite wird geladen ...
Seite wird geladen ...
Seite wird geladen ...
Seite wird geladen ...
Seite wird geladen ...
Seite wird geladen ...
Seite wird geladen ...
Seite wird geladen ...
Seite wird geladen ...
Seite wird geladen ...
Seite wird geladen ...
Seite wird geladen ...
Seite wird geladen ...
Seite wird geladen ...
Seite wird geladen ...
Seite wird geladen ...
Seite wird geladen ...
Seite wird geladen ...
Seite wird geladen ...
Seite wird geladen ...
Seite wird geladen ...
Seite wird geladen ...
Seite wird geladen ...
Seite wird geladen ...
Seite wird geladen ...
Seite wird geladen ...
Seite wird geladen ...
Seite wird geladen ...
Seite wird geladen ...
Seite wird geladen ...
Seite wird geladen ...
Seite wird geladen ...
Seite wird geladen ...
Seite wird geladen ...
Seite wird geladen ...
Seite wird geladen ...
Seite wird geladen ...
Seite wird geladen ...
Seite wird geladen ...
Seite wird geladen ...
Seite wird geladen ...
Seite wird geladen ...
Seite wird geladen ...
Seite wird geladen ...
Seite wird geladen ...
Seite wird geladen ...
Seite wird geladen ...
Seite wird geladen ...
Seite wird geladen ...
Seite wird geladen ...
Seite wird geladen ...
Seite wird geladen ...
Seite wird geladen ...
Seite wird geladen ...
Seite wird geladen ...
Seite wird geladen ...
Seite wird geladen ...
Seite wird geladen ...
Seite wird geladen ...
Seite wird geladen ...
Seite wird geladen ...
Seite wird geladen ...
Seite wird geladen ...
Seite wird geladen ...
Seite wird geladen ...
-
 1
1
-
 2
2
-
 3
3
-
 4
4
-
 5
5
-
 6
6
-
 7
7
-
 8
8
-
 9
9
-
 10
10
-
 11
11
-
 12
12
-
 13
13
-
 14
14
-
 15
15
-
 16
16
-
 17
17
-
 18
18
-
 19
19
-
 20
20
-
 21
21
-
 22
22
-
 23
23
-
 24
24
-
 25
25
-
 26
26
-
 27
27
-
 28
28
-
 29
29
-
 30
30
-
 31
31
-
 32
32
-
 33
33
-
 34
34
-
 35
35
-
 36
36
-
 37
37
-
 38
38
-
 39
39
-
 40
40
-
 41
41
-
 42
42
-
 43
43
-
 44
44
-
 45
45
-
 46
46
-
 47
47
-
 48
48
-
 49
49
-
 50
50
-
 51
51
-
 52
52
-
 53
53
-
 54
54
-
 55
55
-
 56
56
-
 57
57
-
 58
58
-
 59
59
-
 60
60
-
 61
61
-
 62
62
-
 63
63
-
 64
64
-
 65
65
-
 66
66
-
 67
67
-
 68
68
-
 69
69
-
 70
70
-
 71
71
-
 72
72
-
 73
73
-
 74
74
-
 75
75
-
 76
76
-
 77
77
-
 78
78
-
 79
79
-
 80
80
-
 81
81
-
 82
82
-
 83
83
-
 84
84
-
 85
85
-
 86
86
-
 87
87
-
 88
88
-
 89
89
-
 90
90
-
 91
91
-
 92
92
-
 93
93
-
 94
94
-
 95
95
-
 96
96
-
 97
97
-
 98
98
-
 99
99
-
 100
100
-
 101
101
-
 102
102
-
 103
103
-
 104
104
-
 105
105
-
 106
106
-
 107
107
-
 108
108
-
 109
109
-
 110
110
-
 111
111
-
 112
112
-
 113
113
-
 114
114
-
 115
115
-
 116
116
-
 117
117
-
 118
118
-
 119
119
-
 120
120
-
 121
121
-
 122
122
-
 123
123
-
 124
124
-
 125
125
-
 126
126
-
 127
127
-
 128
128
-
 129
129
-
 130
130
-
 131
131
-
 132
132
-
 133
133
-
 134
134
-
 135
135
-
 136
136
-
 137
137


in anderen Sprachen
- français: Parkside ULG 17 A1 Manuel utilisateur
- español: Parkside ULG 17 A1 Manual de usuario
- Nederlands: Parkside ULG 17 A1 Handleiding
- slovenčina: Parkside ULG 17 A1 Používateľská príručka
- dansk: Parkside ULG 17 A1 Brugermanual
- polski: Parkside ULG 17 A1 Instrukcja obsługi
Andere Dokumente
-
ULTIMATE SPEED ULG 15 B4 Operation and Safety Notes
-
ULTIMATE SPEED ULG 17 A1 Operation And Safety Notes Translation Of The Original Instructions
-
ULTIMATE SPEED ULG 12 A1 Operation and Safety Notes
-
ULTIMATE SPEED ULG 12 A2 Operation and Safety Notes
-
-
-
-
-
MY PROJECT CPAWSB 2 C2 Benutzerhandbuch
-
LIVARNO 359803 Bedienungsanleitung