
1
de
f
2
4 6
3
b
a
c
5
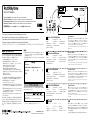
PuttRhythm
GOLF PUTT TRAINER
EFGSJ 1
Owner’s Manual (Scan the QR code to view a tutorial video)
Manuel d’utilisation
(Scannez le code QR pour visionner un didacticiel vidéo)
Bedienungsanleitung
(Scannen Sie den QR-Code, um eine Videoanleitung anzuschauen)
Manual del usuario (Escanee el código QR para ver un vídeo explicativo)
Thank you for purchasing the Korg PuttRhythm golf putt trainer.
Merci d’avoir choisi l’entraîneur de putt de golf PuttRhythm de Korg.
Vielen Dank, dass Sie sich für den PuttRhythm Golf-Putt-Trainer von Korg entschieden haben.
Gracias por comprar el entrenador de putt de golf Korg PuttRhythm.
このたびは、コルグ・ゴルフ・パット・トレーナー PuttRhythmをお買い上げいただきまして、まことにありがとうございます。
2019
www.korg.com
Published 4/2019 Printed in Vietnam
■お願い
1.
保証書に販売年月日等の記入がない場合は無効となります。記
入できないときは、お買い上げ年月日を証明できる領収書等と
一緒に保管してください。
2.
保証書は再発行致しませんので、紛失しないように大切に保管
してください。
コルグ
PuttRhythm
保証書
本保証書は、保証規定により無償修理をお約束するものです。
お買い上げ日 年 月 日
販売店名
アフターサービス
修理または商品のお取り扱いについてのご質問、ご相談は、お客様相
談窓口へお問い合わせください。
お客様相談窓口
PHS等一部の電話ではご利用できません。固定電話または携帯電話
からおかけください。
受付時間月曜~金曜10:00 ~ 17:00
(祝祭日、窓口休業日を除く)
●サービス・センター :
〒168-0073 東京都杉並区下高井戸1-18-16 2F
保証規定(必ずお読みください)
本保証書は、保証期間中に本製品を保証するもので、付属品類(ヘッ
ドホンなど)は保証の対象になりません。保証期間内に本製品が故
障した場合は、保証規定によって無償修理いたします。
1.本保証書の有効期間はお買い上げ日より1か年です。
2.次の修理等は保証期間内であっても有償となります。
・消耗部品(電池、スピーカー、真空管、フェーダーなど)の交換。
・お取扱い方法が不適当のために生じた故障。
・天災(火災、浸水等)によって生じた故障。
・故障の原因が本製品以外の他の機器にある場合。
・不当な改造、調整、部品交換などにより生じた故障または損傷。
・保証書にお買い上げ日、販売店名が未記入の場合、または字句が書
き替えられている場合。
・本保証書の提示がない場合。
尚、当社が修理した部分が再度故障した場合は、保証期間外であっ
ても、修理した日より3か月以内に限り無償修理いたします。
3.本保証書は日本国内においてのみ有効です。
ThiswarrantyisvalidonlyinJapan.
4.お客様が保証期間中に移転された場合でも、保証は引き続きお使い
いただけます。詳しくは、お客様相談窓口までお問い合わせくださ
い。
5.修理、運送費用が製品の価格より高くなることもありますので、あ
らかじめお客様相談窓口へご相談ください。発送にかかる費用は、
お客様の負担とさせていただきます。
6.修理中の代替品、商品の貸し出し等は、いかなる場合においても一
切行っておりません。
本製品の故障、または使用上生じたお客様の直接、間接の損害につ
きましては、弊社は一切の責任を負いかねますのでご了承ください。
本保証書は、保証規定により無償修理をお約束するためのもの
で、これによりお客様の法律上の権利を制限するものではあり
ません。
Ja
各部の名称
1.ディスプレイ2.テンポLED3.ゲート
4.バー5.ガイドライン6.固定用穴
a.電池アイコンb.メーターc.テンポ表示
d.電源ボタンe.VOLUMEボタンf.TEMPO+/-ボタン
De
Es
Parts of the PuttRhythm
1. Display 2. Tempo LED 3. Gate
4. Bar 5. Guideline 6. Mounting holes
a. Battery Icon b. Meter c. Tempo display
d. Power Button e. VOLUME Button
f. TEMPO +/- Button
En
Parties du PuttRhythm
1. Ecran 2. Tempo LED 3. Portail
4. Barre 5. Guide 6. Orifices de fixation
a. Icône de pile b. Mesure c. Affichage du tempo
d. Bouton d'alimentation e. Bouton VOLUME
f. Bouton TEMPO +/-
Fr
Teile des PuttRhythm
1. Display 2. Tempo-LED 3. Tor
4. Anschlag 5. Führungshilfe 6. Montagelöcher
a. Batteriesymbol b. Skala c. Tempo-Anzeige
d. Einschalttaste e. VOLUME-Taste
f. TEMPO +/- -Taste
Technische Daten
●
Tempobereich: 20—80 Taktschläge/Minute
●
Stromversorgung:
CR2032 Lithiumbatterie (Knopfzelle, 3 V)
●
Batterielebensdauer: 120
Stunden (TEMPO=60, VOLUME=Max)
●
Abmessungen (B x T x H): 297
x 148 x 15 mm
●
Gewicht: 186 g (mit Batterie)
●
Lieferumfang: CR2032
Lithiumbatterie (Knopfzelle, 3 V), Bedienungsanleitung
*Änderungen der technischen Daten und des Designs ohne vorherige
Ankündigung vorbehalten.
Partes del PuttRhythm
1. Pantalla 2. Tempo LED 3. Puerta
4. Barra 5. Guía 6. Orificios de fijación
a. Icono de pila b. Medidor c. Pantalla de tempo
d. Botón de alimentación e. Botón VOLUME
f. Botón TEMPO +/-
Specifications
●
Tempo Range: 20—80 beats/minute
●
Power supply: CR2032
lithium battery (3V)
●
Battery Life: 120 hours (TEMPO=60,
VOLUME=Max)
●
Dimensions (W x D x H): 297 x 148 x 15 mm/11.7 x
5.83 x 0.60 inches
●
Weight: 186g/6.57oz (incl. batt.)
●
Included
Items: CR2032 lithium battery (3V), Owner's Manual
* Specifications and appearance are subject to change without notice for
improvement.
Fiche technique
●
Gamme de tempo: 20
~
80 mesures/minute
●
Alimentation: Pile au
lithium CR2032 (3V)
●
Autonomie de la pile: 120 heures (TEMPO=60,
VOLUME=Max)
●
Dimensions (L x P x H): 297 x 148 x 15 mm
●
Poids:
186 g (pile comprise)
●
Accessoires fournis: Pile au lithium CR2032 (3V),
Manuel d'utilisation
* Les caractéristiques et l’aspect du produit sont susceptibles d’être
modifiés sans préavis en vue d’une amélioration.
Especificaciones
●
Rango de Tempo: 20—80 tiempos por minuto
●
Alimentación:
Pila de litio CR2032 (3 V)
●
Vida de la pila: 120 horas (TEMPO=60,
VOLUME=Max)
●
Dimensiones (Anch. x Prof. x Alt.): 297 x 148 x 15
mm
●
Peso: 186 g (incluyendo pila)
●
Elementos incluidos: Pila de litio
CR2032 (3 V), Manual del usuario
* Las especificaciones y el aspecto están sujetos a cambios sin previo aviso
por mejora.
仕様
●テンポ範囲:20 ~ 80拍/分 ●電源:コイン型リチウム電池
(CR2032)x1 ●電池寿命:約120時間(テンポ60、音量大)
●外形寸法(WxDxH):297x148x15mm ●質量:186g(電
池含む) ●付属品:動作確認用コイン型リチウム電池(CR2032)
x1、取扱説明書
※仕様および外観は改良のため予告なく変更する場合があります。

電池を入れる
1. ラバー部を手で曲げてメトロノームを取り出します
(Fig.1)。
2. メトロノーム背面にある電池カバーを矢印Aの方
向に引いてから押し上げます。
3. 極性に注意してプラス(+)の表示が見えるように電
池を挿入し、電池カバーを元に戻します。
4. 手でラバー部を曲げてメトロノームをはめ込みます。
電
池
の
交
換
時
期
に
な
る
と
、
電
池
ア
イ
コ
ン
(
)
が
表
示
さ
れ
ま
す
。
速
や
か
に
新
し
い
電
池
と
交
換
し
て
く
だ
さ
い
。
電
池
を
交
換
す
る
と
き
は
、
メ
ト
ロ
ノ
ー
ム
の
電
源
を
切
っ
て
く
だ
さ
い
。
ま
た
、
付
属
の
電
池
は
動
作
確
認
用
で
す
の
で
、
寿
命
が
短
い
場
合
が
あ
り
ま
す
。
PuttRhythmを使う
1. 本機を床に置き電源ボタンを押します。芝の上など
では、固定用穴にティーを刺して本機を固定するこ
とができます(Fig.2)。
2. ラバー部の最もくびれた部分にぴったりと接するよ
うにボールをセットします(Fig.3)。
3. バー後方のガイドラインを確認し、スタンスをとり
ます。
4. カウント音に合わせながら、バーのわずか上を通る
ようにパターを浮かせ、ボールがゲートを通るよう
にストロークをします。タイミングはFig.4(
)を 参
考にしてください。
T
I
P
バ
ー
に
よ
っ
て
高
さ
方
向
の
打
点
位
置
の
ト
レ
ー
ニ
ン
グ
が
で
き
ま
す
。
バ
ー
の
わ
ず
か
上
を
通
る
よ
う
に
パ
タ
ー
を
浮
か
せ
ス
ト
ロ
ー
ク
す
る
こ
と
で
、
パ
タ
ー
の
芯
で
ボ
ー
ル
を
捉
え
る
こ
と
が
で
き
ま
す
(
F
i
g
.
5
)
。
5. VOLUMEボタンを押すたびにカウント音の大/小
が切り替わります。TEMPO+/-ボタンでテンポ
を調節します。
T
I
P
テ
ン
ポ
は
男
性
は
7
0
、
女
性
は
6
0
く
ら
い
が
ひ
と
つ
の
目
安
で
す
。
ま
ず
は
こ
の
テ
ン
ポ
で
、
パ
ッ
ト
練
習
を
は
じ
め
て
み
ま
し
ょ
う
。
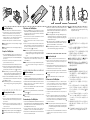
Insert the battery
1. Bend the rubber part to remove the metronome (Fig. 1).
2. Slide the battery cover on the back of the metronome
in the direction indicated by arrow A, and lift it up.
3. Making sure to observe the correct polarity, insert the
battery so that the “+” side of the battery is visible. Then
return the battery cover to its original position.
4. Bend the rubber part to fit it around the metronome.
Whenthebaerystartstorunlow,thebaeryicon( )
isdisplayed.
Makesurethatthemetronomeisturnedobeforereplacing
thebaery.
Using the PuttRhythm
1. Place the PuttRhythm on the floor, and then press the
power button. When PuttRhythm is used on a lawn, stick
tees into the mounting holes to hold the PuttRhythm in
place (Fig. 2).
2. Set the ball so that it fits perfectly with the narrowest
part of the rubber base (Fig. 3).
3. Check the guideline behind the bar and take your stance.
4. Listen for the count to begin and swing the putter in time
so that it passes slightly above the bar, and then hit the
ball through the gate. Refer to Fig. 4(
)for the timing.
TIP
Thebarallowsyoutopracticethestrikeheight.Swinging
thepuersothatitpassesslightlyabovethebarallowsyou
tolineupthecenterofthepuerwiththeball.(Fig.5)
5. Each press of the VOLUME button switches the counting
volume between high and low. Adjust the tempo with
the TEMPO +/— button.
TIP
Astandardtempoformenis70,andastandardtempofor
womenis60.Trypracticingyourswingstartingwiththis
tempo.
En
Fig.1
Fig.2
Fig.5
Fig.3
Fig.4
Mise en place de la pile
1. Pliez la partie en caoutchouc pour retirer le métronome
(Fig. 1).
2. Glissez le couvercle du compartiment de la pile au dos
du
métronome
dans la direction indiquée par la flèche A,
puis relevez-le.
3. Remplacez la pile en veillant à respecter la polarité: la
face “+” de la pile doit être visible. Remettez en place le
couvercle de la pile.
4. Repliez la partie en caoutchouc autour du métronome.
Quandlapilecommenceàs’épuiser,l’icônedepile( )s’ache.
Coupeztoujoursl’alimentationavantdechangerlapile.
Utilisation du PuttRhythm
1. Placez le PuttRhythm sur le sol et appuyez sur le bouton
d’alimentation. Quand le PuttRhythm est utilisé sur un gazon,
enfoncez des tees dans les orifices de fixation pour maintenir
la PuttRhythm en place (Fig. 2).
2. Placez la balle de sorte qu’elle soit parfaitement logée dans
la partie la plus étroite de la base (Fig. 3).
3. Vérifiez le guide derrière la barre et adoptez la position
adéquate.
4. Écoutez le comptage du temps qui démarre et swinguez le
putter sur le temps, de sorte qu’il passe légèrement au-dessus
de la barre, puis frappez la balle et envoyez-la à travers le
portail. Voyez la Fig. 4(
) pour le timing.
Astuce
Labarrevouspermetdetravaillerlahauteurdevotrefrappe.
Swinguerlepuerdesortequ’ilpasselégèrementau-dessus
delabarrepermetd’alignerlecentredupueraveclaballe.
(Fig.5)
5. Chaque pression du bouton VOLUME change le volume du
comptage entre élevé et faible. Réglez le tempo avec le
bouton TEMPO +/—.
Astuce
Pourleshommes,70estletempostandard.Pourlesfemmes,
ilestde60.Travaillezvotreswingencommençantàce
tempo.
Inserción de la pila
1. Doble la parte de goma para sacar el metrónomo (Fig. 1).
2. Deslice la tapa de la pila situada en la parte posterior del
metrónomo en la dirección que indica la flecha A y, a con-
tinuación, levántela.
3. Inserte la pila asegurándose de que la polaridad es correcta,
de forma que la cara “+” de la pila sea visible. Vuelva a colocar
la cubierta de la pila en su posición original.
4. Doble la parte de goma para encajarla alrededor del metrónomo.
Cuandolapilacomienceaagotarse,semostraráeliconode
pila( ).
Apaguelaunidadantesdeinstalaroreemplazarlapila.
Utilización del PuttRhythm
1. Coloque el PuttRhythm en el suelo y a continuación pulse
el botón de alimentación. Cuando utilice el PuttRhythm
sobre césped, introduzca tees en los orificios de fijación
para sujetar la PuttRhythm en su sitio (Fig. 2).
2. Coloque la bola de manera que encaje perfectamente con
la parte más estrecha del pedestal (Fig. 3).
3. Compruebe la guía situada detrás de la barra y adopte su
posición.
4. Escuche la cuenta para empezar y haga el movimiento de
swing con el putter a tiempo de modo que pase ligeramente
por encima de la barra, y a continuación golpee la pelota
para que pase a través de la puerta. Remítase a la Fig.4(
)
para la sincronización.
Consejo
barrapermitepracticarlaalturadeataque.Hacerelmovi-
mientodeswingconelpuerdemodoquepaseligeramente
porencimadelabarrapermitealinearelcentrodelpuer
conlabola(Fig.5).
5. Cada pulsación del botón VOLUME cambia el volumen de
la cuenta entre alto y bajo. Ajuste el tempo con el botón
TEMPO +/—.
Batterie einlegen
1. Biegen Sie die Gummihülle leicht auf, um das Metronom zu
entnehmen (Fig. 1).
2. Schieben Sie den Batteriefachdeckel auf der Rückseite des
Slimpitch in Pfeilrichtung A und entnehmen Sie ihn nach oben.
3. Um die korrekte Polarität zu gewährleisten, legen Sie die neue
Batterie so ein, dass die „+“-Seite sichtbar ist.Schließen Sie
den Batteriefachdeckel wieder.
4. Biegen Sie die Gummihülle leicht auf, damit diese das Met-
ronom wieder fest umschließt.
WenndieLeistungderBaerieabnimmt,leuchtetdieBaer-
iesymbol( )auf.
AchtenSiedarauf,dasMetronomauszuschalten,bevorSiedie
Baerieerseen.
Verwendung des PuttRhythm
1. Stellen Sie den PuttRhythm auf den Boden und drücken Sie
die Einschalttaste. Falls Sie den PuttRhythm auf einem Rasen
verwenden, stecken Sie Tees durch die Montagelöcher, um
das PuttRhythm zu fixieren (Fig. 2).
2. Legen Sie den Ball in den engsten Teil der Öffnung der
Grundplatte, so dass er vor dem Anschlag anliegt (Fig. 3).
3. Überprüfen Sie die Führungshilfe hinter dem Anschlag und
stellen Sie sich zum Abschlag auf.
4. Warten Sie, bis das Metronom zu zählen anfängt und setzen
Sie den Putter knapp über dem Anschlag an – dann holen Sie
im Takt aus und schlagen den Ball durchs Tor. Halten Sie sich
an das in Fig. 4(
) dargestellte Timing.
TIPP
DerAnschlaghilftIhnen,dierichtigeAbschlagshöhezun-
den.WennSiedenPuersoschwingen,dasserknappüber
demAnschlagvorbeiläuft,tritdessenSchwerpunktgenau
dieMiedesBalls.(Fig.5)
5. Mit jedem Druck auf die VOLUME-Taste schalten Sie die
Metronomlautstärke abwechselnd laut und leise. Das Tempo
können Sie mit der TEMPO+/— -Taste einstellen.
TIPP
DasStandardtempofürMännerist70,dasfürFrauen60.
ÜbenSieIhrenAbschlaganfangsindiesemTempo.
Consejo
Untempoestándarparahombreses70,yuntempo
estándarparamujereses60.Intentepracticarsuswing
empezandoconestetempo.
Fr
De
Es
Ja
-
 1
1
-
 2
2


in anderen Sprachen
- English: Korg PuttRhythm Owner's manual
- français: Korg PuttRhythm Le manuel du propriétaire
- español: Korg PuttRhythm El manual del propietario
- 日本語: Korg PuttRhythm 取扱説明書