Andrew James AJ001326 Benutzerhandbuch
- Kategorie
- Küchenmaschinen
- Typ
- Benutzerhandbuch

1
Thank you for your purchase. We hope that you are sased with
your new Andrew James product.
To fully and safely enjoy the benets of your new product, please read the
manual fully before use and keep safe for future reference.
Food Processor with Blender

2
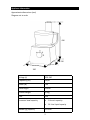
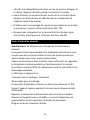
Appliance informaon
Approximate dimensions (mm)
Diagram not to scale
Voltage (v) 220-240
Frequency (Hz) 50/60
Power (w) 700
Cable length 110cm
Product weight 3.5Kg
Fuse 13a
Processor bowl capacity
• 2 Litre air capacity
• 1.4 Litre liquid capacity
Blender jug capacity 1.8 Litre
436
230
260

3
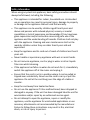
Safety informaon
When using any electrical appliance, basic safety precauons should
always be followed, including the following;
• This appliance is intended for indoor, household use. Unintended
use or operaon may result in personal injury, damage to property
or damage to the appliance that will void the warranty.
• This appliance can be used by children aged from 8 years and
above and persons with reduced physical, sensory or mental
capabilies or lack of experience and knowledge if they have been
given supervision and/or instrucon concerning safe use of the
appliance and the understanding of hazards. Children shall not play
with the appliance. Cleaning and user maintenance shall not be
made by children unless they are older than 8 years old and
supervised.
• Keep the appliance and its cord out of reach of children less than 8
years old.
• Never handle or operate any appliance with wet or moist hands.
• Do not immerse appliance, cord or plug in water or other liquids.
Take care whilst cleaning.
• If the appliance has fallen in water do not reach for it, immediately
switch the appliance o at the mains and unplug it.
• Ensure that the cord is not in a posion where it can be pulled or
tripped over accidentally. Never use the cord to carry or pull the
appliance. Do not let the cord hang over the edge of a table or
counter.
• Keep the cord away from heated surfaces.
• Do not use the appliance if it has malfunconed, been dropped or
damaged in anyway. If the unit has been damaged take the unit for
examinaon and/or repair by an authorised service agent.
• Do not aempt to open the appliance, repair or modify the
appliance, use the appliance for unintended applicaons or use
accessory aachments not recommended by the manufacturer.
Failure to follow these instrucons may result in re, electrical
shock, or risk of injury to persons.

4
• Do not place the appliance near a naked ame, hot gas or electric
burners, or any appliances generang heat.
• Always remove the plug safely from the socket aer use. Do not
pull from the cord.
• Ensure that all packaging is removed before use.
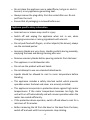
Appliance specic safety informaon
• Incorrect use or misuse may result in injury.
• Switch o and unplug the appliance when not in use, when
changing accessories or mixing ingredients with utensils
• Do not push food with ngers, or other objects (like knives), always
use the enclosed pusher.
• Accessory blades are very sharp. Handle carefully during assembly,
emptying the bowl and during cleaning aer use.
• Remove accessory blades before pouring contents from the bowl
• This appliance is not dishwasher safe.
• Do not use the product with wet hands
• Do not aempt to use non-standard aachments.
• Liquids should be allowed to cool to room temperature before
blending.
• This appliance includes a safety interlock switch which prevents
operaon unless the bowl and cover are securely installed.
• This appliance incorporates a protecve device against high motor
temperatures. If the motor temperature becomes too high, the
unit will turn o automacally and will resume operaon when the
motor has cooled suciently.
• If the protecve device operates, switch o and allow to cool for a
minimum of 15 minutes.
• Before removing the lid from the bowl or the bowl from the base,
switch o and wait unl the components stop rotang.

5
• Do not use the lid interlock to Start or Stop the processor, always
use the ON/OFF speed control.
• Do not place this appliance on or near any gas or electric burner or
inside a heated oven.
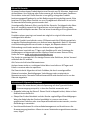
Rated Run Time (RRT)
Warning: Do not exceed the Rated Run Time.
• Electrical appliances intended for food preparation are designed
with sealed enclosures or with small openings in the enclosure to
prevent contamination.
• The lack of openings in the enclosure restricts airflow and
increases the internal operating temperatures. A Rated Run Time
(RRT) is stated to prevent overheating and potential damage.
• The RRT for this appliance is:
• 3 minutes chopping/processing
• 30 seconds for Blending
• Periods of continuous use should not exceed the RRT.
• Allow the appliance to rest for 5 minutes after each period of use.
• Exceeding the Rated Run Time is an abusive condition where
the appliance may overheat indicated by an increased enclosure
temperature and possible odour.
• Switch o and allow the appliance to cool.

6
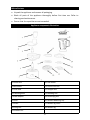
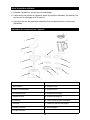
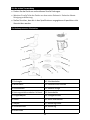
1. Control Dial 10. Disc Holder
2. Motor Base 11. French Fries Disc
3. Drive Sha 12. Chopper Disc
4. Processing Bowl 13. Kneading Disc
5. Blade Adapter 14. Emulsifying Disc
6. Cover 16. Blender Measuring Cup
7. Pusher 17. Blender Jug Cover
8. Slicing Disc 18. Blender Jug
9. Shredder Disc
Appliance components illustraon
Before rst use
• Unpack the appliance and remove all packaging.
• Wash all parts of the appliance thoroughly before rst me use. Refer to
cleaning and maintenance.
• Ensure that the capacies are not exceeded.

7
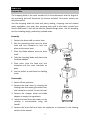
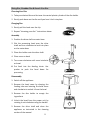
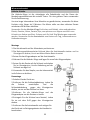
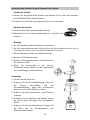
Chopper Disc
The chopping blade is the most versale of all the aachments and the length of
the processing me will determine the texture achieved. For coarser texture use
the pulse control.
Use the chopping blade for cake and pastry making, chopping raw and cooked
meat, vegetables, nuts, pate, dips, pureeing soups and to also make crumbs from
biscuits and bread. It can also be used for yeasted dough mixes. Use the kneading
tool for kneading dough, parcularly yeasted mixes.
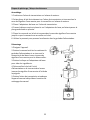
Assembly
Posion the drive sha on motor base.
Slot the processing bowl over the drive
sha and turn clockwise to lock into
place on the motor base.
Place the blade adaptor onto the drive
sha.
4. Take the chopping blade and place onto
the blade adaptor.
5. Place cover onto the bowl and turn
clockwise unl the cover interlocks on
bowl.
6. Use the pusher to push food into feeding
chute.
Disassembly
1. Switch o the appliance.
2. Remove the bowl cover by clasping the
feeding tube and rotang the bowl cover
an-clockwise to unlock it from the bowl.
3. Remove the chopper blade and blade
adapter to empty the ingredients.
4. Unlock the bowl from the power unit by
rotang it an-clockwise using the
handle.
5. Remove the drive sha and clean the appliance as instructed in the cleaning
secon of the manual.
How to use

8
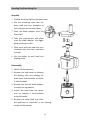
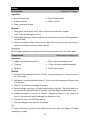
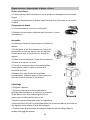
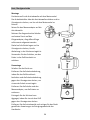
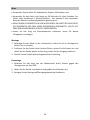
Kneading Disc/Emulsifying Disc
Assembly
Posion the drive sha on the motor base.
Slot the processing bowl over the
drive sha and turn clockwise to
lock into place on the motor base.
Place the blade adaptor onto the
drive sha.
Take the required disc and place
onto the blade adaptor, the bigger
blade should go on rst.
Place cover onto the bowl and turn
clockwise unl the cover interlocks
on bowl.
Use the pusher to push food into
feeding chute.
Disassembly
1. Switch o the appliance.
2. Remove the bowl cover by clasping
the feeding tube and rotang the
bowl cover an-clockwise to unlock
it from the bowl.
3. Remove the disc and blade adapter
to empty the ingredients.
4. Unlock the bowl from the power
unit by rotang it an-clockwise
using the handle.
5. Remove the drive sha and clean
the appliance as instructed in the cleaning
secon of the manual.

9
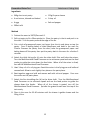
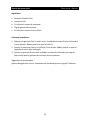
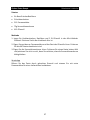
Slicing Disc, Shredder Disc & French Fries Disc
Choosing Your Disc
1. Take your desired disc and slot over the central plasc cylinder of the disc holder
2. Gently push down on the disc unl you hear it lock into place
Changing Disc
1. Gently pull the hook over the clip
2. Repeat “choosing your disc” instrucons above
Assembly
1. Posion the drive sha on motor base
2. Slot the processing bowl over the drive
sha and turn clockwise to lock into place
on the motor base
3. Place disc holder onto the drive sha
4. Place cover on bowl
5. Turn cover clockwise unl cover interlocks
on bowl.
6. Put food into the feeding chute. Use
pusher to push the food down for
processing
Disassembly
1. Switch o the appliance.
2. Remove the bowl cover by clasping the
feeding tube and rotang the bowl cover
an-clockwise to unlock it from the bowl
3. Remove the disc holder to empty the
ingredients
4. Unlock the bowl from the power unit by
rotang it an-clockwise using the handle
5. Remove the drive sha and clean the
appliance as instructed in the cleaning
secon of the manual

10
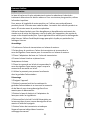
Blender
• Use the blender for pasta sauces, soups, milkshakes etc.
• Do not use the machine connuously for more than 30 seconds on this funcon.
The motor should be allowed to cool down for at least 1 minute. Only use for a
maximum of 3 mes before leng the machine cool down fully.
• Do not put hot liquids into the blender as this will cause the jug to crack. Please
ensure that the temperature of the ingredients do not exceed 30°C above room
temperature.
• Allow the jug to warm up to room temperature before adding warm liquids.
Assembly
1. Aach the blender to the motor unit by rotang clockwise unl it is locked into
place.
2. Remove the lid by gently pulling, place in the ingredients and replace the lid back
on the jug by reversing the acon.
3. Turn the control dial to your required seng.
Disassembly
1. Remove the jug from the motor unit by rotang an-clockwise using the handle.
2. Li the lid o the appliance and pour out the ingredients.
3. Clean as instructed in the cleaning secon of the manual.

11
Recipes
Chunky pesto
• Bunch of fresh basil
• 3 cloves of garlic
• 3 tbsp. parmesan cheese
• 75g sunower seeds
• 6 tbsp. olive oil
Ingredients
Method
1. Place garlic cloves, basil and 2 tbsp. of olive oil into the mini chopper
bowl. Pulse unl the garlic is ne.
2. Add grated parmesan cheese and the rest of the olive oil. Pulse unl ingredients
are combined.
3. Add the sunower seeds. Pulse once last me. Don’t pulse too much here as you
want the sunower seeds to remain chunky.
Serving p
Sr through cooked gnocchi and sprinkle with extra parmesan for an Italian treat.
Tomato bread
Ingredients
• 250g strong white bread our
• 1 tsp salt
• 7g yeast
• 55g sundried tomatoes, jarred
• 1 tbsp. oil from sundried tomatoes
• 110ml warm water
Method
1. Add salt, our and yeast to the 1.5l bowl. Using kneading tool, mix on minimum
for 30 seconds.
2. Add water, sundried tomatoes and oil. If the sundried tomatoes are large, chop
into 3 pieces.
3. Mix for 1-2 minutes unl dough is formed.
4. Remove dough and place in a bowl covered with cling lm. Stand the bowl in a
warm place for approximately 60 minutes, unl the dough has doubled in size.
5. Knead the dough by hand for 2 minutes. Shape and place in a n, cover and
stand in a warm place unl the dough has doubled in size.
6. Preheat the oven to 180°C/Gas mark 4.
7. Place the dough in the oven for 35 minutes.
Tip
To check the bread is cooked, tap the base of the bread with your ngers, if hollow
sounding it is ready.
Aachment: Chopper
Aachment: Kneading tool

12
Caramelised Onion Tart
Aachment: Cung discs
Ingredients
• 340g short crust pastry
• 4 red onions, skinned and halved
• 4 eggs
• 200ml milk
• 120g Gruyere cheese
• 1 tbsp. oil
• Salt and pepper
Method
1. Preheat the oven to 190°C/Gas mark 5.
2. Roll out pastry to t a 20cm quiche n. Place the pastry in the n and push in to
the sides. Trim the pastry around the edge of the n.
3. Cut a circle of greaseproof paper just larger than the n and place on top the
pastry. Pour in baking beans or dried peas/beans and bake in the oven for
10mins. Remove the pastry from the oven, take the greaseproof paper and
baking beans o the pastry then put the pastry back in the oven for a further 5
minutes.
4. Aach the thick slicing disc (c) onto the drive sha. Skin and halve the onions.
Turn the Mulfunconal Food Processor on to minimum speed and use the food
pusher to guide the onion down the feed tube. When all of the onion is sliced,
turn o the Mulfunconal Food Processor.
5. Heat 1 tbsp. of oil in a frying pan. Sauté the onion in the frying pan unl so and
caramelised. Allow to cool slightly then place on the pastry base.
6. Beat together eggs and milk and season well with salt and pepper. Pour over
the onions on the pastry base.
7. Aach the ne shredding disc (b) to the drive sha. Turn the Mulfunconal
Food Processor on to minimum speed and use the food pusher to guide the
cheese down the feeder. When all of the cheese is grated, turn o the
Mulfunconal Food Processor. Sprinkle the grated cheese over the top of the
tart evenly.
8. Place in the oven for 35-40 minutes unl the cheese is golden brown and the
lling is rm.

13
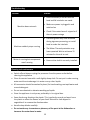
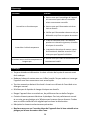
Troubleshoong
Problem Soluon
Machine does not work
• Ensure assembly is correct and the
bowl and lid interlocks are made
• Make sure power is plugged in and
switched on
• Check if the mains haven't tripped or if
there is power outage
Machine suddenly stops running
• Processing bowl may have loosened
during vigorous processing, re-install
bowl to make the interlock
• The Motor Thermal protecon may
have operated. Wait a minimum 15
minutes for the unit to cool
Motor is running but components
aren't moving
• Ensure drive sha is correctly installed.
Cleaning and maintenance
• Switch o and always unplug the processor from the power outlet before
cleaning the appliance.
• Clean the motor base with a so slightly damp cloth. Do not put it under running
water and do not submerge it in water or any other liquids.
• All accessories should be washed by hand, for hand washing use tepid water and
normal detergent.
• Do not use chemical or abrasive washing up liquids.
• Store the appliance in a dry area, preferably in its original box.
• Some foods may discolour the plasc. This is perfectly normal and wont harm
the plasc or aect the avour of your food. Rub with a cloth dipped in
vegetable oil to remove the discolouraon.
• Handle sharp blades carefully.
• Do not under any circumstances place any of the parts in the dishwasher or
immerse the motor base in water.

14
UK and EU warranty
Your new Andrew James product comes with a 24 month guarantee and a 2 year
xed warranty, eecve from receipt conrmaon. Your receipt or order number is
required as proof of purchase date so it is imperave that you keep it safe. This
guarantee only applies if the item has been used solely for the use intended, and all
instrucons have been followed accordingly. Please note this product is only for
domesc use only and is not for commercial use.
Abuse of your product will invalidate the guarantee. Returned goods can only be
accepted if repackaged properly within the original colour product box, and
presented with the original receipt of sale/order number. This does not aect your
statutory rights.
Returned products must be cleaned and returned to us in as close to delivery
condion as possible.
If your product develops a problem within the rst 12 months of the xed warranty,
we will pay all shipping costs to have it returned to us. Aer 12 months the
customer will be liable for the cost of returning the product to us. We will then pay
to have the repaired/replaced item shipped back to the customer.
If you wish to return your item for a full refund, you have the right to do so within
the rst 7 days. For our returns policy please go to:
www.andrewjamesworldwide.com
Customers are responsible for any taxes applied to our products when they are
shipped outside of the EU.
All of our prices are inclusive of VAT.
Once a product has been returned to us, we will aim to repair or replace it within 30
days of receipt.
The guarantee does not cover any defect arising from improper use, damage, build-
up of lime scale or repair aempts made by third-pares. Also, the guarantee does
not cover normal wear and tear of individual parts.
Class II electrical safety informaon
Always ensure the voltage on the rang label corresponds to the power supply
where the product is being used.
Class II double insulaon. This appliance is double insulated therefore no
earth connecon is required.
Check the power cord and plug regularly for any damage. If the cord or the plug is
damaged, it must be replaced by a qualied electrician or a service repair centre to
avoid a hazard.
Precauons should be followed for safe cable management and connecon to the
power supply.

15
Disposal of the appliance
Waste Electrical & Electronic Equipment (WEEE) Waste & Recycling
Disposal of Electrical and Electronic Waste
Non-household waste. This product must not be disposed of together with
ordinary household waste.
Separate collecon of used products, baeries and packaging allows the
recovery and recycling of materials. Reuse of materials helps prevent
environmental polluon and reduces the demand for raw materials.
Local authories, retailers and collecon organisaons may provide for
separate collecon of electrical products, baeries and packaging.
www.andrewjamesworldwide.com
Address: Andrew James UK Ltd, Lighthouse View, Spectrum Business Park,
Seaham, Durham, SR7 7PR, UK
Customer Service Telephone: 0191 377 8358
Email: customerservices@andrewjamesworldwide.com
Twier: @andrewjamesltd Facebook: Andrew James
Copyright Andrew James
AJ001326 | 01/2019
Contact Details
If a new mains plug needs to be ed follow the ng instrucons supplied with
good quality BS1363A plugs. If in doubt consult a qualied electrician or appliance
repair agent.
a) Remove and safely dispose of the old plug.
b) Connect the brown lead to the live terminal “L” in the new plug.
c) Connect the blue lead to the neutral “N” terminal.
d) Recommended fuse: 10 A.
Warning! For double insulated product no connecon is made to the Earth
terminal.
Use of an extension cable is not recommended. If an extension cable is required, it
should be rated no less than 13A and be fully unwound before use to avoid
overheang. Do not connect mulple appliances to the extension cable
Do not aempt to modify electrical plugs or sockets or aempt to make an
alternave connecon to the electrical supply.

16
FR
Merci pour votre achat. Nous espérons que vous êtes sasfait de votre nouveau
produit Andrew James.
Pour proter pleinement et en toute sécurité des avantages de votrenouveau
produit, veuillez lire enèrement le manuel avant ulisaon et conservez-le pour
vous y référer ultérieurement.
Processeur Mulfonconnel
Consignes de sécurité générales
Lorsqu’on ulise les appareils électriques, il faut suivre les consignes
de sécurité ci-dessous:
• Cet appareil est desné à être ulisé par des personnes de plus de
8 ans et des personnes ayant les capacités physiques, sensorielles
ou mentales réduites, ou le manque d'expérience et de
connaissances, à moins qu'ils n'aient été donnés supervision ou des
instrucons quant à l'appareil et ils comprennent tous les dangers.
Les enfants ne sont pas autorisés à jouer avec l’appareil. Le
neoyage et l’entreen ne devraient pas être eectués par les
enfants à moins qu’ils aient plus de 8 ans. Garder l’appareil et le
cordon hors de la portée des enfants de moins de 8 ans.
• Veuillez s’assurer que la tension de votre maison correspond à la
tension indiquée sur l’appareil.
• Veuillez vérier régulièrement qu’il n’y a pas de signes de
dommages sur le cordon d’alimentaon ou sur la che. Si le cordon
d’alimentaon ou la che est endommagé, il doit être remplacé par
un électricien ou un centre de service. Pour plus d’informaons
veuillez contacter notre service clientèle.
• Cet appareil n’est conçu que pour l’ulisaon domesque. Un
usage incorrect va invalider la garane. Le fournisseur ne peut pas
être tenu pour responsable de blessures ou de dommages si
l’appareil est ulisé pour les ns autres que celles prévues.
• Un usage abusif peut aussi endommager l’appareil et causer des
blessures.

17
• Ne jamais uliser l’appareil s’il a fait tomber ou s’il y a des signes de
dommages sur l’appareil. Si l’appareil est endommagé il doit être
examiné/ réparé par un technicien autorisé.
• Ne jamais plonger le bloc moteur, la che ou le cordon
d’alimentaon dans l’eau ou tout autre liquide.
• Si le cordon d’alimentaon est endommagé il doit être remplacé
par le fabricant ou par une personne qualiée pour éviter tout
danger.
• Ne jamais laisser l’appareil pendre d’une table ou d’un comptoir.
Veuillez posionner l’appareil en assurant qu’il ne peut pas vous
trébucher ou être ré par inadvertance.
• Ne jamais laisser le cordon d’alimentaon entre en contact avec les
surfaces chaudes ou les brûleurs chauds ou placer l’appareil dans
un four chaud.
• Il n’est pas recommandé d’uliser une rallonge ou une mulprise
avec l’appareil. Si nécessaire veuillez uliser une rallonge qui
correspond à la tension de l’alimentaon pour éviter le surchaue.
Ne jamais brancher tout autre appareil sur la rallonge. Veuillez
posionner la rallonge en assurant qu’il ne peut pas vous
trébuchera ou être ré par des animaux ou des enfants.
• Toujours uliser l’appareil sur une surface plane et stable. Ne
jamais placer l’appareil sur une surface chaude.
• Veuillez s’assurer qu’il y a assez d’espace autour de l’appareil
pendant l’opéraon.
• Toujours débrancher l’appareil en tout sécurité. Ne jamais rer sur
le cordon pour débrancher l’appareil.
• Ne jamais toucher l’appareil avec les mains mouillées.

18
Consignes de sécurité spéciques
• Toujours neoyer avant ulisaon.
• Une mauvaise ulisaon ou une ulisaon incorrecte de l’appareil
peut entraîner des blessures.
• Éteignez et débranchez l'appareil lorsqu'il n'est pas ulisé, pendant
le changement d'accessoires ou pendant le mélange des
ingrédients.
• Ne pousser pas les ingrédients dans l’appareil avec les mains.
• Ne touchez aucun élément de la machine en mouvement avec des
ustensiles ou les mains.
• N'ulisez pas l'appareil pour des ingrédients durs tels que les
viandes congelées, les os, etc.
• Les lames accessoires sont très tranchantes. Manipuler avec soin
pendant le montage, la vidange et le neoyage du bol après l’avoir
ulisé.
• Rerez les lames accessoires avant de verser le contenu du bol.
• Ne pas laver les lames accessoires dans le lave-vaisselle.
• Ne pas uliser l’appareil avec les mains mouillées
• N'essayez pas d'uliser d’accessoires ou de pièces jointes non
standard avec cet appareil.
• Ne versez pas de liquides chauds dans l'appareil. Les liquides
doivent être laissés refroidir à température ambiante avant de les
mélanger.
• Ne jamais dépasser les quantés maximales.
• Cet appareil comprend un interrupteur de sécurité qui empêche
l’appareil de se mere en marche à moins que le bol et le couvercle
ne soient solidement assemblés.
• Cet appareil intègre un disposif de protecon contre les
températures élevées du moteur. Si la température du moteur
devient trop élevée, l'appareil s'éteint automaquement et
reprend son fonconnement lorsque le moteur a susamment

19
refroidi. Si le disposif de protecon se met en marche, éteignez-le
et laissez l’appareil refroidir pendant au moins 15 minutes.
• Avant d'enlever le couvercle du bol ou de rerer le bol de la base,
éteignez le robot culinaire et aendez que les composants de
l’appareil cessent de tourner.
• N'ulisez pas le verrouillage du couvercle pour démarrer ou arrêter
le processeur, toujours ulisez la foncon ON / OFF.
• Ne posez pas cet appareil sur ou à proximité d’un bruleur à gaz,
d'un brûleur électrique ou à l'intérieur d'un four chaué.
Durée d'exécuon nominal
Averssement: Ne dépassez pas le temps de fonconnement
nominal.
Les appareils électriques desnés à la préparaon des aliments sont
conçus avec des armoires scellées ou avec des petes ouvertures
dans le boier pour éviter toute contaminaon.
L'absence d'ouvertures dans le boier limite le ux d'air et augmente
la température interne pendant son fonconnement. Un temps
d’exécuon nominal (TEN) est indiqué pour éviter la surchaue et les
dommages potenels.
Le TEN pour cet appareil est :
3 minutes pour le hachage / traitement
30 secondes pour le mélange
Les périodes d'ulisaon connue ne doivent pas dépasser le TEN.
Laisser l'appareil reposer pendant 5 minutes après chaque période
d'ulisaon.
Dépasser le temps de fonconnement nominal est une situaon
abusive où l'appareil peut surchauer, ce qui est indiqué par une
augmentaon de la température du boier et des odeurs.
Éteignez et laissez l'appareil refroidir.

20
Avant la première ulisaon
• Déballez l'appareil et rerez tous les emballages.
• Lavez toutes les pares de l'appareil avant la première ulisaon. Se reporter à la
secon sur le neoyage et à l'entreen.
• Assurez-vous que les capacités indiquées dans les spécicaons ne soient pas
dépassées.
Illustraon des composants de l'appareil
1. Cadran de commande 10. Support de disque
2. Base moteur 11. Disque à frites
3. Arbre de transmission 12. Disque hachoir
4. Bol de traitement 13. Disque de pétrissage
5. Adapteur lame 14. Disque émulsionneur
6. Couvercle 16. Tasse à mesurer pour mélangeur
7. Poussoir 17. Couvercle pour bol mélangeur
8. Disque trancheur 18. Bol melangeur
9. Disque éminceur
Seite wird geladen ...
Seite wird geladen ...
Seite wird geladen ...
Seite wird geladen ...
Seite wird geladen ...
Seite wird geladen ...
Seite wird geladen ...
Seite wird geladen ...
Seite wird geladen ...
Seite wird geladen ...
Seite wird geladen ...
Seite wird geladen ...
Seite wird geladen ...
Seite wird geladen ...
Seite wird geladen ...
Seite wird geladen ...
Seite wird geladen ...
Seite wird geladen ...
Seite wird geladen ...
Seite wird geladen ...
-
 1
1
-
 2
2
-
 3
3
-
 4
4
-
 5
5
-
 6
6
-
 7
7
-
 8
8
-
 9
9
-
 10
10
-
 11
11
-
 12
12
-
 13
13
-
 14
14
-
 15
15
-
 16
16
-
 17
17
-
 18
18
-
 19
19
-
 20
20
-
 21
21
-
 22
22
-
 23
23
-
 24
24
-
 25
25
-
 26
26
-
 27
27
-
 28
28
-
 29
29
-
 30
30
-
 31
31
-
 32
32
-
 33
33
-
 34
34
-
 35
35
-
 36
36
-
 37
37
-
 38
38
-
 39
39
-
 40
40


Andrew James AJ001326 Benutzerhandbuch
- Kategorie
- Küchenmaschinen
- Typ
- Benutzerhandbuch
in anderen Sprachen
- English: Andrew James AJ001326 User manual
- français: Andrew James AJ001326 Manuel utilisateur
Verwandte Artikel
Andere Dokumente
-
Hendi 299272 Benutzerhandbuch
-
Hendi 230688 Benutzerhandbuch
-
-
Hendi 230602 Benutzerhandbuch
-
 Essentiel b ERBT2 Bedienungsanleitung
-
Waring Commercial WFP16SCDK Benutzerhandbuch
-
Hendi 298985 Benutzerhandbuch
-
KitchenAid 5KFP0719 Benutzerhandbuch
-
-
