
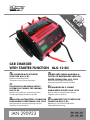
IAN 290923
CAR CHARGER
WITH STARTER FUNCTION ULG 12 B3
KFZ-LADEGERÄT MIT STARTHILFE-
FUNKTION ULG 12 B
3
DE
HU
CZ
CAR CHARGER WITH STARTER
FUNCTION ULG 12 B3
Operation and Safety Notes
Translation of the original instructions
GB
Bedienungs- und Sicherheitshinweise
Originalbetriebsanleitung
HU
SK
GB
CZ
SI
DE
SZEMÉLYGÉPJÁRMŰ AKKUMULÁ-
TORTÖLTŐ BERENDEZÉS INDÍTÁSI
SEGÉD FUNKCIÓVAL ULG 12 B3
AUTONABÍJEČKA S FUNKCÍ
POMOCNÉHO STARTU ULG 12 B3
Kezelési és biztonsági hivatkozások
Az eredeti használati utasítás fordítása
Návod k obsluze a bezpečnostní pokyny
Originální návod k obsluze
Návod na obsluhu a bezpečnostné upozornenia
Originálny návod na obsluhu
Navodila za upravljanje in varnostna opozorila
Prevod originalnega navodila za uporabo
NABÍJAČKA AUTOBATÉRIÍ S FUNKCIOU
POMOCNÉHO ŠTARTOVANIA ULG 12 B3
SK
POLNILNIK ZA MOTORNA VOZILA
S FUNKCIJO POMOČI PRI ZAGONU
ULG 12 B3
SI


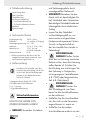
Before reading, unfold the page containing the illustrations and familiarise yourself with all functions of
the device.
GB
DE
Klappen Sie vor dem Lesen die Seite mit den Abbildungen aus und machen Sie sich anschließend mit
allen Funktionen des Gerätes vertraut.
GB Operation and Safety Notes Page 5
HU Kezelési és biztonsági hivatkozások Oldal 17
SI Navodila za upravljanje in varnostna opozorila Stran 31
CZ Návod k obsluze a bezpečnostní pokyny Strana 43
SK Návod na obsluhu a bezpečnostné upozornenia Strana 55
DE Bedienungs- und Sicherheitshinweise Seite 67
Olvasás előtt hajtsa ki az ábrát tartalmazó oldalt, és ezután ismerje meg a készülék mindegyik
funkcióját.
Než začnete číst tento návod k obsluze, rozložte stránku s obrázky a seznamte se se všemi funkcemi
zařízení.
Pred branjem odprite stran s slikami in se nato seznanite z vsemi funkcijami naprave.
Prv než začnete čítať tento návod, rozložte si stranu s obrázkami a potom sa oboznámte so všetkými
funkciami zariadenia.
HU
CZ
SI
SK

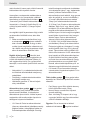
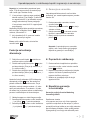
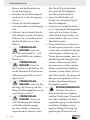
A
1
2
3
4
6
5
8
7

Table of contents
GB
5
Introduction ...........................................................................................................Page 6
Intended use ............................................................................................................... Page 6
Parts description .......................................................................................................... Page 7
Technical specifications ................................................................................................ Page 7
Delivery contents ......................................................................................................... Page 7
Safety notes .......................................................................................................... Page 7
Operation ............................................................................................................... Page 10
Product properties ........................................................................................................ Page 10
Connection ................................................................................................................. Page 10
Disconnecting ............................................................................................................. Page 11
Choosing the charging mode ........................................................................................ Page 11
Using the jump-start function.......................................................................................... Page 12
Replacing the fuse ....................................................................................................... Page 13
Maintenance and care ..................................................................................... Page 13
Warranty and service information ............................................................ Page 13
Warranty conditions.....................................................................................................Page 13
Extent of warranty ........................................................................................................ Page 13
Processing of warranty claims ....................................................................................... Page 14
Environmental notes and disposal information ..................................Page 14
Declaration of conformity ..................................................................................... Page 15

GB
6
Car charger with
starter function ULG 12 B3
Introduction
Congratulations!
You have purchased one of our
high-quality products.
Before initial setup, please familiarize yourself with
the product. Read the following original operat-
ing and safety instructions carefully. Only trained
persons may set up this product.
Intended use
The Ultimate Speed ULG 12 B3 is a car charger
with pulse maintenance charge (chip software),
used for charging and maintenance charging and
suitable for the following 6 V or 12 V-lead batteries
(batteries) with electrolyte solution, AGM batteries,
acid-lead batteries, deep cycle (boat batteries) or
gel batteries:
• For car and motorcycle batteries with
12 V/6 V and 8–180 Ah capacity
You can also regenerate discharged batteries
(depending on the battery type). The car charger
has a safety circuit against sparking and over-
heating. Any non-intended or improper use causes
loss of warranty. The manufacturer assumes no
liability for damage resulting from non-intended
use. The device is not intended for commercial use.
Note: The car charger cannot charge any electri-
cal vehicles with integrated rechargeable battery.
Introduction
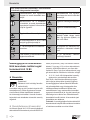
The following icons are used in this original operating manual/at the device:
Read the operating instructions of this
product attentively and completely
before use.
Read the operating manual of this
product attentively and completely
before using it.
NOTE: This symbol indicates addi-
tional information and explanations
on the product and its use.
Caution! Possible dangers!
Caution! Danger of explosion!
Caution! Danger of electric shock!
Protection type: Protected from
solid foreign bodies with diameter
≥ 12.5 mm, protected from access
with a finger; no protection from
water.
Dispose of batteries at the intended
battery collection points.
Suitable for lead-acid battery:
8Ah - 180Ah.
Do not dispose of electrical devices
in the household waste!
Only for use in closed, ventilated
rooms!
~50Hz
Alternating voltage at a frequency
of 50Hz.
I

GB
7
Introduction / Safety notes
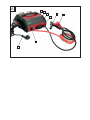
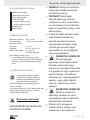
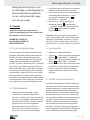
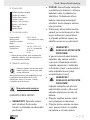
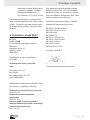
Parts description
Digital display button
Battery type button
Charge start button
Fuse with cover
"+" pole connection cable (red)
"–" pole connection cable (black)
Mains cable
Digital display
Technical specifications
Input voltage: 230 V~ 50 Hz
Return current*:
< 5 mA (no AC input)
Nominal output voltage: 6 V/12 V
Charge current: 2 A, 6 A, 12 A ± 10%
Battery type with: 12 V/6 V and
8–180 Ah capacity
Housing protection type: IP 20
* = Return current means the current that the char-
ger consumes from the battery when no mains
current is connected.
Delivery contents
Check the scope of delivery and the
device as well as all parts for damage
right after unpacking. Do not take a
defective unit or parts into operation.
1 Charger Ultimate Speed ULG 12 B3
2 Quick contact connection terminals
(1 red, 1 black)
1 original operating instructions
Safety notes
KEEP OUT OF THE REACH
OF CHILDREN!
DANGER! Avoid danger to
life and danger of injury from
improper use!
CAUTION! Do not operate the
device with a damaged cable,
mains cable or mains plug.
Damaged mains cables pose
danger to life from electric shock.
Have the mains cable only re-
paired by authorized and trained
specialists if there is any damage!
Contact the service point of your
country if you need any repair!
DANGER OF ELECTRIC
SHOCK! Ensure that the
vehicle is not in operation if the
battery is installed firmly in the
vehicle! Switch off the ignition and
put the vehicle into the parking
position, with the parking brake
engaged (e.g. car) or the rope
attached (e.g. electrical robot)!
DANGER OF ELECTRIC
SHOCK! Disconnect
the car charger from the mains
before removing the connection
terminals.
Connect the connection terminal
that is not connected to the car
body first.
Connect the other connection ter-
minal to the car body away from
the battery and the gasoline line.
Connect the car charger to the
supply grid only thereafter.
2
1
3
4
5
6
7
8

GB
8
Safety notes
Disconnect the car charger from
the supply grid after charging.
Only then disconnect the connec-
tion terminal from the car body.
Then disconnect the connection
terminal from the battery.
DANGER OF ELECTRIC
SHOCK! Only touch
the pole connection cables ("–"
and "+") in the insulated area!
DANGER OF ELECTRIC
SHOCK! Conduct the
connection to the battery
and the socket of the mains grid
completely protected from moisture!
DANGER OF ELECTRIC
SHOCK! Perform installa
-
tion, servicing and maintenance
of the car charger only when the
mains current is not connected!
DANGER OF ELECTRIC
SHOCK! Disconnect the
minus pole connection cable
(black) of the car charger from
the minus pole of the battery first
after completing charging and
maintenance charging if the
battery is continually connected
in the vehicle.
Do not leave any toddlers or
children unsupervised around
the car charger!
Children cannot assess possible
dangers in use of electrical
devices. Children must be super-
vised to ensure that they do not
play with the device.
This device may be used by
persons with reduced physical,
sensory or mental abilities or a
lack of experience and knowledge
if they are supervised or have
been instructed about safe use
of the device and understand the
resulting dangers. Do not allow
children to play with the product.
Cleaning and user maintenance
must not be performed by children
without supervision.
EXPLOSION HAZARD!
Protect yourself from
highly explosive oxyhydrogen
reactions! Gaseous hydrogen can
escape during charging or mainte
-
nance charging of the battery.
Oxyhydrogen is a potentially
explosive mix of gaseous hydrogen
and oxygen. The oxyhydrogen
reaction occurs at contact with
open fire (flames, smouldering or
sparks)! Perform charging and
maintenance charging in a
weather-protected space that is
ventilated well. Ensure that there
are no open light (flames, smoul
-
dering or sparks) during charging
or maintenance charging!
EXPLOSION AND FIRE
HAZARDS! Ensure that explosive
or flammable substances, such

GB
9
Safety notes
as gasoline or solvents cannot be
ignited when you are using the
car charger!
EXPLOSIVE GASES! Avoid
flames and sparks!
Ensure sufficient ventilation when
charging.
Put the battery onto a well-
ventilated surface when charging.
Otherwise, the device can be
damaged.
EXPLOSION HAZARD!
Ensure that the plus-pole
connection cable has no contact
with a fuel line (e.g. gasoline line)!
DANGER OF CAUSTIC
BURNS! Protect your eyes
and skin from caustic burns from
the acid (sulphuric acid) when it
comes into contact with the battery!
Use: acid-resistant goggles,
clothing and gloves! If your eyes
or skin have come into contract
with the sulphuric acid, flush the
affected body region with plenty
of running, clear water and seek
medical advice at once!
Avoid electrical short circuit when
connecting the car charger to the
battery. Connect the minus pole
connection cable only to the
minus pole of the battery or the
car body. Connect the plus pole
connection cable only to the plus
pole of the battery!
Before connecting the mains
current, ensure that the mains
current is equipped properly with
230 V~ 50 Hz, an earthed zero
conductor, a 16 A fuse and an
FI-switch (fault-circuit interrupter)!
Otherwise, the device can be
damaged.
Do not use the car charger near
any fires, heat and long-term
temperatures above 50 °C! For
higher temperatures, the output
power of the car charger will
drop automatically.
Use the car charger only
with the original parts it was
delivered with!
Do not cover the car charger
with any objects! Otherwise, the
device can be damaged.
Protect the electrical contact
surfaces of the battery from
short circuit!
Use the car charger only for
charging and maintenance
charging of undamaged
6 V-/12 V-lead batteries
(with electrolyte solution or gel)!
Otherwise, property damage
may be the consequence.
Do not use the car charger for
charging and maintenance
charging of non-rechargeable
batteries. Otherwise, property
damage may be the consequence.

GB
10
Do not use the car charger for
charging and maintenance
charging of damaged or frozen
batteries! Otherwise, property
damage may be the consequence.
Learn about the maintenance
of your battery in its original
operating instructions before con-
necting the charger! Otherwise,
there is a danger of injury and/or
the risk of damage to the device.
Before connecting the charger to
a battery that is continually con
-
nected to the vehicle, learn about
compliance with the electrical
safety and maintenance in the
original operating instructions of
the vehicle! Otherwise, there is
a danger of injury and/or the
risk of property damage.
Disconnect the car charger from
the mains current when it is not
is use to protect the environment
as well! Note that power is
consumed in standby operation
as well.
Always pay attention and observe
what you are doing. Proceed
reasonably and do not take the
car charger into operation
when you are not focused or
not feeling well.
Operation
Always pull the mains plug from the
socket before you perform any work at
the car charger.
DANGER OF ELECTRIC SHOCK!
DANGER OF PROPERTY DAMAGE!
DANGER OF INJURY!
Product properties
This device is designed for charging many SLA
batteries (sealed lead-acid batteries), which are
mostly used in cars, motorcycles and some other
vehicles. They can be, e.g., WET (with liquid elec-
trolyte), GEL (with electrolyte gel) or AGM batteries
(with electrolyte-absorbent mats). A special design
of the device (also called a "three-stage charging
strategy") permits recharging of the battery to
nearly 100% of its capacity. The battery may also
be connected to the car charger permanently in
order to keep it in optimal condition at all times.
Connection
Disconnect the minus pole connection cable
(black) of the vehicle from the minus pole of the
battery first before charging and maintenance
charging if the battery is continually connected
in the vehicle. The minus pole of your battery
is usually connected to the car body of the
vehicle.
Then disconnect the plus pole connection cable
(red) of the vehicle from the plus pole of the
battery.
Only then connect the "+" pole quick contact
connection terminals (red)
5
of the car
charger to the "+"-pole of the battery.
Connect the "–"-pole quick contact-connection
terminal (black)
6
to the "–"-pole of the
battery. Connect the mains cable
7
of the
car charger to the socket.
Safety notes / Operation

GB
11
Operation
Note: If the connection terminals are connected
correctly, the display indicates the voltage and
the display "connected" lights up. If polarity is
reversed, the display shows 0.0 and the display
"connected" does not light up.
Disconnecting
Disconnect the device from the mains current.
Disconnect the "–"-pole quick contact-connec-
tion terminal (black)
6
from the "–"-pole of
the battery.
Disconnect the "+"-pole quick contact-connec-
tion terminal (red)
5
from the "+"-pole of
the battery.
Reconnect the plus pole connection cable of
the battery to the plus pole of the battery.
Reconnect the minus pole connection cable of
the battery to the minus pole of the battery.
Choosing the charging
mode
You can choose from different charging modes for
charging different batteries at different ambiance
temperatures. As compared to conventional car
chargers, this device has a special function for
reuse of a flat battery/rechargeable battery. You
can recharge a completely discharged battery/
rechargeable battery. Protection against wrong
connection and short circuit ensures safe charging.
The integrated electronics do not start the car char-
ger at once after connection of the battery, but only
after a charging mode has been selected.
If the connection terminals are connected to the
battery and the device is connected to the mains,
the digital display
8
will show "Connected". After
the charging mode has been selected, the display
"Charging" lights up. When charging is complete,
the display "Charged" lights up.
If the digital display is continually lit before the
battery is completely charged, there is a defect.
In this case, check again if the connection
terminals
6
,
5
are correctly attached to the
battery and whether the correct battery type
has been chosen. If the display lights up
continually anyway, there may be a defect in
the battery.
Digital display button
1
: Permits replacing of
the digital display of the voltage and the charging
progress in percent (battery %). Use this button in
order to switch between the following displays:
– Battery %: shows the charging progress of the
connected battery in percent.
– Voltage: shows the voltage of the connected
battery.
– Alternator %: Output power in percent
Battery type button
2
: Use this button to set
the type of the battery to be charged. You can
choose between different battery types here. The
battery type must be set correctly before charging
commences:
– 12 V Regular: These batteries (lead-acid bat-
teries) are usually used in cars, trucks and
motorcycles. They have venting caps and are
often marked as "low-maintenance" or "no
maintenance". This battery type is meant for
transferring energy quickly (e.g. starting an
engine). "Regular" batteries should not be used
for "Deep Cycle" applications.
– 12 V Deep Cycle: These batteries are usually
also marked as "Deep Cycle" or "Marine".
Batteries of this type are usually larger than
other battery types. This supplies less short-term
energy, but a longer-term energy transmission.
These batteries can withstand a large number
of discharge cycles.
– 12 V AGM/gel: The battery types AGM
are usually good deep cycle batteries. They
have the best "service life" when they are
recharged before they have been discharged
by more than 50%. At complete discharge,
they can withstand about 300 charge cycles.
The battery type GEL is similar to the battery
type AGM. The voltage at recharging is lower

GB
12
Operation
than in other lead-acid batteries. If you use the
wrong charger for a gel battery, a reduced
output or shorter service life can be expected.
– 6 V Regular: Choose this mode for commercial
6-V batteries.
Charge-start button
3
: Use this button to
switch between the following options:
– Fast charge: fast charging (recommended for
low outdoor temperatures/winter)
– Normal charge: normal charging (normal
speed)
– Start: supplies 75 Ampere briefly to bridge
batteries with a weak charge or flat batteries
for starting the engine
Attention: The mode can only be terminated by
pulling the mains cable
7
.
Using the jump-start
function
Always make all connections as
described and in the proper order. Otherwise, the
electronic system of the vehicle can be damaged.
If proceeding contrary to the specifications
described, you will act at your own risks and
responsibility.
Attention: This function is not suitable for
batteries below 45 Ah. For batteries below 45 Ah,
this function may damage the battery. For diesel
vehicles and large-volume gasoline motors, higher
currents than 75 A are needed for starting at times.
Note: The charger has an analysis program that
protects the battery from damage in particular
for the jump-start function (e.g. sulphatisation, too
strong voltage drops). If the batteries are dis-
charged very strongly or subject to very high stress,
the device will not activate the jump-starter to
protect the battery. During this process, the battery
is already being charged at low currents (charging
is lit). The display then stays at "0". In this case,
jump starting is not possible. This protects the
battery from damage. The battery should be
charged first. The function "Fast Charge" or
"Normal Charge" can be used for this.
If the connection terminals are connected
correctly, the car charger will automatically
choose the proper battery type. You can check
it in the option field "Battery type" and change
it by pushing the Battery-Type button
2
if
necessary.
Now use the Charge-Start button
3
to select
the function "Start". The car charger now
analysis the charge condition of the battery.
The display now shows "0".
Now actuate the vehicle's ignition. A count-
down of 5 seconds now starts in the display
(including a lead time or analysis function of
2 seconds and jump-start function of 3 seconds
at 75 A), when jump-start by the car charger
is necessary (this will be analysed by the car
charger in advance). During this countdown,
your car charger will briefly supply 75 A, in
order to bridge the battery for starting the en-
gine. This will be followed by a break of 180
seconds to protect the battery. Now the cycle
restarts (2 seconds lead or analysis function
and 3 seconds jump-start function at 75 A /
180 seconds pause).
To disconnect the device, remove the connec-
tion terminals first (
6
/
5
) and then pull the
mains cable
7
.
Note: If the battery is discharged entirely, the
75 A will not be sufficient to start the engine in all
vehicles (e.g. diesel vehicles).
In this case, use the Charge-Start button
3
to select the option "Fast Charge" and then
charge the battery to 60 % (for diesel engines,
the warm-up withdraws energy from the bat-
tery. The 60% must be pending after warm-up).
You can track charging progress at the display by
selecting the option "Battery %" with the digital
display button
1
.
When 60% is reached, repeat the jump-start
function.
Attention: End the mode by pulling the mains
plug
7
.

GB
13
Operation
/
Maintenance and care
/ Warranty and service information
Alternator test function
Connect the mains cable
7
of the car charger
to the socket.
Attach the red connection terminals
5
to the
plus pole of your battery. (The plus pole is
marked by a "+" and a red mark.)
Attach the black connection terminals
6
to the
minus pole of your battery. (The minus pole is
marked by a "+" and a black mark.)
Set the function alternator (LED next to the alternator)
via the button
1
. A %-value is displayed. Start the
engine. If the %-value rises with the engine running,
the alternator will charge the battery. If the %-value
drops or remains the same, there is a problem with
the alternator, the connection or the battery.
Disconnect the device from the mains current.
Disconnect the "–"-pole quick contact-
connection terminal (black)
6
from the "–"-
pole of the battery.
Disconnect the "+"-pole quick contact-
connection terminal (red)
5
from the "+"-pole
of the battery.
Replacing the fuse
The fuse of the car charger may be damaged,
e.g. by a device defect, overload, etc.
Before replacing the fuse, pull the mains
cable
7
.
Remove the cover of the fuse
4
by depressing
it slightly on the side.
Unscrew the fuse
4
with a matching
open-faced wrench and attach the new fuse.
Screw it on subsequently and replace the
cover
4
.
Note: If you need a new fuse, contact our
service (see chapter with notes on guarantee
and service processing).
Maintenance and care
Always pull the mains cable
7
from the socket
before you perform any work at the car charger.
The device is maintenance-free. Deactivate the
device. Clean the metal and plastic surfaces of
the device with a dry cloth.
Never use any solvents or other aggressive
cleaning agents.
Warranty and service
information
Creative Marketing
Consulting GmbH warranty
Dear customer,
The warranty for this equipment is 3 years from the
date of purchase. In the event of product defects,
you have legal rights against the retailer of this
product. Our warranty, outlined below, does not
limit your statutory rights.
Warranty conditions
The warranty period begins on the date of purchase.
Please retain the original sales receipt.
This document is required as your proof of purchase.
Should this product have a material or manufacturing
error within three years of the purchase date, the
product will be repaired or replaced – dependent on
our choice – by us at no cost to you. This warranty
service requires that you retain proof of purchase
(sales receipt) for the defective device for the three
year period and that you briefly explain in writing
what the fault entails and when it occurred.
If the defect is covered by our warranty, we will
return the repaired device or a replacement thereof.
A repair or exchange of the device does not start a
new warranty period.
Extent of warranty
The device has been manufactured according to
strict quality guidelines and meticulously examined
before delivery.

GB
14
...
/
Environmental notes and disposal information
The warranty applies to defects in material or
manufacture. This warranty does not extend to
product parts which are subject to normal wear
and tear and can thus be regarded as consum-
able parts, or for damages to fragile parts, e.g.
switches, rechargeable batteries, or parts made
from glass. This warranty is void if the product is
damaged, improperly used, or serviced. For proper
use of the product, all of the instructions given in
the original operating instructions must be followed
precisely. Uses and acts that the original operating
instructions advise or warn against are to be
avoided without question.
The product is only intended for private use and is
not for commercial use. The warranty becomes void
in the event of misuse and improper use, use of
force, and any interference not carried out by our
authorized service branch.
Processing of warranty
claims
Please follow the instructions below to ensure quick
processing of your claim:
Please retain proof of purchase and the article
number (e.g., EAN) for all inquiries. The product
number can be found on the type plate, an
engraving, the cover page of your instructions
(bottom left), or the sticker on the back or bottom.
Should you have any functional fault or other error,
first contact the service department listed below
by phone or email.
You can then forward a product recognized as
defective with a proof of purchase (sales receipt)
and a statement indicating what the fault entails
and when it occurred to the service address, which
will be given at no cost to you for postage.
Note:
You can download this handbook and
many more, as well as product videos
and software at www.lidl-service.com.
How to contact us:
GB, NI, IE
Name: C. M. C. GmbH
Website: www.cmc-creative.de
E-mail: ser[email protected]
Phone: 0-808-189-0652
Registered office: GERMANY
IAN 290923
Please note that the following address is not a ser-
vice address. Please first contact the service point
(hotline) named above.
Address:
C. M. C. GmbH
Katharina-Loth-Str. 15
66386 St. Ingbert
GERMANY
Ordering spare parts:
www.lidl.com/contact-us
Environmental notes and
disposal information
Do not throw electrical tools into
the household waste!
Always recycle the device, accessories
and packaging in an environmental-
ly-friendly manner.
Do not dispose of the car charger in household
waste, in fire or in water. Devices which are no
longer functional should be recycled whenever
possible.
Contact your local retailer for information.
As the consumer you are legally
obligated (Battery Ordinance) to return
any used batteries. Batteries containing
harmful substances are labelled with the
adjacent symbol, which indicates the

GB
15
Declaration of conformity
ban on disposal in household waste.
The abbreviations for the essential heavy
metals are: Cd = Cadmium,
Hg = Mercury, Pb = Lead.
Take used batteries to a disposal facility in your
city or community, or back to the distributor. This
satisfies your legal obligations and you are greatly
contributing to protecting the environment.
Declaration of conformity
We,
C. M. C. GmbH
Responsible for documentation: Mark Uhle
Katharina-Loth-Str. 15
66386 St. Ingbert
GERMANY
declare in our sole responsibility the product
Car charger with jump-start function
Year of manufacture: 2017 / 43
IAN: 920923
Year of CE mark: 2017
Model: ULG 12 B3
meets the basic safety requirements of European
Directives
EC low-voltage directive
2014 / 35 / EU
EC directive on electromagnetic
compatibility
2014 / 30 / EU
RoHS directive
2011 / 65 / EU
The object of the declaration described above
meets the requirements of Directive 2011 / 65 / EU
of the European Parliament and Council dated
8th June 2011, restricting the use of certain
hazardous substances in electrical appliances and
electronics.
The conformity assessment is based on the
following harmonized standards:
EN 60335-2-29:2004/A2:2010
EN 60335-1:2012/A11:2014
EN 62233:2008
EN 50498:2010
EN 55014-1:2006/A2:2011
EN 55014-2:1997/A2:2008
EN 61000-3-2:2014
EN 61000-3-3:2013
AfPS GS 2014:01 PAK
St. Ingbert, 18 August 2017
ppa. Marc Uhle
- Document officer

GB
16

HU
17
Tartalomjegyzék
Bevezetés .......................................................................................................................... Oldal 18
Rendeltetésszerűhasználat .................................................................................................. Oldal 18
Azalkatrészekleírása............................................................................................................ Oldal 19
Műszakiadatok ...................................................................................................................... Oldal 19
Szállításiterjedelem............................................................................................................... Oldal 19
Biztonsági tudnivalók .................................................................................................... Oldal 19
Kezelés .................................................................................................................................. Oldal 23
Terméktulajdonságok ............................................................................................................. Oldal 23
Csatlakoztatás ....................................................................................................................... Oldal 23
Leválasztás ............................................................................................................................ Oldal 23
Atöltőmódkiválasztása ........................................................................................................ Oldal 23
Indítássegítőfunkcióhasználata ........................................................................................... Oldal 25
Biztosítékcseréje................................................................................................................... Oldal 26
Karbantartás és ápolás ................................................................................................. Oldal 26
Garanciával és szervizszolgáltatással kapcsolatos tudnivalók................ Oldal 26
Garanciálisfeltételek ............................................................................................................. Oldal 26
Agaranciaterjedelme ............................................................................................................ Oldal 27
Garanciálisesetkezelése ...................................................................................................... Oldal 27
Környezetvédelemmel kapcsolatos tudnivalók
és az ártalmatlanítás adatai ........................................................................................ Oldal 29
EU megfelelőségi nyilatkozat............................................................................................Oldal 29

HU
18
Személygépjármű akkumulátor
töltő berendezés indítási segéd
funkcióval ULG 12 B3
Bevezetés
Gratulálunk!
Vállalatunkkiválóminőségűterméke
mellett döntött.
Atermékkelmégazelsőüzembehelyezéselőtt
ismerkedjenmeg.Ehhezgyelmesenolvassa
elakövetkezőeredetihasználataiútmutatót
ésabiztonságitudnivalókat.Aterméküzembe
helyezésétcsakoktatásbanrészesítettszemély
végezheti.
Rendeltetésszerű használat
AzUltimateSpeedULG12B3személygépjármű
akkumulátortöltőberendezéspulzusfenntartótöl-
téssel(chipszoftver),melyakövetkezőelektrolit
oldatos6V-osvagy12V-osólomakkumulátorok
(elemek),AGM-akkumulátorok,sav-ólomakku-
mulátorok,DeepCycle(bootakkumulátorok)vagy
gélakkumulátoroktöltéséreéskisütéséreszolgál:
• 12V/6Vés8–180Ahkapacitásúszemély-
gépkocsiésmotorkerékpárakkumulátor
Ezenkívülakisütöttakkumulátorokatregene-
rálnitudja(azakkumulátortípusátólfüggően).
Aszemélygépjárműakkumulátortöltőberende-
zésszikraképződésvagytúlmelegedésellen
védőkapcsolássalrendelkezik.Mindennem
rendeltetésszerűvagyszakszerűtlenhasználat
agaranciaelvesztéséveljár.Agyártósemmilyen
felelősségetsemvállalanemrendeltetésszerű
használatbóleredőkárokért.Aberendezésipari
használatranemalkalmas.
Tudnivaló: Aszemélygépjárműakkumulátortöltő
berendezésselbeépítettakkumulátorralrendelke-
zőelektromosautókatnemlehettölteni.
Bevezetés
Jelen eredeti használati útmutatóban / a berendezésen
a következő piktogramokat használjuk:
Használatbavétel előtt gyelmesen
olvassaelatermékhasználatiútmu-
tatóját.
Használatbavétel előtt gyelme-
senolvassaelatermékhasználati
útmutatóját.
MEGJEGYZÉS: ez a szimbólum
atermékkel,ésannakhasználatával
kapcsolatoskiegészítőinformációkra
hívjafelgyelmét.
Figyelem!Lehetségesveszélyek!
Figyelem!Robbanásveszély!
Figyelem!Áramütésveszély! Védettség: védett ≥ 12,5 mm
átmérőjű szilárd idegen testek
ellen;egyujjalnemnyitható;víz
ellen nem védett.
Az akkumulátorokat az erre a célra
szolgálógyűjtőhelyenadjale!
8-180Aókapacitásúólomakkumu-
látorokhoz.
Ne helyezze az elektromos ké-
szülékeket a háztartási hulladék
közé!
Csakzárható,jólszellőztethetőhelyi-
ségbenhasználható!
~50Hz
50 Hz frekvenciájú váltakozó
feszültségűáramhoz.
I

HU
19
Bevezetés/Biztonságitudnivalók
Az alkatrészek leírása
Digitáliskijelzőgombja
Akkumulátortípusgombja
Töltésindításgombja
Afedélbiztosítása
„+“-pólussorkapocs(piros)
„–“-pólussorkapocs(fekete)
Hálózatikábel
digitáliskijelző
Műszaki adatok
Bemenetifeszültség: 230V~50Hz
Visszatérőáram*:
<5mA(nincsAC-bemenet)
Névlegeskimeneti
feszültség: 6V/12V
Töltőáram: 2A,6A,12A±10%
Akkumulátortípusa: 12V/6Vés
8–180Ahkapacitás
Házvédettségimódja:IP20
*=avisszatérőáramaztazáramotjelenti,
melyetatöltőberendezésazakkumulátorból
használel,hanincshálózatiáramforrásra
kötve.
Szállítási terjedelem
Akicsomagolásutánközvetlenül
ellenőrizzeaszállításiterjedelmet,
valamintagépvalamennyirészét,
hogynincsenek-emegsérülve.
Ahibásberendezéstvagyannakelemeitne
helyezzeüzembe.
1dbUltimateSpeedULG12B3akkumulátortöltő
2gyorsrögzítősorkapocs(1piros,1fekete)
1eredetikezelésiútmutató
Biztonsági tudnivalók
ABERENDEZÉSNEKERÜLJÖN
GYEREKEKKEZÉBE!
VESZÉLY! Kerüljeelaszaksze-
rűtlenhasználatbóleredőélet-
éssérülésveszélyt!
VIGYÁZAT! Sérültkábel,
hálózatikábelvagyhálózati
csatlakozóeseténneüzemeltes
-
seakészüléket.Asérülthálózati
kábelazáramütésveszélyemiatt
életveszélyes.
Ahálózatikábeltsérülésesetén
csakfelhatalmazássalren-
delkezőésképzettszakmai
személyzetteljavíttassameg!
Javításiigényeseténlépjen
kapcsolatbaazönországának
szervizszolgálatával!
ÁRAMÜTÉS VESZÉLYE!
Állandójelleggel
ajárműbeszereltakkumulátor
töltésekorbiztosítsa,hogy
ajárműneüzemeljen!Kapcsolja
kiagyújtástésvigyeajárművet
parkolóállásba,akézifékbe-
húzásával(pl.személygépjármű
esetén),vagyakötélrögzíté-
sével(pl.elektromoscsónak
esetén)!
ÁRAMÜTÉS VESZÉLYE!
Mielőttasorkapcsot
eltávolítja,válasszaleasze-
mélygépjárműakkumulátortöltő
berendezéstahálózatról.
Előszöraztasorkapcsot
csatlakoztassa,amelyiknem
csatlakozikakarosszériára.
2
1
3
4
5
6
7
8

HU
20
Biztonságitudnivalók
Amásiksorkapcsotakkumulátor-
tólésabenzinvezetéktőltávol
csatlakoztassaakarosszériához.
Csakezutáncsatlakoztassa
aszemélygépjárműakkumulátor-
töltőberendezéstabetápláló
hálózatra.
Aszemélygépjárműakkumulá-
tortöltőberendezésttöltésután
válasszaleabetáplálóhálózatról.
Csakezutántávolítsael
asorkapcsotakarosszériáról.
Közvetlenülezutántávolítsael
asorkapcsotazakkumulátorról.
ÁRAMÜTÉS VESZÉLYE
!
Apóluscsatlakozókábelt
(„–“és„+“)kizárólagaszigetelt
részénfogjameg!
ÁRAMÜTÉS VESZÉLYE!
Acsatlakozótazakku-
mulátorhozésazelektromos
áramhálózatialjzatáhoznedves-
ségtőlteljesenvédvevezesseel!
ÁRAMÜTÉS VESZÉLYE!
Aszemélygépjármű
akkumulátortöltőberendezés
szerelését,karbantartásátés
ápolásátcsakakkorvégezze,
haaberendezésnincshálózati
áramforrásracsatlakoztatva!
ÁRAMÜTÉS VESZÉLYE!
Azoknálazakkumuláto-
roknál,melyekfolyamatosanrá
vannakcsatlakoztatvaajárműre,
afeltöltésiéskisütésifolyamat
befejezéseutánelőszöraszemél-
ygépjárműakkumulátortöltő
berendezésmínuszpóluscsatla
-
kozókábelét(fekete)távolítsael
azakkumulátormínuszpólusáról.
Nehagyjonkisgyermekeket
ésgyermekeketfelügyelet
nélkülaszemélygépjárműtöltő
berendezéssel!
A gyerekek az elektromos
berendezésekkezelésének
esetlegesveszélyeitmég
nemtudják
felmérni.Ügy-
eljen a gyermekekre annak
érdekében,hogynejátszanak
akészülékkel.
Korlátozottzikai,érzékelő
vagymentálisképességű,vagy
ismeretekkeléstapasztalatok-
kalnemrendelkezőszemélyek
akészüléketcsakfelügyeletmel-
lett,illetveakkorhasználhatják,
haőketakészülékhasználatára
kioktatták,ésakészülék
használatánakveszélyeit
megértették. A gyermekek
nemjátszhatnakakészülékkel.
Atisztítástésafelhasználóikar-
bantartástgyermekekfelügyelet
nélkülnemvégezhetik.
ROBBANÁSVESZÉLY!
Óvakodjonarendkívül
robbanásveszélyesrobbanógáz
reakciótól!Atöltőéstöltésfenn-
tartóműveletvégzésesorán
Seite wird geladen ...
Seite wird geladen ...
Seite wird geladen ...
Seite wird geladen ...
Seite wird geladen ...
Seite wird geladen ...
Seite wird geladen ...
Seite wird geladen ...
Seite wird geladen ...
Seite wird geladen ...
Seite wird geladen ...
Seite wird geladen ...
Seite wird geladen ...
Seite wird geladen ...
Seite wird geladen ...
Seite wird geladen ...
Seite wird geladen ...
Seite wird geladen ...
Seite wird geladen ...
Seite wird geladen ...
Seite wird geladen ...
Seite wird geladen ...
Seite wird geladen ...
Seite wird geladen ...
Seite wird geladen ...
Seite wird geladen ...
Seite wird geladen ...
Seite wird geladen ...
Seite wird geladen ...
Seite wird geladen ...
Seite wird geladen ...
Seite wird geladen ...
Seite wird geladen ...
Seite wird geladen ...
Seite wird geladen ...
Seite wird geladen ...
Seite wird geladen ...
Seite wird geladen ...
Seite wird geladen ...
Seite wird geladen ...
Seite wird geladen ...
Seite wird geladen ...
Seite wird geladen ...
Seite wird geladen ...
Seite wird geladen ...
Seite wird geladen ...
Seite wird geladen ...
Seite wird geladen ...
Seite wird geladen ...
Seite wird geladen ...
Seite wird geladen ...
Seite wird geladen ...
Seite wird geladen ...
Seite wird geladen ...
Seite wird geladen ...
Seite wird geladen ...
Seite wird geladen ...
Seite wird geladen ...
Seite wird geladen ...
Seite wird geladen ...
-
 1
1
-
 2
2
-
 3
3
-
 4
4
-
 5
5
-
 6
6
-
 7
7
-
 8
8
-
 9
9
-
 10
10
-
 11
11
-
 12
12
-
 13
13
-
 14
14
-
 15
15
-
 16
16
-
 17
17
-
 18
18
-
 19
19
-
 20
20
-
 21
21
-
 22
22
-
 23
23
-
 24
24
-
 25
25
-
 26
26
-
 27
27
-
 28
28
-
 29
29
-
 30
30
-
 31
31
-
 32
32
-
 33
33
-
 34
34
-
 35
35
-
 36
36
-
 37
37
-
 38
38
-
 39
39
-
 40
40
-
 41
41
-
 42
42
-
 43
43
-
 44
44
-
 45
45
-
 46
46
-
 47
47
-
 48
48
-
 49
49
-
 50
50
-
 51
51
-
 52
52
-
 53
53
-
 54
54
-
 55
55
-
 56
56
-
 57
57
-
 58
58
-
 59
59
-
 60
60
-
 61
61
-
 62
62
-
 63
63
-
 64
64
-
 65
65
-
 66
66
-
 67
67
-
 68
68
-
 69
69
-
 70
70
-
 71
71
-
 72
72
-
 73
73
-
 74
74
-
 75
75
-
 76
76
-
 77
77
-
 78
78
-
 79
79
-
 80
80


ULTIMATE SPEED ULG 12 B3 Original Instructions Manual
- Typ
- Original Instructions Manual
- Dieses Handbuch eignet sich auch für
in anderen Sprachen
- English: ULTIMATE SPEED ULG 12 B3
- slovenčina: ULTIMATE SPEED ULG 12 B3
Verwandte Artikel
-
ULTIMATE SPEED ULG 15 B4 Operation and Safety Notes
-
-
-
-
ULTIMATE SPEED ULG 17 A1 Operation And Safety Notes Translation Of The Original Instructions
-
ULTIMATE SPEED ULG 12 A2 Operation and Safety Notes
-
-
-
-
ULTIMATE SPEED ULG 12 A1 Operation and Safety Notes
Andere Dokumente
-
Silvercrest 282352 Operation and Safety Notes
-
 Powerfix Profi 278555 Operating Instructions Manual
-
Parkside PASL 4000 B2 Bedienungsanleitung
-
 Avacom JVL-305 Benutzerhandbuch
-
 Avacom VL-505 Schnellstartanleitung
-
LIVARNO 114063 Bedienungsanleitung
-
AEG LP 3.8 Bedienungsanleitung
-
Hummer H8 Multifunctional Jump Starter Power Bank Benutzerhandbuch
-
-
iGET Li-Polymer, 12000 mAh Benutzerhandbuch


