


Használati útmutató
3
W
a
t
e
ilk
Magyarország
Biztonsági utasítások-Álatlános információk
• Kérjük, figyelmesen olvassa el ezeket az utasításokat, és őrizze meg azokat referenciaként.
• A készüléket kizárólag ezeknek az utasításoknak megfelelően használja.
• A készüléket 8 évnél idősebb gyermekek, vagy csökkent fizikai, érzékszervi vagy mentális képességű
személyek, vagy a kellő tapasztalatokat illetve ismereteket nélkülöző személyek csak felügyelet mellett,
vagy abban az esetben használhatják, ha előzetesen a biztonságukért felelős személytől megfelelő
tájékoztatást kaptak a készülék használatát illetően, illetve csak megfelelő felügyelet mellett.
• Biztosítani kell, hogy gyerekek ne játszhassanak a készülékkel.
• A javításokat kizárólag szakképzett szerelővel végeztesse. Soha ne próbálja megjavítani saját maga a készüléket.
• A készülék tisztítását és karbantartását nem végezhetik gyermekek, kivéve, ha azok 8 évnél idősebbek, valamint
felügyelet mellet vannak.
Biztonsági utasítások-Használat közben
• Soha ne merítse a készüléket, a csatlakozót, vagy a kábelt vízbe, vagy más folyadékba.
• Nem vállalunk felelősséget helytelen használat okozta károkért, illetve azért ha figyelmen kívül hagyja az ebben a
kézikönyvben leírt szabályokat.
Működés-Általános
A készülék csak háztartási
használatra alkalmas,
professzionális használatra
nem. 6
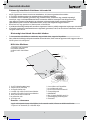
5
2
3
1
4
a f
b g
c h
d i
j
e
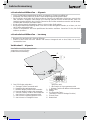
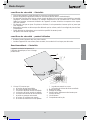
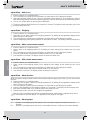
1. Az LCD-kijelző mutatja, hogy;
a. melyik funkciót használja
b. ha negatív értéket mér
c. normális súly mérés funkció használatakor
d. normális súly mérés funkció használatakor
e. Ha tej mérés funkciót használ
f. ha grammban mér
g. ha ml-ben mér
h. ha unciában mér folyadékot
i. ha unciában mér súlyt
j. Ha víz mérés funkciót használ
2. Üzemmód gomb
3. Mérőfelület
4. Be / ki gomb (Nullázó gomb is)
5. Mértékegység választó gomb
6. Elemtartó
Kezelés - elemcsere
A gyár már helyezett elemet a készülékbe. Ha ki szeretné cserélni, kövesse az alábbi utasításokat.
1. Nyissa ki az elemtartót (6) a készülék alján.

Használati útmutató
4
Magyarország
2. Vegye ki az elemet, majd helyezze be az újat (CR2032).
3. Zárja vissza az elemtartó fedelét.
Kezelés-Használat előtt
1. Helyezze a készüléket egy sima és szilárd felületre.
2. Kapcsolja be a készüléket a be/ki gombbal (4). Várja meg, amíg az LCD-kijelző bekapcsol.
3. Válassza ki a mértékegységet a mértékegység választó gombbal (5). A kijelző (1) azt mutatja, hogy váltakozik a g
(Európai mértékegység) és lb: oz (angol / amerikai mértékegység) közt.
4. A készüléket kikapcsolni a be / ki gombbal lehet.
A készülék kikapcsol, ha nem használja 2 percig. A készülék megjegyzi a beállításokat a rendszer
kikapcsolása után.
Kezelés-Mérleg
1. Helyezze a készüléket egy sima és szilárd felületre.
2. Tegye a tálat a mérlegre (3). Készítse elő a hozzávalókat. Mindig tegyen így, mielőtt bekapcsolja a készüléket.
3. Kapcsolja be a készüléket a be/ki gombbal (4). Várja meg, amíg az LCD-kijelző bekapcsol.
4. Öntse a hozzávalókat a tálba. A kijelzőn megjelenik a mérési eredmény.
Kezelés-Víz mérése
1. Helyezze a készüléket egy sima és szilárd felületre.
2. Tegyen egy tálat a mérlegre (3). Készítse elő a vizet. Mindig tegyen így, mielőtt bekapcsolja a készüléket.
3. Kapcsolja be a készüléket a be/ki gomb (4). Várja meg, amíg az LCD-kijelző bekapcsol.
4. Nyomja meg az üzemmód gombot (2), amíg nincsenek gondolatjelek, ml (fl. Oz) és víz felirat alatt.
5. Öntse a vizet a tálba. A kijelzőn megjelenik a víz mennyisége.
Működés-Tej mérése
1. Helyezze a készüléket egy sima és szilárd felületre.
2. Tegyen egy tálat a mérlegre (3). Készítse elő a tejet. Mindig tegyen így, mielőtt bekapcsolja a készüléket.
3. Kapcsolja be a készüléket a be/ki gomb (4). Várja meg, amíg az LCD-kijelző bekapcsol.
4. Nyomja meg az üzemmód gombot (2), amíg nincsenek gondolatjelek, ml (fl. Oz) és tej felirat alatt.
5. Öntse a tejet a tálba. A kijelzőn megjelenik a tej mennyisége.
Kezelés-Önsúly funkció
Ha több terméket szeretne egymás után mérni a mérlegen, a tál kiürítése nélkül, akkor használja az önsúly funkciót:
1. Helyezze a készüléket egy sima és szilárd felületre.
2. Tegyen egy tálat a mérlegre (3), készítse elő az összes hozzávalót. Mindig tegyen így, mielőtt bekapcsolja a
készüléket.
3. Kapcsolja be a készüléket a be/ki gombbal (4). Várja meg, amíg az LCD-kijelző bekapcsol.
4. Helyezze az első összetevőt a tálba. A kijelzőn megjelenik ennek a tömege.
5. Nyomja meg a nulla-gombot (4), hogy a kijelzőn vissza állítsa az értéket nullára.
6. Ismételje meg a 4. és az 5. lépést, amíg le nem mérte az összes hozzávalót.
Miután eltávolított mindent a mérlegről, egy negatív érték jelenik meg a kijelzőn. Nyomja meg a nulla-gombot. A
készülék most már használatra kész újra.

Használati útmutató
5
Kezelés-Figyelmeztetés
Min: jelenik meg a kijelzőn, amikor az elem töltöttsége már alacsony. Mihamarabb ki kell cserélni az
elemet.
HIBA: jelenik meg a kijelzőn, ha a mérleg túl van terhelve. Vegyünk le egy kis mennyiséget a károsodás
megelőzése érdekében.
Tisztítás és karbantartás
o Ez a konyhai mérleg egy precíziós műszer. Kérjük, védje az ütődésektől. Ne tartson rajta
nagyobb súlyokat hosszú ideig.
o Törölje át egy tiszta, nedves ruhával. Utána szárítsa meg alaposan.
o Ne használjon erős vagy súroló tisztítószereket vagy oldószereket.
Környezetvédelem
• A csomagolást, mint például a műanyag, és a dobozok, a megfelelő hulladék konténerekbe dobja.
• Ha ez a termék eléri hasznos élettartama végét,ne dobja ki a szemetesbe; adja át a gyűjtőhelyre, hogy
újrafelhasználhassák elektromos és elektronikus alkatrészeit. Kérjük, tekintse meg a szimbólumokat a
terméken, a használati utasításban, vagy a csomagoláson.
• Az anyagok újrahasznosíthatók, mint jelezték. Az Ön segítsége a régi elektromos berendezések
újrafelhasználásában, újrahasznosításában vagy más módon, jelentősen hozzájárul környezete
védelméhez.
• Keresse fel a megfelelő gyűjtőhelyet környezetében.
G
arancia feltételek
Az importőr biztosítja a garanciát a készülékre, a gyártási és / vagy anyaghibák okozta meghibásodás esetén, a
vásárlás napjától 60 hónapig, az alábbi feltételekkel:
1. A javítás bér-, illetve anyagköltségét a garancia ideje alatt nem számítjuk fel
2. Az importőr automatikusan tulajdonosává válik a hibás alkatrészeknek, amelyeket helyettesít, vagy a hibás
készüléknek (abban az esetben, ha a készülék cserélni kell).
3. Minden garanciális igény benyújtásához csatolni kell az eredeti adásvételt bizonyító dokumentumokat.
4. Garanciális igényt benyújtani a kereskedőnél lehet, ahol a készüléket vásárolta.
5. A kiadott garancia kizárólag az első vásárlót illeti, és nem ruházható át.
6. A garancia nem vonatkozik az alábbi módokon okozott károk esetén:
a. Balesetek, helytelen használat, kopás és/vagy hanyagság.
b. A hibás telepítés és/vagy használat során, amellyel megsértették a hatályos jogi, műszaki vagy biztonsági
előírásokat.
c. Csatlakoztatás más hálózati feszültséghez, mint amely a hálózati töltőn megadott típusú hálózat.
d. A jogosulatlan módosítások.
e. Harmadik fél által végzett javítások.
f. Gondatlan szállítás, azaz megfelelő csomagolás, illetve védelem nélkül.
7. Az alábbiakért nem vállalunk felelősséget a jótállás ideje alatt:
a. A szállítás során elszenvedet sérülések.
b. A készülék sorozatszámának eltávolítása vagy megváltoztatása.
8. A garancia nem vonatkozik a tápkábelekre, a lámpákra vagy az üveg alkatrészekre.
9. Nem lehet követelést benyújtani jelen jótállás alapján másra, mint javításra vagy cserére a meghibásodott
alkatrészekre. Az importőr soha nem tehető felelőssé semmiféle - a javítás vagy csere folytán keletkezett - kárért
vagy hiányért, vagy bármilyen más, ebből adódó eseményért, amely közvetlenül, vagy közvetve érinti a terméket.
10. Amennyiben Garanciaigénye van, forduljon ahhoz a kereskedelmi egységhez, ahol a készüléket vásárolta, vagy
jelezheti problémáját közvetlenül szerződött partnerszervizeink valamelyikénél is.
11. Ez a készülék nem alkalmas professzionális felhasználásra.

Használati útmutató
6
Nederlands
Szolgáltatás
Ha bármi probléma merülne fel, kérjük, forduljon a BESTRON képviselethez:
Magyarország:
DORA-LAND Kft.
2161 Csomád, Szent István u. 13.
Tel.:
Fax.:
E-mail:
Internet: www.bestron.hu
CE-megfelelőségi nyilatkozat
Ez a termék megfelel az alapvető követelményeknek, és a következő EU biztonsági irányelveknek:
• EMC irányelv 2004/108 / EK
• Kisfeszültségű berendezésekről szóló 2006/95 / EK
r
.
n
eyman
Quality control

7
Gebrauchsanweisung
W
a
t
e
ilk
Deutsch
sicherheitsbestiMMunGen
- Allgemein
• Lesen Sie die Bedienungsanleitung gut durch und bewahren Sie diese sorgfältig auf.
• Verwenden Sie dieses Gerät nur so wie in dieser Bedienungsanleitung beschrieben.
• Das Gerät kann von Kindern ab 8 Jahren sowie von Personen mit reduzierten physischen, sensorischen
oder mentalen Fähigkeiten oder Mangel an Erfahrung und/oder Wissen benutzt werden, wenn sie
beaufsichtigt oder bezüglich des sicheren Gebrauchs des Gerätes unterwiesen wurden und die daraus
resultierenden Gefahren verstanden haben.
• Kinder müssen beaufsichtigt werden, damit sie nicht mit dem Gerät spielen.
• Reinigung und Benutzer-Wartung dürfen nicht durch Kinder durchgeführt werden, es sei denn, sie sind
ab 8 Jahren und beaufsichtigt.
• Lassen Sie Reparaturen von einem qualifizierten Mechaniker ausführen. Versuchen Sie nie, das Gerät
selbst zu reparieren.
sicherheitsbestiMMunGen
- benutzung
• Benutzen Sie das Gerät nie in feuchten Räumen.
• Stellen Sie das Gerät auf einen stabilen und ebenen Untergrund und an eine Stelle, wo es nicht
herunterfallen kann.
VerWendunG
- Allgemein
Das Gerät ist nur für den Hausgebrauch
vorgesehen und nicht für die
professionelle Verwendung.
6
5
2
3
1
4
1. Das LCD-Display zeigt dass…
a. Zuwiege-Funktion verwendet wird
b. Negativer Wert wird gemessen
c. Normale Wiege-Funktion wird verwendet
d. Normale Wiege-Funktion wird verwendet
e. Volumen-Funktion für Milch wird verwendet
f. das Gewicht in Gramm gemessen wird
g. das Volumen in Milliliter gemessen wird
h. das Volumen in Flüssigkeit-Unzen
a
f b
g
c h
d i
j
e gemessen wird
i. das Gewicht in Unzen gemessen wird
j Volumen-Funktion für Wasser wird verwendet
2. Modus-Taste
3. Waage
4. Ein-/Ausschalt-Taste
(auch NULL-Taste für Zuwiege-Funktion)
5. Einheits-Taste
6. Batteriefach

8
Gebrauchsanweisung
Deutsch
VerWendunG
- batterien einlegen
Die Fabrik hat bereits eine Batterie in der Einheit platziert. Wollen Sie die Batterie zu ersetzen, folgen Sie
bitte den folgenden Anweisungen:
1. Öffnen Sie das Batteriefach (6) an der Unterseite des Gerätes.
2. Entfernen Sie die Batterie und legen Sie die neue Batterie (CR2032) ein.
3. Schließen Sie das Batteriefach wieder.
VerWendunG
- bevor sie beginnen
1. Stellen Sie das Gerät auf eine feste, ebene Fläche.
2. Schalten Sie das Gerät durch Drücken der Ein-/Ausschalt-Taste (4) ein. Warten Sie bis die LCD-Anzeige
( 1 ) zur Ruhe gekommen ist.
3. Wählen Sie das Wiegesystem Ihrer Wahl mit der Einheits-Taste (5). In der LCD-Anzeige (1) zeigt ein
Strich abwechselnd unter g (Europäische Mess-System) und lb:oz (British/American Mess-System).
4. Sie können das Gerät durch Drücken der Ein-/Ausschalt-Taste ausschalten.
Sie können das Gerät ausschalten und das Gerät merkt sich Ihre Wahl des Systems nach dem
Abschalten.
VerWendunG
- Wiegen
1. Stellen Sie das Gerät auf eine feste, ebene Fläche.
2. Optional können Sie eine Schale auf die Waage (3) stellen für das Hinzufügen von Zutaten. Stellen Sie
die Schale auf die Waage ( 3 )bevor Sie das Gerät einschalten.
3. Schalten Sie das Gerät durch Drücken der Ein-/Ausschalt-Taste ( 4 ) ein. Warten Sie bis die LCD-
Anzeige zur Ruhe gekommen ist.
4. Starten Sie das Wiegen indem Sie die Zutaten auf der Waage (oder in die Schale) platzieren. Die
Anzeige zeigt nun das Gewicht.
VerWendunG
- Wasser-Volumenmessung
1. Stellen Sie das Gerät auf eine feste, ebene Fläche.
2. Stellen Sie eine Schale auf die Waage für das Hinzufügen von Wasser. Immer bevor Sie das Gerät
einschalten.
3. Schalten Sie das Gerät durch Drücken der Ein-/Ausschalt-Taste ein. Warten Sie bis die LCD-Anzeige
zur Ruhe gekommen ist.
4. Drücken Sie die Modus-Taste (2) bis das Bindestriche unter ml (fl. oz) und “Water” ist.
5. Gießen Sie das Wasser in die Schale. Die Anzeige zeigt jetzt die Menge der Wasser in Milliliter.
VerWendunG
- Milch-Volumenmessung
1. Stellen Sie das Gerät auf eine feste, ebene Fläche.
2. Stellen Sie eine Schale auf die Waage für das Hinzufügen von Milch. Immer bevor Sie das Gerät
einschalten.
3. Schalten Sie das Gerät durch Drücken Ein-/Ausschalt-Taste ein. Warten Sie bis die LCD-Anzeige zur
Ruhe gekommen ist.
4. Drücken Sie die Modus-Taste bis das Bindestriche unter ml (fl. oz) und “Milk” ist.
5. Gießen Sie die Milch in die Schale. Die Anzeige zeigt jetzt die Menge der Milch in Milliliter.
VerWendunG
-
Zuwiege-
f
unktion
Wenn Sie mehr als eine Zutat nach der anderen wiegen wollen, können sie Gebrauch machen von der
Zuwiege-Funktion.
1. Stellen Sie das Gerät auf eine feste, ebene Fläche.
2. Stellen Sie eine Schale auf die Waage für das Hinzufügen von alle Zutaten. Immer bevor Sie das Gerät
einschalten.

9
Gebrauchsanweisung
Deutsch
3. Schalten Sie das Gerät durch Drücken der Ein-/Ausschalt-Taste ein. Warten Sie bis die LCD-Anzeige
zur Ruhe gekommen ist.
4. Platzieren Sie die ersten Zutaten in der Schale. Die Anzeige zeigt nun das Gewicht.
5. Drücken Sie jetzt die Null -Taste ( 4 ) um den Wert in die Anzeige auf Null zurückzusetzen.
6. Wiederholen Sie die Schritte 4 und 5, bis Sie alle Zutaten abgewogen haben.
Nachdem Sie alles von der Waage entfernt haben, wird ein negativer Wert angezeigt. Drücken Sie die
Null-Taste ( 4 )um die Anzeige auf Null zu stellen. Das Gerät ist nun wieder betriebsbereit.
VerWendunG
- Warnungszeichen
Lo: Wenn die Batterie fast leer ist, erscheint auf dem Display die Meldung ‘Lo’. Sie sollen die Batterie
so schnell wie möglich ersetzen.
Err: Die Waage ist zu voll geladen. Nehmen Sie etwas aus der Schale um Schäden zu vermeiden.
reiniGunG
und
pfle
G
e
• Diese Küchenwaagschale ist ein Präzision Instrument. Wir empfehlen Ihnen die Schale nicht für lange
Zeit zu belasten mit Inhalt.
• Wir empfehlen keine aggressive Reinigungsmittel zu benutzen.
• Das Gerät können Sie reinigen mit einem feuchten Tuch, und nachher abtrocknen mit einem trocknem
Tuch.
uMW
el
t
• Werfen Sie Verpackungsmaterial wie Kunststoff und Kartons in die dafür vorgesehenen Container.
• Geben Sie dieses Produkt am Ende der Nutzungsdauer nicht als normalen Haushaltsabfall ab,
sondern bei einem Sammelpunkt für die Wiederverwendung elektrischer und elektronischer Geräte.
Achten Sie auf das Symbol auf dem Produkt, der Gebrauchsanweisung oder der Verpackung.
• Die Materialien können wie angegeben wiederverwendet werden. Durch Ihre Hilfe bei der
Wiederverwendung, der Verarbeitung der Materialien oder anderen Formen der Benutzung alter
Geräte liefern Sie einen wichtigen Beitrag zum Schutz unserer Umwelt.
• Erkundigen Sie sich bei den Stadtverwaltungen nach dem richtigen Sammelpunkt in Ihrer Nähe.
G
A
r
A
ntiebesti
MM
un
G
en
Der Importeur gewährt für dieses Gerät unter den folgenden Bedingungen 60 Monate Garantie ab Kaufdatum
auf Schäden, die aufgrund von Herstellungs- und/ oder Materialfehlern entstanden sind.
1. Innerhalb der genannten Garantiefrist werden keine Kosten für Arbeitslohn und Material berechnet. Die
Garantiefrist wird durch die unter Garantie ausgeführte Reparatur nicht verlängert.
2. Schadhafte Teile oder, im Falle eines Umtauschs, die schadhaften Geräte selbst werden automatisch
Eigentum des Importeurs.
3. Bei jedem Garantieanspruch muss ein Kaufbeleg der Firma vorgelegt werden.
4. Garantieansprüche müssen entweder beim Händler, bei dem das Gerät gekauft wurde, geltend gemacht
werden oder beim Importeur.
5. Die Garantie gilt nur für den ersten Käufer und ist nicht übertragbar.
6. Die Garantie gilt nicht für Schäden, die entstanden sind durch:
a. Unfälle, verkehrte Benutzung, Abnutzung und/oder Verwahrlosung
b. falsche Montage und/oder Benutzung, die gegen die einschlägigen gesetzlichen und technischen
Normen oder gegen Sicherheitsnormen verstößt
c. Anschluss an eine andere Netzspannung als die auf dem Typenschild angegebene
d. eine ungenehmigte Veränderung
e. eine Reparatur, die durch Dritte ausgeführt wurde
f. nachlässigen Transport ohne geeignete Verpackung bzw. ohne geeigneten Schutz
7. Auf diese Garantiebestimmungen kann kein Anspruch erhoben werden im Falle von:
a. Verlusten, die während des Transports auftreten
b. Entfernung oder Änderung der Geräteseriennummer
8. Ausgenommen von der Garantie sind Kabel, Lampen und Glasteile.

10
Gebrauchsanweisung
Deutsch
9. Außer einem Ersatz bzw. einer Reparatur der schadhaften Teile räumt die Garantie kein Recht
auf Erstattung eines eventuellen Schadens ein. Der Importeur kann in keinem Fall für eventuelle
Folgeschäden oder irgendwelche anderen Folgen haftbar gemacht werden, die durch das von ihm
gelieferte oder in Verbindung mit dem von ihm gelieferten Gerät entstanden sind.
10. Um Garantieleistungen in Anspruch zu nehmen, wenden Sie sicht direkt an Ihren Händler. Bestron bietet
auch die Möglichkeit direkt mit dem Werkskundendienst abzuwickeln. Voraussetzung hierfür ist, dass
Sie sich zunächst telefonisch, per Fax oder Mail an den Werkskundendienst wenden. Bitte schicken
Sie keine Geräte unaufgefordert. Insbesondere dürfen Pakete niemals unfrei eingesendet werden.
Sprechen Sie daher zuerst mit uns. Wir sagen Ihnen wie Sie Ihr Gerät an uns einsenden sollen.
11. Das Gerät eignet sich nicht für die professionelle Verwendung.
k
undendienst
Sollte unerwartet eine Störung auftreten dann können Sie sich mit dem BESTRON-Kundendienst in
Verbindung setzen: www.bestron.com/service
ce
-
k
onfor
M
itätserklärun
G
Dieses Produkt entspricht auf dem Gebiet der Sicherheit den Bestimmungen der folgenden europäischen
Richtlinien:
• EMC-Richtlinie 2004/108/EC
• Niederspannungsrichtlinie 2006/95/EC.
r
.
n
eyman
Qualitätskontrolle

11
Mode d’emploi
W
a
t
e
ilk
Français
consiGnes
de
sécurité
- Généralités
• Lisez soigneusement le mode d’emploi et conservez-le précieusement.
• Utilisez cet appareil uniquement suivant les instructions décrites dans le mode d’emploi.
• Cet appareil peut être utilisé par les enfants à partir de 8ans et les personnes ayant réduit les capacités
physiques, sensorielles ou mentales ou manque d’expérience et de connaissances si elles ont été
aidées ou instruites concernant l’utilisation de l’appareil en toute sécurité et comprennent les risques
qu’il peut entraîne.
• Cet appareil n’est pas un jouet. En présence d’enfants, il est important de s’assurer qu’ils ne jouent pas
avec l’appareil.
• Nettoyage et entretien ne doivent pas être effectués par les enfants, sauf s’ils sont âgés de plus de 8 ans
et supervisés.
• Faites effectuer les réparations par un technicien qualifié. Ne tentez jamais
de réparer vous-même l’appareil.
consiGnes
de
sécurité
- pendant l’utilisation
• N’utilisez jamais l’appareil dans une pièce humide.
• Installez l’appareil sur une surface plane et stable, à un endroit où il ne risque pas de tomber.
f
onctionne
M
ent
- Généralités
L’appareil est destiné uniquement à
l’utilisation domestique, et non à l’usage
professionnel.
6
5
2
3
1
4
a
f b
g
c h
d i
j
e
1. L’écran LCD montre que
a. la fonction de tare est utilisée
b. une valeur négative est mesurée
c. la fonction de poids normal est utilisée.
d. la fonction de poids normal est utilisée.
e. la fonction du volume de lait est utilisée
f. le poids en grammes est mesuré
g. le volume, en millilitres est mesuré
h. le volume est mesuré en onces liquides
i. le poids est mesuré en onces
j la fonction du volume de l’eau est utilisée
2. Bouton de mode
3. Plateau de pesage
4. On/off bouton (également zéro-bouton pour
fonction de tare)
5. L’unité-bouton
6. Compartiment de la pile

12
Mode d’emploi
Français
f
onctionne
M
ent
- Mettre en place la pile
L’usine a déjà placé une pile dans l’appareil, si vous voulez la remplacer, veuillez suivre les instructions
suivantes :
1. Ouvrez le compartiment de pile (6) au bas de l’appareil.
2. Retirer la pile et insérez la nouvelle pile (CR2032).
3. Refermez le compartiment de pile.
f
onctionne
M
ent
- Avant de commencer
1. Placez l’appareil sur une surface plane solide.
2. Allumez l’appareil en appuyant sur le bouton marche/arrêt (4). Attendez que le LCD-affichage est venu
se reposer.
3. Sélectionnez le système de pèse de votre choix en appuyant sur le bouton de l’unité (5). Dans l’affichage
(1) montre un tiret en alternance sous g (système de mesure d’européen) et lb:oz (système de mesure
britannique et américain).
4. Vous pouvez désactiver le périphérique en appuyant sur le bouton marche/arrêt.
Le dispositif lui-même se met hors service quand il n’est pas utilisé pendant 2 minutes. L’appareil se
souviendra de votre choix du système après le commutateur-au loin.
f
onctionne
M
ent
-
p
eser
1. Placez l’appareil sur une surface plane solide.
2. Facultativement, vous pouvez placer un bol sur le plateau de pesage (3) pour ajouter tous les ingrédients.
Toujours faire avant que vous allumez l’appareil.
3. Allumez l’appareil en appuyant sur le bouton marche/arrêt (4). Attendez que le LCD-affichage est venu
se reposer.
4. Placez les ingrédients sur le plateau (ou bol). L’affichage montre le poids maintenant.
f
onctionne
M
ent
- Mesure du volume d’eau
1. Placez l’appareil sur une surface plane solide.
2. Placer un bol sur le plateau de pesage (3) pour l’ajout de l’eau. Toujours faire avant que vous allumez
l’appareil.
3. Allumez l’appareil en appuyant sur le bouton marche/arrêt (4). Attendez que le LCD-affichage est venu
se reposer.
4. Appuyez sur le bouton mode (2) jusqu’à ce qu’il y a des tirets en ml (fl. oz) et “Water.”
5. Verser l’eau dans le bol. L’affichage montre la quantité d’eau maintenant.
f
onctionne
M
ent
- Mesure du volume de lait
1. Placez l’appareil sur une surface plane solide.
2. Placer un bol sur le plateau de pesage (3) pour ajouter le lait. Toujours faire avant que vous allumez
l’appareil.
3. Allumez l’appareil en appuyant sur le bouton marche/arrêt (4). Attendez que le LCD-affichage est venu
se reposer. Appuyez sur le bouton mode jusqu’à ce qu’il y a les tirets dans ml (fl. oz) et “Milk”
5. Versez le lait dans le bol. L’affichage montre la quantité de lait maintenant.
f
onctionne
M
ent
-
f
onction
de tare
Si vous voulez peser plusieurs produits après l’autre sans avoir à vider les échelles, vous pouvez utiliser la
fonction de tarage:
1. Placez l’appareil sur une surface plane solide.
2. Facultativement, vous pouvez placer un bol sur le plateau de pesage (3) pour ajouter tous les ingrédients.
Toujours faire avant que vous allumez l’appareil.
3. Allumez l’appareil en appuyant sur le bouton marche/arrêt (4). Attendez que le LCD-affichage est venu
se reposer.

13
Mode d’emploi
Français
4. Placez les premiers ingrédients sur le plateau de pesage (ou dans le bol). L’affichage montre le poids
maintenant.
5. Maintenant appuyez sur le bouton Zéro (4) pour réinitialiser la valeur de l’affichage à zéro.
6. Répétez les étapes 4 et 5 jusqu’à ce que vous avez pesé tous les ingrédients.
Après que vous avez supprimé le tout du plateau de pesage, elle affichera une valeur négative Appuyez
sur le bouton de zéro pour rétablir l’affichage. L’appareil est maintenant prêt à être utilisé à nouveau.
f
onctionne
M
ent
-
e
rreurs
Lo: Quand la pile sera presque vide, l’écran en fera mention par monter LO. Il faudra remplacer la pile
le plus rapidement possible.
Err: La balance est surchargée. Enlevez une tartie du continu.
n
ett
oy
AG
e
et entretien
• Ce pèse cuisine est un instrument de précision. On vous conseille de ne pas charger la coupe avec un
contenu pour longtemps.
• N’utilisez pas des produits de nettoyage ou des abrasifs agressifs
• Nettoyez l’appareil par préférence avec une serviette mouillée et séchez l’appareil ensuite solidement.
en
V
ironne
M
ent
• Jetez le matériel d’emballage, tel que le plastique et les boîtes, dans les conteneurs prévus à cet
effet.
• Lorsque l’appareil est usé, ne le mettez pas aux ordures ménagères, mais portez-le dans un centre
de collecte agréé pour les appareils électriques et électroniques. Attention au symbole figurant sur
le produit, le mode d’emploi ou l’emballage.
• Les matériaux peuvent être recyclés selon les indications. Votre collaboration au recyclage des
appareils et/ou au retraitement des matériaux, sous quelle forme que ce soit, est une contribution
précieuse à la sauvegarde de notre environnement.
• Les autorités de votre commune vous renseigneront sur le centre de collecte le plus proche.
conditions
de GA
r
A
ntie
À compter de la date d’achat de cet appareil, l’importateur donne, aux conditions suivantes, 60 mois de
garantie couvrant tous les défauts consécutifs à des défauts de pièce et main d’œuvre.
1. Pendant la période de garantie aucun frais ne sera facturé pour les pièces et la main d’œuvre. Les
réparations effectuées sous garantie ne prolongent pas le délai de garantie.
2. En cas d’échange, les pièces défectueuses ou les appareils défectueux deviennent automatiquement la
propriété de l’importateur.
3. Toute demande de garantie doit être assortie de la preuve d’achat de l’entreprise.
4. Toute demande de garantie doit être faite auprès du revendeur où l’appareil a été acheté ou auprès de
l’importateur.
5. La garantie est uniquement valable pour le premier acheteur et ne peut être transférée.
6. La garantie ne couvre pas les dommages causés par:
a. les accidents, l’utilisation impropre, l’usure et / ou la négligence ;
b. l’installation incorrecte et/ou une utilisation contraire aux normes de sécurité, aux normes techniques
ou aux dispositions légales en vigueur ;
c. le branchement sur un réseau d’une tension autre que celle figurant sur la plaquette type ;
d. toute modification non autorisée ;
e. toute réparation effectuée par des tiers ;
f. le transport sans précautions suffisantes, telles que la protection et l’emballage appropriés.
7. Les présentes conditions de garantie ne peuvent pas être invoquées dans les cas suivants:
a. pertes survenues pendant le transport;
b. effacement ou modification du numéro de série de l’appareil.
8. Les cordons, ampoules et pièces en verre ne sont pas couverts par la garantie.

14
Mode d’emploi
Français
9. La garantie ne donne aucun droit d’indemnisation pour des dommages éventuels, autres que le
remplacement ou la réparation de pièces défectueuses. L’importateur ne peut être tenu responsable
d’aucun dommage indirect, ni d’aucune conséquence quelle qu’elle soit, causé par ou ayant un
quelconque rapport avec l’appareil qu’il a fourni.
10. Pour pouvoir faire appel à la garantie, vous pouvez vous adresser à votre revendeur. Bestron offre aussi
la possibilité de faire réparer l’appareil directement par le service après-vente de Bestron. Toutefois,
n’envoyez jamais rien sans avoir reçu d’instructions au préalable. Le colis pourrait en effet être refusé
et les frais éventuels seraient à votre charge. Prenez contact avec le service après-vente qui vous
expliquera comment vous devez emballer et expédier l’appareil.
11. L’appareil n’est pas destiné à l’usage professionnel.
MA
inten
A
nce
Si, par malheur, une panne se produisait, veuillez contacter le service de maintenance de BESTRON:
www.bestron.com/service
d
écl
A
r
A
tion
de
confor
M
ité
ce
Le présent produit répond aux dispositions des directives européennes suivantes en matière de sécurité.
• Directive EMC 2004/108/EC
• Directive sur la basse tension 2006/95/EC
r
.
n
eyman
c
ontrôle
de la qualité

15
user’s instructions
sAfety instructions
- General
W
a
t
e
ilk
English
• Please read these instructions carefully and retain them for future reference.
• Use this appliance solely in accordance with these instructions.
• This appliance can be used by children older than 8 years and persons with reduced physical, sensory
or mental capabilities or lack of experience and knowledge, but only if they have been given supervision
or instruction concerning use of the appliance in a safe way and understand the hazards involved.
• Children should be supervised to ensure that they do not play with the appliance.
• Cleaning and maintenance must not be done by children, except if they are older than 8 years and
supervised.
• Have any repairs carried out solely by a qualified electrician. Never try to
repair the appliance yourself.
sAfety instructions
- during use
• Never submerge the appliance in water or another liquid.
• We accept no liability for damage caused by incorrect usage or the
ignoring of the regulations in this manual.
o
per
A
tion
- General
This appliance is intended only for
domestic use, not for professional use.
6
5
2
3
1
4
a
f b
g
c h
d i
j
e
1. The LCD-display shows that
a. the tare function is used
b. a negative value is measured
c. the normal weigh function is used
d. the normal weigh function is used
e. the volume function for milk is used
f. the weight in grams is measured
g. the volume in millilitres is measured
h. the volume is measured in fluid ounces
i. the weight is measured in ounces
j. the volume function for water is used
2. Mode button
3. Weighing platform
4. On/off button (also Zero-button for tare-function)
5. Unity button
6. Battery compartment
o
per
A
tion
- placing the battery
The factory has already placed a battery in the appliance. If you want to replace the battery, please follow
the following instructions:
1. Open the battery compartment (6) at the bottom of the appliance.
2. Remove the battery and insert the new battery (CR2032).
3. Close the battery compartment again.

16
user’s instructions
o
per
A
tion
- before use
English
1. Place the device on a solid flat surface.
2. Turn on the device by pressing the on/off button (4). Wait until the LCD-display has settled.
3. Select the weighing system of your choice by pressing the Unity-button (5). In the display (1) shows a
dash alternating under g (European measuring system) and lb:oz (British/American measuring system).
4. You can turn off the device by pressing the on/off button.
The device switches itself off when it’s not used for 2 minutes. The appliance will remember your choice
of system after switch-off.
o
per
A
tion
- Weighing
1. Place the device on a solid flat surface.
2. Optionally, you can place a bowl on the weighing plateau (3) for adding all the ingredients. Always do this
before you turn on the device.
3. Turn on the device by pressing the on/off button (4). Wait until the LCD-display has settled.
4. Start the weighing by placing the ingredients on the plateau (or bowl). The display shows the weight now.
o
per
A
tion
- Water volume measurement
1. Place the device on a solid flat surface.
2. Place a bowl on the weighing plateau (3) for adding the water. Always do this before you turn on the
device.
3. Turn on the device by pressing the on/off button (4). Wait until the LCD-display has settled.
4. Press the mode button (2) until there are dashes under ml (fl. oz) and water.
5. Pour the water in the bowl. The display shows the amount of water now.
o
per
A
tion
- Milk volume measurement
1. Place the device on a solid flat surface.
2. Place a bowl on the weighing plateau (3) for adding the milk. Always do this before you turn on the
device.
3. Turn on the device by pressing the on/off button (4). Wait until the LCD-display has settled.
4. Press the mode button until there are dashes under ml (fl. oz) and milk.
5. Pour the milk in the bowl. The display shows the amount of milk now.
o
per
A
tion
-
t
A
re
function
When you want to weigh multiple products after another without emptying the scales, you can use the tare
function:
1. Place the device on a solid flat surface.
2. Optionally, you can place a bowl on the weighing plateau (3) for adding all the ingredients. Always do this
before you turn on the device.
3. Turn on the device by pressing the on/off button (4). Wait until the LCD-display has settled.
4. Place the first ingredients on the weighing plateau (or in the bowl). The display shows the weight now.
5. Now press the Zero-button (4) to reset the value in the display to zero.
6. Repeat steps 4 and 5 until you have weighed all ingredients.
After you have removed everything from the weighing plateau, it will display a negative value. Press
the Zero-button to reset the display. The appliance is now ready for use again.
o
per
A
tion
- Warningsigns
Lo: Appears on the display when the batterie is low. You need to replace the batterie as soon as
possible.
Err: Appears on the display when the scale is overloaded. Remove a small amout to prevent damage.

17
user’s instructions
c
le
A
nin
G
And MA
inten
A
nce
English
• This kitchen scale is a precision instrument. Please avoid heavy striking. Do not keep it laden with
weights for a long period.
• Wipe the base unit with a clean damp of cloth. Dry thoroughly afterwards.
• Don’t use harsh or abrasive cleaning agents or solvents.
t
he
en
V
iron
M
ent
• Dispose of packaging material, such as plastic and boxes, in the appropriate waste containers.
• When this product reaches the end of its useful life do not dispose of it by putting it in a dustbin;
hand it in at a collection point for the reuse of electrical and electronic equipment. Please refer to the
symbols on the product, the user’s instructions or the packaging.
• The materials can be re-used as indicated. Your help in the re-use, recycling or other means of
making use of old electrical equipment will make an important contribution to the protection of the
environment.
• Contact your municipality for the address of the appropriate collection point in your neighbourhood.
Gu
A
r
A
ntee
ter
M
s
The importer guarantees the appliance against defects caused by manufacturing and/or material faults for
60 months from the date of purchase, subject to the following conditions.
1. No charges will be made for labour costs or materials during the warranty period. Any repairs carried out
during the warranty period do not extend the warranty period.
2. The importer automatically becomes the owner of any faulty parts that he replaces or a faulty appliance
(in the event of replacement of the appliance).
3. All claims submitted under warranty must be accompanied by the original bill of sale.
4. Claims under warranty must be submitted to the dealer where the appliance was purchased or to the
importer.
5. The warranty is issued solely to the first purchaser and cannot be transferred.
6. The warranty does not cover damage caused by:
a. Accidents, incorrect use, wear and/or neglect.
b. Faulty installation and/or use in a manner contravening the prevailing legal, technical or safety
regulations.
c. Connection to a mains voltage other than the voltage specified on the type plate.
d. Unauthorized modifications.
e. Repairs carried out by third parties.
f. Careless transport, i.e. without suitable packaging materials or protection.
7. No claims may be made under this warranty for:
a. Losses incurred during transport.
b. The removal or changing of the appliance’s serial number.
8. The guarantee does not cover power cords, lamps or glass parts.
9. No claims can be submitted under this warranty for damage other than the repair or replacement of faulty
parts. The importer can never be held responsible for any consequential loss or damage or any other
consequences, resulting either directly or indirectly from the appliance supplied by the importer.
10. In case of claims under guarantee you can contact your dealer where the appliance is purchased.
Bestron offers you also the possibility to send the appliance directly to our Service Department. Do not
send your appliance without consulting us. The package may be refused and any any costs will be for
your account. Please contact the Service Department and they will tell you how to pack and send the
appliance.
11. This appliance is not suitable for professional use.
s
er
V
ice
If a fault should occur please contact the BESTRON service department: www.bestron.com/service


-
 1
1
-
 2
2
-
 3
3
-
 4
4
-
 5
5
-
 6
6
-
 7
7
-
 8
8
-
 9
9
-
 10
10
-
 11
11
-
 12
12
-
 13
13
-
 14
14
-
 15
15
-
 16
16
-
 17
17
-
 18
18
-
 19
19
-
 20
20


in anderen Sprachen
- English: Bestron AKS700SD User manual
- français: Bestron AKS700SD Manuel utilisateur
