Lindy 42907 Benutzerhandbuch
- Kategorie
- Schnittstellen-Hubs
- Typ
- Benutzerhandbuch

USB 2.0 Hard Drive Enclosure
Installation Guide English
Installationsanleitung Deutsch
Manuel Utilisateur Français
Manuale d’uso Italiano
For 2.5” HDD’s of up to 9.5mm in height only!
LINDY No. 42907
www.LINDY.com
© LINDY ELECTRONICS LIMITED & LINDY-ELEKTRONIK GMBH - FIRST EDITION (NOV 2005)
INSTALLATION
ENGLISH
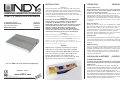
Remove the plastic end cover (with the USB connection)
from the housing. If present, set the jumper on your hard
drive to the MASTER setting. Attach the drive to the 44-way
connector as illustrated below. Slide the drive into the
housing carefully and tighten the two screws. Be careful not
to overtighten the small screws!
Deutsch
Entfernen Sie die Plastikkappe mit dem integrierten
USB Anschluss vom Gehäuse. Jumpern Sie Ihre
Festplatte als MASTER sofern die Platte diese
Möglichkeit anbietet. Stecken Sie die Platte vorsichtig
auf die 44polige Steckleiste wie in untenstehendem
Bild und schieben Sie beides vorsichtig in das
Gehäuse. Verwenden Sie bitte den beiliegenden
kleinen Schraubendreher und schrauben die kleinen
Schrauben vorsichtig ein ohne sie zu überdrehen!
Français
Retirez la partie arrière en plastique avec le
connecteur USB
du reste du boîtier
. Si présent, réglez
le cavalier du disque dur en mode MASTER. Connectez le
disque au connecteur 44 broches comme illustré ci-
dessous. Insérez doucement le disque dur dans le boîtier et
ne forcez pas sur les petites vis!
Italiano
Rimuovete la copertura in plastica più grande
dall’astuccio. Se presente, impostate il Jumper
dell’hard disk in modalità MASTER. Collegate il
drive al connettore a 44 poli come indicato in
figura. Fate scivolare con cautela il disco
all’interno dell’astuccio e serrate le due viti. Fate
attenzione a non stringere eccessivamente!
OPERATION (ENGLISH)
Power Requirement
Do not connect this enclosure to a non self-powered
USB hub or port - they cannot supply enough power to
operate the hard drive properly!
Modern 2.5” drives with low power requirements can be
powered from a single USB port only. This product is
supplied with a special dual USB connector cable. If the
drive draws a current greater than 0.5A from the USB port,
or operation is erratic, then you should use the second USB
connector.
Driver Installation
Modern operating systems such as Windows XP, 2000 and
ME already include the necessary drivers (as long as the
drivers for your USB 2.0 ports are up to date!). If the
external hard drive is recognized correctly as a USB 2.0
device then please do not install any drivers again!
Otherwise, obtain updated drivers for your USB controller
from your computer manufacturer’s web site.
LED Indicator
The LED indicator illuminates red when the hard drive is
connected and powered up. The LED flashes during data
transfer. Do not disconnect the enclosure while the LED is
flashing!
HDD Partitioning
If you use a brand new hard drive it may not be partitioned
and your operating system will not show the drive. Use the
partitioning program from your operating system (FDISK or
similar). Find Information on this topic from the HELP
section of your operating system, or get help from an
experienced technician.
ANSCHLUSS & BETRIEB (DEUTSCH)
STROMVERSORGUNG
Schließen Sie das Gehäuse NICHT an einen USB Hub
ohne eigenes Netzteil oder an einen non-self-powered
USB Port an!
Moderne 2,5“ Festplatten mit niedrigen Strombedarf
können in den meisten Fällen über einen einzigen USB-
Port mit Strom versorgt werden. Dieses Produkt wird mit
einem besonderen DUAL-USB-Kabel geliefert. Sie
benötigen den zweiten flachen USB-Stecker nur, wenn
Ihre Festplatte einen höheren Strombedarf als 0,5A hat
oder falls die Platte nicht korrekt funktioniert. In diesem
Falle schließen Sie den zweiten USB-Stecker an einen
weiteren USB-Port des gleichen Rechners an!
For Home and Office Use
Tested to Comply with FCC Standards

TREIBERINSTALLATION
Moderne Betriebssysteme wie Windows XP, ME, 2000 (mit
aktuellen USB- Treibern) haben bereits alle notwendigen
Treiber an Board. Sollte das externe Laufwerk hier bereits
als USB 2.0 Device erkannt werden und funktionieren, so
sollte keine erneute weitere Treiberinstallation vorgenom-
men werden! Andernfalls ist ein Update der Treiber für
ihren USB Controller (z.B. via Internet) notwendig.
Anzeige-LED
Die Anzeige-LED leuchtet rot sobald das Gehäuse
angeschlossen und mit Strom versorgt ist. Sie blinkt
während eines Datentransfers. Ziehen daher nie die
Stecker während die LED noch blinkt!
Partitionierung der Festplatte
Wenn Sie eine brandneue Festplatte anschließen ist diese
höchstwahrscheinlich nicht partitioniert und Ihr Betriebs-
system wird kein Laufwerk anzeigen! Verwenden Sie das
Partitionierungsprogramm Ihres Betriebssystems wie zum
Beispiel FDISK. Weitergehende Informationen hierzu
finden Sie im Hilfesystem Ihres Betriebssystem oder
wenden Sie sich an einen erfahrenen PC-Techniker.
UTILISATION (FRANCAIS)
PUISSANCE NECESSAIRE
Ne connectez pas le boîtier à un hub USB non-alimenté
– ces derniers ne fournissent pas assez de puissance
pour que le disque dur fonctionne correctement!
Les disques durs 2.5” classiques avec une faible
consommation d’énergie peuvent être utilisés avec un seul
port USB. Si le disque dur se comporte de manière
étrange, veuillez utiliser le câble double USB fourni avec le
boîtier et connectez le second connecteur USB.
Installation du pilote
Les systèmes d’exploitation actuels comme Windows XP,
2000, ME incluent directement le pilote USB 2.0 et il sera
mis à jour automatiquement. Si le disque dur externe est
reconnu correctement en tant que périphérique USB 2.0
n’essayez pas de réinstaller le pilote.
Veuillez vous référer au manuel fourni pour l’installation
des pilotes sous d’autres systèmes.
Indicateurs LED
La LED est rouge lorsque le disque est connecté et
alimenté. La LED clignote durant le transfert de données.
Ne débranchez jamais le boîtier à ce moment la.
Installation du disque dur
Si vous installez un nouveau disque dur et qu’il n’est pas
reconnu par le système, il est nécessaire de le partitionner
avant son utilisation (FDISK ou autre).
UTILIZZO (ITALIANO)
Alimentazione richiesta.
Non collegate questo astuccio ad un Hub USB non
alimentato. Senza un adeguata alimentazione
l’astuccio non può funzionare correttamente!
Gli Hard Disk da 2.5” moderni possono funzionare con un
ridotto apporto di corrente e quindi connessi anche solo ad
una porta USB. Questo astuccio è comunque fornito con
uno speciale cavo USB a doppio connettore. Se il drive
richiede più di 0,5A di corrente o se incorrete in errori di
funzionamento sarà necessario collegare anche il secondo
connettore.
Installazione dei Driver
I sistemi operativi moderni come Windows XP, 2000 e ME
includono già tutto il software necessario (se le porte USB
2,0 sono già correttamente installate). Se il drive viene
correttamente riconosciuto come periferica USB 2.0 non
procedete all’installazione di alcun driver! In caso contrario
richiedete i driver aggiornati per il controller USB a chi vi ha
fornito il computer o scaricateli dal corrispondente sito web.
Indicatore LED
Il LED si illuminata di rosso quando l’hard disk è connesso
e acceso e lampeggia durante il trasferimento dati. NON
disconnettete il disco mentre il LED sta lampeggiando.
Partizionamento dell’HDD
Se state utilizzando un Hard Disk esso potrebbe non
essere partizionato. Utilizzate il programma di
partizionamento del vostro sistema operativo (FDISK o
similare). Potrete trovare informazioni su questa
operazione nella guida del vostro sistema operativo o
chiedete aiuto ad un tecnico esperto.
Technical Data
For 2.5” hard drives of up to 9.5mm in height only!
Interface: USB 2.0 to IDE ATA/133
Enclosure dimensions: 12 x 7.5 x 1.3 cm
Enclosure weight: 80g approx.
Operating temperature: -5…40°C,
Humidity: 10…80%, non condensing
(Operating temperature and humidity may be limited by the
installed hard drive. Please refer to your drives data sheet!)
For indoor use only
Driver for WIN98SE see www.lindy.com
Packing List
USB 2.0 Hard Drive Enclosure
Protective carry case
Dual USB connection cable
Bag with small fitting screws and screwdriver
This manual
FCC Warning
This equipment has been tested and found to comply with the limits for a Class B Digital
device, pursuant to part 15 of the FCC Rules. These limits are designed to provide
reasonable protection against harmful interference in a residential installation. This
equipment generates, uses, and can radiate radio frequency energy and, if not installed
and used in accordance with the instructions, may cause harmful interference to radio
communications. However, there is no guarantee that interference will not occur in a
particular installation. If this equipment does cause harmful interference to radio or
television reception, which can be determined by turning the equipment off and on, the
user is encouraged to try to correct the interference by one or more of the following
measures:
Reorient or relocate the receiving antenna
Increase the separation between the equipment and receiver
Connect the equipment into an outlet on a circuit different from that to which the
receiver is connected
Consult the dealer or an experienced radio/TV technician for help
You are cautioned that changes or modifications not expressly approved by the party
responsible for compliance could void your authority to operate the equipment.
For Home and Office Use
Tested to Comply
with FCC Standards
LINDY No. 42907
©LINDY ELECTRONICS LIMITED & LINDY-ELEKTRONIK GMBH - First Edition, NOV 2005
-
 1
1
-
 2
2


Lindy 42907 Benutzerhandbuch
- Kategorie
- Schnittstellen-Hubs
- Typ
- Benutzerhandbuch
in anderen Sprachen
- English: Lindy 42907 User manual
- français: Lindy 42907 Manuel utilisateur
- italiano: Lindy 42907 Manuale utente
Verwandte Artikel
-
Lindy 42831 Benutzerhandbuch
-
-
-
-
-
-
-
-
-