
13639/09 E
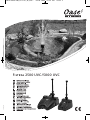
Filtral 2500 UVC/5000 UVC
13639 OASE-GAW_Filtral_A6_end:. 03.09.2009 15:25 Uhr Seite 2

2
Pos: 2 /Pumpen/Schla mmsauger/Filtral 2500 UV C / 5000 UVC/Grafik 2 Montage Fi ltral 2500 / 5000 UVC @ 11\mod_125 1302004194_0.d oc @ 71230 @

3
Pos: 3 /Pumpen/Schla mmsauger/Filtral 2500 UV C / 5000 UVC/Grafik 3 Montage Fi ltral 2500 /5000 UVC @ 11\mod_1 251302193680_0.do c @ 71258 @

4
Pos: 4 /Pumpen/Schla mmsauger/Filtral 2500 UV C / 5000 UVC/Grafik 4 Montage Fi ltral 2500, 5000 UVC @ 11\mod_1 251215033185_0.do c @ 70832 @

5
Pos: 5 /Pumpen/Schla mmsauger/Filtral 2500 UV C / 5000 UVC/Grafik 5 Montage Fi ltral 2500, 5000 UVC @ 11\mod_1 251215039935_0.do c @ 70860 @

6
Pos: 6 /Pumpen/Schla mmsauger/Filtral 2500 UV C / 5000 UVC/Grafik 6 Montage Fi ltral 2500, 5000 UVC @ 11\mod_1 251215090560_0.do c @ 70888 @

7
Pos: 7 /Alle Produkte/ Länderkennzeichen/ 00===LEER=== @ 0\mod_112 6786111024_0.doc @ 5631 @
Pos: 8 /Alle Produkte/ Dummy_module/=== == Seitenwechsel ===== @ 0\mod_1125648978015_0.doc @ 1630 @

8
- DE -
Pos: 9 /Alle Produkte/ Länderkennzeichen/ 01===DE===1.Spr ache @ 7\mod_1197635778796_0. doc @ 42184 @
Pos: 10 /Alle Produkte/ Überschriften/H 1 Hinweise zu dieser Gebrauc hsanleitung @ 10\mod_12 48768026340_6.doc @ 66251 @
Hinweise zu dieser Gebrauchsanleitung
Pos: 11 /Alle Produkte/ Einleitung/Hinwei se zur Anleitung @ 11\mod_12 51641382851_6.doc @ 71882 @
Willkommen bei OASE Living Water. Mit dem Kauf des Produkts Filtral 2500 UVC / 5000 UVC haben Sie eine gute
Wahl getroffen.
Lesen Sie vor der ersten Benutzung des Gerätes die Anleitung sorgfältig und machen Sie sich mit dem Gerät vertraut.
Alle Arbeiten mit diesem Gerät dürfen nur gemäß der vorliegenden Anleitung durchgeführt werden.
Beachten Sie unbedingt die Sicherheitshinweise für den richtigen und sicheren Gebrauch.
Bewahren Sie diese Anleitung sorgfältig auf. Bei Besitzerwechsel geben Sie bitte die Anleitung weiter.
Pos: 12 /Alle Produkte/ Dummy_module/Abstan d 6 pt @ 7\mod_1196627997106 _0.doc @ 41649 @
Pos: 13 /Alle Produkte/ Überschriften/H1 B estimmungsgemäße Ver wendung @ 9\mod_12248614464 32_6.doc @ 54762 @
Bestimmungsgemäße Verwendung
Pos: 14 /Alle Produkte/ Bestimmungsgemäße Ver wendung/Best. Verwe ndung - Verwendung untersa gt in @ 10\mod_124877128 4180_6.doc @ 66306 @
Filtral 2500 UVC / 5000 UVC , im weiteren "Gerät" genannt, darf ausschließlich zum Reinigen von normalem Teich-
wasser verwendet werden. Auch alle anderen Teile aus dem Lieferumfang dürfen nur in diesem Zusammenhang
verwendet werden. Zulässige Wassertemperatur: + 4 °C bis + 35 °C. Das Gerät darf in Teichen mit oder ohne Fisch-
besatz verwendet werden.
Das Gerät darf niemals verwendet werden
− ohne Wasserdurchfluss und Pumpenfilter
− zum industriellen Einsatz
− in Verbindung mit Chemikalien, Lebensmitteln, leicht brennbaren oder explosiven Stoffen
− in Schwimm- und Badeteichen
Pos: 15 /Alle Produkte/ Bestimmungsgemäße Ver wendung/Best. Verwe ndung UVC-Lampe @ 11\mod_12511 23035663_6.doc @ 70268 @
Die in das Gerät eingebaute UVC-Lampe dient zum Abtöten von Algen und Bakterien im Teichwasser. Ihre Strahlung
ist auch in geringen Dosierungen gefährlich für die Augen und die Haut. Die UVC-Lampe darf niemals in einem defek-
ten Gehäuse oder ausserhalb ihres Gehäuses oder für andere Zwecke verwendet werden.
Pos: 16 /Alle Produkte/ Dummy_module/Abstan d 6 pt @ 7\mod_1196627997106 _0.doc @ 41649 @
Pos: 17 /Alle Produkte/ Überschriften/H 1 Sicherheitshinweise @ 6\ mod_1196353926316_6. doc @ 40979 @
Sicherheitshinweise
Pos: 18 /Alle Produkte/ Sicherheit/Einlei tung/SIC 1 Sicher heitshinweise Einlei tung @ 7\mod_12053107997 30_6.doc @ 45452 @
Die Firma OASE hat dieses Gerät nach dem aktuellen Stand der Technik und den bestehenden Sicherheitsvorschrif-
ten gebaut. Trotzdem können von diesem Gerät Gefahren für Personen und Sachwerte ausgehen, wenn das Gerät
unsachgemäß bzw. nicht dem Verwendungszweck entsprechend eingesetzt wird oder wenn die Sicherheitshinweise
nicht beachtet werden.
Pos: 19 /Alle Produkte/ Sicherheit/Einlei tung/SIC 2 Kinder und J ugendliche unter 16 Jahr en @ 10\mod_1248435245769_6. doc @ 65252 @
Aus Sicherheitsgründen dürfen Kinder und Jugendliche unter 16 Jahren sowie Personen, die mögliche Gefah-
ren nicht erkennen können oder nicht mit dieser Gebrauchsanleitung vertraut sind, dieses Gerät nicht benut-
zen.
Pos: 20 /Alle Produkte/ Sicherheit/Einlei tung/SIC 3 Gefahr dur ch Kombination von Wasser und El ektrizität (2009- 09-17 09:47:13) @ 8\mod_1219 222159989_6.doc @ 50032 @
Gefahren durch die Kombination von Wasser und Elektrizität
− Die Kombination von Wasser und Elektrizität kann bei nicht vorschriftsmäßigem Anschluss oder unsachgemäßer
Handhabung zum Tod oder zu schweren Verletzungen durch Stromschlag führen.
− Bevor Sie ins Wasser greifen, immer die Netzstecker aller im Wasser befindlichen Geräte ziehen.
Pos: 21 /Alle Produkte/ Dummy_module/Abstan d 3pt @ 11\mod_12519018468 64_0.doc @ 72824 @
Pos: 22 /Alle Produkte/ Überschriften/H 2 Vorschriftsmäßige ele ktrische Installa tion @ 7\mod_120401905 1664_6.doc @ 44617 @
Vorschriftsmäßige elektrische Installation
Pos: 23 /Alle Produkte/Si cherheit/Vorschr iftsmäßig elektrisc he Installation/SIC BAS E-I nst @ 10\mod_1248349362194_ 6.doc @ 65181 @
− Elektrische Installationen müssen den nationalen Errichterbestimmungen entsprechen und dürfen nur von einer
Elektrofachkraft vorgenommen werden.
− Eine Person gilt als Elektrofachkraft, wenn sie auf Grund ihrer fachlichen Ausbildung, Kenntnisse und Erfahrungen
befähigt und berechtigt ist, die ihr übertragenen Arbeiten zu beurteilen und durchzuführen. Das Arbeiten als
Fachkraft umfasst auch das Erkennen möglicher Gefahren und das Beachten einschlägiger regionaler und
nationaler Normen, Vorschriften und Bestimmungen.
− Bei Fragen und Problemen wenden Sie sich an eine Elektrofachkraft.
− Der Anschluss des Gerätes ist nur erlaubt, wenn die elektrischen Daten von Gerät und Stromversorgung
übereinstimmen. Die Gerätedaten befinden sich auf dem Typenschild am Gerät, oder auf der Verpackung, oder in
dieser Anleitung.
− Das Gerät muss über eine Fehlerstrom-Schutzeinrichtung mit einem Bemessungsfehlerstrom von maximal 30 mA
abgesichert sein.
Pos: 24 /Alle Produkte/ Sicherheit/Vorsc hriftsmäßig elektri sche Installation/ SIC ERW Elektr. Instal lation - Für außen geeignet e Leitungen @ 11\mod_125 0762600052_6.doc @ 70125 @
− Verlängerungsleitungen und Stromverteiler (z.B. Steckdosenleisten) müssen für die Verwendung im Freien geeignet
sein (spritzwassergeschützt).
Pos: 25 /Alle Produkte/ Sicherheit/Vorsc hriftsmäßig elektri sche Installation/ SIC ERW Elektr. Instal lation - H05RN-F-Lei tung @ 11\mod_125112113971 4_6.doc @ 70241 @
− Netzanschlussleitungen dürfen keinen geringeren Querschnitt haben als Gummischlauchleitungen mit dem
Kurzzeichen H05RN-F. Verlängerungsleitungen müssen der DIN VDE 0620 genügen.
Pos: 26 /Alle Produkte/ Dummy_module/=== == Seitenwechsel ===== @ 0\mod_1125648978015_0.d oc @ 1630 @
- DE -

9
- DE -
Pos: 27 /Alle Produkte/ Überschriften/H 2 Sicherer Betrieb @ 7\ mod_1204022429287_6.doc @ 44669 @
Sicherer Betrieb
Pos: 28 /Alle Produkte/ Sicherheit/Sic herer Betrieb/SI C ERW Sich. Betrieb - Keine Per sonen im Wasser @ 10\mod_1248351236 831_6.doc @ 65208 @
− Betreiben Sie das Gerät nur, wenn sich keine Personen im Wasser aufhalten!
Pos: 29 /Alle Produkte/Si cherheit/Sicher er Betrieb/SIC BAS Sich. Betri eb @ 11\mod_1250507406044_6.d oc @ 69395 @
− Bei defekten elektrischen Leitungen oder defektem Gehäuse darf das Gerät nicht betrieben werden.
− Tragen oder ziehen Sie das Gerät nicht an der elektrischen Leitung.
− Verlegen Sie alle Leitungen geschützt, so dass Beschädigungen ausgeschlossen sind und niemand darüber fallen
kann.
− Öffnen Sie niemals das Gehäuse des Gerätes oder zugehöriger Teile, wenn Sie nicht ausdrücklich in der Anleitung
dazu aufgefordert werden.
− Verwenden Sie nur Original-Ersatzteile und -Zubehör für das Gerät.
− Nehmen Sie niemals technische Änderungen am Gerät vor.
− Lassen Sie Reparaturen nur von OASE-autorisierten Kundendienststellen durchführen.
Pos: 30 /Alle Produkte/ Dummy_module/Abstan d 6 pt @ 7\mod_1196627997106 _0.doc @ 41649 @
Pos: 31 /Alle Produkte/ Überschriften/H 1 Montage @ 7\mod_120290772 5390_6.doc @ 43906 @
Montage
Pos: 32 /Alle Produkte/ Dummy_module/Abstan d 3pt @ 11\mod_12519018468 64_0.doc @ 72824 @
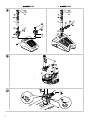
Pos: 33 /Pumpen/Schla mmsauger/Filtral 2500 UVC / 5000 UVC/Montage Filtr al 2500 UVC @ 11\mod_125120480 3439_6.doc @ 70552 @
Filtral 2500
Gerät montieren (Bild A)
Abzweigventil (12), Anschlussstück für Kugelgelenk (19), Düsenrohr (11) mit Klemmschraube (10), Düsenaufnah-
me (9) und Düseneinsatz (8) zusammenbauen und mit dem Unterlegring (14) auf das Anschlussgewinde vom UVC-
Wassergehäuse (26) schrauben. Höhe und Form der Fontäne sind abhängig vom verwendeten Düseneinsatz (8).
Schließen Sie gegebenenfalls an dem seitlichen separat regulierbaren Ausgang am Abzweigventil (12) zusätzlich
einen Schlauch für Speierfiguren oder einen Bachlauf an.
Falls Sie nur den seitlichen Ausgang am Abzweigventil (12) verwenden, dann verschließen Sie den oberen Ausgang
mit der Verschlusskappe (38).
Pos: 34 /Alle Produkte/ Dummy_module/Abstan d 3pt @ 11\mod_12519018468 64_0.doc @ 72824 @
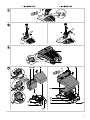
Pos: 35 /Pumpen/Schla mmsauger/Filtral 2500 UVC / 5000 UVC/Montage Filtr al 5000 UVC @ 11\mod_125129329 0978_6.doc @ 71120 @
Filtral 5000
Belüftungspumpe anschließen - Option (Bild V-Y)
Wenn Sie das Wasser zusätzlich mit Sauerstoff anreichern möchten, müssen Sie vor der Montage des Gerätes die
Belüftungspumpe (Aqua Oxy) anschließen. Belüfterstein und Schlauch gehören zum Lieferumfang der Aqua Oxy.
Filtergehäuse öffnen (Bild V): Auf beiden Seiten die Klammern an der Filter-Unterschale (2) zur Seite ziehen und Filter-
Oberschale (1) nach oben abheben. Den Filterschaum (3) entnehmen.
Belüfterstein anschließen (Bild W): Im Gehäuse den Belüfterstein (25) mit einem Stück Schlauch (4) an das Luftan-
schlussstück (5) anschließen und den Belüfterstein (25) zwischen die Kiessäcke (24) legen. Der Schlauch darf nicht
knicken. Am Luftanschlussstück (5) außerhalb des Gehäuses die Belüftungspumpe (Aqua Oxy) anschließen. Lesen
Sie die Dokumentation zur Belüftungspumpe.
Filtergehäuse schließen (Bild Y): Filterschaum (3) in die Filter-Unterschale (2) legen. Filter-Oberschale (1) aufsetzen
und auf die Filter-Unterschale (2) drücken, bis die Klammern an der Filter-Unterschale einrasten.
Wichtig: Anschlussleitung (7) durch die Kabelöffnung an der Filter-Unterschale (2) führen und so verlegen, dass sie
nicht gequetscht wird.
Gerät montieren (Bild A)
Reduzierstück (13), Abzweigventil (12), Düsenrohr (11) mit Klemmschraube (10), Düsenaufnahme (9) und Düsenein-
satz (8) zusammenbauen und mit dem Unterlegring (14) auf das Anschlussgewinde vom UVC-Wassergehäuse (26)
schrauben. Höhe und Form der Fontäne sind abhängig vom verwendeten Düseneinsatz (8).
Schließen Sie gegebenenfalls an dem seitlichen separat regulierbaren Ausgang am Abzweigventil (12) zusätzlich
einen Schlauch für Speierfiguren oder einen Bachlauf an. Dazu das Reduzierstück (15) und die Stufenschlauchtül-
le (16) auf den seitlichen Ausgang am Abzweigventil (12) schrauben.
Pos: 36 /Alle Produkte/ Dummy_module/Abstan d 6 pt @ 7\mod_1196627997106 _0.doc @ 41649 @
Pos: 37 /Alle Produkte/ Überschriften/H 1 Aufstellen @ 7\mod_1202 907856718_6.doc @ 43932 @
Aufstellen
Pos: 38 /Pumpen/Schla mmsauger/Filtral 2500 UVC / 5000 UVC/Aufstellen / Düse einstellen @ 11\mod_ 1251292808663_6.doc @ 71092 @
Gerät aufstellen
Das Gerät im Teich waagerecht auf einen festen, schlammfreien Untergrund aufstellen, so dass es komplett mit
Wasser bedeckt ist.
Fontäne/Wasserspiel einstellen (Bild B, C)
Düsenrohr (11) auf die gewünschte Länge ziehen. Klemmschraube (10) lösen, Düsenrohr (11) senkrecht ausrichten
und Klemmschraube (10) handfest anziehen.
Drehregler (18) für Fontäne ganz öffnen. Mit dem Drehregler (17) für Speierfigur oder Bachlauf wird auch die Fontä-
ne/das Wasserspiel geregelt. Die zusätzliche Wasserumwälzung über den seitlichen Ausgang verbessert auch bei
nicht angeschlossener Speierfigur oder Bachlauf die Filterwirkung.
Pos: 39 /Alle Produkte/ Dummy_module/=== == Seitenwechsel ===== @ 0\mod_1125648978015_0.d oc @ 1630 @

10
- DE -
Pos: 40 /Alle Produkte/ Überschriften/H 1 Inbetriebnahme @ 7\mod_11 96625111244_6.doc @ 41415 @
Inbetriebnahme
Pos: 41 /Alle Produkte/ Dummy_module/Abstan d 6 pt @ 7\mod_1196627997106 _0.doc @ 41649 @
Pos: 42 /Alle Produkte/ "Achtung"-Texte/ SIC E-Achtung - Netzstec ker ziehen @ 11\mod_12506800 89636_6.doc @ 69897 @
Achtung! Gefährliche elektrische Spannung.
Mögliche Folgen: Tod oder schwere Verletzungen.
Schutzmaßnahmen:
− Bevor Sie ins Wasser greifen Netzstecker aller im Wasser befindlichen Geräte ziehen.
− Vor Arbeiten am Gerät Netzstecker am Gerät ziehen.
Pos: 43 /Alle Produkte/ Dummy_module/Abstan d 3pt @ 11\mod_12519018468 64_0.doc @ 72824 @
Pos: 44 /Alle Produkte/ "Achtung"-Texte/ SIC Achtung - Nicht dimmen! @ 11\mod_1252588525329_6. doc @ 73509 @
Achtung! Empfindliche elektrische Bauteile.
Mögliche Folge: Das Gerät wird zerstört.
Schutzmaßnahme: Gerät nicht an eine dimmbare Stromversorgung anschließen.
Pos: 45 /Alle Produkte/ Dummy_module/Abstan d 3pt @ 11\mod_12519018468 64_0.doc @ 72824 @
Pos: 46 /Alle Produkte/ Inbetriebnahme/Inbe triebnahme - Netzs tecker stecken/ziehen @ 11\ mod_1251212083983_6. doc @ 70771 @
Einschalten: Netzstecker in die Steckdose stecken. Das Gerät schaltet sich sofort ein, wenn die Stromverbindung
hergestellt ist.
Ausschalten: Netzstecker ziehen.
Pos: 47 /Pumpen/Schla mmsauger/Filtral 2500 UVC / 5000 UVC/Schauleuc hte UVC @ 11\mod_125127501250 6_6.doc @ 71031 @
Die Schauleuchte (Bild D, 21) zeigt an, ob die UVC-Lampe in Betrieb ist.
Pos: 48 /Alle Produkte/ Dummy_module/Abstan d 6 pt @ 7\mod_1196627997106 _0.doc @ 41649 @
Pos: 49 /Pumpen/Schla mmsauger/PondoRell/S törung PondoRell 300 0, 5000 @ 12\mod_125438844 6496_6.doc @ 76652 @
Störungen
Störung Ursache Abhilfe
Das Gerät läuft nicht Netzspannung fehlt Netzspannung überprüfen
Durchflussregler zu weit zugedreht Durchflussregler einstellen
Düse verstopft Düseneinsatz abschrauben und reinigen
Zu hohe Druckverluste in den Leitungen Schlauchlänge und Verbindungsteile auf
Minimum reduzieren, Schläuche möglichst
gerade verlegen
Einlassöffnungen verstopft Gehäuse reinigen
Filtermedien verschmutzt Filtermedien reinigen
Rotor blockiert Rotor reinigen
Teich ist extrem verschmutzt Algen und Blätter aus dem Teich entfernen,
Wasser tauschen
Förderleistung bzw. Fontänenhöhe ungenü-
gend oder unregelmäßig,
Wasser nicht klar
Quarzglasrohr ist verschmutzt UVC-Vorklärgerät ausbauen und Quarzglasrohr
reinigen
Lampe überhitzt. Temperaturwächter hat die
Lampe abgeschaltet
Nach Abkühlung schaltet sich die Lampe
wieder automatisch ein
UVC-Lampe defekt UVC-Lampe austauschen
UVC-Lampe leuchtet nicht
UVC-Lampe sitzt nicht richtig in der Fassung UVC-Lampe richtig in die Fassung stecken
Gerät schaltet nach kurzer Laufzeit ab Wassertemperatur zu hoch Maximale Wassertemperatur von +35 °C
einhalten
Pos: 50 /Alle Produkte/ Dummy_module/Abstan d 6 pt @ 7\mod_1196627997106 _0.doc @ 41649 @
Pos: 51 /Alle Produkte/ Überschriften/H 1 Reinigung und Wartung @ 7\ mod_1196625212761_6.doc @ 41467 @
Reinigung und Wartung
Pos: 52 /Alle Produkte/ Dummy_module/Abstan d 3pt @ 11\mod_12519018468 64_0.doc @ 72824 @
Pos: 53 /Alle Produkte/ "Achtung"-Texte/ SIC E-Achtung - Netzstec ker ziehen @ 11\mod_12506800 89636_6.doc @ 69897 @
Achtung! Gefährliche elektrische Spannung.
Mögliche Folgen: Tod oder schwere Verletzungen.
Schutzmaßnahmen:
− Bevor Sie ins Wasser greifen Netzstecker aller im Wasser befindlichen Geräte ziehen.
− Vor Arbeiten am Gerät Netzstecker am Gerät ziehen.
Pos: 54 /Alle Produkte/ Dummy_module/Abstan d 3pt @ 11\mod_12519018468 64_0.doc @ 72824 @
Pos: 55 /Alle Produkte/ "Achtung"-Texte/ SIC Achtung - UVC @ 11\mod_12512 10131939_6.doc @ 70744 @
Achtung! Ultraviolette Strahlung.
Mögliche Folgen: Verletzen von Augen oder Haut durch Verbrennen.
Schutzmaßnahmen:
− UVC-Lampe niemals außerhalb des Gehäuses betreiben.
− UVC-Lampe niemals in einem defekten Gehäuse betreiben.
Pos: 56 /Alle Produkte/ Dummy_module/Abstan d 3pt @ 11\mod_12519018468 64_0.doc @ 72824 @
Pos: 57 /Pumpen/Schla mmsauger/Filtral 2500 UVC / 5000 UVC/Gehäuse und Filter medien reinigen Fi ltral 2500 UVC @ 11\mod_1251206 135150_6.doc @ 70635 @
Filtral 2500: Filtergehäuse öffnen und Filtermedien reinigen (Bild E-G)
Abzweigventil (12) und Anbauelemente abschrauben. Auf beiden Seiten die Klammern an der Filter-Unterschale (2)
zur Seite ziehen und Filter-Oberschale (1) nach oben abheben. Filterschaum (3), UVC-Vorklärgerät zusammen mit
Pumpe (20) und Filterfeinschaum (22), Bioflächenelemente (23) und Kiessack (24) entnehmen.
Filter-Unterschale (2) und Filter-Oberschale (1) mit klarem Wasser und einer Bürste reinigen. Filterschäume (3, 22),
Bioflächenelemente (23) und Kiessack (24) unter fließendem Wasser auswaschen. Keine chemischen Reinigungsmit-
tel verwenden, da diese die Mikroorganismen in den Filtermedien abtöten. Das führt zu einer anfänglich verminderten
Filterleistung.
Pos: 58 /Alle Produkte/ Dummy_module/=== == Seitenwechsel ===== @ 0\mod_1125648978015_0.d oc @ 1630 @

11
- DE -
Pos: 59 /Pumpen/Schla mmsauger/Filtral 2500 UVC / 5000 UVC/Gehäuse und Filter medien reinigen Fi ltral 5000 UVC @ 11\mod_1251205 709008_6.doc @ 70607 @
Filtral 5000: Filtergehäuse öffnen und Filtermedien reinigen (Bild E-G)
Abzweigventil (12) und Anbauelemente abschrauben. Auf beiden Seiten die Klammern an der Filter-Unterschale (2)
zur Seite ziehen und Filter-Oberschale (1) nach oben abheben. UVC-Vorklärgerät mit Pumpe (20), Filterschäume (3,
22), Bioflächenelemente (23) und Kiessäcke (24) entnehmen. Eventuell angeschlossenen Belüfterstein (25) zur Seite
legen. Filter-Unterschale (2) und Filter-Oberschale (1) mit klarem Wasser und einer Bürste reinigen. Filterschäume (3,
22), Bioflächenelemente (23) und Kiessäcke (24) unter fließendem Wasser auswaschen. Keine chemischen Reini-
gungsmittel verwenden, da diese die Mikroorganismen in den Filtermedien abtöten. Das führt zu einer anfänglich
verminderten Filterleistung.
Pos: 60 /Pumpen/Schla mmsauger/Filtral 2500 UVC / 5000 UVC/Pumpe reinigen Fi ltral 2500/5000 @ 11\ mod_1252572046287_6. doc @ 73341 @
Pumpe reinigen (Bild H, I)
Pumpe (28) vom UVC-Wassergehäuse (26) abschrauben. Pumpendeckel (27) gegen den Uhrzeigersinn aufdrehen
(Bajonettverschluss) und Rotor (29) entnehmen. Alle Teile mit klarem Wasser und einer Bürste reinigen. Nach dem
Reinigen die Pumpe in umgekehrter Reihenfolge zusammenbauen.
Pos: 61 /Alle Produkte/ Dummy_module/Abstan d 3pt @ 11\mod_12519018468 64_0.doc @ 72824 @
Pos: 62 /Alle Produkte/ Überschriften/H 2 UVC-Wassergehäuse öffnen u nd reinigen (Bild J ) @ 11\mod_1252572133694_6. doc @ 73368 @
UVC-Wassergehäuse öffnen und reinigen (Bild J)
Pos: 63 /Alle Produkte/ Dummy_module/Abstan d 3pt @ 11\mod_12519018468 64_0.doc @ 72824 @
Pos: 64 /Alle Produkte/ "Hinweis"-Texte/ ZEICHEN Hinweis UVC-Betr ieb nur mit Gehäuse möglic h @ 11\mod_1252572385120 _6.doc @ 73396 @
Hinweis!
Aufgrund eines Sicherheitsschalters kann bei abgenommenem UVC-Wassergehäuse die UVC-Lampe nicht
eingeschaltet werden.
Pos: 65 /Alle Produkte/ Dummy_module/Abstan d 3pt @ 11\mod_12519018468 64_0.doc @ 72824 @
Pos: 66 /Pumpen/Schla mmsauger/Filtral 25 00 UVC / 5000 UVC/UVC-Wassergehä use öffen und reini gen @ 11\mod_1251206968655_ 6.doc @ 70662 @
Das UVC-Wassergehäuse (J, 26) ist mit einem Bajonettverschluss am Gerätekopf (31) befestigt. Auf die Rastzun-
ge (30) am Gerätekopf (31) drücken, das UVC-Wassergehäuse (26) gegen den Uhrzeigersinn drehen und vorsichtig
vom Gerätekopf (31) abziehen. UVC-Wassergehäuse (26) unter fließendem Wasser reinigen. Das Quarzglas (33) auf
Beschädigungen prüfen und von außen mit einem feuchten Tuch reinigen.
Hinweis: Für eine optimale Filterleistung sollten Sie die UVC-Lampe nach ca. 8000 Betriebsstunden ersetzen. Siehe
"UVC-Lampe ersetzen".
UVC-Wassergehäuse schließen (Bild P- R)
Am Gerätekopf (31) den O-Ring (37) auf Beschädigungen prüfen. Den O-Ring (37) auf den Absatz am Gerätekopf (31)
setzen und das UVC-Wassergehäuse (26) vorsichtig und mit mittlerem Druck auf den Gerätekopf (31) schieben. Dabei
das UVC-Wassergehäuse (26) etwas verdrehen, damit Zapfen (39) und Nuten (40) des Bajonettverschlusses ineinan-
der greifen. UVC-Wassergehäuse (26) im Uhrzeigersinn bis zum Anschlag drehen und einrasten lassen.
Pos: 67 /Alle Produkte/ Dummy_module/Abstan d 6 pt @ 7\mod_1196627997106 _0.doc @ 41649 @
Pos: 68 /Pumpen/Schla mmsauger/Filtral 2500 UVC / 5000 UVC/Filtral 2500 zusa mmenbauen @ 11\mod_1251 207729894_6.doc @ 7068 9 @
Filtral 2500: Gerät zusammenbauen (Bild S-V)
Pumpe (28) mit Überwurfmutter am UVC-Wassergehäuse (26) festschrauben. Filterfeinschaum (22) in die Filter-
Unterschale (2) einsetzen, Bioflächenelemente (23) und Kiessack (24) in die Filter-Unterschale (2) legen. UVC-
Vorklärgerät mit Pumpe (20) einsetzen. Filterschaum (3) einlegen. Filter-Oberschale (1) aufsetzen und auf die Filter-
Unterschale (2) drücken, bis die Klammern an der Filter-Unterschale einrasten. Wichtig: Anschlussleitung (7) durch
die Kabelöffnung an der Filter-Unterschale (2) führen und mit dem Kabelknickschutz in der Filter-Unterschale einklip-
sen (U, 37).
Pos: 69 /Alle Produkte/ Dummy_module/Abstan d 3pt @ 11\mod_12519018468 64_0.doc @ 72824 @
Pos: 70 /Pumpen/Schla mmsauger/Filtral 2500 UVC / 5000 UVC/Filtral 5000 zusa mmenbauen @ 11\mod_1251 207782285_6.doc @ 7071 6 @
Filtral 5000: Gerät zusammenbauen (Bild S-V)
Pumpe (28) mit Überwurfmutter am UVC-Wassergehäuse (26) festschrauben. Die Bioflächenelemente (23) und
Kiessäcke (24) in die Filter-Unterschale (2) legen. Den Belüfterstein (25) zwischen die Kiessäcke (24) legen. Der
Schlauch darf nicht knicken. Filterschäume (3, 22) in die Filter-Unterschale (2) legen. UVC-Vorklärgerät mit Pum-
pe (20) einsetzen. Filter-Oberschale (1) aufsetzen und auf die Filter-Unterschale (2) drücken, bis die Klammern an der
Filter-Unterschale einrasten. Wichtig: Anschlussleitung (7) durch die Kabelöffnung an der Filter-Unterschale (2) führen
und so verlegen, dass sie nicht gequetscht wird.
Pos: 71 /Alle Produkte/ Dummy_module/=== == Seitenwechsel ===== @ 0\mod_1125648978015_0.d oc @ 1630 @

12
- DE -
Pos: 72 /Alle Produkte/ Überschriften/H 2 UVC-Lampe ersetzen (Bild L- S) @ 11\mod_1252574101 379_6.doc @ 73423 @
UVC-Lampe ersetzen (Bild L-S)
Pos: 73 /Alle Produkte/ Dummy_module/Abstan d 3pt @ 11\mod_12519018468 64_0.doc @ 72824 @
Pos: 74 /Alle Produkte/ "Achtung"-Texte/ SIC Achtung - Zerbrechlic hes Glas @ 11\mod_125257418 1349_6.doc @ 73450 @
Achtung! Zerbrechliches Glas.
Mögliche Folgen: Schnittverletzung an den Händen.
Schutzmaßnahmen: Vorsichtig mit Quarzglas und UVC-Lampe umgehen.
Pos: 75 /Alle Produkte/ Dummy_module/Abstan d 3pt @ 11\mod_12519018468 64_0.doc @ 72824 @
Pos: 76 /Alle Produkte/ "Achtung"-Texte/ SIC Achtung - UVC @ 11\mod_12512 10131939_6.doc @ 70744 @
Achtung! Ultraviolette Strahlung.
Mögliche Folgen: Verletzen von Augen oder Haut durch Verbrennen.
Schutzmaßnahmen:
− UVC-Lampe niemals außerhalb des Gehäuses betreiben.
− UVC-Lampe niemals in einem defekten Gehäuse betreiben.
Pos: 77 /Alle Produkte/ Dummy_module/Abstan d 3pt @ 11\mod_12519018468 64_0.doc @ 72824 @
Pos: 78 /Pumpen/Schla mmsauger/Filtral 25 00 UVC / 5000 UVC/UVC-Lampe erse tzen @ 11\mod_12525142228 79_6.doc @ 73311 @
− UVC-Wassergehäuse öffnen (siehe "UVC-Wassergehäuse öffnen und reinigen").
− Blechschraube (32) herausdrehen.
− Klemmschraube (34) gegen den Uhrzeigersinn vom Gerätekopf (31) abdrehen.
− Quarzglas (33) und O-Ring (35) mit einer leichten Drehbewegung vom Gerätekopf (31) abziehen.
− UVC-Lampe (36) herausziehen und ersetzen.
Wichtig: Verwenden Sie nur Lampen, deren Bezeichnung und Leistungsangabe mit den Angaben auf dem Typen-
schild übereinstimmen.
− Quarzglas (33) und O-Ring (35) auf Beschädigungen prüfen.
− Quarzglas (33) mit O-Ring (35) bis zum Anschlag in den Gerätekopf (31) einsetzen.
− Klemmschraube (34) im Uhrzeigersinn bis zum Anschlag festdrehen.
− Blechschraube (32) eindrehen und festziehen.
− UVC-Wassergehäuse schließen (siehe "UVC-Wassergehäuse schließen").
Pos: 79 /Alle Produkte/ Dummy_module/Abstan d 6 pt @ 7\mod_1196627997106 _0.doc @ 41649 @
Pos: 80 /Alle Produkte/ Überschriften/H 1 Lagern / Überwintern @ 7\mod _1196625251745_6.doc @ 41493 @
Lagern/Überwintern
Pos: 81 /Alle Produkte/ Lagern/Überwinter n/LAG - Vor Frost deinstal lieren (2009-09-22 1 7:24:28) @ 11\mod_1253613 119879_6.doc @ 74731 @
Bei Frost muss das Gerät deinstalliert werden. Führen Sie eine gründliche Reinigung durch und prüfen Sie das Gerät
auf Beschädigungen.
Pos: 82 /Alle Produkte/ Lagern/Überwinter n/LAG - Getaucht, Stec ker nicht fluten (2009- 09-22 17:24:19) @ 11\mod_12 53613155911_6.doc @ 74759 @
Bewahren Sie es in Wasser getaucht oder mit Wasser befüllt und frostfrei auf. Den Stecker nicht überfluten!
Pos: 83 /Alle Produkte/ Dummy_module/Abstan d 6 pt @ 7\mod_1196627997106 _0.doc @ 41649 @
Pos: 84 /Pumpen/Schla mmsauger/PondoRell/Ver schleißteile Po ndoRell 3000, 5000 @ 0\mod_11 27677370702_6.doc @ 6737 @
Verschleißteile
Die UVC-Lampe, die Filtermedien und der Rotor sind Verschleißteile und unterliegen nicht der Gewährleistung.
Pos: 85 /Alle Produkte/ Dummy_module/Abstan d 6 pt @ 7\mod_1196627997106 _0.doc @ 41649 @
Pos: 86 /Alle Produkte/ Überschriften/H 1 Entsorgung @ 7\mod_11966255 83904_6.doc @ 41545 @
Entsorgung
Pos: 87 /Alle Produkte/En tsorgung/ENT BAS - Kein Hausmüll @ 10\ mod_1243521970991_6. doc @ 63328 @
Dieses Gerät darf nicht als Hausmüll entsorgt werden! Nutzen Sie bitte das dafür vorgesehene
Rücknahmesystem. Machen Sie das Gerät vorher durch Abschneiden der Kabel unbrauchbar.
Pos: 88 /Alle Produkte/ Entsorgung/ENT E RW - UVC entsorgen @ 11\mod_125308982 0646_6.doc @ 73940 @
Entsorgen Sie die UVC-Lampe über das dafür vorgesehene Rücknahmesystem.
Pos: 89 /Alle Produkte/ Dummy_module/=== == Seitenwechsel ===== @ 0\mod_1125648978015_0.d oc @ 1630 @

13
- GB -
Pos: 90 /Alle Produkte/ Länderkennzeichen/ 02===GB===1. Sprac he @ 4\mod_1155109065198_0. doc @ 23181 @
Pos: 91 /Alle Produkte/ Überschriften/H 1 Hinweise zu dieser Gebrauc hsanleitung @ 10\mod_12 48768026340_121.d oc @ 66253 @
Information about these operating instructions
Pos: 92 /Alle Produkte/ Einleitung/Hinwei se zur Anleitung @ 11\mod_12 51641382851_121.d oc @ 71883 @
Welcome to OASE Living Water. You made a good choice with the purchase of the product Filtral 2500 UVC / 5000
UVC.
Prior to commissioning the unit, please read the instructions of use carefully and fully familiarise yourself with the unit.
Ensure that all work with this unit is only carried out in accordance with these instructions.
Adhere to the safety information for the correct and safe use of the unit.
Keep these instructions in a safe place! Please also hand over the instructions when passing the unit on to a new
owner.
Pos: 93 /Alle Produkte/ Dummy_module/Abstan d 6 pt @ 7\mod_1196627997106 _0.doc @ 41651 @
Pos: 94 /Alle Produkte/ Überschriften/H1 B estimmungsgemäße Ver wendung @ 9\mod_12248614464 32_121.doc @ 54763 @
Intended use
Pos: 95 /Alle Produkte/ Bestimmungsgemäße Ver wendung/Best. Verwe ndung - Verwendung untersa gt in @ 10\mod_124877128 4180_121.doc @ 66308 @
Filtral 2500 UVC / 5000 UVC , in the following termed "unit", may only be used for cleaning normal pond water. This
also applies to all other components being part of our scope of delivery. Permissible water temperature: + 4 °C to
+ 35 °C. The unit may be used in ponds with and without fish.
Never use the unit
− without water flow and pump filter
− for industrial purposes
− in conjunction with chemicals, foodstuff, easily flammable or explosive substances
− in swimming or bathing ponds
Pos: 96 /Alle Produkte/ Bestimmungsgemäße Ver wendung/Best. Verwe ndung UVC-Lampe @ 11\mod_12511 23035663_121.doc @ 70270 @
The UVC lamp installed in the unit is intended to kill algae and bacteria in the pond water. Even in small doses, its
radiation is harmful for eyes and skin. Never use the UVC lamp in a defective housing or outside the housing, or any
other purpose other than that intended.
Pos: 97 /Alle Produkte/ Dummy_module/Abstan d 6 pt @ 7\mod_1196627997106 _0.doc @ 41651 @
Pos: 98 /Alle Produkte/ Überschriften/H 1 Sicherheitshinweise @ 6\ mod_1196353926316_1 21.doc @ 40981 @
Safety information
Pos: 99 /Alle Produkte/ Sicherheit/Einlei tung/SIC 1 Sicher heitshinweise Einlei tung @ 7\mod_12053107997 30_121.doc @ 45453 @
The company OASE has built this unit according to the state of the art and the valid safety regulations. Despite the
above, hazards for persons and assets can emanate from this unit if it is used in an improper manner or not in accor-
dance with its intended use, or if the safety instructions are ignored.
Pos: 100 /Alle Produkte/ Sicherheit/Einl eitung/SIC 2 Kinder und Jugendliche unter 16 Jahr en @ 10\mod_1248435245769_1 21.doc @ 65253 @
For safety reasons, children and young persons under 16 years of age as well as persons who cannot re-
cognise possible danger or who are not familiar with these operating instructions, are not permitted to use the
unit.
Pos: 101 /Alle Produkte/ Sicherheit/Einl eitung/SIC 3 Gefahr dur ch Kombination von Wasser und Elektrizität (2009- 09-17 09:47:13) @ 8\ mod_1219222159989_121.doc @ 50033 @
Hazards encountered by the combination of water and electricity
− The combination of water and electricity can lead to death or severe injury from electrocution, if the unit is incorrectly
connected or misused.
− Prior to reaching into the water, always disconnect the power supply to all units used in the water.
Pos: 102 /Alle Produkte/ Dummy_module/Absta nd 3pt @ 11\mod_1251901846 864_0.doc @ 72826 @
Pos: 103 /Alle Produkte/ Überschriften/ H2 Vorschriftsmäßige el ektrische Insta llation @ 7\mod_12040190 51664_121.doc @ 44619 @
Correct electrical installation
Pos: 104 /Alle Produkte/ Sicherheit/Vorsc hriftsmäßig elektri sche Installation/ SIC BAS E-Inst @ 10\mod_12 48349362194_121.doc @ 65183 @
− Electrical installations must meet the national regulations and may only be carried out by a qualified electrician.
− A person is regarded as a qualified electrician, if, due to his/her vocational education, knowledge and experience, he
or she is capable of and authorised to judge and carry out the work commissioned to him/her. Working as a qualified
person also includes the recognition of possible hazards and the adherence to the pertinent regional and national
standards, rules and regulations.
− For your own safety, please consult a qualified electrician.
− The unit may only be connected when the electrical data of the unit and the power supply coincide. The unit data is
to be found on the unit type plate or on the packaging, or in this manual.
− Ensure that the unit is fused for a rated fault current of max. 30 mA by means of a fault current protection device.
Pos: 105 /Alle Produkte/ Sicherheit/Vorsc hriftsmäßig elektri sche Installation/ SIC ERW Elektr. Instal lation - Für außen geeigne te Leitungen @ 11\mod_1250 762600052_121.doc @ 70127 @
− Extension cables and power distributors (e.g. outlet strips) must be suitable for outdoor use.
Pos: 106 /Alle Produkte/ Sicherheit/Vorsc hriftsmäßig elektri sche Installation/ SIC ERW Elektr. Instal lation - H05RN-F-Lei tung @ 11\mod_12511211397 14_121.doc @ 70243 @
− Ensure that the power connection cable cross section is not smaller than that of the rubber sheath with the
identification H05RN-F. Extension cables must meet DIN VDE 0620.
Pos: 107 /Alle Produkte/ Dummy_module/=== == Seitenwechsel === == @ 0\mod_1125648978015_0. doc @ 1631 @
- GB -

14
- GB -
Pos: 108 /Alle Produkte/ Überschriften/ H2 Sicherer Betrieb @ 7\ mod_1204022429287_121.doc @ 44671 @
Safe operation
Pos: 109 /Alle Produkte/ Sicherheit/Sic herer Betrieb/SI C ERW Sich. Betrieb - Keine Per sonen im Wasser @ 10\mod_124835123 6831_121.doc @ 65210 @
− Only operate the unit if no persons are in the water!
Pos: 110 /Alle Produkte/Si cherheit/Sicher er Betrieb/SIC BAS Sich. Betrieb @ 11\mod_1250507406044_ 121.doc @ 69397 @
− Never operate the unit if either the electrical cables or the housing are defective!
− Do not carry or pull the unit by its electrical cable.
− Route all cables such that damage is excluded and nobody can trip over them.
− Never open the unit housing or its attendant components, unless this is explicitly required in the operating
instructions.
− Only use original spare parts and accessories for the unit.
− Never carry out technical modifications to the unit.
− Only have repairs carried out by customer service points authorised by OASE.
Pos: 111 /Alle Produkte/ Dummy_module/Absta nd 6 pt @ 7\mod_119662799710 6_0.doc @ 41651 @
Pos: 112 /Alle Produkte/ Überschriften/ H1 Montage @ 7\mod_12029077 25390_121.doc @ 43908 @
Installation
Pos: 113 /Alle Produkte/ Dummy_module/Absta nd 3pt @ 11\mod_1251901846 864_0.doc @ 72826 @
Pos: 114 /Pumpen/Schla mmsauger/Filtra l 2500 UVC / 5000 UVC/Montage Fi ltral 2500 UVC @ 11\mod_12512048 03439_121.doc @ 7055 3 @
Filtral 2500
Unit assembly (Fig. A)
Assemble the branch valve (12), the connection element for the ball joint (19), the nozzle tube (11) with the clamping
screw (10), nozzle mounting (9) and nozzle insert (8), then screw the assembly on the connection thread of the UVC
water housing (26) including the washer (14). The fountain height and shape depend on the nozzle insert (8) used.
If required, connect an additional hose for features or a water course to the lateral separately regulated connection of
the branch valve (12).
If you only use the lateral outlet at the branch valve (12), close the upper outlet using the cover cap (38).
Pos: 115 /Alle Produkte/ Dummy_module/Absta nd 3pt @ 11\mod_1251901846 864_0.doc @ 72826 @
Pos: 116 /Pumpen/Schla mmsauger/Filtra l 2500 UVC / 5000 UVC/Montage Fi ltral 5000 UVC @ 11\mod_12512932 90978_121.doc @ 7112 1 @
Filtral 5000:
Connecting the venting pump – option (Fig. V-Y)
If you wish to enrich the water with additional oxygen, connect the venting pump (Aqua Oxy) prior to installing the unit.
The Aqua Oxy scope of delivery includes the aeration stone and the hose.
Open the filter housing (Fig. V): Pull the clamps on both sides of the bottom strainer casing (2) to the side and lift off
the top strainer casing (1). Remove the foam filter (3).
Connect the aeration stone (figure W): Inside the housing, connect the aeration stone (25) with a section of the hose
(4) to the air connector (5) and place the aeration stone (25) between the gravel bags (24). Ensure that the hose is not
kinked. Connect the aeration pump (Aqua Oxy) to the air connector (5) outside of the housing. Read the aeration pump
documentation.
Close the filter housing (Fig. Y): Place the foam filter (3) in the bottom strainer casing (2). Attach the top strainer casing
(1) and press it onto the bottom strainer casing (2) until the clamps engage in the bottom strainer casing.
Important: Lead the connection cable (7) through the cable opening in the bottom strainer casing (2) and route the
cable such that pinching is avoided.
Unit assembly (Fig. A)
Assemble the reduction element (13), branch valve (12), nozzle tube (11) with the clamping screw (10), nozzle moun-
ting (9) and nozzle insert (8), then screw the assembly on the connection thread of the UVC water housing (26) inclu-
ding the washer (14). The fountain height and shape depend on the nozzle insert (8) used.
If required, connect an additional hose for features or a water course to the lateral separately regulated connection of
the branch valve (12). For this purpose, screw the reduction element (15) and the stepped hose adapter (16) on the
lateral outlet of the branch valve (12).
Pos: 117 /Alle Produkte/ Dummy_module/Absta nd 6 pt @ 7\mod_119662799710 6_0.doc @ 41651 @
Pos: 118 /Alle Produkte/ Überschriften/ H1 Aufstellen @ 7\mod_120 2907856718_121.doc @ 43934 @
Installation
Pos: 119 /Pumpen/Schla mmsauger/Filtra l 2500 UVC / 5000 UVC/Aufstelle n / Düse einstellen @ 11\mod _1251292808663_121.doc @ 71093 @
Set-up the unit
Place the unit in the pond on a horizontal, firm and sludge free ground and ensure that it is completely covered by
water.
Setting the fountain/water feature (Fig. B, C)
Pull the nozzle tube (11) to the desired length. Undo the clamping screw (10), vertically align the nozzle tube (11) and
fasten the clamping screw (10) hand tight.
Fully open the rotary regulator (18) for the fountain. The rotary regulator (17) for the features or the water course is
also used to control the fountain/water feature. The additional water recirculation via the lateral outlet improves the
filtering effect, even if the feature or the water course is not connected.
Pos: 120 /Alle Produkte/ Dummy_module/=== == Seitenwechsel === == @ 0\mod_1125648978015_0. doc @ 1631 @

15
- GB -
Pos: 121 /Alle Produkte/ Überschriften/ H1 Inbetriebnahme @ 7\mod_1 196625111244_121. doc @ 41417 @
Start-up
Pos: 122 /Alle Produkte/ Dummy_module/Absta nd 6 pt @ 7\mod_119662799710 6_0.doc @ 41651 @
Pos: 123 /Alle Produkte/ "Achtung"-Texte/ SIC E-Achtung - Netzstec ker ziehen @ 11\mod_1250680 089636_121.doc @ 69898 @
Attention! Dangerous electrical voltage.
Possible consequences: Death or severe injury.
Protective measures:
− Prior to reaching into the water, disconnect the power supply to all units used in the water.
− Disconnect the power plug prior to carrying out work on the unit.
Pos: 124 /Alle Produkte/ Dummy_module/Absta nd 3pt @ 11\mod_1251901846 864_0.doc @ 72826 @
Pos: 125 /Alle Produkte/ "Achtung"-Texte/ SIC Achtung - Nicht dimmen! @ 11\mod_1252588525329_ 121.doc @ 73510 @
Attention! Sensitive electrical components.
Possible consequence: The unit will be destroyed.
Protective measure: Do not connect the unit to a dimmable power supply.
Pos: 126 /Alle Produkte/ Dummy_module/Absta nd 3pt @ 11\mod_1251901846 864_0.doc @ 72826 @
Pos: 127 /Alle Produkte/ Inbetriebnahme/ Inbetriebnahme - Netzs tecker stecken/ziehe n @ 11\mod_1251212083983_ 121.doc @ 70773 @
Switching on: Connect power plug to the socket. The unit switches on immediately when the power connection is
established.
Switching off: Disconnect the power plug.
Pos: 128 /Pumpen/Schla mmsauger/Filtra l 2500 UVC / 5000 UVC/Schauleuc hte UVC @ 11\mod_12512750125 06_121.doc @ 71033 @
The indicator lamp (Fig. D, 21) indicates the ON/OFF status of the UVC lamp.
Pos: 129 /Alle Produkte/ Dummy_module/Absta nd 6 pt @ 7\mod_119662799710 6_0.doc @ 41651 @
Pos: 130 /Pumpen/Schla mmsauger/PondoRel l/Störung PondoRell 30 00, 5000 @ 12\mod_12543884 46496_121.doc @ 76653 @
Malfunctions
Malfunction Cause Remedy
The unit is not operating No mains voltage Check mains voltage
Flow regulator excessively throttled Set flow regulator
Nozzle blocked Unscrew and clean the nozzle insert
Excessive pressure losses in the hoses Reduce hose length and connecting parts to a
minimum, route hoses as straight as possible
Intake openings blocked Clean housing
Filters clogged Clean filters
Rotor blocked Clean rotor
Pond extremely dirty Remove algae and leaves from the pond,
change the water
Delivery or fountain height insufficient or not
consistent,
Cloudy water
Quartz glass tube soiled Remove UVC clarifying unit and clean the
quartz glass tube
Lamp overheated. The temperature switch has
switched off the lamp
The lamp will automatically switch on again
once cooled down
UVC lamp defective Replace the UVC lamp
UVC lamp does not light up
UVC lamp is not correctly seated in the socket Correctly insert the UVC lamp into the socket
Unit switches off after a short running period Water temperature too high Note maximum water temperature of +35°
Pos: 131 /Alle Produkte/ Dummy_module/Absta nd 6 pt @ 7\mod_119662799710 6_0.doc @ 41651 @
Pos: 132 /Alle Produkte/ Überschriften/ H1 Reinigung und Wartung @ 7\ mod_1196625212761_121. doc @ 41469 @
Maintenance and cleaning
Pos: 133 /Alle Produkte/ Dummy_module/Absta nd 3pt @ 11\mod_1251901846 864_0.doc @ 72826 @
Pos: 134 /Alle Produkte/ "Achtung"-Texte/ SIC E-Achtung - Netzstec ker ziehen @ 11\mod_1250680 089636_121.doc @ 69898 @
Attention! Dangerous electrical voltage.
Possible consequences: Death or severe injury.
Protective measures:
− Prior to reaching into the water, disconnect the power supply to all units used in the water.
− Disconnect the power plug prior to carrying out work on the unit.
Pos: 135 /Alle Produkte/ Dummy_module/Absta nd 3pt @ 11\mod_1251901846 864_0.doc @ 72826 @
Pos: 136 /Alle Produkte/ "Achtung"-Texte/ SIC Achtung - UVC @ 11\mod_1251 210131939_121.doc @ 70745 @
Attention! Ultra-violet radiation.
Possible consequences: Eye or skin injury from burns.
Protective measures:
− Never operate the UVC lamp outside its housing.
− Never operate the UVC lamp in a housing that is defective.
Pos: 137 /Alle Produkte/ Dummy_module/Absta nd 3pt @ 11\mod_1251901846 864_0.doc @ 72826 @
Pos: 138 /Pumpen/Schla mmsauger/Filtra l 2500 UVC / 5000 UVC/Gehäuse und Fi ltermedien reinigen Fi ltral 2500 UVC @ 11\mod_125120 6135150_121.doc @ 70636 @
Filtral 2500: Opening the filter housing and cleaning the different filters (Fig. E-G)
Unscrew the branch valve (12) and the attachment elements. Pull the clamps on both sides of the bottom strainer
casing (2) to the side and lift off the top strainer casing (1). Remove the foam filter (3) and the UVC clarifying unit
including pump (20), and the fine foam filters (22), bio surface elements (23) and the gravel bag (24).
Clean the bottom strainer casing (2) and the top strainer casing (1) with clear water using a brush. Wash out foam
filters (3, 22), bio-surface elements (23) and the gravel bag (24) under running water. Do not use chemical cleaning
agents as they would kill the micro-organisms in the different filter media. At the beginning, this entails a reduced filter
capacity.
Pos: 139 /Alle Produkte/ Dummy_module/=== == Seitenwechsel === == @ 0\mod_1125648978015_0. doc @ 1631 @

16
- GB -
Pos: 140 /Pumpen/Schla mmsauger/Filtra l 2500 UVC / 5000 UVC/Gehäuse und Fi ltermedien reinigen Fi ltral 5000 UVC @ 11\mod_125120 5709008_121.doc @ 70608 @
Filtral 5000: Opening the filter housing and cleaning the different filters (Fig. E-G)
Unscrew the branch valve (12) and the attachment elements. Pull the clamps on both sides of the bottom strainer
casing (2) to the side and lift off the top strainer casing (1). Remove the UVC clarifying unit including pump (20), foam
filters (3, 22), bio surface elements (23) and gravel bags (24). When the aeration stone (25) is connected, put it to the
side. Clean the bottom strainer casing (2) and the top strainer casing (1) with clear water using a brush. Wash out foam
filters (3, 22), bio-surface elements (23) and gravel bags (24) under running water. Do not use chemical cleaning
agents as they would kill the micro-organisms in the different filter media. At the beginning, this entails a reduced filter
capacity.
Pos: 141 /Pumpen/Schla mmsauger/Filtra l 2500 UVC / 5000 UVC/Pumpe reinigen Fi ltral 2500/5000 @ 11\ mod_1252572046287_12 1.doc @ 73343 @
Cleaning the pump (Fig. H, I)
Unscrew pump (28) from the UVC water housing (26). Unscrew the pump lid (27) counter-clockwise (bayonet closure)
and remove rotor (29). Clean all components using clean water and a brush. After cleaning the pump, reassemble in
the reverse order.
Pos: 142 /Alle Produkte/ Dummy_module/Absta nd 3pt @ 11\mod_1251901846 864_0.doc @ 72826 @
Pos: 143 /Alle Produkte/ Überschriften/ H2 UVC-Wassergehäuse öf fnen und reinigen (Bild J ) @ 11\mod_1252572133694_ 121.doc @ 73370 @
Opening and cleaning the UVC water housing (Fig. J)
Pos: 144 /Alle Produkte/ Dummy_module/Absta nd 3pt @ 11\mod_1251901846 864_0.doc @ 72826 @
Pos: 145 /Alle Produkte/ "Hinweis"-Texte/ ZEICHEN Hinweis UVC-Betr ieb nur mit Gehäuse mög lich @ 11\mod_125257238512 0_121.doc @ 73398 @
Note!
A safety switch prevents switching on the UVC lamp as long as the UVC water housing is removed.
Pos: 146 /Alle Produkte/ Dummy_module/Absta nd 3pt @ 11\mod_1251901846 864_0.doc @ 72826 @
Pos: 147 /Pumpen/Schla mmsauger/Filtra l 2500 UVC / 5000 UVC/UVC-W assergehäuse öffen und reini gen @ 11\mod_1251206968655 _121.doc @ 70664 @
The UVC water housing (J, 26) is fastened to the unit head (31) by means of a bayonet closure. Press on the engage-
ment lug (30) at the unit head (31), turn the UVC water housing (26) counter-clockwise and carefully pull it off the unit
head (31). Clean the UVC water housing (26) under running water. Check the quartz glass (33) for damage and clean
its outer face with a moist cloth.
Note: For an optimum filter performance, we recommend to replace the UVC lamp after approx. 8000 operating hours.
Refer to 'Replace UVC lamp'.
Closing the UVC water housing (Fig. P - R):
Check the O ring (37) at the unit head (31) for damage. Place the O ring (37) on the recess at the unit head (31), then
carefully push the UVC water housing (26) on the unit head (31) by applying medium pressure. While doing so, slightly
turn the UVC water housing (26) to ensure that the tenons (39) and the grooves (40) of the bayonet closure intermesh.
Turn the UVC water housing (26) clockwise against the stop and allow to engage.
Pos: 148 /Alle Produkte/ Dummy_module/Absta nd 6 pt @ 7\mod_119662799710 6_0.doc @ 41651 @
Pos: 149 /Pumpen/Schla mmsauger/Filtra l 2500 UVC / 5000 UVC/Filtral 2500 zus ammenbauen @ 11\mod_125 1207729894_121.doc @ 70691 @
Filtral 2500: Assembly of the unit (Fig. S-V)
Bolt the pump (28) to the UVC water housing (26) using the union nut. Insert fine foam filter (22) in the bottom strainer
casing (2), place the bio surface elements (23) and the gravel bag (24) in the bottom strainer casing (2). Insert the UVC
clarifying unit including the pump (20). Insert the foam filter (3). Attach the top strainer casing (1) and press it onto the
bottom strainer casing (2) until the clamps engage in the bottom strainer casing. Important: Guide the connection
cable (7) through the cable opening at the bottom strainer casing (2) and clip with the cable kink protection in the
bottom strainer casing (U, 37).
Pos: 150 /Alle Produkte/ Dummy_module/Absta nd 3pt @ 11\mod_1251901846 864_0.doc @ 72826 @
Pos: 151 /Pumpen/Schla mmsauger/Filtra l 2500 UVC / 5000 UVC/Filtral 5000 zus ammenbauen @ 11\mod_125 1207782285_121.doc @ 70718 @
Filtral 5000: Assembly of the unit (Fig. S-V)
Bolt the pump (28) to the UVC water housing (26) using the union nut. Place the bio surface element (23) and gravel
bags (24) in the bottom strainer casing (2). Place the aeration stone (25) between the gravel bags (24). Ensure that the
hose is not kinked. Place the foam filters (3, 22) in the bottom strainer casing (2). Insert the UVC clarifying unit inclu-
ding the pump (20). Attach the top strainer casing (1) and press it onto the bottom strainer casing (2) until the clamps
engage in the bottom strainer casing. Important: Lead the connection cable (7) through the cable opening in the
bottom strainer casing (2) and route the cable such that pinching is avoided.
Pos: 152 /Alle Produkte/ Dummy_module/=== == Seitenwechsel === == @ 0\mod_1125648978015_0. doc @ 1631 @

17
- GB -
Pos: 153 /Alle Produkte/ Überschriften/ H2 UVC-Lampe ersetzen (B ild L-S) @ 11\mod_125257410 1379_121.doc @ 73425 @
UVC lamp replacement (Fig. L-S)
Pos: 154 /Alle Produkte/ Dummy_module/Absta nd 3pt @ 11\mod_1251901846 864_0.doc @ 72826 @
Pos: 155 /Alle Produkte/ "Achtung"-Texte/ SIC Achtung - Zerbrechlic hes Glas @ 11\mod_12525741 81349_121.doc @ 73452 @
Attention! Breakable glass.
Possible consequences: Injury of your hands caused by cuts.
Protective measures: Handle both quartz glass and UVC lamp with care.
Pos: 156 /Alle Produkte/ Dummy_module/Absta nd 3pt @ 11\mod_1251901846 864_0.doc @ 72826 @
Pos: 157 /Alle Produkte/ "Achtung"-Texte/ SIC Achtung - UVC @ 11\mod_1251 210131939_121.doc @ 70745 @
Attention! Ultra-violet radiation.
Possible consequences: Eye or skin injury from burns.
Protective measures:
− Never operate the UVC lamp outside its housing.
− Never operate the UVC lamp in a housing that is defective.
Pos: 158 /Alle Produkte/ Dummy_module/Absta nd 3pt @ 11\mod_1251901846 864_0.doc @ 72826 @
Pos: 159 /Pumpen/Schla mmsauger/Filtra l 2500 UVC / 5000 UVC/UVC-Lampe erse tzen @ 11\mod_1252514222 879_121.doc @ 73313 @
− Open the UVC water housing (see "Opening and cleaning the UVC water housing").
− Remove the self-tapping screw (32).
− Unscrew the clamping screw (34) from the unit head (31) by turning counter-clockwise.
− Pull off the quartz glass (33) and the O-ring (35) while slightly turning the unit head (31).
− Pull out the UVC lamp (36) and replace.
Important: Only use lamps the identification and capacity data of which correspond to the information on the type
plate.
− Check the quartz glass (33) and the O ring (35) for damage.
− Insert the quartz glass (33) including the O ring (35) against the stop in the unit head (31).
− Tighten the clamping screw (34) clockwise up to the stop.
− Turn in and tighten the self-tapping screw (32).
− Close the UVC water housing (see "Closing the UVC water housing").
Pos: 160 /Alle Produkte/ Dummy_module/Absta nd 6 pt @ 7\mod_119662799710 6_0.doc @ 41651 @
Pos: 161 /Alle Produkte/ Überschriften/ H1 Lagern / Überwintern @ 7\mo d_1196625251745_121.d oc @ 41495 @
Storage/Over-wintering
Pos: 162 /Alle Produkte/ Lagern/Überwinter n/LAG - Vor Frost deins tallieren (2009-09- 22 17:24:28) @ 11\mod_125361 3119879_121.doc @ 74732 @
Remove the unit at temperatures below zero degrees centigrade. Thoroughly clean and check the unit for damage.
Pos: 163 /Alle Produkte/ Lagern/Überwinter n/LAG - Getaucht, Stec ker nicht fluten (2009- 09-22 17:24:19) @ 11\ mod_1253613155911_121. doc @ 74760 @
Store the unit immersed in water or filled with water at a frost-free place. Do not flood the power plug!
Pos: 164 /Alle Produkte/ Dummy_module/Absta nd 6 pt @ 7\mod_119662799710 6_0.doc @ 41651 @
Pos: 165 /Pumpen/Schla mmsauger/PondoRel l/Verschleißteil e PondoRell 3000, 5000 @ 0\mod_1 127677370702_121. doc @ 6738 @
Wearing parts
The UVC lamp, the different filters and the rotor are wear parts and are excluded from the warranty.
Pos: 166 /Alle Produkte/ Dummy_module/Absta nd 6 pt @ 7\mod_119662799710 6_0.doc @ 41651 @
Pos: 167 /Alle Produkte/ Überschriften/ H1 Entsorgung @ 7\mod_1196625 583904_121.doc @ 41547 @
Disposal
Pos: 168 /Alle Produkte/En tsorgung/ENT BAS - Kein Haus müll @ 10\mod_12435219709 91_121.doc @ 63330 @
Do not dispose of this unit with domestic waste! For disposal purposes, please use the return system
provided. Disable the unit beforehand by cutting off the cables.
Pos: 169 /Alle Produkte/ Entsorgung/ENT E RW - UVC entsorgen @ 11\mod_12530898 20646_121.doc @ 73941 @
Only dispose of the UVC lamp by using the return system provided for this purpose.
Pos: 170 /Alle Produkte/ Dummy_module/=== == Seitenwechsel === == @ 0\mod_1125648978015_0. doc @ 1630 @
-
 1
1
-
 2
2
-
 3
3
-
 4
4
-
 5
5
-
 6
6
-
 7
7
-
 8
8
-
 9
9
-
 10
10
-
 11
11
-
 12
12
-
 13
13
-
 14
14
-
 15
15
-
 16
16
-
 17
17


OASE Filtral 5000 UVC Operating Instructions Manual
- Typ
- Operating Instructions Manual
- Dieses Handbuch ist auch geeignet für
in anderen Sprachen
- English: OASE Filtral 5000 UVC
Verwandte Papiere
-
OASE 5000 Benutzerhandbuch
-
 Toast 133.110 Bedienungsanleitung
-
OASE FiltoMatic CWS Bedienungsanleitung
-
 Toast PondoVac Classic Bedienungsanleitung
-
 Toast Aquarius Universal 1000 Bedienungsanleitung
-
OASE 37148 Operating Instructions Manual
-
-
-
-


Sonstige Unterlagen
-
Pontec 87589 PondoTronic UVC 11 Device Benutzerhandbuch
-
-
EHEIM Clear UVC-36 Bedienungsanleitung
-
 Toast Aquarius Fountain 2500 Bedienungsanleitung
-
Scheppach PFS8000 Benutzerhandbuch
-
SuperFish RC10000 Benutzerhandbuch
-
 SuperFish RC 20000 Benutzerhandbuch
-
Renkforce 1233679 Bedienungsanleitung
-
FIAP Pond Active Benutzerhandbuch
-
SuperFish E7070220 Benutzerhandbuch

