
Precautions
Location
Using the unit in the following locations can result in a malfunction.
• In direct sunlight
• Locations of extreme temperature or humidity
• Excessively dusty or dirty locations
• Locations of excessive vibration
• Close to magnetic fields
Power supply
Be sure to turn the power switch to OFF when the unit is not in use. Remove the battery in order to
prevent it from leaking when the unit is not in use for extended periods.
Interference with other electrical devices
Radios and televisions placed nearby may experience reception interference. Operate this unit
at a suitable distance from radios and televisions.
Handling
To avoid breakage, do not apply excessive force to the switches or controls.
Care
If the exterior becomes dirty, wipe it with a clean, dry cloth. Do not use liquid cleaners such as
benzene or thinner, or cleaning compounds or flammable polishes.
Keep this manual
After reading this manual, please keep it for later reference.
Keeping foreign matter out of your equipment
Never set any container with liquid in it near this equipment. If liquid gets into the equipment, it
could cause a breakdown, fire, or electrical shock. Be careful not to let metal objects get into the
equipment.
Notice regarding disposal (EU only)
When this “crossed-out wheeled bin” symbol is displayed on the product, owner’s manual,
battery, or battery package, it signifies that when you wish to dispose of this product, manual,
package or battery you must do so in an approved manner. Do not discard this product,
manual, package or battery along with ordinary household waste. Disposing in the correct
manner will prevent harm to human health and potential damage to the environment. Since
the correct method of disposal will depend on the applicable laws and regulations in your
locality, please contact your local administrative body for details. If the battery contains
heavy metals in excess of the regulated amount, a chemical symbol is displayed below the
“crossed-out wheeled bin” symbol on the battery or battery package.
THE FCC REGULATION WARNING (for USA)
This equipment has been tested and found to comply with the limits for a Class B digital device, pursu-
ant to Part 15 of the FCC Rules. These limits are designed to provide reasonable protection against
harmful interference in a residential installation. This equipment generates, uses, and can radiate radio
frequency energy and, if not installed and used in accordance with the instructions, may cause harmful
interference to radio communications. However, there is no guarantee that interference will not occur in
a particular installation. If this equipment does cause harmful interference to radio or television recep-
tion, which can be determined by turning the equipment off and on, the user is encouraged to try to
correct the interference by one or more of the following measures:
• Reorient or relocate the receiving antenna.
• Increase the separation between the equipment and receiver.
• Connect the equipment into an outlet on a circuit different from that to which the receiver is con-
nected.
• Consult the dealer or an experienced radio/TV technician for help.
Unauthorized changes or modification to this system can void the user’s authority to operate this equip-
ment.
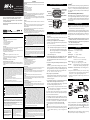
Parts of the AW-2+ and what they do
Internal mic
Note name indicator
Reference pitch indicator
High(+) indicator
Pure major third,
Pure minor third
Input indicator
Input select button
Clip attachment slot
Light button
Calib button
Power button
Battery cover
Trans button
Transpose
indicator
Tuning procedure
1. Press the power button. The power will turn on/off when you press
this button.
If the power is left on for approximately 20 minutes without any sound
being input, it will turn off automatically.
2. If necessary, press the light button to set the backlight.(*
M
)
Each time you press the light button, the setting will cycle between
soft → auto → unlit → soft ...
Soft: To conserve battery life, the illumination will remain low.
Auto: The backlight will light up brightly when sound is input or
when a button is pressed. When there has been no input or
button use for approximately ten seconds, the backlight will
change to the "Soft" level of brightness.
Unlit: The backlight is off.
3. Use the input select button to choose the sound input source. (Please
refer to the "Recommended locations for attachment" section)
The setting will alternate between Mic and Piezo each time you press
the button.(*
M
)
4. If you want to change the standard pitch (calibration), press the
Calib button.
Each time you press the button, the setting will rise in 1 Hz incre-
ments. If you hold down the button, the setting will be reset to 440
Hz in approximately one second; if you continue holding down the
button, the setting will continue rising in 10 Hz increments (450 →
460 → 470 → 410 → 420 → 430 → 440 → 450 ...).(*
M
)
5. Play a single note on your instrument.
The display will show the name of the note that
's closest to the pitch
detected. Tune your instrument to the correct pitch so that the de-
sired note name appears.
6. Once again play a single note on your instrument, and adjust the
tuning so that the center segment of the meter is lit up.
The right (+) indicator will light up if the pitch is too high, and the
left (-) indicator will light up if the pitch is too low.
You have the option of reversing the direction of the AW-2+'s meter be-
tween left and right, but in our explanation here we will assume that the
High (+) indicator is located on the right side.
If you want to tune to a pure major third (-13.7 cents) or pure minor
third (+15.6 cents) above a certain note, adjust the pitch to the pure
major or minor third marks in the meter.
For example if you want to tune to a pure major third (-13.7 cents) above
A (0 cents), make the note name indicator read C
, and tune so that the
meter indicates the left [
]. Alternatively, if you want to tune to a pure
minor third (+15.6 cents) above A (0 cents), make the note name indica-
tor read C, and tune so that the meter indicates the right [
].
Avoid letting the mic pick up any extraneous sound while tuning.
Even if the pitch is within the range of detection, it may not be possible to
detect the pitch of an instrumental sound that contains large numbers of
overtones or that has a rapid decay (e.g., very low or very high notes on a
piano).
Transpose*
M
You can use this function when tuning a transposing instrument. Each
time you press the Trans button, the setting will step through the choices
F → B
→ E
→ C (no transposition; the Transpose indicator will not ap-
pear). The display will show the Transpose indicator and the key that
you specified.
Reverse the meter display (Reverse function)*
M
When turning the power on, hold down the power button for one sec-
ond or longer (the backlight will blink twice). Each time you repeat these
steps, the High (+) indication will be exchanged between left and right.
Select the position that feels most natural for the instrument where you've
attached the AW-2+.
Installing the battery
Turn the power switch off before you install or replace the battery. The bat-
tery that
's included with the AW-2+ is for the purpose of verifying that the
unit functions correctly, and may not have a very long life.
When the battery begins to run low, the liquid crystal display (in particu-
lar the meter movement) will become lighter and the backlight will be-
come dimmer. The AW-2+ will continue to function for a while longer,
but tuning will become less accurate. Replace the battery as soon as pos-
sible.
1. With the ball of your thumb, lightly press the battery cover located
on the back of the AW-2+, turn it counter-clockwise, and remove it.
2. Replace the battery, being sure to observe the correct polarity so that
the "+" side of the battery is visible.
3. Turn the battery cover clockwise to reattach it.
Specifications
Scale: 12-note equal temperament
Range(sine wave): A0 (27.50 Hz)–C8 (4186 Hz)
Precision: +/-1 cent
Reference pitch: 410...480 Hz (1 Hz steps)
Transposition range: C, F, B
, E
Dimensions: 58 mm (W) x 26 mm (D) x 12.6 mm (H)
2.28’’ (W) x 1.02’’ (D) x 0.50’’ (H) (unit only)
Weight: unit only 17.4 g/0.61 oz. (including battery)
Clip 17.7 g/0.62 oz. (large), 3.7 g/0.13 oz. (small)
Battery life: approximately 150/75/20 hours (backlight: unlit/
soft/auto, tuner continuously operating, A4 input)
Included items: CR2032 lithium battery (3V) for checking operation
Instrument clip
*
M
Settings are remembered even when the power is off. However, settings
will be initialized when you replace the battery (default: Calib=440 Hz,
No transposition (C), Piezo, right side High, backlight is unlit).
• Specifications and appearance are subject to change without notice for
improvement.
Attaching the included clip
Ye s
No
Meter surface
Attach
Remove
Large Clip
Small Clip
Joint
Firmly press the clip all the way into the attachment slot, making sure
that it's oriented correctly. To remove the clip, grasp the AW-2+, and re-
move the clip by pressing it at the location marked
in the illustration.
Do not attempt to insert anything other than the included clip. Doing so may
damage the connector or other parts.
Do not attempt to remove the clip by pulling the jaws of the large clip. Doing
so may cause the joint to come apart, or may damage the clip.
IMPORTANT NOTICE TO CONSUMERS
This product has been manufactured according to strict specifications and voltage requirements that
are applicable in the country in which it is intended that this product should be used. If you have
purchased this product via the internet, through mail order, and/or via a telephone sale, you must verify
that this product is intended to be used in the country in which you reside.
WARNING: Use of this product in any country other than that for which it is intended could be danger-
ous and could invalidate the manufacturer's or distributor's warranty.
Please also retain your receipt as proof of purchase otherwise your product may be disqualified from
the manufacturer's or distributor's warranty.
This device complies with Part 15 of the FCC Rules.
Operation is subject to the following two conditions:
(1) This device may not cause harmful interference,
and (2) this device must accept any interference
received, including interference that may cause
undesired operation.
Complies with Canadian ICES-003 Class B.
Conforme au Reglement Canadian NMB-003 classe B.
CALIFORNIA USA ONLY
This Perchlorate warning applies only
to primary CR (Manganese Dioxide)
Lithium coin cells sold or distributed
ONLY in California USA.
“Perchlorate Material–special handling
may apply, See www.dtsc.ca.gov/
hazardouswaste/perchlorate.”
4015-2 Yanokuchi, Inagi-city, Tokyo 206-0812 Japan
C
2012 KORG INC.
Thank you for purchasing the Korg AW-2+ Clip-on Orchestral Tuner.
Merci d’favoir choisi la Clip-on Orchestral Tuner AW-2+ de Korg.
Vielen Dank, dass Sie sich für einen AW-2+ Clip-on Orchestral Tuner
von Korg entschieden haben.
Gracias por comprar el afinador para enchufar AW-2+ Clip-on Orches-
tral Tuner de Korg.
Clip-on Orchestral Tuner
OWNER’S MANUAL
MANUEL D’UTILISATION
BEDIENUNGSANLEITUNG
MANUAL DE USUARIO
Note concernant les dispositions (Seulement EU)
Quand un symbole avec une poubelle barrée d’une croix apparait sur le produit, le mode d’em-
ploi, les piles ou le pack de piles, cela signifie que ce produit, manuel ou piles doit être déposé
chez un représentant compétent, et non pas dans une poubelle ou toute autre déchetterie
conventionnelle. Disposer de cette manière, de prévenir les dommages pour la santé humaine
et les dommages potentiels pour l'environnement. La bonne méthode d'élimination dépendra
des lois et règlements applicables dans votre localité, s’il vous plaît, contactez votre organisme
administratif pour plus de détails. Si la pile contient des métaux lourds au-delà du seuil régle-
menté, un symbole chimique est affiché en dessous du symbole de la poubelle barrée d’une
croix sur la pile ou le pack de piles.
REMARQUE IMPORTANTE POUR LES CLIENTS
Ce produit a été fabriqué suivant des spécifications sévères et des besoins en tension applicables dans le
pays où ce produit doit être utilisé. Si vous avez acheté ce produit via l’internet, par vente par correspon-
dance ou/et vente par téléphone, vous devez vérifier que ce produit est bien utilisable dans le pays où vous
résidez.
ATTENTION: L’utilisation de ce produit dans un pays autre que celui pour lequel il a été conçu peut être
dangereuse et annulera la garantie du fabricant ou du distributeur. Conservez bien votre récépissé qui est
la preuve de votre achat, faute de quoi votre produit ne risque de ne plus être couvert par la garantie du
fabricant ou du distributeur.
Précautions
Emplacement
L'utilisation de cet instrument dans les endroits suivants peut en entraîner le mauvais fonctionne-
ment.
• En plein soleil
• Endroits très chauds ou très humides
• Endroits sales ou fort poussiéreux
• Endroits soumis à de fortes vibrations
• A proximité de champs magnétiques
Alimentation
Lorsque vous n’utilisez pas l’appareil, n’oubliez pas de le mettre hors tension. Retirez les piles pour
éviter toute fuite lorsque l’appareil ne sera pas utilisé pendant de longues périodes de temps.
Interférences avec d'autres appareils électriques
Les postes de radio et de télévision situés à proximité peuvent par conséquent souffrir d'interféren-
ces à la réception. Veuillez dès lors faire fonctionner cet appareil à une distance raisonnable de
postes de radio et de télévision.
Maniement
Pour éviter de les endommager, manipulez les commandes et les boutons de cet instrument avec
soin.
Entretien
Lorsque l'instrument se salit, nettoyez-le avec un chiffon propre et sec. Ne vous servez pas d'agents
de nettoyage liquides tels que du benzène ou du diluant, voire des produits inflammables.
Conservez ce manuel
Après avoir lu ce manuel, veuillez le conserver soigneusement pour toute référence ultérieure.
Evitez toute intrusion d'objets ou de liquide
Ne placez jamais de récipient contenant du liquide près de l'instrument. Si le liquide se renverse ou
coule, il risque de provoquer des dommages, un court-circuit ou une électrocution.Veillez à ne pas
laisser tomber des objets métalliques dans le boîtier (trombones, par ex.).
Vorsichtsmaßnahmen
Aufstellungsort
Vermeiden Sie das Aufstellen des Geräts an Orten, an denen
• es direkter Sonneneinstrahlung ausgesetzt ist;
• hohe Feuchtigkeit oder Extremtemperaturen auftreten können;
• Staub oder Schmutz in großen Mengen vorhanden sind;
• das Gerät Erschütterungen ausgesetzt sein kann.
• in der Nähe eines Magnetfeldes.
Stromversorgung
Stellen Sie den Netzschalter auf OFF, wenn das Gerät nicht benutzt wird. Wenn Sie das Gerät über einen
längeren Zeitraum nicht benutzen, nehmen Sie die Batterien heraus, damit sie nicht auslaufen.
Störeinflüsse auf andere Elektrogeräte
Dieser kann bei in der Nähe aufgestellten Rund-funkempfängern oder Fernsehgeräten Empfangsstörungen
hervorrufen. Betreiben Sie solche Geräte nur in einem geeigneten Abstand von diesem Erzeugnis.
Bedienung
Vermeiden Sie bei der Bedienung von Schaltern und Reglern unangemessenen Kraftaufwand.
Reinigung
Bei auftretender Verschmutzung können Sie das Gehäuse mit einem trockenen, sauberen Tuch abwischen.
Verwenden Sie keinerlei Flüssigreiniger wie beispielsweise Reinigungsbenzin, Verdünnungs- oder Spülmittel.
Verwenden Sie niemals brennbare Reiniger.
Bedienungsanleitung
Bewahren Sie diese Bedienungsanleitung gut auf, falls Sie sie später noch einmal benötigen.
Flüssigkeiten und Fremdkörper
Stellen Sie niemals Behältnisse mit Flüssigkeiten in der Nähe des Geräts auf. Wenn Flüssigkeit in das Gerät
gelangt, können Beschädigung des Geräts, Feuer oder ein elek-trischer Schlag die Folge sein. Beachten Sie,
daß keinerlei Fremdkörper in das Gerät gelangen.
Hinweis zur Entsorgung (Nur EU)
Wenn Sie das Symbol mit der „durchgekreuzten Mülltonne“ auf Ihrem Produkt, der dazugehö-
rigen Bedienungsanleitung, der Batterie oder dem Batteriefach sehen, müssen Sie das Pro-
dukt in der vorgeschriebenen Art und Weise entsorgen. Dies bedeutet, dass dieses Produkt mit
elektrischen und elektronischen Komponenten nicht mit dem normalen Hausmüll entsorgt wer-
den darf. Für Produkte dieser Art existiert ein separates, gesetzlich festgelegtes Entsorgungs-
system. Gebrauchte elektrische und elektronische Geräte müssen separat entsorgt werden,
um ein umweltgerechtes Recycling sicherzustellen. Diese Produkte müssen bei benannten
Sammelstellen abgegeben werden. Die Entsorgung ist für den Endverbraucher kostenfrei! Bit-
te erkundigen sie sich bei ihrer zuständigen Behörde, wo sie diese Produkte zur fachgerechten
Entsorgung abgeben können. Falls ihr Produkt mit Batterien oder Akkumulatoren ausgerüstet
ist, müssen sie diese vor Abgabe des Produktes entfernen und separat entsorgen (siehe oben). Die Abga-
be dieses Produktes bei einer zuständigen Stelle hilft ihnen, dass das Produkt umweltgerecht entsorgt
wird. Damit leisten sie persönlich einen nicht unerheblichen Beitrag zum Schutz der Umwelt und der mensch-
lichen Gesundheit vor möglichen negativen Effekten durch unsachgemäße Entsorgung von Müll. Batterien
oder Akkus, die Schadstoffe enthalten, sind auch mit dem Symbol einer durchgekreuzten Mülltonne ge-
kennzeichnet. In der Nähe zum Mülltonnensymbol befindet sich die chemische Bezeichnung des Schad-
stoffes.
Cd oder NiCd steht für Cadmium, Pb für Blei und Hg für Quecksilber.
WICHTIGER HINWEIS FÜR KUNDEN
Dieses Produkt wurde unter strenger Beachtung von Spezifikationen und Spannungsanforderungen her-
gestellt, die im Bestimmungsland gelten. Wenn Sie dieses Produkt über das Internet, per Postversand und/
oder mit telefonischer Bestellung gekauft haben, müssen Sie bestätigen, dass dieses Produkt für Ihr Wohn-
gebiet ausgelegt ist.
WARNUNG: Verwendung dieses Produkts in einem anderen Land als dem, für das es bestimmt ist, ver-
wendet wird, kann gefährlich sein und die Garantie des Herstellers oder Importeurs hinfällig lassen wer-
den. Bitte bewahren Sie diese Quittung als Kaufbeleg auf, da andernfalls das Produkt von der Garantie des
Herstellers oder Importeurs ausgeschlossen werden kann.
Seite laden ...

Einsetzen der Batterie
Deaktivieren Sie den Netzschalter, bevor Sie die Batterie einlegen oder auswechseln. Die zum Lieferumfang des
AW-2+ gehörige Batterie dient nur dem Zweck, die Funktionstüchtigkeit des Gerätes nach dem Auspakken zu
überprüfen und hat daher nur eine kurze Laufzeit.
Wenn die Batterie fast erschöpft ist, wird das LC-Display (und somit die angezeigte Nadel) nach und nach
immer schwächer. Auch die Hintergrundbeleuchtung wird allmählich dunkler. Der AW-2+ funktioniert
dann zwar noch eine Weile, allerdings lässt seine Genauigkeit dann ebenfalls nach. Wechseln Sie die Batte-
rie also so schnell wie möglich aus.
1.
Drücken Sie die Batteriefachblende auf der Rückseite des AW-2+ mit dem Daumenballen behutsam
hinunter und drehen Sie sie anschließend gegen den Uhrzeigersinn, um sie entnehmen zu können.
2. Legen Sie die neue Batterie so ein, dass ihre „+“-Seite sichtbar bleibt, weil nur dann die Polarität
gewahrt wird.
3. Drehen Sie die Batteriefachblende im Uhrzeigersinn, um sie wieder zu arretieren.
Technische Daten
Skala: 12 Noten gleichschwebende Stimmung Präzision: +/-1 Cent
Bereich (Sinuswelle): A0 (27,50 Hz)–C8 (4186 Hz)
Transpositionsbereich: C, F, B
, E
Bezugstonhöhe: 410–480 Hz (in Schritten von 1 Hz)
Abmessungen: 58 mm (T) x 26 mm (B) x 12,6 mm (H) (Nur das Gerät)
Gewicht: Nur das Gerät 17,4 g (mit Batterie), Clip 17,7 g (
Großer)
/3,7 g (Kleiner)
Batterielebensdauer: ca. 150/75/20 Stunden
(
Hintergrundbeleuchtung:
aus/schwach/ automatisch, kontinuierlicher
Betrieb mit eingeschaltetem Stimmgerät, A4-Eingang)
Lieferumfang: CR2032-Lithiumbatterie (3 V) zur Funktionsprüfung, Strumenten-Clip
*M Einstellungen werden auch bewahrt, wenn das Gerät eingeschaltet ist. Einstellungen werden initiali-
siert, wenn Sie die Batterie ersetzen (Vorgabe: Calib=440 Hz, keine Transposition (C), Piezo, rechte
Seite Hoch,
Hintergrundbeleuchtung
: Aus).
• Änderungen der technischen Daten und des Designs ohne vorherige Ankündigung vorbehalten.
Anbringungsort des Clips
Dieses Stimmgerät eignet sich auch für Holz-, Blechblas- und Streichinstrumente. Bei Verwendung des
Piezo-Mikrofons im beiliegenden Clip richtet sich die Stelle, an welcher das Stimmgerät angebracht wer-
den muss, nach dem verwendeten Instrument.
In der Tabelle auf der Rückseite und in den Abbildungen rechts finden Sie die für die einzelnen Instrumen-
te empfohlene Positionen. Bisweilen erzielen Sie eventuell auch gute Ergebnisse, indem Sie das Stimmgerät
ganz woanders anbringen. Bei Bedarf können Sie das eingebaute Mikrofon (Mic) verwenden und sich das
Stimmgerät auf den Notenständer legen. Bei Anwahl des internen Mikrofons braucht der Clip nicht ver-
wendet zu werden.
Bitte befestigen sie das AW-2+ vorsichtig an ihrem Instrument. Wenn sie das AW-2+ für längere Zeit an ihrem Instru-
ment befestigt lassen, kann dies zu Veränderungen an der Oberfläche des Instruments führen.
Wenn das interne Mikrofon das Signal nicht optimal abgreifen kann, müssen Sie die Position und/oder die Neigung
des Geräts ändern.
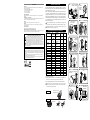
Empfohlene Platzierungen für Ansätze
Instrumentenname Clip Ansatz-Platzierung
Abbildung Bemer -
Groß Klein
(andere Seite)
kungen
Trompete / Kornett Haupttubus A1
Becher (Oberseite) A1
Posaune
Mundstück-Empfänger
Schallstück (oben rechts) A2 *1
Horn einzeln Erster Tubus
doppel Schallbecher A3
Tuba Mundröhre A4
Tenorbaßhorn Schallstück A5
Whiffler — — *2 *3
Oboe Schallbecher A6
E
Klarinette Schallstück
B
Klarinette Schallstück A7
Bassklarinette Blastubus
Fagott Flügelverbindung-Bereich A8
Sopransaxophon Schallstück
Altsaxophon Hals/Hauptrohr A9
Tenorsaxophon Hals
Barytonsaxophon Schallstück
Violine Kopf B1
Viola Kopf B1
Violoncello Endstück B2
Kontrabass Endstück B2
Notenständer — — Nach Wunsch C1 *3
*1 Verwenden Sie die „Reverse“-Funktion
*2 Anstelle den AW-2+ am Instrument anzubringen, platzieren Sie den AW-2+ an einer gut sichtbaren Stel-
le und verwenden Sie das interne Mikrofon.
*3 Drücken Sie die Eingangswahltaste, um das interne Mikrofon (Mic) zu wählen.
Das AW-2+ und dem Clip, Bei den übrigen Komponenten besteht die Gefahr, dass sie beschädigt werden, wenn
Sie sie mit Gewalt in eine an sich unmögliche Richtung ziehen.
Kleiner Clip
Großer Clip
Schwenkbereich:
ca.100°
Schwenkbereich: 360°
Beispiele für die
Verwendung des
Verbindungsstücks
Parties du AW-2+ et leurs fonctions
Micro incorporé
Indicateur High (+)
Tierce majeure pure,
Tierce mineure pure
Indicateur
de la source
Indicateur de la note
de référence
Indicateur du nom de la note
Touche de sélection
de la source
Fente de fixation
de la pince
bouton d’éclairage
Bouton Calib
Interrupteur
d'alimentation
Couvercle du
logement de la pile
Bouton Trans
Témoin de
transposition
Procédure d'accordage
1. Appuyez sur l'interrupteur d'alimentation. L'appareil se mettra sous/hors tension à
chaque pression sur l'interrupteur.
Si vous laissez l'appareil allumé pendant environ 20 minutes sans capter aucun son, il
s'éteindra automatiquement.
2.
Si nécessaire, appuyez sur le bouton d’éclairage pour régler le rétro-éclairage.
Chaque pression sur le bouton d’éclairage change le réglage selon la séquence sui-
vante: doux → automatique → éteint → doux…(*M)
Doux: Pour économiser la pile, l’éclairage reste doux.
Automatique:
Le rétroéclairage s’allume de façon vive quand un signal arrive ou quand
vous actionnez un bouton. S’il n’y a aucun signal d’entrée et si aucun bouton n’est ac-
tionné durant environ 10 secondes, le rétroéclairage s’atténue et passe au niveau “Doux”.
Eteint: Le rétroéclairage est coupé.
3. Utilisez le bouton de sélection d’entrée pour choisir la source. (Voyez la section
“Positions conseillées pour la mise en place”)
Le réglage alterne entre Mic et Piezo chaque fois que vous appuyez sur le bouton.(*M)
4. Pour changer le diapason (calibrage), appuyez sur le bouton Calib.
Chaque pression sur ce bouton augmente le réglage par pas de 1Hz. Si vous mainte-
nez le bouton enfoncé, le réglage est ramené à 440Hz en environ 1 seconde; si vous
continuez à maintenir le bouton enfoncé, le réglage augmente par pas de 10Hz.
(450 → 460 → 470 → 410 → 420 → 430 → 440 → 450 …) (*M).
5. Jouez une note isolée sur l’instrument.
L’écran affiche le nom de la note la plus proche de la hauteur détectée. Accordez gros-
sièrement votre instrument de sorte à faire apparaître la note voulue.
6. Jouez à nouveau une note isolée sur l’instrument et accordez-la jusqu’à ce que le
segment central de l’indicateur s’allume.
Le témoin droit (+) s’allume si la note est trop haute et le témoin gauche (–) s’allume si
la note est trop basse.
Vous pouvez inverser le fonctionnement gauche/droite de l’indicateur de l’AW-2+. Dans nos
explications, nous partons du principe que le témoin High (+) est situé du côté droit.
Si vous souhaitez que l’accord soit décalé d’une tierce majeure pure (–13,7 cents) ou
d’une tierce mineure pure (+15,6 cents) par rapport à une note donnée, réglez la hau-
teur sur l’indicateur de la tierce majeure pure ou de la tierce mineure pure.
Si, par exemple, vous voulez que l’accord soit une tierce majeure pure (–13,7 cents)
plus haut que la note A (0 cents), affichez la note “C
” et accordez la note pour que
l’indicateur montre le [ ] gauche. Alternativement, si vous voulez que l’accord soit
une tierce mineure pure (+15,6 cents) plus haut que la note A (0 cents), affichez la note
“C” et accordez la note pour que l’indicateur montre le [
] droit.
Faites attention à ne pas laisser le micro capter d'autre son pendant l'accordage.
Même si la note se trouve à l’intérieur de la plage de détection, elle peut ne pas être détectée
si le son de l’instrument de musique contient un grand nombre d’harmoniques ou un temps
de descente rapide (par exemple, des notes très basses ou très hautes sur un piano).
Transposition* M
Vous pouvez utiliser cette fonction pour accorder un instrument transposé. Chaque pres-
sion sur le bouton Trans fait défiler les options suivantes: F → B
→ E
→ C (pas de trans-
position; le témoin de transposition n’est pas affiché). L’écran affiche le témoin de trans-
position et la tonalité choisie.
Inversion de l’affichage de l’indicateur (fonction ‘Inversion’)*M
Lors de la mise sous tension, maintenez l’interrupteur d’alimentation enfoncé au moins une
seconde (le rétro-éclairage clignote deux fois). Chaque fois que vous effectuez cette opéra-
tion, l’indication High (+) passe de droite à gauche et inversement. Sélectionnez la position
qui vous semble la plus naturelle pour l’instrument auquel l’AW-2+ est fixé.
Mise en place de la pince fournie
Enfoncez fermement le clip à fond dans la fente de fixation en vérifiant qu’il est orienté
correctement. Pour retirer le clip, prenez l’AW-2+ en main et retirez le clip en appuyant
sur l’endroit indiqué par un astérisque ( ) dans l’illustration.
N’essayez pas d’insérer autre chose que le clip fourni. Vous risqueriez d’endommager le con-
necteur ou d’autres éléments.
N’essayez pas de retirer le clip en tirant sur les mâchoires du grand. Vous risqueriez de déta-
cher le joint ou d’endommager le clip.
Mise en place
Surface de
l'accordeur
Petit clip
Grand clip
Joint
Oui
Non
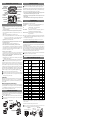
Teile des AW-2+ und ihre Funktionen
Reine große Terz,
reine kleine Terz
Notennamen-Anzeige
Clipanbringungsschacht
Lichttaster
Calib-Taster
Internes Mikrofon
Bezugstonhö
henanzeige
Hoch (+) Anzeige
Eingangsanzeige
Ein/Aus-Taste
Eingangswahltaste
Batteriefachdeckel
Trans-Taster
Transpositionsanzeige
Tuning-Verfahren
1. Drücken Sie die Ein/Aus-Taste. Bei jedem Drücken dieser Taste schaltet das Gerät ein/aus.
Wenn das Gerät ca. 20 Minuten lang eingeschaltet bleibt, ohne dass Ton angelegt wird, schaltet es
automatisch aus.
2. Drücken Sie bei Bedarf den Lichttaster, um die Hintergrundbeleuchtung zu aktivieren. (*M)
Beim wiederholtem Drücken des Lichttasters ändert sich die Einstellung folgendermaßen:
Schwach → automatisch → aus → schwach...
Schwach: Bei Anwahl der schwachen Beleuchtung wird die Batterie geschont.
Automatisch: Die Hintergrundbeleuchtung wird aktiviert, wenn ein Eingangssignal empfan-
gen wird bzw. wenn Sie einen Taster drücken. Ungefähr zehn Sekunden nach dem
letzten Bedienvorgang bzw. Verstummen des Eingangssignals ändert sich die
Helligkeit der Hintergrundbeleuchtung zu „schwach“.
Aus: Die Hintergrundbeleuchtung ist aus.
3. Wählen Sie mit dem Eingangswahltaster die gewünschte Signalquelle. (Siehe „Empfohlene
Platzierungen für Ansätze“)
Bei wiederholtem Drücken des Tasters wählen Sie abwechselnd „Mic“ und „Piezo“.(*M)
4. Mit dem Calib-Taster können Sie eine andere Kammertonfrequenz wählen.
Bei wiederholtem Drücken dieses Tasters wird die Einstellung jeweils um 1Hz erhöht. Wenn Sie
den Taster gedrückt halten, ändert sich der Wert nach ±1 Sekunde wieder zu 440Hz. Wenn Sie ihn
dann noch weiter gedrückt halten, steigt der Wert in 10Hz-Schritten.
(450 → 460 → 470 → 410 → 420 → 430 → 440 → 450 …).(*M)
5. Spielen Sie eine Einzelnote auf dem Instrument.
Das Display zeigt den Namen der Note an, die der gespielten Note am nächsten kommt. Stimmen
Sie Ihr Instrument so, dass der Name der gewünschten Note angezeigt wird.
6. Spielen Sie erneut eine Einzelnote und ändern Sie die Stimmung so lange, bis das mittlere
Metersegment leuchtet.
Wenn die Note zu hoch ist, leuchtet die rechte Anzeige (+). Ist sie zu tief, so leuchtet die linke Anzeige (–).
Der AW-2+ bietet zwar eine Funktion, mit der man die Anzeige umkehren kann, aber im folgenden gehen
wir davon aus, dass sich die „High (+)“-Anzeige rechts befindet.
Um mit einem reinen (–13,7 Cent) oder reinen kleinen Terzintervall (+15,6 Cents) über einer be-
stimmten Note zu arbeiten, müssen Sie die Note so stimmen, dass das Meter sich bei der betreffen-
de Anzeige befindet. Beispiel: Um eine reine große Terz (–13,7 Cent) über dem „A“ (0 Cent) zu
erzielen, müssen Sie dafür sorgen, dass als Notenname „C
“ angezeigt wird und die Note dann so
stimmen, dass die linke [
]-Anzeige leuchtet. Um z.B. eine reine kleine Terz (+15,6 Cent) über
dem „A“ (0 Cent) zu erzielen, müssen Sie dafür sorgen, dass als Notenname „C“ angezeigt wird
und die Note dann so stimmen, dass die rechte [
]-Anzeige leuchtet.
Vermeiden Sie, dass das Mikrofon beim Stimmen störende Außengeräusche aufnimmt.
Auch wenn die Tonhöhe innerhalb des Erkennungsbereichs ist, kann es unmöglich sein, die Tonhöhe eines
Instrumentenklangs zu erkennen, wenn dieser einen hohen Anteil an Obertönen oder sehr schnelles Ab-
klingen aufweist (z.b. sehr niedrige oder sehr hohe Noten auf dem Klavier).
Transposition*M
Diese Funktion können Sie verwenden, um ein transponierendes Instrument zu stimmen. Bei jedem
Drücken des Trans-Tasters wählen Sie den jeweils nächsten Schritt im Bereich F → B
→ E
→ C (keine
Transposition, die Transpositionsanzeige erscheint nicht). Im Display erscheinen dann die
Transpositionsanzeige und die gewählte Tonart.
Umkehren der Meteranzeige (,Reverse‘-Funktion)*M
Halten Sie den Netzschalter beim Einschalten mindestens eine Sekunde gedrückt (die Hintergrund-
beleuchtung blinkt zwei Mal). Mit diesem Vorgang sorgen Sie dafür, dass sich die High (+)-Anzeige
an der jeweils anderen Seite (links statt rechts und umgekehrt) befindet. Wählen Sie jeweils die Ein-
stellung, die sich am besten für das Instrument eignet, das Sie mit Hilfe des AW-2+ stimmen.
Anbringen des mitgelieferten Clips
Schieben Sie den Clip vollständig in die dafür vorgesehene Aussparung und achten Sie auf die richti-
ge Ausrichtung. Um den Clip zu entfernen, müssen Sie den AW-2+ festhalten, während Sie auf die mit
„
“ gekennzeichnete Stelle drücken.
Versuchen Sie niemals, eine andere Halterung als den beiliegenden Clip anzubringen. Sonst werden näm-
lich das Verbindungsstück und andere Partien beschädigt.
Versuchen Sie niemals den Clip zu entfernen, indem Sie an den Klemmen der großen Halterung. Sonst bricht
eventuell das Verbindungsstück ab bzw. wird der Clip beschädigt.
Anbringen
Ja
Nein
Kleiner Clip
Großer Clip
Abnehmen
Verbindungsstück
Messgerätob
erfläche
Mise en place de la pile
Coupez toujours l’alimentation avant de changer la pile. La pile fournie avec l’AW-2+ sert à
vérifier le bon fonctionnement du produit et peut avoir une longévité réduite.
Quand la pile s’épuise, l’écran à cristaux liquides (notamment le mouvement de l’indi-
cateur) faiblit de plus en plus et le rétro-éclairage s’atténue progressivement. L’AW-2+
continue à fonctionner un certain temps mais l’accordage devient moins précis. Rempla-
cez la pile aussi vite que possible.
1. Appuyez légèrement avec le pouce sur le couvercle du compartiment à pile situé
sous l’AW-2+, tournez-le vers la gauche et retirez-le
2.
Remplacez la pile en veillant à respecter la polarité: la face “+” de la pile doit être visible.
3. Tournez le couvercle du compartiment à pile vers la droite pour le refermer.
Spécifications
Gamme: 12 notes tempérament égal Précision: +/-1 centième
Plage de détection (onde sinus): A0 (27,50 Hz) à C8 (4186 Hz)
Note de référence: 410 à 480 Hz (paliers de 1 Hz)
Plage de transposition: C, F, B
, E
Dimensions: 58 mm (P) x 26 mm (L) x 12,6 mm (H) (appareil seul)
Poids:
Appareil seul 17,4 g (pile comprise), Clip 17,7 g (grand)/3,7 g (petite)
Autonomie de la pile:
Environ 150/75/20 heures (régler le rétro-éclairage: éteint/doux/
automatique , utilisation continue de l'accordeur, entrée de la note A4)
Accessoires fournis: Pile au lithium CR2032 (3 V) pour vérification du fonctionnement
Instrument de musique
*M Les réglages sont conservés même quand l'appareil est mis hors tension. Néanmoins,
les réglages seront réinitialisés si vous remplacez la pile (par défaut : Calib = 440 Hz,
Pas de transposition (C), Piezo, High à droite, régler le rétro-éclairage: Eteint).
• Les caractéristiques et l’aspect du produit sont susceptibles d’être modifiés sans avis
préalable en vue d’une amélioration.
Où installer la pince
Vous pouvez utiliser cet accordeur avec des vents, des cuivres et des cordes. La position
de fixation de l’accordeur à l’instrument pour utiliser le Piezo du clip fourni varie en
fonction du type d’instrument.
Voyez le tableau au verso de ce feuillet ainsi que les illustrations à droite pour fixer l’accor-
deur à l’endroit recommandé. Selon les conditions d’utilisation, il peut être possible d’accor-
der l’instrument en fixant l’accordeur à un autre endroit. Vous pouvez également sélection-
ner le micro interne comme entrée (Mic) et fixer l’accordeur à un pupitre au lieu de l’instru-
ment. Si vous avez choisi le micro interne, vous pouvez aussi utiliser l’accordeur sans le clip.
S'il vous plait, attachez soigneusement l'AW-2+ à votre instrument. Le laisser attach pen-
dant un long moment, peut rayer la surface de votre instrument.
Si le micro interne ne semble pas capter le son convenablement, ajustez la position et/ou l’in-
clinaison de l’appareil.
Positions conseillées pour la mise en place
Nom de Clip Position
Illustration
Remarques
l'instrument
grand
petite
(au verso)
Trompette /
Tuyau principale A1
Cornet à bouquin Pavillon A1
Trombone
Récepteur d’embouchure
Pavillon (en haut à droite) A2 *1
Cor simple Premier tube
double Corps du pavillon A3
Tuba Branche d'embouchure A4
Basse Pavillon A5
Flûte – – *2 *3
Hautbois Corps du pavillon A6
Clarinette E
Corps du pavillon
Clarinette B
Pavillon A7
Clarinette basse Bec
Basson Petite branche A8
Saxohone soprano Pavillon
Saxohone alto Bocal/Tube A9
Saxohone ténor Bocal
Saxohone baryton Pavillon
Violon Chevillier B1
Alto Chevillier B1
Violoncelle Pointe B2
Contrebasse Pointe B2
Pupitre – – Au choix C1 *3
*1 Utilisez la fonction d’inversion.
*2 Au lieu d’attacher l’AW-2+ à l’instrument, installez-le dans un endroit où il est facile
à voir et utilisez le micro incorporé.
*3 Appuyez sur la touche de sélection de la source pour passer au micro incorporé (Mic).
Le AW-2+ et le clip peut, Il risque toutefois de s’endommager si vous exercez une force excessive
sur toute autre partie mobile ou sur le joint en tentant d’aller au-delà de sa plage de mouvement.
Petit clip
Grand clip
Plage de
mouvement:
environ 100°
Plage de mouvement: 360°
Exemples d’utilisation
du joint
Seite laden ...
-
 1
1
-
 2
2
-
 3
3
-
 4
4


Korg AW-2 Bedienungsanleitung
- Typ
- Bedienungsanleitung
- Dieses Handbuch ist auch geeignet für
in anderen Sprachen
- English: Korg AW-2 Owner's manual
- français: Korg AW-2 Le manuel du propriétaire
- español: Korg AW-2 El manual del propietario
Verwandte Papiere
-
Korg AW2 Benutzerhandbuch
-
-
-
-
Korg AW-LT100T Bedienungsanleitung
-
-
-
-
-