Korg Slimpitch Bedienungsanleitung
- Kategorie
- Mikrofone
- Typ
- Bedienungsanleitung
Dieses Handbuch eignet sich auch für

Precautions
Location
Using the unit in the following locations can result in a malfunction.
• In direct sunlight
• Locations of extreme temperature or humidity
• Excessively dusty or dirty locations
• Locations of excessive vibration
• Close to magnetic elds
Power supply
Be sure to turn the power switch to OFF when the unit is not in use. Remove the battery
in order to prevent it from leaking when the unit is not in use for extended periods.
Interference with other electrical devices
Radios and televisions placed nearby may experience reception interference. Operate
this unit at a suitable distance from radios and televisions.
Handling
To avoid breakage, do not apply excessive force to the switches or controls.
Care
If the exterior becomes dirty, wipe it with a clean, dry cloth. Do not use liquid cleaners
such as benzene or thinner, or cleaning compounds or ammable polishes.
Keep this manual
After reading this manual, please keep it for later reference.
Keeping foreign matter out of your equipment
Never set any container with liquid in it near this equipment. If liquid gets into the
equipment, it could cause a breakdown, re, or electrical shock. Be careful not to let
metal objects get into the equipment.
THE FCC REGULATION WARNING (for USA)
NOTE: This equipment has been tested and found to comply with the limits for
a Class B digital device, pursuant to Part 15 of the FCC Rules. These limits are
designed to provide reasonable protection against harmful interference in a
residential installation. This equipment generates, uses, and can radiate radio
frequency energy and, if not installed and used in accordance with the instruc-
tions, may cause harmful interference to radio communications. However, there
is no guarantee that interference will not occur in a particular installation. If this
equipment does cause harmful interference to radio or television reception, which
can be determined by turning the equipment off and on, the user is encouraged to
try to correct the interference by one or more of the following measures:
• Reorient or relocate the receiving antenna.
• Increase the separation between the equipment and receiver.
• Connect the equipment into an outlet on a circuit different from that to which
the receiver is connected.
• Consult the dealer or an experienced radio/TV technician for help.
If items such as cables are included with this equipment, you must use those
included items.
Unauthorized changes or modication to this system can void the user’s authority
to operate this equipment.
Notice regarding disposal (EU only)
When this “crossed-out wheeled bin” symbol is displayed on the product,
owner’s manual, battery, or battery package, it signies that when you
wish to dispose of this product, manual, package or battery you must do
so in an approved manner. Do not discard this product, manual, package
or battery along with ordinary household waste. Disposing in the correct
manner will prevent harm to human health and potential damage to the
environment. Since the correct method of disposal will depend on the
applicable laws and regulations in your locality, please contact your local
administrative body for details. If the battery contains heavy metals in
excess of the regulated amount, a chemical symbol is displayed below the
“crossed-out wheeled bin” symbol on the battery or battery package.
IMPORTANT NOTICE TO CONSUMERS
This product has been manufactured according to strict specications and volt-
age requirements that are applicable in the country in which it is intended that
this product should be used. If you have purchased this product via the internet,
through mail order, and/or via a telephone sale, you must verify that this product
is intended to be used in the country in which you reside.
WARNING: Use of this product in any country other than that for which it is
intended could be dangerous and could invalidate the manufacturer’s or dis-
tributor’s warranty.
Please also retain your receipt as proof of purchase otherwise your product may
be disqualied from the manufacturer’s or distributor’s warranty.
CALIFORNIA USA ONLY
This Perchlorate warning applies only to primary CR (Manganese Dioxide) Lithium
coin cells sold or distributed ONLY in California USA.
“Perchlorate Material–special handling may apply, See www.dtsc.ca.gov/haz-
ardouswaste/perchlorate.”
This device complies with Part 15 of the FCC Rules.
Operation is subject to the following two conditions: (1) This device may not cause
harmful interference, and (2) this device must accept any interference received,
including interference that may cause undesired operation.
CAN ICES-3 B / NMB-3 B.
Thank you for purchasing the Korg Slimpitch Chromatic
Tuner.
Merci d’avoir choisi l’Accordeur Chromatique Slimpitch
de Korg.
Vielen Dank, dass Sie sich für das chromatische Stimmge-
rät Slimpitch von Korg entschieden haben.
Gracias por comprar el anador cromático Slimpitch de Korg.
Seite wird geladen ...
Seite wird geladen ...
Seite wird geladen ...

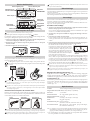
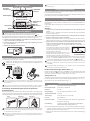
Parties du Slimpitch
Mise en place de la pile
Coupeztoujoursl’alimentationavantdechangerlapile.
Quand la pile commence à s’épuiser, l’icône de pile (
) s’ache.
Le Slimpitch continue à fonctionner un certain temps mais l’accordage devient
moins précis. Remplacez la pile aussi vite que possible.
1. GlissezlecouvercleducompartimentdelapileaudosduSlimpitchdans
ladirectionindiquéeparlaècheA,puisrelevez-le.
2. Remplacezlapileenveillantàrespecterlapolarité:laface“+”delapile
doitêtrevisible.
3. Remeezenplacelecouvercledelapile.
Utilisation du Slimpitch
Vous pouvez utiliser le couvercle transparent du Slimpitch comme pied en le
tournant comme illustré ci-dessous.
Le Slimpitch comporte aussi un aimant intégré. Cela permet de xer
l’accordeur à la partie inférieure d’un pupitre ou de tout autre dispositif
en métal.
VouspouvezxerleSlimpitchàdespupitresnecomportantpasdesurfaceaimantée
(enaluminium,plastique,etc.).Vousdevezpourcelaxerlaplaquemétallique
fournieaustandenquestion.
NeplacezetneconservezpaslaportionaimantéeduSlimpitchàproximitéd’objets
telsquedesmontres,disquesdurs,cartesmagnétiquesoutoutautreobjetsensible
auxchampsmagnétiques.
Utilisation du microphone de contact dédié
Branchez le microphone de contact dédié à la prise INPUT de l’accordeur et
xez le micro à votre instrument. Cela permet d’éliminer l’inuence du bruit
environnant quand vous accordez l’instrument.
Veuillezxercorrectementlemicrodecontactàvotreinstrument.Silemicroreste
xésurl’instrumentpendantunepériodeprolongée,celarisquederayersanition.
Selondiversfacteurstelsquelanition,l’âgeetl’étatdel’instrument,ilsepourrait
quelesystèmedexationàpinceabîmelanitiondel’instrument.
Indicateur de la
note de référence
Indicateur du nom de la note
Bouton CALIB
Bouton CALIB
Tierce majeure pure
Tierce mineure pure
Icône de pile
Indicateur
TRANSPOSE
Interrupteur
d’alimentation
Bouton TRANS
Prise INPUT
Microphone
interne
Couvercle
transparent
Portion aimantée
SaxophoneClarinette
Flûte
N’appliquezjamaisdepressionexcessivesurlabasedumicrophonedecontact.Cela
risqueraitdeledébrancher.
Rétroéclairage
Le rétroéclairage s’allume de façon vive quand un signal arrive ou quand vous
actionnez un bouton.
Après environ 3 secondes sans aucun signal ou manipulation, l’intensité du
rétroéclairage diminue an d’économiser la pile.
Accordage
Pour accorder votre instrument avec le microphone de contact spécial fourni,
branchez ce dernier à la prise INPUT du Slimpitch.
Si aucun câble n’est branché à la prise INPUT de l’accordeur, il eectue l’accor-
dage avec son microphone intégré.
Procédure d’accordage
1. Appuyezsurl’interrupteurd’alimentation.L’appareilsemerasous/hors
tensionàchaquepressionsurl’interrupteur.
Si vous laissez l’appareil allumé pendant environ 20 minutes sans capter
aucun son, il s’éteindra automatiquement.
2. Sinécessaire,vouspouvezmodierlesréglagesdecalibrageetdetrans-
position.
3. Jouezunenoteisoléesurl’instrument.
L’écran ache le nom de la note la plus proche de la hauteur détectée. Ac-
cordez grossièrement votre instrument de sorte à faire apparaître la note
voulue.
4. Jouezànouveauunenoteisoléesurl’instrumentetaccordez-lajusqu’àce
quelesegmentcentraldel’indicateur(repérépar
)s’allume.
Le témoin côté droit s’allume si la note est
trop haute et le témoin côté gauche s’allume
si la note est trop basse.
Si vous voulez vous
accorder une tierce majeure pure ou une
tierce mineure pure plus haut qu’une note
donnée, réglez la hauteur de sorte que
l’écran ache l’indicateur de tierce majeure
pure ou de tierce mineure pure.
Si, par exemple, vous voulez vous accorder une tierce majeure pure au-dessus
de La, veillez à ce que l’indicateur du nom de la note corresponde à “C
#
”, et
accordez-vous de sorte que le segment de gauche (repéré par [
]) s’allume à
l’écran. Pour vous accorder une tierce mineure pure au-dessus de La, veillez
à ce que l’indicateur du nom de la note corresponde à “C”, et accordez-vous
de sorte que le segment de droite (repéré par [
]) s’allume à l’écran.
Mêmesilanotesetrouveàl’intérieurdelaplagededétection,ellepeutnepasêtre
détectéesilesondel’instrumentdemusiquecontientungrandnombred’harmo-
niquesouuntempsdedescenterapide.
Ilsepourraitquel’accordeurréagisseàdesvibrationsambiantesqu’ilcapte;cela
n’aectetoutefoispasl’accorddel’instrument.
Réglages de calibrage (diapason) (*M)
Appuyez sur le bouton CALIB [ ] ou [ ] pour ajuster le calibrage; la plage de
réglage s’étend de 410 Hz à 480 Hz par pas de 1 Hz. Vous pouvez augmenter
ou diminuer le réglage de façon continue en maintenant le bouton enfoncé.
Transposition (*M)
Cee fonction permet de transposer l’accord d’un instrument. Chaque pression
sur le bouton TRANS sélectionne tour à tour les réglages de transposition
suivants: F → B
b
→ E
b
→ C (pas de transposition; l’indicateur TRANSPOSE ne
s’allume pas) → F...
Spécications
Gamme: 12 notes tempérament égal (chromatique),
Plagededétection(ondesinus): A0 (27,50 Hz)–C8 (4186 Hz)
Précision: +/-1 centième
Notederéférence: A4 = 410 à 480 Hz (paliers de 1 Hz)
Plagedetransposition: C, F, B
b
, E
b
Dimensions: 75 mm (L) x 32 mm (P) x 15 mm (H)
Poids: 28 g (pile comprise)
Autonomiedelapile: Environ 8 heures
(utilisation continue, entrée de la note A4)
Accessoiresfournis: Microphone de contact dédié, plaque métallique,
Pile au lithium CR2032 (3 V)
*M Les réglages sont conservés même quand l’appareil est mis hors tension.
Néanmoins, les réglages seront réinitialisés si vous remplacez la pile (ré-
glages par défaut, calibrage: 442 Hz Hz, sans transposition (C)).
• Les caractéristiques et l’aspect du produit sont susceptibles d’être modiés
sans avis préalable en vue d’une amélioration.
Indications à l'écran
quand l'accord est
correct
Seite wird geladen ...

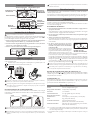
Partes del Slimpitch
Instalación de la Batería
Apaguelaunidadantesdeinstalaroreemplazarlabatería.
Cuando la batería comience a agotarse, se mostrará el indicador de batería (
).
El Slimpitch seguirá funcionando un tiempo, pero la anación será menos
precisa. Reemplace la batería tan pronto como sea posible.
1. DeslicelatapadelabateríasituadaenlaparteposteriordelSlimpitchen
ladirecciónqueindicalaechaAy,acontinuación,levántela.
2. Insertelabateríaasegurándosedequelapolaridadescorrecta,deforma
quelacara“+”delabateríaseavisible.
3. Vuelvaacolocarlacubiertadelabateríaensuposiciónoriginal.
Uso del Slimpitch
Puede utilizar la cubierta transparente del Slimpitch como un soporte girándola
como se muestra aquí.
También hay un imán integrado en el Slimpitch. Le permite jarlo a la
parte inferior de un atril musical metálico, etc.
ParajarelSlimpitchalosatrilesmusicalesquenosonmagnéticos(aluminio,
plástico,etc.),debecolocarlaplacametálicasuministrada.
NocoloqueniguardelasecciónmagnéticadelSlimpitchcercadeobjetoscomorelojes,
discosduros,tarjetasmagnéticasocualquierotroobjetoquepuedaverseafectado
porcamposmagnéticos.
Uso del micrófono de contacto dedicado
Si conecta el micrófono de contacto dedicado a la toma INPUT y ja el clip al
instrumento, puede eliminar la inuencia de los ruidos ambientales al anar
el instrumento.
Feconcuidadoelmicrófonodecontactoasuinstrumento.SidejaelSlimpitchsujeto
alinstrumentoduranteunlargoperiodo,puededañarlasuperciedelinstrumento.
Dependiendodevariosfactores,comoelenvejecimientodelacabadodelasupercie,
existelaposibilidaddequesuinstrumentopuedadañarseporlacolocacióndel
anador.
Indicador de tono
de referencia
Indicador de nombre de nota
Botón TRANS
Icono de batería
Tercera mayor pura
Tercera menor pura
Botón CALIB
Botón CALIB
Indicadores
de ajuste de
TRANSPOSE
Botón de
alimentación
Toma INPUT
Micrófono
interno
Cubierta
transparente
Sección magnética
Flauta
Clarinete
Saxofón
Noejerzaunafuerzaexcesivasobrelabasedelmicrófonodecontacto.Delocontrario,
podríadesconectarse.
Retroiluminación
La retroiluminación se hace más brillante cuando hay sonido de entrada o
cuando se pulsa un botón.
Si el usuario no realiza ninguna operación durante unos tres segundos, la
retroiluminación se atenuará ligeramente para evitar que la batería se agote.
Anación
Para anar el instrumento utilizando el micrófono de contacto dedicado sumi-
nistrado, conéctelo a la toma INPUT del Slimpitch.
Si no se conecta ningún componente a la toma INPUT, la anación se realiza
con el micrófono integrado.
Procedimiento de anación
1. Pulseelbotóndealimentación.Launidadseenciendeoseapagacadavez
quepulseestebotón.
Si la alimentación se deja encendida durante unos 20 minutos sin ningún
sonido de entrada, seapagará de forma automática.
2. Encasonecesario,cambielosajustesdecalibraciónytransposiciónsegún
susnecesidades.
3. Toqueunasolanotaensuinstrumento.
La pantalla mostrará el nombre de la nota más cercana al tono detectado.
Ane su instrumento con el tono correcto para que aparezca el nombre de la
nota deseada.
4.
De nuevo, toque una nota en su instru-
mentoyajustelaanacióndeformaquese
ilumine el segmentocentral delmedidor
(indicadopor
).
El indicador de la derecha se iluminará si el
tono es demasiado agudo, y el indicador de la
izquierda se iluminará si es demasiado grave.
Si desea anar una tercera mayor pura o una
tercera menor pura por encima de una cierta nota, ajuste el tono hasta que
la tercera mayor o menor pura se marque en el medidor.
Por ejemplo, si desea anar una tercera mayor pura por encima de A, haga que
el indicador de nombre de nota marque C
#
y ane de forma que el medidor
indique la izquierda [
]. Asimismo, si desea anar una tercera menor pura
por encima de A, haga que el indicador de nombre de nota marque C y ane
de forma que el medidor indique la derecha [
].
Aunqueeltonoestédentrodelrangodedetección,puedequenoseaposibledetectarel
tonodeunsonidoquecontengagrancantidaddearmónicosoquetengaunarápidacaída.
Elmedidorpuederesponderalasvibracionesquerecogedelentorno;sinembargo,
esonoafectaráalaanacióndelinstrumento.
Ajustes de la calibración (tono de referencia) (*M)
Pulse el botón CALIB [ ] o [ ] para cambiar el ajuste en el intervalo de 410 Hz
a 480 Hz en pasos de 1 Hz. Mantenga pulsado el botón para aumentar o reducir
el ajuste de forma continua.
Transposición (*M)
Esta función se utiliza para anar un instrumento de transposición. Cada vez
que pulse el botón TRANS, el ajuste cambiará entre F → B
b
→ E
b
→ C (sin trans-
posición; el indicador TRANSPOSE no aparecerá) → F...
Especicaciones
Escala: 12 notas, temperamento igual
Rango(ondasinusoidal): A0 (27,50 Hz)–C8 (4186 Hz)
Precisión: +/-1 centésima
TonodeReferencia: A4 = 410–480 Hz (en pasos de 1 Hz)
Rangodetransposición: C, F, B
b
, E
b
Dimensiones: 75 mm (Anch.) x 32 mm (Prof.) x 15 mm (Alt.)
Peso: 28 g (incluyendo batería)
Vidaútildelabatería: Aproximadamente 8 horas
(entrada A4, funcionando continuamente)
Elementosincluidos: Micrófono de contacto dedicado, placa metálica,
batería de litio CR2032 (3 V)
*M
Los ajustes se recuerdan incluso al apagar la unidad. No obstante, los ajustes
se inicializarán al reemplazar la batería (valor por defecto, calibración: 442
Hz sin transposición (C)).
• Las especicaciones y el aspecto están sujetos a cambios sin previo aviso por
mejora.
Indicaciones de
medidor si se ha
afinado correctamente
-
 1
1
-
 2
2
-
 3
3
-
 4
4
-
 5
5
-
 6
6
-
 7
7


Korg Slimpitch Bedienungsanleitung
- Kategorie
- Mikrofone
- Typ
- Bedienungsanleitung
- Dieses Handbuch eignet sich auch für
in anderen Sprachen
- English: Korg Slimpitch Owner's manual
- français: Korg Slimpitch Le manuel du propriétaire
- español: Korg Slimpitch El manual del propietario