
ENGLISHENGLISH
Luminescence sensor
Operating instructions
Safety notes
> Not a safety component in accordance with EU Machinery Directive.
> Read the operating instructions before commissioning.
> Connection, mounting, and setting is only to be performed by
trained specialists.
> When commissioning, protect the device from moisture and
contamination.
Correct use
The luminescence sensor LUTM is an photoelectronic scanner and is used
to record uorescent objects optically and without contact.
Starting operation
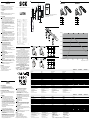
1 Connect and secure cable receptacle tension-free. The following apply
for connection in B: brn = brown, blu = blue, blk = black, wht = white.
Connect the scanner according to the B connection chart.
Mount the sensor with mounting holes at the place (e. g., deection
roller) where the test object has the least horizontal and vertical
movement. In doing so, pay attention to the sensing range (see
technical data, Fig. 1, and diagram, x = sensing range, y = relative
sensitivity, TM: SICK LM 100% = sensing material: SICK luminescence
scale 100%).
Measure the scanning range from the front lens.
Align the horizontal and vertical movements of the test object using
correspondingly long markings.
Make sure that sensor movement does not inuence the scanning
distance.
Connect cables.
Connect photoelectric switch to operating voltage (see type label).
2 “2 point teach-in (static)” via operating panel (Fig. 2)
First teach-in procedure: Bring the mark into the light spot and start
teach-in with teach-in pushbutton (> 1 s ≤ 3 s). The emitted light and
the yellow LED ash slowly: i. e. second teach-in process must be
triggered.
Second teach-in procedure: Bring background into the light spot and
start teach-in with teach-in button (> 20 ms < 3 s). Quit the teach-in
procedure. The switching threshold is set between the mark’s receive
signal and background and is stored in a nonvolatile manner.
Output active by mark (rst teach-in).
3 Dynamic teach-in via operating panel (Fig. 3)
Bring the mark or background into the light spot.
Hold down teach-in button > 3 s < 30 s.
The emitted light and the yellow LED ash slowly.
Move material through light spot (min. one repeat length).
Quit the teach-in procedure.
The switching threshold is set between the mark‘s receive signal and
background and is stored in a nonvolatile manner.
Switching output active on mark or background depending on teach-in
starting point.
4 Dynamic teach-in via ET
Dynamic teach-in can also be done via the control cable.
Control cable High > 30 ms.
See technical specications table
5 Faulty teaching
The emitted light and the function LED ash rapidly: insucient con-
trast. Readjust sensor, clean or check application conditions, teach-in
again. For teach-in via ET ashlight signal (5 Hz) via switching output Q.
6 IO-Link setting
Information on the IO-Link functions can be found in the enclosed
supplementary operating instructions for LUTM IO-Link or downloaded
from www.sick.com under the device order number.
7 Keylock
Activation and deactivation: hold down teach-in button > 30 s.
Emitted light and function display ash 3 x.
Maintenance
SICK luminescence sensors are maintenance-free.
We recommend doing the following regularly
- clean the external lens surfaces.
- check the screw connections and plug-in connections.
No modications may be made to devices.
DEUTSCHDEUTSCH
Lumineszenzsensor
Betriebsanleitung
Sicherheitshinweise
> Kein Sicherheitsbauteil gemäß EU-Maschinenrichtlinie.
> Vor der Inbetriebnahme die Betriebsanleitung lesen.
> Anschluss, Montage und Einstellung nur durch Fachpersonal.
> Gerät bei Inbetriebnahme vor Feuchte und Verunreinigung schützen.
Bestimmungsgemäße Verwendung
Der Lumineszenzsensor LUTM ist ein optoelektronischer Sensor und wird
zum optischen, berührungslosen Erfassen von uoreszierendem Tastgut
eingesetzt.
Inbetriebnahme
1 Leitungsdose spannungsfrei aufstecken und festschrauben.
Für Anschluss in B gilt: brn = braun, blu = blau, blk = schwarz,
wht = weiß. Sensor laut Anschlussschema B anschließen.
Sensor mit Befestigungsbohrungen an Stelle (z. B. Umlenkrolle)
montieren, an der das Prüfobjekt die geringsten Seiten- und Höhenbe-
wegungen ausführt. Dabei Tastweite beachten (s. technische Daten,
Abb. 1 und Diagramm, x = Tastweite, y = relative Empndlichkeit,
TM: SICK LM 100 % = Tastmaterial: SICK-Lumineszenzmaßstab 100 %).
Seiten- und Höhenbewegungen des Prüfobjektes durch entsprechend
lange Markierungen ausgleichen.
Bewegungen des Sensors mit Tastweiteneinuss ausschließen.
Leitungen anschließen.
Sensor an Betriebsspannung legen (s. Typenaufdruck).
2 2 Punkt Teach-in (statisch) über Bedienfeld (Abbildung 2)
Erster Teach-in-Vorgang: Marke in den Lichteck bringen und Teach-in
über Teach-in-Taste (> 1 s ≤ 3 s) auslösen. Das Sendelicht und die
gelbe Anzeige LED blinken langsam: d. h. zweiter Teach-in-Vorgang
muss ausgelöst werden.
Zweiter Teach-in-Vorgang: Hintergrund in den Lichteck bringen und
Teach-in über Teach-in-Taste (> 20 ms < 3 s) auslösen. Teach-in-Vor-
gang beendet. Die Schaltschwelle hat sich zwischen Empfangssignal
der Marke und Hintergrund gelegt und ist nichtüchtig gespeichert.
Schaltausgang aktiv auf Marke (erster Teach-in).
LUTM
--------------------------------------------------------- 8017182.16IC 0120 COMAT ------------------------------------------------------
A
3 Teach-in dynamisch über Bedienfeld (Abbildung 3)
Marke oder Hintergrund in den Lichteck bringen.
Teach-in Taste > 3 s < 30 s gedrückt halten
Sendelicht und die gelbe Anzeige LED blinken langsam
Material durch den Lichteck bewegen (min. eine Rapportlänge)
Teach-in Taste loslassen.
Teach-in-Vorgang beendet.
Die Schaltschwelle hat sich zwischen Empfangssignal der Marke und
Hintergrund gelegt und ist nichtüchtig gespeichert. Schaltausgang
aktiv auf Marke oder auf Hintergrund je nach Startpunkt des Teachs.
4 Teach-in dynamisch über ET
Dynamischer Teach-in kann auch über Steuerleitung erfolgen.
Steuerleitung High > 30 ms.
Vgl. Tabelle technische Daten.
5 Fehlteach
Das Sendelicht und die Funktionsanzeige blinken schnell: Kontrast
nicht ausreichend. Sensor neu justieren, reinigen bzw. Einsatzbedin-
gungen prüfen, erneut einlernen. Bei Teach-in über ET Blinksignal
(5 Hz) über Schaltausgang Q.
6 Einstellung IO-Link
Die IO-Link Funktionalitäten bitte der beiliegenden Zusatz-Betriebs-
anleitung LUTM IO-Link entnehmen oder über www.sick.com unter der
Geräte-Bestellnummer downloaden.
7 Tastensperre
Aktivierung und Deaktivierung: Teach-in Taste > 30 s gedrückt halten.
Sendelicht und Funktionsanzeige blinken 3 x.
Wartung
SICK-Sensoren sind wartungsfrei.
Wir empfehlen, in regelmäßigen Abständen
– die optischen Grenzächen zu reinigen,
– Verschraubungen und Steckverbindungen zu überprüfen.
Veränderungen an Geräten dürfen nicht vorgenommen werden.
L+
Q
ET
M
1
4
2
3
brn
blk
wht
blu
B
LUTM-UP81162P LUTM-UN81162P LUTM-UP817A2P
Scanning range Tastweite Distance de détection Campo de exploração 12.5 mm
Light spot Lichtfleck Spot lumineux Ponto luminoso 1.5 x 1.5 mm
Supply voltage U
B
Versorgungsspannung U
B
Tension d‘alimentation U
B
Tensão de força U
B
12 ... 24 V
1)
Switching output Schaltausgang Sortie de commutation Saída de comutação PNP NPN PNP / IO-Link
Output voltage Ausgangsspannung Tension de sortie Tensão de saída HIGH: U
B
≤ 2V; LOW: ca. 0 V
Output current I
max.
Ausgangsstrom I
max.
Courant de sortie I
max.
Corrente de saída I
max.
≤ 50 mA
2)
Input, teach-in (ET) Eingang Teach-in (ET) Entrée Teach-in (ET) Entrada Teach-in (ET) Teach: U = 10.8 V … < U
B
Run: U < 2 V or open
Teach: U < 2 V
Run: U > U
B
–
2 V or open
Teach: U = 10.8 V … < U
B
Run: U < 2 V or open
Signal sequence Schaltfrequenz Fréquence Sequência de sin ais 6 kHz
3)
Jitter Jitter
Scintillement
Jitter
40 µs 40 µs 40 µs
Response time Ansprechzeit Temps de réponse Tempo de reação 80 µs
4)
Enclosure rating Schutzart Type de protection Tipo de proteção IP 67
Protection class Schutzklasse Classe de protection Classe de proteção
Ambient operating temperature Betriebsumgebungstemperatur Température ambiante Temperatura ambiente de operação -10 ... +55 °C
1)
Limit values:
12 V (-10 %) ... 24 V (+20 %).
Power consumption without load < 50 mA
Operation in short-circuit protected network
max. 8 A ripple max. 5 V
CC
2)
At supply voltage > 24 V, I
max.
= 30 mA.
I
max.
is consumption count of all Q
N
.
3)
Scanning ratio 1:1
4)
Signal transit time with resistive load
1)
Grenzwerte:
12 V (-10 %) ... 24 V (+20 %).
Stromaufnahme ohne Last < 50 mA
Betrieb in kurzschlussgeschütztem Netz max. 8 A.
Restwelligkeit ≤ 5 V
CC
2)
Bei Versorgungsspannung > 24 V, I
max.
= 30 mA.
I
max.
ist Summenstrom aller Q
N
.
3)
Tastverhältnis 1:1
4)
Signallaufzeit bei ohmscher Last
1)
Valeurs limites:
12 V (-10 %) ... 24 V (+20 %).
Consommation de courant sans charge < 50 mA
Service dans un réseau protégév contre les courts-circuits 8 A au max.
Ondulation résiduelle max. 5 V
CC
2)
Pour tension d‘alimentation > 24 V I
max.
= 30 mA.
I
max.
est la somme des courant de tous les Q
N
3)
Rapport de 1:1
4)
Durée du signal en charge ohmique
1)
Valores limite:
12 V (-10 %) ... 24 V (+20 %).
Consumo de corrente sem carga < 50 mA
Operação em rede protegida contra curto-circuitos max. 8 A
Ondulação residual max. 5 V
CC
2)
No caso de tensão de alimentação > 24 V, I
max.
= 30 mA.
I
max.
é a corrente total de todos Q
N
.
3)
Fator de detecção 1:1
4)
Tempo de transição do sinal com carga ôhmica
LUTM-UP81162P LUTM-UN81162P LUTM-UP817A2P
Distanza di ricezione Alcance de exploratión
感应距离 検出範囲
12.5 mm
Punto luminoso Mancha de luz
光斑 光点
1.5 x 1.5 mm
Tensione di alimentazione U
B
Tensión de alimentación U
B
电源电压 U
B
供給電圧 U
B
12 ... 24 V
1)
Uscita di commutazione Salida conmutada
开关输出端 スイッチング出力
PNP NPN PNP / IO-Link
Tensione all'uscita Tension de salida
输出压 出力電圧
HIGH: U
B
≤ 2V; LOW: ca. 0 V
Corrente di uscita I
max.
Corriente de salida I
max.
输出电流I
max.
最大出力電流 I
max.
≤ 50 mA
2)
Ingresso Teach-in (ET) Entrada Teach-in (ET) 示教输入(ET) ティーチイン入力 (ET) Teach: U = 10.8 V … < U
B
Run: U < 2 V or open
Teach: U < 2 V
Run: U > U
B
–
2 V or open
Teach: U = 10.8 V … < U
B
Run: U < 2 V or open
Sequenza signali Secuencia de señales
开关频率 スイッチング頻度
6 kHz
3)
Jitter
Inestabilidad
抖动
ステップ偏差 (
Jitter) 40 µs 40 µs 40 µs
Tempo di risposta Tiempo de reacción
触发时间
応答時間
80 µs
4)
Tipo di protezione Tipo de protección
保护种类 保護等級
IP 67
Classe di protezione Protección clase
保护级别 保護クラス
Temperatura ambiente circostante Temperatura ambiente de servicio
工作环境-温度 使用周囲温度
-10 ... +55 °C
1)
Valori limite:
12 V (-10 %) ... 24 V (+20 %).
Assorbimento di corrente senza carico < 50 mA
Funzionamento in rete con protezione dai cortocircuiti max. 8 A
ondulazione residua max. 5 V
CC
2)
Per una tensione di alimentazione> 24 V, I
max.
= 30 mA.
I
max.
è la corrente cumulativa di tutti i Q
N
.
3)
Rapporto di lavoro 1:1
4)
Tempo di continuare de segnale a resistenza ohmica
1)
Valores límite:
12 V (-10 %) ... 24 V (+20 %).
Consumo de corriente sin carga < 50 mA
Funcionamiento en la red protegida contra cortocircuito, max. 8 A
ondulación residual max. 5 V
CC
2)
Tensión de alimentación > 24 V, I
max.
= 30 mA.
I
max.
es la corriente total de todos los Q
N
.
3)
Relación de exploración 1:1
4)
Duración de la señal con carga óhmica
1)
操作电流:
12 V (-10 %) ... 24 V (+20 %)。
耗用电流无负荷< 50 mA
在防短路的网络里, 最大8
极限值剩余波纹度 max. 5 V
CC
2)
当供电电压 > 24 V 时,最大电流 I
max.
= 30 mA。
最大电流 I
max.
是所有 Q
N
的总电流。
3)
感应比:1:1
4)
电阻性负载时,传感器检测到变化时输出信号的转 换时间
1)
限界値:
12 V (-10 %) ... 24 V (+20 %).
負荷なしでの電流消費 < 50 mA
短絡防止回路での動作 最大 8 A、
残留リップル最大 5 V
CC
2)
電源電圧が> 24 V の場合、I
max.
= 30 mA。
I
max.
はすべての Q
N
の全電流。
3)
検出比 1:1
4)
抵抗負荷における信号遷移時間
L+
C/Q
M
Q
1
4
3
2
brn
blk
blu
wht
9
(0.35)
9.7
(0.38)
21
(0.83)
31.5 (1.24)
28.5
(1.12)
25.4
(1.00)
0.5
(0.02)
0.5
(0.02)
3
(0.12)
18.3
(0.72)
9.9
(0.39)
0.9
(0.04)
12
(0.47)
305
(12.01)
2
3
> 3 s ≤ 30 s
> 1 s ≤ 3 s < 3 s
5
(0.20)
010
(0.39)
15
(0.59)
20
(0.79)
25
(0.98)
0.00 %
20.00 %
40.00 %
60.00 %
80.00 %
100.00
%
120.00
%
Sensing distance in mm (inch)
Relative sensitivity in %
LUTM-xxxx16xx LUTM-xxxx7Axx
1
1
Status indicator LED, yellow: Status switching output
Q
2
Status indicator LED green: power on
3 Teach-in button
12
3
2011/65/EU
More representatives and agencies at www.sick.com ∙ Subject to change
without notice ∙ The specied product features and technical data do not
represent any guarantee.
Weitere Niederlassungen nden Sie unter www.sick.com ∙ Irrtümer
und Änderungen vorbehalten ∙ Angegebene Produkteigenschaften und
technische Daten stellen keine Garantieerklärung dar.
Plus de représentations et d’agences à l’adresse www.sick.com ∙ Sujet à
modication sans préavis ∙ Les caractéristiques de produit et techniques
indiquées ne constituent pas de déclaration de garantie.
Para mais representantes e agências, consulte www.sick.com ∙ Alterações
poderão ser feitas sem prévio aviso ∙ As características do produto e os
dados técnicos apresentados não constituem declaração de garantia.
Altri rappresentanti ed agenzie si trovano su www.sick.com ∙ Contenuti
soggetti a modiche senza preavviso ∙ Le caratteristiche del prodotto e i
dati tecnici non rappresentano una dichiarazione di garanzia.
Más representantes y agencias en www.sick.com ∙ Sujeto a cambio sin
previo aviso ∙ Las características y los datos técnicos especicados no
constituyen ninguna declaración de garantía.
欲了解更多代表机构和代理商信息,请登录 www.sick.com ∙
如有更改 , 不另行通知 ∙ 对所给出的产品特性和技术参数
的正确性不予保证。
その他の営業所は www.sick.com よりご覧ください ∙ 予告なし
に変更されることがあります ∙ 記載されている製品機能およ
び技術データは保証を明示するものではありません。
BZ int49
Detailed addresses and further locations at www.sick.com
Australia
Phone +61 (3) 9457 0600
1800 33 48 02 – tollfree
Austria
Phone +43 (0) 2236 62288-0
Belgium/Luxembourg
Phone +32 (0) 2 466 55 66
Brazil
Phone +55 11 3215-4900
Canada
Phone +1 905.771.1444
Czech Republic
Phone +420 234 719 500
Chile
Phone +56 (2) 2274 7430
China
Phone +86 20 2882 3600
Denmark
Phone +45 45 82 64 00
Finland
Phone +358-9-25 15 800
France
Phone +33 1 64 62 35 00
Germany
Phone +49 (0) 2 11 53 010
Greece
Phone +30 210 6825100
Hong Kong
Phone +852 2153 6300
Hungary
Phone +36 1 371 2680
India
Phone +91-22-6119 8900
Israel
Phone +972 97110 11
Italy
Phone +39 02 27 43 41
Japan
Phone +81 3 5309 2112
Malaysia
Phone +603-8080 7425
Mexico
Phone +52 (472) 748 9451
Netherlands
Phone +31 (0) 30 229 25 44
New Zealand
Phone +64 9 415 0459
0800 222 278 – tollfree
Norway
Phone +47 67 81 50 00
Poland
Phone +48 22 539 41 00
Romania
Phone +40 356-17 11 20
Russia
Phone +7 495 283 09 90
Singapore
Phone +65 6744 3732
Slovakia
Phone +421 482 901 201
Slovenia
Phone +386 591 78849
South Africa
Phone +27 10 060 0550
South Korea
Phone +82 2 786 6321/4
Spain
Phone +34 93 480 31 00
Sweden
Phone +46 10 110 10 00
Switzerland
Phone +41 41 619 29 39
Taiwan
Phone +886-2-2375-6288
Thailand
Phone +66 2 645 0009
Turkey
Phone +90 (216) 528 50 00
United Arab Emirates
Phone +971 (0) 4 88 65 878
United Kingdom
Phone +44 (0)17278 31121
USA
Phone +1 800.325.7425
Vietnam
Phone +65 6744 3732
SICK AG, Erwin-Sick-Strasse 1, D-79183 Waldkirch
2006/42/EC
2006/42/EC
NO
SAFETY
Seite wird geladen ...
-
 1
1
-
 2
2


in anderen Sprachen
- English: SICK LUTM Operating instructions
- français: SICK LUTM Mode d'emploi
- español: SICK LUTM Instrucciones de operación
- italiano: SICK LUTM Istruzioni per l'uso
- português: SICK LUTM Instruções de operação
- 日本語: SICK LUTM 取扱説明書
Verwandte Artikel
-
SICK LUTM Bedienungsanleitung
-
-
-
-
-
-
-
-
-