Seite laden ...
Seite laden ...
Seite laden ...

2
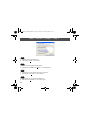
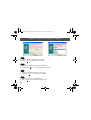
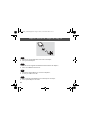
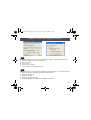
Informationen für die Installation
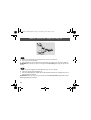
> Auf den nächsten Seiten können Sie lesen, wie man den Philips USB-Adapter auf dem Computer installiert.
Da es zahlreiche Computermarken und -typen gibt, sind die abgebildeten Fotos nur als Beisiel zu
betrachten. Spezielle Informationen zu Ihrem Computer finden Sie in Ihrem Computerhandbuch oder
erhalten Sie bei Ihrem Fachhändler vor Ort.
> Vor der Installation die Firewall (Software/Hardware) deaktivieren. Nach der Installation nicht vergessen
die Firewall wieder zu aktivieren.
> Bei Einsatz der Betriebssysteme Windows 2000 und Windows XP müssen Sie sich als Benutzer mit
Administratorrechten anmelden.
> Wenn Sie bereits eine ältere Version für IP-Telefonie installiert haben, empfehlen wir Ihnen diese zu
deinstallieren bevor Sie den USB-Adapter installieren.
> Internet-Verbindungen außerhalb der Firewall werden von den IP Softphone-Leistungsmerkmalen nicht
unterstützt.
> Zu einem bestimmten Zeitpunkt darf nur ein Softphone aktiv sein. Um Konflikte beim Einsatz des
Adapters zu vermeiden, deaktivieren Sie alle anderen Softphones bis auf das verwendete.
> Der Einsatz anderer Softphone-Anwendungen außer Skype beeinträchtigt die Installation und die Nutzung
des Produktes.
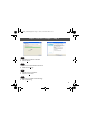
Informations importantes
Avant d’installer votre adaptateur USB et votre logiciel, lisez attentivement les
informations suivantes :
Informations d’installation
> Les pages suivantes décrivent l’installation de l’adaptateur USB sur votre ordinateur. Sachant qu’il existe
des ordinateurs de marques et de types très divers, les photos présentées ici ne constituent que des
exemples. Pour plus de détails sur votre ordinateur, consultez le manuel qui l’accompagne ou contactez
votre revendeur.
F
VOIP021_installationguide.fm Page 2 Jeudi, 15. décembre 2005 3:26 15
Seite laden ...
Seite laden ...

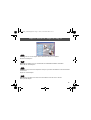
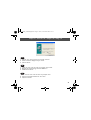
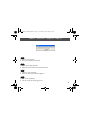
5
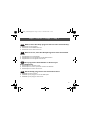
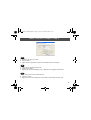
1 Place the Installation CD into the CDROM drive of your computer and close the drive.
2 Wait until the Setup program starts automatically
1 Legen Sie die Installations-CD in das CD-ROM-Laufwerk Ihres Computers ein und schließen Sie
die Schublade.
2 Warten Sie, bis das Setup-Programm automatisch startet.
1 Insérez le CD d’installation dans le lecteur de CD-ROM de votre ordinateur et refermez le lecteur.
2 Attendez que le programme d’installation démarre automatiquement.
VOIP021
voice over IP telephone adapter
PHI
PC compatible
Version 3.00
Installation CD
IP Phone Center SN#
XXXX0-XXXX-XXXX-XXX0
UK
D
F
Step 1 / Schritt 1 / Etape 1 / Stap 1
VOIP021_installationguide.fm Page 5 Jeudi, 15. décembre 2005 3:26 15
Seite laden ...

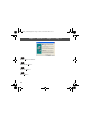
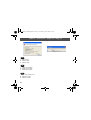
7
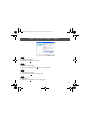
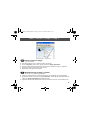
What to do if the Setup program does not start automatically :
1 Double-click on "My computer"
2 Double-click on the CDROM drive icon
3 Double-click on the "autorun.exe" icon.
Was ist zu tun, wenn das Setup-Programm nicht automatisch
startet:
1 Doppelklicken Sie auf "Arbeitsplatz"
2 Doppelklicken Sie auf das Symbol für das CD-ROM-Laufwerk
3 Doppelklicken Sie auf das Symbol "autorun.exe"
Si le programme d’installation ne démarre pas
automatiquement:
1 Double-cliquez sur "Poste de travail"
2 Double-cliquez sur l’icône représentant le lecteur de CD-ROM
3 Double-cliquez sur l’icône "autorun.exe".
Als het Setup-programma niet automatisch start:
1 Dubbelklik op "Mijn computer"
2 Dubbelklik op het pictogram voor de CD-ROM-speler
3 Dubbelklik op het pictogram "autorun.exe"
UK
D
F
NL
Step 2 / Schritt 2 / Etape 2 / Stap 2
VOIP021_installationguide.fm Page 7 Jeudi, 15. décembre 2005 3:26 15

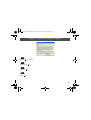
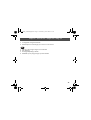
8
Click on "Install Skype"
Klicken Sie auf "Install Skype"
Cliquez sur "Install Skype"
Klik op "Install Skype"
UK
D
F
NL
Step 3 / Schritt 3 / Etape 3 / Stap 3
VOIP021_installationguide.fm Page 8 Jeudi, 15. décembre 2005 3:26 15

9
1 Choose your language
2 Then click on "N
ext >" to continue.
1 Wählen Sie Ihre Sprache.
2 Klicken Sie anschließend auf "W
eiter >", um fortzufahren.
1 Choisissez votre langue
2 Puis cliquez sur "S
uivant >" pour continuer.
1 Kies uw taal.
2 Klik daarna op "V
olgende >" om verder te gaan.
UK
D
F
NL
Step 4 / Schritt 4 / Etape 4 / Stap 4
VOIP021_installationguide.fm Page 9 Jeudi, 15. décembre 2005 3:26 15

10
1 Tick the contract agreement box.
2 Then click on "N
ext >" to continue.
1 Ticken der Vertrag Vereinbarung Kasten.
2 Klicken Sie anschließend auf "W
eiter >", um fortzufahren.
1 Cochez la case pour accepter les termes du contrat.
2 Puis cliquez sur "S
uivant >" pour continuer.
1 Tik het vakje van de contractovereenkomst
2 Klik daarna op "V
olgende >" om verder te gaan.
UK
D
F
NL
Step 5 / Schritt 5 / Etape 5 / Stap 5
VOIP021_installationguide.fm Page 10 Jeudi, 15. décembre 2005 3:26 15

11
1 Wait until the installation is finished.
2 Click on "F
inish"
1 Warten Sie, bis die Installation beendet ist.
2 Klicken Sie auf "F
ertig".
1 Attendez la fin de l’installation.
2 Cliquez sur "T
erminer".
1 Wacht tot de installatie wordt beëindigd
2 Klik op "A
fwerking".
UK
D
F
NL
Step 6 / Schritt 6 / Etape 6 / Stap 6
VOIP021_installationguide.fm Page 11 Jeudi, 15. décembre 2005 3:26 15

12
Create your Skype account.
Legen Sie Ihr Skype-Konto an.
Créez votre compte Skype.
Maak uw Skype-account aan.
UK
D
F
NL
Step 7 / Schritt 7 / Etape 7 / Stap 7
VOIP021_installationguide.fm Page 12 Jeudi, 15. décembre 2005 3:26 15

13
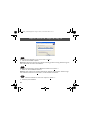
1 Complete your new user profile.
2 Click on "Next >".
> Skype will send a confirmation email to the email address declared in your profile.
1 Tragen Sie Ihr neues Benutzerprofil ein.
2 Klicken Sie auf "Next".
> Skype sendet eine E-mail-Bestätigung an die im Profil von Ihnen angegebene E-mail-Adresse.
1 Remplissez votre nouveau profil d’utilisateur.
2 Cliquez sur "Next".
> Skype enverra un e-mail de confirmation à votre adresse e-mail indiquée dans votre profil.
UK
D
F
Step 8 / Schritt 8 / Etape 8 / Stap 8
VOIP021_installationguide.fm Page 13 Jeudi, 15. décembre 2005 3:26 15

14
1 Voer uw nieuwe gebruikersprofiel in.
2 Klik op "Next".
> Skype verstuurt een e-mailbevestiging naar het e-mailadres dat u in het profiel hest aangegeven.
NL
Step 8 / Schritt 8 / Etape 8 / Stap 8
VOIP021_installationguide.fm Page 14 Jeudi, 15. décembre 2005 3:26 15

15
Create contacts in Skype
1 Press + to add a contact.
2 Enter Pseudo Skype of your relation and follow instructions
3 Go in tab Contacts, press mouse right key and select "Assign Speed-Dial"
4 Assign a number between 0 to 99 for this new contact to directly call from your telephone
> This number will be the speed dial key of your contact
> Repeat these 4 steps for each new contact.
Kontakteinträge in Skype erstellen
1 Drücken Sie auf +, um einen Eintrag einzufügen.
2 Geben Sie den Skype-Namen Ihres Ansprechpartners ein und befolgen Sie die Anweisungen.
3 Positionieren Sie den Cursor auf das Register Kontakte, drücken Sie die rechte Maustaste und
wählen Sie "Assign Speed-Dial" (Kurzwahl zuweisen).
4 Weisen Sie diesem neuen Kontakt eine Nummer zwischen 0 und 99 zu, um ihn direkt über Ihr
UK
D
Step 9 / Schritt 9 / Etape 9 / Stap 9
VOIP021_installationguide.fm Page 15 Jeudi, 15. décembre 2005 3:26 15
Seite laden ...

17
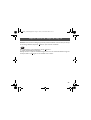
Warning: Do not connect adapter before CD-ROM installation is completed.
Click on "Install adapter".
Achtung: Den Adapter nicht vor dem Beenden der CD-RO%M-Installation anschließen.
Klicken Sie auf "Install adapter".
Attention: Ne pas connecter l’adaptateur avant que la procédure d’installation à l’aide du CD-ROM
soit terminée.
Cliquez sur "Install adapter".
LET OP: Sluit de adapter niet aan,alvorens de installatie van de CD-rom is voltooid.
Klik op "Install adapter".
UK
D
F
NL
Step 10 / Schritt 10 / Etape 10 / Stap 10
VOIP021_installationguide.fm Page 17 Jeudi, 15. décembre 2005 3:26 15

18
Click on "Next >" to continue.
Klicken Sie auf "N
ext >".
Cliquez sur "N
ext >".
Klik op "N
ext >".
UK
D
F
NL
Step 11 / Schritt 11 / Etape 11 / Stap 11
VOIP021_installationguide.fm Page 18 Jeudi, 15. décembre 2005 3:26 15

19
Click on "Yes" to continue.
Klicken Sie auf "Y
es".
Cliquez sur "Y
es".
Klik op "Y
es".
UK
D
F
NL
Step 12 / Schritt 12 / Etape 12 / Stap 12
VOIP021_installationguide.fm Page 19 Jeudi, 15. décembre 2005 3:26 15

20
1 Follow instructions displayed on your screen.
2 Click on "N
ext >" to continue the installation.
1 Befolgen Sie die Anweisungen auf Ihrem Bildschirm.
2 Klicken Sie auf "N
ext >", um die Installation fortzusetzen.
1 Suivez les instructions affichées sur votre écran.
2 Cliquez sur "N
ext >" pour continuer l’installation.
1 Volg de aanwijzingen op uw beeldscherm.
2 Klik op "N
ext >" om de installatie voort te zetten.
UK
D
F
NL
Step 13 / Schritt 13 / Etape 13 / Stap 13
VOIP021_installationguide.fm Page 20 Jeudi, 15. décembre 2005 3:26 15

21
1 Tick the "Yes, I want to restart my computer now" box.
2 Follow instructions displayed on your screen.
3 Click on "Finish".
1 Ticken der "Yes, I want to restart my computer now" Kasten.
2 Befolgen Sie die Anweisungen auf Ihrem Bildschirm.
3 Klicken Sie auf "Finish".
1 Cochez la case "Yes, I want to restart my computer now".
2 Suivez les instructions affichées sur votre écran.
3 Cliquez sur "Finish".
UK
D
F
Step 14 / Schritt 14 / Etape 14 / Stap 14
VOIP021_installationguide.fm Page 21 Jeudi, 15. décembre 2005 3:26 15
Seite laden ...

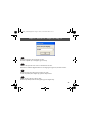
23
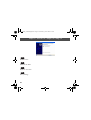
Select your language in the list and click on "OK".
This screen is optional. If it is not displayed, go to next step.
Wählen Sie Ihre Sprache in der Liste vor und klicken Sie an "OK".
Dieser Schirm ist wahlweise freigestellt. Ween er nicht angezeigt wird, gehen Sie, zunächst zu tretten.
Sélectionnez votre langue dans la liste et cliquez sur "OK".
Cet écran est facultatif. S’il ne s’affiche pas, passez à l’étape suivante.
Selecteer uw taal in de lijst en klik op "OK".
Dit scherm is facultatief. Als het niet wordt getoond, ga naar volgende stap.
UK
D
F
NL
Step 15 / Schritt 15 / Etape 15 / Stap 15
VOIP021_installationguide.fm Page 23 Jeudi, 15. décembre 2005 3:26 15

24
1 Connect the supplied USB cable on the back of the adapter,
2 and on your PC USB port
1 Schließen Sie das mitgelieferte USB-Kabel auf der Rückseite des Adapters,
2 und an der USB-Buchse Ihres PCs an.
1 Connectez le câble USB fourni à l’arrière de l’adaptateur,
2 et sur le port USB de votre PC.
1 Sluit de meegeleverde USB-kabel aan de achterzijde van de adapter,
2 aan en op de USB-poort van uw PC.
UK
D
F
NL
Step 16 / Schritt 16 / Etape 16 / Stap 16
VOIP021_installationguide.fm Page 24 Jeudi, 15. décembre 2005 3:26 15

25
If you removed the installation CD-ROM as requested in the window of step 14, insert it again and
click on "N
ext >".
Wenn Sie die Installation CD-ROM entfernten, wie im Fenster von Schritt 15 verlangt, setzen Sie es
wieder ein, wie durch das Fenster auf Ihrem Schirm spezifiziert und klicken Sie an "W
eiter >".
Si vous avez retiré votre CD-ROM d’installation comme il était demandé dans la fenêtre de l’étape 14,
insérez-le de nouveau et cliquez sur "S
uivant >".
Als u installatiecCd-rom zoals die in het venster van stap 15 wordt gevraagd verwijderde, neem het op
opnieuw zoals gespecificeerd door het venster op het uw scherm en klik op "V
olgende >".
UK
D
F
NL
Step 17 / Schritt 17 / Etape 17 / Stap 17
VOIP021_installationguide.fm Page 25 Jeudi, 15. décembre 2005 3:26 15

26
Follow instructions displayed on your screen. Click on "Next >"
> Wait until the installation is finished.
Warning: If dialog boxes appear during installation informing you about a missing Windows Logo test,
click on "C
ontinue" to continue the installation.
Befolgen Sie die Anweisungen auf Ihrem Bildschirm. Klicken Sie auf "W
eiter >"
> Warten Sie, bis die Installation beendet ist..
Achtung: Wenn während der Installation Dialogfenster bezüglich eines fehlenden Windows Logo-
Tests erscheinen, klicken Sie auf "F
ortsetzen", um die Installation fortzusetzen.
Suivez les instructions affichées sur votre écran. Cliquez sur "S
uivant >"
> Attendez la fin de l’installation
UK
D
F
Step 18 / Schritt 18 / Etape 18 / Stap 18
VOIP021_installationguide.fm Page 26 Jeudi, 15. décembre 2005 3:26 15
Seite laden ...
Seite laden ...
Seite laden ...
Seite laden ...
Seite laden ...
Seite laden ...
Seite laden ...
Seite laden ...
Seite laden ...
Seite laden ...
Seite laden ...
Seite laden ...
Seite laden ...
Seite laden ...
Seite laden ...
Seite laden ...
-
 1
1
-
 2
2
-
 3
3
-
 4
4
-
 5
5
-
 6
6
-
 7
7
-
 8
8
-
 9
9
-
 10
10
-
 11
11
-
 12
12
-
 13
13
-
 14
14
-
 15
15
-
 16
16
-
 17
17
-
 18
18
-
 19
19
-
 20
20
-
 21
21
-
 22
22
-
 23
23
-
 24
24
-
 25
25
-
 26
26
-
 27
27
-
 28
28
-
 29
29
-
 30
30
-
 31
31
-
 32
32
-
 33
33
-
 34
34
-
 35
35
-
 36
36
-
 37
37
-
 38
38
-
 39
39
-
 40
40
-
 41
41
-
 42
42
-
 43
43
-
 44
44


Philips VOIP1211S/01 Schnellstartanleitung
- Typ
- Schnellstartanleitung
- Dieses Handbuch ist auch geeignet für
in anderen Sprachen
- English: Philips VOIP1211S/01 Quick start guide
- français: Philips VOIP1211S/01 Guide de démarrage rapide
- Nederlands: Philips VOIP1211S/01 Snelstartgids
Verwandte Papiere
Sonstige Unterlagen
-
USRobotics 9600 USB Internet Phone Benutzerhandbuch
-
 ADS Technologies USBAV-709-EF Software Manual
-
US Robotics USR205630D Bedienungsanleitung
-
HP Deskjet 460 Mobile printer serie Benutzerhandbuch
-
-
-
Brother NC-2200w Kurzanleitung zur Einrichtung
-
HP Deskjet 9800 Printer series Benutzerhandbuch
-
