Ascaso H64 Molino/Grinder Benutzerhandbuch
- Kategorie
- Kaffeemühlen
- Typ
- Benutzerhandbuch

Manual del usuario
User’s manual
Mode d’emploi
Bedienungsanleitung
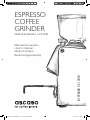
PROFESSIONAL SYSTEM
ESPRESSO
COFFEE
GRINDER
81070680 V2 / 2024
MANUAL - MOLINO H64 - V2_ES_EN_FR_DE.indd 1MANUAL - MOLINO H64 - V2_ES_EN_FR_DE.indd 1 12/01/2024 10:42:0412/01/2024 10:42:04

www.ascaso.com
MANUAL - MOLINO H64 - V2_ES_EN_FR_DE.indd 2MANUAL - MOLINO H64 - V2_ES_EN_FR_DE.indd 2 12/01/2024 10:42:0412/01/2024 10:42:04

1
ascaso
Introducción
Gracias por haber adquirido un producto
ascaso
. Con él podrá obtener el
mejor café espresso y deliciosos cappuccinos.
Su máquina de café ha sido diseñada y construida aplicando las últimas
innovaciones tecnológicas, por lo que el resultado es un producto de alta
calidad, seguro y fiable.
Introduction
Thank you for purchasing an
ascaso
product. This machine makes the best
espresso coffee and delicious cappuccinos.
Your coffee machine has been designed and built using the latest technological
computing and engineering innovations. It is therefore a high-quality, safe and
reliable product.
Introduction
Merci d’avoir acquis un produit
ascaso
. Avec lui vous pourrez obtenir le meilleur
des cafés expresso et de délicieux cappuccinos.
Votre machine à café a été conçue et fabriquée en appliquant les dernières
innovations technologiques, tant en matière d’informatique que d’ingénierie. Le
résultat est donc un produit de premier choix, sûr et fiable.
Einleitung
Wir beglückwünschen Sie zum Kauf dieses
ascaso
-Produkts. Mit diesem
Kaffeeautomaten genießen Sie besten Espresso und feinsten Cappuccino!
Dieser hochzuverlässige Kaffeeautomat wurde unter Anwendung der neuesten
technologischen Erkenntnisse in Informatik und Gerätebau entwickelt und erfüllt
höchste Qualitäts- und Sicherheitsstandards.
MANUAL - MOLINO H64 - V2_ES_EN_FR_DE.indd 1MANUAL - MOLINO H64 - V2_ES_EN_FR_DE.indd 1 12/01/2024 10:42:0412/01/2024 10:42:04

EC DIRECTIVE 2002/96/EC
Reciclaje de su aparato
Las cafeteras pueden contener materiales reciclables.
Contacte con su distribuidor o con el centro de reciclaje de su localidad.
Disposal of your appliance
Old appliances may contain materials which can be reclaimed or recycled.
Please contact your distributor or your local waste collection centre.
Mise au rebut de votre ancien appareil
Les vieux appareils peuvent contenir des matériaux recyclables.
Veuillez contacter votre distributeur ou le centre de recyclage de votre localité.
Entsorgung Ihres Geräts
Altgeräte können Materialien enthalten, die zurückgewonnen bzw. recycelt
werden können.
Bitte kontaktieren Sie zur Entsorgung Ihren Händler oder die örtliche Recycling-
Stelle.
MANUAL - MOLINO H64 - V2_ES_EN_FR_DE.indd 2MANUAL - MOLINO H64 - V2_ES_EN_FR_DE.indd 2 12/01/2024 10:42:0512/01/2024 10:42:05

3
ascaso
ESPAÑOL
Indice
1. Características técnicas
2. Notas importantes acerca de la seguridad
3. Instalación / Puesta en marcha
4. Punto de molienda y su regulación
5. Programación
6. Limpieza
7. Mantenimiento
8. Seguridad
9. Declaración conformidad CE
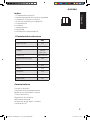
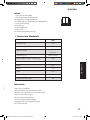
1 Características técnicas
Características
Cuerpo en aluminio
Fresas de acero templado planas
Modelos con dosificador o tobera
Control electrónico
Regulación micrométrica
Molienda profesional
Accesorios “single dose” incluidos
Certificación CE
H64
Potencia (W) 245
Giros/minuto (r.p.m.) 1350/1650
Fresas Planas
ø64 mm
Voltaje (V) 230/120/100
Capacidad tolva (gr.) 300
Dimensiones
Alto 355
Ancho 140
Profundo 215
Peso (Kg.) 7
Ruido (dB) 60
MANUAL - MOLINO H64 - V2_ES_EN_FR_DE.indd 3MANUAL - MOLINO H64 - V2_ES_EN_FR_DE.indd 3 12/01/2024 10:42:0512/01/2024 10:42:05

4
ascaso
ESPAÑOL
2. Notas importantes acerca
de la seguridad
1. Lea íntegramente las instrucciones.
2. No toque superficies muy calientes.
Utilice los mangos o tiradores.
3. Para prevenir incendios, descargas
eléctricas y lesiones a personas, no
sumerja el cable o los enchufes en
agua o en otros líquidos.
4. Es necesaria una estrecha
supervisión en caso de que cualquier
aparato sea utilizado por niños o
cerca de estos.
5. Desenchufe el aparato de la toma
de corriente cuando no lo utilice y
antes limpiarlo. Deje que el aparato
se enfríe antes de incorporar o retirar
piezas y antes de limpiarlo.
6. No utilice ningún aparato que
presente daños en el cable o el
enchufe, o después de un fallo de
funcionamiento del aparato o de que
este haya sufrido cualquier daño. De-
vuelva el aparato al punto de servicio
técnico autorizado más cercano para
su inspección, reparación o ajuste.
7. El uso de accesorios no recomen-
dados por el fabricante del aparato
pude provocar incendios, descargas
eléctricas o lesiones personales.
8. No utilice el aparato al aire libre.
9. No deje el cable colgando del
borde de la mesa o la encimera ni
en contacto con superficies muy
calientes. No deje que el cable esté
en contacto con superficies muy
calientes, incluido el fogón.
10. Si el cable suministrado está
dañado, deberá ser sustituido por
el fabricante, su agente de servicio
técnico o personas con similar cualifi-
cación, a fin de prevenir riesgos.
11. No coloque el aparato encima o
cerca de un quemador de gas o eléc-
trico caliente o en un horno caliente.
12. Conecte siempre primero el
enchufe al aparato y a continua-
ción enchufe el cable a la toma de
corriente. Para desconectarlo, gire el
correspondiente control a la posición
«off» y a continuación desconecte el
enchufe de la toma de corriente.
13. No utilice el aparato para ningún
fin distinto a su uso previsto.
14. Antes de usar el aparato, com-
pruebe que no haya objetos extraños
en la tolva.
15. Evite cualquier contacto con
piezas móviles.
16. Aparatos de mano, excepto los
modelos sin cable: no deje que el ca-
ble esté en contacto con superficies
muy calientes, incluido el fogón.
17. Este aparato no está concebido
para su uso por personas (incluidos
niños) con capacidades físicas,
sensoriales o mentales disminuidas,
ni carentes de experiencia y conoci-
mientos, a no ser que sean estrecha-
mente supervisadas e instruidas en
el uso del aparato por una persona
responsable de su seguridad. Es
necesaria una estrecha supervisión
en caso de que cualquier aparato sea
utilizado por niños o cerca de estos.
Los niños deberían ser supervisados
para asegurarse de que no jueguen
con el aparato.
18. Apague el aparato situando el
control en OFF y a continuación
desenchúfelo de la toma de corriente
cuando no lo esté utilizando, antes de
montar o desmontar piezas y antes
de limpiarlo. Para desenchufar el
aparato de la toma de corriente, tire
del enchufe. Nunca tire del cable de
alimentación.
MANUAL - MOLINO H64 - V2_ES_EN_FR_DE.indd 4MANUAL - MOLINO H64 - V2_ES_EN_FR_DE.indd 4 12/01/2024 10:42:0512/01/2024 10:42:05

5
ascaso
ESPAÑOL
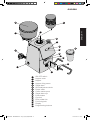
1
2
3
4
5
6
7
8
9
10
11
12
13
14
S
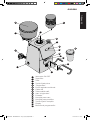
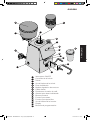
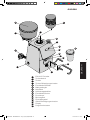
Interruptor ON-OFF
Tapa tolva
Tolva
Tornillo fijador tolva
“Single dose”
Pomo regulador molienda
Cable red
Tobera salida café
Vaso “single dose”
Pulsador
Horquilla para vaso
Horquilla para portafiltro
Tornillo fijación horquilla
Display
Botones de porgramación
34
6
7
8
1
10
11
13
2
12
5
9
14
S2
S1
MANUAL - MOLINO H64 - V2_ES_EN_FR_DE.indd 5MANUAL - MOLINO H64 - V2_ES_EN_FR_DE.indd 5 12/01/2024 10:42:0512/01/2024 10:42:05

6
ascaso
ESPAÑOL
3. Puesta en marcha.
Instalación
El instalador deberá leer atentamente
este manual antes de efectuar la
puesta en marcha del aparato, que
debe ser efectuada por personal
cualificado, y respetando las normas
de seguridad.
El molino debe situarse sobre una
superficie plana, estable y a una
altura adecuada que permita su uso
con comodidad y seguridad y si es
posible lo más cercano a la máquina
de café.
El operador debe ser una persona
adulta y responsable.
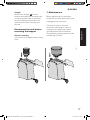
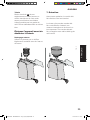
Montaje de la tolva/”single
dose”
Retirar el tornillo
4
de fijación de
la tolva, introducir la tolva haciendo
coincidir los agujeros y volver a poner
el tornillo. (FIG.3)
Instalación eléctrica
Antes de conectar el cable de
alimentación del molino comprobar
que los datos de éste corresponden
con los de la red eléctrica.
Se desaconseja la utilización de
alargadores y conectores múltiples.
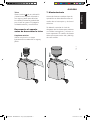
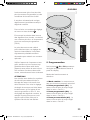
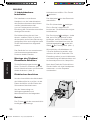
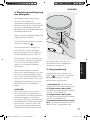
Funcionamiento
Llenar de café la tolva
3
con café en
grano en la cantidad que estimemos
gastar durante la jornada. Poner la
tapa
2
.
Conectar el cable electrico
7
a la
red.
Accionar el interruptor de puesta
en marcha
1
. En este momento
se encenderá el led que éste lleva
incorporado. El molino ya está
preparado para moler.
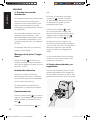
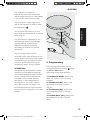
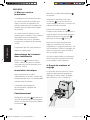
Pulsar sobre pulsador
10
. Cada
vez que quiera café molido, solo
tiene que colocar el portafiltro de su
máquina bajo la salida de café
8
,
guiado por la horquilla
12
. (FIG.1)
Aconsejamos que lo regule a un
tiempo de molienda que equivalga a
7 gr. de café: entre 20 y 25 segundos.
Revisar la regulación que variará
según tipo de café y desgaste de
fresas.
Una vez obtenida su dosis, prensar
el café con un prensa manual, para
preparar su espresso.
4. Punto de molienda y su
regulación
El punto de molienda (más o menos
grueso) dependerá de la calidad de
la mezcla de cafés que se utilice, del
grado de torrefacción, de la humedad
FIG.1
MANUAL - MOLINO H64 - V2_ES_EN_FR_DE.indd 6MANUAL - MOLINO H64 - V2_ES_EN_FR_DE.indd 6 12/01/2024 10:42:0512/01/2024 10:42:05

7
ascaso
ESPAÑOL
del ambiente (cuanto más húmedo, la
molienda debe ser más gruesa) y de
las condiciones de la cafetera.
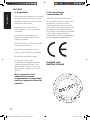
Por ello, es necesario corregir
periódicamente (diario) el grado de
molienda.
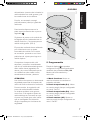
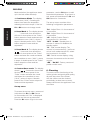
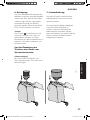
Para hacerlo disponemos en la
parte superior derecha de un pomo
regulador
6
.
Si giramos el pomo en el sentido de
las agujas del reloj obtendremos un
molido más fino, y viceversa para un
molido más grueso. (FIG.2)
El punto de molienda viene calibrado
por el fabricante con un ajuste
intermedio de molido. Por lo tanto
es necesario proceder a una fase
preliminar de ajuste para lograr un
molido óptimo.
Comprobar el aspecto del café
espresso y su sabor, considerando
que de un molido demasiado grueso
salen cafés claros (aguados) sin
aroma y sin crema. Mientras que de
un molido fino salen cafés cortos,
excesivamente fuertes y densos.
ATENCIÓN!
Los molinos incorporan un sistema de
seguridad para evitar el bloqueo del
motor del molino durante la molienda.
Por este motivo, la regulación del
punto de molienda está limitada
en ambos sentidos, tanto grueso
como fino. Si al regular el punto de
molienda llega un momento en que
el pomo no puede girar más, indica
que se ha llegado a la limitación
de giro impuesta por el sistema de
seguridad.
5. Programación
Desde el display
14
se pueden
configurar los siguientes parámetros
mediante los pulsadores S1 y S2.
Modos de funcionamiento y
selección:
1. Modo Continuo: Motor en
marcha mientras se mantiene el
pulsador activado.
2. Dosis temporizado (D1): Motor
en marcha según tiempo configurado
en menú “Set-D1”
3. Dosis temporizado (D2): Motor
en marcha según tiempo configurado
en menú “Set-D2”
4. Dosis custom (dC): Motor en
marcha según tiempo configurado en
menú “Set-dC”
FIG.2
MANUAL - MOLINO H64 - V2_ES_EN_FR_DE.indd 7MANUAL - MOLINO H64 - V2_ES_EN_FR_DE.indd 7 12/01/2024 10:42:0512/01/2024 10:42:05

8
ascaso
ESPAÑOL
Selección modo (cuando se inicia
la máquina mantiene la última
selección):
1. Modo Continuo: el display
muestra “00.0”, cuando se activa el
pulsador pone en marcha el crono
con conteo ascendente, se detiene
al liberar el pulsador, para cambiar el
modo pulsar S1 o S2.
2. Modo Dosis 1: El display muestra
“ ” 3 segundos, a continuación
muestra el tiempo configurado en el
display, activar el modo con una
pulsación corta para iniciar el crono
una cuenta descendente, cuando
llegue al valor “00.0” se detiene. Con
una doble pulsación se detiene la
activación del motor y crono.
3. Modo Dosis 2: El display muestra
“ ” 3 segundos, a continuación
muestra el tiempo configurado en el
display, activar el modo con una
pulsación corta para iniciar el crono
con cuenta descendente, cuando
llegue al valor “00.0” se detiene. Con
una doble pulsación se detiene la
activación del motor y crono.
4. Modo dosisCustom: El display
muestra “ ” 3 segundos, muestra
el tiempo configurado en el display,
activar el modo con una pulsación
corta para iniciar el crono con cuenta
descendente, cuando llegue al valor
“00.0” se detiene. Con una doble
pulsación se detiene la activación del
motor y crono.
Menú Setup
Para acceder al menú Setup se debe
mantener pulsado S1 y S2 durante
3 segundos, a continuación, muestra
“Set” y pasa al primer parámetro de
configuración, pulsado nuevamente
S1 se pasa al siguiente parámetro,
pulsado S2 se edita el parámetro
seleccionado. Para retroceder o salir
hay que dejar de pulsar S1 y S2
durante 3 segundos.
El menú Setup consta de los
siguientes parámetros de
configuración:
“D1“: Regulación tiempo dosis 1 en
0.1seg.
“D2“: Regulación tiempo dosis 2 en
0.1seg.
“dC“: Regulación tiempo
dosisCustom en 0.1seg.
“OFF”-“0..600”: Tiempo de stand-by
en minutos, el valor 0 deshabilita el
stand-by.
“Ct“: Visualización de contador
total. El incremento del contador
se realizará de 1 café en todos los
modos menos en D2 que contabiliza
2 cafés.
“CP“: Visualización de contador
parcial siguiendo el mismo conteo
que el contador total.
“rES” -“On/Off”: Reset de fábrica y
reset contadores parciales.
6. Limpieza
Para garantizar un buen
funcionamiento del molino, así como
una buena calidad del molido, hemos
de realizar una limpieza periódica
(al menos una vez a la semana) de
las partes que están en contacto
con el café. Siempre con el aparato
desconectado de la red eléctrica.
MANUAL - MOLINO H64 - V2_ES_EN_FR_DE.indd 8MANUAL - MOLINO H64 - V2_ES_EN_FR_DE.indd 8 12/01/2024 10:42:0512/01/2024 10:42:05

9
ascaso
ESPAÑOL
Tolva
Sacar la tolva
3
de su ubicación
y lavarla con un paño húmedo o
con agua y jabón para eliminar
los residuos oleosos producidos
por el café en grano. Enjuagarla
cuidadosamente y secarla bien.
Desconecte el aparato
antes de desmontar la tolva
Limpieza exterior
Utilizar un pincel o un trapo
ligeramente humedecido en agua y
jabón.
7. Mantenimiento
Antes de efectuar cualquer tipo de
operación se debe desconectar el
molino de su interruptor y de la red
eléctrica.
Se deberá controlar el nivel de
desgaste de las fresas para obtener
un molido homogéneo, y ofrecer un
buen espresso. El cambio de fresas
debe efectuarse entre 400 y 600 Kg
de café molido.
FIG.3
MANUAL - MOLINO H64 - V2_ES_EN_FR_DE.indd 9MANUAL - MOLINO H64 - V2_ES_EN_FR_DE.indd 9 12/01/2024 10:42:0512/01/2024 10:42:05

10
ascaso
ESPAÑOL
8. Seguridad
Este molino de café deberá ser usado
exclusivamente para lo que ha sido
diseñado: molido de café en grano y
dosificación del mismo.
No permitir que el aparato sea
manipulado por niños o personas
inexpertas.
No intervenir para trabajos de
limpieza o mantenimiento con la
clavija enchufada.
No desconectar el molino tirando del
cable de alimentación.
No manipular el aparato con las
manos o pies mojados o húmedos.
No se debe sumergir en agua.
En caso de avería o mal
funcionamiento apagar el aparato
y desenchufarlo de la red, no se
debe intentar repararlo o intervenir
directamente. Llamar a su servicio
técnico.
El no respetar estas
advertencias puede
comprometer la seguridad
tanto del aparato como del
usuario.
9. Declaración de
conformidad CE
ASCASO FACTORY declaramos
que el producto que se refiere esta
declaración, es conforme a los
requisitos de la Directiva de 14 de
junio 1989 sobre la aproximación de
las leyes de los Estados Miembros
con relación a la maquinaria (89/392/
CEE). Sobre material eléctrico
(73/23/CEE) y sobre compatibilidad
electromagnética (89/396/CEE).
GUARDE LAS
INSTRUCCIONES
MANUAL - MOLINO H64 - V2_ES_EN_FR_DE.indd 10MANUAL - MOLINO H64 - V2_ES_EN_FR_DE.indd 10 12/01/2024 10:42:0512/01/2024 10:42:05

ENGLISH
11
ascaso
Index
1. Technical features
2. Important notes on safety
3. Installation / Start-up
4. Adjusting the grind point
5. Programming
6. Cleaning
7. Maintenance
8. Safety
9. EC Declaration of Conformity
1 Technical features
Features
Aluminium body
Tempered steel flat burrs
Models with dispenser or spout
Digital controls
Micrometric adjustment
Professional grinding
Single dose accessories included
CE marking
H64
Power (W) 245
Revolutions/minute (rpm) 1350/1650
Burrs Flat
ø64 mm
Voltage (V) 230/120/100
Hopper capacity (g) 300
Dimensions
Height 355
Width 140
Depth 215
Weight (kg) 7
Noise (dB) 60
MANUAL - MOLINO H64 - V2_ES_EN_FR_DE.indd 11MANUAL - MOLINO H64 - V2_ES_EN_FR_DE.indd 11 12/01/2024 10:42:0512/01/2024 10:42:05

ENGLISH
12
ascaso
2. Important notes on safety
1. Read all the instructions carefully.
2. Do not touch very hot surfaces.
Use the handles or knobs.
3. To protect against fire, electric
shock and personal injury, do not
immerse the cable or plug in water or
other liquids.
4. Close supervision is necessary
if any appliance is used by or near
children.
5. Unplug the unit from the mains
socket when not in use and before
cleaning. Allow the unit to cool down
before inserting or removing parts and
before cleaning.
6. Do not use any appliance with a
damaged cable or plug, or after the
appliance malfunctions or has been
damaged in any way. Return the
appliance to the nearest authorised
service centre for inspection, repair or
adjustment.
7. The use of accessories not recom-
mended by the appliance manufactur-
er may result in fire, electric shock or
personal injury.
8. Do not use the device outdoors.
9. Do not leave the cable hanging
over the edge of the table or counter-
top, or in contact with very hot sur-
faces. Do not allow the cable to come
into contact with very hot surfaces,
including the hob or stove top.
10. If the cable supplied with the
appliance is damaged, this must
be replaced by the manufacturer,
customer service agent or similarly
qualified person to prevent hazards.
11. Do not place the appliance on or
near a hot gas or electric burner or in
a hot oven.
12. Always connect the plug to the
appliance first, before plugging the
cable into the socket. To disconnect
the appliance, first turn the corres-
ponding control to the "Off" position,
then pull the plug out of the socket.
13. Do not use the appliance for any
purpose other than its intended use.
14. Before using the appliance,
ensure there are no foreign objects in
the hopper.
15. Avoid any contact with moving
parts.
16. Hand-held appliances, except
cordless models: do not allow the
cable to come into contact with very
hot surfaces, including the hob or
stove top.
17. This appliance is not intended
for use by children or persons with
reduced physical, sensory or mental
capabilities or lack of experience and
knowledge, unless they are closely
supervised and instructed in the use
of the appliance by a person respon-
sible for their safety. Close supervision
is necessary if any appliance is used
by or near children. Children should
be supervised to ensure they do not
play with the machine.
18. When not in use, before assem-
bling or disassembling parts, and
before cleaning, turn off the appliance
by turning the control to the “Off”
position, then unplugging it from the
socket. Always handle the plug when
you want to unplug the appliance
from the socket. Never tug on the
power cable.
MANUAL - MOLINO H64 - V2_ES_EN_FR_DE.indd 12MANUAL - MOLINO H64 - V2_ES_EN_FR_DE.indd 12 12/01/2024 10:42:0612/01/2024 10:42:06

ENGLISH
13
ascaso
1
2
3
4
5
6
7
8
9
10
11
12
13
14
S
ON-OFF switch
Hopper cover
Hopper
Hopper fixing screw
Single dose
Grind adjustment knob
Power cable
Coffee outlet spout
Single dose cup
Pulse button
Cup fork
Filter holder fork
Fork fixing bolt
Display
Programming buttons
34
6
7
8
1
10
11
13
2
12
5
9
14
S2
S1
MANUAL - MOLINO H64 - V2_ES_EN_FR_DE.indd 13MANUAL - MOLINO H64 - V2_ES_EN_FR_DE.indd 13 12/01/2024 10:42:0612/01/2024 10:42:06

ENGLISH
14
ascaso
3. Start-up. Installation
The installer must read this manual
carefully before starting up the
appliance, which must be carried out
by qualified personnel in compliance
with safety regulations.
The coffee grinder should be placed
on a flat, stable surface, at a suitable
height to enable it to be operated
comfortably and safely and as close
as possible to the coffee machine.
The operator should be a responsible
adult.
Hopper/single dose
assembly
Remove the hopper fixing screw
4
,
then insert the hopper by matching
up the holes and replacing the screw.
(Fig. 3)
Electrical installation
Before connecting the power cable,
check that the voltage indicated
in the coffee grinder’s technical
specifications corresponds to your
mains installation.
The use of extension cords and
multiple connectors is discouraged.
Operation
Fill the hopper
3
with the amount of
coffee beans you estimate you will
need during the day. Put the lid on
2
.
Connect the power cable
7
to the
mains.
Press the “ON-OFF” switch to turn
the appliance on.
1
. The built-in LED
will light up. The grinder is now ready
to grind.
Click on the “Pulse” button
10
. Every
time you want ground coffee, just
place the filter holder under the coffee
outlet
8
, guided by the fork
12
.
(Fig. 1)
We recommend you adjust the coffee
grinder to a grinding time equivalent to
7 grams of coffee, that is, between 20
and 25 seconds. Check the grind point
periodically, which will vary according
to the type of coffee and burr wear.
Once you have obtained your dose,
tamp the coffee with a coffee tamper
to prepare your espresso.
4. Adjusting the grind point
The grind point, whether more or less
coarse, will depend on the quality
of the blend of coffees used, the
degree of roasting, the humidity of
the environment (the more humid, the
coarser the grind), and the conditions
of the coffee machine.
Fig. 1
MANUAL - MOLINO H64 - V2_ES_EN_FR_DE.indd 14MANUAL - MOLINO H64 - V2_ES_EN_FR_DE.indd 14 12/01/2024 10:42:0612/01/2024 10:42:06

ENGLISH
15
ascaso
This makes it necessary to
periodically correct the check and
adjust the grind point, on a daily basis
if you use the machine every day.
The knob on the upper right-hand
side of the machine is used to make
the adjustment
6
.
Turn the knob clockwise for a finer
grind, and anti-clockwise for a coarser
grind. (Fig. 2)
The grind point is calibrated by the
manufacturer with an intermediate
grinding setting. A preliminary
adjustment phase is therefore
necessary to achieve the optimal
grind point.
Check the appearance of the
espresso coffee and its flavour. A too
coarse grind will produce clear, watery
coffees lacking in aroma and cream.
A too fine grind will produce short,
excessively dense, strong coffees.
ATTENTION!
The appliance incorporates a safety
system to protect against blocking
of the motor during grinding. For this
reason, the grind point adjustment
is limited in both coarse and fine
directions. If, when adjusting the
grinding point, you reach a point
when the knob can no longer turn,
this indicates that you have reached
the turning limit imposed by the safety
system.
5. Programming
The following parameters can be
configured from the display
14
using
the S1 and S2 buttons.
Operating modes and selection:
1. Continuous Mode: Motor runs
while the “Pulse” button is being
pressed.
2. Timed Dose (D1): Motor runs
according to time set in menu
"Set-D1”.
3. Timed Dose (D2): Motor runs
according to time set in "Set-D2”
menu.
4. Custom Dose (dC): Motor runs
according to time set in "Set-dC"
menu.
Fig. 2
MANUAL - MOLINO H64 - V2_ES_EN_FR_DE.indd 15MANUAL - MOLINO H64 - V2_ES_EN_FR_DE.indd 15 12/01/2024 10:42:0612/01/2024 10:42:06

ENGLISH
16
ascaso
Mode selection (the appliance starts
up in the last mode selected):
1. Continuous Mode: The display
shows zero (“00.0”). Pressing the
button then starts the stopwatch;
releasing the button stops it. Use the
S1 or S2 buttons to change mode.
2. Dose Mode 1: The display shows
“ ” 3 seconds, then shows the
time set. A short press of the “Pulse”
button starts the mode and starts the
countdown to zero (“00.0”), where it
stops. A double press of the “Pulse”
button stops the motor and the
stopwatch.
3. Dose Mode 2: The display shows
“ ” 3 seconds, then shows the
time set. A short press of the “Pulse”
button activates the mode and starts
the countdown to zero (“00.0”), where
it stops. A double press of the “Pulse”
button stops the motor and the
stopwatch.
4. Custom Dose mode: The display
shows “ ” 3 seconds, then shows
the time set. A short press of the
“Pulse” button activates the mode
and starts the countdown to zero
(“00.0”), where it stops. A double
press of the “Pulse” button stops the
motor and the stopwatch.
Set-up menu
To access the set-up menu, press and
hold down the S1 and S2 buttons
for 3 seconds until “Set” is displayed
to enter the first set-up parameter.
Press the S1 button to go to the next
parameter; use the S2 button to edit
the selected parameter. To go back or
exit, press and hold down the S1 and
S2 buttons for 3 seconds.
The set-up menu consists of the
following configuration parameters:
“D1“: Adjust Dose 1 in increments of
0.1 seconds.
“D2“: Adjust Dose 2 in increments of
0.1 seconds.
“dC“: Adjust Custom Dose in
increments of 0.1 seconds.
“OFF”-”0..600”: Standby time in
minutes. A value of 0 disables the
standby option.
“Ct“: Total counter display. The
counter is incremented by 1 coffee at
a time in all modes except D2, where
the increment is 2 coffees.
“CP“: Partial counter display, using
the same increments as for the total
counter.
“rES” -”On/Off”: Factory reset and
partial counter reset.
6. Cleaning
To ensure correct functioning of the
coffee grinder and good grind quality,
all parts that come into contact
with the coffee must be cleaned
periodically (at least once a week).
Always disconnect the appliance from
the mains.
MANUAL - MOLINO H64 - V2_ES_EN_FR_DE.indd 16MANUAL - MOLINO H64 - V2_ES_EN_FR_DE.indd 16 12/01/2024 10:42:0612/01/2024 10:42:06

ENGLISH
17
ascaso
Hopper
Remove the hopper
3
from its
location and wash with a damp cloth
or with soap and water to eliminate
the oily residues left behind by the
coffee beans. Rinse carefully and
dry well.
Disconnect the unit before
removing the hopper.
Exterior cleaning
Use a brush or a slightly damp, soapy
cloth.
7. Maintenance
Before performing any operation,
the grinder must be switched off and
unplugged from the mains.
The level of wear of the burrs
should be monitored to ensure a
homogeneous grind that yields a
good espresso. Burrs should be
changed after grinding between 400
and 600 kg of coffee.
Fig. 3
MANUAL - MOLINO H64 - V2_ES_EN_FR_DE.indd 17MANUAL - MOLINO H64 - V2_ES_EN_FR_DE.indd 17 12/01/2024 10:42:0612/01/2024 10:42:06

ENGLISH
18
ascaso
8. Safety
This coffee grinder should be used
exclusively for its intended purpose:
grinding and dosing coffee beans.
Do not allow the appliance to be
operated by children or inexperienced
adults.
Do not carry out cleaning or
maintenance while the appliance is
plugged in.
Do not disconnect the coffee grinder
by tugging on the power cable.
Do not handle the appliance with wet
hands or feet.
Do not immerse the appliance in
water.
In the event of incorrect performance
or malfunction, switch the machine off
and unplug it. Do not attempt to repair
it yourself. Call a service technician.
Ignoring these warnings
can jeopardise the safety of
both the machine and the
user.
9. EC Declaration of
Conformity
ASCASO FACTORY declares that
the product to which this declaration
refers conforms to the requirements
of EU Council Directive 89/392/EEC of
14 June 1989 on the approximation of
the laws of the Member States relating
to machinery, Directive 73/23/EEC
on electrical equipment and Directive
89/396/EEC on electromagnetic
compatibility.
KEEP THESE
INSTRUCTIONS IN A SAFE
PLACE
MANUAL - MOLINO H64 - V2_ES_EN_FR_DE.indd 18MANUAL - MOLINO H64 - V2_ES_EN_FR_DE.indd 18 12/01/2024 10:42:0612/01/2024 10:42:06
Seite wird geladen ...
Seite wird geladen ...
Seite wird geladen ...
Seite wird geladen ...
Seite wird geladen ...
Seite wird geladen ...
Seite wird geladen ...
Seite wird geladen ...
Seite wird geladen ...
Seite wird geladen ...
Seite wird geladen ...
Seite wird geladen ...
Seite wird geladen ...
Seite wird geladen ...
Seite wird geladen ...
Seite wird geladen ...
Seite wird geladen ...
Seite wird geladen ...
-
 1
1
-
 2
2
-
 3
3
-
 4
4
-
 5
5
-
 6
6
-
 7
7
-
 8
8
-
 9
9
-
 10
10
-
 11
11
-
 12
12
-
 13
13
-
 14
14
-
 15
15
-
 16
16
-
 17
17
-
 18
18
-
 19
19
-
 20
20
-
 21
21
-
 22
22
-
 23
23
-
 24
24
-
 25
25
-
 26
26
-
 27
27
-
 28
28
-
 29
29
-
 30
30
-
 31
31
-
 32
32
-
 33
33
-
 34
34
-
 35
35
-
 36
36
-
 37
37
-
 38
38


Ascaso H64 Molino/Grinder Benutzerhandbuch
- Kategorie
- Kaffeemühlen
- Typ
- Benutzerhandbuch