Parkside PMB 1100 A1 Bedienungsanleitung
- Kategorie
- Elektrowerkzeuge
- Typ
- Bedienungsanleitung

METAL CUTTING BANDSAW PMB 1100 A1
METAL CUTTING BANDSAW
Translation of the original instructions
METALLBANDSÄGE
Originalbetriebsanleitung
IAN 322848_1901

GB / IE / NI Translation of the original instructions Page 1
DE / AT / CH Originalbetriebsanleitung Seite 11
Before reading, unfold the page containing the illustrations and familiarise yourself with all functions of
the device.
Klappen Sie vor dem Lesen die Seite mit den Abbildungen aus und machen Sie sich anschließend mit allen
Funktionen des Gerätes vertraut.

A
B

C
D
E
15a

PMB 1100 A1
GB
│
IE
│
NI
│
1 ■
Contents
Introduction ......................................................2
Intended use ................................................................ 2
Features ................................................................... 2
Package contents ............................................................ 2
Technical specifications ....................................................... 2
General power tool safety warnings .................................3
1. Work area safety .......................................................... 3
2. Electrical safety ........................................................... 3
3. Personal safety ............................................................ 4
4. Power tool use and care .................................................... 4
5. Service .................................................................. 5
Additional safety instructions for band saws ....................................... 5
Original accessories/auxiliary equipment ......................................... 5
Before use .......................................................5
Assembly .................................................................. 5
Making settings ............................................................. 6
Changing the saw blade ...................................................... 6
Use .............................................................7
Switching the appliance on and off .............................................. 7
Switching the work lamp on and off .............................................. 7
Setting rotational speed ....................................................... 7
Working procedures .......................................................... 7
Cleaning and maintenance .........................................7
Disposal .........................................................8
Kompernass Handels GmbH warranty ...............................8
Service ..........................................................9
Importer ................................................................... 9
Translation of the original Conformity Declaration .....................10

PMB 1100 A1
■ 2
│
GB
│
IE
│
NI
METAL CUTTING BANDSAW
PMB 1100 A1
Introduction
Congratulations on the purchase of your new appli-
ance. You have chosen a high-quality product.
The operating instructions are a part of this product.
They contain important information about safety,
usage and disposal. Before using the product,
please familiarise yourself with all of the operating
and safety instructions. Use the product only as de-
scribed and for the range of applications specified.
Please also pass these operating instructions on to
any future owner.
Intended use
The appliance is primarily intended for sawing
metal pipes or profiles.
Any other usage or modification of the appliance
is deemed to be improper and carries a significant
risk of accidents.
The appliance should not be used for industrial
purposes.
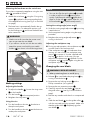
Features
Light switch
Speed setting wheel
On/Off switch
Workpiece stop
Workpiece stop screws
Small hex key
Saw blade
Saw blade clamping lever
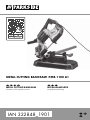
Figure A:
Handle
Wing screw on handle
Protective covers
Locking screws
Figure B:
Rubber wheels
Guide rollers
Figure C:
Handle on the vice
15a
Quick release
Vice
Short wing screws
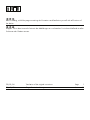
Figure D:
Cutting angle adjustment
Long wing screw
Screw for the cutting angle adjustment
Locking pin
Swivel arm
Figure E:
Work lamp
Saw table
Package contents
1 metal cutting bandsaw
1 saw table
4 large wing screws
4 small wing screws
1 hex key (small)
1 hex key (large)
1 set of operating instructions
Technical specifications
Rated voltage: 230 V ∼, 50 Hz
(AC)
Rated power
consumption: 1100 W
Cutting width at 90°: 127 mm x 127 mm
(without saw table)
Cutting width at 45°: 127 mm x 40 mm
(without saw table)
Rated idle speed: n
0
0–290 rpm
Saw band speed: 0–2.4 m/s
Inclined cuts: 0°–45°
Protection class: II /
(double insulation)
Noise emission value:
Noise measurement value determined in accordance
with EN 60745. The A-rated noise level of the power
tool is typically:
Sound pressure level: L
PA
= 90.7 dB (A)
Uncertainty K: K
PA
= 3 dB
Sound power level: L
WA
= 101.7 dB (A)
Uncertainty K: K
WA
= 3 dB

PMB 1100 A1
GB
│
IE
│
NI
│
3 ■
Wear ear muffs!
Read the operating instructions be-
fore use.
Total vibration value:
(vector total of three directions) determined in ac-
cordance with EN 60745:
Sawing metal: a
h,CM
= 6.94 m/s
2
Uncertainty K = 1.5 m/s
2
Sawing wood: a
h,CW
= 6.25 m/s
2
Uncertainty K = 1.5 m/s
2
NOTE
► The vibration emission values and the noise
emission values given in these instructions
have been measured in accordance with
a standardised test procedure and can be
used for comparison of the power tool with
another tool.
► The specified total vibration values and the
noise emission values can also be used to
make a provisional load estimate.
WARNING!
► Depending on the manner in which the power
tool is being used, and in particular the kind
of workpiece being worked, the vibration and
noise emission values can deviate from the
values given in these instructions during actual
use of the power tool.
► Try to keep the vibration loads as low as
possible. Measures to reduce the vibration
load are, e.g. wearing gloves and limiting the
working time. Wherein all states of operation
must be included (e.g. times when the power
tool is switched off and times where the power
tool is switched on but running without load).
General power tool safe-
ty warnings
WARNING!
► Read all safety warnings and all instructions.
Failure to follow the warnings and instructions
may result in electric shock, fire and/or serious
injury.
Save all warnings and instructions for future
reference.
The term "power tool" in the warnings refers to your
mains-operated (corded) power tool or battery-
operated (cordless) power tool.
1. Work area safety
a) Keep work area clean and well lit.
Cluttered or dark areas invite accidents.
b) Do not operate power tools in explosive atmos-
pheres, such as in the presence of flammable
liquids, gases or dust. Power tools create sparks
which may ignite the dust or fumes.
c) Keep children and bystanders away while
operating a power tool. Distractions can cause
you to lose control.
2. Electrical safety
a) Power tool plugs must match the outlet.
Never modify the plug in any way.
Do not use any adapter plugs with earthed
(grounded) power tools. Unmodified plugs
and matching outlets will reduce risk of electric
shock.
b) Avoid body contact with earthed or grounded
surfaces, such as pipes, radiators, ranges and
refrigerators. There is an increased risk of elec-
tric shock if your body is earthed or grounded.

PMB 1100 A1
■ 4
│
GB
│
IE
│
NI
c) Do not expose power tools to rain or wet
conditions. Water entering a power tool will
increase the risk of electric shock.
d) Do not abuse the cord. Never use the cord
for carrying, pulling or unplugging the power
tool. Keep cord away from heat, oil, sharp
edges or moving parts. Damaged or entangled
cords increase the risk of electric shock.
e) When operating a power tool outdoors, use
an extension cord suitable for outdoor use.
Use of a cord suitable for outdoor use reduces
the risk of electric shock.
f) If operating a power tool in a damp location
is unavoidable, use a residual current device
(RCD) protected supply. Use of an RCD re-
duces the risk of electric shock.
3. Personal safety
a) Stay alert, watch what you are doing and
use common sense when operating a power
tool. Do not use a power tool while you are
tired or under the influence of drugs, alcohol
or medication. A moment of inattention while
operating power tools may result in serious
personal injury.
b) Use personal protective equipment. Always
wear eye protection. Protective equipment such
as dust mask, non-skid safety shoes, hard hat,
or hearing protection used for appropriate
conditions will reduce personal injuries.
c) Prevent unintentional starting. Ensure the
switch is in the off-position before connecting
to power source and/or battery pack, picking
up or carrying the tool. Carrying power tools
with your finger on the switch or energising power
tools that have the switch on invites accidents.
d) Remove any adjusting key or wrench before
turning the power tool on. A wrench or a key
left attached to a rotating part of the power tool
may result in personal injury.
e) Do not overreach. Keep proper footing and
balance at all times. This enables better control
of the power tool in unexpected situations.
f) Dress properly. Do not wear loose clothing or
jewellery. Keep your hair, clothing and gloves
away from moving parts. Loose clothes, jewel-
lery or long hair can be caught in moving parts.
g) If devices are provided for the connection of
dust extraction and collection facilities, ensure
these are connected and properly used. Use of
dust collection can reduce dust-related hazards.
4. Power tool use and care
a) Do not force the power tool. Use the correct
power tool for your application. The correct
power tool will do the job better and safer at
the rate for which it was designed.
b) Do not use the power tool if the switch does
not turn it on and off. Any power tool that can-
not be controlled with the switch is dangerous
and must be repaired.
c) Disconnect the plug from the power source
and/or the battery pack from the power tool
before making any adjustments, changing
accessories, or storing power tools. Such
preventive safety measures reduce the risk of
starting the power tool accidentally.
d) Store idle power tools out of the reach of
children and do not allow persons unfamiliar
with the power tool or these instructions to
operate the power tool. Power tools are
dangerous in the hands of untrained users.
e) Maintain power tools. Check for misalignment
or binding of moving parts, breakage of parts
and any other condition that may affect the
power tool’s operation. If damaged, have the
power tool repaired before use. Many acci-
dents are caused by poorly maintained power
tools.
f) Keep cutting tools sharp and clean. Properly
maintained cutting tools with sharp cutting edges
are less likely to bind and are easier to control.
g) Use the power tool, accessories and tool bits,
etc., in accordance with these instructions,
taking into account the working conditions
and the work to be performed. Use of the
power tool for operations different from those
intended could result in a hazardous situation.

PMB 1100 A1
GB
│
IE
│
NI
│
5 ■
5. Service
a) Have your power tool serviced by a qualified
repair person using only identical replace-
ment parts. This will ensure that the safety of
the power tool is maintained.
Additional safety instructions for
band saws
■ Hold the appliance by the insulated grip-
ping surfaces when performing work
where the cutting tool may come into con-
tact with hidden cables or its connecting
cable. If the cutting tool comes into contact with
a live wire, this may make exposed metal parts
of the power tool live and could give the opera-
tor an electric shock.
■ Keep your hands out of the sawing area and
away from the saw blade.
■ Always make sure that the portable band saw is
clean before use.
■ Always stop working immediately if you notice
anything unusual.
■ Before using the tool, always ensure that all
components are properly and safely assem-
bled.
■ Always be careful when attaching or removing
the band saw blade.
■ Always keep your hands away from the cutting
path of the band saw blade.
■ Always wait until the motor has reached full
speed before sawing.
■ Keep the handles dry, clean and free from oil
and grease. Hold the tool firmly while working.
■ Always be vigilant, especially during repetitive,
monotonous operations. Always make sure that
your hands are in the correct position in relation
to the saw blade.
■ Never remove the workpiece stop.
■ Keep away from end pieces that fall down after
sawing. They can be hot, sharp and/or heavy.
This could result in serious injury.
■ Ventilation openings often cover moving parts and
should be kept free. Loose clothing, jewellery or
long hair can get caught in the moving parts.
WARNING!
► The power tool creates an electromagnetic
field during operation. This field can, in cer-
tain circumstances, impair active or passive
medical implants. To reduce the risk of serious
or fatal injury, we recommend that individuals
with medical implants consult their physician
and the manufacturer of the medical implant
before operating the power tool.
Original accessories/auxiliary
equipment
Only use the accessories and additional equip-
ment that are specified in the operating instruc-
tions and compatible with the appliance.
Before use
WARNING! RISK OF INJURY!
Always remove the power plug from
the wall socket before carrying out any
work on the appliance.
Assembly
Mounting the vice
♦ Fasten the vice
in the corresponding holes
on the back of the saw table using the 4 short
wing screws supplied (see fig. C on the fold-
out page).
Mounting the cutting angle adjustment on the
saw table
♦ Completely unscrew the screw
from the
cutting angle adjustment . Insert the screw
through the angle recess on the saw table
from below and retighten it using the cutting
angle adjustment (see fig. D on the fold-out
page).
♦ Use a long wing screw
to fasten the swivel
arm through the other hole on the saw table
(see fig. D on the fold-out page).

PMB 1100 A1
■ 6
│
GB
│
IE
│
NI
Mounting the band saw on the swivel arm
If you plan to operate the appliance using the saw
table
, proceed as follows:
♦ Attach the swivel arm
using the 3 long wing
screws
supplied in the corresponding holes
of the appliance housing (see fig. E on the fold-
out page).
♦ The band saw is automatically fixed in the up-
permost position. To release the position, pull
out the locking pin
and lower the band saw
at the same time.
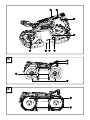
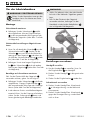
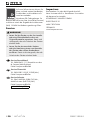
WARNING!
► Make sure at all times that the power cord
can not get near the saw blade.
► If you want to use the unit with the saw table,
attach the power cord with the two cable
holders
A
, as shown in the following picture:
A
Making settings
Adjusting the handle
♦ To adjust the handle
, loosen the wing screw
on the handle.
♦ Turn the handle
to the required position.
♦ Retighten the wing screw
.
Using the vice
♦ Turn the handle on the vice
clockwise to
clamp the workpiece.
♦ Turn the handle on the vice
anticlockwise to
unclamp the workpiece.
NOTE
► You can also flip the quick release
15a
upwards
in order to adjust the vice setting more
quickly. Fold the quick release
15a
back down
again to fix the vice
in place. After this, use
the vice handle to make fine adjustments.
Setting the cutting angle (mitre angle)
♦ Undo the cutting angle adjustment
by turning
it anticlockwise.
♦ Set the required cutting angle using the angle
provided.
♦ Retighten the cutting angle adjustment
by
turning it clockwise.
Adjusting the workpiece stop
■ During normal operation, the workpiece stop
must be fixed in the lowest position.
♦ If the workpiece stop
is a hindrance when
sawing, you can use the two workpiece stop
screws
to remove it. Use the supplied small
hex key
to do this. In this way, you can
adjust the workpiece stop
upwards. Fix the
workpiece stop
in place again using the two
workpiece stop screws
.
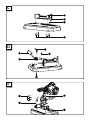
Changing the saw blade
WARNING! RISK OF INJURY!
► Wear protective gloves to avoid injury.
♦ Release
the saw blade clamping lever
by
turning it anticlockwise .
♦ Remove the two locking screws
with a
Phillips screwdriver (not supplied).
♦ Remove the two protective covers .
♦ Carefully remove the saw blade
. Start at
the guide rollers (see fig. B on the fold-out
page).
♦ Remove any sawdust with a brush or compressed
air.
♦ Slide the saw blade
into the guide rollers
with the saw teeth pointing upwards. Make sure
that the guide rollers completely grip the
saw blade .

PMB 1100 A1
GB
│
IE
│
NI
│
7 ■
NOTE
► Make sure that the direction arrow on the
saw blade
(if any) is the same as the one
on the rubber wheels
.
♦ Insert the saw blade around the two rubber
wheels.
♦ Retighten the saw blade clamping lever by
turning it clockwise
again.
♦ Replace the two protective covers
.
WARNING! RISK OF INJURY!
► Only operate the appliance with the
protective covers fitted
!
♦ Perform a test run by briefly switching the ap-
pliance on and off a few times to determine
whether the saw blade is correctly seated.
WARNING! RISK OF INJURY!
► Keep your body away from the sawing
area during the test run!
Use
Switching the appliance on and off
Switching on:
♦ Hold down the On/Off switch
.
Switching off:
♦ Release the On/Off switch
.
Switching the work lamp on and off
Switching on:
♦ Move the light switch
to position I.
The work lamp lights up.
Switching off:
♦ Move the light switch
to position 0.
The work lamp goes out.
Setting rotational speed
♦ Adjust the speed setting wheel to a position
between 1 and 6.
Working procedures
♦ Secure the workpiece against slipping, e.g. with
the vice
of the saw table.
♦ Use the weight of the saw when sawing.
Do not exert any additional pressure.
♦ Wait until the saw has reached its full speed
before carefully bringing it into contact with the
workpiece.
♦ If the saw blade
blocks, switch off the appli-
ance immediately.
♦ Do not twist the saw blade
while making
the cut.
WARNING! RISK OF INJURY!
► Do not remove the workpiece until the saw
has come to a standstill.
Cleaning and maintenance
WARNING! RISK OF INJURY!
► Always remove the power plug from the
wall socket before carrying out any work
on the appliance.
■ Store the appliance and the saw blades in a
dry and dust-free location.
■ The appliance must always be clean and free
of oil or grease.
■ Use a soft, dry cloth to clean the housing.
■ The carbon brushes should only be replaced
by the service centre or an authorised specialist
workshop.
■ Never obstruct the ventilation openings.
■ Remove any adhering sawdust with a brush.
NOTE
► Replacement parts not listed (such as carbon
brushes, switch) can be ordered via our
service hotline.

PMB 1100 A1
■ 8
│
GB
│
IE
│
NI
Disposal
The packaging is made from environmen-
tally friendly material and can be dis-
posed of at your local recycling plant.
Do not dispose of power tools in
your normal household waste!
European Directive 2012/19/EU requires that
worn-out power tools are collected separately and
recycled in an environmentally compatible manner.
Dispose of the packaging in an en-
vironmentally friendly manner.
Note the labelling on the packaging
and separate the packaging material
components for disposal if necessary.
The packaging material is labelled
with abbreviations (a) and numbers
(b) with the following meanings:
1–7: plastics,
20–22: paper and cardboard,
80–98: composites
Your local community or municipal
authorities can provide information
on how to dispose of the worn-out
product.
Kompernass Handels GmbH
warranty
Dear Customer,
This appliance has a 3-year warranty valid from
the date of purchase. If this product has any faults,
you, the buyer, have certain statutory rights. Your
statutory rights are not restricted in any way by the
warranty described below.
Warranty conditions
The warranty period starts on the date of purchase.
Please keep your receipt in a safe place. This will
be required as proof of purchase.
If any material or manufacturing fault occurs within
three years of the date of purchase of the product,
we will either repair or replace the product for you
or refund the purchase price (at our discretion).
This warranty service requires that you present the
defective appliance and the proof of purchase (re-
ceipt) within the three-year warranty period, along
with a brief written description of the fault and of
when it occurred.
If the defect is covered by the warranty, your prod-
uct will either be repaired or replaced by us. The
repair or replacement of a product does not signify
the beginning of a new warranty period.
Warranty period and statutory claims for
defects
The warranty period is not prolonged by repairs
effected under the warranty. This also applies to
replaced and repaired components. Any damage
and defects present at the time of purchase must
be reported immediately after unpacking. Repairs
carried out after expiry of the warranty period shall
be subject to a fee.
Scope of the warranty
This appliance has been manufactured in accord-
ance with strict quality guidelines and inspected
meticulously prior to delivery.
The warranty covers material faults or production
faults. The warranty does not extend to product parts
subject to normal wear and tear or to fragile parts
which could be considered as consumable parts
such as switches, batteries or parts made of glass.

PMB 1100 A1
GB
│
IE
│
NI
│
9 ■
The warranty does not apply if the product has
been damaged, improperly used or improper-
ly maintained. The directions in the operating
instructions for the product regarding proper use
of the product are to be strictly followed. Uses
and actions that are discouraged in the operating
instructions or which are warned against must be
avoided.
This product is intended solely for private use and
not for commercial purposes. The warranty shall
be deemed void in cases of misuse or improper
handling, use of force and modifications / repairs
which have not been carried out by one of our
authorised Service centres.
Warranty claim procedure
To ensure quick processing of your case, please
observe the following instructions:
■ Please have the till receipt and the item number
(e.g.IAN12345) available as proof of purchase.
■ You will find the item number on the type plate
on the product, an engraving on the product,
on the front page of the operating instructions
(below left) or on the sticker on the rear or
bottom of the product.
■ If functional or other defects occur, please
contact the service department listed either by
telephone or by e-mail.
■ You can return a defective product to us free of
charge to the service address that will be pro-
vided to you. Ensure that you enclose the proof
of purchase (till receipt) and information about
what the defect is and when it occurred.
You can download these instructions
along with many other manuals,
product videos and installation
software at www.lidl-service.com.
This QR code will take you directly
to the Lidl service page (www.lidl-service.com)
where you can open your operating instructions by
entering the item number (IAN) 123456.
Service
WARNING!
► Have the appliances repaired by the Service
Centre or a qualified electrician and only
using genuine replacement parts. This will
ensure that the safety of the appliance is
maintained.
► Always ensure that the power plug and
power cord are replaced only by the manu-
facturer of the appliance or its customer
service. This will ensure that the safety of the
appliance is maintained.
Service Great Britain
Tel.: 0800 404 7657
E-Mail: [email protected]
Service Ireland
Tel.: 1890 930 034
(0,08 EUR/Min., (peak))
(0,06 EUR/Min., (off peak))
E-Mail: [email protected]
IAN 322848_1901
Importer
Please note that the following address is not the
service address. Please use the service address
provided in the operating instructions.
KOMPERNASS HANDELS GMBH
BURGSTRASSE 21
44867 BOCHUM
GERMANY
www.kompernass.com

PMB 1100 A1
■ 10
│
GB
│
IE
│
NI
Translation of the original Conformity Declaration
We, KOMPERNASS HANDELS GMBH, document officer: Mr Semi Uguzlu, BURGSTR. 21,
44867 BOCHUM, GERMANY, hereby declare that this product complies with the following
standards, normative documents and EC directives:
Machinery Directive
(2006/42/EC)
Electromagnetic Compatibility
(2014/30/EU)
RoHS Directive
(2011/65/EU)*
* The manufacturer bears the full responsibility for compliance with this conformity declaration.
The object of the declaration described above complies with the requirements of the Directive
2011/65/EU of the European Parliament and Council of 8 June 2011 on the limitations of
use of certain dangerous substances in electrical and electronic appliances.
Applied harmonised standards:
EN 60745-1:2009 + A11:2010
EN 60745-2-20:2009
EN 55014-1:2017
EN 55014-2:2015
EN 61000-3-2:2014
EN 61000-3-3:2013
EN 50581:2012
Type/appliance designation: Metal cutting bandsaw PMB 1100 A1
Year of manufacture: 05 - 2019
Serial number: IAN 322848_1901
Bochum, 04/06/2019
Semi Uguzlu
- Quality Manager -
We reserve the right to make technical changes in the context of further product development.

PMB 1100 A1
DE
│
AT
│
CH
│
11 ■
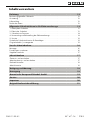
Inhaltsverzeichnis
Einleitung .......................................................12
Bestimmungsgemäßer Gebrauch ...............................................12
Ausstattung ................................................................12
Lieferumfang ...............................................................12
Technische Daten ...........................................................12
Allgemeine Sicherheitshinweise für Elektrowerkzeuge ..................13
1. Arbeitsplatz-Sicherheit ..................................................... 13
2. Elektrische Sicherheit ...................................................... 13
3. Sicherheit von Personen ....................................................14
4. Verwendung und Behandlung des Elektrowerkzeugs ............................. 14
5. Service .................................................................15
Zusätzliche Sicherheitshinweise für Bandsägen ....................................15
Originalzubehör / -zusatzgeräte ............................................... 15
Vor der Inbetriebnahme ..........................................16
Montage ................................................................. 16
Einstellungen vornehmen ..................................................... 16
Sägeblatt wechseln .........................................................17
Inbetriebnahme .................................................17
Gerät ein- und ausschalten ....................................................17
Arbeitsleuchte ein- und ausschalten ............................................. 17
Drehzahl einstellen .......................................................... 18
Arbeitshinweise. . . . . . . . . . . . . . . . . . . . . . . . . . . . . . . . . . . . . . . . . . . . . . . . . . . . . . . . . . . . . 18
Reinigung und Wartung ...........................................18
Entsorgung .....................................................18
Garantie der Kompernaß Handels GmbH ............................19
Service .........................................................20
Importeur ......................................................20
Original-Konformitätserklärung ....................................21

PMB 1100 A1
■ 12
│
DE
│
AT
│
CH
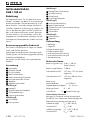
METALLBANDSÄGE
PMB 1100 A1
Einleitung
Wir beglückwünschen Sie zum Kauf Ihres neuen
Gerätes. Sie haben sich damit für ein hochwertiges
Produkt entschieden. Die Betriebsanleitung ist Teil
dieses Produkts. Sie enthält wichtige Hinweise für
Sicherheit, Gebrauch und Entsorgung. Machen Sie
sich vor der Benutzung des Produkts mit allen Be-
dien- und Sicherheitshinweisen vertraut. Benutzen
Sie das Produkt nur wie beschrieben und für die
angegebenen Einsatzbereiche. Händigen Sie alle
Unterlagen bei Weitergabe des Produkts an Dritte
mit aus.
Bestimmungsgemäßer Gebrauch
Das Gerät ist vornehmlich zum Sägen von Metall-
rohren oder Profilen bestimmt.
Jede andere Verwendung oder Veränderung des
Gerätes gilt als nicht bestimmungsgemäß und birgt
erhebliche Unfallgefahren.
Verwenden Sie das Gerät nicht zu gewerblichen
Zwecken.
Ausstattung
Lichtschalter
Drehzahl-Stellrad
Ein-/Ausschalter
Werkstückanschlag
Werkstückanschlag-Schrauben
Innensechskantschlüssel klein
Sägeblatt
Sägeblatt-Spannhebel
Abbildung A:
Handgriff
Flügelschraube am Handgriff
Schutzabdeckungen
Sicherungsschrauben
Abbildung B:
Gummiräder
Führungsrollen
Abbildung C:
Handgriff am Schraubstock
15a
Schnellverstellung
Schraubstock
kurze Flügelschrauben
Abbildung D:
Schnittwinkelverstellung
lange Flügelschraube
Schraube von der Schnittwinkelverstellung
Sicherungsstift
Schwenkarm
Abbildung E:
Arbeitsleuchte
Sägetisch
Lieferumfang
1 Bandsäge
1 Sägetisch
4 Flügelschrauben groß
4 Flügelschrauben klein
1 Innensechskantschlüssel klein
1 Innensechskantschlüssel groß
1 Betriebsanleitung
Technische Daten
Bemessungsspannung: 230 V ∼, 50 Hz
(Wechselstrom)
Bemessungsaufnahme: 1100 W
Schnittbreite bei 90°: 127 mm x 127 mm (ohne
Sägetisch)
Schnittbreite bei 45°: 127 mm x 40 mm (ohne
Sägetisch)
Bemessungs-
Leerlaufdrehzahl: n
0
0 - 290 min
-1
Sägebandgeschwindigkeit: 0 - 2,4 m/s
Neigungsschnitte: 0° – 45°
Schutzklasse: II / (Doppelisolierung)
Geräuschemissionswert:
Messwert für Geräusch ermittelt entsprechend
EN 60745. Der A-bewertete Geräuschpegel des
Elektrowerkzeugs beträgt typischerweise:
Schalldruckpegel: L
PA
= 90,7 dB (A)
Unsicherheit K: K
PA
= 3 dB
Schallleistungspegel: L
WA
= 101,7 dB (A)
Unsicherheit K: K
WA
= 3 dB

PMB 1100 A1
DE
│
AT
│
CH
│
13 ■
Gehörschutz tragen!
Vor der Inbetriebnahme die Bedie-
nungsanleitung lesen!
Schwingungsgesamtwerte:
(Vektorsumme dreier Richtungen) ermittelt
entsprechend EN 60745:
Sägen von Metall: a
h,CM
= 6,94 m/s
2
Unsicherheit K = 1,5 m/s
2
Sägen von Holz: a
h,CW
= 6,25 m/s
2
Unsicherheit K = 1,5 m/s
2
HINWEIS
► Die angegebenen Schwingungsgesamtwerte
und die angegebenen Geräuschemission-
swerte sind nach einem genormten Prüfver-
fahren gemessen worden und können zum
Vergleich eines Elektrowerkzeugs mit einem
anderen verwendet werden.
► Die angegebenen Schwingungsgesamtwerte
und die angegebenen Geräuschemission-
swerte können auch zu einer vorläufigen Ein-
schätzung der Belastung verwendet werden.
WARNUNG!
► Die Schwingungs- und Geräuschemissionen
können während der tatsächlichen Benutzung
des Elektrowerkzeugs von den Angabewerten
abweichen, abhängig von der Art und Weise,
in der das Elektrowerkzeug verwendet wird,
insbesondere, welche Art von Werkstück
bearbeitet wird.
► Versuchen Sie, die Belastung so gering wie
möglich zu halten. Beispielhafte Maßnahmen
zur Verringerung der Vibrationsbelastung sind
das Tragen von Handschuhen beim Ge
-
brauch des Werkzeugs und die Begrenzung
der Arbeitszeit. Dabei sind alle Anteile des
Betriebszyklus zu berücksichtigen (beispiels-
weise Zeiten, in denen das Elektrowerkzeug
abgeschaltet ist, und solche, in denen es zwar
eingeschaltet ist, aber ohne Belastung läuft).
Allgemeine
Sicherheitshinweise
für Elektrowerkzeuge
WARNUNG!
► Lesen Sie alle Sicherheitshinweise und An-
weisungen. Versäumnisse bei der Einhaltung
der Sicherheitshinweise und Anweisungen
können elektrischen Schlag, Brand und/oder
schwere Verletzungen verursachen.
Bewahren Sie alle Sicherheitshinweise und
Anweisungen für die Zukunft auf.
Der in den Sicherheitshinweisen verwendete Begriff
„Elektrowerkzeug“ bezieht sich auf netzbetriebene
Elektrowerkzeuge (mit Netzkabel) und auf akkube-
triebene Elektrowerkzeuge (ohne Netzkabel).
1. Arbeitsplatz-Sicherheit
a) Halten Sie Ihren Arbeitsbereich sauber und
gut beleuchtet. Unordnung und unbeleuchtete
Arbeitsbereiche können zu Unfällen führen.
b) Arbeiten Sie mit dem Elektrowerkzeug nicht in
explosionsgefährdeter Umgebung, in der sich
brennbare Flüssigkeiten, Gase oder Stäube
befinden. Elektrowerkzeuge erzeugen Funken, die
den Staub oder die Dämpfe entzünden können.
c) Halten Sie Kinder und andere Personen wäh-
rend der Benutzung des Elektrowerkzeugs fern.
Bei Ablenkung können Sie die Kontrolle über
das Gerät verlieren.
2. Elektrische Sicherheit
a) Der Anschlussstecker des Elektrowerkzeuges
muss in die Steckdose passen. Der Stecker
darf in keiner Weise verändert werden.
Verwenden Sie keine Adapterstecker gemein-
sam mit schutzgeerdeten Elektrowerkzeugen.
Unveränderte Stecker und passende Steckdosen
verringern das Risiko eines elektrischen Schlages.
b) Vermeiden Sie Körperkontakt mit geerdeten
Oberflächen, wie von Rohren, Heizungen,
Herden und Kühlschränken. Es besteht ein
erhöhtes Risiko durch elektrischen Schlag, wenn
Ihr Körper geerdet ist.

PMB 1100 A1
■ 14
│
DE
│
AT
│
CH
c) Halten Sie Elektrowerkzeuge von Regen oder
Nässe fern. Das Eindringen von Wasser in ein
Elektrogerät erhöht das Risiko eines elektrischen
Schlages.
d) Zweckentfremden Sie das Kabel nicht, um
das Elektrowerkzeug zu tragen, aufzuhängen
oder um den Stecker aus der Steckdose zu
ziehen. Halten Sie das Kabel fern von Hitze,
Öl, scharfen Kanten oder sich bewegenden
Geräteteilen. Beschädigte oder verwickelte Kabel
erhöhen das Risiko eines elektrischen Schlages.
e) Wenn Sie mit einem Elektrowerkzeug im
Freien arbeiten, verwenden Sie nur Verlänge-
rungskabel, die auch für den Außenbereich
zugelassen sind. Die Anwendung eines für den
Außenbereich geeigneten Verlängerungskabels
verringert das Risiko eines elektrischen Schlages.
f) Wenn der Betrieb des Elektrowerkzeuges in
feuchter Umgebung nicht vermeidbar ist, ver-
wenden Sie einen Fehlerstromschutzschalter.
Der Einsatz eines Fehlerstromschutzschalters ver-
mindert das Risiko eines elektrischen Schlages.
3. Sicherheit von Personen
a) Seien Sie stets aufmerksam, achten Sie darauf,
was Sie tun und gehen Sie mit Vernunft an die
Arbeit mit einem Elektrowerkzeug. Benutzen
Sie kein Elektrowerkzeug, wenn Sie müde sind
oder unter dem Einfluss von Drogen, Alkohol
oder Medikamenten stehen. Ein Moment der
Unachtsamkeit beim Gebrauch des Elektrowerk-
zeuges kann zu ernsthaften Verletzungen führen.
b) Tragen Sie persönliche Schutzausrüstung und
immer eine Schutzbrille. Das Tragen persönlicher
Schutzausrüstung wie Staubmaske, rutschfeste
Sicherheitsschuhe, Schutzhelm oder Gehörschutz,
je nach Art und Einsatz des Elektrowerkzeuges,
verringert das Risiko von Verletzungen.
c) Vermeiden Sie eine unbeabsichtigte Inbetrieb-
nahme. Vergewissern Sie sich, dass das Elek-
trowerkzeug ausgeschaltet ist, bevor Sie es
an die Stromversorgung und/oder den Akku
anschließen, es aufnehmen oder tragen.
Wenn Sie beim Tragen des Elektrowerkzeuges
den Finger am Schalter haben oder das Gerät
bereits eingeschaltet an die Stromversorgung
anschließen, kann dies zu Unfällen führen.
d) Entfernen Sie Einstellwerkzeuge oder Schrau-
benschlüssel, bevor Sie das Elektrowerkzeug
einschalten. Ein Werkzeug oder Schlüssel, der
sich in einem drehenden Geräteteil befindet,
kann zu Verletzungen führen.
e) Vermeiden Sie eine abnormale Körperhaltung.
Sorgen Sie für einen sicheren Stand und halten
Sie jederzeit das Gleichgewicht. Dadurch kön-
nen Sie das Elektrowerkzeug in unerwarteten
Situationen besser kontrollieren.
f) Tragen Sie geeignete Kleidung. Tragen Sie
keine weite Kleidung oder Schmuck. Halten
Sie Haare, Kleidung und Handschuhe fern
von sich bewegenden Teilen. Lockere Kleidung,
Schmuck oder lange Haare können von sich
bewegenden Teilen erfasst werden.
g) Wenn Staubabsaug- und -auffangeinrichtun-
gen montiert werden können, vergewissern
Sie sich, dass diese angeschlossen sind und
richtig verwendet werden. Die Verwendung
einer Staubabsaugung kann Gefährdungen
durch Staub verringern.
4. Verwendung und Behandlung des
Elektrowerkzeugs
a) Überlasten Sie das Gerät nicht. Verwenden
Sie für Ihre Arbeit das dafür bestimmte
Elektrowerkzeug. Mit dem passenden Elektro-
werkzeug arbeiten Sie besser und sicherer im
angegebenen Leistungsbereich.
b) Benutzen Sie kein Elektrowerkzeug, dessen
Schalter defekt ist. Ein Elektrowerkzeug, das
sich nicht mehr ein- oder ausschalten lässt, ist
gefährlich und muss repariert werden.
c) Ziehen Sie den Stecker aus der Steckdose
und/oder entfernen Sie den Akku, bevor Sie
Geräteeinstellungen vornehmen, Zubehörtei-
le wechseln oder das Gerät weglegen. Diese
Vorsichtsmaßnahme verhindert den unbeabsich-
tigten Start des Elektrowerkzeuges.
d) Bewahren Sie unbenutzte Elektrowerkzeuge
außerhalb der Reichweite von Kindern auf.
Lassen Sie Personen das Gerät nicht benutzen,
die mit diesem nicht vertraut sind oder diese
Anweisungen nicht gelesen haben. Elektro-
werkzeuge sind gefährlich, wenn sie von
unerfahrenen Personen benutzt werden.

PMB 1100 A1
DE
│
AT
│
CH
│
15 ■
e) Pflegen Sie Elektrowerkzeuge mit Sorgfalt.
Kontrollieren Sie, ob bewegliche Teile einwand-
frei funktionieren und nicht klemmen, ob Teile
gebrochen oder so beschädigt sind, dass die
Funktion des Elektrowerkzeuges beeinträch-
tigt ist. Lassen Sie beschädigte Teile vor dem
Einsatz des Gerätes reparieren. Viele Unfälle
haben ihre Ursache in schlecht gewarteten
Elektrowerkzeugen.
f) Halten Sie Schneidwerkzeuge scharf und
sauber. Sorgfältig gepflegte Schneidwerkzeuge
mit scharfen Schneidkanten verklemmen sich
weniger und sind leichter zu führen.
g) Verwenden Sie Elektrowerkzeug, Zubehör,
Einsatzwerkzeuge usw. entsprechend diesen
Anweisungen. Berücksichtigen Sie dabei die
Arbeitsbedingungen und die auszuführende
Tätigkeit. Der Gebrauch von Elektrowerkzeugen
für andere als die vorgesehenen Anwendungen
kann zu gefährlichen Situationen führen.
5. Service
a) Lassen Sie Ihr Elektrowerkzeug nur von quali-
fiziertem Fachpersonal und nur mit Original-
Ersatzteilen reparieren. Damit wird sicherge-
stellt, dass die Sicherheit des Elektrowerkzeugs
erhalten bleibt.
Zusätzliche Sicherheitshinweise für
Bandsägen
■ Halten Sie das Gerät an den isolierten
Griffflächen, wenn Sie Arbeiten ausführen,
bei denen das Schneidwerkzeug in Kontakt
mit verborgenen Leitungen oder seiner An-
schlussleitung kommen könnte. Der Kontakt
der Schneidwerkzeuge mit einer spannungsfüh-
renden Leitung kann auch metallene Geräteteile
unter Spannung setzen und zu einem elektrischen
Schlag führen.
■ Halten Sie Ihre Hände vom Sägebereich und
Sägeblatt fern.
■ Achten Sie vor der Verwendung immer darauf,
dass die tragbare Bandsäge sauber ist.
■ Stellen Sie immer sofort den Betrieb ein, wenn
Sie irgendetwas Ungewöhnliches bemerken.
■ Stellen Sie vor der Verwendung des Werkzeugs
immer sicher, dass alle Komponenten ordnungs-
gemäß und sicher montiert sind.
■ Seien Sie immer vorsichtig, wenn Sie das Band-
sägeblatt anbringen oder entfernen.
■ Halten Sie Ihre Hände immer dem Schnittweg
des Bandsägeblattes fern.
■ Warten Sie vor dem Sägen immer, bis der
Motor die volle Drehzahl erreicht hat.
■ Halten Sie die Griffe immer trocken, sauber und
frei von Öl und Fett. Halten Sie das Werkzeug
während der Arbeit gut fest.
■ Seien Sie immer wachsam, vor allem auch bei
sich wiederholenden, monotonen Operationen.
Achten Sie immer auf die richtige Position der
Hände im Verhältnis zum Sägeblatt.
■ Entfernen Sie niemals den Werkstückanschlag.
■ Halten Sie sich von Endstücken fern, die nach
dem Sägen herunterfallen. Sie können heiß,
scharf und/oder schwer sein. Dies könnte zu
schweren Verletzungen führen.
■ Luftöffnungen decken häufig bewegliche Teile
ab und sollten freigehalten werden. Lose sitzen-
de Kleidung, Schmuck oder lange Haare kön-
nen sich in den beweglichen Teilen verfangen.
WARNUNG!
► Dieses Elektrowerkzeug erzeugt während
des Betriebs ein elektromagnetisches Feld.
Dieses Feld kann unter bestimmten Um-
ständen aktive oder passive medizinische
Implantate beeinträchtigen. Um die Gefahr
von ernsthaften oder tödlichen Verletzun-
gen zu verringern, empfehlen wir Personen
mit medizinischen Implantaten ihren Arzt
und den Hersteller vom medizinischen
Implantat zu konsultieren, bevor das Elekt-
rowerkzeug bedient wird.
Originalzubehör / -zusatzgeräte
Benutzen Sie nur Zubehör und Zusatzgeräte,
die in der Bedienungsanleitung angegeben sind
bzw. deren Aufnahme mit dem Gerät kompatibel
ist.

PMB 1100 A1
■ 16
│
DE
│
AT
│
CH
Vor der Inbetriebnahme
WARNUNG! VERLETZUNGSGEFAHR!
Ziehen Sie den Netzstecker immer aus der
Steckdose, bevor Sie Arbeiten am Gerät
durchführen.
Montage
Schraubstock montieren
♦ Befestigen Sie den Schraubstock
mithilfe
der mitgelieferten 4 kurzen Flügelschrauben
in den entsprechenden Bohrungen auf der
Rückseite des Sägetischs (siehe Abb. C auf der
Ausklappseite).
Schnittwinkelverstellung an Sägetisch mon-
tieren
♦ Lösen Sie vollständig die Schraube
von der
Schnittwinkelverstellung . Stecken Sie die
Schraube
von unten durch die Winkel-Aus-
sparung auf dem Sägetisch
und ziehen Sie
mit Hilfe der Schnittwinkelverstellung wieder
fest (siehe Abb. D auf der Ausklappseite).
♦ Befestigen Sie mit einer langen Flügelschrau-
be
den Schwenkarm
durch die andere
Bohrung am Sägetisch (siehe Abb. D auf der
Ausklappseite).
Bandsäge an Schwenkarm montieren
Falls Sie das Gerät mithilfe des Sägetischs
verwenden möchten, gehen Sie wie folgt vor:
♦ Befestigen Sie den Schwenkarm
mithilfe der
mitgelieferten 3 langen Flügelschrauben
in
den entsprechenden Bohrungen des Gerätege-
häuses (siehe Abb. E auf der Ausklappseite).
♦ In der obersten Position wird die Bandsäge au-
tomatisch fixiert. Um die Fixierung aufzuheben,
ziehen Sie den Sicherungsstift
heraus und
lassen gleichzeitig die Bandsäge herabsinken.
WARNUNG!
► Stellen Sie jederzeit sicher, dass das Netzka-
bel nicht in die Nähe des Sägeblatts geraten
kann.
► Falls Sie das Gerät mit dem Sägetisch
verwenden möchten, befestigen Sie das
Netzkabel mit den beiden Kabelhaltern
A
,
wie im folgenden Bild dargestellt:
A
Einstellungen vornehmen
Handgriff verstellen
♦ Um den Handgriff
zu verstellen, lösen Sie
die Flügelschraube
am Handgriff.
♦ Drehen Sie den Handgriff
in die gewünschte
Position.
♦ Ziehen Sie die Flügelschraube
wieder fest.
Schraubstock verwenden
♦ Drehen Sie den Handgriff am Schraubstock
in Uhrzeigerrichtung, um das Werkstück
einzuspannen.
♦ Drehen Sie den Handgriff am Schraubstock
gegen die Uhrzeigerrichtung, um das Werk-
stück zu lösen.
Seite wird geladen ...
Seite wird geladen ...
Seite wird geladen ...
Seite wird geladen ...
Seite wird geladen ...
Seite wird geladen ...
Seite wird geladen ...
-
 1
1
-
 2
2
-
 3
3
-
 4
4
-
 5
5
-
 6
6
-
 7
7
-
 8
8
-
 9
9
-
 10
10
-
 11
11
-
 12
12
-
 13
13
-
 14
14
-
 15
15
-
 16
16
-
 17
17
-
 18
18
-
 19
19
-
 20
20
-
 21
21
-
 22
22
-
 23
23
-
 24
24
-
 25
25
-
 26
26
-
 27
27


Parkside PMB 1100 A1 Bedienungsanleitung
- Kategorie
- Elektrowerkzeuge
- Typ
- Bedienungsanleitung
in anderen Sprachen
Verwandte Artikel
-
Parkside 336931 2001 Translation Of The Original Instructions
-
Parkside PBS 350 A1 Operating And Safety Instructions Manual
-
-
Parkside 281993 Original Instructions Manual
-
Parkside PHKSA 12 A2 Translation Of The Original Instructions
-
Parkside PHKSA 18-Li B2 Bedienungsanleitung
-
-
-
Parkside A1 Benutzerhandbuch
-
Parkside PUV 1100 A1 Bedienungsanleitung