
EX
-
06
WIRELESS HD
STEREO HEADSET
PS3
|
XBOX
|
PC
|
MAC
IPOD
|
MP3 PLAYERS
EX6UNI-wireless-manual-book.indb 1 11/09/2013 10:24

EX6UNI-wireless-manual-book.indb 2 11/09/2013 10:24

EN
1
IMPORTANT : READ & UNDERSTAND THESE INSTRUCTIONS BEFORE USE.
WARNINGS
This symbol indicates important
installation, operational or
maintenance instructions.
Always follow these
instructions very closely.
ENVIRONMENT
Please help to conserve the
environment by recycling
the cardboard packaging
of this product.
This product should NOT be
disposed of in normal household
waste. It should be disposed of
separately. Please take it to an
electrical waste collection point.
PRECAUTIONS
This product has been designed with
the highest concern for safety. However,
any electrical device if used improperly
has the potential to cause harm. To help
ensure risk-free operation please pay
attention to the following guidelines:
• Use only as intended. This is a
precision product, handle with care.
• Contains small parts. Not suitable for
children under three years of age.
• Store in a dry and dust free area.
• Do not store in areas of extreme
heat or cold, and avoid direct sunlight
or heat sources e.g. heaters.
• Do not allow the product to get wet
or dirty; doing so may cause damage.
• Do not clean with benzene,
paint thinner, acetone, alcohol,
or other such solvents.
• Do not take the product apart; doing
so will void your warranty and may
cause electrical shock on your console.
FOR ADDITIONAL CUSTOMER SUPPORT &
TO VIEW THIS MANUAL ONLINE VISIT:
WWW.GIOTECK.COM
EX6UNI-wireless-manual-book.indb 1 11/09/2013 10:24

EN
2
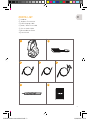
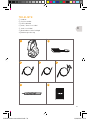
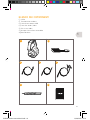
PARTS LIST
i] Headset
ii] Wireless Transmitter
iii] USB Charging Cable
iv] Audio / Xbox Chat Cable
v] RCA to Audio Cable
vi] Removable Mic Boom
vii] User Manual
i ii
iii iv
vi
v
vii
EX6UNI-wireless-manual-book.indb 2 11/09/2013 10:24

EN
3
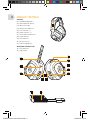
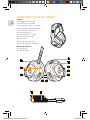
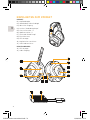
PRODUCT DETAILS
HEADSET
01 | Headband Adjusters
02 | Removable Mic Boom
03 | Xbox Chat Input
04 | Mute/Pairing Button
05 | Chat Volume –/+
06 | Game Volume –/+
07 | Surround sound button
08 | Power Button
09 | LED Indicator
10 | Mic Boom Port
11 | USB Charging Port
WIRELESS TRANSMITTER
12 | LED Indicator
13 | Audio input
1312
08
09
02
11
03
10
04 07
05 06
01
EX6UNI-wireless-manual-book.indb 3 11/09/2013 10:24

EN
4
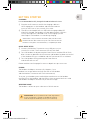
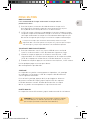
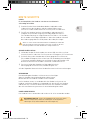
GETTING STARTED
CHARGING
It is recommended to fully charge the headset before first use.
1] Plug the small connector end of the charging cable into
the charging port on the headset and the other end into
a port on the front of your console, PC or MAC.
2] The LED on the headset will turn RED while charging and be OFF
when fully charged. The headset will take approximately 4-5 hours
to fully recharge from a drained state. The charging cycle will
take longer If the headset is in use during charging.
When there is only 20 minutes of battery le, the LED on the
headset will flash blue continuously. This will continue until the
headset is charged or until the battery is completely drained.
QUICK-START SETUP
1] Connect the Wireless Transmitter into a USB port on your
console, PC or MAC. The Transmitter LED will flash Red.
2] Turn the headset ON by pressing the Power Button and the LED will flash
blue. Connection between the transmitter and headset has been successful
if the Headset LED turns solid blue and the Transmitter LED is solid red.
3] Turn the headset OFF by pressing the Power Button
and the LED will turn o.
Please read the next few pages for more in-depth set-up instructions.
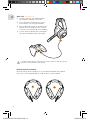
PAIRING
The headset should pair automatically. However, if your
headset has not paired successfully the LED on the Headset
and the Wireless Transmitter will flash intermittently.
To re-pair your headset, press and hold the mute button on the headset
until the LED on the headset and the LED on the transmitter both turn solid.
The headset should pair automatically on the next usage.
WIRELESS RANGE
The headset is eective up to a distance of 20-30 metres.
PLEASE NOTE: You may need to make some adjustments
to your TV/Monitor’s settings to enable the audio to
come through the headset (Consult your TV manual).
EX6UNI-wireless-manual-book.indb 4 11/09/2013 10:24

EN
AV MULTI OUT
AV RCA CABLE
(SUPPLIED WITH
PS3 CONSOLE)
YELLOW/
VIDEO
CONNECT INTO
THE FRONT
OF PS3
TV / MONITOR
AUDIO OUT
03
02
01
04
05
5
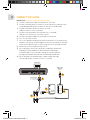
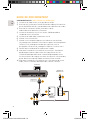
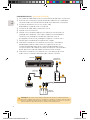
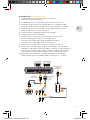
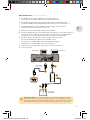
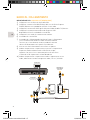
CONNECTION GUIDE
PS3 SET UP : WITH A/V CABLES (WITHOUT HDMI)
1] Connect the AV RCA cable into the back of your PS3.
2] Connect the RED/WHITE connectors from the AV RCA Cable into the
corresponding RED/WHITE sockets on the RCA to Audio cable.
3] Connect the yellow VIDEO connector into the
Video IN socket of your TV/Monitor.
4] Connect the the wireless transmitter into an available
USB port on the front of your PS3 console.
5] Connect the audio cable into the wireless transmitter.
6] Turn on your PS3 console.
7] Turn your Headset ON by pressing the Power Button. Pairing with the
wireless transmitter should happen automatically. However, if pairing is
unsuccessful, please refer to the Pairing section in ‘Getting Started’.
8] Make sure that microphone mute is OFF.
9] Go to Settings > Accessory Settings > Audio Device Settings
and select EX-06 Headset for both the Input and Output.
You will be able to hear yourself talking into the microphone
through the headset earcups. Set the desired volume level
10] Go to Settings > Sound Settings > Audio Output Settings,
choose Audio Input Connector/ Scart / AV Multi.
EX6UNI-wireless-manual-book.indb 5 11/09/2013 10:24

EN
TV/MONITOR
HDMI INPUT
HDMI OUTPUT AV MULTI OUT
AV RCA CABLE
(SUPPLIED WITH
PS3 CONSOLE)
HDMI CABLE
(NOT SUPPLIED)
CONNECT INTO
THE FRONT
OF PS3
05
04
03
0201
6
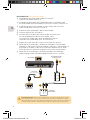
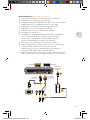
PS3 SET UP : WITH HDMI (OPTION A)
1] Connect the HDMI lead between the PS3 console and your TV/Monitor.
2] Connect the AV RCA cable into the back of your PS3.
3] Connect the RED/WHITE connectors from the AV RCA Cable into the
corresponding RED/WHITE sockets on the RCA to Audio cable.
4] Connect the the wireless transmitter into an available
USB port on the front of your PS3 console.
5] Connect the audio cable into the wireless transmitter.
6] Turn on your PS3 console.
7] Turn your Headset ON by pressing the Power Button. Pairing with the
wireless transmitter should happen automatically. However, if pairing is
unsuccessful, please refer to the Pairing section in ‘Getting Started’.
8] Make sure that microphone mute is OFF.
9] Go to Settings > Accessory Settings > Audio Device Settings
and select EX-06 Headset for both the Input and Output. You
will be able to hear yourself talking into the microphone through
the headset earcups. Set the desired volume level.
10] Go to Settings > Sound Settings > Audio Output Settings,
choose Audio Input Connector/ Scart / AV Multi.
EX6UNI-wireless-manual-book.indb 6 11/09/2013 10:24

EN
RED
WHITE
HDMI OUTPUT
CONNECT INTO
THE FRONT
OF PS3
HDMI CABLE
(NOT SUPPLIED)
TV/MONITOR
HDMI INPUT
TV / MONITOR
AUDIO OUT
01
03
04
02
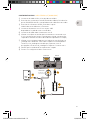
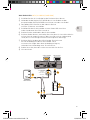
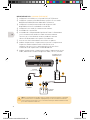
PLEASE NOTE: Your TV/Monitor will need to have Audio Out (RED/WHITE) sockets.
Most, but not all TVs/Monitors have RED/WHITE Audio IN and YELLOW Video IN sockets
but not all TV’s, and even fewer monitors have RED/WHITE Audio OUT sockets.
7
PS3 SET UP : WITH HDMI (OPTION B)
1] Connect the HDMI between the PS3 console and TV/Monitor.
2] Connect the RED/WHITE connectors on the RCA to Audio cable
into the Audio OUT RED/WHITE sockets on your TV/Monitor.
3] Connect the the wireless transmitter into an available
USB port on the front of your PS3 console.
4] Connect the audio cable into the wireless transmitter.
5] Turn on your PS3 console.
6] Turn your Headset ON by pressing the Power Button. Pairing with the
wireless transmitter should happen automatically. However, if pairing is
unsuccessful, please refer to the Pairing section in ‘Getting Started’.
7] Make sure that microphone mute is OFF.
8] Go to Settings > Accessory Settings > Audio Device Settings
and select EX-06 Headset for both the Input and Output. You
will be able to hear yourself talking into the microphone through
the headset earcups. Set the desired volume level.
9] Go to Settings > Sound Settings > Audio Output Settings,
choose Audio Input Connector/ Scart / AV Multi.
EX6UNI-wireless-manual-book.indb 7 11/09/2013 10:24

EN
AV MULTI OUT USB PORT
AV RCA CABLE
(SUPPLIED WITH
XBOX CONSOLE)
YELLOW/
VIDEO
TV / MONITOR
AUDIO OUT
03
02
05
01 04
8
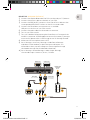
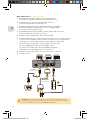
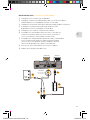
XBOX SET UP : WITH A/V CABLES (WITHOUT HDMI)
1] Connect the AV RCA Cable into the back of your Xbox.
2] Connect the RED/WHITE connectors from the AV RCA Cable into the
corresponding RED/WHITE sockets on the RCA to Audio cable.
3] Connect the yellow VIDEO connector into the
Video IN socket on your TV/Monitor.
4] Connect the the wireless transmitter into an available
USB port on the front of your Xbox console.
5] Connect the audio cable into the wireless transmitter.
6] Turn on your Xbox and make sure that your controller is wirelessly
connected to your console (do not leave the controller charging
or it will transfer electrical noise into your headset).
7] Turn your Headset ON by pressing the Power Button. Pairing with the
wireless transmitter should happen automatically. However, if pairing is
unsuccessful, please refer to the Pairing section in ‘Getting Started’.
8] Make sure that microphone mute is OFF.
9] Go to chat set up.
EX6UNI-wireless-manual-book.indb 8 11/09/2013 10:24

EN
HDMI CABLE
(NOT SUPPLIED)
TV/MONITOR
HDMI INPUT
AV RCA CABLE
(NOT SUPPLIED)
AV MULTI OUT USB PORTHDMI OUTPUT
05
04
03
02
01
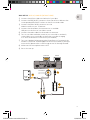
IMPORTANT: The AV cable supplied with the Xbox 360 does not allow for simultaneous
use with a HDMI cable, as the shape of the AV connector covers the HDMI socket.
You will need to purchase one for this set up method.
9
XBOX SET UP : WITH HDMI (OPTION A)
1] Connect the HDMI (not included) between the Xbox and TV/Monitor.
2] Connect the AV RCA Adaptor Cable (not included) into the Xbox.
3] Connect the RED/WHITE connectors from the RCA to Audio cable into
the corresponding inputs of the AV RCA Adaptor Cable (not included).
4] Connect the the wireless transmitter into an available
USB port on the front of your Xbox console.
5] Connect the audio cable into the wireless transmitter.
6] Turn on your Xbox and make sure that your controller is wirelessly
connected to your console (do not leave the controller charging
or it will transfer electrical noise into your headset).
7] Turn your Headset ON by pressing the Power Button. Pairing with the
wireless transmitter should happen automatically. However, if pairing is
unsuccessful, please refer to the Pairing section in ‘Getting Started’.
8] Make sure that microphone mute is OFF.
9] Go to chat set up.
EX6UNI-wireless-manual-book.indb 9 11/09/2013 10:24

EN
RED
WHITE
HDMI CABLE
(NOT SUPPLIED)
TV/MONITOR
HDMI INPUT
TV / MONITOR
AUDIO OUT
USB PORTHDMI OUTPUT
04
01
03
02
PLEASE NOTE: Your TV/Monitor will need to have Audio Out (RED/WHITE) sockets.
Most, but not all TVs/Monitors have RED/WHITE Audio IN and YELLOW Video IN sockets
but not all TV’s, and even fewer monitors have RED/WHITE Audio OUT sockets.
10
XBOX SET UP : WITH HDMI (OPTION B)
1] Connect the HDMI (not included) between your Xbox and TV/Monitor.
2] Connect the RED/WHITE connectors from the RCA to Audio cable
into the Audio OUT RED/WHITE sockets on your TV/Monitor.
3] Connect the the wireless transmitter into an available
USB port on the front of your Xbox console.
4] Connect the audio cable into the wireless transmitter.
5] Turn on your Xbox and make sure that your controller is wirelessly
connected to your console (do not leave the controller charging
or it will transfer electrical noise into your headset).
6] Turn your Headset ON by pressing the Power Button. Pairing with the
wireless transmitter should happen automatically. However, if pairing is
unsuccessful, please refer to the Pairing section in ‘Getting Started’.
7] Make sure that microphone mute is OFF.
8] Go to chat set up.
EX6UNI-wireless-manual-book.indb 10 11/09/2013 10:24

EN
02
01
11
XBOX LIVE : CHAT SET UP
1] Connect the mini jack cable between
your headset and Xbox controller.
2] Go to Settings > Preferences > Voice.
Voice Output: Play through Headset.
3] Set the desired volume for Game Sound
and Voice. (You should now hear sound
from your console through your headset.)
4] To test the microphone go to messages
then record and play back a message.
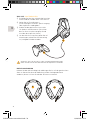
MICROPHONE ADJUSTMENT
Remove the Mic boom and place it on your preferred side. Then replace
the cover on the exposed side to avoid any dust or dirt build up.
It is important to do this in the correct order to ensure that the console
connects to the headset’s microphone.
02
01
EX6UNI-wireless-manual-book.indb 11 11/09/2013 10:24

EN
CONNECT INTO
PC/MAC/CONSOLE
12
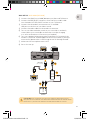
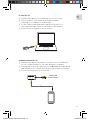
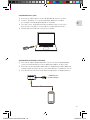
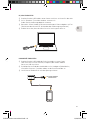
PC, MAC SET UP
1] Plug the USB cable into an available port on your PC or Mac.
2] Your PC (windows 7) will automatically find the Headset
and assign it as the device for audio output.
3] For Mac, open system preferences and go to sound. (You can
then assign the audio output to the Gioteck EX-06 Headset.)
4] Make sure the microphone is not set to mute.
HANDHELD DEVICE SET UP
1] Plug the USB cable on the wireless transmitter into an available port
on your console/computer/or any other device with a USB port.
2] Plug one end of the audio cable into your handheld device (mobile phone,
ipod, mp3 player etc.) and the other end into the wireless transmitter.
3] You can now listen to music on the move!
EX6UNI-wireless-manual-book.indb 12 11/09/2013 10:24

EN
13
LIMITED WARRANTY
This product warranty covers against any defects in materials and
workmanship for a period of ninety (90) days from the date of purchase.
This warranty does not cover damage caused by accident, misuse, or neglect
such as tears in fabric, and is limited to replacement or product repair at
our discretion. Damage caused by the use of harsh chemicals is not covered
under the warranty. If there is a defect with 90 days of purchase please
contact us to obtain authorization to return the product. The customer will
be responsible for shipping charges, but Goodbetterbest Limited will cover
the shipping charges on the replacement product. You will need to pack
the product securely and include with the product (1) a copy of the original
proof of purchase (retail receipt) showing the date of purchase, and (b) a
detailed explanation of the problem(s) requiring service. This statement of
warranty prevails over any other statement by the seller specified or implied.
EX6UNI-wireless-manual-book.indb 13 11/09/2013 10:24

EN
14
LEGALS
This product complies with the following legal regulations.
For further information go to www.gioteck.com
This device complies with Industry Canada licence-exempt RSS standard(s). Operation
is subject to the following two conditions: (1) this device may not cause
interference, and (2) this device must accept any interference, including
interference that may cause undesired operation of the device.
Caution: The user is cautioned that changes or modifications not expressly
approved by the party responsible for compliance could void the user’
s autho
rity
to operate the equipment. This device complies with Part 15 of the FCC Rules.
Operation is subject to the following two conditions: (1) this device may not cause
harmful interference,and (2) this device must accept any interference received,
including interference that may cause undesired operation. However, there is no
guarantee that interference will not occur in a particular installation. The device
and its antenna must not be co-located or oper
ating in conjunction with any other
antenna or trans
mitter. Gioteck are not responsible for any interference caused
by un-authorized changes to this equipment. This equipment generates, uses,
and can radiate radio frequency energy and, if not installed correctly, may cause
harmful interference to radio communications. This equipment has been tested and
found to comply with the limits for a Class B digital device, pursuant to part 15 of
the FCC Rules. These limits are
designed to provide reasonable protection against
harmful interference in a residential installation. If this equipment does cause
harmful interference to radio/television reception try the following: • Reorient or
relocate the receiving antenna. • Increase the separation between the equipment
to which the receiver is connected. • Consult the dealer or an experienced radio/TV
technician for help. This equipment complies with FCC radiation exposure limits set
forth for an uncontrolled environment. End user must follow the specific operating
instructions for satisfying RF exposure compliance. This transmitter must not be
co-located or operating in conjunction with any other antenna or transmitter.
Gioteck hereby declares that this product is in compliance with the essential
requirements and other provisions of Directive 2004/108/EC and R&TTe 1999/5/EC.
To view the full version of the Declaration of Conformity go on
line to doc.gioteck.com
Complies with
IDA Standards
DB100398
EX6UNI-wireless-manual-book.indb 14
11/09/2013 10:24

FR
15
IMPORTANT : LIRE ATTENTIVEMENT LA NOTICE AVANT D’UTILISER LE PRODUIT.
MISES EN GARDE
Ce symbole indique des consignes
importantes pour l’installation,
l’utilisation ou l’entretien du
produit. Toujours suivre à
la lettre ces consignes.
ENVIRONNEMENT
Merci de contribuer à
préserver l’environnement
en recyclant l’emballage en
carton de ce produit.
Ce produit ne doit PAS être
jeté dans les déchets ménagers
habituels. Il doit être traité à
part. Merci de le déposer dans
un point de collecte des déchets
électriques et électroniques.
PRÉCAUTIONS
Ce produit a été conçu dans un souci
absolu de sécurité. Cependant, tout
appareil électrique mal utilisé peut être
dangereux. Pour faire en sorte d’utiliser
ce produit sans risques, merci de prêter
attention aux directives suivantes :
• Utiliser le produit uniquement de la
manière prévue. Il s’agit d’un matériel
de précision, manipulez-le avec soin.
• Contient de petites pièces.
Ne convient pas à des enfants
de moins de trois ans.
• Ranger le produit dans un endroit
sec et non poussiéreux.
• Ne pas le ranger dans des endroits
exposés à une chaleur ou à un froid
extrêmes et éviter l’ensoleillement
direct ou les sources de chaleur telles
que les appareils de chauage.
• Ne pas mouiller le produit et
ne pas le laisser se salir : ceci
pourrait l’endommager.
• Ne pas utiliser de benzène, de
diluant pour peintures, d’acétone,
d’alcool ou d’autres solvants
similaires pour le nettoyer.
• Ne pas démonter le produit :
ceci annulerait la garantie et
pourrait occasionner un choc
électrique sur votre console.
EX6UNI-wireless-manual-book.indb 15 11/09/2013 10:24

FR
16
CONTENU
i] Casque
ii] Émetteur sans fil
iii] Câble de mise en charge USB
iv] Câble audio/conversation Xbox
v] Câble RCA vers Audio
vi] Perche micro amovible
vii] Manuel d’utilisation
i ii
iii iv
vi
v
vii
EX6UNI-wireless-manual-book.indb 16 11/09/2013 10:24

FR
17
CARACTÉRISTIQUES DU PRODUIT
CASQUE
01 | Réglages du serre-tête
02 | Perche micro amovible
03 | Entrée pour conversation Xbox
04 | Bouton de sourdine/jumelage
05 | Volume de conversation –/+
06 | Volume de jeu –/+
07 | Bouton de son surround
08 | Bouton marche/arrêt
09 | DEL témoin
10 | Port pour perche micro
11 | Port de mise en charge USB
ÉMETTEUR SANS FIL
12 | DEL témoin
13 | Entrée audio
1312
08
09
02
11
03
10
04 07
05 06
01
EX6UNI-wireless-manual-book.indb 17 11/09/2013 10:24

FR
18
PRISE EN MAIN
MISE EN CHARGE
Il est recommandé de charger entièrement le casque avant la
première utilisation.
1] Brancher le petit connecteur du câble de mise en charge sur le
port de mise en charge du casque et l’autre extrémité sur un port
en façade de votre console, de votre PC ou de votre MAC.
2] La DEL du casque s’allume en rouge pendant la mise en charge et s’éteint
lorsque le casque est entièrement chargé. Il faut environ 4 à 5 heures pour
recharger entièrement le casque s’il est entièrement déchargé. Le cycle
de mise en charge sera plus long si l’on utilise le casque en même temps.
Lorsqu’il ne reste plus que 20 minutes d’autonomie, la DEL du casque
clignote en bleu sans interruption. Ceci se poursuit jusqu’à ce que le casque
soit rechargé ou jusqu’à ce que la batterie soit entièrement épuisée.
TALLATION ET MISE EN ROUTE RAPIDE
1] Brancher l’émetteur sans fil sur un port USB de votre console, de
votre PC ou de votre MAC. La DEL de l’émetteur clignote en rouge.
2] Allumer le casque en appuyant sur le bouton marche/arrêt ; la DEL
clignote en bleu. Si la connexion entre l’émetteur et le casque est établie,
la DEL du casque passe au bleu fixe et la DEL de l’émetteur au vert fixe.
3] Éteindre le casque en appuyant sur le bouton marche/arrêt ; la DEL s’éteint.
Lire les quelques pages suivantes pour obtenir
des renseignements plus détaillés.
JUMELAGE
Le casque doit se jumeler automatiquement. Cependant, si le jumelage
ne s’opère pas correctement, la DEL du casque et celle de l’émetteur
sans fil clignotent lentement.
Pour refaire le jumelage, appuyer de façon prolongée sur le bouton
de mise en sourdine du casque jusqu’à ce que la DEL du casque et
la DEL de l’émetteur restent allumées de manière fixe. Le casque
devrait se jumeler automatiquement à la prochaine utilisation.
PORTÉE SANS FIL
Le casque fonctionne ecacement jusqu’à une distance de 20 à 30 mètres.
REMARQUE : vous devrez peut-être procéder à quelques réglages
sur votre téléviseur ou moniteur pour que le son puisse passer
par le casque (consulter la notice de votre téléviseur).
EX6UNI-wireless-manual-book.indb 18 11/09/2013 10:24
Seite laden ...
Seite laden ...
Seite laden ...
Seite laden ...
Seite laden ...
Seite laden ...
Seite laden ...
Seite laden ...
Seite laden ...
Seite laden ...
Seite laden ...
Seite laden ...
Seite laden ...
Seite laden ...
Seite laden ...
Seite laden ...
Seite laden ...
Seite laden ...
Seite laden ...
Seite laden ...
Seite laden ...
Seite laden ...
Seite laden ...
Seite laden ...
Seite laden ...
Seite laden ...
Seite laden ...
Seite laden ...
Seite laden ...
Seite laden ...
Seite laden ...
Seite laden ...
-
 1
1
-
 2
2
-
 3
3
-
 4
4
-
 5
5
-
 6
6
-
 7
7
-
 8
8
-
 9
9
-
 10
10
-
 11
11
-
 12
12
-
 13
13
-
 14
14
-
 15
15
-
 16
16
-
 17
17
-
 18
18
-
 19
19
-
 20
20
-
 21
21
-
 22
22
-
 23
23
-
 24
24
-
 25
25
-
 26
26
-
 27
27
-
 28
28
-
 29
29
-
 30
30
-
 31
31
-
 32
32
-
 33
33
-
 34
34
-
 35
35
-
 36
36
-
 37
37
-
 38
38
-
 39
39
-
 40
40
-
 41
41
-
 42
42
-
 43
43
-
 44
44
-
 45
45
-
 46
46
-
 47
47
-
 48
48
-
 49
49
-
 50
50
-
 51
51
-
 52
52


Goodbetterbest EX-06 Benutzerhandbuch
- Kategorie
- Kopfhörer
- Typ
- Benutzerhandbuch
in anderen Sprachen
- English: Goodbetterbest EX-06 User manual
- français: Goodbetterbest EX-06 Manuel utilisateur
- italiano: Goodbetterbest EX-06 Manuale utente
Verwandte Papiere

Sonstige Unterlagen
-
VENOM Vibration Headset XT+ Benutzerhandbuch
-
Gioteck EX-06 Benutzerhandbuch
-
Turtle Beach Ear Force XP300 Benutzerhandbuch
-
Turtle Beach Earforce PX3 Benutzerhandbuch
-
Turtle Beach Ear Force Delta Benutzerhandbuch
-
Gioteck EX-05 Benutzerhandbuch
-
Gioteck EX-05 Military Style Bedienungsanleitung
-
Turtle Beach Ear Force Bravo Benutzerhandbuch
-
Turtle Beach Earforce PX5 Bedienungsanleitung
-