
INSTALLATION
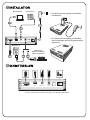
SCHNITTSTELLEN
Hinweis: Schnittstellen und Kabel unterliegen den Modellspezifikationen.
1
USB A USB B AUDIO OUT
AUDIO IN
/AV IN
DC IN
3
4
RWY
6
5
USB
USB
1
2
DC IN
DVD-Player,
Digitalempfänger,
HDTV-Empfänger
iPod/iPhone
Lautsprecher
Notebook/PC
• An die Stromversorgung anschließen:
durch Anbringung eines Projektorakkus
(optional)
• An die Stromversorgung anschließen:
per Netzteil
2
USB A USB B AUDIO OUT
AUDIO IN
/AV IN
DC IN

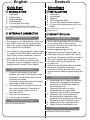
Quick Start
INSTALLATION
1. USB cable
2. Audio cable
3. Power adapter
4. USB disk/stick
5. 3.5 mm jack A/V cable
6. 3.5 mm jack A/V to RCA cable
Note: Connector interface and cable are subject to model's
specifications.
INTERFACE CONNECTOR
• To connect to a USB disk/stick, plug it to
the USB A connector on the projector,
and refer to the supplied Multi-media
user’s guide CD for details.
• To connect to your computer, take a type
A to type mini B USB cable, connect the
type A plug to the computer, and the
type mini B plug to the projector.
If it is the first time you connect the
projector to your computer, refer to the
supplied user’s guide CD for details.
1. Connect one end of the power
adapter into the DC IN socket on the
projector; connect the other end to
an electrical outlet.
Or attach a charged projector battery
(optional) to the projector.
2. Press and hold the power button on
the control panel for 3 seconds or
press the power button on the
remote control.
3. Select an input source.
4. Run your presentation.
Press the power button.
Schnellstart
INSTALLATION
1. USB-Kabel
2. Audiokabel
3. Netzteil
4. USB-Festplatte/-Stick
5. 3,5 mm A/V-Klinkenstecker-Kabel
6.
3,5 mm
A/V-Klinkenstecker-auf-Cinch-
Kabel
Hinweis: Schnittstellen und Kabel unterliegen den
Modellspezifikationen.
SCHNITTSTELLEN
• Einen USB-Datenträger/-Stick verbinden
Sie mit dem USB A-Anschluss am
Projektor; Einzelheiten entnehmen Sie
bitte der multimedialen
Bedienungsanleitung auf CD.
• Verbinden Sie den Projektor über ein
USB-Kabel (Typ A zu Mini-USB, Typ B)
mit Ihrem Computer; schließen Sie dazu
den Typ-A-Stecker am Computer und
den Mini-USB-Typ-B-Stecker am
Projektor an.
Wenn Sie den Projektor das erste Mal
mit Ihrem Computer verbinden,
beachten Sie bitte die Hinweise in der
mitgelieferten Bedienungsanleitung auf
CD.
1. Verbinden Sie ein Ende des Netzteils
mit dem DC-Eingang am Projektor;
schließen Sie das andere Ende an
eine Steckdose an.
Alternativ können Sie einen
aufgeladenen Projektorakku
(optional) am Projektor anbringen.
2. Halten Sie die Ein-/Austaste am
Bedienfeld drei Sekunden lang
gedrückt bzw. betätigen Sie die Ein-
/Austaste auf der Fernbedienung.
3. Wählen Sie eine Eingangsquelle.
4. Führe Sie Ihre Präsentation aus.
Drücken Sie die Ein-/Austaste.
1
2
Connecting to Devices
Powering On the Projector
Powering Off the Projector
1
2
Geräte anschließen
Einschalten des Projektors
Ausschalten des Projektors
English Deutsch
-
 1
1
-
 2
2

