

1
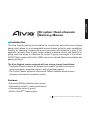
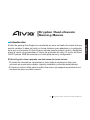
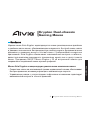
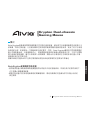
Krypton Dual-chassis Gaming Mouse
ENGLISH
Krypton Dual-chassis
Gaming Mouse
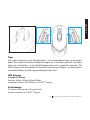
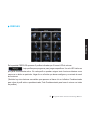
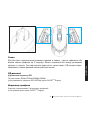
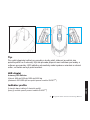
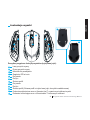
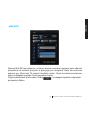
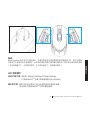
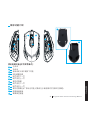
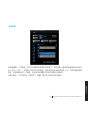
The Aivia Krypton gaming mouse features a revolutionary new dual mouse chassis
design which allows for a hot-swappable mouse chassis giving the user unparalleled
freedom by changing fundamental mouse movement and dynamics to best fit the
application at hand. Aivia Krypton further enables maximum control and exibility by
giving users the option to customize the center of gravity and weight of the mouse.
GHOST Macro engine with built-in 32KB memory for onboard Macro memorization and
gaming on the go.
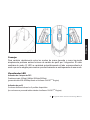
The Aivia Krypton comes equipped with two unique chassis foundations:
- The Speed Chassis features an abrasion-free ceramic foundation focused on
quick movements, immediate reaction, and extraordinary speed.
- The Control Chassis utilizes an ultra smooth Teon foundation which ensures
precision movements for maximum control.
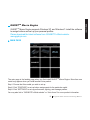
Introduction
Features
• Advanced 8200dpi resolution laser sensor
• Optimized for speed + control performance
• Customizable center of gravity
• Build-in GHOST
TM
macro engine

2
Krypton Dual-chassis Gaming Mouse
ENGLISH
Windows® 98 / 2000/ XP / Windows7 Installation Instructions
1. Download the GHOST macro engine installer from GIGABYTE of cial website.
2. Run the installer and follow the onscreen instructions.
3. Plug Aivia Krypton into the USB port of your computer.
4. Execute the software and then the UI will automatically detect the Aivia Krypton Mouse.
5. Set up advanced assignments for your Aivia Krypton via GIGABYTE software.
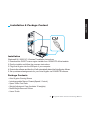
Installation
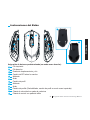
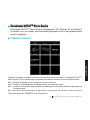
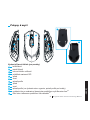
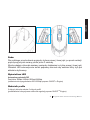
Package Contents
• Aivia Krypton Gaming Mouse
• Interchangeable Mouse Chassis(Speed / Control)
• Spare Te on Feet Pads
• Weight Adjustment Case (Includes 10 weights)
• Metal Weight Removal Device
• Users’ Guide
Installation & Package Content

3
Krypton Dual-chassis Gaming Mouse
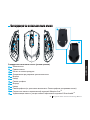
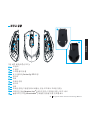
ENGLISH
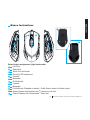
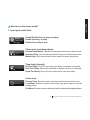
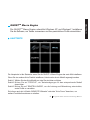
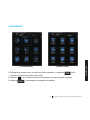
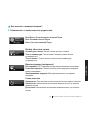
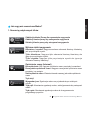
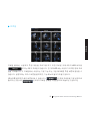
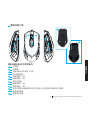
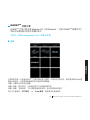
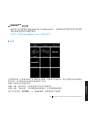
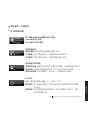
Left Click
Right Click
Scroll Click and wheel
On-the- y DPI adjustment
Forward
Backward
Pro le Switch
Forward
Backward
Pro le Switch (Disabled on default, Pro le Switch under Left-Hand mode)
Speed Chassis with Abrasion-free
TM
ceramic mouse feet
Control Chassis with Ultra-durable
TM
te on feet
Default button assignments (right-hand mode):
A
A
G
G
D
D
J
J
B
B
H
H
E
E
K
C
C
I
I
F
F
L
Mouse Instructions
K
L

4
Krypton Dual-chassis Gaming Mouse
ENGLISH
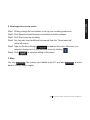
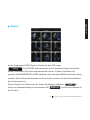
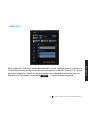
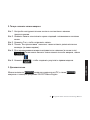
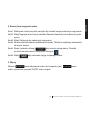
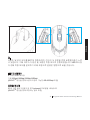
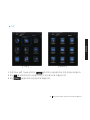
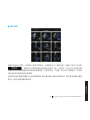
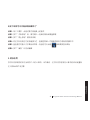
LED Display
4-stage DPI indicator
Default: 800dpi/1600dpi/3200dpi/5600dpi
(customizable 400~8200dpi adjustment via GHOST
TM
Engine)
Profi le indicator
5 different colors indicates 5 onboard pro les
(customized color lighting via GHOST
TM
Engine)
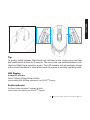
Tip:
To quickly switch between Right-Hand and Left-Hand mode, simply press and hold
both pro le switch buttons for 3 seconds. The mouse has now switched between Left-
Hand and Right-Hand operation modes. The LED indicator will automatically change
to the correct orientation to show which mode the mouse is currently operating under.

5
Krypton Dual-chassis Gaming Mouse
ENGLISH
GHOST
TM
Macro Engine supports Windows XP, and Windows7. Install the software
to assign buttons and set up your personal proles.
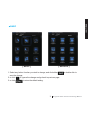
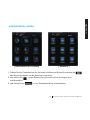
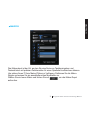
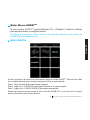
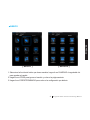
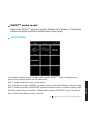
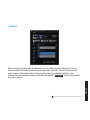
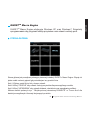
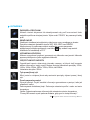
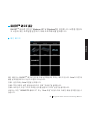
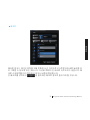
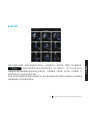
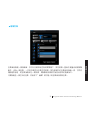
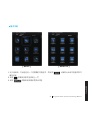
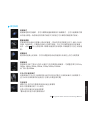
MAIN PAGE
The main page is the landing page when you rst install GHOST
TM
Macro Engine. More than one
model may appear when you install another Aivia product.
Step1. Choose the Aivia model you wish to set up.
Step2. Click “PROFILES” to set up button assignments for the particular model.
Step3. Click “SETTINGS” to set up performance, lighting, and manage proles.
You may also link to “GIGABYTE ofcial website” or “Aivia forum” for more product information.
GHOST
TM
Macro Engine
Please download the latest software from GIGABYTE ofcial website:
www.gigabyte.com

6
Krypton Dual-chassis Gaming Mouse
ENGLISH
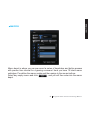
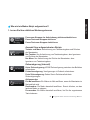
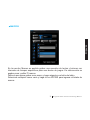
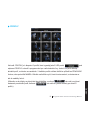
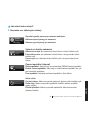
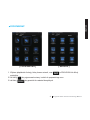
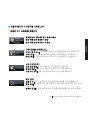
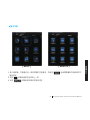
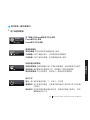
In the PROFILES tab, there are 5 pro les which appear as 5 LED bars
underneath PROFILE to program for your speci c games. A single LED bar
indicates the current pro le you locate. In each pro le, you can assign either BASIC functions or
advanced MACROS to particular buttons. Click any mouse button you wish to set up, you will then
enter into the function menu.
(There are also hid buttons by clicking the arrowhead-
is back to default setting for
the current pro le; is back to default for all 5 pro les.)
the current pro le; is back to default for all 5 pro les.)
PROFILES

7
Krypton Dual-chassis Gaming Mouse
ENGLISH
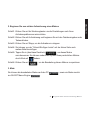
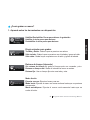
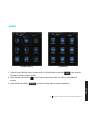
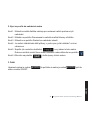
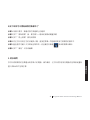
1. Select any button function you wish to change, and click either or double-click to
save the change.
2. or click to ignore the change and go back to previous page.
3. or click to return the default setting.
1. Select any button function you wish to change, and click either or double-click to
2. or click to ignore the change and go back to previous page.
3. or click to return the default setting.
[ BASIC ] [ MACROS ]
BASIC

8
Krypton Dual-chassis Gaming Mouse
ENGLISH
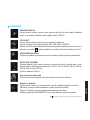
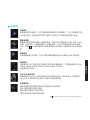
Macro depot is where you can pre-record a series of keystrokes and button presses
with precise time interval for a gaming command. Here you have 70 blank macro
cartridges. Pre-de ne the macro scripts and then assign to the mouse buttons.
Select any empty macro and click , and you will then enter into the macro
depot.
Select any empty macro and click , and you will then enter into the macro
MACROS

9
Krypton Dual-chassis Gaming Mouse
ENGLISH
1. Learn your useful tools
Enable Pause Key to Stop
Disable Pause Key to stop
Chose your recording objects
Keyboard and Mouse: Record both keystrokes and mouse button press.
Keyboard Only: Only record keystrokes but ignore mouse button press.
Mouse Only: Only record mouse button press but ignore keystrokes.
Time delay (interval)
No Time Delay: Do NOT record any time delay in-between commands.
Real Time Delay: Record the real delay in-between as how it is entered.
Fixed Time Delay: Key-in the time interval as a xed time delay.
Action mode
Execute Once: Execute a macro once as press the mouse button once.
Loop Mode: Execute a macro continuously, and press again to stop the
running macro.
Fire Mode: Execute a macro continuously until you release the assigned button.
How to record a macro script?
Enable/Disable Pause to stop recording

10
Krypton Dual-chassis Gaming Mouse
ENGLISH
2. Now begin to record a macro
3. More
Step1. Clicking change the tool buttons to set up your recording preference.
Step2. Click Record and start keying in keystrokes or button presses.
Step3. Click Stop to end up recording
Step4. You may also insert additional commands from the “Quick-insert bar”
at the left screen.
Step5. Type on (the blue oblong) to rename this macro. Moreover, you
may also change icon of your personal macro by clicking
Step6. Click to save the editing of this macro.
You may the macros you’d edited to the PC, and also a macro
back to GHOST macro engine.
Step5. Type on (the blue oblong) to rename this macro. Moreover, you
Step6. Click to save the editing of this macro.
You may the macros you’d edited to the PC, and also a macro
You may the macros you’d edited to the PC, and also a macro

11
Krypton Dual-chassis Gaming Mouse
ENGLISH
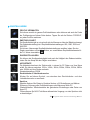
MANAGE PROFILES
You may either disable or enable a whole pro le and also change the color of the
pro le indicator in this page. Type on the characters “PROFILE” to mark each pro le.
SETTINGS
SENSITIVITY
Sensitivity is how fast the mouse cursor travels across the screen.
Default setting has 4 sensitivity stages: 800, 1600, 3200, and 5600DPI.
You can create 4 preferred sensitivity stages by moving the single adjusting slider,
and click to set different sensitivity value of X-Y axis independently.
REPORT RATE
The report rate determines the time intervals that your PC retrieves data from your
mouse. You can switch between to 125Hz, 142Hz, 166Hz, 200Hz, 250Hz, 333Hz,
500Hz, or 1000Hz on the slider.
Default setting: 500Hz
Right/Left hand mode
Clicking change this icon to change between right hand mode and left hand mode.
Memory Storage
Clean memory: Erase all data on memory, such as settings and macros
Back up: Back up the pro le settings or macros to your PC
Restore: Restore the backed up the settings or data from your PC
*Please DO NOT remove the mouse during processing in case memory damages.*
WHEEL SETTINGS
You can adjust the scrolling speed and also the wheel brightness by moving the knob
on the slider.

1
Krypton Dual-chassis Gaming Mouse
DEUTSCH
Krypton Dual-chassis
Gaming Mouse
Die Aivia Krypton Gaming-Maus verfügt über ein revolutionäres neues Dual-Maus
Chassis-Design, mit dem das Mausgehäuse auf der Stelle gewechselt werden kann.
Dies gibt dem Anwender die einzigartige Freiheit, grundlegende Mausbewegungen
und Dynamiken zu ändern, um die Anwendung optimal an die Hand anzupassen.
Aivia Krypton ermöglicht zudem ein Maximum an Kontrolle und Flexibilität, indem
sie Anwendern die Möglichkeit gibt, den Schwerpunkt und das Gewicht der Maus
anzupassen. Die GHOST Macro Engine mit eingebautem 32KB Speicher ermöglicht
Onboard-Makros für unterwegs.
Die Aivia Krypton ist mit zwei einzigartigen Gehäusevarianten ausgestattet:
- Das Speed - Gehäuse verfügt über abriebfreie Mausfüße aus Keramik, die auf
schnelle Bewegungen, sofortige Reaktion, und außergewöhnliche Geschwindigkeit
abzielen.
- Das Control-Gehäuse ist mit äußerst gleitfähigen Mausfüßen aus Teon ausgestattet,
die für präzise Bewegungen mit maximaler Kontrolle sorgen.
Einführung

2
Krypton Dual-chassis Gaming Mouse
DEUTSCH
Linksklick
Rechtsklick
Scroll Klick und Rad
On-the- y DPI-Einstellungen
Vorwärts
Rückwärts
Pro l wechseln
Vorwärts
Rückwärts
Pro l wechseln (Standardmäßig deaktiviert, Pro l wechseln im Linkshändermodus)
Speed-Gehäuse mit Abrasion-free
TM
Mausfüßen aus Keramik
Control-Gehäuse mit Ultra-durable
TM
Mausfüßen aus Te on
Standard-Tastenbelegung (Rechtshändermodus):
A
A
G
G
D
D
J
J
B
B
H
H
E
E
K
C
C
I
I
F
F
L
Mausbefehle
K
L

3
Krypton Dual-chassis Gaming Mouse
DEUTSCH
LED Anzeige
4-stufi ge DPI Anzeige
Standard: 800dpi/1600dpi/3200dpi/5600dpi
(anpassbar zwischen 400~8200dpi via GHOST
TM
Engine)
Profi lanzeige
5 Farben zur Anzeige der 5 Onboard-Pro le
(Farben anpassbar via GHOST
TM
Engine)
Tipp:
Um schnell zwischen dem Rechtshänder- und Linkshändermodus zu wechseln,
halten Sie einfach die beiden Pro ltasten länger als 3 Sekunden gedrückt. Die Maus
wird vom Linkshänder- in den Rechtshändermodus oder umgekehrt wechseln. Die
LED-Anzeige wird automatisch die korrekte Ausrichtung anzeigen, um darzustellen,
in welchem Modus die Maus gegenwärtig betrieben wird.

4
Krypton Dual-chassis Gaming Mouse
DEUTSCH
Die GHOST
TM
Macro Engine unterstützt Windows XP und Windows7. Installieren
Sie die Software, um Tasten zuzuweisen und Ihre persönlichen Prole einzurichten.
HAUPTSEITE
Die Hauptseite ist die Startseite, wenn Sie die GHOST
TM
Macro Engine das erste Mal installieren.
Wenn Sie ein anderes Aivia Produkt installieren, könnte mehr als ein Modell angezeigt werden.
Schritt1. Wählen Sie das Aivia Modell aus, das Sie einrichten möchten.
Schritt2. Klicken Sie auf “PROFILE”, um Tastenbelegungen für das entsprechende Modell
einzurichten.
Schritt3. Klicken Sie auf “EINSTELLUNGEN”, um die Leistung und Beleuchtung einzurichten,
sowie Prole zu verwalten.
Sie können auch die “ofzielle GIGABYTE Webseite” oder das “Aivia Forum” besuchen, um
weitere Produktinformationen zu erhalten.
GHOST
TM
Macro Engine

5
Krypton Dual-chassis Gaming Mouse
DEUTSCH
Auf der Registerkarte PROFILE gibt es 5 Pro le, die als 5 LED Leisten
unter PROFILE angezeigt werden und für Ihre Spiele programmiert werden
können. Eine einzelne LED Leiste zeigt das aktuelle Pro l an. In jedem Pro l können Sie
entweder die GRUNDEINSTELLUNGEN bearbeiten oder erweiterte MAKROS bestimmten Tasten
zuweisen. Klicken Sie auf die Maustaste, die Sie einrichten möchten und rufen Sie anschließend
das Funktionsmenü auf.
(Durch Anklicken des Pfeils können Sie weitere Schalt ächen aufdecken- ist
zurück zur Standardeinstellung für das aktuelle Pro l; ist zurück zum Standard für
alle 5 Pro le.)
unter PROFILE angezeigt werden und für Ihre Spiele programmiert werden
(Durch Anklicken des Pfeils können Sie weitere Schalt ächen aufdecken- ist
zurück zur Standardeinstellung für das aktuelle Pro l; ist zurück zum Standard für
PROFILE

6
Krypton Dual-chassis Gaming Mouse
DEUTSCH
1. Wählen Sie eine Tastenfunktion, die Sie ändern möchten und klicken Sie entweder auf
oder klicken Sie doppelt, um die Änderung zu speichern.
2. oder klicken Sie , um die Änderung zu ignorieren und zur vorherigen Seite
zurückzukehren.
3. oder klicken Sie auf , um zur Standardeinstellung zurückzukehren.
1. Wählen Sie eine Tastenfunktion, die Sie ändern möchten und klicken Sie entweder auf
2. oder klicken Sie , um die Änderung zu ignorieren und zur vorherigen Seite
3. oder klicken Sie auf , um zur Standardeinstellung zurückzukehren.
[GRUNDEINSTELLUNGEN] [ MAKROS ]
GRUNDEINSTELLUNGEN

7
Krypton Dual-chassis Gaming Mouse
DEUTSCH
Das Makrodepot ist der Ort, an dem Sie eine Serie von Tastatureingaben und
Tastendrücken mit präzisen Zeitintervallen für einen Spielbefehl aufzeichnen können.
Hier stehen Ihnen 70 freie Makro-Plätze zur Verfügung. De nieren Sie die Makro-
Skripte und weisen Sie sie anschließend den Maustasten zu.
Wählen Sie ein leeres Makro und klicken Sie auf , um das Makro-Depot
aufzurufen.
Wählen Sie ein leeres Makro und klicken Sie auf , um das Makro-Depot
MAKROS

8
Krypton Dual-chassis Gaming Mouse
DEUTSCH
1. Lernen Sie Ihre nützlichen Werkzeuge kennen
Pause-Taste zum Stoppen aktivieren
Pause-Taste zum Stoppen deaktivieren
Auswahl Ihrer aufgezeichneten Skripte
Tastatur und Maus: Aufzeichnung von Tastatureingaben und Drücken
der Maustasten.
Nur Tastatur: Nur Aufzeichnung von Tastatureingaben, aber Ignorieren
von Drücken der Maustasten.
Nur Maus: Nur Aufzeichnung der Drücke der Maustasten, aber
Ignorieren von Tastatureingaben.
Zeitverzögerung (Intervall)
Keine Zeitverzögerung: KEINE Zeitverzögerung zwischen den Befehlen
aufzeichnen.
Echtzeitverzögerung: Verzögerungen in Echtzeit aufzeichnen.
Feste Zeitverzögerung: Geben Sie ein Zeitintervall als feste
Zeitverzögerung an.
Aktionsmodus
Ein Mal ausführen: Ein Makro ein Mal ausführen, wenn die Maustaste ein
Mal gedrückt wird.
Dauermodus: Ein Makro dauerhaft ausführen. Erneut drücken, um das
laufende Makro zu stoppen.
Feuermodus: Ein Makro dauerhaft ausführen, bis Sie die zugewiesene
Taste loslassen.
Wie wird ein Makro-Skript aufgezeichnet?
Pause zum Stoppen der Aufzeichnung aktivieren/deaktivieren
Seite wird geladen ...
Seite wird geladen ...
Seite wird geladen ...
Seite wird geladen ...
Seite wird geladen ...
Seite wird geladen ...
Seite wird geladen ...
Seite wird geladen ...
Seite wird geladen ...
Seite wird geladen ...
Seite wird geladen ...
Seite wird geladen ...
Seite wird geladen ...
Seite wird geladen ...
Seite wird geladen ...
Seite wird geladen ...
Seite wird geladen ...
Seite wird geladen ...
Seite wird geladen ...
Seite wird geladen ...
Seite wird geladen ...
Seite wird geladen ...
Seite wird geladen ...
Seite wird geladen ...
Seite wird geladen ...
Seite wird geladen ...
Seite wird geladen ...
Seite wird geladen ...
Seite wird geladen ...
Seite wird geladen ...
Seite wird geladen ...
Seite wird geladen ...
Seite wird geladen ...
Seite wird geladen ...
Seite wird geladen ...
Seite wird geladen ...
Seite wird geladen ...
Seite wird geladen ...
Seite wird geladen ...
Seite wird geladen ...
Seite wird geladen ...
Seite wird geladen ...
Seite wird geladen ...
Seite wird geladen ...
Seite wird geladen ...
Seite wird geladen ...
Seite wird geladen ...
Seite wird geladen ...
Seite wird geladen ...
Seite wird geladen ...
Seite wird geladen ...
Seite wird geladen ...
Seite wird geladen ...
Seite wird geladen ...
Seite wird geladen ...
Seite wird geladen ...
Seite wird geladen ...
Seite wird geladen ...
Seite wird geladen ...
Seite wird geladen ...
Seite wird geladen ...
Seite wird geladen ...
Seite wird geladen ...
Seite wird geladen ...
Seite wird geladen ...
Seite wird geladen ...
Seite wird geladen ...
Seite wird geladen ...
Seite wird geladen ...
Seite wird geladen ...
Seite wird geladen ...
Seite wird geladen ...
-
 1
1
-
 2
2
-
 3
3
-
 4
4
-
 5
5
-
 6
6
-
 7
7
-
 8
8
-
 9
9
-
 10
10
-
 11
11
-
 12
12
-
 13
13
-
 14
14
-
 15
15
-
 16
16
-
 17
17
-
 18
18
-
 19
19
-
 20
20
-
 21
21
-
 22
22
-
 23
23
-
 24
24
-
 25
25
-
 26
26
-
 27
27
-
 28
28
-
 29
29
-
 30
30
-
 31
31
-
 32
32
-
 33
33
-
 34
34
-
 35
35
-
 36
36
-
 37
37
-
 38
38
-
 39
39
-
 40
40
-
 41
41
-
 42
42
-
 43
43
-
 44
44
-
 45
45
-
 46
46
-
 47
47
-
 48
48
-
 49
49
-
 50
50
-
 51
51
-
 52
52
-
 53
53
-
 54
54
-
 55
55
-
 56
56
-
 57
57
-
 58
58
-
 59
59
-
 60
60
-
 61
61
-
 62
62
-
 63
63
-
 64
64
-
 65
65
-
 66
66
-
 67
67
-
 68
68
-
 69
69
-
 70
70
-
 71
71
-
 72
72
-
 73
73
-
 74
74
-
 75
75
-
 76
76
-
 77
77
-
 78
78
-
 79
79
-
 80
80
-
 81
81
-
 82
82
-
 83
83
-
 84
84
-
 85
85
-
 86
86
-
 87
87
-
 88
88
-
 89
89
-
 90
90
-
 91
91
-
 92
92


Gigabyte Aivia Krypton Benutzerhandbuch
- Typ
- Benutzerhandbuch
- Dieses Handbuch eignet sich auch für
in anderen Sprachen
Verwandte Artikel
-
Gigabyte GM-M8000 Bedienungsanleitung
-
-
Gigabyte Aivia M8600 Benutzerhandbuch
-
Gigabyte GAMER M6980X Bedienungsanleitung
-
Gigabyte GAMER M6980X Benutzerhandbuch
-
-
Gigabyte AIVIA K8100 M6980X Benutzerhandbuch
-
-
Gigabyte Aivia Uranium Bedienungsanleitung
-
Gigabyte K8100V2 Benutzerhandbuch