Electrolux ERN29651 Benutzerhandbuch
- Kategorie
- Kombikühlschränke
- Typ
- Benutzerhandbuch

user manual
kasutusjuhend
käyttöohje
benutzerinformation
Οδηγίες Χρήσης
Fridge-Freezer
Külmik-sügavkülmuti
Jääkaappi-pakastin
Kühl-/Gefrierschrank
Ψυγειοκαταψύκτης
ERN29651

Electrolux. Thinking of you.
Share more of our thinking at www.electrolux.com
Contents
Safety information 2
Operation 4
Control panel 4
First use 5
Daily use 5
Helpful hints and tips 7
Care and cleaning 8
What to do if… 10
Technical data 12
Installation 12
Environmental concerns 16
Subject to change without notice
Safety information
In the interest of your safety and to ensure
the correct use, before installing and first us-
ing the appliance, read this user manual
carefully, including its hints and warnings. To
avoid unnecessary mistakes and accidents,
it is important to ensure that all people using
the appliance are thoroughly familiar with its
operation and safety features. Save these in-
structions and make sure that they remain
with the appliance if it is moved or sold, so
that everyone using it through its life will be
properly informed on appliance use and safe-
ty.
For the safety of life and property keep the
precautions of these user's instructions as
the manufacturer is not responsible for dam-
ages caused by omission.
Children and vulnerable people safety
• This appliance is not intended for use by
persons (including children) with reduced
physical, sensory or mental capabilities, or
lack of experience and knowledge, unless
they have been given supervision or in-
struction concerning use of the appliance
by a person responsible for their safety.
Children should be supervised to ensure
that they do not play with the appliance.
• Keep all packaging well away from chil-
dren. There is risk of suffocation.
• If you are discarding the appliance pull the
plug out of the socket, cut the connection
cable (as close to the appliance as you
can) and remove the door to prevent play-
ing children to suffer electric shock or to
close themselves into it.
• If this appliance featuring magnetic door
seals is to replace an older appliance hav-
ing a spring lock (latch) on the door or lid,
be sure to make that spring lock unusable
before you discard the old appliance. This
will prevent it from becoming a death trap
for a child.
General safety
Caution! Keep ventilation openings
clear of obstruction.
• The appliance is intended for keeping
foodstuff and/or beverages in a normal
household as explained in this instruction
booklet.
• Do not use a mechanical device or any ar-
tificial means to speed up the thawing
process.
• Do not use other electrical appliances
(such as ice cream makers) inside of re-
frigerating appliances, unless they are ap-
proved for this purpose by the manufac-
turer.
• Do not damage the refrigerant circuit.
2 electrolux

• The refrigerant isobutane (R600a) is con-
tained within the refrigerant circuit of the
appliance, a natural gas with a high level of
environmental compatibility, which is nev-
ertheless flammable.
During transportation and installation of
the appliance, be certain that none of the
components of the refrigerant circuit be-
come damaged.
If the refrigerant circuit should become
damaged:
– avoid open flames and sources of igni-
tion
– thoroughly ventilate the room in which
the appliance is situated
• It is dangerous to alter the specifications or
modify this product in any way. Any dam-
age to the cord may cause a short-circuit,
fire and/or electric shock.
Warning! Any electrical component
(power cord, plug, compressor) must be
replaced by a certified service agent or
qualified service personnel.
1. Power cord must not be lengthened.
2. Make sure that the power plug is not
squashed or damaged by the back of
the appliance. A squashed or dam-
aged power plug may overheat and
cause a fire.
3. Make sure that you can come to the
mains plug of the appliance.
4. Do not pull the mains cable.
5. If the power plug socket is loose, do
not insert the power plug. There is a
risk of electric shock or fire.
6. You must not operate the appliance
without the lamp cover
1)
of interior
lighting.
• This appliance is heavy. Care should be
taken when moving it.
• Do not remove nor touch items from the
freezer compartment if your hands are
damp/wet, as this could cause skin abra-
sions or frost/freezer burns.
• Avoid prolonged exposure of the appli-
ance to direct sunlight.
Daily Use
• Do not put hot pot on the plastic parts in
the appliance.
• Do not store flammable gas and liquid in
the appliance, because they may explode.
• Do not place food products directly
against the air outlet on the rear wall.
2)
• Frozen food must not be re-frozen once it
has been thawed out.
• Store pre-packed frozen food in accord-
ance with the frozen food manufacturer's
instructions.
• Appliance's manufacturers storage rec-
ommendations should be strictly adhered
to. Refer to relevant instructions.
• Do not place carbonated or fizzy drinks in
the freezer compartment as it creates
pressure on the container, which may
cause it to explode, resulting in damage to
the appliance.
• Ice lollies can cause frost burns if con-
sumed straight from the appliance.
Care and cleaning
• Before maintenance, switch off the appli-
ance and disconnect the mains plug from
the mains socket.
• Do not clean the appliance with metal ob-
jects.
• Do not use sharp objects to remove frost
from the appliance. Use a plastic scraper.
• Regularly examine the drain in the refriger-
ator for defrosted water. If necessary,
clean the drain. If the drain is blocked, wa-
ter will collect in the bottom of the appli-
ance.
Installation
Important! For electrical connection
carefully follow the instructions given in
specific paragraphs.
• Unpack the appliance and check if there
are damages on it. Do not connect the ap-
pliance if it is damaged. Report possible
damages immediately to the place you
bought it. In that case retain packing.
• It is advisable to wait at least four hours
before connecting the appliance to allow
the oil to flow back in the compressor.
1) If the lamp cover is foreseen
2) If the appliance is Frost Free
electrolux 3

• Adequate air circulation should be around
the appliance, lacking this leads to over-
heating. To achieve sufficient ventilation
follow the instructions relevant to installa-
tion.
• Wherever possible the back of the product
should be against a wall to avoid touching
or catching warm parts (compressor, con-
denser) to prevent possible burn.
• The appliance must not be located close
to radiators or cookers.
• Make sure that the mains plug is accessi-
ble after the installation of the appliance.
•
Connect to potable water supply only.
3)
Service
• Any electrical work required to do the serv-
icing of the appliance should be carried out
by a qualified electrician or competent per-
son.
• This product must be serviced by an au-
thorized Service Centre, and only genuine
spare parts must be used.
Environment Protection
This appliance does not contain gasses
which could damage the ozone layer, in
either its refrigerant circuit or insulation
materials. The appliance shall not be dis-
carded together with the urban refuse
and rubbish. The insulation foam con-
tains flammable gases: the appliance
shall be disposed according to the ap-
plicable regulations to obtain from your
local authorities. Avoid damaging the
cooling unit, especially at the rear near
the heat exchanger. The materials used
on this appliance marked by the symbol
are recyclable.
Operation
Switching on
Insert the plug into the wall socket.
Turn the Temperature regulator clockwise to
a medium setting.
Switching off
To turn off the appliance, turn the Tempera-
ture regulator to the "O" position.
Temperature regulation
The temperature is automatically regulated.
To operate the appliance, proceed as fol-
lows:
• turn the Temperature regulator toward
lower settings to obtain the minimum cold-
ness.
• turn the Temperature regulator toward
higher settings to obtain the maximum
coldness.
A medium setting is generally the most
suitable.
However, the exact setting should be chosen
keeping in mind that the temperature inside
the appliance depends on:
• room temperature
• how often the door is opened
• the quantity of food stored
• the location of the appliance.
Important! If the ambient temperature is
high or the appliance is fully loaded, and the
appliance is set to the lowest temperatures,
it may run continuously causing frost to form
on the rear wall. In this case the dial must be
set to a higher temperature to allow
automatic defrosting and therefore reduced
energy consumption.
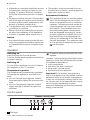
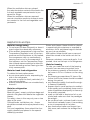
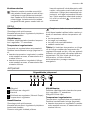
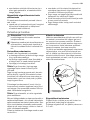
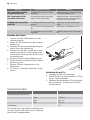
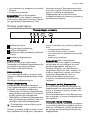
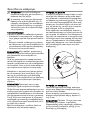
Control panel
Freezer control panel
5
6
4
1
2
3
1 2 3 4 5
1 Pilot light
3) If a water connection is foreseen
4 electrolux

2 Fast Freezing light
3 Alarm light
4 Fast Freezing regulator (Normal-Super)
5 Temperature regulator
Switching on
Insert the plug into the wall socket.
Turn the Temperature setting regulator
clockwise to a medium setting.
The pilot light will light up.
Switching off
To turn off the appliance, turn the Tempera-
ture regulator to the "O" position.
The pilot light will switch off.
Temperature regulation
The temperature is automatically regulated.
To operate the appliance, proceed as fol-
lows:
• turn the Temperature regulator toward
lower settings to obtain the minimum cold-
ness.
• turn the Temperature regulator toward
higher settings to obtain the maximum
coldness.
A medium setting is generally the most
suitable.
However, the exact setting should be chosen
keeping in mind that the temperature inside
the appliance depends on:
• room temperature
• how often the door is opened
• the quantity of food stored
• the location of the appliance.
Important! If the ambient temperature is
high or the appliance is fully loaded, and the
appliance is set to the lowest temperatures,
it may run continuously causing frost to form
on the rear wall. In this case the dial must be
set to a higher temperature to allow
automatic defrosting and therefore reduced
energy consumption.
High temperature alarm
In the event of an abnormal temperature rise
inside the freezer (e.g. power cut) alarm light
comes on.
When normal conditions are restored the
alarm light will switch off automatically.
Fast Freezing Function
The Fast Freezing function accelerates the
freezing of fresh food and, at the same time,
protects foodstuffs already stored from un-
desirable warming.
To activate the function, do these steps:
Turn the Fast freezing regulator to "S".
The Fast freezing light will light up.
To deactivate the function, do these steps:
Turn the Fast freezing regulator to "N".
The Fast freezing light goes out.
First use
Cleaning the interior
Before using the appliance for the first time,
wash the interior and all internal accessories
with lukewarm water and some neutral soap
so as to remove the typical smell of a brand-
new product, then dry thoroughly.
Important! Do not use detergents or abra-
sive powders, as these will damage the fin-
ish.
Daily use
Freezing fresh food
The freezer compartment is suitable for
freezing fresh food and storing frozen and
deep-frozen food for a long time.
To freeze fresh food activate the Fast Freez-
ing function at least 24 hours before placing
the food to be frozen in the freezer compart-
ment.
Place the fresh food to be frozen in the top
compartment.
The maximum amount of food that can be
frozen in 24 hours is specified on the rating
plate , a label located on the inside of the
appliance.
The freezing process lasts 24 hours: during
this period do not add other food to be fro-
zen.
electrolux 5

Storage of frozen food
When first starting-up or after a period out of
use, before putting the products in the com-
partment let the appliance run at least 2
hours on the higher settings.
If large quantities of food are to be stored,
remove all drawers and baskets from appli-
ance and place food on cooling shelves to
obtain the best performance.
Warning! Make sure that foods do not
exceed the load limit stated on the side
of the upper section (where applicable)
Important! In the event of accidental
defrosting, for example due to a power
failure, if the power has been off for longer
that the value shown in the technical
characteristics chart under "rising time", the
defrosted food must be consumed quickly or
cooked immediately and then re-frozen (after
cooling).
Freezing Calendar
The symbols show different types of frozen
goods.
The numbers indicate storage times in
months for the appropriate types of frozen
goods. Whether the upper or lower value of
the indicated storage time is valid depends
on the quality of the foods and treating before
freezing.
Thawing
Deep-frozen or frozen food, prior to being
used, can be thawed in the refrigerator com-
partment or at room temperature, depending
on the time available for this operation.
Small pieces may even be cooked still frozen,
directly from the freezer: in this case, cooking
will take longer.
Ice-cube production
This appliance is equipped with one or more
trays for the production of ice-cubes. Fill
these trays with water, then put them in the
freezer compartment.
Important! Do not use metallic instruments
to remove the trays from the freezer.
Movable shelves
The walls of the refrigerator are equipped
with a series of runners so that the shelves
can be positioned as desired.
For better use of space, the front half-shelves
can lie over the rear ones.
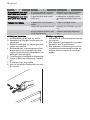
Positioning the door shelves
To permit storage of food packages of vari-
ous sizes, the door shelves can be placed at
different heights.
To make these adjustments proceed as fol-
lows:
gradually pull the shelf in the direction of the
arrows until it comes free, then reposition as
required.
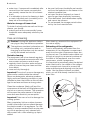
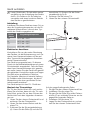
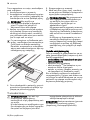
Humidity control
The glass shelf incorporates a device with
slits (adjustable by means of a sliding lever),
which makes it possible to regulate the tem-
perature in the vegetable drawer(s).
6 electrolux

When the ventilation slots are closed:
the natural moisture content of the food in the
fruit and vegetable compartments is pre-
served for longer.
When the ventilation slots are opened:
more air circulation results in a lower air mois-
ture content in the fruit and vegetable com-
partments.
Helpful hints and tips
Hints for energy saving
• Do not open the door frequently or leave it
open longer than absolutely necessary.
• If the ambient temperature is high and the
Temperature Regulator is set to low tem-
perature and the appliance is fully loaded,
the compressor may run continuously,
causing frost or ice on the evaporator. If
this happens, set the Temperature Regu-
lator toward warmer settings to allow au-
tomatic defrosting and so a saving in elec-
tricity consumption.
Hints for fresh food refrigeration
To obtain the best performance:
• do not store warm food or evaporating liq-
uids in the refrigerator
• do cover or wrap the food, particularly if it
has a strong flavour
• position food so that air can circulate freely
around it
Hints for refrigeration
Useful hints:
Meat (all types) : wrap in polythene bags and
place on the glass shelf above the vegetable
drawer.
For safety, store in this way only one or two
days at the most.
Cooked foods, cold dishes, etc..: these
should be covered and may be placed on any
shelf.
Fruit and vegetables: these should be thor-
oughly cleaned and placed in the special
drawer(s) provided.
Butter and cheese: these should be placed
in special airtight containers or wrapped in
aluminium foil or polythene bags to exclude
as much air as possible.
Milk bottles: these should have a cap and
should be stored in the bottle rack on the
door.
Bananas, potatoes, onions and garlic, if not
packed, must not be kept in the refrigerator.
Hints for freezing
To help you make the most of the freezing
process, here are some important hints:
• the maximum quantity of food which can
be frozen in 24 hrs. is shown on the rating
plate;
• the freezing process takes 24 hours. No
further food to be frozen should be added
during this period;
• only freeze top quality, fresh and thorough-
ly cleaned, foodstuffs;
• prepare food in small portions to enable it
to be rapidly and completely frozen and to
make it possible subsequently to thaw only
the quantity required;
• wrap up the food in aluminium foil or pol-
ythene and make sure that the packages
are airtight;
• do not allow fresh, unfrozen food to touch
food which is already frozen, thus avoiding
a rise in temperature of the latter;
• lean foods store better and longer than
fatty ones; salt reduces the storage life of
food;
electrolux 7

• water ices, if consumed immediately after
removal from the freezer compartment,
can possibly cause the skin to be freeze
burnt;
• it is advisable to show the freezing in date
on each individual pack to enable you to
keep tab of the storage time.
Hints for storage of frozen food
To obtain the best performance from this ap-
pliance, you should:
• make sure that the commercially frozen
foodstuffs were adequately stored by the
retailer;
• be sure that frozen foodstuffs are transfer-
red from the foodstore to the freezer in the
shortest possible time;
• not open the door frequently or leave it
open longer than absolutely necessary.
• Once defrosted, food deteriorates rapidly
and cannot be refrozen.
• Do not exceed the storage period indica-
ted by the food manufacturer.
Care and cleaning
Caution! Unplug the appliance before
carrying out any maintenance operation.
This appliance contains hydrocarbons in
its cooling unit; maintenance and re-
charging must therefore only be carried
out by authorized technicians.
Periodic cleaning
The equipment has to be cleaned regularly:
• clean the inside and accessories with luke-
warm water and some neutral soap.
• regularly check the door seals and wipe
clean to ensure they are clean and free
from debris.
• rinse and dry thoroughly.
Important! Do not pull, move or damage any
pipes and/or cables inside the cabinet.
Never use detergents, abrasive powders,
highly perfumed cleaning products or wax
polishes to clean the interior as this will dam-
age the surface and leave a strong odour.
Clean the condenser (black grill) and the
compressor at the back of the appliance with
a brush or a vacuum cleaner. This operation
will improve the performance of the appli-
ance and save electricity consumption.
Important! Take care of not to damage the
cooling system.
Many proprietary kitchen surface cleaners
contain chemicals that can attack/damage
the plastics used in this appliance. For this
reason it is recommended that the outer cas-
ing of this appliance is only cleaned with
warm water with a little washing-up liquid
added.
After cleaning, reconnect the equipment to
the mains supply.
Defrosting of the refrigerator
Frost is automatically eliminated from the
evaporator of the refrigerator compartment
every time the motor compressor stops, dur-
ing normal use. The defrost water drains out
through a trough into a special container at
the back of the appliance, over the motor
compressor, where it evaporates.
It is important to periodically clean the defrost
water drain hole in the middle of the refriger-
ator compartment channel to prevent the
water overflowing and dripping onto the food
inside. Use the special cleaner provided,
which you will find already inserted into the
drain hole.
8 electrolux

Defrosting the freezer
A certain amount of frost will always form on
the freezer shelves and around the top com-
partment.
Defrost the freezer when the frost layer rea-
ches a thickness of about 3-5 mm.
Important! About 12 hours prior to
defrosting, set the Temperature regulator
toward higher settings , in order to build up
sufficient chill reserve for the interruption in
operation.
To remove the frost, follow the instructions
below:
1. Switch off the appliance.
2. Remove any stored food, wrap it in sev-
eral layers of newspaper and put it in a
cool place.
Caution! Do not touch frozen goods
with wet hands. Hands can freeze to the
goods.
3. Leave the door open and insert the plas-
tic scraper in the appropriate seating at
the bottom centre, placing a basin un-
derneath to collect the defrost water
In order to speed up the defrosting proc-
ess, place a pot of warm water in the
freezer compartment. In addition, re-
move pieces of ice that break away be-
fore defrosting is complete.
4. When defrosting is completed, dry the in-
terior thoroughly and keep the scraper for
future use.
5. Switch on the appliance.
6. After two or three hours, reload the pre-
viously removed food into the compart-
ment.
Warning! Never use sharp metal tools
to scrape off frost from the evaporator
as you could damage it.
Do not use a mechanical device or any
artificial means to speed up the thawing
process other than those recommended
by the manufacturer.
A temperature rise of the frozen food
packs, during defrosting, may shorten
their safe storage life.
Periods of non-operation
When the appliance is not in use for long pe-
riods, take the following precautions:
• disconnect the appliance from elec-
tricity supply
• remove all food
•
defrost
4)
and clean the appliance and all
accessories
• leave the door/doors ajar to prevent un-
pleasant smells.
If the cabinet will be kept on, ask somebody
to check it once in a while to prevent the food
inside from spoiling in case of a power failure.
4) If foreseen.
electrolux 9

What to do if…
Warning! Before troubleshooting,
disconnect the mains plug from the
mains socket.
Only a qualified electrician or competent
person must do the troubleshooting that
is not in this manual.
Important! There are some sounds during
normal use (compressor, refrigerant
circulation).
Problem Possible cause Solution
The appliance does not
operate. The lamp does
not operate.
The appliance is switched off. Switch on the appliance.
The mains plug is not connected
to the mains socket correctly.
Connect the mains plug to the
mains socket correctly.
The appliance has no power.
There is no voltage in the mains
socket.
Connect a different electrical appli-
ance to the mains socket.
Contact a qualified electrician.
The lamp does not work.
The lamp is in stand-by. Close and open the door.
The lamp is defective. Refer to "Replacing the lamp".
The compressor operates
continually.
The temperature is not set cor-
rectly.
Set a higher temperature.
The door is not closed correctly. Refer to "Closing the door".
The door has been opened too
frequently.
Do not keep the door open longer
than necessary.
The product temperature is too
high.
Let the product temperature de-
crease to room temperature before
storage.
The room temperature is too
high.
Decrease the room temperature.
Water flows on the rear
plate of the refrigerator.
During the automatic defrosting
process, frost defrosts on the rear
plate.
This is correct.
Water flows into the re-
frigerator.
The water outlet is clogged. Clean the water outlet.
Products prevent that water flows
into the water collector.
Make sure that products do not
touch the rear plate.
Water flows on the
ground.
The melting water outlet does not
flow in the evaporative tray above
the compressor.
Attach the melting water outlet to
the evaporative tray.
The temperature in the
appliance is too low.
The temperature regulator is not
set correctly.
Set a higher temperature.
The temperature in the
appliance is too high.
The temperature regulator is not
set correctly.
Set a lower temperature.
The door is not closed correctly. Refer to "Closing the door".
The product temperature is too
high.
Let the product temperature de-
crease to room temperature before
storage.
Many products are stored at the
same time.
Store less products at the same
time.
10 electrolux

Problem Possible cause Solution
The temperature in the re-
frigerator is too high.
There is no cold air circulation in
the appliance.
Make sure that there is cold air cir-
culation in the appliance.
The temperature in the
freezer is too high.
Products are too near to each
other.
Store products so that there is cold
air circulation.
There is too much frost.
Food is not wrapped correctly. Wrap the food correctly.
The door is not closed correctly. Refer to "Closing the door".
The temperature regulator is not
set correctly.
Set a higher temperature.
Replacing the lamp
1. Disconnect the mains plug from the
mains socket.
2. Remove the screw from the lamp cover.
3. Remove the lamp cover (refer to the illus-
tration).
4. Replace the used lamp with a new lamp
of the same power (the maximum power
is shown on the lamp cover).
5. Install the lamp cover.
6. Tighten the screw to the lamp cover.
7. Connect the mains plug to the mains
socket.
8. Open the door. Make sure that the lamp
comes on.
Closing the door
1. Clean the door gaskets.
2. If necessary, adjust the door. Refer to "In-
stallation".
3. If necessary, replace the defective door
gaskets. Contact the Service Center.
electrolux 11

Technical data
Dimension of the recess
Height 1780 mm
Width 560 mm
Depth 550 mm
Rising Time 20 h
The technical information are situated in the
rating plate on the internal left side of the ap-
pliance and in the energy label.
Installation
Read the "Safety Information" carefully
for your safety and correct operation of
the appliance before installing the
appliance.
Positioning
Install this appliance at a location where the
ambient temperature corresponds to the cli-
mate class indicated on the rating plate of the
appliance:
Climate
class
Ambient temperature
SN +10°C to + 32°C
N +16°C to + 32°C
ST +16°C to + 38°C
T +16°C to + 43°C
Electrical connection
Before plugging in, ensure that the voltage
and frequency shown on the rating plate cor-
respond to your domestic power supply.
The appliance must be earthed. The power
supply cable plug is provided with a contact
for this purpose. If the domestic power sup-
ply socket is not earthed, connect the appli-
ance to a separate earth in compliance with
current regulations, consulting a qualified
electrician.
The manufacturer declines all responsibility if
the above safety precautions are not ob-
served.
This appliance complies with the E.E.C. Di-
rectives.
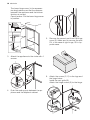
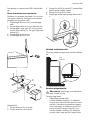
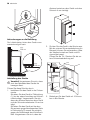
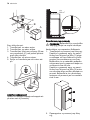
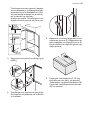
Door reversibility
The door of the appliance opens to the right.
If you want to open the door to the left, do
these steps before you install the appliance:
1. Loosen the upper pin and remove the
spacer.
2. Remove the upper pin and the upper
door.
3. Remove the hinge cover (A). Unscrew the
pins (B) and spacers (C). Fit the hinge
cover (A).
4. Remove the lower door.
5. Loosen the lower pin.
12 electrolux

A
B
C
On the opposite side:
1. Install the lower pin.
2. Install the lower door.
3. Refit the pins (B) and the spacers (C) on
the middle hinge on the opposite side.
4. Install the upper door.
5. Tighten the spacer and tighten the upper
pin.
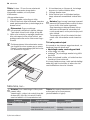
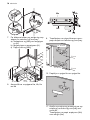
Ventilation requirements
The airflow behind the appliance must be
sufficient.
min.
200 cm
2
min.
200 cm
2
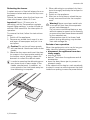
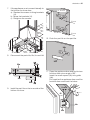
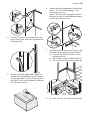
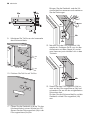
Installing the appliance
Caution! Make sure that the mains
cable can move freely.
Do these steps.
1. Install the appliance in the niche.
Push the appliance in the direction of the
arrows (1) until the upper gap cover
stops against the kitchen furniture. Make
sure that the distance between the ap-
pliance and the cupboard front-edge is
44 mm.
Push the appliance in the direction of the
arrows (2) against the cupboard on the
opposite side of the hinge. Make sure
that the clearance between the appli-
ance and the cupboard is 4 mm.
1
2
2. Adjust the appliance in the niche.
electrolux 13

The lower hinge cover (in the accesso-
ries bag) makes sure that the distance
between the appliance and the kitchen
furniture is correct.
Open the door. Put the lower hinge cover
in position.
44mm
4mm
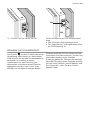
3. Attach the appliance to the niche with 4
screws.
I
4. Push the sealing strip between the ap-
pliance and the adjacent cabinet.
5. Remove the correct part from the hinge
cover (E). Make sure to remove the part
DX, in the case of right hinge, SX in op-
posite case.
6. Attach the covers (C, D) to the lugs and
the hinge holes.
Install the vent grille (B).
Attach the hinge covers (E) to the hinge.
B
E
E
D
C
14 electrolux

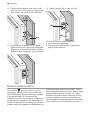
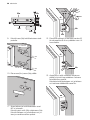
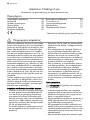
7. If the appliance must connect laterally to
the kitchen furniture door:
a) Slacken the screws in fixing brackets
(H).
b) Move the brackets (H).
c) Retighten the screws.
8. Disconnect the parts Ha, Hb, Hc and Hd
Ha
Hb
Hc
Hd
9. Install the part Ha on the inner side of the
kitchen furniture.
ca. 50 mm
ca. 50 mm
21 mm
90°
90°
21 mm
10. Push the part Hc on the part Ha.
Ha
Hc
11. Open the appliance door and the kitchen
furniture door at an angle of 90°.
Insert the small square (Hb) into guide
(Ha).
Put together the appliance door and the
furniture door and mark the holes.
Ha
Hb
8 mm
electrolux 15

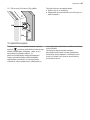
12. Remove the brackets and mark a dis-
tance of 8 mm from the outer edge of the
door where the nail must be fitted (K).
Ha
K
8 mm
13. Place the small square on the guide
again and fix it with the screws supplied.
Align the kitchen furniture door and the
appliance door by adjusting the part Hb.
Hb
14. Press the part Hd on the part Hb.
Hb
Hd
Do a final check to make sure that:
• All screws are tightened.
• The magnetic sealing strip is attached
tightly to the cabinet.
Environmental concerns
The symbol on the product or on its
packaging indicates that this product may
not be treated as household waste. Instead
it should be taken to the appropriate
collection point for the recycling of electrical
and electronic equipment. By ensuring this
product is disposed of correctly, you will help
prevent potential negative consequences for
the environment and human health, which
could otherwise be caused by inappropriate
waste handling of this product. For more
detailed information about recycling of this
product, please contact your local council,
your household waste disposal service or the
shop where you purchased the product.
16 electrolux

Electrolux. Thinking of you.
Tulge jagama meie mõtteid aadressil www.electrolux.com
Sisukord
Ohutusinfo 17
Käitus 19
Juhtpaneel 19
Esimene kasutamine 20
Igapäevane kasutamine 20
Vihjeid ja näpunäiteid 22
Puhastus ja hooldus 23
Mida teha, kui... 24
Tehnilised andmed 26
Paigaldamine 26
Keskkonnainfo 30
Jäetakse õigus teha muutusi
Ohutusinfo
Teie turvalisuse huvides ning tagamaks õiget
kasutamist lugege kasutusjuhend, sh näpu-
näited ja hoiatused, hoolikalt läbi, enne kui
paigaldate masina ja kasutate seda esimest
korda. Et vältida asjatuid vigu ja õnnetusi, on
tähtis tagada, et kõik seadet kasutavad ini-
mesed tunneksid põhjalikult selle käitamist ja
ohutusseadiseid. Hoidke need juhised alles
ja veenduge, et need oleksid alati seadmega
kaasas, kui selle asukohta muudetakse või
seadme müümise korral, nii et kõik kasutajad
oleksid kogu seadme kasutusaja jooksul sel-
le kasutamisest ja ohutusest põhjalikult infor-
meeritud.
Elu ja materiaalse vara turvalisuse huvides
tuleb kinni pidada selles kasutusjuhendis
toodud ettevaatusabinõudest, sest mittejär-
gimisest tingitud kahjustuste eest tootja ei
vastuta.
Laste ja riskirühma kuuluvate inimeste
turvalisus
• See seade ei ole ette nähtud kasutamiseks
isikute (sh laste) poolt, kelle füüsilised, sen-
soorsed või vaimsed võimed või kogemu-
se ja teadmiste puudus seda ei võimalda,
v.a. juhul, kui nende üle teostab järelvalvet
või neid juhendab seadme kasutamisel
isik, kes nende turvalisuse eest vastutab.
Laste puhul tuleb jälgida, et nad seadmega
mängima ei hakkaks.
• Hoidke kogu pakend lastele kättesaama-
tus kohas. Lämbumisoht.
• Seadme utiliseerimisel tõmmake pistik pe-
sast välja, lõigake toitekaabel läbi (võima-
likult seadme lähedalt) ja võtke ära uks, et
mängivad lapsed ei saaks elektrilööki ega
sulgeks end kappi.
• Juhul kui käesolev magnetiseeritud ukse-
tihenditega versioon vahetab välja vanema
vedrulukustussüsteemiga seadme, siis
enne vana seadme äraviskamist veendu-
ge, et lukustusmehhanismi poleks võimalik
enam kasutada. Vastasel juhul võib seade
muutuda lapse jaoks surmalõksuks.
Üldised ohutusjuhised
Ettevaatust Hoidke ventilatsiooniavad
vabadena.
• Nagu kasutusjuhendis selgitatud on seade
ette nähtud toiduainete ja/või jookide säili-
tamiseks tavalises kodumajapidamises.
• Ärge kasutage sulatusprotsessi kiirenda-
miseks mehhaanilisi vahendeid või kunst-
likke abivahendeid.
• Ärge kasutage muid elektrilisi seadmeid
(jäätise tegijad) jahutusseadme sees.
• Ärge kahjustage jahutusvedeliku voolua-
helat.
• Seadme jahutusvedeliku ahel sisaldab ja-
hutusvedelikku isobutaan (R600a). Tege-
mist on keskkonnasõbraliku maagaasiga,
mis on aga kergestisüttiv.
Seadme transportimisel ja paigaldamisel
tuleb veenduda, et ükski jahutusvedeliku
ahela komponent viga ei saaks.
Kui jahutusvedeliku ahel on viga saanud:
– vältige lahtist leeki ja sädemeid
– õhutage põhjalikult ruumi, kus seade
asub
electrolux 17

• On ohtlik on teha muudatusi seadme spet-
sifikatsioonidesse või muuta toodet mingil
moel. Katkine toitekaabel võib põhjustada
lühise, tulekahju ja/või elektrilöögi.
Hoiatus Kõik elektrilised komponendid
(toitekaabel, pistik, kompressor) peab
välja vahetama volitatud teenindusagent
või kvalifitseeritud teeninduspersonal.
1. Toitekaablit ei tohi pikendada.
2. Veenduge, et toitepistik ei oleks sead-
me taga katki surutud või viga saanud.
Katkine või vigastatud toitepistik võib
üle kuumeneda ja põhjustada tulekah-
ju.
3. Veenduge, et saate toitepistikule ligi
pääseda.
4. Ärge tõmmake toitekaablist.
5. Kui toitepistiku pesa on lahti, et tohi
pistikut sellesse ühendada. Elektrilöögi
või tuleoht.
6. Seadet ei tohi kasutada ilma lambikat-
teta
5)
sisemuse valgustamiseks.
• Seade kaalub palju. Selle tõstmisel tuleb
ettevaatlik olla.
• Ärge eemaldage ega puudutage sügav-
külmutuses olevaid toiduaineid, kui teie
käed on niisked/märjad, sest see võib
põhjustada naha marrastusi või külmapõ-
letusi.
• Ärge hoidke seadet otsese päiksevalguse
käes.
Igapäevane kasutamine
• Ärge asetage tuliseid nõusid seadme
plastmassist osadele.
• Ärge hoidke seadmes kergestisüttivat
gaasi või vedelikku, sest need võivad plah-
vatada.
• Ärge asetage toiduaineid otse vastu taga-
seinas olevat õhuava.
6)
• Külmutatud toituaineid ei tohi pärast sula-
tamist uuesti külmutada.
• Säilitage eelpakendatud sügavkülmutatud
toitu vastavalt toidu tootja juhistele.
• Rangelt tuleb järgida seadme tootja pool-
seid hoiustamisnõuandeid. Vaadake vas-
tavaid juhiseid.
• Ärge paigaldage külmikusse gaseeritud
jooke, kuna see tekitab anumas rõhju, mis
võib põhjustada plahvatuse, mis omakor-
da kahjustab seadet.
• Seadmega tehtud jää võib otse seadmest
söömisel külmapõletust tekitada.
Hooldus ja puhastamine
• Enne hooldust lülitage seade välja ja ühen-
dage toitejuhe pistikust lahti. Kui te ei pää-
se pistikule ligi, katkestage toide.
• Ärge puhastage seadet metallesemetega.
• Ärge kasutage jää eemaldamisel teravaid
esemeid. Kasutage plastikust kaabitsat.
• Kontrollige külmkapi sulavee äravoolu re-
gulaarselt. Vajadusel puhastage äravoolu.
Kui äravool on blokeeritud, hakkab vesi
kogunema seadme põhja.
Paigaldamine
Tähtis Elektriühenduse puhul jälgige
hoolikalt vastavas alalõigus toodud juhiseid.
• Pakkige seade lahti ja kontrollige kahjus-
tuste osas. Ärge ühendage seadet, kui see
on viga saanud. Teatage võimalikest kah-
justustest koheselt toote müüjale. Sel juhul
jätke pakend alles.
• On soovitatav enne seadme taasühenda-
mist oodata vähemalt kolm tundi, et õli
saaks kompressorisse tagasi voolata.
• Seadme ümber peab olema küllaldane
õhuringlus, selle puudumine toob kaasa
ülekuumenemise. Et tagada küllaldane
ventilatsioon, järgige paigaldamisjuhiseid.
• Kus võimalik, peaks seadme tagakülg ole-
ma vastu seina, et vältida soojade osade
(kompressor, kondensaator) puudutamist
ja võimalikke põletusi.
• Seade ei tohi asuda radiaatorite või pliitide
lähedal.
• Pärast seadme paigaldamist veenduge, et
toitepistikule oleks olemas juurdepääs.
•
Ühendage ainult joogiveevõrku.
7)
Teenindus
• Kõik masina hoolduseks vajalikud elektri-
tööd peab teostama kvalifitseeritud elek-
trik või kompetentne isik.
• Käesolev toode tuleb teenindusse viia vo-
litatud teeninduskeskussesse ja kasutada
tohib ainult originaal varuosi.
5) Lambikate on ette nähtud
6) Kui seadme temperatuur on ülalpool nulli
7) Kui on ette nähtud veeühendus
18 electrolux

Keskkonnakaitse
Käesolev seade ei sisalda osoonikihti
kahjustada võivaid gaase ei selle külmu-
tussüsteemis ega isolatsioonimaterjali-
des. Seadet ei tohi likvideerida koos muu
olmeprügiga. Isolatsioonivaht sisaldab
kergestisüttivaid gaase: seade tuleb uti-
liseerida vastavalt kohaldatavatele mää-
rustele, mille saate oma kohalikust oma-
valitsusest. Vältige jahutusseadme kah-
justamist, eriti taga soojusvaheti lähedu-
ses. Selles seadmes kasutatud materja-
lid, millel on sümbol
, on korduvka-
sutatavad.
Käitus
Sisselülitamine
Ühendage pistik pistikupessa.
Keerake temperatuuri regulaatorit päripäeva
keskmisele seadele.
Väljalülitamine
Seadme väljalülitamiseks keerake tempera-
tuuri regulaator "O" asendisse.
Temperatuuri reguleerimine
Temperatuuri reguleeritakse automaatselt.
Seadme kasutamiseks toimige järgmisel vii-
sil:
• keerake temperatuuri regulaatorit madala-
mate seadete suunas, et saavutada mini-
maalne külmus.
• keerake temperatuuri regulaatorit kõrge-
mate seadete suunas, et saavutada mak-
simaalne külmus.
Reeglina on keskmine asend sobivaim.
Kuid täpset seadet valides tuleks meeles pi-
dada, et seadmes valitsev temperatuur sõl-
tub:
• toa temperatuurist
• kui sageli ust avatakse
• kui palju toitu seal säilitatakse
• seadme asukohast.
Tähtis Kui ümbritsev temperatuur on kõrge
või kui kõige madalamale temperatuurile
reguleeritud seade on täis, võib see pidevalt
töötada, mis põhjustab härmatise tekkimist
tagaseinale. Sel juhul tuleb valida kõrgem
temperatuur, et oleks võimalik
automaatsulatus ja seega madalam
energiakulu.
Juhtpaneel
Sügavkülmiku juhtpaneel
5
6
4
1
2
3
1 2 3 4 5
1 Märgutuli
2 Kiirkülmetuse märgutuli
3 Alarmtuli
4 Kiirkülmetuse regulaator (Normal-Super)
5 Temperatuuri regulaator
Sisselülitamine
Ühendage pistik pistikupessa.
Keerake temperatuuri regulaatorit päripäeva
keskmisele seadele.
Peamine märgutuli hakkab põlema.
Väljalülitamine
Seadme väljalülitamiseks keerake tempera-
tuuri regulaator "0" asendisse.
Märgutuli lülitub välja.
Temperatuuri reguleerimine
Temperatuuri reguleeritakse automaatselt.
Seadme kasutamiseks toimige järgmiselt:
• keerake temperatuuri regulaatorit madala-
mate seadete suunas, et saavutada mini-
maalne külmus,
electrolux 19

• keerake temperatuuri regulaatorit kõrge-
mate seadete suunas, et saavutada mak-
simaalne külmus.
Reeglina on sobivaim keskmine asend.
Kuid täpset seadet valides tuleks meeles pi-
dada, et seadmes valitsev temperatuur sõl-
tub:
•toa temperatuurist
• kui sageli ust avatakse
• kui palju toitu seal säilitatakse
• seadme asukohast.
Tähtis Kui ümbritsev temperatuur on kõrge
või kui kõige madalamale temperatuurile
reguleeritud seade on täis, võib see pidevalt
töötada, mis põhjustab härmatise tekkimist
tagaseinale. Sel juhul tuleb valida kõrgem
temperatuur, et oleks võimalik
automaatsulatus ja seega madalam
energiakulu.
Kõrge temperatuuri hoiatus
Kui temperatuur sügavkülmikus tõuseb eba-
normaalselt (nt voolukatkestuse korral), süt-
tib alarmtuli.
Kui normaaltingimused on taastunud, lülitub
alarmtuli automaatselt välja.
Kiirkülmutuse funktsioon
Kiirkülmutuse funktsioon kiirendab värske
toidu sügavkülmutamist ja kaitseb juba kapis
olevat toitu soovimatu soojenemise vastu.
Funktsiooni aktiveerimiseks toimige järgmi-
selt:
Keerake sügavkülmutuse regulaator asen-
disse "S".
Sütib kiirkülmutuse tuli.
Funktsiooni deaktiveerimiseks toimige järg-
miselt:
Keerake kiirkülmutuse regulaator asendisse
"N".
Kustub kiirkülmutuse tuli.
Esimene kasutamine
Sisemuse puhastamine
Enne seadme esmakordset kasutamist, pes-
ke seadme sisemus ja kõik lisatarvikud leige
vee ja neutraalse seebiga eemaldamaks uu-
tele toodetele omast lõhna ja kuivatage sea-
de hoolikalt.
Tähtis Ärge kasutage pesuvahendeid ja ab-
rasiivseid pulbreid, kuna need kahjustavad
sisepindu.
Igapäevane kasutamine
Värske toidu sügavkülmutamine
Sügavkülmuti sobib värske toidu sügavkül-
mutamiseks ja külmutatud ning sügavkülmu-
tatud toidu pikaajaliseks säilitamiseks.
Värske toidu kiirkülmutamiseks aktiveerige
funktsioon vähemalt 24 tunniks enne külmu-
tatava toidu sügavkülmutusvahesse aseta-
mist.
Paigaldage külmutamiseks mõeldud värsked
toiduained ülemisse osasse.
Maksimaalne toidukogus, mida on võimalik
24 tunni jooksu külmutada, on ära toodud
andmeplaadil , sildil, mis asub seadme si-
seküljel.
Külmutusprotsess kestab 24 tundi: sel ajal ei
tohi lisada külmutamiseks toitu.
Sügavkülmutatud toidu säilitamine
Esmakordsel käivitamisel või pärast pike-
maaegset mittekasutamist tuleb lasta sead-
mel vähemalt 2 tundi kõrgemate seadetega
töötada, enne kui asetate toiduained sead-
messe.
Kui säilitamisele kuulub suur kogus toiduai-
neid, eemaldage kõik sahtlid ja asetage toi-
duained parima tulemuse saamiseks riiulitele
külmutamiseks.
Hoiatus Veenduge, et toiduained ei
ületaks limiiti, mis on äratoodud ülemise
sektsiooni küljel (kui on kasutusel)
Tähtis Kui sulamine on toimunud
ettekavatsematult, nt elektrikatkestuse tõttu,
ning elekter on ära olnud kauem kui
tehnilistes andmetes osutatud ("tõusuaeg"),
tuleb sulanud toiduained kiiresti ära tarvitada
või need koheselt valmistada ja seejärel
uuesti külmutada (pärast jahtumist).
20 electrolux
Seite wird geladen ...
Seite wird geladen ...
Seite wird geladen ...
Seite wird geladen ...
Seite wird geladen ...
Seite wird geladen ...
Seite wird geladen ...
Seite wird geladen ...
Seite wird geladen ...
Seite wird geladen ...
Seite wird geladen ...
Seite wird geladen ...
Seite wird geladen ...
Seite wird geladen ...
Seite wird geladen ...
Seite wird geladen ...
Seite wird geladen ...
Seite wird geladen ...
Seite wird geladen ...
Seite wird geladen ...
Seite wird geladen ...
Seite wird geladen ...
Seite wird geladen ...
Seite wird geladen ...
Seite wird geladen ...
Seite wird geladen ...
Seite wird geladen ...
Seite wird geladen ...
Seite wird geladen ...
Seite wird geladen ...
Seite wird geladen ...
Seite wird geladen ...
Seite wird geladen ...
Seite wird geladen ...
Seite wird geladen ...
Seite wird geladen ...
Seite wird geladen ...
Seite wird geladen ...
Seite wird geladen ...
Seite wird geladen ...
Seite wird geladen ...
Seite wird geladen ...
Seite wird geladen ...
Seite wird geladen ...
Seite wird geladen ...
Seite wird geladen ...
Seite wird geladen ...
Seite wird geladen ...
Seite wird geladen ...
Seite wird geladen ...
Seite wird geladen ...
Seite wird geladen ...
Seite wird geladen ...
Seite wird geladen ...
Seite wird geladen ...
Seite wird geladen ...
Seite wird geladen ...
Seite wird geladen ...
Seite wird geladen ...
Seite wird geladen ...
-
 1
1
-
 2
2
-
 3
3
-
 4
4
-
 5
5
-
 6
6
-
 7
7
-
 8
8
-
 9
9
-
 10
10
-
 11
11
-
 12
12
-
 13
13
-
 14
14
-
 15
15
-
 16
16
-
 17
17
-
 18
18
-
 19
19
-
 20
20
-
 21
21
-
 22
22
-
 23
23
-
 24
24
-
 25
25
-
 26
26
-
 27
27
-
 28
28
-
 29
29
-
 30
30
-
 31
31
-
 32
32
-
 33
33
-
 34
34
-
 35
35
-
 36
36
-
 37
37
-
 38
38
-
 39
39
-
 40
40
-
 41
41
-
 42
42
-
 43
43
-
 44
44
-
 45
45
-
 46
46
-
 47
47
-
 48
48
-
 49
49
-
 50
50
-
 51
51
-
 52
52
-
 53
53
-
 54
54
-
 55
55
-
 56
56
-
 57
57
-
 58
58
-
 59
59
-
 60
60
-
 61
61
-
 62
62
-
 63
63
-
 64
64
-
 65
65
-
 66
66
-
 67
67
-
 68
68
-
 69
69
-
 70
70
-
 71
71
-
 72
72
-
 73
73
-
 74
74
-
 75
75
-
 76
76
-
 77
77
-
 78
78
-
 79
79
-
 80
80


Electrolux ERN29651 Benutzerhandbuch
- Kategorie
- Kombikühlschränke
- Typ
- Benutzerhandbuch
in anderen Sprachen
- English: Electrolux ERN29651 User manual
- eesti: Electrolux ERN29651 Kasutusjuhend
Verwandte Artikel
-
Electrolux ERB34001W8 Benutzerhandbuch
-
-
-
-
-
-
-
Electrolux ECN40105W Benutzerhandbuch
-
Electrolux ENN2801EOW Benutzerhandbuch
Andere Dokumente
-
Zanussi ZFC102 Benutzerhandbuch
-
Aeg-Electrolux SN81840-5I Benutzerhandbuch
-
Zanussi ZRG316CW Benutzerhandbuch
-
AEG S53600CSS0 Benutzerhandbuch
-
-
Zanussi ZRB936PX2 Benutzerhandbuch
-
Zanussi ZUA12420SA Benutzerhandbuch
-
-
Zanussi ZFC51400WA Benutzerhandbuch
-
 Inventor MB490W Refrigerator Mini Bar Benutzerhandbuch
