
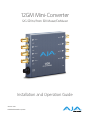
12GM Mini-Converter
12G-SDI to/from SDI Muxer/DeMuxer
Version 1.6r1
Published December 2, 2019
Installation and Operation Guide

12GM Mini-Converter v1.6r1 2 www.aja.com
Notices
Trademarks
AJA® and Because it matters.® are registered trademarks of AJA Video Systems, Inc.
for use with most AJA products. AJA™ is a trademark of AJA Video Systems, Inc. for
use with recorder, router, software and camera products. Because it matters.™ is a
trademark of AJA Video Systems, Inc. for use with camera products.
CION®, Corvid Ultra®, lo®, Ki Pro®, KONA®, KUMO®, ROI® and T-Tap® are registered
trademarks of AJA Video Systems, Inc.
AJA Control Room™, KiStor™, Science of the Beautiful™, TruScale™, TruZoom™,
V2Analog™ and V2Digital™ are trademarks of AJA Video Systems, Inc.
All other trademarks are the property of their respective owners.
Copyright
Copyright © 2019 AJA Video Systems, Inc. All rights reserved. All information in
this manual is subject to change without notice. No part of the document may be
reproduced or transmitted in any form, or by any means, electronic or mechanical,
including photocopying or recording, without the express written permission of AJA
Video Systems, Inc.
Contacting AJA Support
When calling for support, have all information at hand prior to calling. To contact AJA
for sales or support, use any of the following methods:
Telephone +1.530.271.3190
FAX +1.530.271.3140
Web
https://www.aja.com
Support Email
suppor[email protected]
Sales Email

12GM Mini-Converter v1.6r1 3 www.aja.com
Table of Contents
Notices . . . . . . . . . . . . . . . . . . . . . . . . . . . . . . . . . . . . . .2
Trademarks. . . . . . . . . . . . . . . . . . . . . . . . . . . . . . . . . . . . . . . . . .2
Copyright . . . . . . . . . . . . . . . . . . . . . . . . . . . . . . . . . . . . . . . . . . .2
Contacting AJA Support . . . . . . . . . . . . . . . . . . . . . . . . . . . . . . . . . 2
Chapter 1 – Introduction . . . . . . . . . . . . . . . . . . . . . . . . . . .4
Overview. . . . . . . . . . . . . . . . . . . . . . . . . . . . . . . . . . . . . . . . . . . . .4
Features . . . . . . . . . . . . . . . . . . . . . . . . . . . . . . . . . . . . . . . . . . . . . 4
Block Diagram . . . . . . . . . . . . . . . . . . . . . . . . . . . . . . . . . . . . . . . . . 5
I/O Connections . . . . . . . . . . . . . . . . . . . . . . . . . . . . . . . . . . . . . . . . 5
Installation. . . . . . . . . . . . . . . . . . . . . . . . . . . . . . . . . . . . . . . . . . . .6
Chapter 2 – Operation . . . . . . . . . . . . . . . . . . . . . . . . . . . . .7
USB Control and Setup—Using AJA Mini-Cong . . . . . . . . . . . . . . . . . . . 7
Acquiring AJA Mini-Cong . . . . . . . . . . . . . . . . . . . . . . . . . . . . . . . .7
Mini-Converter Documentation . . . . . . . . . . . . . . . . . . . . . . . . . . .7
Installing AJA Mini-Cong . . . . . . . . . . . . . . . . . . . . . . . . . . . . . . . . 7
PC Installation . . . . . . . . . . . . . . . . . . . . . . . . . . . . . . . . . . . . . . 7
Mac Installation . . . . . . . . . . . . . . . . . . . . . . . . . . . . . . . . . . . . . 8
Running AJA Mini-Cong. . . . . . . . . . . . . . . . . . . . . . . . . . . . . . . . . 9
PC Startup . . . . . . . . . . . . . . . . . . . . . . . . . . . . . . . . . . . . . . . . .9
Mac Startup. . . . . . . . . . . . . . . . . . . . . . . . . . . . . . . . . . . . . . . .9
Saving Setups . . . . . . . . . . . . . . . . . . . . . . . . . . . . . . . . . . . . . 10
Operating AJA Mini-Cong . . . . . . . . . . . . . . . . . . . . . . . . . . . . . . 10
Tabbed Screens . . . . . . . . . . . . . . . . . . . . . . . . . . . . . . . . . . . . . . 11
Input Tab Screen . . . . . . . . . . . . . . . . . . . . . . . . . . . . . . . . . . . . . . . 12
Input Detail Tab Screen. . . . . . . . . . . . . . . . . . . . . . . . . . . . . . . . . . . 14
Timing Tab Screen . . . . . . . . . . . . . . . . . . . . . . . . . . . . . . . . . . . . . . 15
Output Tab Screen. . . . . . . . . . . . . . . . . . . . . . . . . . . . . . . . . . . . . . 17
Output Detail Tab Screen . . . . . . . . . . . . . . . . . . . . . . . . . . . . . . . . . 19
Update Tab Screen. . . . . . . . . . . . . . . . . . . . . . . . . . . . . . . . . . . . . . 20
Software Update Procedure . . . . . . . . . . . . . . . . . . . . . . . . . . . . . . 21
Info Tab Screen . . . . . . . . . . . . . . . . . . . . . . . . . . . . . . . . . . . . . . . . 21
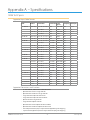
Appendix A – Specications . . . . . . . . . . . . . . . . . . . . . . . . 23
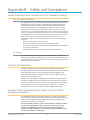
Appendix B – Safety and Compliance . . . . . . . . . . . . . . . . . .25
Warranty and Liability Information . . . . . . . . . . . . . . . . . . . .33
Limited Warranty on Hardware.. . . . . . . . . . . . . . . . . . . . . . . . . . . . 33
Limitation of Liability . . . . . . . . . . . . . . . . . . . . . . . . . . . . . . . . . . 33
Governing Law and Language; Your Rights. . . . . . . . . . . . . . . . . . . . . 33

12GM Mini-Converter v1.6r1 4 www.aja.com
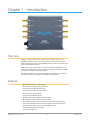
Chapter 1 – Introduction
Overview
12GM is a compact SDI transport converter that can solve a wide range of
UltraHD/4K equipment inter-connection problems. The product will convert
quad-link SDI signals to single-link SDI (Mux function) as well as single-link SDI to
quad-link SDI (Demux function).
12GM supports Two Sample Interleave (2SI) to Square Division (Quadrant) and
Square Division (Quadrant) to Two Sample Interleave (2SI) pixel mapping. 12GM
also supports 3G-SDI Level A and Level B-DL.
The 12GM is configured using the free AJA Mini-Config application, which also
provides detailed input and output signal diagnostic information.
Features
• Quad 3G-SDI Level A to Single 12G-SDI
• Quad 3G-SDI Level B-DL to Single 12G-SDI
• Single 12G-SDI to Quad 3G-SDI Level A
• Single 12G-SDI to Quad 3G-SDI Level B-DL
• Quad 1.5G-SDI to Single 6G-SDI
• Single 6G-SDI to Quad 1.5G-SDI
• Quad 3G-SDI Level A to Quad 3G-SDI Level B-DL
• Quad 3G-SDI Level B-DL to Quad 3G-SDI Level A
• Two Sample Interleave (2SI) to Square Division (Quadrant) pixel mapping
• Square Division (Quadrant) to Two Sample Interleave (2SI) pixel mapping
• Pass through of Single Link 3G, 1.5G and 270M SDI video
• Distribution Amplier support (1x4)
• Input signal diagnostics

12GM Mini-Converter v1.6r1 5 www.aja.com
• Input timing analyzer for quad link signals
• Automatic or manual control
• Detailed timing analysis for validating alignment of quad-link SDI inputs
• Passes SDI embedded audio, 24-bit, up to 16-Channels
• Recognizes and transmits High Dynamic Range (HDR) and Wide Color Gamut
(WCG) signaling on VPID
• DWP-U-R1 power supply included
• Five year warranty
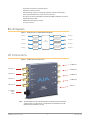
Block Diagram
Figure 1. 12GM Converter, Simplified Block Diagram
SDI Input 1
SDI Receiver
SDI Input 2
SDI Input 3
SDI Input 4
SDI Receiver
SDI Receiver
SDI Receiver
SDI
Processing
SDI Transmitter
SDI Output 1
SDI Output 2
SDI Output 3
SDI Output 4
SDI Transmitter
SDI Transmitter
SDI Transmitter
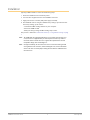
I/O Connections
Figure 2. 12GM Converter Connections
USB Port
+5-20 VDC
Power
Input
SDI Output 1
SDI Output 3
SDI Output 4
SDI Output 2
SDI Input 1
SDI Input 3
SDI Input 4
SDI Input 2
NOTE: The LEDs adjacent to each SDI input connector indicate by color the detected
signal type. Off is no signal, Green is SD-SDI, Red is HD-SDI, Amber is 3G-SDI,
Purple is 6G-SDI, and Blue is 12G-SDI.

12GM Mini-Converter v1.6r1 6 www.aja.com
Installation
Typically, 12GM installation consists of the following steps:
1. Ensure the 12GM is disconnected from power.
2. Connect video equipment to the converter BNC connectors.
3. Apply power to the converter (AJA power supply included).
4. The 12GM will now run using the default factory settings. If you wish to alter
the factory settings, you’ll need to:
• Install the AJA Mini-Cong software on your computer
• Attach the 12GM via USB
• Make your changes using AJA Mini-Cong setup screens.
This process is detailed in "USB Control and Setup—Using AJA Mini-Config" on page
7.
NOTE: The 12GM packs an unprecedented feature set into a mini converter box. As a
result, the unit uses approximately 12 watts of power. It will be very warm to
the touch, which is normal. The unit is engineered to operate across the full
temperature range, from 0 to 40 degrees C.
NOTE: For highest reliability, the mini converter relies on convection cooling instead
of using a built-in fan. Therefore, when installing the unit, mount in a location
where it has access to air for proper cooling. Do not stack the 12GM with other
mini converters.

12GM Mini-Converter v1.6r1 7 www.aja.com
Chapter 2 – Operation
USB Control and Setup—Using AJA Mini-Config
Your AJA Mini-Converter can be used right out of the box for some applications
since it is designed to recognize inputs and perform standard actions
automatically by default. However, to use its full capability, you must use AJA’s
Mini-Config software application for PCs and Macs. This same application can be
used to update to new Mini-Converter software released by AJA.
Acquiring AJA Mini-Config
AJA’s Mini-Config application is available for download from the AJA website.
To download the latest AJA Mini-Config package, which includes the AJA Mini-
Config application, Mini-Converter firmware, and documentation, go to:
https://www.aja.com/en/products/mini-converters/mini-cong-software
Select either the Windows or Mac icon to download the desired version.
CAUTION: If you are running Mini-Config on macOS Catalina, please make sure you
are using Mini-Config v2.24.1 or later. Earlier versions of Mini-Config are not
compatible with macOS Catalina.
Mini-Converter Documentation
Included with the AJA Mini-Config package is a complete set of documentation
for all Mini-Converters supported by AJA Mini-Config. A .PDF of the Installation
and Operation Guide for the currently connected Mini-Converter can be accessed
from the AJA Mini-Config UI via the Help/Manual drop-down menu.
Documentation for all AJA Mini-Converters that use AJA Mini-Config can also
be accessed directly in the AJA Mini-Config download package Documentation
folder, and via the Documentation icon available on the Mac installer.
Documentation (and firmware) included with the AJA Mini-Config application
are the versions available at the time of distribution. However, Mini-Converter
software, firmware and documentation are updated regularly, so newer versions
may exist.
To download the latest documentation for an individual Mini-Converter, go to:
https://www.aja.com/en/category/mini-converters
and navigate to the Support webpage of that Mini-Converter.
Installing AJA Mini-Config
PC Installation
To install AJA Mini-Config on a Windows PC:
1. Download the application from the AJA website (select the Windows icon
on the AJA Mini-Cong Support webpage).
2. Open the AJA_MiniCong.zip le
3. Double-click on the MiniInstaller.msi le.

12GM Mini-Converter v1.6r1 8 www.aja.com
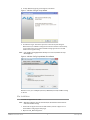
4. A Setup Wizard will guide you through the installation.
Figure 3. AJA Mini-Config PC Setup Wizard
5. Click Next to begin. Answer the questions in the subsequent dialogues.
When nished, an AJA Mini-Cong shortcut will be installed on the desktop,
and you will be able to locate the AJA Mini-Cong application in the AJA
folder in the Programs listing.
NOTE: If the AJA Mini-Config application already exists on the PC, a different Setup
Wizard appears.
Figure 4. AJA Mini-Config Setup Wizard, Reinstallation
With this screen you can Repair (reinstall) or Remove (uninstall) AJA Mini-Config
on the PC.
Mac Installation
To install the application on a Mac:
NOTE: Macintosh computers must be Intel-based (G5, G4 and earlier models will not
work with AJA Mini-Config).
1. Download the application from the AJA website (select the Apple icon on
the AJA Mini-Cong Support webpage).
2. Open the AJA_MiniCong folder.

12GM Mini-Converter v1.6r1 9 www.aja.com
3. Double-click on the AJAMiniCong.dmg le.
4. Answer the prompt and a utility program will be launched.
Figure 5. AJA Mini-Config Mac Installer
5. To complete the installation drag the “MiniCong.app” icon to the
Applications folder.
Running AJA Mini-Config
Connect the Mini-Converter to the PC or Mac via the supplied USB cable. Connect
the external power supply (supplied) to the Mini-Converter.
PC Startup
To run AJA Mini-Config on a PC, double-click on the AJA Mini-Config icon on your
desktop, or open the AJA folder in the program list and click on the AJA Mini-
Config application located inside the AJA Mini-Config folder.
Mac Startup
To run AJA Mini-Config on a Mac, open the Applications folder and locate the AJA
Mini-Config application. Double-click the application to launch it.

12GM Mini-Converter v1.6r1 10 www.aja.com
Saving Setups
A File drop down menu on the AJA Mini-Config application bar allows you to
save the current state of the Mini-Converter to a preset file for later recall.
Using this feature you can set up the converter for different applications, storing
each configuration (Save Preset As...) with a unique name for easy recall (Open
Preset...).
A Revert to Factory Settings menu item similarly allows you to change the
settings back to AJA’s factory defaults.
Operating AJA Mini-Config
The AJA Mini-Config application provides a graphic interface for viewing settings
and updating software. It consists of an information area at the top that shows
the available Mini-Converters attached to the computer via USB, with a graphical
rendering of the selected Mini-Converter showing all the connectors and their
current state.
Colored text next to the connectors indicates the signal type and what the Mini-
Converter is doing:
• Blue text indicates the values automatically selected
• Black text indicates values that you have manually selected
• Red text indicates the Mini-Converter is not detecting a signal, or cannot
operate with the current user settings.
NOTE: Even if no output device is detected, the SDI connector text still shows the signal it
is outputting.
NOTE: Configuration settings in red will change based on the attached output device as
well as input signals. For improved accuracy and reliability, you should configure
the Mini-Converter only when the target output device is attached and input
signals are supplied at the inputs.
Screens are virtually the same on both PC and Mac, with subtle differences that
reflect the general look of the platform environment.

12GM Mini-Converter v1.6r1 11 www.aja.com
Figure 6. Example AJA Mini-Config Screen
Select a USB port and
an attached
Mini-Converter (name
in parentheses).
The status represents
the aggregate signal
currently detected
by one or four
connectors.
Firmware Version
and Serial Number
Status Message
Tabbed Screens
NOTE: The LEDs adjacent to each SDI input connector indicate by color the detected
signal type. Off is no signal, Green is SD-SDI, Red is HD-SDI, Amber is 3G-SDI,
Purple is 6G-SDI, and Blue is 12G-SDI.
Selecting a Mini-Converter with the pulldown menu causes this application to
connect to the selected converter. The graphic of Mini-Converter and text below
it provides:
• Type of converter
• Firmware version
• Serial number of the unit.
A status field at the bottom of the screen shows if your application is connected
and communicating with the Mini-Converter.
When configuring the Mini-Converter, select it from the top pulldown, view the
current settings and change any values. Making a change communicates that
new value to the Mini-Converter’s non-volatile memory.
Tabbed Screens
The Tabs delineate control screens with groups of controls for each type of task to
be performed. The controls for the actual configuration parameters are specific
to each Mini-Converter type. When you Click on any of the tab buttons, the pane
below the tabs will change to match your tab selection. Any changes you make
are immediately applied and will be saved, overwriting previous settings.

12GM Mini-Converter v1.6r1 12 www.aja.com
Input Tab Screen
Figure 7. Example of Input Tab Screen showing Quad 3G-SDI to Single 12G-SDI
conversion using Square Division (Quadrant) to Two Sample Interleave (2SI)
pixel mapping.
Click on the Input tab to view and make changes to the converter’s input settings.
Input SDI
Selects the input video format. Choose from the following:
Auto - Automatically selects the format based on the detected input video
parameters. To the right of the drop-down menu, the status display reflects
the current Input SDI behavior.
In order for "Auto" to select Quad Link (SDI 1-4), all four inputs must match in
terms of data rate, link mapping, raster, frame rate, scan type, sampling, bit
depth, and pixel mapping.
Single Link (SDI 1) - Select this option if you have a Single Link UltraHD/4K signal
coming in through SDI In 1.
Single Link (SDI 2) - Select this option if you have a Single Link UltraHD/4K signal
coming in through SDI In 2.
Single Link (SDI 3) - Select this option if you have a Single Link UltraHD/4K signal
coming in through SDI In 3.
Single Link (SDI 4) - Select this option if you have a Single Link UltraHD/4K signal
coming in through SDI In 4.
Quad Link (SDI 1-4) - Select this option if you have a Quad Link UltraHD/4K signal
coming in through SDI In 1-4.
Input Mapping
NOTE: Input pixel mapping applies only to 4K/UltraHD signals being transported on
Quad Link 4 x 3G inputs, as 6G and 12G SDI are always Two Sample Interleave
(2SI), and Quad Link 1.5G SDI is always Square Division (Quadrant).

12GM Mini-Converter v1.6r1 13 www.aja.com
For 4K/UltraHD signals using Quad Link 3Gbps transport, the Video Payload
Identifier (VPID) embedded in each link indicates whether the pixel mapping
is 2SI or not. If 2SI is not indicated, the 12GM assumes that the input signal is
mapped Square Division (Quadrant). Note that there are no specific VPID bits to
indicate Square Division (Quadrant).
Use the Input Mapping control to select the input mapping. Choose from the
following:
Auto - Analyzes details of each input. The VPID from each input signal indicates
whether its pixel mapping is Two Sample Interleave (2SI) or Square Division
(Quadrant).
In order for "Auto" to select 2SI pixel mapping, the video input (whether
single link 6G-SDI or 12G-SDI, or Quad Link 3G-SDI) must indicate 2SI with its
embedded VPID(s).
2SI - Select this option if you are inputting a Two Sample Interleave (2SI) pixel
mapped signal.
SQD - Select this option if you are inputting a Square Division (Quadrant) pixel
mapped signal.
Figure 8. Example of Input Tab Screen showing Single 12G-SDI to Quad 3G-SDI
conversion.

12GM Mini-Converter v1.6r1 14 www.aja.com
Input Detail Tab Screen
Figure 9. Example of Input Detail Tab Screen showing Single 12G-SDI to Quad
3G-SDI conversion.
Figure 10. Example of Input Detail Tab Screen showing Quad 3G-SDI to
Single 12G-SDI conversion using Square Division (Quadrant) to Two Sample
Interleave (2SI) pixel mapping.
Click on the Input Details tab to view detailed input signal diagnostic information.
This can be useful for trouble-shooting and debugging. Input details detected
include Status, Standard, Scan Type, Frame Rate, Data Rate, Level, Sampling, Bit
Depth, and Mapping for each input BNC.

12GM Mini-Converter v1.6r1 15 www.aja.com
Timing Tab Screen
Figure 11. Example of Timing Tab Screen showing Quad 3G-SDI to Single
12G-SDI conversion using Square Division (Quadrant) to Two Sample
Interleave (2SI) pixel mapping.
The purpose of the Timing Tab Screen is to validate that all four links of a Quad
Link input signal meet the required 400ns link-to-link timing, and if not, which
link(s) are not meeting this specification.
The Timing Tab Screen measures timing differences link to link, but displays
timing values relative to SDI 1 for ease of understanding and correcting timing
issues. If the SDI In 1, 2, 3, and 4 links are within +/- 400ns relative to each other,
then the text will be blue. If two or more links are determined to be more than
+/- 400ns relative to each other, then the text is red. The Timing analyzer has a
measurement range of +/- 1/2 frame.
The first row of the Pixels Timing information indicates any horizontal offset
in terms of pixels for each link, while the second row of the Pixels Timing
information indicates the horizontal offset in terms of microseconds. The two
rows display the same information represented in different terms (pixels versus
microseconds). The pixel information (pixels and time) indicates offset of up to 1
line. If the offset exceeds 1 line, then the line count is incremented.
The Total row displays each link's total offset (vertical timing plus horizontal
offset) in terms of time.

12GM Mini-Converter v1.6r1 16 www.aja.com
Figure 12. Example of Timing Tab Screen showing Quad 3G-SDI to Single
12G-SDI conversion using Square Division (Quadrant) to Two Sample
Interleave (2SI) pixel mapping. In this example, a timing error message
displays.
The above Timing Tab Screen shows that links 2, 3, and 4 are equally advanced
with respect to link 1 by about 60 pixels. Since all three links are equally
advanced, most likely link 1 has an additional function element (piece of
processing equipment or additional processing function) which is delaying it 60
lines—so links 2, 3, and 4 appear advanced.
To solve this error, the signal chain feeding SDI Input 1 needs to be analyzed
to determine the cause of the delay. Once found, the delay should be reduced
enough so that it is less than 400ns between links 1 and 2, 1 and 3, and 1 and 4.

12GM Mini-Converter v1.6r1 17 www.aja.com
Output Tab Screen
Figure 13. Example of Output Tab Screen showing Quad 3G-SDI to Single
12G-SDI conversion using Square Division (Quadrant) to Two Sample
Interleave (2SI) pixel mapping.
Click on the Output tab to view and make changes to the converter’s output
settings.
Output SDI
Auto - Automatically selects the output format based on the inputs detected.
If Quad Link UltraHD/4K (SDI 1-4) is detected on the input, the output will
auto-select to a Single Link (SDI 1) multiplex output.
If Single Link UltraHD/4K (SDI 1) is detected on the input, the output will auto-
select to a Quad Link (SDI 1-4) to demux the signal to four outputs using SDI
Outputs 1-4.
Single Link (SDI 1) - Causes the 12GM to use only SDI Output 1. The combination
of input and output settings determines whether the 12GM is muxing,
demuxing or passing through.
Quad Link (SDI 1-4) - Causes the 12GM to use SDI Outputs 1-4, if possible. The
combination of input and output settings determines whether the 12GM is
muxing, demuxing or passing through.
Output Mapping
NOTE: Output pixel mapping applies only to 4K/UltraHD signals being transported
on Quad Link 4x 3G outputs. 6G and 12G SDI are always Two Sample
Interleave (2SI), and Quad Link 1.5G SDI is always Square Division (Quadrant).
Selects the output mapping for Quad Link 4x 3G outputs. Choose from the
following:
Auto - Automatically selects the output pixel mapping based on the input pixel
mapping detected.

12GM Mini-Converter v1.6r1 18 www.aja.com
If Quad Link UltraHD/4K (SDI 1-4) 2SI is detected on the input, the output pixel
mapping will be SQD.
If Quad Link UltraHD/4K (SDI 1-4) SQD is detected on the input, the output
pixel mapping will be 2SI.
If Dual Link UltraHD/4K (SDI 1-4) 1.5G SQD is detected on the input, the output
pixel mapping will be 6G 2SI.
If Quad Link UltraHD/4K (SDI 1-4) SQD or 2SI 3G is detected on the input, the
output pixel mapping will be 12G 2SI.
If Dual Link UltraHD/4K (SDI 1-4) 6G is detected on the input, the output pixel
mapping will be Quad 1.5G SQD.
If Single Link UltraHD/4K (SDI 1-4) 12G is detected on the input, the output
pixel mapping will be Quad 3G 2SI.
2SI - Causes the 12GM to output a Two Sample Interleave (2SI) pixel mapped
signal.
SQD - Causes the 12GM to output a Square Division (Quadrant) pixel mapped
signal.
3G-SDI Mode
The 12GM's 3G-SDI Mode offers the choice between Auto, Level A and Level B-DL.
Auto - The 12GM will automatically select Level A or Level B-DL based on the
inputs detected.
• For Single Link 12G input, Auto will select 4x 3G Level A for the output.
• For a Single Link 6G input, Auto will select 4x 1.5G for the output.
• For a Single Link 3G Level A input, Auto will select 2x 3G Level B-DL for
the output.
Level A - The SDI Outputs will carry a 3G-SDI Level A signal to support these
configurations:
• 4x 3G-SDI Level B-DL to 4x 3G-SDI Level A
• 1.5G-SDI to 3G-SDI Level A
Level B-DL - The SDI Outputs will carry a 3G-SDI Level B-DL signal to support
these configurations:
• 12G-SDI to 4x 3G-SDI Level B-DL
• 4x 3G-SDI Level A to 4x 3G-SDI Level B-DL
• 3G-SDI Level A to 1.5G-SDI
DA Function
The 12GM's Distribution Amplifier (DA) function is available for Single Link output
signals.
On - When turned on, the DA function will duplicate SDI Output 1's signal on SDI
Outputs 2, 3, and 4.
NOTE: If the output is a Quad Link signal, the DA function is overridden and turned
off.
Off - When turned off, no signal duplication will occur.

12GM Mini-Converter v1.6r1 19 www.aja.com
Figure 14. Example of Output Tab Screen showing the output set to Single Link
12G-SDI. The DA Function is turned on, duplicating the 12G-SDI input signal
and sending it out through all four SDI outputs.
Output Detail Tab Screen
Figure 15. Example of Output Detail Tab Screen showing Quad 3G-SDI to
Single 12G-SDI conversion using Square Division (Quadrant) to Two Sample
Interleave (2SI) pixel mapping.
Click on the Output Details tab to view detailed output signal diagnostic
information. This can be useful for trouble-shooting and debugging. Output

12GM Mini-Converter v1.6r1 20 www.aja.com
signal details include Status, Standard, Scan Type, Frame Rate, Data Rate, Level,
Sampling, Bit Depth, and Mapping for each output BNC.
Figure 16. Example of Output Detail Tab Screen showing Single 12G-SDI to
Quad 3G-SDI conversion using Square Division (Quadrant) to Two Sample
Interleave (2SI) pixel mapping.
Update Tab Screen
Use this Update tab screen to view the software version currently installed on the
converter or to install new software.
Seite wird geladen ...
Seite wird geladen ...
Seite wird geladen ...
Seite wird geladen ...
Seite wird geladen ...
Seite wird geladen ...
Seite wird geladen ...
Seite wird geladen ...
Seite wird geladen ...
Seite wird geladen ...
Seite wird geladen ...
Seite wird geladen ...
Seite wird geladen ...
Seite wird geladen ...
-
 1
1
-
 2
2
-
 3
3
-
 4
4
-
 5
5
-
 6
6
-
 7
7
-
 8
8
-
 9
9
-
 10
10
-
 11
11
-
 12
12
-
 13
13
-
 14
14
-
 15
15
-
 16
16
-
 17
17
-
 18
18
-
 19
19
-
 20
20
-
 21
21
-
 22
22
-
 23
23
-
 24
24
-
 25
25
-
 26
26
-
 27
27
-
 28
28
-
 29
29
-
 30
30
-
 31
31
-
 32
32
-
 33
33
-
 34
34


in anderen Sprachen
- English: AJA 12GM User manual
- français: AJA 12GM Manuel utilisateur
- italiano: AJA 12GM Manuale utente
- português: AJA 12GM Manual do usuário
Verwandte Artikel
-
AJA 12GDA Benutzerhandbuch
-
AJA HB-T-SDI Installation and Operation Guide
-
-
AJA io XT Benutzerhandbuch
-
-
-
AJA Hi5-12G Benutzerhandbuch
-
-
AJA ROI-DP Bedienungsanleitung
-