
Model • Modèle • Modell • Modello • Modelo • Malli:
DY993/DY994/DY995/DY996/DY997/DY998
Bistro Contact
Grill
Instruction manual
EN Bistro Contact Grill
Handleiding
2DE Kontaktgrill
Bedienungsanleitung
20
NL Contactgrill
Handleiding
8IT Grill a contatto
Manuale di istruzioni
26
FR Grill
Mode d'emploi
14 ES Grill de contacto
Manual de instrucciones
32

2
EN
Safety Instructions
• Position on a flat, stable surface.
• A service agent/qualified technician should carry out
installation and any repairs if required. Do not remove any
components on this product.
• Consult Local and National Standards to comply with the
following:
- Health and Safety at Work Legislation
- BS EN Codes of Practice
- Fire Precautions
- IEE Wiring Regulations
- Building Regulations
• Caution! Hot surface!
• DO NOT immerse the appliance in water.
• DO NOT clean with jet/pressure washers.
• DO NOT carry when hot.
• DO NOT leave the appliance unattended during operation.
• DO NOT obstruct or cover the appliance in any way when in
use.
• During and after cooking, the unit is still hot. Never touch the
surface to avoid scalding.
• Not suitable for outdoor use.
• Always switch off and disconnect the power supply to the
appliance before when not in use.
• This appliance must only be used in accordance with these
instructions and by persons competent to do so.
• Keep all packaging away from children. Dispose of the
packaging in accordance to the regulations of local authorities.
• If the power cord is damaged, it must be replaced by a
BUFFALO agent or a recommended qualified technician in
order to avoid a hazard.

3
EN
• This appliance is not intended for use by persons (including
children) with reduced physical, sensory or mental capabilities,
or lack of experience or knowledge, unless they have been
given supervision or instruction concerning the use of the
appliance by a person responsible for their safety.
• Children should be supervised to ensure that they do not play
with the appliance.
• BUFFALO recommend that this appliance should be periodically
tested (at least annually) by a Competent Person. Testing
should include, but not be limited to: Visual Inspection,
Polarity Test, Earth Continuity, Insulation Continuity and
Functional Testing.
• BUFFALO recommend that this product is connected to a
circuit protected by an appropriate RCD (Residual Current
Device).
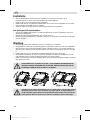
Product Description
• DY993 - Buffalo Bistro Contact Grill, Single Ribbed plates
• DY994 - Buffalo Bistro Contact Grill, Double Ribbed plates
• DY995 - Buffalo Bistro Contact Grill, Large Ribbed plates
• DY996 - Buffalo Bistro Contact Grill, Single Flat plates
• DY997 - Buffalo Bistro Contact Grill, Large Flat plates
• DY998 - Buffalo Bistro Contact Grill, Double Flat plates
Introduction
Please take a few moments to carefully read through this manual. Correct maintenance and operation of
this machine will provide the best possible performance from your BUFFALO product.
Pack Contents
The following is included:
• Buffalo Bistro Contact Grill
• Scraper
• Allen Key
• Instruction manual
BUFFALO prides itself on quality and service, ensuring that at the time of unpacking the contents are
supplied fully functional and free of damage.
Should you find any damage as a result of transit, please contact your BUFFALO dealer immediately.

4
EN
Installation
• Remove your Buffalo Bistro Contact Grill from its packaging and be certain that all protective plastics
and residues are thoroughly cleaned from its surface.
• Locate on a firm level surface.
• Buffalo recommended that you allow no less than 100mm ventilated gap around the perimeter of this
unit.
• Ensure that the stainless steel waste tray is correctly positioned.
• Connect to the electricity supply using the plug, the Grill is now ready to turn on and operate.
Preparing the cooking surface
• Make sure the cooking surface is clean, turn the unit on and apply a generous amount of oil to the
plates.
• Using the thermostat control, set the Grill to 110°C.
• When the Grill has reached temperature, switch off and carefully wipe any excess oil from the plates.
Operation
• The Contact Grill should be turned on at least 5 minutes before use.
• To get efficient use out of this unit while in intermittent use, it is recommended that the Grill plates
remain closed and the thermostat turned down, when not cooking. This will assist in reducing power
consumption and also allow for quicker heat response when needed.
• Buffalo recommends that the cooking surface is lightly greased before each use.
• A temperature setting of between 200°C and 220°C will be sufficient for general cooking. This may
vary for particular food types, individual needs, or experience.
• Simply place the food products on the bottom grilling surface and lower the top plate down, and cook
to your needs.
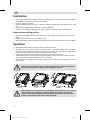
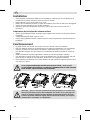
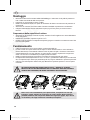
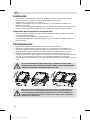
Note: If top plate becomes loose/ stiff use the Allen key supplied to adjust the
tension. Turn clockwise to tighten, anti-clockwise to loosen.
Note: With the new treatment for the flat plates, the surfaces now are smoother
and thus better for cooking and cleaning. Whereas, the initial surfaces may
appear to have ribbed markings with the first time use. After several hours of
cooking, such markings will start to fade/disappear.

5
EN
Cleaning, Care & Maintenance
Before starting to clean the Grill, disconnect from the electricity supply by removing the plug from the
socket.
Clean the cooking surface regularly. We recommend it is cleaned after every use session.
When the cooking surfaces are still warm, wash with warm soapy water and then rinse thoroughly with
clean water. This will help to stop food sticking to the plates. Remove the fat drip tray and wash in warm
soapy water.
Other surfaces can be wiped over with a damp cloth to remove all food residues. Do not immerse the
Contact Grill in water or use water sprays to clean it.
If grease is permitted to accumulate, it will begin to carbonise into a hard substance that is extremely
difficult to remove. To prevent this, follow the cleaning steps below:
• Always turn OFF the appliance and disconnect from the power supply before cleaning.
• Allow the appliance to cool before cleaning, but for best results clean the plates when they are still
slightly warm.
• Use warm, soapy water and a damp cloth to clean the exterior of the appliance.
• Take care when using scrapers to remove cooking residues as they can damage the cooking surface.
• Dry thoroughly after cleaning.
Scraping
• After each use, scrape the appliance with a scraper/grill stone/copper brush or flexible spatula to
remove excess fat and food. A waste tray is provided for the scrapings if necessary
• If there is an accumulation of burned fat or food, the cooking surface should be thoroughly scoured
and re-seasoned.
Note: It is vital that the cooking surface is re-seasoned after scouring.
Warning: Do not use steel wool as it may leave shards that could Contaminate
food.
Waste tray
• This appliance features a waste tray to collect any liquid or fats that run off during cooking
• At least once a day, remove and empty the waste tray before washing with warm, soapy water.
• Do not allow the tray to overfill, or excess grease will run out of the overflow hole at the front of the
tray.
Warning: Do not remove tray during or immediately after use as the contents
will be hot.

6
EN
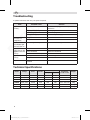
Troubleshooting
A qualified technician must carry out repairs if required.
Fault Probable Cause Solution
Appliance not
working The unit is not switched on Check the unit is plugged in correctly and
switched on
Plug or lead is damaged Replace plug or lead
Fuse in the plug has blown Replace the plug fuse
Mains power supply fault Check mains power supply
Appliance does
not reach set
temperature
Faulty thermostat Replace the thermostat
Faulty element Replace the element
Appliance heats up
but indicator light
does not come on
Indicator light has expired Replace the indicator light
Power indicator
light comes on but
appliance does not
heat up
Faulty element Replace the element
Faulty thermostat Replace the thermostat
Thermostat set incorrectly Check thermostat
Appliance slow to
heat up Cooking surface not cleaned Clean cooking surface as instructed
Faulty element Replace the element
No power Thermal cut-out switch is
activated Press re-set switch on rear of unit
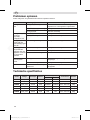
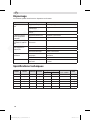
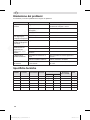
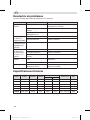
Technical Specifications
Model Voltage Power Current Plate Type Dimensions
H x W x D mm Weight
Top Bottom
DY993 230V, 50Hz 1500W 6.5A Rib Rib 210 x 290 x 320 14.5kg
DY994 230V, 50Hz 2900W 12.6A Rib Rib 210 x 540 x 320 27kg
DY995 230V, 50Hz 2200W 9.5A Rib Rib 210 x 380 x 320 19kg
DY996 230V, 50Hz 1500W 6.5A Flat Flat 210 x 290 x 320 16kg
DY997 230V, 50Hz 2200W 9.5A Flat Flat 210 x 380 x 320 21kg
DY998 230V, 50Hz 2900W 12.6A Flat Flat 210 x 540 x 320 29kg

7
EN
Electrical Wiring
This appliance is supplied with a 3 pin BS1363 plug and lead.
The plug is to be connected to a suitable mains socket.
This appliance is wired as follows:
• Live wire (coloured brown) to terminal marked L
• Neutral wire (coloured blue) to terminal marked N
• Earth wire (coloured green/yellow) to terminal marked E
This appliance must be earthed.
If in doubt consult a qualified electrician.
Electrical isolation points must be kept clear of any obstructions. In the event of any emergency
disconnection being required they must be readily accessible.
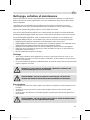
Compliance
The WEEE logo on this product or its documentation indicates that the product must
not be disposed of as household waste. To help prevent possible harm to human
health and/or the environment, the product must be disposed of in an approved and
environmentally safe recycling process. For further information on how to dispose of
this product correctly, contact the product supplier, or the local authority responsible for
waste disposal in your area.
BUFFALO parts have undergone strict product testing in order to comply
with regulatory standards and specifications set by international,
independent, and federal authorities.
BUFFALO products have been approved to carry the following symbol:
All rights reserved. No part of these instructions may be produced or transmitted in any form or by any means, electronic,
mechanical, photocopying, recording or otherwise, without the prior written permission of BUFFALO.
Every effort is made to ensure all details are correct at the time of going to press, however, BUFFALO reserve the right to
change specifications without notice.

8
NL
Veiligheidstips
• Plaatsen op een vlakke en stabiele ondergrond.
• De installatie en eventuele reparaties dienen door een
gekwalificeerde onderhoudsmonteur/vakman uitgevoerd te worden.
Verwijder geen componenten of servicepanelen van dit product.
• Raadpleeg en volg de plaatselijke en nationale regelgeving op
m.b.t. tot het volgende:
- Wetgeving inzake gezondheid en veiligheid op het werk
- Werkregels
- Brandpreventie
- IEE-bedradingsvoorschriften
- Bouwvoorschriften
• Let op! Warm oppervlak!
• Dit apparaat NIET in water dompelen.
• NIET reinigen met straal-/drukreinigers.
• Niet vervoeren als het apparaat heet is.
• Laat het toestel NIET onbeheerd achter wanneer het in
gebruik is.
• Bedek het toestel NIET tijdens gebruik.
• Tijdens en na het koken is de eenheid nog warm. Raak het
nooit aan om brandwonden te vermijden.
• Niet geschikt voor gebruik buitenshuis.
• Schakelt altijd uit en isoleer de stroomtoevoer naar het
apparaat wanneer deze niet gebruikt wordt.
• Dit apparaat mag uitsluitend in overeenstemming met deze
instructies en door competente personen worden gebruikt.
• Laat verpakkingsmateriaal niet binnen handbereik van kinderen.
Verpakkingsmateriaal in overeenstemming met de regelgeving
van de plaatselijke overheden als afval laten verwerken
.
• Indien de stroomkabel beschadigd raakt, dient men deze
door een Buffalo-monteur of aanbevolen vakman te laten
vervangen om gevaarlijke situaties te voorkomen.

9
NL
• Dit apparaat is niet bedoeld voor gebruik door personen met
lichamelijke, zintuiglijke of mentale beperkingen (inclusief
kinderen) of door personen met gebrek aan ervaring of kennis,
tenzij zij hierin worden begeleid of zijn opgeleid in het gebruik
van het apparaat door een persoon, die verantwoordelijk is
voor hun veiligheid.
• Men dient er toezicht op te houden dat kinderen niet met het
apparaat spelen.
• Buffalo beveelt aan dat dit apparaat periodiek (minstens
jaarlijks) door een bevoegde persoon wordt getest. Tests moeten
omvatten, maar zijn niet beperkt tot: visuele inspectie, polariteit,
aardings continuïteit, isolatie continuïteit en functionele test.
Productbeschrijving
• DY993 - Buffalo Bistro Contact Grill, Enkelvoudige Geribbelde Platen
• DY994 - Buffalo Bistro Contact Grill, Dubbele Geribbelde Platen
• DY995 - Buffalo Bistro Contact Grill, Grote Geribbelde Platen
• DY996 - Buffalo Bistro Contact Grill, Enkelvoudige Vlakke Platen
• DY997 - Buffalo Bistro Contact Grill, Grote Vlakke Platen
• DY998 - Buffalo Bistro Contact Grill, Dubbele Vlakke Platen
Inleiding
Neem de tijd om deze handleiding aandachtig door te lezen. Correct gebruik en onderhoud van deze
machine waarborgt de beste prestatie van uw Buffalo product.
Verpakkingsinhoud
De verpakking bevat het volgende:
• Buffalo Bistro Contact Grill
• Schraper
• Inbussleutel
• Handleiding
BUFFALO is trots op de haar productkwaliteit en dienstverlening en controleert de inhoud van de
verpakkingen, tijdens de verpakkingsfase, op functionaliteit en schade.
Mocht uw product door transport beschadigd zijn, neem dan onmiddellijk contact op met uw BUFFALO-
dealer.

10
NL
Installatie
• Haal uw Buffalo Bistro Contact Grill uit de verpakking en vergewis u ervan dat er geen
beschermingsfolie of resten ervan achtergebleven zijn op het apparaat.
• Plaats de grill op een vaste genivelleerde ondergrond.
• Buffalo raadt aan om een minimale ventilatieruimte van 100 mm rond het apparaat aan te houden.
• Zorg dat de RVS opvangbak correct is geplaatst.
• Steek de stekker in het stopcontact, u kunt de grill nu aanzetten en gebruiken.
Het grilloppervlak voorbereiden
• Zorg dat het grilloppervlak schoon is, schakel het apparaat in en smeer de grillplaten in met een
rijkelijke hoeveelheid olie.
• Met behulp van de thermostaatregelaar zet u de grill op 110˚C.
• Wanneer de grill op temperatuur is, schakelt u de grill uit en verwijdert u voorzichtig de overtollige
olie van de platen.
Werking
• Men dient de Contact Grill minimaal 5 minuten vóór gebruik in te schakelen
• Om de efficiënte werking bij onregelmatig gebruik te garanderen, raden wij u aan om de grillplaten
dicht te houden en de thermostaatregelaar omlaag te draaien wanneer u de grill niet gebruikt. Dit
zorgt voor een verlaging van het stroomverbruik en een snellere warmterespons wanneer het nodig
is.
• Buffalo raadt aan om voor elk gebruik het grilloppervlak licht met olie in te smeren.
• Een temperatuurinstelling van 200°C tot 220°C is voldoende voor algemeen kookgebruik. Dit kan
naar bepaalde soorten voedsel, individuele behoeften of ervaring variëren.
• Plaats het voedsel op het onderste grilloppervlak en breng de bovenste grillplaat omlaag. Vervolgens
laten grillen naar wens.
ALS BOVENPLAAT LOS KOMT TE ZITTEN / STIJF GEBRUIK DE INBUSSLEUTEL
GELEVERD AAN DE SPANNING AAN TE PASSEN. DRAAI DE KLOK MEE AAN TE
SCHERPEN, TEGEN DE KLOK IN OM LOS TE MAKEN.
Opgelet: Met de nieuwe behandeling voor de vlakke platen, zijn de oppervlaktes
nu gladder end us beter voor het koken en proper maken. In tegenstelling, de
oorspronkelijke oppvervlakes kunnen geribbelde markeringen vertonen bij het
eerste gebruik. Na een aantal uren van koken verdwijnen deze markeringen.

11
NL
Reiniging, zorg & onderhoud
Voordat u de grill reinigt, dient u de elektrische stroom uit te schakelen door de stroomstekker uit het
stopcontact te halen.
Reinig regelmatig het grilloppervlak, wij raden de reiniging aan na elk gebruik.
Wanneer de grilloppervlakken nog warm zijn, was deze met warm zeepwater en spoel vervolgens de
oppervlakken grondig met schoon water. Dit helpt het aanbakken van voedselresten aan de platen te
voorkomen.
Haal de vetdruppellade eruit en reinig deze met warm zeepwater.
Alle voedselresten op andere oppervlakken kunnen met een vochtige doek worden verwijderd. De Contact
Grill NIET in water onderdompelen of reinigen met drukspuitreinigers.
Wanneer men toestaat dat vetten zich kunnen opbouwen, dan wordt dit vet hard en is dan uiterst moeilijk
te verwijderen. Volg de onderstaande stappen om dit te voorkomen:
• Alvorens het apparaat te reinigen dient men altijd het apparaat UIT te schakelen en de stekker uit het
stopcontact te halen.
• Alvorens het apparaat te reinigen dient men het apparaat te laten afkoelen. Echter voor het beste
resultaat reinigt u het apparaatwanneer de platen nog enigszins warm zijn.
• Gebruik warm zeepwater en een vochtige doek om de buitenkant van het apparaat te reinigen.
• Wees voorzichtig met het gebruik van schrapers om resten te verwijderen aangezien deze de kookop-
pervlakken kunnenbeschadigen.
• Na reiniging goed drogen.
Schrapen
• Schraap na elk gebruik het apparaat met een schraper/grillsteen/koperen borstel of flexibele spatel
om de overdadige vet- en voedselresten te verwijderen. Indien nodig, gebruik de meegeleverde
opvangbak.
• Wanneer er een opeenhoping van verbrand vet of voedsel is, moet het oppervlak grondig worden
gereinigd en voor gebruik weer worden voorbereiden.
OPMERKING: HET IS VAN VITAAL BELANG DAT HET KOOKOPPERVLAK NA
REINIGING OPNIEUW VOOR GEBRUIK WORDT VOORBEREID.
WAARSCHUWING: GEBRUIK GEEN STAALWOL OMDAT DIT STUKJES KAN
ACHTERLATEN DIE VOEDSEL KUNNEN BEDERVEN.
Opvangbak
• Dit apparaat is voorzien van een opvangbak die tijdens het grillen vetten en vloeistoffen opvangt.
• Verwijder de opvangbak minimaal één keer per dag alvorens deze met warm zeepwater te wassen.
• Laat de opvangbak niet te vol worden anders stroomt het te veel aan vet uit de overstortopening aan
de voorzijde van de bak.
WAARSCHUWING: OPVANGBAK NIET TIJDENS GEBRUIK OF KORT NA GEBRUIK
UIT HET APPA- RAAT HALEN, DE INHOUD IS HEET.

12
NL
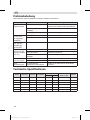
Problemen oplossen
Indien nodig moet een gekwalificeerde technicus reparaties uitvoeren.
Probleem Mogelijke oorzaak Handeling
Het apparaat werkt
niet
Het apparaat is niet ingeschakeld Controleer of de stroomkabel van het apparaat is
aangesloten en of het apparaat is ingeschakeld
Stekker en kabel zijn beschadigd Vervang stekker of kabel
Storing netvoedi Controleer netvoeding
Het apparaat
bereikt de
ingestelde
temperatuur niet
Defecte thermostaat Vervang de thermostaat
Defect verwarmingselement Vervang het verwarmingselement
Het apparaat wordt
warm maar het
indicatielampje gaat
niet aan
Indicatorlampje vervangen Vervang het controlelampje
Het lampje van de
stroomindicator
gaat aan maar het
apparaat wordt niet
op temperatuur
gebracht
Defect verwarmingselement Vervang het verwarmingselement
Defecte thermostaat Vervang de thermostaat
Thermostaat verkeerd ingesteld Controleer de thermostaat
Apparaat wordt
heel langzaam
warm
Kookoppervlak is niet schoon Reinig het kookoppervlak volgens de
aanwijzingen
Defect verwarmingselement Vervang het verwarmingselement
Geen stroom De thermische uitschakelknop is
geactiveerd Druk op de reset-knop aan de achterkant van
het apparaat
Technische specificaties
Model Voltage Vermogen Stroom Plaat type Inhoud
h x b x d mm Gewicht
Boven Onder
DY993 230V, 50Hz 1500W 6,5A Geribbeld Geribbeld 210 x 290 x 320 14,5kg
DY994 230V, 50Hz 2900W 12,6A Geribbeld Geribbeld 210 x 540 x 320 27kg
DY995 230V, 50Hz 2200W 9,5A Geribbeld Geribbeld 210 x 380 x 320 19kg
DY996 230V, 50Hz 1500W 6,5A Vlak Vlak 210 x 290 x 320 16kg
DY997 230V, 50Hz 2200W 9,5A Vlak Vlak 210 x 380 x 320 21kg
DY998 230V, 50Hz 2900W 12,6A Vlak Vlak 210 x 540 x 320 29kg

13
NL
Elektrische bedrading
Men dient de stekker op een geschikt stopcontact aan te sluiten.
De bedrading van dit apparaat is als volgt:
• Stroomkabel (bruin) naar de aansluitklem gemarkeerd met L
• Neutraalkabel (blauw) naar de aansluitklem gemarkeerd met N
• Aardekabel (groen/geel) naar de aansluitklem gemarkeerd met E
Dit apparaat moet worden geaard.
Raadpleeg bij twijfel een vakkundige elektricien.
De elektrische isolatiepunten mogen niet worden geblokkeerd. In geval van een nooduitschakeling
moeten de isolatiepunten direct toegankelijk zijn.
Productconformiteit
Het WEEE-logo op dit product of bijbehorende documentatie geeft aan dat het product
niet onder huisvuil valt en ook niet als zodanig mag worden verwerkt. Ter preventie van
mogelijke gevaren voor de gezondheid van personen en/of voor het milieu, dient men
dit product in overeenstemming met het voorgeschreven en milieuveilige recyclingproces
als afval te verwerken. Neem contact op met uw productleverancier of uw plaatselijke
afvalverwerkingsbedrijf voor meer informatie over de juiste verwerking van dit product.
De onderdelen van BUFFALO-producten hebben strenge producttesten ondergaan om te
voldoen aan wettelijke regels en specificaties die door internationale, onafhankelijke en
landelijke overheden worden voorgeschreven.
BUFFALO-producten zijn goedgekeurd en voorzien van het volgende symbool:
Alle rechten voorbehouden. Het is verboden om deze handleiding, hetzij volledig of gedeeltelijk, elektronisch of mechanisch
te reproduceren, kopiëren, op opslagmedia op te slaan of op enigerlei wijze over te dragen, zonder voorafgaande
goedkeuring van BUFFALO.
Wij hebben er alles aan gedaan om er zeker van te zijn dat op publicatiedatum van de handleiding alle details correct zijn.
BUFFALO behoudt zich echter het recht voor om specificaties zonder aankondiging te wijzigen.

14
FR
Conseils de sécurité
• Placez l’appareil sur une surface plane, stable.
• L’installation et les éventuelles réparations doivent être
confiées à un dépanneur / technicien qualifié. Ne retirez aucun
composant ou cache de ce produit.
• Consultez les normes locales et nationales pour vous
conformer aux :
- lois sur l’hygiène et la sécurité au travail ;
- codes de bonnes pratiques BS EN ;
- précautions contre le risque d’incendie ;
- réglementations sur les branchements électriques IEE ;
- règlements sur la construction.
• Attention ! Surface chaude !
• NE PAS immerger l’appareil.
• ÉVITEZ de nettoyer à l’aide d’un nettoyeur à jet ou d’un
nettoyeur à pression.
• Ne pas transporter l’appareil lorsqu’il est chaud.
• ÉVITEZ de laisser l’appareil sans surveillance pendant le
fonctionnement.
• N’obstruez PAS et NE couvrez PAS l’appareil quand il est en
cours d’utilisation.
• Pendant et après le fonctionnement, le toaster est encore
chaud. Ne touchez jamais la surface afin d’éviter les brûlures.
• NE PAS utiliser l’appareil en extérieur.
• N’oubliez pas d’éteindre l’appareil inutilisé et d’isoler le cordon
d’alimentation.
• L’utilisation de cet appareil est exclusivement réservée aux
personnes formées en la matière et doit se conformer à ces
instructions.
• Gardez les emballages hors de portée des enfants.
Débarrassez-vous des emballages conformément aux
règlements des autorités locales.

15
FR
• Un cordon d’alimentation endommagé doit être remplacé par
un agent Buffalo ou un technicien qualifié recommandé, pour
éviter tout danger.
• Cet appareil n’a pas été conçu pour être utilisé par des
personnes (enfants inclus) à capacités physiques, sensorielles
ou mentales réduites ou ne disposant pas d’une expérience ou
de connaissances suffisantes, à moins que lesdites personnes
n’aient été formées ou instruites quant à son utilisation, par
une personne responsable de leur sécurité.
• Les enfants doivent être surveillés afin de s’assurer qu’ils ne
jouent pas avec l’appareil.
• Buffalo recommande de faire tester régulièrement cet appareil
(une fois par an au minimum) par une personne compétente.
Le test devrait inclure, entre autres : inspection visuelle, test de
polarité, la continuité de masse (équipement de classe I), test
d’isolation et test de fonctionnement.
Description du produit
• DY993 - Gril de contact Bistro Buffalo, Plaques nervurées simples
• DY994 - Gril de contact Bistro Buffalo, Plaques nervurées doubles
• DY995 - Gril de contact Bistro Buffalo, Plaques nervurées larges
• DY996 - Gril de contact Bistro Buffalo, Plaques plates simples
• DY997 - Gril de contact Bistro Buffalo, Plaques plates larges
• DY998 - Gril de contact Bistro Buffalo, Plaques plates doubles
Introduction
Nous vous invitons à consacrer quelques instants à la lecture attentive de ce manuel. L’entretien et
l’utilisation appropriés de cet appareil vous permettront de tirer le meilleur de votre produit Buffalo.
Contenu
Eléments fournis de série :
• Gril de contact Bistro
• Racleur
• Clé Allen
• Mode d’emploi
BUFFALO attache une grande importance à la qualité et au service et veille à fournir des produits en
parfait état opérationnel, parfaitement intacts au moment de l’emballage.
Nous vous prions de contacter votre revendeur BUFFALO immédiatement si vous constatez un dommage
quelconque survenu pendant le transport du produit.

16
FR
Installation
• Retirez le grill de contact Bistro Buffalo de son emballage en s’assurant que tous les plastiques de
protection et les résidus soient bien retirés de toutes les surfaces.
• Placez l’appareil sur une surface solide et de niveau.
• Buffalo vous recommande de laisser un espace de ventilation d’au moins 100 mm autour de l’appareil.
• Vérifiez que le bac récepteur en inox est bien positionné.
• Branchez la prise dans l’alimentation électrique. Le grill est prêt à être mis sous tension et à
fonctionner.
Préparation de la surface de cuisson surface
• Vérifiez que la surface de cuisson est propre. Mettez l’appareil sous tension et huilez généreusement
les plaques.
• A l’aide du thermostat, réglez le grill sur 110˚C.
• Une fois cette température atteinte, éteignez le grill et essuyez soigneusement l’excédent d’huile sur
les plaques.
Fonctionnement
• Le grill de contact doit être mis sous tension au moins 5 minutes avant toute utilisation.
• Pour une utilisation efficace de cet appareil lorsqu’il est utilisé par intermittence, il est recommandé
de laisser les plaques du grill fermées et de baisser le thermostat lorsque rien ne cuit. Votre
consommation électrique sera ainsi réduite et vous obtiendrez de meilleurs résultats en termes de
chaleur.
• Buffalo recommande de graisser légèrement la surface de cuisson avant chaque utilisation.
• Une température comprise entre 200°C et 220°C est suffisante pour une cuisson générale. Elle peut
toutefois varier en fonction du type d’aliments, des besoins ou de l’expérience individuels.
• Placez simplement les aliments sur la surface inférieure du grill et abaissez la plaque supérieure pour
une cuisson sur mesure.
SI LA PLAQUE SUPÉRIEURE DEVIENT UTILISATION LÂCHE / STIFF LA CLÉ
ALLEN FOURNIE POUR RÉGLER LA TENSION. TOURNER DANS LE SENS HORAIRE
POUR SERRER, ANTIHORAIRE POUR DESSERRER.
Remarque : grâce au nouveau traitement des plaques planes, les surfaces sont
désormais plus lisses et donc mieux adaptées à la cuisson et au nettoyage. Par
contre, les surfaces initiales peuvent sembler avoir des marques de nervures
lors de la première utilisation. Après plusieurs heures de cuisson, ces marques
commencent à s’estomper ou à disparaître.

17
FR
Nettoyage, entretien et maintenance
Avant de commencer à nettoyer le grill, débranchez-le de l’alimentation électrique en retirant la prise.
Nettoyez la surface de cuisson régulièrement. Nous vous recommandons de la nettoyer après chaque
session d’utilisation.
Lorsqu’elles sont encore chaudes, lavez les plaques de cuisson à l’eau savonneuse et rincez-les
soigneusement à l’eau claire. Cela permettra d’éviter que les aliments ne restent collés aux plaques.
Retirez le bac récepteur des graisses et lavez-le à l’eau chaude savonneuse.
Vous pouvez essuyer les autres surfaces avec un chiffon humide pour éliminer tout résidu alimentaire.
N’immergez jamais le grill de contact dans l’eau et n’utilisez pas de vaporisateurs à eau pour le nettoyer.
En cas d’accumulation des graisses, celles-ci commenceront à se carboniser en une substance dure
extrêmement difficile à nettoyer. Pour empêcher cela, suivez les instructions de nettoyage suivantes :
• Eteignez toujours l’appareil et débranchez-le de l’alimentation avant de le nettoyer.
• Laissez l’appareil refroidir avant tout nettoyage. Pour des résultats optimaux, il est cependant recom-
mandé de nettoyer lesplaques lorsqu’elles sont encore légèrement chaudes.
• Utilisez de l’eau chaude savonneuse et un chiffon humide pour nettoyer l’extérieur de l’appareil.
• Prenez soin de ne pas utiliser de grattoirs pour retirer les résidus de cuisson, car ils pourraient en-
dommager la surface decuisson.
• Essuyez minutieusement après le nettoyage.
Grattage
• Après chaque utilisation, raclez l’appareil avec un racloir / pierre à grill / brosse en cuivre ou une
spatule flexible pour retirer tout excès de graisse ou d’aliments. Un bac récepteur est fourni pour les
raclures, le cas échéant.
• En cas d’accumulation de graisses ou d’aliments brûlés, la surface de cuisson doit être rigoureusement
grattée et préparée à nouveau.
REMARQUE : IL EST CRUCIAL DE PREPARER A NOUVEAU LA SURFACE DE
CUISSON APRES QU’ELLE AIT ETE GRATTEE.
AVERTISSEMENT : NE PAS UTILISER DE PAILLE DE FER, CAR ELLE PEUT
LAISSER DES RESIDUS SUSCEPTIBLES DE CONTAMINER LES ALIMENTS.
Bac récepteur
• Cet appareil est fourni avec un bac récepteur pour collecter tout liquide ou graisse s’écoulant lors de
la cuisson.
• Au moins une fois par jour, retirez et videz ce bac récepteur avant de le laver à l’eau chaude
savonneuse.
• Ne laissez pas le bac déborder ou l’excédent de graisse s’écoulera par l’orifice de trop-plein situé à
l’avant du bac.
AVERTISSEMENT : NE PAS RETIRER LE BAC LORS OU IMMEDIATEMENT APRES
UTILISATION, CAR SON CONTENU SERA CHAUD.

18
FR
Dépannage
Un technicien qualifié doit effectuer les réparations si nécessaire.
Dysfonctionnement Cause probable Intervention
L’appareil ne fonctionne
pas L’appareil n’est pas allumé
Vérifier que l’appareil est bien branché et allumé
La prise et le cordon sont
endommagés Remplacez la fiche ou le câblé
Défaut d’alimentation
secteur Vérifier l’alimentation secteur
L’appareil n’atteint
pas la température
souhaitée
Thermostat défectueux Remplacer le thermostat
Élément défectueux Remplacer l’élément chauffant
L’appareil chauffe, mais
le témoin ne s’allume
pas
Témoin lumineux
défectueux Remplacer le témoin lumineux
Le témoin s’allume,
mais l’appareil ne
chauffe pas
Thermostat défectueux Remplacer le thermostat
Élément défectueux Remplacer l’élément chauffant
Thermostat mal réglé Vérifier le thermostat
L’appareil chauffe
lentement La surface de cuisson n’est
pas propre Nettoyez la surface de cuisson en suivant les
instructions
Élément défectueux Remplacer l’élément chauffant
Aucune alimentation Le rupteur thermique a été
déclenché Appuyer sur le commutateur Réinitialiser à l’arrière
de l’unité
Spécifications techniques
Modèle Tension Puissance Courant Type de plaque Dimensions
H x L x P mm Poids
Supérieure Inférieure
DY993 230V, 50Hz 1500W 6,5A Rainures Rainures 210 x 290 x 320 14,5kg
DY994 230V, 50Hz 2900W 12,6A Rainures Rainures 210 x 540 x 320 27kg
DY995 230V, 50Hz 2200W 9,5A Rainures Rainures 210 x 380 x 320 19kg
DY996 230V, 50Hz 1500W 6,5A Lisse Lisse 210 x 290 x 320 16kg
DY997 230V, 50Hz 2200W 9,5A Lisse Lisse 210 x 380 x 320 21kg
DY998 230V, 50Hz 2900W 12,6A Lisse Lisse 210 x 540 x 320 29kg

19
FR
Raccordement électrique
La prise doit être raccordée à la prise secteur qui convient.
Le branchement des fils de cet appareil correspond au schéma suivant :
• Fil conducteur (brun) à la borne marquée L
• Fil neutre (bleu) à la borne marquée N
• Fil de terre (vert / jaune) à la borne marquée E
Cet appareil doit être mis à la terre.
En cas de doute, consultez un électricien qualifié.
Les points d’isolation électrique doivent être libres de toute obstruction. En cas de débranchement requis
en urgence, ils doivent être facilement accessibles.
Conformité
Le logo WEEE qui figure sur ce produit ou sa documentation indique qu’il ne doit pas
être mis au rebut avec les ordures ménagères. Pour éviter qu’il ne présente un risque
pour la santé humaine et / ou écologique, confiez la mise au rebut de ce produit à un
site de recyclage agréé respectueux de l’environnement. Pour de plus amples détails sur
la mise au rebut appropriée de ce produit, contactez le fournisseur du produit ou l’autorité
responsable de l’enlèvement des ordures dans votre région.
Les pièces BUFFALO ont été soumises à des tests rigoureux pour pouvoir être déclarées
conformes aux normes et spécifications réglementaires définies par les autorités
internationales, indépendantes et fédérales.
Les produits BUFFALO ont été déclarés aptes à porter le symbole suivant :
Tous droits réservés. La production ou transmission, partielles ou intégrales, sous quelque forme que ce soit ou par n’importe
quel moyen, tant électronique que mécanique, sous forme de photocopie, d’enregistrement ou autre de ce mode d’emploi
sont interdites sans l’autorisation préalablement accordée par BUFFALO.
Nous nous efforçons, par tous les moyens dont nous disposons, de faire en sorte que les détails contenus dans le présent
mode d’emploi soient corrects en date d’impression. Toutefois, BUFFALO se réserve le droit de changer les spécifications de
ses produits sans préavis.

20
DE
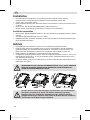
Sicherheitshinweise
• Auf eine flache, stabile Oberfläche stellen.
• Alle erforderlichen Montage- und Reparaturarbeiten sollten
von Wartungspersonal oder einem qualifizierten Techniker
durchgeführt werden. Keine Bauteile oder Bedienflächen von
diesem Produkt entfernen.
• Für folgende Normen und Vorschriften sind die lokalen und
nationalen Normen heranzuziehen:
- Arbeitsschutzvorschriften
- BS EN Verhaltenspraktiken
- Brandschutzvorschriften
- IEE-Anschlussvorschriften
- Bauvorschriften
• Achtung! Heiße Oberfläche!
• Das Gerät NICHT in Wasser eintauchen.
• NICHT mit Düsen / Hochdruckreinigern reinigen.
• Nicht tragen, solange das Gerät heiß ist.
• Das Gerät während des Betriebs NICHT unbeaufsichtigt lassen.
• Das Gerät darf während des Gebrauchs NICHT blockiert oder
abgedeckt werden.
• Während und nach dem Kochen ist das Gerät noch heiß. Berühren
Sie niemals die Oberfläche, um Verbrühungen zu vermeiden.
• Das Gerät NICHT im Freien einsetzen.
• Schalten Sie das Gerät immer aus und trennen Sie es von der
Stromversorgung, wenn es nicht benutzt wird.
• Dieses Gerät darf nur in Übereinstimmung mit diesen.
• Anweisungen und von dafür zuständigen Personen benutzt
werden.
• Verpackungsmaterial außerhalb der Reichweite von Kindern
aufbewahren und gemäß den lokalen Vorschriften entsorgen.
• Aus Sicherheitsgründen muss ein beschädigtes Stromkabel
von einem Buffalo-Mitarbeiter oder empfohlenen qualifizierten
Elektriker erneuert werden.
Seite wird geladen ...
Seite wird geladen ...
Seite wird geladen ...
Seite wird geladen ...
Seite wird geladen ...
Seite wird geladen ...
Seite wird geladen ...
Seite wird geladen ...
Seite wird geladen ...
Seite wird geladen ...
Seite wird geladen ...
Seite wird geladen ...
Seite wird geladen ...
Seite wird geladen ...
Seite wird geladen ...
Seite wird geladen ...
Seite wird geladen ...
Seite wird geladen ...
Seite wird geladen ...
Seite wird geladen ...
-
 1
1
-
 2
2
-
 3
3
-
 4
4
-
 5
5
-
 6
6
-
 7
7
-
 8
8
-
 9
9
-
 10
10
-
 11
11
-
 12
12
-
 13
13
-
 14
14
-
 15
15
-
 16
16
-
 17
17
-
 18
18
-
 19
19
-
 20
20
-
 21
21
-
 22
22
-
 23
23
-
 24
24
-
 25
25
-
 26
26
-
 27
27
-
 28
28
-
 29
29
-
 30
30
-
 31
31
-
 32
32
-
 33
33
-
 34
34
-
 35
35
-
 36
36
-
 37
37
-
 38
38
-
 39
39
-
 40
40


in anderen Sprachen
- français: Buffalo DY997 Manuel utilisateur
- español: Buffalo DY997 Manual de usuario
- italiano: Buffalo DY997 Manuale utente
- Nederlands: Buffalo DY997 Handleiding
Verwandte Artikel
-
Buffalo FC386 Benutzerhandbuch
-
Buffalo GJ455 Bedienungsanleitung
-
-
Buffalo CP793 Benutzerhandbuch
-
Buffalo FC256 Bedienungsanleitung
-
Buffalo CJ799 Benutzerhandbuch
-
Buffalo GJ452 Bedienungsanleitung
-
Buffalo L515 Benutzerhandbuch
-
-
Buffalo GF256 Bedienungsanleitung