EXSYS EX-46001 Bedienungsanleitung
- Kategorie
- Schnittstellenkarten / Adapter
- Typ
- Bedienungsanleitung

6 5 1
BESCHREIBUNG & TECHNISCHE DATEN
AUFBAU
Anleitung
Vers. 1.0 / 30.11.22
EX-46001
Kompatibilität: PCI-Express x1 bis x16
Betriebssysteme: Windows XP / Vista / 7 / 8.x / 10 / 11 / Server 20xx / Linux
Anschlüsse: 1x 25-Pin D-Sub Parallel Buchse
Lieferumfang: EX-46001, Low Profile Bügel, Treiber CD, Anleitung
Zertifikate:
1x 25-Pin D-Dub Parallel Buchse
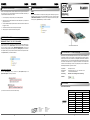
Die EX-46001 ist eine parallel PCI-Express Karte. Sie ist mit einem parallelen SPP/EPP/ECP Bi
-Direktionalen Anschluss für den Anschluss von Peripheriegeräten mit Enhanced Centronics
Interface (z.B. Drucker, Scanner, Laufwerke usw.) ausgestattet. Die EX-46001 unterstützt alle
PCI-Express Slots von x1 bis x16. Der serielle PCI-Express Bus unterstützt optimal die Leistung
des schnellen Asix Chipsatz. Es ist nicht möglich die I/O Adressen und Interrupts manuell
einzustellen, da die Einstellungen der Karte vom System (BIOS) und beim installieren des
Betriebssystems automatisch vorgenommen werden.
Switzerland:
EXSYS Vertriebs GmbH
Dübendorfstrasse 17
8602 Wangen
www.exsys.ch
Germany:
EXSYS Vertriebs GmbH
Industriestrasse 8
61449 Steinbach
www.exsys.de
ANSCHLÜSSE
25-Pin D-Sub Parallel Buchse:
25-Pin D-Sub Parallel Buchse
Pin Signal Pin Signal Pin Signal
1 STROBE 10 ACKNOWLEDGE 19 GROUND
2 DATA 0 11 BUSY 20 GROUND
3 DATA 1 12 PAPER EMPTY 21 GROUND
4 DATA 2 13 SELECT 22 GROUND
5 DATA 3 14 AUTO FEED 23 GROUND
6 DATA 4 15 ERROR 24 GROUND
7 DATA 5 16 INIT 25 GROUND
8 DATA 6 17 SELECT INPUT
9 DATA 7 18 GROUND
DRIVER INSTALLATION
Windows XP / Vista / 7 / 8.x / 10 / 11 / Server 20xx
After the hardware installation is completed, the operating system automatically detects the EX-
46001 and shows you a new „Parallel PCI-Port“. Now insert the driver CD into your CD-ROM
drive (e.g. drive D:) and open the folder „SERIAL&PARALLEL/Ax99100“. Now select the
folder of your operating system and start the application „AX99100_Setup“ which is located in
the respective folder (see picture). Follow the installation instructions and complete the installa-
tion. Important! Restart your PC after the installation.
CHECK INSTALLED DRIVER
Open the >Device-Manager<. Now you should see at „Ports (COM & LPT)“ and at
„Mutlifunction adapter“ the following new Entries:
If you see these or similar entries, the card is installed correctly.
HARDWARE INSTALLATION
Please note the following installation instructions. Because there are large differences between the
PC’s, we can give you only a general installation instructions for the EX-46001. Please refer your
computer’s reference manual whenever in doubt.
1. Turn off the power to your computer and any other connected peripherals.
2. Remove the mounting screws located at the rear and/or sides panels of your Computer and
gently slide the cover off.
3. Locate an available PCI-Express expansion slot and insert the card. Make sure that the card
is plugged in correctly.
4. Then attach the card with a screw to the rear panel of the computer.
5. Gently replace your computer’s cover and the mounting screws.
DRIVER INSTALLATION
Linux
After the hardware installation is completed, the operating system automatically recognizes the
EX-46001. Now insert the driver CD into your CD-ROM drive (e.g. drive D:) and open the folder
„SERIAL&PARALLEL/Ax99100“. The drivers for your Linux system are located in the „linux“
folder (see picture). Important! Restart your PC after the installation.

2 3 4
TREIBER INSTALLATION
Windows XP / Vista / 7 / 8.x / 10 / 11 / Server 20xx
Nach Abschluss der Hardwareinstallation erkennt das Betriebssystem die EX-46001 automa-
tisch und zeigt Ihnen einen neuen „Paralleler PCI-Anschluss“ an. Legen Sie nun die Treiber
CD in Ihr CD-ROM Laufwerk (z.B. Laufwerk D:) ein und öffnen Sie den Ordner
„SERIAL&PARALLEL/Ax99100“. Nun wählen Sie den Ordner Ihres Betriebssystems aus und
starten Sie die Anwendung „AX99100_Setup“ welche sich im jeweiligen Ordern befindet (siehe
Abbildung). Folgen Sie den Installationsanweisungen und schließen Sie die Installation ab.
Wichtig! Starten Sie Ihren PC nach der Installation neu.
ÜBERPRÜFEN DES INSTALLIERTEN TREIBER
Öffnen Sie den >Geräte-Manager<. Jetzt müssten Sie unter „Anschlüsse (COM & LPT)“ und
unter „Multifunktionsadapter“ folgende neue Einträge sehen:
Sind diese oder ähnliche Einträge vorhanden, ist die Karte richtig installiert.
LAYOUT
Manual
Vers. 1.0 / 30.11.22
EX-46001
Schweiz:
EXSYS Vertriebs GmbH
Dübendorfstrasse 17
8602 Wangen
www.exsys.ch
Deutschland:
EXSYS Vertriebs GmbH
Industriestrasse 8
61449 Steinbach
www.exsys.de
HARDWARE INSTALLATION
Beachten Sie bitte die folgenden Installationshinweise. Da es große Unterschiede zwischen PC‘s
gibt, können wir Ihnen nur eine generelle Anleitung zum Einbau der EX-46001 geben. Bei Unklar-
heiten halten Sie sich bitte an die Bedienungsanleitung Ihres Computersystems.
1. Schalten Sie Ihren Rechner und alle angeschlossenen Peripheriegeräte aus und ziehen Sie
bei allen Geräten den Netzstecker.
2. Lösen Sie die Schrauben des Gehäuses auf der Rückseite Ihres Computers und entfernen
Sie vorsichtig das Gehäuse.
3. Suchen Sie jetzt einen freien PCI-Express Steckplatz und stecken Sie die EX-46001 vorsich-
tig in den ausgewählten PCI-Express Steckplatz ein. Beachten Sie, das die EX-46001 korrekt
eingesteckt ist und das kein Kurzschluss entsteht.
4. Danach befestigen Sie die EX-46001 mit einer Schraube am Gehäuse.
5. Jetzt das Computergehäuse mit den Schrauben wieder schließen.
DESCRIPTION & TECNICAL INFORMATION
Compatibility: PCI-Express x1 to x16
Operating System: Windows XP / Vista / 7 / 8.x / 10 / 11 / Server 20xx / Linux
Connectors: 1x 25-Pin D-Sub Parallel Connector
Extent of Delivery: EX-46001, Low Profile Bracket, Driver CD, Manual
Certificates:
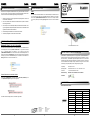
The EX-46001 is a parallel PCI-Express card. It is equipped with a parallel SPP/EPP/ECP bi-
directional output for connecting peripherals with Enhanced Centronics Interface (e.g. printers,
scanners, drives, etc.). The EX-46001 supports all PCI-Express slots from x1 to x16. The serial
PCI-Express bus optimally supports the performance of the fast Asix chipset. It is not possible to
set the I/O addresses and interrupts manually, because the settings of the card are made
automatically by the system (BIOS) and when installing the operating system.
CONNECTORS
25-Pin D-Sub Parallel Connector:
25-Pin D-Sub Parallel Connector
Pin Signal Pin Signal Pin Signal
1 STROBE 10 ACKNOWLEDGE 19 GROUND
2 DATA 0 11 BUSY 20 GROUND
3 DATA 1 12 PAPER EMPTY 21 GROUND
4 DATA 2 13 SELECT 22 GROUND
5 DATA 3 14 AUTO FEED 23 GROUND
6 DATA 4 15 ERROR 24 GROUND
7 DATA 5 16 INIT 25 GROUND
8 DATA 6 17 SELECT INPUT
9 DATA 7 18 GROUND
TREIBER INSTALLATION
Linux
Nach Abschluss der Hardwareinstallation erkennt das Betriebssystem die EX-46001 automa-
tisch. Legen Sie nun die Treiber CD in Ihr CD-ROM Laufwerk (z.B. Laufwerk D:) ein und öffnen
Sie den Ordner „SERIAL&PARALLEL/Ax99100“. Die Treiber für Ihr Linux System befinden
sich im Ordner „linux“ (siehe Abbildung). Wichtig! Starten Sie Ihren PC nach der Installation
neu.
1x 25-Pin D-Dub Parallel Connector
-
 1
1
-
 2
2


EXSYS EX-46001 Bedienungsanleitung
- Kategorie
- Schnittstellenkarten / Adapter
- Typ
- Bedienungsanleitung
in anderen Sprachen
- English: EXSYS EX-46001 Owner's manual