
RENLIG
GB
DE

ENGLISH
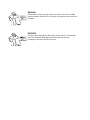
Please refer to the last page of this manual for the full list of IKEA
appointed After Sales Service Provider and relative national phone
numbers.
DEUTSCH
Auf der letzten Seite dieser Broschüre finden Sie eine vollständige
Liste der offiziellen IKEA After-Sales-Dienstleister mit den
jeweiligen nationalen Telefonnummern.


Contents
Safety information 4
Safety instructions 6
Product description 8
Control panel 9
Before first use 12
Daily use 12
Hints and tips 15
Programmes 16
Consumption values 19
Care and cleaning 20
Troubleshooting 23
Technical data 26
Environmental concerns 27
IKEA guarantee 28
Subject to change without notice.
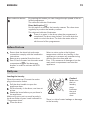
Safety information
Before the installation and use of the appliance, carefully read
the supplied instructions. The manufacturer is not responsible
for any injuries or damages that are the result of incorrect
installation or usage. Always keep the instructions in a safe and
accessible location for future reference.
Children and vulnerable people safety
• This appliance can be used by children aged from 8 years
and above and persons with reduced physical, sensory or
mental capabilities or lack of experience and knowledge if
they have been given supervision or instruction concerning
the use of the appliance in a safe way and understand the
hazards involved.
• Children between 3 and 8 years of age and persons with
very extensive and complex disabilities shall be kept away
from the appliance unless continuously supervised.
• Children of less than 3 years of age should be kept away
from the appliance unless continuously supervised.
• Do not let children play with the appliance.
• Keep all packaging away from children and dispose of it
appropriately.
• Keep detergents away from children.
ENGLISH
4

• Keep children and pets away from the appliance when the
door is open.
• If the appliance has a child safety device, it should be
activated.
• Children shall not carry out cleaning and user maintenance of
the appliance without supervision.
General Safety
• Do not change the specification of this appliance.
• This appliance is intended to be used in household and
similar applications such as:
– staff kitchen areas in shops, offices and other working
environments;
– by clients in hotels, motels, bed & breakfast and other
residential type environments;
– areas for communal use in blocks of flats or in launderettes.
• Do not exceed the maximum load of 7 kg (refer to the
"Programme chart" chapter).
• The operating water pressure at the water entry point from
the outlet connection must be between 0.5 bar (0.05 MPa)
and 8 bar (0.8 MPa).
• The ventilation opening in the base must not be covered by a
carpet, mat, or any floor covering.
• The appliance must be connected to the water mains using
the new supplied hose sets, or other new hose sets supplied
by the Authorised Service Centre.
• Old hose sets must not be reused.
• If the mains power supply cable is damaged, it must be
replaced by the manufacturer, its Authorised Service Centre
or similarly qualified persons to avoid an electrical hazard.
• Before any maintenance operation, deactivate the appliance
and disconnect the mains plug from the socket.
• Do not use high pressure water sprays and/or steam to clean
the appliance.
ENGLISH
5

• Clean the appliance with a moist cloth. Use only neutral
detergents. Do not use abrasive products, abrasive cleaning
pads, solvents or metal objects.
Safety instructions
Installation
The installation must comply with
relevant national regulations.
• Remove all the packaging and the transit
bolts including rubber bush with plastic
spacer.
• Keep the transit bolts in a safe place. If
the appliance is to be moved in the
future they must be reattached to lock
the drum to prevent an internal damage.
• Always take care when moving the
appliance as it is heavy. Always use
safety gloves and enclosed footwear.
• Do not install or use a damaged
appliance.
• Follow the installation instructions
supplied with the appliance.
• Do not install or use the appliance where
the temperature can be less than 0°C or
where it is exposed to the weather.
• The floor area on which the appliance is
to be installed must be flat, stable, heat
resistant and clean.
• Make sure that there is air circulation
between the appliance and the floor.
• When the appliance is in its permanent
position, check if it is levelled correctly
with the aid of a spirit level. If it is not,
adjust the feet accordingly.
• Do not install the appliance directly
above a floor drain.
• Do not spray water on the appliance
and do not expose it to excessive
humidity.
• Do not install the appliance where the
appliance door cannot be fully opened.
• Do not put a closed container to collect
possible water leakage under the
appliance. Contact the Authorised
Service Centre to ensure which
accessories can be used.
Electrical connection
Warning! Risk of fire and electric
shock.
• The appliance must be earthed.
• Always use a correctly installed
shockproof socket.
• Make sure that the parameters on the
rating plate are compatible with the
electrical ratings of the mains power
supply.
• Do not use multi-plug adapters and
extension cables.
• Make sure not to cause damage to the
mains plug and to the mains cable.
Should the mains cable need to be
replaced, this must be carried out by our
Authorised Service Centre.
• Connect the mains plug to the mains
socket only at the end of the installation.
Make sure that there is access to the
mains plug after the installation.
• Do not touch the mains cable or the
mains plug with wet hands.
• Do not pull the mains cable to disconnect
the appliance. Always pull the mains
plug.
• This appliance complies with the E.E.C.
Directives.
Water connection
• Do not cause damage to the water
hoses.
• Before connection to new pipes, pipes
not used for a long time, where repair
work has been carried out or new
ENGLISH
6

devices fitted (water meters, etc.), let the
water flow until it is clean and clear.
• Ensure that there are no visible water
leaks during and after the first use of the
appliance.
• Do not use an extension hose if the inlet
hose is too short. Contact the Authorised
Service Centre for the replacement of the
inlet hose.
• It is possible to see water flowing from
the drain hose. This is due to the testing
of the appliance with the use of water in
the factory.
• You can extend the drain hose to
maximum 400 cm. Contact the
Authorised Service Centre for the other
drain hose and the extension.
Use
Warning! Risk of injury, electric
shock, fire, burns or damage to
the appliance.
• Follow the safety instructions on the
detergent packaging.
• Do not put flammable products or items
that are wet with flammable products in,
near or on the appliance.
• Make sure that all metal objects are
removed from the laundry.
• Do not wash fabrics which are heavily
soiled with oil, grease or other greasy
substances. It can damage rubber parts
of the washing machine. Prewash such
fabrics by hand before loading them into
the washing machine.
• Do not touch the glass door while a
programme is in operation. The glass
can get hot.
Service
• To repair the appliance contact an
Authorised Service Centre.
• Use original spare parts only.
Disposal
Warning! Risk of injury or
suffocation.
• Disconnect the appliance from the mains
electrical and water supplies.
• Cut off the mains electrical cable close to
the appliance and dispose of it.
• Remove the door catch to prevent
children or pets from becoming trapped
in the drum.
• Dispose of the appliance in accordance
with local requirements for the disposal
of Waste Electrical and Electronic
Equipment (WEEE).
ENGLISH
7

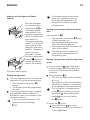
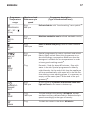
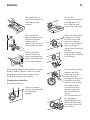
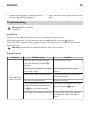
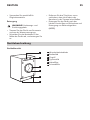
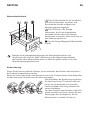
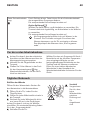
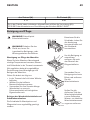
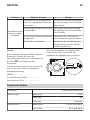
Product description
Appliance overview
1
2
3
4
5
6
1
Detergent dispenser drawer
2
Control panel
3
Door opening handle
4
Rating plate
5
Drain filter
6
Adjustable feet
Detergent dispenser drawer
Compartment for detergent used for
prewash and soak phase. The prewash and
soak detergent is added at the beginning of
the wash programme.
Compartment for powder or liquid
detergent used for main wash. If using liquid
detergent pour it just before starting the
programme.
Compartment for liquid additives (fabric
softener, starch).
Follow the product manufacturer’s recommendations on quantities to use and do
not ever exceed the «MAX» mark in the detergent dispenser drawer. Any fabric
softener or starching additives must be poured into the compartment before
starting the wash programme.
ENGLISH 8

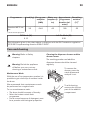
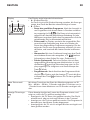
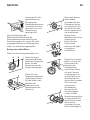
Child safety device
This appliance incorporates a special feature to prevent children and pets becoming
trapped inside the drum.
Make sure that children or pets do not climb into the drum. Please check into the drum
before using it.
To activate this device, rotate the button
clockwise (without pressing it) inside the door
until the groove is horizontal. If necessary use
a coin.
To disable this device and restore the
possibility of closing the door, rotate the
button anticlockwise until the groove is
vertical.
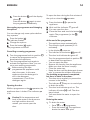
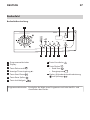
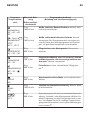
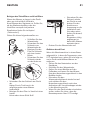
Control panel
Control panel description
21
5678910
43
1
Programme knob
2
Display
3
Delay Start button
4
Door lock indicator
5
Start/Pause button
6
Extra Rinse button
7
Easy Iron button
8
Prewash button
9
Option button :
• Super Quick option
• Economy option
ENGLISH 9

10
Spin reduction and Rinse Hold option
Programme knob It allows you to switch the appliance On/Off and/or to select a
programme.
Display
BA
The display shows the following information:
• A - Child safety lock
This device permits you to leave the appliance unattended
during it's functioning.
• B – Digit:
– Duration of the selected programme. After selecting a
programme, the duration is displayed in hours and mi-
nutes (e. g. ). The duration is calculated automati-
cally on the basis of the maximum recommended load for
each type of fabric. After the programme has started, the
time remaining is updated every minute.
– Delayed start. The selected delay appears on the display
for a few seconds, then the duration of the selected pro-
gramme is displayed again. The delay time value decrea-
ses by one unit every hour and then, when 1 hour re-
mains, every minute.
– Alarm codes. In the event of operating problems, some
alarm codes can be displayed, e. g. (see paragraph
«Troubleshooting»).
– Incorrect option selection. If an option which is not com-
patible with the set wash programme is selected, the mes-
sage is displayed at the bottom of the display for a
few seconds. The integrated red indicator of button
starts flashing.
– End of programme. When the programme has finished
the flashing zero
is displayed, the indicator and the
indicator of button
go out. The door can be opened.
Delay Start button The programme can be delayed from 30 min - 60 min - 90min, 2
hours and then by 1 hour up to a maximum of 20 hours by
means of this button.
ENGLISH 10

Door lock indicator This indicator illuminates when the programme starts and indi-
cates if the door can be opened:
• indicator on: the door cannot be opened. The appliance is
working or has stopped with water left in the tub.
• indicator off: the door can be opened. The programme is fin-
ished or the water has been emptied out.
• indicator flashing: the door is opening in a few minutes.
Start/Pause button This button allows you to start or to interrupt the selected wash-
ing programme.
Extra Rinse button This appliance is designed for saving energy. If it necessary to
rinse the laundry using an extra quantity of water (extra rinse),
select this option. Some additional rinses will be performed. This
option is recommended for people who are allergic to deter-
gents, and in areas where the water is very soft.
The relevant indicator illuminates.
Easy Iron button With this option the laundry is gently washed and spun to avoid
any creasing. In this way ironing is easier.
Furthermore, the appliance will perform some additional rinses
in some programmes.
On cotton programmes the maximum spin speed is reduced au-
tomatically.
The related indicator illuminates.
Prewash button By selecting this option the appliance performs a prewash cycle
before the main wash phase. The washing time will be pro-
longed. This option is recommended for heavily soiled laundry.
The relevant indicator illuminates.
Option button By pressing this button you can set:
• Super Quick option : the appliance performs a short cycle
for lightly soiled items or for laundry which needs only fresh-
ening up.
We recommend you to reduce the fabric load.
The relevant indicator illuminates.
• Economy option :
With this option you can have a good washing results and
decrease the energy consumption at the same time.
The appliance extends the wash time and reduces the tem-
perature.
The related indicator illuminates.
ENGLISH 11

Spin reduction button By pressing this button you can change the spin speed of the se-
lected programme.
The relevant indicator illuminates.
Rinse Hold option
Set this option to prevent the laundry creases. The drum turns
regularly to prevent the laundry creases.
The relevant indicator illuminates.
There is a water in the drum when the programme is
completed. The door stays locked. You must drain the
water to unlock the door. To drain the water refer to
«At the end of the programme».
Before first use
1. Ensure that the electrical and water
connections comply with the installation
instructions.
2. Remove any material from the drum.
3. Pour 2 liters of water into the main wash
compartment of the detergent
drawer in order to activate the ECO
valve.
Select a cotton cycle at the highest
temperature without any laundry in the
appliance, to remove any manufacturing
residue from the drum and tub.
Pour 1/2 a measure of detergent into the
main wash compartment and start the
appliance.
Daily use
Loading the laundry
Open the water tap. Connect the mains
plug to the mains socket.
1. Pull the door handle to open the
appliance door.
2. Put the laundry in the drum, one item at
a time.
3. Shake the items before you put them in
the appliance.
Make sure not to put too much laundry in
the drum. Refer to max. loads indicated in
"Programme chart".
4. Close the door.
Caution!
Make sure
that no
laundry
stays
between
the seal
and the
door.
There is a risk of water leakage or damage
to the laundry.
ENGLISH 12

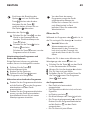
Measure out detergent and fabric
softener
Pour the detergent
into the main wash
compartment
or
in the appropriate
compartment if the
selected programme/
option it requires (see
more details in
"Detergent dispenser
drawer"). To pour the
right quantity of the
detergent, see more
details in "Degrees of
water hardness".
Pour fabric softener
into the compartment
marked
(must not
exceed the «MAX»
mark in the drawer).
Close the drawer gently
Setting a programme
1. Turn the programme knob to switch the
appliance on and set the programme:
• The indicator of the button
flashes.
• The display shows the programme
duration.
2. If necessary, change the spin speed or
add available options. When you
activate an option, the indicator of the
set option comes on.
If you set something incorrect, the
display shows the message
.
For the description of each wash
cycle, the compatibility among
the washing programmes and
the options, consult the chapter
«Programmes».
Starting a programme without the delay
start
Press the button .
• The indicator of the button stops
to flash and stays on.
• The programme starts, the door
locks, the indicator is on.
• The programme time decreases with
steps of one minute.
The drain pump can operate for
a short time at the beginning of
the washing cycle.
Starting a programme with the delay start
option
1. Press the button again and again
until the display shows the delay you
want to set. The delay start indicator
comes on.
2. Press the button :
• The door is locked and the indicator
is on.
• The appliance starts the countdown.
• When the countdown is completed,
the programme starts automatically.
You can cancel or change the set
of the option before you press
the button . After pressing the
button
you can only cancel
the option.
To cancel the option:
a. Press the button to set the
appliance to pause. The indicator of
button
flashes.
ENGLISH
13

b. Press the button until the display
shows .
Press the button
again to start
the programme immediately.
Interrupting a programme and changing
the options
You can change only some options before
they operate.
1. Press the button
.
The indicator flashes.
2. Change the options.
3. Press the button again.
The programme continues.
Cancelling a running programme
1. Turn the programme knob to position
to cancel the programme and to
deactivate the appliance.
2. Turn the programme knob again to
activate the appliance. Now, you can
set a new washing programme.
Before starting the new
programme the appliance could
drain the water. In this case,
make sure that the detergent is
still in the detergent
compartment, if not fill the
detergent again.
Opening the door
While a programme or the operates, the
appliance door is locked. The indicator
is on.
Caution! If the temperature and
level of the water in the drum are
too high and the drum still
rotates, you cannot open the
door.
To open the door during the first minutes of
the cycle or when the
operates:
1. Press the button to pause the
appliance.
2. Wait until the indicator goes off.
3. You can open the door.
4. Close the door and touch the button
again. The programme (or the )
continues.
At the end of the programme
• The appliance stops automatically.
• The acoustic signal operates (if it is
activated).
• In the display
comes on.
• The indicator of the button goes off.
• The door lock indicator goes off.
Turn the programme knob to position
to deactivate the appliance.
• You can open the door.
• Remove the laundry from the appliance.
Make sure that the drum is empty.
• Close the water tap.
• Keep the door and the detergent drawer
ajar, to prevent the mildew and odours.
The washing programme is completed,
but there is water in the drum:
• The drum turns regularly to prevent the
creases in the laundry.
• The indicator
stays on to remind you
to drain the water.
• The door lock indicator is on. The
indicator of button is off. The door
stays locked.
• You must drain the water to open the
door.
Draining the water:
1. To drain the water.
• Set a or a programme.
• Press the button
. The appliance
drains the water and spins.
ENGLISH
14

2. When the programme is completed and
the door lock indicator goes off, you
can open the door.
3. Turn the programme knob to the
position to deactivate the appliance.
Stand by
Once the programme has finished, after a
few minutes the energy saving system will
be enabled. The brightness of the display is
reduced. By pressing any button the
appliance will come out of the energy
saving status.
Hints and tips
Sorting out the laundry
Follow the wash code symbols on each
garment label and the manufacturer’s
washing instructions. Sort the laundry as
follows: whites, coloureds, synthetics,
delicates, woollens.
Removing stains
Stubborn stains may not be removed by just
water and detergent. It is therefore
advisable to treat them prior to washing.
Blood: treat fresh stains with cold water. For
dried stains, soak overnight in water with a
stain remover product then rub in the soap
and water.
Oil based paint: moisten with benzine stain
remover, lay the garment on a soft cloth
and dab the stain; treat several times.
Dried grease stains: moisten with
turpentine, lay the garment on a soft
surface and dab the stain with the fingertips
and a cotton cloth.
Rust: oxalic acid dissolved in hot water or a
rust removing product used cold. Be careful
with rust stains which are not recent since
the cellulose structure will already have
been damaged and the fabric tends to
hole.
Mould stains: treat with bleach, rinse well
(white cottons and fast coloureds only).
Grass: soap lightly and treat with bleach
(white cottons and fast coloureds only).
Ball point pen and glue: moisten with
acetone
1)
, lay the garment on a soft cloth
and dab the stain.
Lipstick: moisten with acetone as above,
then treat stains with methylated spirits.
Treat any residual marks with bleach.
Red wine: soak in water and detergent,
rinse and treat with acetic or citric acid,
then rinse. Treat any residual marks with
bleach.
Ink: depending on the type of ink, moisten
the fabric first with acetone
1)
, then with
acetic acid; treat any residual marks on
white fabrics with bleach and then rinse
thoroughly.
Tar stains: first treat with stain remover,
methylated spirits or benzine, then rub with
detergent paste.
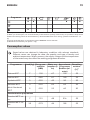
Degrees of water hardness
Water hardness is classified in so-called
“degrees” of hardness. Information on
hardness of the water in your area can be
1)
do not use acetone on artificial silk
ENGLISH 15

obtained from the relevant water supply
company, or from your local authority.
Characteris-
tic
Degrees of water hard-
ness
German
°dH
French °T.H.
Soft 0-7 0-15
Medium 8-14 16-25
Hard 15-21 26-37
Very hard > 21 > 37
A water softener must be added
when water has a medium-high
degree of hardness. Follow the
manufacturer’s instructions. The
quantity of detergent can then
always be adjusted (reduced) to
degree of hardness soft.
Programmes
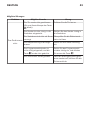
Programme Chart
Please always refer to the care label symbol of your garment and select the
washing programme based on what it says.
Programme
Temperature
range
Maximum load
Reference spin
speed
Programme description
(Type of load and soil level)
COTTONS
90° - 60° - 40° -
30°
7 kg
1400 rpm
White cotton and coloured cotton. Normal, heavy
and light soil.
+ option
COTTONS ECO
1)
60°C - 40°C
7 kg
1400 rpm
White cotton and fast-coloured cotton. Normal soil.
The energy consumption decreases and the time of
the washing programme is extended, ensuring good
washing results.
SYNTHETICS
60° - 40° - 30°
3 kg
900 rpm
Synthetic items or mixed fabric items. Normal soil.
DELICATES
40° - 30°
3 kg
700 rpm
Delicate fabrics such as acrylics, viscose and
mixed fabrics requiring gentler washing. Normal
soil.
ENGLISH 16

Programme
Temperature
range
Maximum load
Reference spin
speed
Programme description
(Type of load and soil level)
HANDWASH
40° - 30° -
(Cold)
2 kg
900 rpm
Delicate fabrics with "hand washing" care symbol.
2)
WOOL
40°
2 kg
900 rpm
Machine washable wool and had washable wool
2)
.
JEANS
40°
3 kg
1200 rpm
Items in denim and jersey. Also for dark coloured
items.
MIX 20°
20°C
3 kg
900 rpm
Special programme for cotton, synthetic and mixed
fabrics lightly soiled. Select this programme to re-
duce the energy consumption. Make sure that the
detergent is suitable for low temperatures in order
to have good washing results
3)
.
SOAK
30°C
7 kg Prewash - Soak for about 40 minutes - Stop with
water in the tub. Special programme for heavily
soiled laundry. At the end of this time the appliance
will stop automatically with water left in the tub. Be-
fore starting a new washing phase, it is necessary to
empty out the water (read "At the end of the pro-
gramme")
4)
.
MINIPROG-
RAMME
30°C
3 kg
700 rpm
A short cycle for synthetic and delicate items with
light soil level or for items to freshen up.
RINSE
7 kg
1400 rpm
To rinse and spin the laundry. All fabrics, except
woollens and very delicate fabrics. Reduce the spin
speed accordingly to the type of laundry.
DRAIN
7 kg To drain the water in the drum. All fabrics.
ENGLISH 17

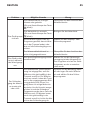
Programme
Temperature
range
Maximum load
Reference spin
speed
Programme description
(Type of load and soil level)
SPIN
7 kg
1400 rpm
All fabrics, except woollens and delicate fabrics.
To spin the laundry and to drain the water in the
drum.
ON/OFF
Position to turn the appliance off or/and reset a programme.
1)
Standard programmes for the Energy Label consumption values. According to regulation 1061/2010, these pro-
grammes are respectively the «Standard 60°C cotton programme» and the «Standard 40°C cotton programme». They
are the most efficient programmes in terms of combined energy and water consumption for washing normally soiled
cotton laundry.
The water temperature of the washing phase may differ from the temperature declared for the selected
programme.
2)
During this cycle the drum rotates slowly to ensure a gentle washing. If it seems that the drum doesn't rotate or
doesn't rotate properly, consider this as a normal functioning of the appliance.
3)
The appliance performs the short heating phase if the water temperature is below 20°C. The appliance can show
the temperature setting as “cold”.
4)
This programme cannot be used for very delicate fabrics as silk or wool. Pour the detergent for the soak pro-
gramme into the compartment marked
. At the end of the soak (after having emptied out the water) you can se-
lect the desired washing programme. First turn the appliance off, then select the programme and start it.
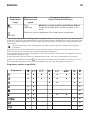
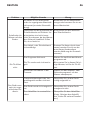
Programme options compatibility
Programme
1)
2) 3) 4)
■ ■ ■ ■ ■ ■ ■ ■
■ ■ ■ ■ ■ ■ ■ ■
■ ■ ■ ■ ■
■ ■ ■
■ ■ ■
■ ■ ■ ■ ■
■ ■ ■ ■
■
■
ENGLISH 18

Programme
1)
2) 3) 4)
■ ■ ■ ■ ■
■ ■
1)
This option is active only at 40° C and 60° C.
2)
When you set this option, we recommend that you decrease the quantity of the laundry. It is possible to keep the full
load but the washing results can be unsatisfactory. Recommended load: cotton: 3.5 kg, synthetics and delicates: 1.5
kg.
3)
If using liquid detergents, a programme without PREWASH must be selected.
4)
Maximum load with Easy iron option 1.5 kg.
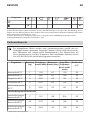
Consumption values
Stated values are obtained in laboratory conditions with relevant standards.
Different causes can change the data: the quantity and type of laundry and
ambient temperature. Water pressure, the supply voltage and the temperature
of inlet water may also affect the washing programme duration.
Programmes Load (kg) Energy con-
sumption
(kWh)
Water con-
sumption (li-
tre)
Approximate
programme
duration (mi-
nutes)
Remaining
moisture
(%)
1)
Cottons 60°C 7 1.35 67 150 52
Cottons 40°C 7 0.85 67 140 52
Synthetics 40°C 3 0.55 42 90 35
Delicates 40°C 3 0.55 63 65 35
Wool/Handwash
30°C
2 0.25 55 60 30
Standard cotton programmes
Standard 60°C cot-
ton
7 1.01 48 216 52
Standard 60°C cot-
ton
3.5 0.79 44 185 52
ENGLISH 19

Programmes Load (kg) Energy con-
sumption
(kWh)
Water con-
sumption (li-
tre)
Approximate
programme
duration (mi-
nutes)
Remaining
moisture
(%)
1)
Standard 40°C cot-
ton
3.5 0.62 43 180 52
1)
At the end of spin phase.
Off Mode (W) Left On Mode (W)
0.10 0.98
The information given in the chart above is compliant with the EU Commission regulation
1015/2010 implementing directive 2009/125/EC .
Care and cleaning
Warning! Refer to Safety
chapters.
Warning! Switch the appliance
off before you carry out any
cleaning or maintenance work.
Maintenance Wash
With the use of low temperature washes it is
possible to get a build up of residues inside
the drum.
We recommend that a maintenance wash
be performed on a regular basis.
To run a maintenance wash:
• The drum should be empty of laundry.
• Select the hottest cotton wash
programme.
• Use a normal measure of detergent, must
be a powder with biological properties.
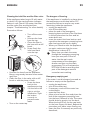
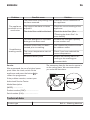
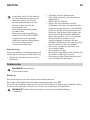
Cleaning the dispenser drawer and the
drawer recess
The washing powder and additive
dispenser drawer should be cleaned
regularly.
To remove the
drawer, press the
catch downwards
and pull it out.
To aid cleaning,
remove also the top
part of the additive
compartment.
ENGLISH 20
Seite laden ...
Seite laden ...
Seite laden ...
Seite laden ...
Seite laden ...
Seite laden ...
Seite laden ...
Seite laden ...
Seite laden ...
Seite laden ...
Seite laden ...
Seite laden ...
Seite laden ...
Seite laden ...
Seite laden ...
Seite laden ...
Seite laden ...
Seite laden ...
Seite laden ...
Seite laden ...
Seite laden ...
Seite laden ...
Seite laden ...
Seite laden ...
Seite laden ...
Seite laden ...
Seite laden ...
Seite laden ...
Seite laden ...
Seite laden ...
Seite laden ...
Seite laden ...
Seite laden ...
Seite laden ...
Seite laden ...
Seite laden ...
Seite laden ...
Seite laden ...
Seite laden ...
Seite laden ...
Seite laden ...
Seite laden ...
Seite laden ...
Seite laden ...
-
 1
1
-
 2
2
-
 3
3
-
 4
4
-
 5
5
-
 6
6
-
 7
7
-
 8
8
-
 9
9
-
 10
10
-
 11
11
-
 12
12
-
 13
13
-
 14
14
-
 15
15
-
 16
16
-
 17
17
-
 18
18
-
 19
19
-
 20
20
-
 21
21
-
 22
22
-
 23
23
-
 24
24
-
 25
25
-
 26
26
-
 27
27
-
 28
28
-
 29
29
-
 30
30
-
 31
31
-
 32
32
-
 33
33
-
 34
34
-
 35
35
-
 36
36
-
 37
37
-
 38
38
-
 39
39
-
 40
40
-
 41
41
-
 42
42
-
 43
43
-
 44
44
-
 45
45
-
 46
46
-
 47
47
-
 48
48
-
 49
49
-
 50
50
-
 51
51
-
 52
52
-
 53
53
-
 54
54
-
 55
55
-
 56
56
-
 57
57
-
 58
58
-
 59
59
-
 60
60
-
 61
61
-
 62
62
-
 63
63
-
 64
64


