Sharp XL-B510 Bedienungsanleitung
- Kategorie
- CD-Spieler
- Typ
- Bedienungsanleitung
Dieses Handbuch eignet sich auch für

XL-B510
User manual
Micro Component System
Product images are for illustration purposes only. Actual product may vary. | Das Bild auf der Verpackung kann vom Inhalt abweichend sein. | Las imágenes del
producto son para fi nes ilustrativos solamente. | Le immagini dei prodotti sono solo ai fi ni illustrativi. | Les images du produit sont présentées à titre d’illustration
uniquement. | Zdjęcie produktu jest tylko w celach ilustracyjnych. Produkt może się różnić.
EN ESDE IT FR PL


EN
Important safety instructions
CAUTION
RISK OF ELECTRIC SHOCK
DO NOT OPEN
Please, read these safety instructions and respect
the following warnings before the appliance is
operated:
The lightning ash with arrowhead symbol, within an
equilateral triangle, is intended to alert the user to the
presence of uninsulated “dangerous voltage” within the
product’s enclosure that may be of su cient magnitude as to
constitute a risk of electric shock to persons.
The exclamation point within an equilateral triangle is
intended to alert the user to the presence of important
operating and maintenance (servicing) instructions in the
literature accompanying the appliance.
This symbol means that the product should be disposed of
in an environmentally friendly manner and not with general
household waste.
AC voltage
DC voltage
Class II equipment
In order to prevent re always
keep candles and other open
ames away from this product.
Warning:
• Always follow basic safety precautions when using this applience, espe-
cially when children are present.
• Children should be supervised to ensure that they do not play with the
appliance.
• Do not damage the power cord, neither do not place any heavy objects
on it, do not strech it or bend it. Also do not attach extension cables.
Damage to the power cord may occur re or electric shock.
• If the supply cord is damaged, it must be replaced by the manufacturer,
a service agent or similarly qualied persons in order to avoid a hazard.
• Ensure that the unit is plugged into an AC 220-240V 50Hz power outlet.
Using higher voltage may cause the unit to malfunction or even re
catching.
• If the power plug does not t into your outlet, do not force the plug into
an electrical socket if it does not t.
• Turn o the unit before unplugging it from power source to completely
switch it o .
• Do not disconnect or connect the power cord with wet hands. It may
cause an electric shock.
• Disconnect the power cord if it is not used for a long time.
• Ensure that the mains plug is always easily accessible.
• This product does not contain any parts that are serviceable by the
user. In case of a fault, contact the manufacturer or authorised service
department. Exposing the internal parts inside the device may endanger
your life. The manufacturers guarantee does not extend to faults caused
by repairs carried out by unauthorised third parties.
• Do not use this product immediately after unpacking. Wait until it warms
up to room temperature before using it.
• Ensure this product is used in moderate climates only (not in tropical/
subtropical climates).
• Place product on a at, stable surface that is not subject to vibrations.
• Ensure the product and its parts is not overhanging the edge of the
supporting furniture.
• To reduce the risk of fire, electric shock or damage to this product, do
not expose it to direct sunlight, dust, rain and moisture. Never expose it
to dripping or splashing and do not place objects filled with liquids on
or near the product.
• Do not place objects lled with liquids, such as vases, on the apparatus.
• Do not install near any heat sources such as radiators, heat registers,
stoves, or other apparatus (including ampli ers) that produce heat.
• Do not place the product where the humidity is high and ventilation is
poor.
• Ensure a minimum distance of 5 cm around the apparatus for su cient
ventilation. Do not block any ventilation openings of this product.
Always ensure that the ventilation openings are not covered with items
such as newspapers, table-cloths, curtains, etc.
• NEVER let anyone, especially children, push anything into holes, slots
or any other openings in the unit’s casing as this could result in a fatal
electric shock.
• Storms are dangerous for all electric appliances. If the mains or aerial
wiring is struck by lightning, the appliance might get damaged, even if it
is turned o . You should disconnect all the cables and connectors of the
appliance before a storm.
• Excessive sound pressure from earphones and headphones can cause
hearing loss.
• Do not move the unit during disc playback. During playback, the disc
rotates at high speed. Do not lift or move the unit during playback, as
doing so may damage the disc or the unit.
• Do not turn up the volume while listening to a section with very low
level inputs or no audio signals. lf you do, the speaker maybe damaged
when a peak level section is suddenly played.
Maintenance
• Unplug the power cable from the power source before cleaning the
appliance.
• Use a soft and clean rag to clean the outside of the unit. Never clean it
with chemicals or detergent.
Batteries
• Observe the correct polarity when inserting the
batteries.
• Do not expose batteries to high temperatures and
do not place them on locations where the tempera-
ture might increase quickly, e.g. near the re or on
the direct sunshine.
• Do not expose batteries to excessive radiant heat,
do not throw them into the re, do not disassemble
them and do not try to recharge un-rechargeable
batteries. They could leak or explode.
• Never use di erent batteries together or mix new and old ones.
• When the Remote Control is not to be used for a long time (more than a
month), remove the battery from the Remote Control to prevent it from
leaking.
• If the batteries leak, wipe away the leakage inside the battery compart-
ment and replace the batteries with new ones.
• Do not use any batteries other than those specied.
Do not ingest battery, chemical burn hazard
• If the battery is swallowed, it can cause severe internal burns in just
2 hours and lead to death. Keep new and used batteries away from
children. If the battery compartment does not close securely, stop
Cd

4
using the product and keep it away from children. If you think batteries
might have been swallowed or placed inside any part of the body, seek
immediate medical attention.
Disposal of this equipment and Batteries
• Do not dispose of this product or its batteries as unsorted
municipal waste. Return it to a designated collection point
for the recycling of WEEE in accordance with local law. By
doing so, you will help to conserve resources and protect
the environment.
• Most of the EU countries regulate the disposal of batteries
by law. Contact your retailer or local authorities for more
information.
• The shown above appears on electrical and electronical
equipment and batteries (or the packaging) to remind
users of this. If "Hg" or 'Pb' appears below the symbol,
this mean that the battery cantains traces of mercury (Hg) or lead (Pb),
respectively.
• Users are requested to use existing return facilities for used equipment
and batteries.
CAUTION:
• Appliances with built in CD player are marked with this caution label
• THIS UNIT IS A CLASS 1 LASER
PRODUCT. THIS UNIT USES A VISIBLE
LASER BEAM WHICH COULD CAUSE
HAZARDOUS RADIATION EXPOSURE IF
DIRECTED. BE SURE TO OPERATE THE
PLAYER CORRECTLY AS INSTRUCTED.WHEN THIS UNIT IS PLUGGED INTO
THE WALL OUTLET, DO NOT PLACE YOUR EYES CLOSE TO THE OPENINGS
TO LOOK INTO THE INSIDE OF THIS UNIT.
• USE OF CONTROLS OR ADJUSTMENTS OR PERFORMANCE OF PROCEDU-
RES OTHER THAN THOSE SPECIFIED HEREIN MAY RESULT IN HAZARDOUS
RADIATION EXPOSURE.
• DO NOT OPEN COVERS AND DO NOT REPAIR YOURSELF. REFER SERVI-
CING TO QUALIFIED PERSONNEL.
CE Statement:
• Hereby, UMC Poland Sp. z o.o. declares that this audio device is in
compliance with the essential requirements and other relevant provi-
sions of RED Directive 2014/53/EU. The full text of the EU declaration of
conformity is available by following the link http://www.sharp.eu/av/
documents-of-con rmity
Trademarks:
The Bluetooth word mark and logos are registered trademarks owned by
Bluetooth SIG,. Inc.
CLASS 1
LASER PRODUCT

EN
What is included in the box
1 x Main unit
2 x Speaker
1 x Remote control
2 x AAA battery
1 x User guide
1 x Quick start guide
1 x EU power cord
Panels & Controls
Front panel
SOURCE
PLAY/PAUSE
EJECT
PREV NEXT
1
2
5
3
4
AUX IN
STANDBY
SOURCE PREV NEXT EJECT
USB
6
7
8
9
12
11
10
PLAY/PAUSE
1. SOURCE button: Press to select the modes.
2. PLAY/PAUSE button: Press to pause or play the music.
3. PREVIOUS button: Press to skip to the previous song/station.
4. NEXT button: Press to skip to the next song/station.
5. EJECT button: Press to pop out the disc drawer.
6. Power Indicator: Indicate the status.
7. STANDBY button: Press to set to standby mode or turn on.
8. Remote Sensor: Point the remote control
to the sensor within 7 meters.
9. Display Screen: Display the station information.
10. VOLUME+/- knob: Turn to adjust the volume level.
11. USB Port: Used to connect with the USB ash disk.
12. Audio Input Socket: Used to connect external audio sources.
Rear panel
14
15
13
13. FM Antenna: To receive the FM signal.
14. Speaker Terminals: Connect the speakers to the main unit.
15. Power socket Connect the power cord to the power supply.
Remote control
1.
EJECT
SHUFFLE
PROGRAM
LOUD
DSP
REPEAT
MO/ST
BASS
FREQ
SAVE
15
13
17
16
10
11
20
19
18
12
14
21
22
1
2
3
4
9
5
6
7
8
_
+
STANDBY: Press this to turn on the unit or enter Standby mode.
2. REPEAT: Press this to repeat the song.
3. PLAY/PAUSE: Start/ Pause playback.
4. FAST REWIND: Press this to fast-rewind the
track that is currently playing.
5. TREBLE: Press this button to adjust the treble, use the
+ or - buttons to increase/decrease the treble.
6. VOLUME- : Press this to decrease volume.
7. PROGRAM: Use this to program the playback order.
8. SHUFFLE: Press this to play music in the random order.
9. NUMBER (0-9): Go to storage location, enter frequency, select track
10. EJECT: Press this to pop out the disc drawer
11. SOURCE: Select mode of operation: CD, FM, USB, Bluetooth® (BT), AUX
12. STOP/ MO/ST: Stop playback, switch between
mono and stereo while in FM mode.
13. PREVIOUS: Press this to skip to the previous track.
14. FAST FORWARD: Press this to fast forward
the track that is currently playing.
15. NEXT: Jump to next track/ station.
16. BASS: Press this button to adjust the bass, use the
+ or - buttons to increase/decrease the bass.
17. VOLUME+: Press this to increase volume.
18. MUTE: Press once to mute the sound, press again to unmute.
You can also unmute by pressing the volume control buttons.
19. DSP: Press this to select the sound equalizer.
20. LOUD: Press LOUD to increase the level of bass at low volume levels.
21. SAVE: Press to save your favourite stations.
22. FREQ: Frequency, in FM mode, press to enter your favourite frequency.
Fitting or replacing the remote control batteries
1. Push the catch on the battery cover in the direction of
the embossed arrow on the rear of the remote.
2. While pushing the catch, open the battery cover.

6
3. Fit two batteries observing polarity +,- as shown.When replacing
the batteries, use only the same type of battery supplied.
4. Re- t the battery cover and clip it in place.
Preparation for use
1.
ANTENNA
1
2
3
AUDIO IN
SOURCE
PLAY/PAUSE
PREV NEXT
EJECT
AUX IN
4
5
6
7
USB
Place a speaker on either side of the main unit, preferably at the same
height and with at least 150mm space between each speaker to the
main unit.
Connect the speaker plugs to the rear of the unit. Take care to match
the speaker placed to the LEFT to the LEFT output on the rear of the
unit. Repeat for the RIGHT speaker.
The LEFT RED cable connects to the LEFT RED terminal, the RIGHT RED
cable to the RIGHT RED terminal. Both BLACK cables connect to the
corresponding BLACK terminals.
2. Please ensure that the voltage marked on the rating label,
located on the rear panel, is the same as the voltage in your
area. Choose a suitable Power Cord, insert the end of the
cord into the Power Socket on the rear panel of the unit. Then
plug the other end of the cable in to the wall socket.
3. Press the STANDBY button on the main unit to turn ON the unit.
Extend the ANTENNA to get the best reception. Press the SOURCE
button to enter the FM mode. To use the radio in FM mode, follow the
instructions in the FM RADIO OPERATION chapter of the User manual.
4. Press the SOURCE button to enter the CD mode. Press the EJECT
button to open the disc drawer and insert a disc. Press the EJECT
button again to close. The CD will begin playing from the rst track.
5. Press the SOURCE button to enter the Aux In (Audio) mode.
Connect your audio device to the AUX IN socket via a 3.5mm aux
in cable. Control playback via your connected audio device.
6. Press the SOURCE button to enter the Bluetooth mode.
Activate the Bluetooth enabled device and select the “SHARP
XL-B510”. Select the song you want and press to play.
7. Press the SOURCE button to enter the USB mode. Plug
the USB device to USB port on the front panel of the unit,
and it will read the USB and play automatically.
BASIC FUNCTIONS
Switching modes
To switch between the modes: CD, FM, Bluetooth, USB and AUX IN. Press
SOURCE button on the unit or the remote control to switch modes.
Volume control
1. Rotate the VOLUME control clockwise or press the
“+” button to increase the volume level.
2. Rotate the VOLUME control anti-clockwise or press
the “ - “ button to decrease the volume level.
DSP e ects
Press the DSP button repeatedly to cyclethrough a set of equalizer presets
to alter the sound. Choose from CLASSIC, ROCK, POP, JAZZ, DANCE, LIVE
and O .
Loudness function
This function will increase the level of bass at low volume levels. Press the
LOUD button on remote to enable the e ect. Press again to disable the
e ect.
Mute function
Press the button at any time to mute the sound output. Press again to
unmute.
Tone controls
Adjust the bass and treble tone controls if required.
Press the BASS or TREBLE button on remote control directly to select bass
or treble, then use the“+”or “ - “ buttons to adjust.
Standby mode
Press the STANDBY button on the unit or the remote to put the system
into standby mode. To resume normal operation, press this button again.
NOTE: This unit is designed to enter STANDBY mode automatically, after about
10 minutes (approximately) of inactivity. Press STANDBY button to wake the
unit.
NOTE: When you power on the unit from standby, the last used mode will
resume.
FM radio operation
1. Press the SOURCE button on the panel or the remote control
to enter the FM mode. (FM frequency: 87.50-108.00MHz)
2. Press the
/ buttons on remote control to decrease
or increase the frequency in 0.05MHz increments.
3. Press and hold the PREV/NEXT buttons on the panel or the
/ buttons on remote control to scan through the frequency
range quickly. The scan will stop once it has found a station.
4. Press and hold the
button to scan through the frequency
range quickly; it will store any stations found automatically.
5. SAVE a station:
You can store up to 40 FM stations in memory.
Press the FREQ button and then, using the number
buttons enter the frequency that you want to store.
Press the SAVE button, it will show " P01" on the display.
Press the
/ button to select through the
station number you want to save.
Press the SAVE button again to con rm.
6. Recall the preset stations:
Press the
/ button to recall your stored stations.

EN
CD operations
1. Press the SOURCE button on the panel or the remote control
to enter the CD mode. Press the EJECT button to pop out the
disc drawer, put a CD on, then press the EJECT button again.
2. Press the
button to pause or play the song.
3. Press the STOP/MO/ST button on remote control to
stop playing, press the
button to re-start.
4. Press the PREV/NEXT button or
/ button on
remote control to skip to the previous or next song.
5. Press the
/ button on remote control to fast forward or fast
rewind the playback, press repeatedly to resume normal speed.
6. To directly select a speci c song press the number buttons 0-9 on
remote control.
Example:
If the track number consists of two digits, for example25, press
button “2“, and then button “5“ to select the 25th track.
If the track number is a one digit number, for example
9, press “0“ rst, then “9“ to skip to the 9th track.
7. REPEAT button:
While in playing mode, press the REPEAT button to set repeat mode.
For CD and CD-R discs, press the REPEAT
button to repeat playing songs.
Press once to repeat current song. Press again to repeat all tracks.
Press a third time to cancel.
8. Press the SHUFFLE button on remote control to play
the disc in random order.Press again to resume.
9. You can set the disc played in a programmed order:
Press the STOP/MO/ST button on remote control to stop playing.
Press the PROGRAM button on remote
control. The screen displays: P01.
Press the number buttons on remote control
to select the tracks to program.
Press the
/ buttons on remote control
to skip between the program tracks.
Press the PROGRAM button on the remote control to con rm.
To begin the programmed order, press the
button.
To cancel the program sequence, press
the STOP/MO/ST button twice.
Notes:
MP3 and WAV formats are supported.
Unsupported le formats are skipped. For example, Word documents
(.doc) or MP3 les with extension .dlf are ignored and not played.
Bluetooth Operation
The Micro system has Bluetooth capability and is able to receive a signal
within 7 meters. To pair the Micro system with a Bluetooth device:
1. Press the SOURCE button repeatedly to enter the Bluetooth
mode, the“bt“ message appear and ash on the display.
2. Activate your Bluetooth device and select the search mode.
3. Select “SHARP XL-B510” from the search list and connect.
4. Enter “0000“ for password if prompted.
5. When the devices are connected to each other, a con rmation
sound will be made. “bt” will stop ashing in the display.
6. Now you can enjoy the music from your device.
7. To turn o the Bluetooth function, switch to another function on the
Micro system, or disable the function on your Bluetooth device.
Connect other audio devices
Audio allows your unit quickly and easily to connect to an MP3 player or
other external sources.
1. Use a 3.5mm audio cable to connect your external audio
device to the AUX IN socket on the front panel.
2. Connect the Micro System mains plug to the power supply.
3. Press the SOURCE button to switch to the AUX IN mode.
4. You may need to operate the external audio
device directly for playback features.
5. For optimum volume levels, adjust the volume
on the external audio device.
USB Operation
It is possible to listen to the music using the USB device interface of the
unit.
Connecting a USB device:
1. Switch the unit on and select USB mode by
pressing the SOURCE button.
2. Connect the USB device to the USB connection
socket on the front panel of the unit.
3. The radio will now play songs which are saved on the USB device.
Notes:
MP3 and WAV formats are supported.
Unsupported le formats are skipped. For example, Word documents
(.doc) or MP3 les with extension .dlf are ignored and not played
Even when the les are in a supported format (MP3), some
may not play or display depending on the compatibility.
In some case, reading may be as long as 60
seconds, this is not a malfunction.
Depending on the amount of data and media speed, it
may take longer for the unit to read the USB device.
The maximum USB memory size is 64GB.
USB memory device must be formatted in FAT, FAT16 or FAT32
Troubleshooting
No Power
Reason
• Power cable not connected to wall socket
• Power socket is not switched on
Solution
• Make sure the plug is connected
• Switch the power on
No Sound CD/AUX/RADIO
No Sound from AUX input
Reason
• Volume is too low
• AUX source volume is too low
Solution
• Increase the volume
• Increase the output volume of the AUX source
Sound is distorted
Sound is distorted from AUX Input
Reason
• Volume is too high
• AUX source volume is too high
Solution
• Reduce the volume
• Reduce the output volume of the AUX source

8
Unable to play CD
Reason
• No disc in the tray
• Disc not loaded properly
• Disc is dirty
Solution
• Insert a compatible disc
• Check the disc loaded
• Clean the disc
Static Sound
Reason
• Poor reception
Solution
• Re-locate the antenna (FM)
Desired station not found
Reason
• Weak signal
• Station not available in your area
Unit switches o after 10 minutes of inactivity
Reason
• Auto standby mode in operation
Solution
• This unit is designed to enter STANDBY mode automatically after 10
minutes of inactivity. Press the STANDBY button to wake up the unit.
Technical speci cation
Model XL-B510
Radio Signal 87.5-108MHz
Power Supply AC 220-240V~ 50Hz
Power Consumption 28 W
Standby Power Consumption <0,5 W
Output Power 2 x 7 W (RMS)
Impedance 2 x 8 Ω
Frequency Response 60Hz - 20KHz
Bluetooth
Version V 2.1 + EDR
Maximum power transmitted <20 dbm
Frequency bands 2402 MHz ~ 2480 MHz
CD player
Disc format CD, CD-R, CD-RW, MP3, WMA
Remote Control
Battery Type 2x AAA / 1.5V
220mm
170mm
150mm
220mm
145mm 177mm
1,75kg
KG
0,95kg
KG

DE
Wichtige Sicherheitsanweisungen
VORSICHT
GEFAHR AUF STROMSCHLAG
NICHT ÖFFNEN
Bitte lesen Sie sich diese Sicherheitsanweisungen
durch und beachten Sie, bevor Sie das Gerät in
Betrieb nehmen, auf die folgenden Warnhinweise:
Das Dreieckszeichen mit Blitzsymbol verweist auf nicht
isolierte „gefährliche Spannungen“ im Gerätegehäuse, die so
hoch sein können, dass sie eine Gefahr von Stromschlägen
bilden.
Das Dreieckszeichen mit Ausrufungszeichen verweist auf
wichtige Funktions - und Wartungshinweise (Reparatur) in
der dem Gerät beigelegten Bedienungsanleitung.
Dieses Symbol bedeutet, dass das Produkt auf
umweltfreundliche Weise und nicht mit dem gewöhnlichen
Haushaltsmüll entsorgt werden sollte.
Wechselspannung
Gleichspannung
Gerät der KlasseII
Halten Sie Kerzen und o enes
Feuer von diesem Produkt fern,
um einen Brand zu vermeiden.
Warnung:
• Halten Sie sich während der Nutzung dieses Geräts immer an die
allgemeinen Sicherheitshinweise, insbesondere, wenn Kinder in der
Nähe sind.
• Kinder sollten beaufsichtigt werden, um sicherzustellen, dass sie nicht
mit dem Gerät spielen.
• Das Stromkabel darf weder beschädigt, noch dürfen schwere Objekte
darauf abgelegt werden, außerdem dürfen Sie es nicht dehnen oder
verbiegen. Schließen Sie auch keine Verlängerungskabel an. Schäden am
Stromkabel können zu einem Feuer oder Stromschlag führen.
• Wenn das Stromversorgungskabel beschädigt ist, muss es vom Her-
steller, einem Servicetechniker oder einer ähnlich quali zierten Person
ausgetauscht werden, um Gefährdungen zu vermeiden.
• Stellen Sie sicher, dass die Einheit an eine AC 220-240V 50Hz Steckdose
angeschlossen wird. Eine höhere Spannung kann zu Fehlfunktionen
oder sogar zu einem Brand führen.
• Wenn der Stecker nicht in die Steckdose passt, dürfen Sie keine Gewalt
anwenden, um einen nicht passenden Stecker in die Steckdose zu
drücken.
• Schalten Sie die Einheit aus, bevor Sie sie von der Stromversorgung
trennen, um sie so vollständig abzuschalten.
• Vermeiden Sie es, das Stromkabel mit nassen Händen anzuschließen
oder zu trennen. Dies könnte andernfalls zu einem Stromschlag führen.
• Trennen Sie das Stromkabel, wenn es längere Zeit nicht verwendet wird.
• Stellen Sie sicher, dass der Hauptstecker immer leicht zugänglich ist.
• Dieses Produkt enthält keine Teile, die vom Benutzer gewartet werden
können. Setzen Sie sich im Fall eines Defekts mit dem Hersteller oder
der autorisierten Kundenabteilung in Verbindung. Teile aus dem Inneren
des Geräts freizulegen kann lebensgefährlich sein. Die Garantie der
Hersteller gilt nicht für Defekte, die durch von nicht autorisierte Dritten
durchgeführte Reparaturen entstehen.
• Benutzen Sie dieses Produkt nicht direkt nach dem Auspacken. Warten
Sie, bis es sich auf Zimmertemperatur erwärmt hat, ehe sie es einschal-
ten.
• Stellen Sie sicher, dass dieses Produkt ausschließlich in Umgebungen
mit mildem Klima verwendet wird (kein tropisches oder subtropisches
Klima).
• Stellen Sie das Produkt auf eine ache, stabile Ober äche, die keinen
Erschütterungen ausgesetzt ist.
• Das Produkt und dessen Teile dürfen nicht über die Kante delelte tragen-
den Möbelstücks hinausragen.
• Um das Risiko eines Feuers, Stromschlags oder Schäden an diesem
Produkt zu reduzieren, sollten Sie es nicht direktem Sonnenlicht, Staub,
Regen oder Feuchtigkeit aussetzen. Setzen Sie es niemals tropfendem
oder spritzendem Wasser aus und positionieren Sie keine mit Flüssigkei-
ten gefüllten Objekte auf oder neben dem Produkt.
• Setzen Sie keine mit Flüssigkeit gefüllten Objekte wie Vasen auf das
Gerät.
• Installieren Sie das Produkt nicht in der Nähe von Heizquellen, wie etwa
Heizungen, Heizregister, Öfen oder anderen Apparaten (einschließlich
Verstärker), die Hitze produzieren.
• Platzieren Sie das Gerät nicht an Orten mit hoher Feuchtigkeit und
mangelhafter Belüftung.
• Sorgen Sie für einen Mindestabstand von 5 cm rund um das Gerät,
um eine ausreichende Belüftung sicherzustellen. Vermeiden Sie es,
Belüftungsö nungen an diesem Produkt zu blockieren. Sorgen Sie
immer dafür, dass die Belüftungsö nungen nicht durch Gegenstände, z.
B. Zeitungen, Tischdecken, Gardinen usw. verdeckt sind.
• Lassen Sie NIEMALS jemanden, ganz besonders nicht Kinder, etwas in
die Löcher, Spalten oder anderen Ö nungen des Gerätegehäuses stop-
fen, da dies zu einem folgenschweren Stromschlag führen kann.
• Gewitter sind für alle elektrischen Geräte gefährlich. Wenn das Strom-
oder Antennenkabel vom Blitz getro en wird, kann das Gerät, auch
wenn es ausgeschaltet ist, beschädigt werden. Bei einem herannahen-
den Gewitter sollten Sie alle Kabel und Stecker des Gerätes ausstecken.
• Ein exzessiver Schalldruck von Kopfhörern kann zu einem Hörverlust
führen.
• Bewegen Sie das Gerät nicht während der Disc-Wiedergabe. Während
der Wiedergabe rotiert die Disc sehr schnell. Heben Sie das Gerät
während der Wiedergabe nicht an und bewegen Sie das Gerät während
der Wiedergabe nicht, denn dies könnte die Disc oder das Gerät
beschädigen.
• Drehen Sie die Lautstärke niemals hoch, während Sie einen sehr leisen
Abschnitt hören oder kein Audiosignal empfangen. Anderenfalls könnte
der Lautsprecher beschädigt werden, wenn plötzlich ein lauter Abschnitt
wiedergegeben wird.
Netzadapter
• Der Netzstecker oder die Merhfachsteckdose wird als Trennvorrichtung
verwendet. Verwenden Sie nur den mitgelieferten Stromversorger.
Andernfalls kann es zu einem Sicherheitsrisiko/einer Beschädigung des
Gerätes kommen.
Wartung
• Trennen Sie vor dem Reinigen des Geräts das Stromkabel von der
Stromquelle.
• Verwenden Sie einen weichen und sauberen Lappen, um die Außen-
ächen der Einheit zu reinigen. Verwenden Sie beim Reinigen niemals
Chemikalien oder Reinigungsmittel.
Batterien
• Achten Sie beim Einlegen der Batterien auf die
richtige Polarität.
• Setzen Sie Batterien keinen hohen Temperaturen
aus und legen Sie sie nicht an Stellen ab, wo sich die
Temperatur schnell erhöht, z. B. neben einem Feuer
oder in die direkte Sonneneinstrahlung.
Cd

10
• Setzten Sie Batterien keiner übermäßigen Strahlungswärme aus, werfen
Sie sie nicht ins Feuer oder bauen sie auseinander und versuchen Sie
nicht, nicht au adbare Batterien aufzuladen. Sie könnten undicht
werden oder explodieren.
• Verwenden Sie niemals unterschiedliche Batterien oder vermischen
neue mit alten.
• Wenn Sie die Fernbedienung für längere Zeit nicht verwenden (länger
als einen Monat), sollten Sie die Batterie aus der Fernbedienung neh-
men, um ein Auslaufen zu verhindern.
• Wenn die Batterien auslaufen, wischen Sie die ausgelaufene Flüssigkeit
im Batteriefach weg und ersetzen die Batterien durch neue.
• Verwenden Sie immer nur die angegebenen Batterien.
• Batterie nicht verschlucken, Gefahr von chemischen Verbrennungen
• Wenn die Batterie verschluckt wird, kann dies zu schweren inneren
Verbrennungen innerhalb von nur 2 Stunden führen und tödlich sein.
Bewahren Sie neue und gebrauchte Batterien für Kinder unzugänglich
auf. Wenn das Batteriefach nicht fest geschlossen werden kann, sollten
Sie das Gerät nicht weiter verwenden und es für Kinder unzugänglich
aufbewahren. Wenn Sie vermuten, dass Batterien verschluckt oder in
irgendein Körperteil eingeführt wurden, müssen Sie sofort medizinische
Hilfe in Anspruch nehmen.
Entsorgung dieses Geräts und von Batterien
• Entsorgen Sie dieses Produkt oder dessen Batterien
niemals über den normalen Hausmüll. Geben Sie es ent-
sprechend den gesetzlichen Regelungen vor Ort bei dem
für das Recycling von WEEE vorgesehenen Sammelpunkt
ab. Damit helfen Sie, Ressourcen einzusparen und die
Umwelt zu schützen.
• In den meisten EU-Ländern gelten für die Entsorgung von
Batterien besondere Gesetze und Vorschriften. Weitere
Informationen erhalten Sie von Ihrem Händler oder den
örtlichen Behörden.
• Der oben aufgeführte Text erscheint auf elektrischen und
elektronischen Geräten und Batterien (oder der Verpack-
ung), um Nutzer entsprechend zu erinnern. Wenn unter dem Symbol
„Hg“ oder „Pb“ erscheint, bedeutet dies, dass die Batterie jeweils Spuren
von Quecksilber (Hg) oder Blei (Pb)enthält.
• Nutzer werden darum gebeten, für gebrauchte Geräte und Batterien
bestehende Rückgabeeinrichtungen zu nutzen.
VORSICHT::
• LASERPRODUKT DER KLASSE1
• Geräte mit eingebautem CD-Player
sind mit diesem Warnetikett geken-
nzeichnet.
• Dieses Warnschild be ndet sich auf der
Rückseite des Geräts
• DIESES GERÄT IST EIN LASERPRODUKT DER KLASSE 1. DIESES GERÄT
NUTZT EINEN SICHTBAREN LASERSTRAHL, BEI DEM ES ZUM AUSTRITT
GEFÄHRLICHER STRAHLUNG KOMMEN KANN, WENN ER GERICHTET
WIRD. BETREIBEN SIE DEN PLAYER NUR ORDNUNGSGEMÄSS ENTSPRECH-
END DER ANLEITUNG.
• WENN DIESES GERÄT IN DIE STECKDOSE EINGESTECKT WIRD, HALTEN
SIE IHRE AUGEN VON DEN ÖFFNUNGEN FERN UND SEHEN SIE NICHT IN
DAS GERÄT.
• EINE NUTZUNG DER STEUERUNG ODER ANPASSUNGEN ODER EINE
DURCHFÜHRUNG VON AKTIONEN AUSSER DENEN, DIE HIER BESCHRIE-
BEN WERDEN, KÖNNEN ZUM AUSTRITT GEFÄHRLICHER STRAHLUNG
FÜHREN.
• ÖFFNEN SIE DIE ABDECKUNGEN NICHT UND NEHMEN SIE SELBST KEINE
REPARATUREN VOR. LASSEN SIE DAS GERÄT NUR VON FACHPERSONAL
REPARIEREN.
CE-Konformitätserklärung:
• Die UMC Poland Sp. z o.o. erklärt hiermit, dass dieses Audiogerät die
wesentlichen Anforderungen und weitere entsprechende Vorschriften
der RED-Verordnung 2014/53/EU einhält. Der vollständige Text der
EU-Konformitätserklärung ist unter folgender Internetadresse erhältlich:
http://www.sharp.eu/av/documents-of-con rmity
Markenzeichen:
Die Bluetooth® Wortmarke und Logos sind geschützte Marken der
Bluetooth SIG Inc.
CLASS 1
LASER PRODUCT

DE
Inhalt der Verpackung
1 x Hauptgerät
2 x Lautsprecher
1x Fernbedienung
2x Batterie vom TypAAA
1x Benutzerhandbuch
1x Schnellstart-Handbuch
1x EU Stromkabel
Panels & Bedienelemente
Vorderseite
SOURCE
PLAY/PAUSE
EJECT
PREV NEXT
1
2
5
3
4
AUX IN
STANDBY
SOURCE PREV NEXT EJECT
USB
6
7
8
9
12
11
10
PLAY/PAUSE
1. Taste SOURCE: Modus auswählen.
2. Taste WIEDERGABE/PAUSE: Musik abspielen oder unterbrechen.
3. Taste ZURÜCK: Zurück zum vorherigen Titel/Sender.
4. Taste WEITER: Weiter zum nächsten Titel/Sender.
5. Taste AUSWERFEN: CD-Fach auswerfen.
6. Betriebsanzeige: Zeigt den Status an.
7. Taste STAND-BY: In den Stand-by-Modus schalten oder einschalten.
8. Fernbedienungssensor: Mit der Fernbedienung in einem
Abstand von bis zu 7Metern auf diesen Sensor zielen.
9. Displayanzeige: Informationen zum Sender anzeigen.
10. Drehknopf LAUTSTÄRKE +/-: Lautstärke durch Drehen regeln.
11. USB-Anschluss: Verbindung mit dem USB-Flash-Laufwerk.
12. Audio-Eingangsbuchse: Verbindung mit externen Audioquellen.
Rückseite
14
15
13
13. FM-Antenne: Empfang des FM-Signals.
14. Lautsprecheranschlüsse: Verbindung der
Lautsprecher mit dem Hauptgerät.
15. Steckdose Stecken Sie das Netzkabel in die Steckdose.
Fernbedienung
1.
EJECT
SHUFFLE
PROGRAM
LOUD
DSP
REPEAT
MO/ST
BASS
FREQ
SAVE
15
13
17
16
10
11
20
19
18
12
14
21
22
1
2
3
4
9
5
6
7
8
_
+
STAND-BY: Gerät einschalten oder in den Stand-by-Modus schalten.
2. REPEAT: Titel wiederholen.
3. WIEDERGABE/PAUSE: Wiedergabe starten/pausieren.
4. SCHNELLER RÜCKLAUF: Derzeit gespielten Titel schnell zurückspulen.
5. HÖHEN: Höhen anpassen; Höhen mit den Tasten + oder - einstellen.
6. LAUTSTÄRKE -: Lautstärke verringern.
7. PROGRAMM: Wiedergabereihenfolge programmieren.
8. ZUFÄLLIGE WIEDERGABE: Musik in einer
zufälligen Reihenfolge wiedergeben.
9. ZAHLEN (0–9): Zum Speicherplatz gehen,
Frequenz eingeben, Titel auswählen
10. AUSWERFEN: CD-Fach auswerfen
11. SOURCE: Betriebsmodus auswählen: CD,
FM, USB, Bluetooth® (BT), AUX
12. STOP/MO/ST: Wiedergabe anhalten, im FM-Modus
zwischen Mono und Stereo umschalten.
13. ZURÜCK: Drücken, um zum vorherigen Titel zurückzuschalten.
14. SCHNELLER VORLAUF: Derzeit gespielten Titel schnell vorspulen.
15. WEITER: Weiter zum nächsten Titel/Sender.
16. BASS: Bass anpassen; Bass mit den Tasten + oder - einstellen.
17. LAUTSTÄRKE +: Lautstärke erhöhen.
18. MUTE: Drücken Sie die Taste einmal, um den Ton auf stumm
zu schalten. Drücken Sie die Taste erneut, um den Ton
erneut einzuschalten. Sie können den Ton auch mit den
Tasten der Lautstärkeregelung erneut einschalten.
19. DSP: Equalizer auswählen.
20. LAUT: Basslevel bei niedriger Lautstärke erhöhen.
21. SAVE: Drücken, um Ihre Lieblingssender abzuspeichern.
22. FREQ: Frequenz, im FM-Modus; drücken, um
Ihre Lieblingsfrequenz einzugeben.
Batterien der fernbedienung einlegen oder ersetzen
1. Drücken Sie die Arretierung auf der Batterieabdeckung auf der
Rückseite der Fernbedienung in Richtung des eingeprägten Pfeils.

12
2. Halten Sie die Arretierung gedrückt und ö nen Sie das Batteriefach.
3. Legen Sie zwei Batterien mit der richtigen Polarität (+/-
) wie angezeigt ein. Verwenden Sie beim Ersetzen der
Batterien nur den gleichen Batterietyp wie mitgeliefert.
4. Setzen Sie die Batterieabdeckung wieder
ein und lassen Sie sie einrasten.
Vorbereitung für die inbetriebnahme
1.
ANTENNA
1
2
3
AUDIO IN
SOURCE
PLAY/PAUSE
PREV NEXT
EJECT
AUX IN
4
5
6
7
USB
Stellen sie die Lautsprecher links und rechts vom Hauptgerät auf,
optimalerweise auf gleicher Höhe und mit einem Abstand von jeweils
zumindest 150mm zum Hauptgerät.
Schließen Sie die Lautsprecherstecker an der Rückseite des Geräts an.
Achten Sie darauf, den LINKEN Lautsprecher an der Rückseite des
Geräts am LINKEN Ausgang anzuschließen. Wiederholen Sie dies für
den RECHTEN Lautsprecher.
Das LINKE ROTE Kabel wird mit dem LINKEN ROTEN Anschluss, das
RECHTE ROTE Kabel mit dem RECHTEN ROTEN Anschluss verbunden.
Beide SCHWARZEN Kabel werden mit dem entsprechenden
SCHWARZEN Anschluss verbunden.
2. Bitte achten Sie darauf, dass die auf dem Typenschild an
der Rückseite angegebene Spannung jener in Ihrer Region
entspricht. Verwenden Sie ein geeignetes Netzkabel und
stecken Sie es in den Anschluss an der Rückseite des Gerätes.
Stecken Sie dann das andere Ende in die Steckdose.
3. Drücken Sie am Hauptgerät auf die Taste STAND-BY, um das Gerät
EINzuschalten.
Ziehen Sie die ANTENNE aus, um den bestmöglichen
Empfang zu gewährleisten. Drücken Sie die Taste SOURCE
(QUELLE), um in den FM-Modus zu gelangen. Um das Radio
im FM-Modus zu verwenden, befolgen Sie die Anleitung im
Kapitel „FM-RADIOBETRIEB“ des Benutzerhandbuchs.
4. Drücken Sie die Taste SOURCE, um in den CD-Modus zu
gelangen. Drücken Sie die Taste AUSWERFEN, um das CD-
Fach zu ö nen, und legen Sie eine CD ein. Drücken Sie
erneut die Taste AUSWERFEN, um das Fach zu schließen.
Die Wiedergabe der CD beginnt mit dem ersten Titel.
5. Drücken Sie die Taste SOURCE, um in den Aux-In (Audio)-
Modus zu gelangen. Schließen Sie ihr Audiogerät mit einem
3,5-mm-Aux-in-Kabel am AUX-IN-Anschluss an. Steuern Sie
die Wiedergabe über Ihr verbundenes Audiogerät.
6. Drücken Sie die Taste SOURCE, um in den Bluetooth-Modus
zu gelangen. Aktivieren Sie das Bluetooth-Gerät und wählen
Sie „SharpXL-B510“ aus. Wählen Sie den Titel aus, den Sie
abspielen möchten, und drücken Sie auf WIEDERGABE.
7. Drücken Sie die Taste SOURCE, um in den USB-Modus zu
gelangen. Stecken Sie das USB-Gerät in den USB-Anschluss
an der Vorderseite des Geräts ein und das USB-Gerät wird
automatisch abgelesen und die Wiedergabe gestartet.
Grundfunktionen
Modus umschalten
Umschalten zwischen den Modi: CD, FM, Bluetooth, USB und AUXIN.
Drücken Sie die Taste SOURCE am Gerät oder der Fernbedienung, um
zwischen den Modi umzuschalten.
Lautstärkeregelung
1. Drehen Sie den Drehknopf LAUTSTÄRKE im Uhrzeigersinn oder
drücken Sie die Taste „+“, um die Lautstärke zu erhöhen.
2. Drehen Sie den Drehknopf LAUTSTÄRKE gegen den Uhrzeigersinn
oder drücken Sie die Taste „-“, um die Lautstärke zu verringern.
DSP-E ekte
Drücken Sie wiederholt die Taste DSP, um zwischen unterschiedlichen
Equalizereinstellungen umzuschalten und den Sound zu verändern.
Wählen Sie aus Klassik, Rock, Pop, Jazz, Dance, Live und O .
Tonstärkefunktion
Diese Funktion erhöht den Basslevel bei niedriger Lautstärke. Drücken
Sie auf der Fernbedienung die Taste LAUT, um den E ekt zu aktivieren.
Drücken Sie die Taste erneut, um den E ekt zu deaktivieren.
Stummschaltfunktion
Drücken Sie jederzeit die Taste , um die Wiedergabe stumm zu schalten.
Drücken Sie die Taste erneut, um die Stummschaltung aufzuheben.
Tonsteuerung
Sie können den Bass und die Höhen bei Bedarf anpassen.
Drücken Sie auf der Fernbedienung die Taste BASS oder HÖHEN, um den
Bass oder die Höhen auszuwählen, und passen Sie die Einstellungen mit
„+“ oder „-“ an.
Stand-by-Modus
Drücken Sie am Gerät oder auf der Fernbedienung die Taste STAND-BY,
um das System in den Stand-by-Modus zu versetzen.
Um den Normalbetrieb wiederaufzunehmen, drücken Sie die Taste erneut.
HINWEIS: Dieses Gerät wurde entwickelt, um nach etwa 10Minuten Inaktivität
automatisch in den STAND-BY-Modus zu wechseln. Drücken Sie die Taste
STAND-BY, um das Gerät einzuschalten.
HINWEIS: Beim Starten des Geräts aus dem Stand-by-Modus wird der zuletzt
verwendete Modus fortgesetzt.
FM-Radiobetrieb
1. Drücken Sie am Bedienfeld oder auf der Fernbedienung
die Taste SOURCE (QUELLE), um in den FM-Modus zu
gelangen. (FM-Frequenz: 87,50 bis 108,00MHz)
2. Drücken Sie auf der Fernbedienung die Tasten
/ , um die
Frequenz in Schritten zu je 0,05MHz zu erhöhen oder zu verringern.

DE
3. Halten Sie die Tasten PREV/NEXT (ZURÜCK/WEITER)
am Panel oder die Tasten
/ auf der Fernbedienung
gedrückt, um den Frequenzbereich schnell abzusuchen.
Die Suche endet, sobald ein Sender gefunden wurde.
4. Halten Sie die Taste
, um den Frequenzbereich schnell zu
durchsuchen– dies speichert automatisch alle gefundenen Sender.
5. Einen Sender ABSPEICHERN:
Sie können bis zu 40FM-Sender im Speicher sichern.
Drücken Sie die Taste FREQ (FREQUENZ) und
geben Sie anschließend mit den Zahlentasten die
Frequenz ein, die Sie abspeichern möchten.
Drücken Sie die Taste SAVE (SPEICHERN)– auf
der Anzeige wird „P01“ angezeigt.
Drücken Sie die Taste
/ , um die Sendernummer
auszuwählen, die Sie abspeichern möchten.
Drücken Sie zur Bestätigung erneut die Taste SAVE (SPEICHERN).
6. Aufrufen des voreingestellten Senders:
Drücken Sie die Taste
/ , um Ihre
abgespeicherten Sender aufzurufen.
CD-Betrieb
1. Drücken Sie am Panel oder auf der Fernbedienung die Taste
SOURCE, um in den CD-Modus zu gelangen. Drücken Sie die
Taste AUSWERFEN, um das CD-Fach zu ö nen, legen Sie eine
CD ein und drücken Sie dann erneut die Taste AUSWERFEN.
2. Drücken Sie die Taste
, um den Titel
abzuspielen oder zu unterbrechen.
3. Drücken Sie auf der Fernbedienung die Taste STOP/
MO/ST, um die Wiedergabe zu beenden, und drücken
Sie die Taste
, um sie wieder zu starten.
4. Drücken Sie die Tasten ZURÜCK/WEITER oder
/ auf der
Fernbedienung, um zum vorigen oder nächsten Titel zu springen.
5. Drücken Sie auf der Fernbedienung die Tasten
/ , um die
Wiedergabe schnell vor- oder zurückzuspulen; drücken Sie
wiederholt, um zur normalen Geschwindigkeit zurückzukehren.
6. Um einen bestimmten Titel direkt aufzurufen, drücken Sie auf der
Fernbedienung die Zahlentasten 0–9.
Beispiel:
Ist der Titel zweistellig, beispielsweise 25, drücken Sie die Taste
„2“ und dann die Taste „5“, um den 25.Titel aufzurufen.
Ist der Titel einstellig, beispielsweise 9, drücken Sie
zuerst „0“ und dann „9“, um den 9.Titel aufzurufen.
7. Taste REPEAT:
Im Wiedergabemodus drücken Sie die Taste REPEAT,
um den Wiederholmodus einzustellen.
Bei CD und CD-R drücken Sie die Taste REPEAT,
um Titel wiederholt abzuspielen.
Drücken Sie einmal, um den aktuellen Titel zu wiederholen.
Drücken Sie erneut, um alle Titel zu wiederholen.
Drücken Sie ein drittes Mal, um dies zu deaktivieren.
8. Drücken Sie auf der Fernbedienung die Taste ZUFÄLLIGE
WIEDERGABE, um die Titel der CD in einer zufälligen Reihenfolge
wiederzugeben. Drücken Sie die Taste erneut, um dies zu deaktivieren.
9. Sie können die Wiedergabe der CD auch programmieren:
Drücken Sie auf der Fernbedienung die Taste STOP/
MO/ST, um die Wiedergabe zu beenden.
Drücken Sie auf der Fernbedienung die Taste
PROGRAMM. Auf dem Display wird angezeigt: P01.
Drücken Sie auf der Fernbedienung die Zahlentasten, um
die Titel auszuwählen, die Sie programmieren möchten.
Drücken Sie auf der Fernbedienung die Tasten
/ um
zwischen den programmierten Titeln weiter zu schalten.
Drücken Sie zur Bestätigung die Taste PROGRAM
(PROGRAMM) auf der Fernbedienung.
Um die programmierte Reihenfolge zu
starten, drücken Sie die Taste
.
Um die Programmsequenz abzubrechen, drücken
Sie zweimal die Taste STOP/MO/ST.
Hinweise:
MP3- und WAV-Formate werden unterstützt.
Nicht unterstützte Dateiformate werden übersprungen.
Word-Dokumente (.doc) oder MP3-Dateien mit der
Endung .dlf werden ignoriert und nicht abgespielt.
Bluetooth-Betrieb
Diese Mikroanlage ist Bluetooth-fähig und empfängt Signale innerhalb von
7Metern. Die Mikroanlage mit einem Bluetooth-Gerät koppeln:
1. Drücken Sie wiederholt die Taste SOURCE, um in den Bluetooth-
Modus zu gelangen; auf dem Display wird blinkend “bt“ angezeigt.
2. Aktivieren Sie Ihr Bluetooth-Gerät und wählen Sie den Suchmodus.
3. Wählen Sie aus der Suchliste „SharpXL-B510“
aus und stellen Sie eine Verbindung her.
4. Geben Sie das Passwort „0000“ ein, wenn
Sie dazu aufgefordert werden.
5. Wenn die Geräte miteinander verbunden sind, ertönt ein
Betätigungston. Auf der Anzeige hört „bt“ zu blinken auf.
6. Nun können Sie die auf Ihrem Gerät gespeicherte Musik genießen.
7. Um die Bluetooth-Funktion auszuschalten, wechseln
Sie auf der Mikroanlage zu einer anderen Funktion oder
deaktivieren Sie die Funktion auf Ihrem Bluetooth-Gerät.
Andere Audiogeräte verbinden
Über „Audio“ können Sie Ihr Gerät rasch und einfach mit einem MP3-Player
oder anderen externen Quellen verbinden.
1. Schließen Sie Ihr externes Audiogerät mit einem 3,5-mm-
Audiokabel am AUX-IN-Anschluss an der Vorderseite an.
2. Stecken Sie den Netzstecker der Mikroanlage in die Steckdose.
3. Drücken Sie die Taste SOURCE, um in den AUX IN-Modus zu gelangen.
4. Es kann sein, dass Sie die Wiedergabe direkt am
externen Audiogerät steuern müssen.
5. Für die optimale Lautstärke passen Sie diese
am externen Audiogerät an.
USB-Betrieb
Sie können auch über die USB-Schnittstelle am Gerät Musik hören.
Ein USB-Gerät anschließen:
1. Schalten Sie das Gerät ein und drücken Sie die Taste
SOURCE, um in den USB-Modus zu gelangen.
2. Stecken Sie das USB-Gerät in den USB-Anschluss
an der Vorderseite des Geräts.
3. Die Anlage spielt nun die auf dem USB-Gerät gespeicherten Titel.
Hinweise:
MP3- und WAV-Formate werden unterstützt.
Nicht unterstützte Dateiformate werden übersprungen.
Word-Dokumente (.doc) oder MP3-Dateien mit der
Endung .dlf werden ignoriert und nicht abgespielt.
Auch wenn die Dateien in einem unterstützten Format (MP3)
vorliegen, kann es vorkommen, dass einige abhängig von der
Kompatibilität nicht abgespielt oder angezeigt werden können.
In manchen Fällen kann dies bis zu 60Sekunden
dauern; dies ist jedoch keine Fehlfunktion.

14
Abhängig von der Datenmenge und Mediengeschwindigkeit
kann es etwas dauern, bis das Gerät das USB-Gerät lesen kann.
USB unterstützt einen maximalen Speicher von 64GB.
USB-Speichergeräte müssen in FAT, FAT16 oder FAT32 formatiert sein
Fehlersuche
Kein Strom
Ursache
• Netzkabel nicht in Steckdose
• Steckdose nicht eingeschaltet
Lösung
• Sicherstellen, dass das Netzkabel angesteckt ist
• Steckdose einschalten
Kein Ton bei CD/AUX/RADIO
Kein Ton bei AUX-Eingang
Ursache
• Lautstärke zu niedrig
• Lautstärke der AUX-Quelle zu niedrig
Lösung
• Erhöhen Sie die Lautstärke
• Erhöhen Sie die Ausgangslautstärke der AUX-Quelle
Ton verzerrt
Ton bei AUX-Eingang verzerrt
Ursache
• Lautstärke zu hoch
• Lautstärke der AUX-Quelle zu hoch
Lösung
• Verringern Sie die Lautstärke
• Verringern Sie die Ausgangslautstärke der AUX-Quelle
CD kann nicht abgespielt werden
Ursache
• Keine CD im Fach
• CD nicht korrekt eingelegt
• CD verschmutzt
Lösung
• Legen Sie eine kompatible CD ein
• Überprüfen Sie die eingelegte CD
• Reinigen Sie die CD
Statisches Geräusch
Ursache
• Schlechter Empfang
Lösung
• Stellen Sie die Antenne (FM) ein
Gewünschter Sender nicht gefunden
Ursache
• Schwaches Signal
• Sender ist in Ihrem Gebiet nicht verfügbar
Gerät schaltet sich nach 10Minuten Inaktivität aus
Ursache
• Automatischer Stand-by-Modus
Lösung
• Dieses Gerät wurde entwickelt, um nach etwa 10Minuten Inaktivität
automatisch in den STAND-BY-Modus zu wechseln. Drücken Sie die Taste
STAND-BY, um das Gerät einzuschalten.
Technische Angaben
Modell XL-B510
Radiosignal 87.5-108MHz
Stromversorgung AC 220-240V~ 50Hz
Stromverbrauch 28 W
Stromverbrauch StandBy <0,5 W
Ausgangsstrom 2 x 7 W (RMS)
Wechselstromwiderstand 2 x 8 Ω
Frequenzabhängigkeit 60Hz - 20KHz
Bluetooth
Version V 2.1 + EDR
Maximaler übertragener Strom <20 dbm
Frequenzbänder 2402 MHz ~ 2480 MHz
CD-Player
Diskformat CD, CD-R, CD-RW, MP3, WMA
Fernbedienung
Batterietyp 2x AAA / 1.5V
220mm
170mm
150mm
220mm
145mm 177mm
1,75kg
KG
0,95kg
KG

ES
Instrucciones de seguridad importantes
ADVERTENCIA
RIESGO DE DESCARGA ELÉCTRICA
NO ABRIR
Lea estas instrucciones de seguridad y respete las
siguientes advertencias antes de utilizar el aparato:
La nalidad del símbolo del rayo con cabeza de echa, dentro
de un triángulo equilátero, es avisar al usuario de la presencia
de "tensión peligrosa" sin aislamiento dentro de la carcasa del
producto, que puede ser de su ciente magnitud como para
provocar descargas eléctricas para las personas.
La nalidad de la marca de admiración dentro de un triángulo
equilátero es avisar al usuario de la presencia de instrucciones
importantes de uso y mantenimiento (servicio) en el manual
que acompaña al aparato.
Este símbolo signi ca que el producto debe eliminarse de
manera respetuosa con el medio ambiente y no con los
residuos domésticos generales.
Tensión de CA
Tensión de CC
Equipo de clase II
Para evitar incendios mantenga
siempre las velas u otras llamas al
descubierto lejos del producto.
Advertencia:
• Respete siempre las precauciones básicas de seguridad cuando utilice
este electrodoméstico, especialmente si hay niños presentes.
• Los niños deben ser supervisados para asegurarse de que no juegan con
el aparato.
• No dañe el cable de alimentación, no coloque objetos pesados encima,
no lo estire ni lo doble. Asimismo, no conecte alargadores. Los daños
en el cable de alimentación pueden ocasionar incendios o descargas
eléctricas.
• Si el cable de alimentación presenta algún daño, deberá ser sustituido
por el fabricante, el servicio técnico o personas con una cuali cación
similar para evitar que se produzcan situaciones de peligro.
• Asegúrese de que la unidad está conectada a una toma de corriente de
CA de 220-240 V y 50 Hz. El uso de una tensión superior puede causar el
mal funcionamiento de la unidad o incluso presentar riesgo de incendio.
• Si el enchufe no encaja en la toma, no lo fuerce.
• Apague la unidad antes de desenchufarla de la corriente para desconec-
tarla por completo.
• No conecte ni desconecte el cable de alimentación con las manos moja-
das, ya que podría producirse una descarga eléctrica.
• Desconecte el cable de alimentación si la unidad no se va a utilizar
durante un periodo prolongado de tiempo.
• Asegúrese de que el enchufe de alimentación resulta fácilmente
accesible.
• Este producto no contiene ninguna pieza que pueda ser reparada por
el usuario. En caso de avería, póngase en contacto con el fabricante o el
servicio técnico autorizado. La exposición a ciertas partes internas del
dispositivo puede poner en peligro su vida. La garantía del fabricante
no cubre las averías resultantes de reparaciones llevadas a cabo por
terceros.
• No utilice este producto inmediatamente tras desembalarlo. Espere a
que se caliente a la temperatura ambiente antes de utilizarlo.
• Asegúrese de utilizar el producto en climas moderados únicamente (no
en climas tropicales o subtropicales).
• Coloque el producto en una super cie plana estable y no expuesta a
vibraciones.
• Asegúrese de que el producto y sus partes no sobresalen de los bordes
del mueble sobre el que se coloca.
• Para reducir el riesgo de incendio, descarga eléctrica o daño en el
producto, no lo exponga directamente a la luz del sol, polvo, lluvia o
humedad. No exponga nunca este producto a gotas o derramamientos y
no coloque objetos llenos de líquido sobre o cerca de este.
• No coloque objetos con líquidos, como jarrones, sobre el aparato.
• No instale el aparato cerca de ninguna fuente de calor, como radiadores,
salidas de aire caliente, estufas u otros aparatos (incluidos ampli cado-
res) que produzcan calor.
• No coloque el producto en espacios húmedos o con ventilación de cien-
te.
• Asegúrese de dejar una distancia mínima de 5 cm en torno al aparato
para garantizar una ventilación adecuada. No obstruya las aberturas de
ventilación de este producto. Evite siempre la obstrucción de las ranuras
de ventilación con objetos como periódicos, manteles, cortinas, etc.
• No permita que nadie, especialmente los niños, introduzca elementos en
los ori cios, ranuras ni en ninguna apertura de la carcasa de la unidad, ya
que podrían dar lugar a descargas eléctricas mortales.
• Las tormentas son peligrosas para todos los aparatos eléctricos. Si el
cable de alimentación o el cableado de la antena es alcanzado por un
rayo, el aparato puede resultar dañado, incluso si no está encendido.
Debe desconectar todos los cables y conectores del aparato antes de
una tormenta.
• La presión acústica excesiva de los auriculares y los cascos puede causar
la pérdida del sentido auditivo.
• No mueva la unidad durante la reproducción de discos. Durante la
reproducción, el disco gira a gran velocidad. No levante ni mueva la
unidad durante la reproducción, ya que de hacerlo podría dañarse el
disco o la unidad.
• No suba el volumen mientras escucha una sección con entradas de muy
bajo nivel o sin señales de audio. De lo contrario, el altavoz podría resul-
tar dañado al reproducir de repente una sección con un nivel máximo.
Mantenimiento
• Desenchufe el cable de alimentación de la toma de corriente antes de
limpiar la unidad.
• Utilice un paño suave y limpio para limpiar la parte exterior de la unidad.
No utilice nunca productos químicos ni detergentes.
Pilas
• Tenga en cuenta la polaridad correcta al insertar
las pilas.
• No exponga las pilas a altas temperaturas y no
las coloque en lugares en los que la temperatura
pueda experimentar cambios bruscos, p. ej., cerca
de un fuente de fuego o en contacto directo con
la luz solar.
• No exponga las pilas a calor radiante excesivo, no
las arroje al fuego, no las desmonte y no intente
recargar pilas no recargables, ya que podrían producirse fugas o
explotar.
• No combine nunca pilas de diferente tipo y no mezcle pilas nuevas y
pilas viejas.
• Si el mando a distancia no se va a utilizar durante un largo periodo de
tiempo (más de un mes), retire la pila para evitar fugas.
• Si las baterías presentan fugas, limpie la parte interior del compartimen-
to y sustitúyalas por pilas nuevas.
• No utilice pilas diferentes a las especi cadas.
No ingiera las pilas, ya que pueden causar quemaduras químicas.
Cd

16
• La ingestión de pilas puede causar quemaduras internas graves en tan
solo 2 horas y producir la muerte. Mantenga las pilas nuevas y usadas
lejos de los niños. Si el compartimiento de la pila no se cierra correc-
tamente, deje de usar el producto y manténgalo alejado de los niños.
Si cree que se pueden haber tragado las pilas o introducido en alguna
parte del cuerpo, busque atención médica inmediatamente.
Eliminación de este equipo y las pilas
• No elimine este producto o sus pilas como residuos
urbanos no clasi cados. Entréguelos en un punto
de recogida designado para el reciclado de aparatos
electrónicos y eléctricos de acuerdo con la ley local. De
esta forma, ayudará a conservar los recursos y a proteger
el medio ambiente.
• La mayor parte de los países de UE regulan la eliminación
de las pilas mediante leyes. Póngase en contacto con su
distribuidor y con las autoridades locales para obtener más
información.
• Se incluye el símbolo anterior en el equipo eléctrico y
electrónico, y las baterías (o el embalaje) para recordar
a los usuarios de esta circunstancia. Si aparece "Hg" o "Pb" debajo del
símbolo, eso signi ca que las pilas contienen trazas de mercurio (Hg) o
plomo (Pb), respectivamente.
• Se solicita a los usuarios que utilicen las instalaciones de devolución
existentes para equipos usados.
ADVERTENCIA::
PRODUCTO DE CLASE 1
• Los aparatos con reproductor de CD
integrado se marcan con esta etiqueta
de precaución.
• Esta etiqueta de advertencia se ubica
en el panel posterior de la unidad
• ESTA UNIDAD ES UN PRODUCTO LÁSER DE CLASE 1. ESTA UNIDAD
UTILIZA UN RAYO LÁSER VISIBLE QUE PODRÍA CAUSAR UNA RADIACIÓN
PELIGROSA EN CASO DE EXPOSICIÓN DIRECTA. ASEGÚRESE DE UTILIZAR
EL REPRODUCTOR DE FORMA CORRECTA, COMO INDICAN LAS INST-
RUCCIONES.
• NO COLOQUE LOS OJOS CERCA DE LA APERTURA PARA MIRAR DENTRO
DE LA UNIDAD CUANDO LA DESENFUCHE DE LA TOMA DE CORRIENTE.
• EL USO DE CONTROLES O AJUSTES O LA APLICACIÓN DE PROCEDI-
MIENTOS DIFERENTES DE LOS ESPECIFICADOS EN ESTE MANUAL PUEDE
OCASIONAR UNA EXPOSICIÓN A RADIACIÓN PELIGROSA.
• NO ABRA LAS TAPAS Y NO REPARE USTED MISMO EL PRODUCTO. CON-
SULTE CON PERSONAL CUALIFICADO DE SERVICIO EN CASO NECESARIO.
Declaración CE:
• Por la presente, UMC Poland Sp. z o.o. declara que este dispositivo
sonoro cumple los requisitos esenciales y otras disposiciones pertinentes
de la Directiva RED 2014/53/UE. El texto completo de la declaración de
conformidad de la UE está disponible en el siguiente enlace http://www.
sharp.eu/av/documents-of-con rmity
Marcas comerciales:
La marca denominativa Bluetooth® y sus logotipos son marcas comerciales
propiedad de Bluetooth SIG, Inc.
CLASS 1
LASER PRODUCT

ES
Contenido de la caja
1 unidad principal
2 altavoces
1 mando a distancia
2 pilas AAA
1 guía del usuario
1 guía de inicio rápido
1 cable de alimentación para la UE
Paneles y controles
Panel frontal
SOURCE
PLAY/PAUSE
EJECT
PREV NEXT
1
2
5
3
4
AUX IN
STANDBY
SOURCE PREV NEXT EJECT
USB
6
7
8
9
12
11
10
PLAY/PAUSE
1. Botón SOURCE: Pulse para seleccionar los modos.
2. Botón PLAY/PAUSE: Pulse para pausar o reproducir la música.
3. Botón PREVIOUS: Pulse para saltar a la canción o emisora anterior.
4. Botón NEXT: Pulse para saltar a la canción o emisora siguiente.
5. Botón EJECT: Pulse para extraer el cajetín del disco.
6. Indicador de encendido: Indica el estado.
7. Botón STANDBY: Pulse para activar el modo
en espera o para encender.
8. Sensor remoto: Apunte con el mando a distancia
al sensor en un radio de 7 metros.
9. Pantalla de visualización: Muestra la información de la emisora.
10. Botón VOLUME+/-: Gírelo para ajustar el nivel de volumen.
11. Puerto USB: Se utiliza para conectar una unidad de memoria USB.
12. Conexión de entrada de audio: Se utiliza para
conectar fuentes de audio externas.
Panel posterior
14
15
13
13. Antena FM: Para recibir la señal de FM.
14. Conectores de altavoces: Conectan los
altavoces con la unidad principal.
15. Toma de alimentación Conecte el cable de
alimentación a la toma de alimentación.
Mando a distancia
1.
EJECT
SHUFFLE
PROGRAM
LOUD
DSP
REPEAT
MO/ST
BASS
FREQ
SAVE
15
13
17
16
10
11
20
19
18
12
14
21
22
1
2
3
4
9
5
6
7
8
_
+
STANDBY: Pulse este botón para encender la unidad o entrar en el
modo en espera.
2. REPEAT: Pulse este botón para repetir la canción.
3. PLAY/PAUSE: Permite detener o poner en pausa la reproducción.
4. FAST REWIND: Pulse este botón para rebobinar en modo
rápido la pista que se esté reproduciendo en ese momento.
5. TREBLE: Pulse este botón para ajustar los agudos; utilice
los botones + o - para aumentar y reducir los agudos.
6. VOLUME -: Pulse este botón para reducir el volumen.
7. PROGRAM: Utilice este botón para programar
el orden de reproducción.
8. SHUFFLE: Pulse este botón para reproducir música en modo aleatorio.
9. NÚMERO (0-9): Ir a la posición guardada, introducir
la frecuencia y seleccionar la pista.
10. EJECT: Pulse este botón para extraer el cajetín del disco.
11. SOURCE: Seleccione el modo de funcionamiento:
CD, FM, USB, Bluetooth® (BT), AUX
12. STOP/MO/ST: permite reproducir, cambiar
entre mono y estéreo en el modo FM.
13. PREVIOUS: permite saltar a la última pista.
14. FAST FORWARD: Pulse este botón para hacer avanzar en modo
rápido la pista que se esté reproduciendo en ese momento.
15. NEXT: Saltar a la siguiente pista o emisora.
16. BASS: Pulse este botón para ajustar los bajos; utilice los
botones + o - para aumentar y reducir los bajos.
17. VOLUME+: Pulse este botón para aumentar el volumen.
18. MUTE: Pulse este botón para silenciar el sonido y vuelva
a pulsarlo para reanudarlo. También puede anular el
sonido pulsando los botones de control del volumen.
19. DSP: Pulse este botón para seleccionar el ecualizador de sonido.
20. LOUD: Pulse LOUD para aumentar el nivel de
bajos con bajos niveles de sonido.
21. SAVE: permite guardar sus emisoras preferidas.
22. FREQ: permite introducir la frecuencia preferida en el modo FM.

18
Instalación o cambio de las pilas del mando a distancia
1. Presione el cierre de la tapa de las pilas en dirección de la echa en
relieve que aparece en la parte posterior del mando a distancia.
2. Mientras presiona el cierre, abra la tapa de las pilas.
3. Introduzca dos pilas jándose en la polaridad +, tal como se indica. Al
cambiar las pilas, utilice solamente el mismo tipo de pila suministrado.
4. Vuelva a colocar la tapa de las pilas y ciérrela.
Preparación para el uso
1.
ANTENNA
1
2
3
AUDIO IN
SOURCE
PLAY/PAUSE
PREV NEXT
EJECT
AUX IN
4
5
6
7
USB
Coloque un altavoz a cada lado de la unidad principal, preferiblemente
a la misma altura y con al menos 150mm de espacio entre cada uno
de ellos y la unidad principal.
Conecte los conectores del altavoz a la parte posterior de la unidad.
Asegúrese de hacer coincidir el altavoz colocado a la IZQUIERDA con la
salida IZQUIERDA de la parte trasera de la unidad. Repita lo mismo con
el altavoz de la DERECHA.
El cable LEFT RED se conecta al terminal LEFT RED y el cable RIGHT
RED al terminal LEFT RED. Ambos cables BLACK se conectan a los
terminales BLACK correspondiente.
2. Asegúrese de que la tensión marcada en la etiqueta de
clasi cación, ubicada en el panel posterior, es la misma que
la tensión en su área. Seleccione un cable de alimentación
adecuado, inserte el extremo del cable en la toma de corriente
situada en el panel posterior de la unidad. A continuación,
enchufe el otro extremo al enchufe de la pared.
3. Pulse el botón STANDBY de la unidad principal para encender la
unidad.
Extienda la ANTENA para conseguir la mejor recepción.
Pulse el botón SOURCE para activar el modo FM. Para utilizar
la radio en modo FM, siga las instrucciones del capítulo
FUNCIONAMIENTO DE LA RADIO FM del manual de uso.
4. Pulse el botón SOURCE para entrar en modo CD. Pulse el
botón EJECT para abrir el cajetín de disco e introduzca
un disco. Pulse de nuevo el botón EJECT para cerrarlo. El
CD empezará a reproducirse en la primera pista.
5. Pulse el botón SOURCE para entrar en modo Aux IN (audio).
Conecte el dispositivo de audio a la toma AUX IN mediante
un cable auxiliar de 3,5mm. Controle la reproducción
mediante el dispositivo de audio conectado.
6. Pulse el botón SOURCE para entrar en modo Bluetooth. Active el
dispositivo habilitado con Bluetooth y seleccione «SHARP XL-B510».
Seleccione la canción correspondiente y pulse para reproducir.
7. Pulse el botón SOURCE para entrar en modo USB. Introduzca el
dispositivo USB en el puerto USB del panel frontal de la unidad.
Se leerá el dispositivo USB y se reproducirá automáticamente.
Funciones básicas
Cambio de modo
Para cambiar entre los modos: CD, FM, Bluetooth, USB y AUX IN. Pulse el
botón SOURCE de la unidad o en el mando a distancia para cambiar de
modo.
Control de volumen
1. Gire el control VOLUME en el sentido de las agujas del
reloj o pulse el botón «+» para aumentar el volumen.
2. Gire el control VOLUME en el sentido contrario a las agujas
del reloj o pulse el botón «-» para reducir el volumen.
Efectos DSP
Pulse el botón DSP repetidamente para desplazarse por un conjunto de
valores predeterminados del ecualizador para modi car el sonido. Elija
entre CLASSIC, ROCK, POP, JAZZ, DANCE, LIVE y O .
Función de intensidad
Esta función aumentará el nivel de bajos con niveles bajos de sonido. Pulse
el botón LOUD del mando a distancia para habilitar el efecto. Pulse de
nuevo para deshabilitar el efecto.
Función silenciar
Pulse el botón en cualquier momento para silenciar la emisión de
sonido. Pulse de nuevo para reanudar el sonido.
Controles de tono
Ajuste los controles de tonos bajos y agudos si resulta necesario.
Pulse directamente el botón BASS o TREBLE del mando a distancia para
seleccionar bajos o agudos y, a continuación, use los botones «+» o «-»
para ajustarlos.
Modo de espera
Pulse el botón STANDBY de la unidad o del mando a distancia para poner
la unidad en modo de espera.
Para reanudar el funcionamiento normal, pulse de nuevo este botón.
NOTA: Esta unidad se ha diseñado para entrar en modo de espera
automáticamente después de 10 minutos (aproximadamente) de inactividad.
Pulse el botón STANDBY para activar la unidad.
NOTA: Al activar la unidad desde el modo en espera, se reanudará el último
modo utilizado.
Funcionamiento de la radio FM
1. Pulse el botón SOURCE del panel o del mando a distancia para
entrar en el modo FM. (Frecuencia FM: 87.50-108.00MHz)
2. Pulse los botones
/ del mando a distancia para reducir
o aumentar la frecuencia en incrementos de 0,05MHz.
3. Mantenga pulsados los botones PREV/NEXT del panel
o los botones
/ del mando a distancia para buscar

ES
el rango de frecuencia rápidamente. La búsqueda
se detendrá cuando encuentre una emisora.
4. Mantenga pulsados el botón
para explorar las
gama de frecuencias rápidamente y almacenar todas
las emisoras encontradas automáticamente.
5. MEMORIZAR una estación:
Puede almacenar hasta 40 emisoras FM en memoria.
Pulse el botón FREQ y utilice los botones de número
para introducir la frecuencia que desea almacenar.
Pulse el botón SAVE; mostrará "P01" en la pantalla.
Pulse el botón
/ para seleccionar el número
de emisora que desea almacenar.
Pulse el botón SAVE de nuevo para con rmar.
6. Recuperar emisoras presintonizadas:
Pulse el botón
/ para recuperar las emisoras almacenadas.
Funcionamiento del CD
1. Pulse el botón SOURCE del panel o del mando a distancia para entrar
en el modo CD. Pulse el botón EJECT para abrir el cajetín del disco,
introduzca un CD y, a continuación, pulse de nuevo el botón EJECT.
2. Pulse el botón
para pausar o reproducir la canción.
3. Pulse el botón STOP/MO/ST del mando a distancia para detener
la reproducción; pulse el botón
para reanudarla.
4. Pulse el botón PREV/NEXT o el botón
/ del mando
a distancia para saltar a la canción anterior o siguiente.
5. Pulse el botón
/ del mando a distancia para avanzar
o rebobinar en modo rápido la reproducción; pulse el
botón varias veces para reanudar la velocidad normal.
6. Para seleccionar directamente una canción especí ca, pulse el botón
de número 0-9 del mando a distancia.
Ejemplo:
Si el número de pista tiene dos dígitos, por ejemplo, 25, pulse
el botón «2» y luego el botón «5» para seleccionar la pista 25.
Si el número de pista es un número de un dígito, por ejemplo,
9, pulse primero «0» y luego «9» para saltar a la pista 9.
7. Botón REPEAT:
En modo de reproducción, pulse el botón REPEAT
para entrar en modo de repetición.
Con discos CD y CD-R, pulse el botón REPEAT para
repetir la reproducción de las canciones.
Pulse una vez para repetir la canción reproducida en ese
momento. Pulse de nuevo para repetir todas las pistas.
Pulse por tercera vez para cancelar.
8. Pulse el botón SHUFFLE del mando a distancia para reproducir
el disco en orden aleatorio. Pulse de nuevo para reanudar.
9. Puede programar un orden para reproducir el disco.
Pulse el botón STOP/MO/ST del mando a
distancia para detener la reproducción.
Pulse el botón PROGRAM del mando a distancia.
En la pantalla se visualizará: P01.
Pulse los botones de número del mando a distancia
para seleccionar las pistas que quiera programar.
Pulse los botones
/ del mando a distancia
para saltar entre las pistas del programa.
Pulse el botón PROGRAM del mando a distancia para con rmar.
Para iniciar el orden programado, pulse el botón
.
Para cancelar la secuencia del programa, pulse
dos veces el botón STOP/MO/ST.
Notas:
El equipo soporta los formatos MP3 y WAV.
Los formatos no admitidos se saltan. Por ejemplo, los
documentos de Word (.doc) o los archivos MP3 con la
extensión .dlf se ignoran o no se reproducen.
Funcionamiento de la función Bluetooth
El microsistema tiene función Bluetooth y puede recibir una señal en un
alcance de 7 metros. Para emparejar el microsistema con un dispositivo
Bluetooth:
1. Pulse varias veces el botón SOURCE para entrar en el modo Bluetooth,
aparecerá el mensaje “bt“ de forma intermitente en la pantalla.
2. Active el dispositivo Bluetooth y seleccione el modo de búsqueda.
3. Seleccione «SHARP XL-B510» en la lista de búsqueda y conecte.
4. Introduzca «0000» como contraseña si se solicita.
5. Cuando los dispositivos se conectan entre sí, se emite un sonido
de con rmación. "bt" dejará de parpadear en la pantalla.
6. A continuación podrá disfrutar de la música desde el dispositivo.
7. Para desactivar la función Bluetooth, cambie a otra función del
microsistema o deshabilite la función en el dispositivo Bluetooth.
Conectar con otros dispositivos de audio
La opción de audio permite que la unidad se conecte rápida y fácilmente
con un reproductor MP3 u otras fuentes externas.
1. Utilice un cable de audio de 3,5mm para conectar un dispositivo
externo de audio con la conexión AUX IN en el panel frontal.
2. Conecte el enchufe del microsistema a la corriente.
3. Pulse el botón SOURCE para cambiar al modo AUX IN.
4. Es posible que tenga que utilizar directamente el dispositivo de
audio externo para utilizar las características de reproducción.
5. Para conseguir unos niveles de volumen óptimos, ajuste
el volumen en el dispositivo de audio externo.
Funcionamiento de la función USB
Se puede escuchar música mediante la interfaz del dispositivo USB de la
unidad. Conexión con un dispositivo USB:
1. Encienda la unidad y seleccione el modo
USB pulsando el botón SOURCE.
2. Conecte el dispositivo USB a la conexión USB
del panel frontal de la unidad.
3. A continuación, la radio reproducirá las canciones
guardadas en el dispositivo USB.
Notas:
El equipo soporta los formatos MP3 y WAV.
Los formatos no admitidos se saltan. Por ejemplo, los
documentos de Word (.doc) o los archivos MP3 con la
extensión .dlf se ignoran o no se reproducen.
Incluso cuando los archivos están en un formato compatible
(MP3), es posible que algunos no se reproduzcan o
visualicen, dependiendo de la compatibilidad.
En algunos casos, la lectura puede tardar hasta 60
segundos; no se trata de un mal funcionamiento.
Dependiendo de la cantidad de datos y la velocidad del medio,
la unidad podría tardar más tiempo en leer el dispositivo USB.
USB admite una memoria máxima de 64GB.
La tarjeta de memoria USB ha de ser formateada en FAT, FAT16 o FAT32
Resolución de problemas
El dispositivo no se enciende.
Motivo
• El cable de alimentación no está conectado a la toma de la pared.
• La toma de corriente no está conectada.
Solución
• Asegúrese de que el enchufe esté conectado.
• Conecte la corriente.

20
No hay sonido de CD/AUX/RADIO.
La entrada AUX no emite sonido.
Motivo
• El volumen está demasiado bajo.
• El volumen de la fuente AUX está demasiado bajo.
Solución
• Aumente el volumen.
• Aumente el volumen de salida de la fuente AUX.
El sonido se oye distorsionado.
El sonido de la entrada AUX se oye distorsionado.
Motivo
• El volumen está demasiado alto.
• El volumen de la fuente AUX está demasiado alto.
Solución
• Reduzca el volumen.
• Reduzca el volumen de salida de la fuente AUX.
No se puede reproducir el CD.
Motivo
• No hay ningún disco en el cajetín.
• El disco no se ha introducido correctamente.
• El disco está sucio.
Solución
• Introduzca un disco compatible.
• Compruebe el disco cargado.
• Limpie el disco.
Sonido estático.
Motivo
• Mala recepción.
Solución
• Reubique la antena (FM).
No se encuentra la emisora deseada.
Motivo
• Señal débil.
• La emisora no está disponible en su zona.
La unidad se apaga después de 10 minutos de inactividad.
Motivo
• Está activado el modo de espera automático.
Solución
• Esta unidad se ha diseñado para entrar en modo de espera automática-
mente después de 10 minutos de inactividad. Pulse el botón STANDBY
para activar la unidad.
Especi cación técnica
Modelo XL-B510
Señal de radio 87.5-108MHz
Fuente de alimentación AC 220-240V~ 50Hz
Consumo de electricidad 28 W
Consumo de electricidad Estado
en espera
<0,5 W
Potencia de salida 2 x 7 W (RMS)
Impedancia 2 x 8 Ω
Respuesta de frecuencia 60Hz - 20KHz
Bluetooth
Versión V 2.1 + EDR
Potencia máxima transmitida <20 dbm
Bandas de frecuencia 2402 MHz ~ 2480 MHz
Del reproductor de CD
Formato de disco CD, CD-R, CD-RW, MP3, WMA
Mando a distancia
Tipo de batería 2x AAA / 1.5V
220mm
170mm
150mm
220mm
145mm 177mm
1,75kg
KG
0,95kg
KG
Seite wird geladen ...
Seite wird geladen ...
Seite wird geladen ...
Seite wird geladen ...
Seite wird geladen ...
Seite wird geladen ...
Seite wird geladen ...
Seite wird geladen ...
Seite wird geladen ...
Seite wird geladen ...
Seite wird geladen ...
Seite wird geladen ...
Seite wird geladen ...
Seite wird geladen ...
Seite wird geladen ...
Seite wird geladen ...
Seite wird geladen ...
Seite wird geladen ...
Seite wird geladen ...
Seite wird geladen ...
-
 1
1
-
 2
2
-
 3
3
-
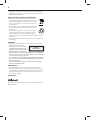 4
4
-
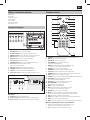 5
5
-
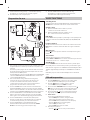 6
6
-
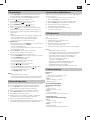 7
7
-
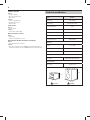 8
8
-
 9
9
-
 10
10
-
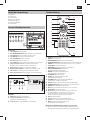 11
11
-
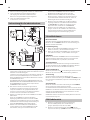 12
12
-
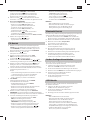 13
13
-
 14
14
-
 15
15
-
 16
16
-
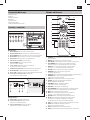 17
17
-
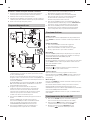 18
18
-
 19
19
-
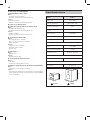 20
20
-
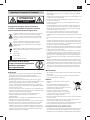 21
21
-
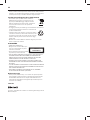 22
22
-
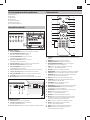 23
23
-
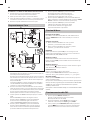 24
24
-
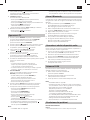 25
25
-
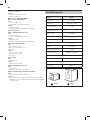 26
26
-
 27
27
-
 28
28
-
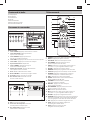 29
29
-
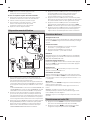 30
30
-
 31
31
-
 32
32
-
 33
33
-
 34
34
-
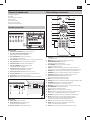 35
35
-
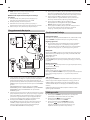 36
36
-
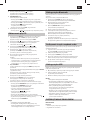 37
37
-
 38
38
-
 39
39
-
 40
40


Sharp XL-B510 Bedienungsanleitung
- Kategorie
- CD-Spieler
- Typ
- Bedienungsanleitung
- Dieses Handbuch eignet sich auch für
in anderen Sprachen
- English: Sharp XL-B510 Owner's manual
- français: Sharp XL-B510 Le manuel du propriétaire
- español: Sharp XL-B510 El manual del propietario
- italiano: Sharp XL-B510 Manuale del proprietario
- polski: Sharp XL-B510 Instrukcja obsługi
Verwandte Artikel
Andere Dokumente
-
Aiwa MSBTU-300 Benutzerhandbuch
-
Yamaha DVX-700 Benutzerhandbuch
-
MPMan MINI300BT Bedienungsanleitung
-
-
-
-
RAIKKO DANCE VACUUM SPEAKER Operating Instructions Manual
-
Our Generation OG Off Roader Bedienungsanleitung